Chef's Choice 662 User manual

Professional Electric Food Slicer
Model 662/667

2
IMPORTANT SAFEGUARDS
When using electrical appliances, basic safety precautions should always be followed,
including the following:
1. Read all instructions carefully before using slicer, to maximize results and to avoid injury.
2. To protect against risk of electrical shock, do not immerse power unit in water or other liquid or
operate in wet areas.
3. When blade is powered, place hands only on recommended push surfaces. Fingers, hand
or body contact with the moving blade can result in serious injury. When power is off, touch
blade only to remove and clean according to instructions. Do not touch the blade’s edge.
4. Never operate any motorized appliance when consuming alcohol or taking medication.
Close supervision is necessary when any appliance is used by or near children, handicapped
and infirm.
5. Unplug power cord from outlet when not in use, before putting on or taking off parts, before
cleaning and before attaching, adjusting or removing the blade sharpener.
6. Avoid contacting moving parts. Never feed food by hand. Always use completely assembled
slicer with food tray and food pusher.
7. Do not operate any appliance with a damaged cord or plug or after the appliance malfunctions,
or is dropped or damaged in any manner. Return slicer if damaged to the nearest authorized
service facility or to EdgeCraft for examination, repair or electrical or mechanical adjustment.
8. The use of attachments not recommended or sold by the appliance manufacturer may cause
fire, electric shock or injury.
9. Do not use outdoors.
10. Do not let cord hang over edge of table or counter or touch hot surfaces.
11. Blade is very sharp. Handle carefully when cleaning. Avoid contact with cutting edge.
12. Do not attempt to cut frozen foods or foods with bones.
13. Follow instructions when lifting or moving the slicer.
14. FOR HOUSEHOLD AND COMMERCIAL USE.
15. Plug cord only into 120V three prong grounded AC outlet. Do not use a 3 to 2 prong adapter.
SAVE THESE INSTRUCTIONS

3
YOU
MADE A
GOOD
CHOICE!
Congratulations on your selection of the Chef’sChoice®
Professional Electric Food Slicer. As an owner of
an Chef’sChoice®slicer, you have an easy-to-use
commercial quality product for slicing bread, meat,
cheese, vegetables and fruits. Its performance will
bring new joy to preparing freshly sliced foods directly
in your kitchen.

4
Figure 1. Front view of slicer.
Introduction:
The Chef’sChoice®Professional Electic Food Slicer is equipped with a commercial quality fine-edge
(non-serrated) blade for slicing a large variety of foods, including meat, cheese, bread, vegetables and fruit.
Review Figure 1 and 2 to familiarize yourself with the Slicer and some of its key components.

5
Figure 2. Rear view of the slicer.
Parts List*
1. Thickness control knob
2a. On/Off power switch
2b. Safety switch
3. Cutting blade
3a. Blade guard
3b. Blade guard bolt
3c. Blade guard hex tool
3d. Power actuator
pin and spring
4. Thickness control plate
5. Food carriage
6. Food pusher
6a. Food pusher handle
7. Blade sharpener, built-in
(Model 667 only)
7a. Detachable blade
sharpener
(Model 662 only)
8. Thumb screws
to fasten food
carriage
9. Base
10. Feet,
non-skid
11. Slice
deflector
12. Power
indicator
lamp
13. Plexiglass
guards
Figure 3. Close up view
of Power & Safety Switches.

6
For Your Safety
• Tominimizethepossibilityofaccidentallypoweringtheslicer,itisdesignedwithadoubleswitch
system (2a and 2b) in Figures 1, 2 and 3. The left – on/off power switch (2a) must be pushed first.
To start the blade, next push the spring-loaded safety switch (2b in Fig. 3 [The spring-loaded safety
switch will return instantly to a “neutral” position]). When the slicer blade (3) is rotating, an indicator
light (12) positioned to the right of the switches will be on. To stop the blade, press the top of the left
switch (2a) as shown in Figure 3.
• Therightsafetyswitch(2b)actuatesacircuitbreaker.Ifthereisapowerfailure,ifthepowerplugis
pulled out, or in the unlikely event that the motor overheats, this breaker automatically turns off the
safety switch and power to the slicer. In that event the safety switch must be depressed manually to
restart the slicer. This is an important safety feature unique to the Chef’sChoice Professional Slicer.
• Youwillnotethattheslicerisequippedwithplexiglassguards(13)onthefoodcarriage(5),andfood
pusher (6), and with a number of other safety guards. It is very important that they not be removed.
• Theslicerincorporatesanotherspecialsafetyswitch(notshown)behindthebladeguard.Itsfunction
is to insure that the slicer will not operate if the blade guard (3a) is mounted incorrectly.
• Tominimizeaccidentalcontact
with the blade when the slicer
is not in use or when lifting the
slicer, always turn the thickness
control knob (1) fully clockwise so
that the thickness control plate (4)
covers the edge of the blade.
• Sliceonlyfoodsforwhichthisslicer
is designed. Do not attempt to slice
frozen food, or materials such as
bones, plastic, cardboard, etc.
• Whenliftingtheslicer,position
the body and hands as shown in
Figure 4, to more uniformly
distribute the weight of the slicer
and to avoid contact with the blade
or with lubricated parts. If the
slicer is too heavy for you, ask
someone to help.
Figure 4. Use two hands to lift as shown.

7
Preparing to Slice
Caution: Avoid personal contact with the blade edge. Serious injury can result.
1. Before using the slicer for the first time, we recommend that you clean it thoroughly (see page 9).
2. Place assembled slicer on a sturdy, clean and dry surface. Position slicer so food carriage (5) is to
your right and thickness control knob (1) is in front of you on your life. Be sure the blade guard (3a)
is correctly mounted. Thickness control knob should be in the fully clockwise (beyond the “zero”)
position. Make certain the food carriage is securely tightened in place. If it is loose tighten the two
thumb screws (8) under the carriage (5). Before tightening the thumb screws, pull the carriage
toward you and away from the blade.
3. Place the food on the carriage insuring that it is placed firmly against the back wall of the carriage
(5). Hold the food in place with the food pusher (6). For extra large foods, such as briskets or slab
bacon, their length may have to be reduced to fit on the carriage, as food should not touch the blade
before starting to slice.
Operating the Slicer
1. Plug cord only into 120V three
prong grounded AC outlet. Do not
use a 3 to 2 prong adapter.
2. Hold the long handle of the food
pusher (6a) with the right hand
with the thumb behind the back
wall of the carriage as shown in
Figure 5.
3. To start the blade, turn on the
power with your left hand by
depressing the Power Switch (2a)
and then the Safety Switch (2b),
see Figure 3.
4. Set the Thickness Control Knob (1)
initially to a thin setting. Make
a slice and then adjust to your
desired thickness. Figure 5. Keep hands behind guards when slicing.

8
5. Now with the firm grip on the food carriage and light pressure against the food pusher advance the
food into contact with the rotating blade by slowly moving the carriage forward (Fig. 5). The food will
be sliced and the slices will drop into a tray or plate placed on the slicer base on the opposite side of
the blade. If the slice thickness needs to be adjusted, do so by rotating the Thickness Control Knob.
Rotating the Knob clockwise reduces the slice thickness. The numbers on the Knob are calibrated in
millimeters (3 millimeters equals approximately one eighth inch).
6. If you continue slicing until the food loaf is nearly expended, you will find you are unable to cut further.
Some food will remain unsliced. Do not attempt to apply excess pressure on the food pusher or to cut
any further! Shut off the power, then the thickness control knob to “zero” and remove the food remainder.
Never try to hold the food by hand when slicing.Youcancutyourselfseriously.Alwaysusethe
carriage and food pusher as described in Figure 5.
7. If the slicer is used for continuous slicing over an extended period, the motor may overheat. If so its
built-in protective thermal overload switch will trip, thereby turning off power to the motor until it
cools. If this occurs wait 10 minutes and then restart by depressing the safety switch (2b).
8. Do not operate the slicer without food on the food carriage.
9. When slices become rough, incomplete or frayed and cuttings becomes difficult, it is time to consider
resharpening the blade (see the Sharpening Section).
Hints for Best Results
• Toslicemeatsandcheesewaferthin,chillthoroughlybeforeslicing.Forbestresultsadvancethe
food carriage slowly while using steady pressure.
• Meatsshouldbeboneless,fruitsshouldbefreeofseeds.
• Foodswithanuneventexture,likeshanduncookedsteaksareoftendifculttoslice.Partially
freeze before slicing for more even cuts.
• Atcanningtime,usetheslicertoquicklyslicecucumbersandonionsforattractivepickles…
applesforpies…vegetablesforthefreezer.
• Forfooddehydrators:Youcanproduceeitherthickorthinslicesforuniformdehydrating.
• Handyforslicinghomemadeorbakerybread:agreatcompanionforyourbreadmachine.
Use extreme caution at all times to avoid contacting the edge of the blade.
Cleaning and Maintenance
Note: Before cleaning, removing the blade or undertaking other maintenance always unplug the cord
from the outlet. Never immerse the slicer in water or other liquid.
Cleaning: Slicer parts can be removed as described in the following sections for thorough cleaning.
Wash with a soft cloth or sponge and a mild soap or spray cleaner. Rinse and dry.
- Never use steel wool or scouring powder on any parts.
- Do not wash any part of the slicer in dishwasher.

Plastic support pads
Removing the Food Carriage:
Turn the thickness control knob clockwise past the “zero” position until it stops. Reach underneath the
food carriage and unscrew the two knurled thumb screws (8). Put aside the thumb screws and plastic
support pads (see Figure 6) in a safe place. Lift off the food carriage with the attached food pusher and
wash them in a sink using a mild soap. Do not wash these parts in the dishwasher.
To replace the carriage, follow the above directions in reverse. Make sure the carriage is properly positioned
andtightenedsecurelyusingtheplasticsupportpadsandknurledthumbscrews.Pleasenote:when
reattaching the carriage, make sure the plastic support pads are oriented correctly and pressed firmly
against the cast support. Then fold the side ears under. After confirming that the holes in the pad are in
line with the holes in the cast support, the carriage can be reattached. With proper installation the carriage
should not jiggle. To confirm that it is aligned correctly, push the food pusher as far as it will move towards
the food thickness control plate. Now move the carriage past the blade and insure that the “teeth” on the
food pusher do not touch the thickness control plate or the blade. There should be about ¼” clearance.
Cleaning the Blade (without removal of blade):
Make sure the thickness control knob is turned fully clockwise. Remove the blade guard (3a) by unscrewing
the retaining screw in the center of the guard (3b) with the provided hex-key tool (see Figure 7). Do not
remove the power actuator pin or spring (3d), but if it falls out, set it aside and reinsert in orientation shown
(Figure 7) before replacing the blade guard and its securing bolt (3b). The slicer will not operate unless the
pin and spring are in place. They actuate an internal safety power switch, not shown. Clean the guard in the
sink or with a spray cleaner.
Now, carefully clean the front of the blade with a moist sponge or cloth. Most – but not all of the back
of the blade can similarly be cleaned with a moist sponge or cloth, by carefully rotating the front of the
blade by hand (touch only the flat side of the blade, not the edge), to expose additional sections of the
blade. For a more thorough cleaning of the blade see the next page.
Figure 7. Removing retaining screw on blade guard.Figure 6. View of underneath of food carriage.
Plastic support pads
Thumb
screws
Thumb
screws
9

10
Cleaning Other Parts of the Slicer:
The slice deflector (11), shown in Figure 2, can be removed with a screwdriver (put screws away for
safekeeping) and cleaned in the sink or using a mild spray cleaner. The area behind the slice deflector
can be cleaned with a bottle brush.
Removing and Cleaning the Blade
Caution: Extreme care must be used when removing, cleaning or handling the blade to avoid
personal injury.
Following extensive use you will want to clean the entire surface of the blade. Small bits of food may
in time collect behind the blade and behind the blade guard. The professional forged blade on your
Chef’sChoice®Professional Slicer is heavier than conventional stamped blades and should be removed
only using the special Blade Removal Tool provided with your slicer.
First, with the thickness control knob turned to the full clockwise position, remove the blade guard as
described in Cleaning Section above and clean it as suggested.
Then to remove the blade, attach the blade-removal tool to the blade. Position the tool (see Figure 8)
with its two handled screws directly in contact with the two threaded holes in the blade as shown. Rotate
the handled screws clockwise, turning the first one then the other screw about two turns sequentially until
each of the two screws are fully and secured fastened to the blade.
Figure 9. Remove screws to release blade.Figure 8. To remove blade always use removal tool.

11
The handles of the screws will now serve as handles to remove the blade. First, however, it is
necessary to remove the three screws that hold the blade to its supporting spindle (see Figure 9).
Using a screwdriver and working through the central hole of the blade removal tool, remove the three
screws. Then holding both plastic handles of the blade removal tool, carefully remove the blade and
set it in the sink or in a sufficiently large wash pan. Never touch the edge of the blade or let it come in
contract with any part of your hand or body. Use extreme care never to drop the blade as it can cause
serious injury as it falls.
Clean the blade with detergent solution using a long handled bottle or sink brush, using extreme care
so that your hands or fingers do not touch the blade edge. Scrub the blade surface well, rinse it and
set it aside to dry. If you attempt to dry it with a cloth or paper towel, preferably use a long handled tool
to move the cloth or towel over the blade surface. Make certain the plastic handles of the blade-removal
tool are not wet or slippery before you attempt to remount the blade on its supporting spindles.
To remount the blade holding it with the removal tool, position and hold it securely onto the spindle.
Insert and fasten fully and securely the three screws. Remove the blade-removal tool by unscrewing the
its two handled screws and replace the blade guard. Be certain that the blade guard is oriented correctly
before tightening the hex head screws. Rotate the blade guard until its seats correctly and securely
around the blade with the open area of the guard to the left and above the blade. Tighten the hex head
screw, fingers tight and then firmly using the provided hex tool. If the guard is replaced correctly the
blade will rotate freely when the slicer is turned on.
Sharpening the Slicer Blade
As described in subsequent sections, the Chef’sChoice®Professional Slicer as delivered includes for
Model 662 a detachable sharpener (7a) and with the Model 667 the sharpener (7) is mounted
“permanently” on a support post, above and slightly behind the blade (see Figure 13a). Each of these
sharpeners have been designed so as to minimize (but not eliminate) the dangers that always exist
when working near an exposed blade edge. For your safety the following instructions must be followed
very carefully . If you are uncomfortable, seek a mechanic to help you with this. The entire sharpening
operation takes only a few minutes and can be done safely with adequate care. Take your time and
donotattempttoshortcutanyofthestepsoutlinedhere.Youwillnditverysatisfyingtoslicewitha
sharpener blade.
12
Using the Detachable Sharpener – Model 662
1. Always, first unplug the cord from the
power outlet.
2. Clean the exposed portion of the slicer
blade, as described in the section on
cleaning, to remove grease.
3. Examine the detachable sharpener
(Figure 10) before using it to make
certain the screw holding the
sharpening stone is tightened fully
and that the sharpening stone is
mounted with the beveled edge of the
stone on the side adjacent the larger
hex head nut as shown. The stone
should spin freely.
4. Lift and rotate the food pusher (6) to its
upright position and advance the food
carriage slightly to insure that the pusher
is out of the way and beyond the exposed
cutting edge of the blade.
5. Turn the thickness control knob to its full
counterclockwise “open” position. This
opens the thickness control plate fully and
exposes the cutting edge of the blade to its
fullest. Use extreme care to avoid contact-
ing the blade with your hand or fingers.
6. Standing to the left of the slicer, hold the
sharpener in your right hand as shown in
Figure 10. Insert its mounting pins fully into
the holes on the thickness control plate
(see Figure 10). When fully inserted rotate
the forward pin downward until it seats
squarely in its respective slot. The sharpening stone should not be contracting the blade at this point.
7. Plug the cord into the power outlet.
8. Standing at the end of the slicer adjacent to the thickness control knob and with the sharpener
securely in place, turn on the slicer to start the blade rotating.
Figure 10. Attaching the detachable sharpener (7a).
Figure 11. Sharpener in position to sharpen rear facet of
blade edge.
13
9. Place one hand on the thickness control knob and the other hand away from the blade. Then slowly turn
the thickness control knob clockwise until the sharpening stone lightly contacts the rear facet of the
rotatingbladeasshowninFigure11.Youwillbeabletohearwhenitrstcontactstheblade.Itwillbe
slightly noisy. Maintain the stone in steady but light contact with the blade edge for 30-40 seconds. Then
promptly turn the thickness control knob counterclockwise to full open position in order to move the stone
away from its contact with the blade. Turn “off” the power switch and unplug the slicer cord from the
poweroutlet.Youhavenowcompletedtherststepofsharpeningtherearfacetoftheblade.Thisleaves
a light burr along the front face of the blade, which must now be removed in Steps 10 through 14.
10. Keeping the hand and fingers away from the blade, carefully remove the sharpener by rotating the
forward retaining pin upward and then lightly pulling the sharpener pins out of the two supporting holes.
Place the sharpener on the table.
11. Turn the thickness control knob full clockwise,
which will close fully the thickness control plate,
and “cover” the blade edge.
12. Remount the sharpener on the thickness control
plate as in Step 6 and make certain its forward
mounting pin is rotated down tightly to seat fully in
its slot. The sharpening stone must now be in front
of the blade (see Figure 12) but the stone should
not at this point be touching the blade edge.
13. Insert the plug in power outlet and, with hands
clear of the blade, turn on the slicer.
14. With one hand on the thickness control knob, and
other hand away from the blade, slowly turn the
Thickness Control Knob counterclockwise until the
abrasive stone touches the front edge of the blade.
Again you will be able to hear a slight noise when
contact is made. Maintain a light contact for only 4-6 seconds to remove the burr, which was created
along the edge in Step 9. Promptly turn the thickness control knob clockwise to stop contact of the
abrasivewheelwiththeblade.Yourbladeisnowverysharp.
15. Turn off the power switch and unplug the power cord from the outlet.
16. Remove the sharpener as in Step 10.
Figure 12. Sharpener in position to remove burr from
front of blade edge.

14
17.Youmaywishtocleanthebladeasdescribedintheprevious“CleaningtheBlade(withoutremovalof
blade)” section before cutting food.
18. After many sharpenings, when the gap between the blade edge and the thickness control plate (in fully
closed position) exceeds 6 mm, the blade must be replaced.
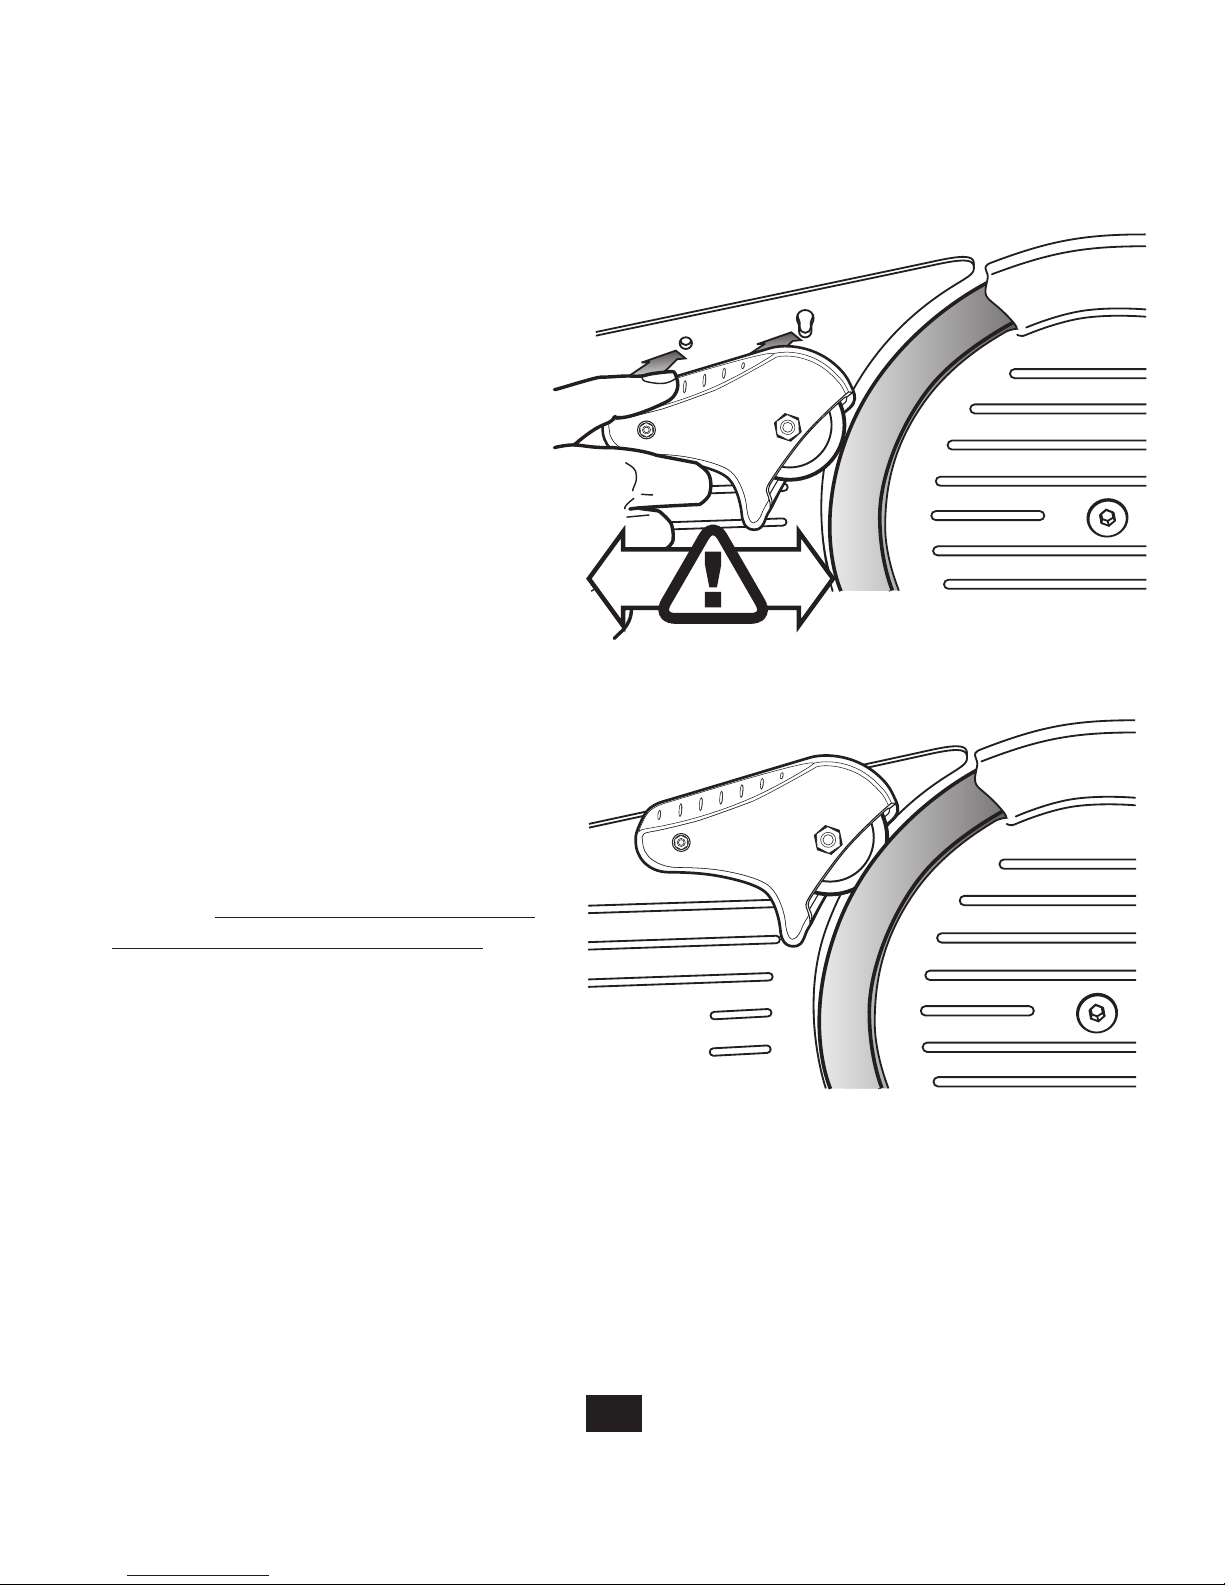
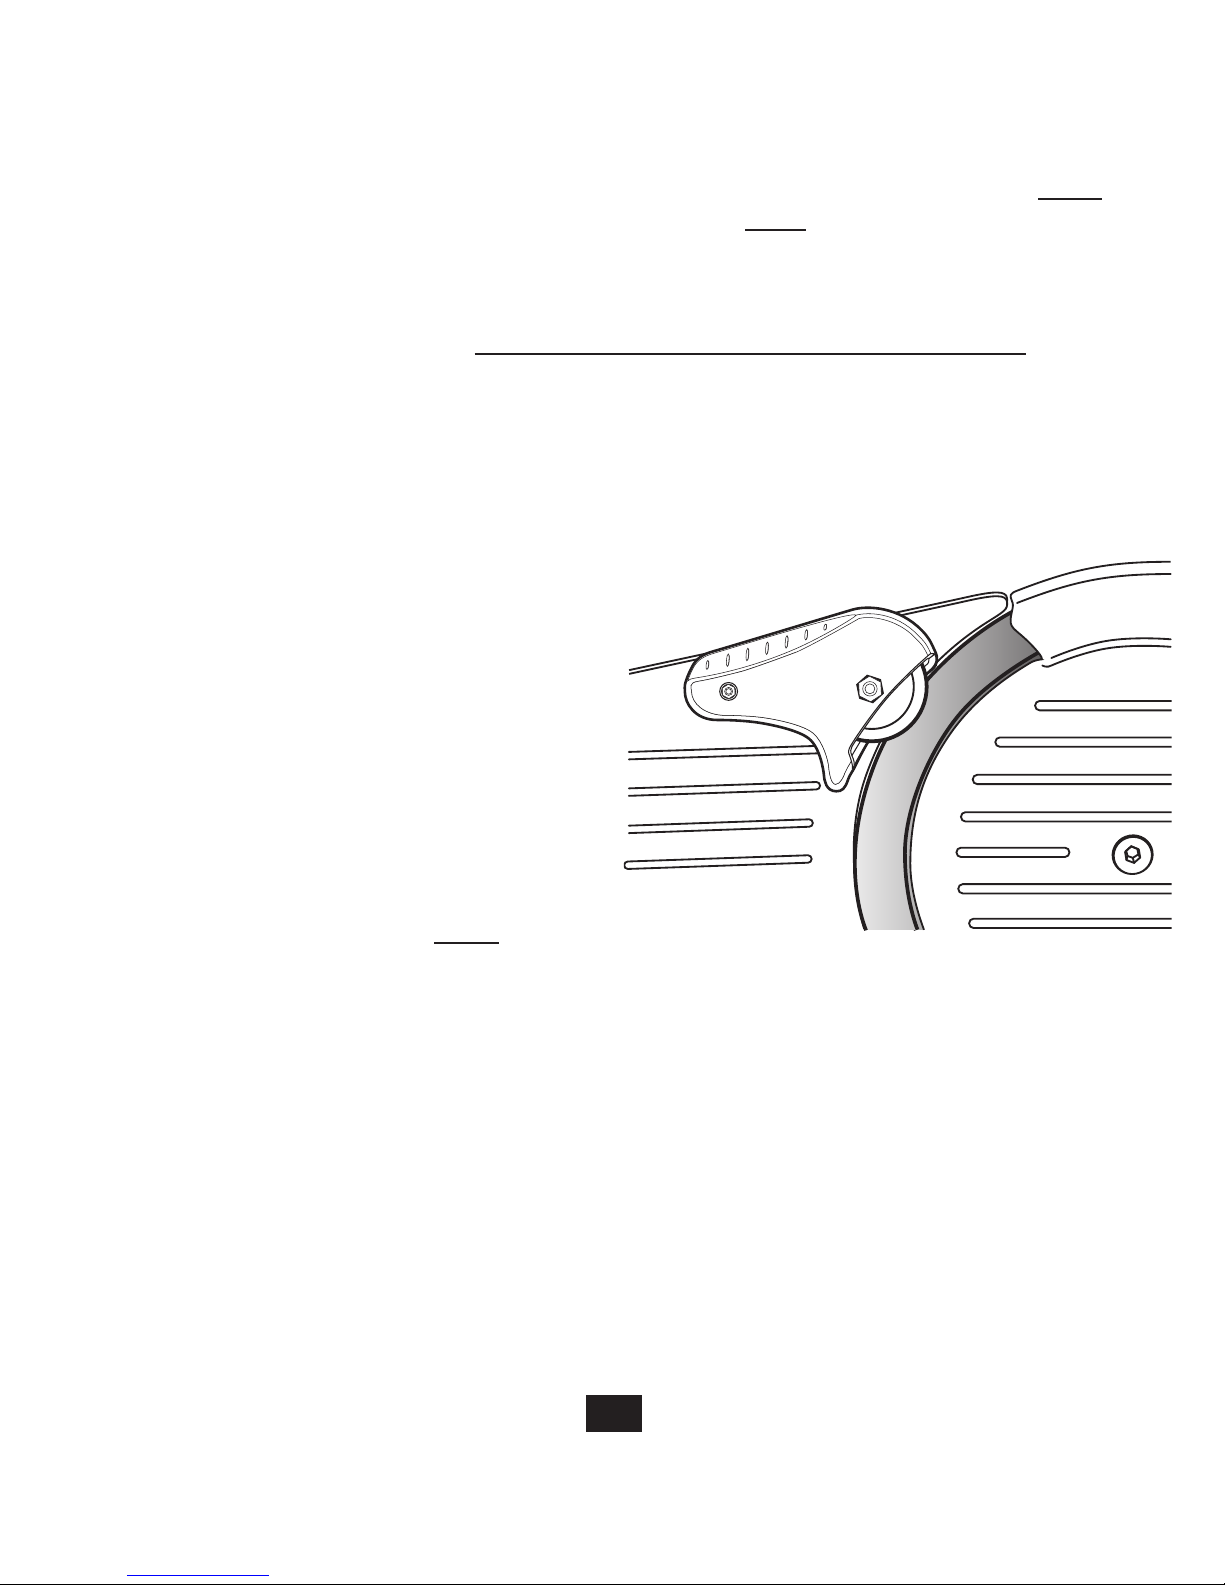
Using the Built-In Sharpener – Model 667
1. Always, first turn off the power switch and unplug the power cord form the power outlet.
2. Clean the exposed portion of the blade as described in the Cleaning Section to remove greases.
3. Turn the thickness control knob fully clockwise so that the thickness control plate fully “covers” the
blade edge.
4. As always keep hands and fingers away from and free of any contact with the blade.
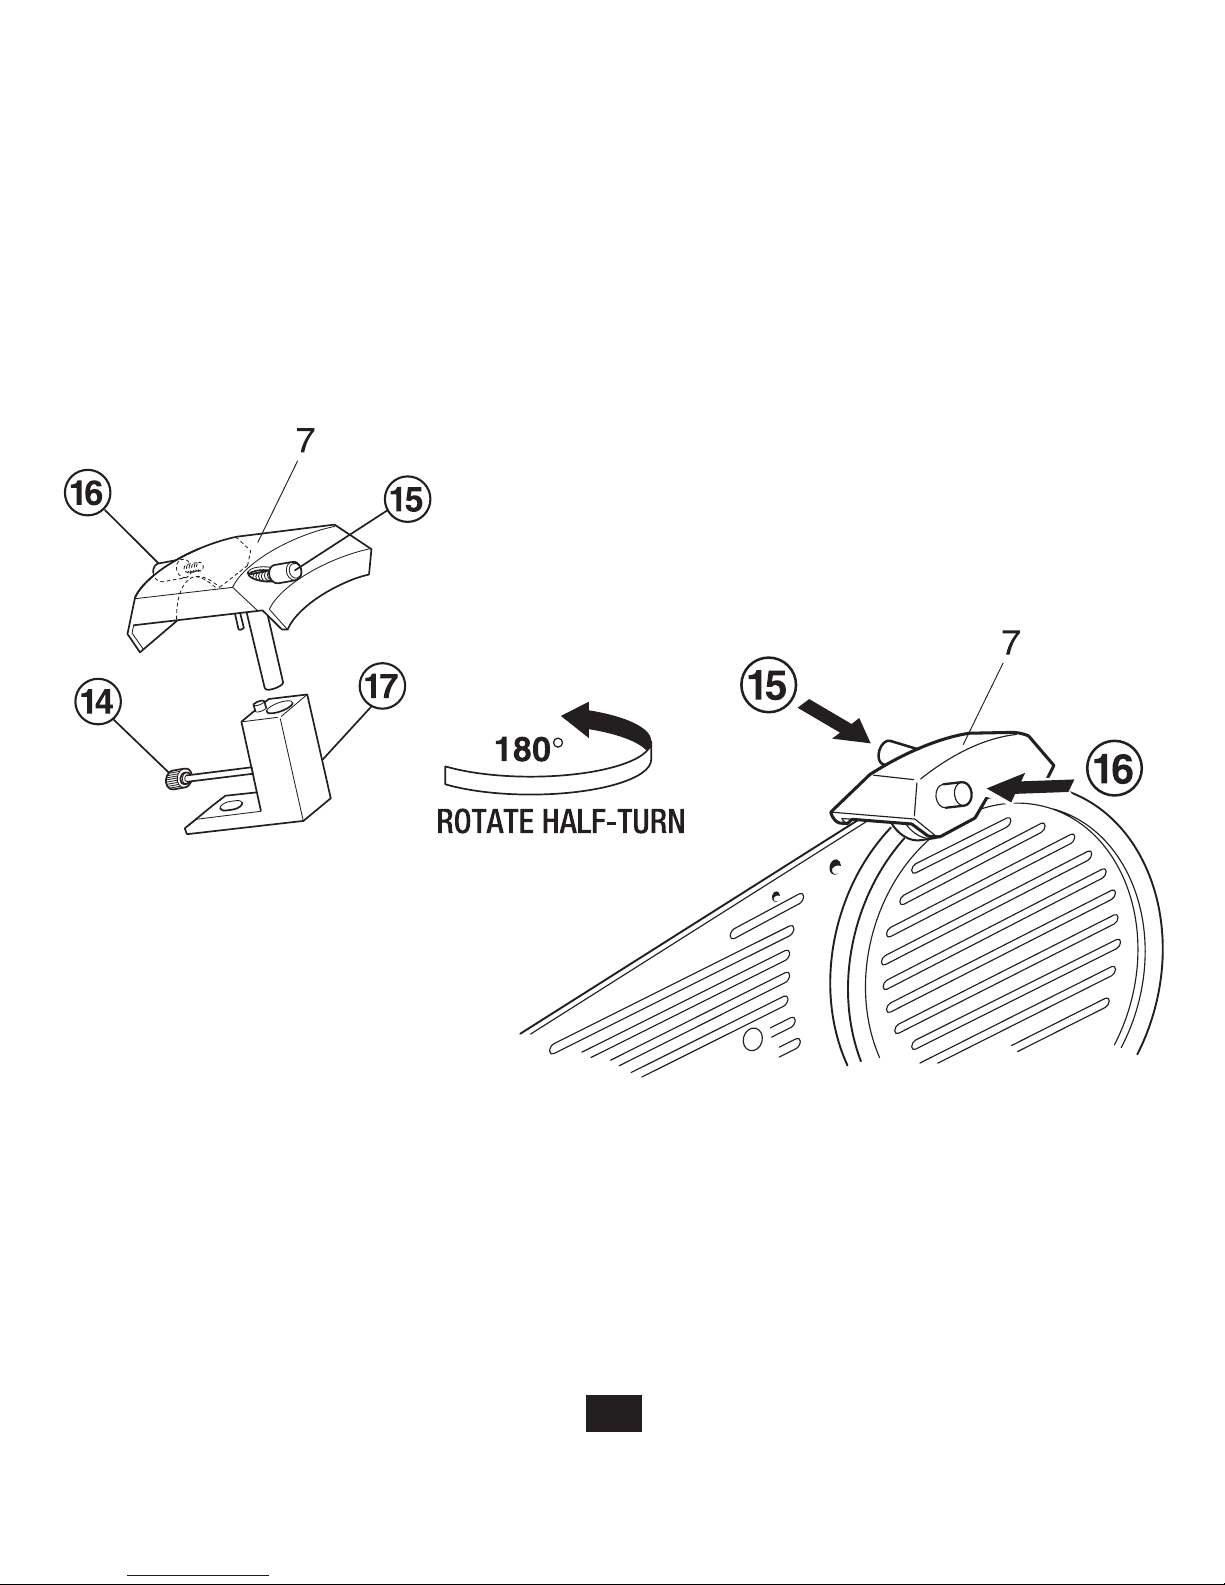
5. Loosen the thumb screw knob (14) and support post (17) (see Figure 13a). Grasp the sharpener (7),
keeping fingers away from the blade, and slide it steadily upward while the sharpener supporting shaft
remains in its mounting hole. When the sharpener is raised sufficiently you will be able to turn it 180°
from the storage position. Then press down steadily on the sharpener so that the blade is positioned
between the two stones on the sharpener and the sharpener will fit neatly over the blade (see Figure
13c). The sharpener must be pushed down fully. Be sure that the abrasive stones are not touching the
blade at this time. Tighten the thumb screw knob securely. By pulling up slightly on the sharpener, you
can insure that the sharpener is securely fastened in the down position.
6. Plug the cord into a power outlet and turn on the slicer so that the blade is turning.
7. With the forefinger depress the longer shafted rear knob (15) and hold it firmly to engage the first and
coarser abrasive wheel against the rear facet of the blade edge. Hold it down firmly for 30-40 seconds
and then remove your finger from the knob. This will sharpen that rear facet and leave a small burr
along the front edge of the blade.
8. Then depress the shorter shafted front knob (16) and hold it down so that the finer front abrasive wheel
lightly contacts the front of the edge for 4-6 seconds and removes the burr. The blade is now fully sharp-
ened. This step must always be performed sequentially after Step 7, not in reverse order. Otherwise the
blade edge alignment may be altered and the edge will not be as sharp.
9. With the blade now fully sharpened, loosen the thumb screw knob, raise the sharpener, carefully rotate it
180° back to its original storage position, push it down fully and tighten the rear thumb screw for secure
storage of the sharpener.
10.YoumaywishtocleantheexposedareasofthebladeasdescribedinCleaningtheBlade(without
removal of blade) before slicing any food with the newly sharpened blade.
11. After many sharpenings, when the gap between the blade edge and the thickness control plate (in fully
closed position) exceeds 6 mm, the blade must be replaced.
ABC
15
Figure 13. To use the sharpener (7), it must be raised from its storage position in post (A), rotated (B) and then
lowered over blade as shown (C).

16
Service
No user-serviceable parts are inside. Refer servicing to qualified personnel.
In the event service is needed, you may return your food slicer to EdgeCraft Corp., where the cost of repair
or electrical or mechanical adjustment can be estimated before the repair is undertaken. Please include
your return address and a brief description of the problem or damage to the slicer on a separate sheet
inside the box.
Sendyourslicer,insuredandpostageprepaidto:
EdgeCraft Corporation
825 Southwood Road
Avondale, PA 19311 U.S.A.
Telephone:800-342-3255
Retain evidence of shipping for your protection.
Limited Warranty: Used with normal care, this EdgeCraft product is guaranteed against defective material and workmanship for a period of one (1) year from the
date of original purchase (“Warranty Period”).We will repair or replace, at our option, any product or part that is defective in material or workmanship without charge
if the product is returned to us postage prepaid with dated proof of purchase within the Warranty Period.This warranty does not apply to commercial use or any prod-
uctabuse.ALLIMPLIEDWARRANTIES,INCLUDINGIMPLIEDWARRANTIESOFMERCHANTABILITYANDFITNESSFORAPARTICULARPURPOSE,ARELIMITEDTOTHE
WARRANTYPERIOD.EDGECRAFTCORPORATIONSHALLNOTBELIABLEFORANYINCIDENTALORCONSEQUENTIALDAMAGES.Somestatesdonotallowlimitations
on how long an implied warranty lasts and some states do not allow exclusions or limitation of incidental or consequential damages, so the above limitations or
exclusions may not apply to you. This Limited Warranty gives you specific legal rights, and you may also have other rights which vary from state to state.
This product may be covered by one or more EdgeCraft patents and/or patents pending as marked on the product.
Conformsto:UL982 CertiedtoCAN/CSA:C22.2#195 120volts/60Hertz,130watts
© EdgeCraft Corporation 2014 C14 S662076
This manual suits for next models
1
Table of contents
Popular Food Processor manuals by other brands


German pool
German pool PRO-6SS user manual

Silvercrest
Silvercrest SMZE 500 A1 operating instructions

Silvercrest
Silvercrest SKM 350 A1 operating instructions

Silvercrest
Silvercrest SMZE 500 C2 operating instructions

Silvercrest
Silvercrest SMZC 500 A1 User manual and service information

Silvercrest
Silvercrest SKMP 1200 A1 operating instructions