Chef CHPM12R User manual

Page 1
Quesadilla / Pizza Maker
User Manual
MODEL: CHPM12R
1. READ these instructions carefully before installing and operating the
appliance. Keep them for further reference.
2. Record in the space below the “SERIAL/MODEL NUMBER” found on the back
or bottom of your appliance and retain this information for future reference.
SERIAL NUMBER:
MODEL NUMBER:
DATE OF PURCHASE:
Save and staple your sales receipt to your manual for warranty coverage.


Page 3
SAFETY INFORMATION
IMPORTANT SAFETY INSTRUCTIONS
1. READ ALL INSTRUCTIONS BEFORE USE
2. Do not touch hot surfaces. Use handles or knobs.
3. To protect against risk of electric shock, do not immerse cord, plug
or unit in water or other liquid.
4. Close supervision is necessary when any appliance is used by or
near children.
5. Unplug from outlet when not in use and before cleaning. Allow
to cool before putting on or taking off parts, and before cleaning
appliance.
6. Do not operate any appliance with a damaged cord or plug or after
the appliance malfunctions or has been damaged in any manner.
Return appliance to the nearest authorized service facility for
examination, repair or adjustment.
7. The use of accessory attachments not recommended by the
manufacturer may cause injuries.
8. Do not use outdoors.
9. Do not let cord hang over the edge of the table or counter, or touch
hot surfaces.
10. Do not place on or near a hot gas or electric burner or heated oven.
11. Extreme caution must be used when moving an appliance
containing hot oil or other hot liquids.
12. To disconnect, remove plug from the wall outlet.
13. Do not use appliance for other than intended use.
14. Do not store vertically.
SAVE THESE INSTRUCTIONS
HOUSEHOLD USE ONLY
DANGER
DANGER - Immediate hazards
which WILL result in severe
personal injury or death
WARNING
WARNING - Hazards or unsafe
practices which COULD result in
severe personal injury or death
CAUTION
CAUTION - Hazards or unsafe
practices which COULD result in
minor personal injury
WARNING
When using electrical appliances, basic safety precautions
should be followed, including the following

Page 4
ELECTRICAL REQUIREMENTS
This appliance has a polarized plug (one blade is wider than the other). To reduce the
risk of electric shock, this plug is intended to t into a polarized outlet only one way.
If the plug does not t into the outlet, reverse the plug. If it still does not t, contact a
qualied electrician. Do not attempt to modify the plug in any way.
POWER SUPPLY CORD
1. A short power supply cord is provided to reduce the risk of becoming entangled in
or tripping over a longer cord.
2. If the power supply cord is too short, do not use an extension cord. Have a
qualied electrician or serviceman to install an outlet near the appliance.
3. If it is absolutely necessary to use longer cord sets or an extension cord, extreme
care must be exercised.
a) The marked electrical rating of the cord set or extension cord must equal to or
be greater than the electrical rating of the appliance. The longer cord should be
arranged so that it will not drape over the counter top or table top where it can be
pulled on by children or tripped over unintentionally.
NOTE: Neither Commercial Chef nor the dealer can accept any liability for damage to
the product or personal injury resulting from failure to observe the electrical
connection procedures.
SAFETY INFORMATION
Page 5
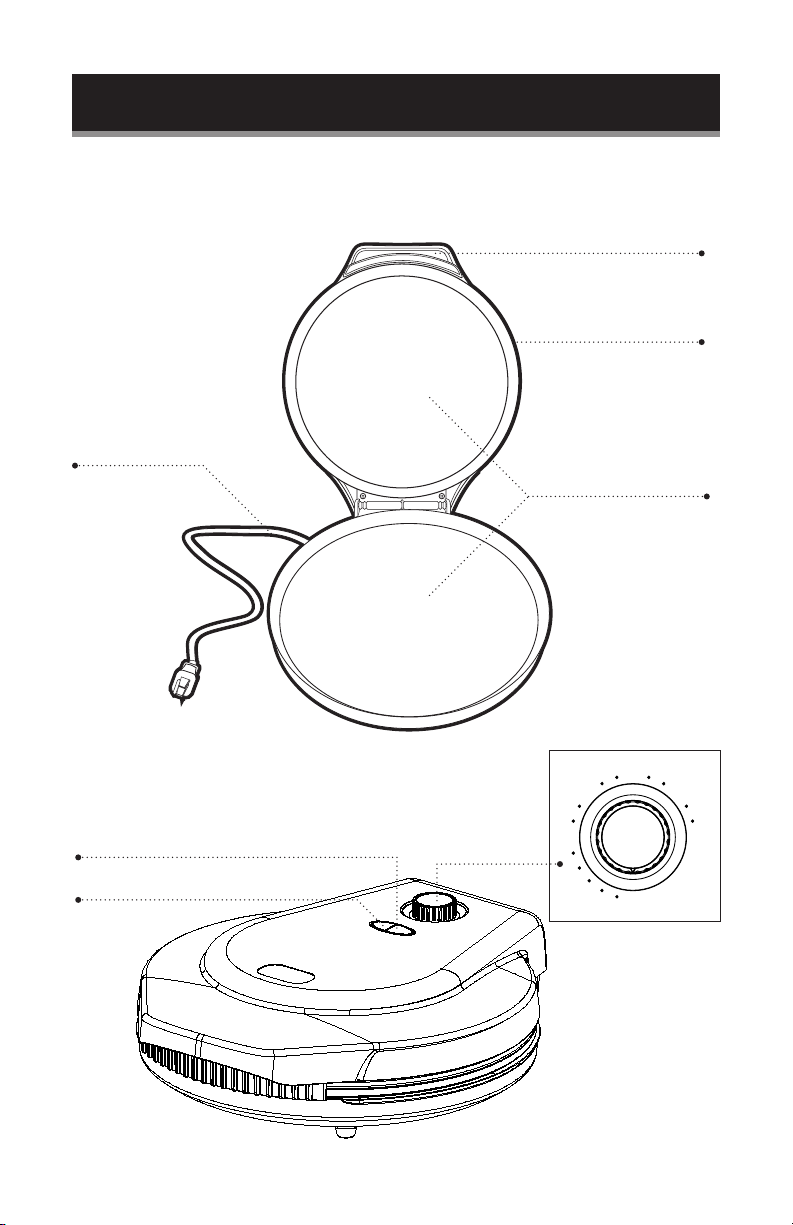
PARTS & FEATURES
SET UP & USE
Lid Handle
Polarized Plug
Power On (RED)
Temperature Ready (GREEN)
Lid
Non-Stick Upper &
Bottom Baking Plates
Temperature
Control Knob
180
230
290
340
400˚F
0

Page 6
SET UP & USE
BEFORE USING FOR THE FIRST TIME
1. Carefully unpack and remove all packaging materials.
2. Clean with a mild soap and water solution.
CAUTION: Take care to prevent water from entering into the appliance.
3. Set the quesadilla / pizza maker on a dry at surface making sure there is
approximately 4” of space around each side of the appliance.
OPERATING INSTRUCTIONS
1. Put a few drops of vegetable oil on the baking plates to prevent sticking.
2. Close the quesadilla / pizza maker and plug it into a 120v AC electrical outlet.
3. Both the red power on light and green temperature ready indicator lights will
illuminate.
4. Turn the temperature knob to select a temperature range between low 200˚,
medium 320˚ and high 410˚. The green indicator light will turn off while the unit is
preheating.
NOTE: The temperature you select should be based on the thickness or your
Quesadilla or Pizza. For thicker items choose a higher setting. If you
are melting cheese or warming previously cooked foods, select a lower
temperature setting.
5. It will take approximately 3 minutes to reach the recommended baking
temperature. The green indicator light will go on once the device is ready to use.
BAKING A PIZZA
Once your Quesadilla/ Pizza Maker is preheated, open it using the handle.
Place your uncooked pizza dough directly onto the bottom baking plate and add
toppings. Never over-ll or mount your topping too high on your pizza. The topping
should always be below the height of the top baking plate to prevent burning.
On average it will take about 25 minutes to bake a pizza, depending on the
thickness.
It is recommended that you open the lid to check the progress and see if the cheese
is melted and crust is browned.
NOTE: When the device is turned on for the rst time, a slight odor will occur. This is
normal, ensure adequate ventilation.
TO MAKE QUESADILLAS OR OTHER ITEMS:
Follow the same instructions. Select the temperature according to the type and
thickness of food. A thick Quesadilla should be baked at a higher setting. For Nachos,
use a lower temperature to melt the cheese. Keep Track of the ideal setting and
bake time for future use. The food should only be lled below the top baking plate to
prevent burning.
When removing cooked foods, wear oven mitts and use non-metallic utensils.
Additional batches of food may bake faster because heat has been retained so it

Page 7
SET UP & USE
CARE AND CLEANING
This appliance requires little maintenance and contains no serviceable parts. Do
not attempt to repair yourself but rather contact the customer service department
mentioned in this manual for assistance.
CAUTION: Unplug from electrical outlet and allow to cool thoroughly before
cleaning. Never immerse appliance in water or any other kind of liquid and
never place in dishwasher.
NOTE: The quesadilla / pizza maker cannot be disassembled for cleaning.
1. Wipe lid, base, and cooking plates with a damp cloth and a non-abrasive soap or
dishwashing detergent. Wipe with a clean, soft, damp cloth and towel dry.
NOTE: To protect the non-stick surface, use only plastic, nylon or wooden utensils.
2. To remove any pizza dough from the cooking plates, pour a small amount of
cooking oil on to the hardened pizza dough. Allow to set for 5 minutes then wipe
softened pizza dough off with a paper towel or soft cloth.
3. For best results, use only products with directions stating that they are safe for
use on non-stick cooking surfaces.
NOTE: Do NOT use steel wool or coarse scouring pads.
STORAGE
• Always unplug the quesadilla / pizza maker before storage.
• Always make sure the quesadilla / pizza maker is cool and dry before storing.
may be necessary to adjust to a shorter cooking time.
When baking is complete, turn the temperature control to “0” position. Unplug the
power cord from electrical outlet, lift the top lid to expose the cooking plates and
allow unit to cool.
CAUTION: Do not attempt to clean until unit has fully cooled.

Page 8
BEFORE YOU CALL FOR SERVICE
IF THE APPLIANCE FAILS TO OPERATE:
A) Check to make sure that the appliance is plugged in securely. If it is not, remove
the plug from the outlet, wait 10 seconds and plug it in again securely.
B) Check for a blown circuit fuse or a tripped main circuit breaker. If these seem to
be operating properly, test the outlet with another appliance.
IF NONE OF THE ABOVE SOLVES THE PROBLEM, CONTACT A QUALIFIED
TECHNICIAN. DO NOT TRY TO ADJUST OR REPAIR THE APPLIANCE YOURSELF.
CUSTOMER SERVICE
IMPORTANT
DO NOT RETURN THIS Appliance TO THE STORE
If you have a problem with this appliance, please contact the
W Appliance Co. Customer Satisfaction Center at 1-855-855-0294.
DATED PROOF OF PURCHASE, MODEL # AND DATE CODE
REQUIRED FOR WARRANTY SERVICE
TROUBLESHOOTING & WARRANTY

Page 9
TROUBLESHOOTING
Troubleshoot your problem by using the chart below. If the appliance still does not
work properly, contact W Appliance Co. customer service center or the nearest
authorized service center. Customers must never troubleshoot internal components.
SPECIFICATIONS
• Unit Dimensions (WxDxH): 12.9” x 14.75” x 4.9”
• Unit Weight: 6.2 lbs.
• Watts: 1500
TROUBLESHOOTING & WARRANTY
TROUBLE POSSIBLE CAUSE POSSIBLE REMEDY
Appliance does not turn on Appliance is not plugged in Check that appliance is
plugged into a working outlet

Page 10
TROUBLESHOOTING & WARRANTY
LIMITED WARRANTY
Commercial Chef brand is used under license.
Any repair, replacement, or warranty service,
and all questions about this appliance should
be directed to W Appliance Co. at 1 (855)
855-0294 from the USA or Puerto Rico.
W Appliance Co. warrants to the original purchaser
that the appliance will be free from defects in material,
parts and workmanship for the period designated for
this appliance. The warranty commences the day the
appliance is purchased and covers up to a period of
1 year (12 months) for labor/1 year (12 months) for
parts (manufacturing defects only).
W Appliance Co. agrees that it will, at its option,
replace the defective appliance with either a new or
remanufactured appliance equivalent to your original
purchase during the warranty period.
Exclusions: This warranty does not apply to the
below:
1. If the appearance or exterior of the
appliance has been damaged or
defaced, altered or modied in design or
construction.
2. If the appliance original serial number
has been altered or removed or cannot
be readily determined.
3. If there is damage due to power line
surge, user damage to the AC power
cord or connection to improper voltage
source.
4. If damage is due to general misuse,
accidents or acts of God.
5. If repair attempts are done by
unauthorized service agents, use of
parts other than genuine parts or parts
obtained from persons other than
authorized service companies.
6. On units that have been transferred
from the original owner.
7. On appliances that have been purchased
as refurbished, like new, second-hand, in
a “As-Is” or “Final Sale” terms.
8. To appliances used in a commercial or
rental setting.
9. To appliances used in settings other
than ordinary household use or used
other than in accordance with the
provided instructions.
10. To damages for service calls for
improper installations.
11. To glass parts and other accessory
items that are included with the unit.
12. Transportation and shipping costs
associated with the replacement of
the unit.
13. Food loss for loss due to appliance
failure or delay in service, repair or
replacement.
14. Service calls to instruct you how to use
your slow cooker.
15. Service calls to repair or replace the
house fuse, reset the circuit breaker or
correct the wiring in the house.
REPAIR OR REPLACEMENT AS PROVIDED UNDER
THIS WARRANTY IS THE EXCLUSIVE REMEDY OF
THE CUSTOMER; W Appliance Co. SHALL NOT BE
LIABLE FOR ANY INCIDENTAL OR CONSEQUENTIAL
DAMAGES FOR BREACH OF ANY EXPRESS OR
IMPLIED WARRANTY ON THIS Appliance, EXCEPT
TO THE EXTENT PROHIBITED BY APPLICABLE LAW.
ANY IMPLIED WARRANTY OF MERCHANTABILITY
OF FITNESS FOR A PARTICULAR PURPOSE ON THIS
Appliance IS LIMITED TO THE DURATION OF THE
WARRANTY.
Some states do not allow the exclusion or limitations
of incidental or consequential damages, or limitations
on how long the warranty lasts. In these cases the
above exclusions or limitations may not apply to you.
This warranty gives you specic legal rights and you
may also have other rights which vary from state to
state.
Obtaining Service: To obtain service, appliance
literature, supplies or accessories please call
1 (855) 855-0294 to create a ticket for exchange/
repair. Please make sure to provide the date of
purchase, model number and a brief description of the
problem. Our customer service representative
will contact you or send detailed return instructions.
W Appliance Co. does not warrant that the appliance will work
properly in all environmental conditions, and makes no warranty
and representation, either implied or expressed, with respect
to the quality, performance, merchantability, or tness for a
particular purpose other than the purpose identied within this
user’s manual. W Appliance Co. has made every effort to ensure
that this user’s manual is accurate and disclaims liability for any
inaccuracies or omissions that may have occurred. Information
in this user’s manual is subject to change without notice and
does not represent a commitment on the part of W Appliance
Co.. W Appliance Co. reserves the right to make improvements
to this user’s manual and/or to the appliances described in this
user’s manual at any time without notice. If you nd information
in this manual that is incorrect, misleading, or incomplete, please
contact us at 1- 855-855-0294.
W Appliance Co.,
1356 Broadway
New York, NY 10018

Page 11

Page 12 January 2023
© 2023 Commercial Chef is a W Appliance Company.
All Rights Reserved.

FRANÇAIS
Manuel de l’Utilisateur
Machine à Quesadilla / Pizza
MODÈLE: CHPM12R
1. LISEZ attentivement ces instructions avant d’installer et d’utiliser l’appareil.
Gardez-les pour une référence ultérieure.
2. Enregistrez dans l’espace ci-bas le “NUMÉRO DE SÉRIE/MODÈLE” situé
à l’arrière ou au bas de votre appareil et gardez ces informations pour
référence ultérieure.
NUMÉRO DE SÉRIE:
NUMÉRO DE MODÈLE:
DATE D’ACHAT:
Enregistrez et agrafez votre reçu de vente à votre manuel pour une couverture
de garantie.


Page 15
FRANÇAIS
CONSIGNES DE SÉCURITÉ
CONSIGNES DE SÉCURITÉ IMPORTANTES
1. LIRE TOUTES LES INSTRUCTIONS AVANT UTILISATION
2. Ne pas toucher les surfaces chaudes. Utilisez des poignées ou des
boutons.
3. Pour se protéger contre le risque de choc électrique, ne pas
immerger le cordon, la che ou l’unité dans l’eau ou un autre liquide.
4. Une surveillance étroite est nécessaire lorsqu’un appareil est utilisé
par ou à proximité des enfants.
5. Débranchez de la prise de courant lorsqu’elle n’est pas utilisée et
avant de la nettoyer. Laissez refroidir avant de mettre ou d’enlever
des pièces, et avant de nettoyer l’appareil.
6. N’utilisez aucun appareil avec un cordon ou une che endommagé
ou après que l’appareil fonctionne mal ou a été endommagé en
aucune façon. Renvoyez l’appareil au centre de service autorisé le
plus proche pour examen, réparation ou réglage.
7. L’utilisation d’accessoires non recommandés par le fabricant peut
causer des blessures.
8. Ne pas utiliser à l’extérieur.
9. Ne pas laisser le cordon pendre sur le bord de la table ou du
comptoir, ni toucher les surfaces chaudes.
10. Ne pas placer sur ou à proximité d’un brûleur électrique ou à gaz
chaud ou d’un four chauffé.
11. Il faut être extrêmement prudent lors du déplacement d’un appareil
contenant de l’huile chaude ou d’autres liquides chauds.
12. Pour débrancher, enlevez la che de la prise murale.
13. Ne pas utiliser l’appareil à des ns autres que celles prévues.
14. Ne pas ranger verticalement.
GARDEZ CES INSTRUCTIONS
USAGE DOMESTIQUE UNIQUEMENT
DANGER
DANGER - Risques immédiats
qui VONT entraîner des blessures
graves ou la mort
AVERTISSEMENT
AVERTISSEMENT - Risques ou
pratiques dangereuses POUVANT
entraîner des blessures graves ou la mort
ATTENTION
ATTENTION - Risques ou pratiques
dangereuses POUVANT entraîner
des blessures corporelles mineures
AVERTISSEMENT
Lors de l’utilisation d’appareils électriques, les précautions de sécurité de base
doivent être respectées, y compris les suivantes

Page 16
FRANÇAIS
EXIGENCES ÉLECTRIQUES
Cet appareil est équipé d’une che polarisée (une lame est plus large que l’autre).
Pour réduire le risque de choc électrique, cette che est conçue pour s’insérer dans
une prise polarisée dans un seul sens. Si la che ne rentre pas complètement dans la
prise, inversez la che. Si elle ne rentre toujours pas, contactez un électricien qualié.
Ne modiez pas la che en aucune façon.
CORDON D’ALIMENTATION
1. Un cordon d’alimentation court est prévu pour réduire le risque de s’emmêler ou
de trébucher dans un cordon plus long.
2. Si le cordon d’alimentation est trop court, n’utilisez pas de rallonge. Demandez à un
électricien ou à un technicien qualié d’installer une prise près de l’appareil.
3. S’il est absolument nécessaire d’utiliser des cordons plus longs ou une rallonge, il
faut faire preuve d’une extrême prudence.
a) Le calibre électrique marqué du jeu de cordons ou de la rallonge doit être égal ou
supérieur au calibre électrique de l’appareil. Le cordon plus long doit être disposé
de manière à ne pas draper le dessus du comptoir ou de la table où il peut être tiré
par les enfants ou trébucher involontairement.
REMARQUE: Ni Commercial Chef ni le détaillant ne peuvent accepter aucune
responsabilité pour les dommages causés au produit ou les blessures
résultant du non-respect des procédures de connexion électrique.
CONSIGNES DE SÉCURITÉ

Page 17
FRANÇAIS
PIÈCES ET CARACTÉRISTIQUES
CONFIGURATION ET UTILISATION
Poignée du couvercle
Prise polarisée
Alimentation (ROUGE)
Température prête (VERT)
Couvercle
Plaques de cuisson
supérieures et inférieures
antiadhésives
Bouton de Contrôle de
la Température
180
230
290
340
400˚F
0

Page 18
FRANÇAIS
CONFIGURATION ET UTILISATION
AVANT LA PREMIÈRE UTILISATION
1. Déballez et enlevez soigneusement tous les matériaux d’emballage.
2. Nettoyez avec une solution douce de savon et d’eau.
ATTENTION: Veillez à ce que l’eau ne pénètre pas dans l’appareil.
3. Placez la machine à quesadilla / pizza sur une surface sèche et plane en vous
assurant qu’il y a environ 4” d’espace autour de chaque côté de l’appareil.
MODE D’EMPLOI
1. Mettez quelques gouttes d’huile végétale sur les plaques de cuisson pour éviter de
coller.
2. Fermez la machine à quesadilla / pizza et branchez-le dans une prise électrique de
120V.
3. Le voyant rouge d’alimentation et le voyant vert de température prête s’allument.
4. Tournez le bouton de température pour sélectionner une gamme de température
entre 200° bas, 320° moyen et 410° haut. Le voyant vert s’éteint pendant le
préchauffage de l’appareil.
REMARQUE: La température que vous sélectionnez doit être basée sur l’épaisseur
de votre Quesadilla ou Pizza. Pour les articles plus épais, choisissez un réglage plus
élevé. Si vous faites fondre du fromage ou réchauffez des aliments préalablement
cuits, sélectionnez un réglage de température plus basse.
5. Il faudra environ 3 minutes pour atteindre la température de cuisson
recommandée. Le voyant vert s’allume dès que l’appareil est prêt à l’emploi.
CUIRE UNE PIZZA
Une fois que votre Machine À Quesadilla / Pizza est préchauffé, ouvrez-le à l’aide de
la poignée.
Placez votre pâte à pizza non cuite directement sur la plaque de cuisson inférieure et
ajoutez les garnitures. Ne jamais trop remplir ou monter votre garniture trop haut sur
votre pizza. La garniture doit toujours être en dessous de la hauteur de la plaque de
cuisson supérieure pour éviter toute brûlure.
En moyenne, ça prendra environ 25 minutes pour cuire une pizza, selon l’épaisseur.
Il est recommandé d’ouvrir le couvercle pour vérier la progression et voir si le
fromage est fondu et la croûte est dorée.
REMARQUE: Quand l’appareil est allumé pour la première fois, une légère odeur se
produit. Ceci est normal, assurez une ventilation adéquate.
POUR FAIRE DES QUESADILLAS OU D’AUTRES ITEMS:
Suivez les mêmes instructions. Sélectionnez la température selon le type et
l’épaisseur des aliments. Un Quesadilla épais doit être cuit à un réglage plus élevé.
Pour les Nachos, utilisez une température plus basse pour faire fondre le fromage.
Enregistrez le réglage idéal et le temps de cuisson pour une utilisation future. Les
aliments ne doivent être remplis qu’en dessous de la plaque de cuisson supérieure
pour éviter de les brûler.

Page 19
FRANÇAIS
CONFIGURATION ET UTILISATION
ENTRETIEN ET NETTOYAGE
Cet appareil nécessite peu d’entretien et ne contient aucune pièce réparable.
N’essayez pas de le réparer vous-même, mais contactez plutôt le service client
mentionné dans ce manuel pour obtenir de l’aide.
ATTENTION: Débranchez la prise électrique et laissez-la refroidir complètement
avant de la nettoyer. Ne jamais immerger l’appareil dans l’eau ou tout autre type de
liquide et ne jamais le placer dans un lave-vaisselle.
REMARQUE: La machine à quesadilla / pizza ne peut pas être démonté pour le
nettoyage.
1. Essuyez le couvercle, la base et les plaques de cuisson avec un chiffon humide
et un savon non abrasif ou un détergent pour lave-vaisselle. Nettoyez avec un
chiffon propre, doux et humide et essuyez avec une serviette.
REMARQUE: Pour protéger la surface antiadhésive, utilisez uniquement des
ustensiles en plastique, en nylon ou en bois.
2. Pour enlever la pâte à pizza des plaques de cuisson, versez une petite quantité
d’huile de cuisson sur la pâte à pizza durcie. Laissez reposer pendant 5 minutes
puis essuyez la pâte à pizza ramollie avec une serviette en papier ou un chiffon
doux.
3. Pour de meilleurs résultats, utilisez uniquement des produits avec des instructions
indiquant qu’ils sont sûrs pour une utilisation sur des surfaces de cuisson
antiadhésives.
REMARQUE: Ne PAS utiliser de laine d’acier ou de tampons à récurer grossiers.
ENTREPOSAGE
• Débranchez toujours la machine à quesadilla / pizza avant de le ranger.
• Assurez-vous toujours que la machine à quesadilla / pizza est frais et sec avant de
le ranger.
Quand vous enlevez des aliments cuits, portez des mitaines de four et utilisez des
ustensiles non métalliques.
Des lots supplémentaires d’aliments peuvent cuire plus rapidement parce que la
chaleur a été retenue de sorte qu’il peut être nécessaire de s’adapter à un temps de
cuisson plus court.
Quand la cuisson est terminée, tournez le contrôle de température sur la position
“0”. Débranchez le cordon d’alimentation de la prise électrique, soulevez le couvercle
supérieur pour exposer les plaques de cuisson et laissez l’appareil refroidir.
ATTENTION: N’essayez pas de nettoyer tant que l’appareil n’est pas complètement
refroidi.

Page 20
FRANÇAIS
AVANT D’APPELER LE SERVICE
SI L’APPAREIL NE FONCTIONNE PAS:
A) Vériez que l’appareil est bien branché. Si ce n’est pas le cas, enlevez la che de la
prise, attendez 10 secondes et rebranchez-la fermement.
B) Vériez s’il y a un fusible de circuit grillé ou un disjoncteur principal déclenché. Si
ceux-ci semblent fonctionner correctement, testez la prise avec un autre appareil.
SI RIEN DE CE QUI PRÉCÈDE NE RÉSOUT LE PROBLÈME, CONTACTEZ
UN TECHNICIEN QUALIFIÉ. N’ESSAYEZ PAS DE RÉGLER OU DE RÉPARER
L’APPAREIL VOUS-MÊME.
SERVICE CLIENT
IMPORTANT
NE PAS RETOURNER CET APPAREIL AU MAGASIN
Si vous avez un problème avec cet appareil, veuillez contacter le
Centre de Satisfaction Client W Appliance Co. au 1-855-855-0294.
PREUVE D’ACHAT DATÉE, NUMÉRO DE MODÈLE ET CODE DE
DATE REQUIS POUR LE SERVICE DE GARANTIE
DÉPANNAGE ET GARANTIE
Table of contents
Languages:


