Berkel 823E-PLUS Owner's manual

BK45760 Rev. A (February 2015)
MODELS
823E-PLUS, 825E-PLUS,
825A-PLUS, 827E-PLUS,
827A-PLUS, & 829E-PLUS
SLICERS
OWNER/OPERATOR
MANUAL
IMPORTANT NOTICE
This manual contains Important Safety
Instructions which must be strictly
followed when using this equipment.

BEFORE USING THIS EQUIPMENT
Berkel’s slicers are designed to slice meat and other food products safely and
HI¿FLHQWO\+RZHYHUXQOHVVWKHRSHUDWRULVSURSHUO\WUDLQHGDQGVXSHUYLVHG
there is the possibility of a serious injury. It is the responsibility of the owner
to ensure that this slicer is used properly and safely, strictly following the
instructions contained in this manual and any requirements of local law.
1RRQHVKRXOGXVHRUVHUYLFHWKLVVOLFHUZLWKRXWSURSHUWUDLQLQJDQGVXSHUYL
sion. All operators should be thoroughly familiar with the procedures con-
WDLQHGLQWKLVPDQXDO(YHQVR%HUNHOFDQQRWDQWLFLSDWHHYHU\FLUFXPVWDQFHRU
HQYLURQPHQWLQZKLFKLWVVOLFHUVZLOOEHXVHG<RXWKHRZQHUDQGRURSHUDWRU
must remain alert to the hazards posed by the function of a slicer—particu-
ODUO\WKHVKDUSURWDWLQJEODGHDQGPRYLQJWDEOH1RRQHXQHU\HDUVRIDJH
should operate this equipment. If you are uncertain about a particular task, ask
\RXUVXSHUYLVRU
This manual contains a number of safe practices in the General Safety Instruc-
tion Section. Additional warnings are placed throughout this manual.WA R N -
INGS RELATED TO YOUR PERSONAL SAFETY ARE INDICATED
BY:
WA R N I NG
If any warning label, wall chart or manual becomes misplaced, damaged or
illegible, please contact your nearest distributor or Berkel directly, for a free
replacement.
5HPHPEHUKRZHYHUTHIS MANUAL OR THE WARNING LABELS DO
NOT REPLACE THE NEED TO BE ALERT AND TO USE YOUR
COMMON SENSE WHEN USING THIS SLICER.

TABLE OF CONTENTS
Page
General Safety Instructions......................................................................................................................... 2
Equipment Description................................................................................................................................ 5
Unpacking and Installation ......................................................................................................................... 6
Operation ..................................................................................................................................................... 6
Cleaning and Sanitizing Instructions.......................................................................................................... 7
Sharpening Instructions ............................................................................................................................
Gasket Inspection ......................................................................................................................................
5HSDLU3DUWV5HSDLU6HUYLFH......................................................................................................................
Troubleshooting ..........................................................................................................................................
Warranty ....................................................................................................................................................
The Berkel Company • World’s Leading Manufacturer of Slicers and Food Processing Equipment
BERKEL COMPANY
1RUWKZHVWHUQ3DUNZD\/RXLVYLOOH.<
3KRQH)D[
www.berkelequipment.com
3ULQWHGLQ86$ %HUNHO&RPSDQ\ 3DUW1R%.5HY$

4•OWNER/OPERATOR MANUAL BK45760 Rev. A (02-15)
WA R N I NG
SHARP KNIFE BLADE
to avoid serious personal injury
follow all the instructions in this manual
and
1(9(5WRXFKWKLVPDFKLQHZLWKRXWWUDLQLQJDQGDXWKRUL]DWLRQE\\RXU
VXSHUYLVRU
0$&+,1(0867%(RQVROLGOHYHOVXSSRUW
3. GUARDS MUST BE in place before plugging in and turning on machine.
$/:$<6XVHWKUHHSURQJHGSOXJSURYLGHG
$/:$<6XVHIRRGSXVKHUQRW\RXUKDQG
1(9(5728&+527$7,1*.1,)(
.((3KDQGVDUPVKDLUDQGORRVHFORWKLQJ
FOHDURIDOOPRYLQJSDUWV
6+28/'0$&+,1(-$0WXUQRIIDQGXQSOXJ
EHIRUHUHPRYLQJREVWUXFWLRQ
78512))$1'813/8*PDFKLQHIURPSRZHUVRXUFHEHIRUHFOHDQLQJ
VDQLWL]LQJRUVHUYLFLQJ
86(21/<WKHDWWDFKPHQWVSURYLGHGE\WKHPDQXIDFWXUHU
6+28/'DQ\ZDUQLQJODEHORQDPDFKLQHFRPHRIIRUEHFRPHXQUHDGDEOH
FRQWDFWWKHPDQXIDFWXUHURU\RXU'HVLJQDWHG%HUNHO6HUYLFH/RFDWLRQIRUDIUHH
replacement.

BK45760 Rev. A (02-15) OWNER/OPERATOR MANUAL •5
Equipment Description
WA R N I NG
To avoid serious personal injury, properly
install slicer in adequate work area
• $/:$<6XVHDTXDOL¿HGWHFKQLFLDQIRULQVWDOODWLRQ
• $/:$<6LQVWDOOVOLFHULQZRUNDUHDZLWKDGHTXDWHOLJKWDQGVSDFH
• 21/<RSHUDWHVOLFHURQDVROLGOHYHOVXSSRUW
• 1(9(5E\SDVVRUDOWHUVZLWFKHVRUFLUFXLWV
• 1(9(5RSHUDWHVOLFHUZLWKRXWDOOJXDUGVLQVWDOOHG
• 1(9(5RSHUDWHVOLFHUZLWKRXWDOOZDUQLQJVWLFNHUVDQGZDOOFKDUWVSRVWHG

6•OWNER/OPERATOR MANUAL BK45760 Rev. A (02-15)
Unpacking and Installation
UNPACKING AND ASSEMBLY
• :KHQWKHVOLFHUKDVEHHQXQSDFNHGDQGUHPRYHGIURPLWVVKLSSLQJFDUWRQLWVKRXOGEHFKHFNHG
FDUHIXOO\IRUDQ\GDPDJHWKDWPD\KDYHRFFXUUHGGXULQJVKLSPHQW'RQRWSOXJLQWKHSRZHU
FRUGRUDWWHPSWWRRSHUDWHWKHVOLFHUSULRUWRWKLVH[DPLQDWLRQ
• Carefully check all slicer components such as the product table, pusher, sharpener, thickness
FRQWURONQREHWFWRPDNHFHUWDLQWKH\PRYHIUHHO\DQGWKDWWKHUHDUHQRREVWUXFWLRQV7XUQWKH
thickness control knob as far right as possible. Lubricate the pusher slide bar (on the product
WDEOHDQGWKHVTXDUHDQGURXQGWDEOHVXSSRUWUDLOVXQGHUVLGHRIVOLFHUZLWK%HUNHO)RRG0D-
chine Oil.
WA R N I NG
Use only USDA-authorized oil on this slicer. Non USDA-authorized oil may contaminate this slicer
DQGFDXVHIRRGSRLVRQLQJDQGSHUVRQDOLQMXU\%HUNHO)RRG0DFKLQH2LOLVDQ86'$DXWKRUL]HGRLO
IRUIRRGSURFHVVLQJHTXLSPHQW%HUNHO)RRG0DFKLQH2LOFDQEHSXUFKDVHGLQR]ERWWOHV3DUW
R]ERWWOHV3DUWRUJDOORQV3DUW
Testing Prior To Operation
0DNHVXUHWKDWWKH212))VZLWFKLVRQWKH2SRVLWLRQDQGWKHWKLFNQHVVFRQWURONQRELV
WXUQHGDVIDUWRWKHULJKWDVSRVVLEOH7KLVSRVLWLRQVWKHJDXJHSODWHVRWKHNQLIHLVQRWH[SRVHG
during testing.
2. 3OXJWKHSRZHUFRUGLQWRDJURXQGHG9$&HOHFWULFDORXWOHW
3. 6OLGHWKHSURGXFWWDEOHEDFNDQGIRUWKKROGLQJRQWRWKH3URGXFW7DEOH+DQGOH,IWKHUHLVDQ\
URXJKRSHUDWLRQRUREVWUXFWLRQVKXWRIIXQSOXJSRZHUFRUGDQGFDOO\RXU%HUNHOVHUYLFHPDQ
7XUQWKHVOLFHURQE\FOLFNLQJRQWKH,SRVLWLRQDQGFKHFNIRUVPRRWKNQLIHURWDWLRQ7XUQWKH
VOLFHU2))
WA R N I NG
:+(1029,1*7+(352'8&77$%/(*5$6321/<7+(352'8&77$%/(+$1'/(
Operation
General
Rotate the pusher out of the way of the product table and place in the stop at the bottom of the
table. Place product to be sliced on the product table. Position the pusher at the end of product.
If the product you’re slicing is long, place the pusher on top of the product. The pusher will feed
the product toward the knife after each slice.
2. Turn the slicer ON.
3. 7KHWKLFNQHVVFRQWURONQREDOORZV\RXWRYDU\WKHWKLFNQHVVRIWKHVOLFHVIURPSDSHUWKLQWRDS-
SUR[LPDWHO\WKLFN7RPDNHWKLQQHUVOLFHVWXUQWKHWKLFNQHVVFRQWURONQREWRWKHULJKW)RU
thicker slices, turn the knob to the left.
$KDQGOHLVSURYLGHGRQWKHSURGXFWWDEOHWRPRYHLWEDFNDQGIRUWK

BK45760 Rev. A (02-15) OWNER/OPERATOR MANUAL •7
Cleaning And Sanitizing Instructions
GENERAL INFORMATION
7KLVPDFKLQHVKDOOEHFOHDQHGDQGVDQLWL]HGDWLQWHUYDOVWRFRPSO\ZLWKQDWLRQDOVWDWHDQGRUORFDO
health codes. We recommend that the machines should be properly cleaned at least once a day; if neces-
VDU\HYHQPRUH,IWKHPDFKLQHVKDYHQRWEHHQXVHGIRUDZKLOHWKH\PXVWEHFOHDQHGEHIRUHXVHDVZHOO
PARTS THAT MUST BE REMOVED FOR CLEANING
OTHER PARTS THAT MUST BE CLEANED

8•OWNER/OPERATOR MANUAL BK45760 Rev. A (02-15)
DISASSEMBLING THE MACHINE FOR CLEANING
Disconnect the plug from the electric mains supply.
2. Turn the regulating knob of the thickness plate to
‘0’.
3. 5HPRYHWKHYDULRXVFRPSRQHQWVDVGHVFULEHGLQWKH
following paragraphs.
Disassembling the Meat Pusher
8QVFUHZWKHNQRELQRUGHUWRH[WUDFWWKHURGIURP
the tray.
2. 5HPRYHWKHPHDWSXVKHU
Disassembling the product table
Turn the locking knob counter clockwise all the
ZD\UHPRYLQJWKHNQRELWVHOI
2. Take out the whole group by pulling it upwards.

BK45760 Rev. A (02-15) OWNER/OPERATOR MANUAL •9
'LVDVVHPEOLQJWKH6OLFH'HÀHFWRU
5HPRYHWKHVOLFHGHÀHFWRUZKLFKLVDWWDFKHGWR
the main slicer body, as shown in the picture.
Disassembling the Sharpener
/RRVHQWKHNQREEHORZWKHVKDUSHQHUEORFNZLWKRXWUHPRYLQJLW
2. 7KHQUHPRYHWKHZKROHVKDUSHQHUE\SXOOLQJXSZDUGV
Disassembling the Center Plate
Unscrew the center plate locking knob.
2. 3XVKRQWKHNQREWRPRYHWKHFHQWHUSODWHRIIWKH
knife.
3. 5HPRYHERWKWKHFHQWHUSODWHDQGWKHORFNLQJ
knob.

10 •OWNER/OPERATOR MANUAL BK45760 Rev. A (02-15)
PRODUCTS TO BE USED FOR CLEANING
2QO\XVHKRWZDWHUDQGDELRGHJUDGDEOHGHWHUJHQWIRUGLVKHVZLWKD3+DWDWHPSHUDWXUHRIQRORZHU
WKDQ&RU)XVLQJDVRIWVSRQJ\FORWKDQGDVHPLULJLGQ\ORQEUXVKIRUWKHSODWHDQGWKHVKDUS
food press.
7KHVDQLWL]HUFRQFHQWUDWLRQVKDOOFRPSO\ZLWK6HFWLRQ0DQXDODQG0HFKDQLFDO:DUHZDVKLQJ
(TXLSPHQW&KHPLFDO6DQLWL]DWLRQ±7HPSHUDWXUHS+&RQFHQWUDWLRQDQG+DUGQHVVRIWKH)'$)RRG
&RGH%HUNHOUHFRPPHQGVXVLQJ86'$DSSURYHGVDQLWL]HU%HUNHOSDUWQXPEHU
If a chemical sanitizer other than chlorine, iodine or quaternary ammonium is used, it shall be applied
in accordance with the EPA-registered label use instructions.
WA R N I NG
)RUFOHDQLQJWKHVKDUSDUHDVRIWKHSODWHVWKHIRRGSUHVVDQGWKHEODGHZHUHFRPPHQGXVLQJSURWHF-
WLYHJORYHV
Rinse well with a lot of hot clean water and dry with a soft cloth or a spongy material. Do not clean the
slicer with water or stream jets or similar methods.
&OHDQDOOWKHUHPRYHGSDUWVXVLQJDFORWKDQGDFOHDQLQJVROXWLRQ5LQVHZLWKKRWZDWHU6DQLWL]HDQGOHW
air dry.
&OHDQWKHVKDUSHQHUFRYHUZLWKZDWHUDQGGHWHUJHQW&DUHIXOO\FOHDQWKHVKDUSHQHUDVVHPEO\DQGDURXQG
the stones. DO NOT submerge the sharpener assembly.
CLEANING SHARPENING STONES
CAUTION
Dirty stones cannot sharpen!
,IWKHVKDUSHQLQJVWRQHVKDYHEHFRPHFRDWHGZLWKIRRGIDWV
RUPHWDOOLFEXLOGXSWKH\ZLOOQRWVKDUSHQHIIHFWLYHO\
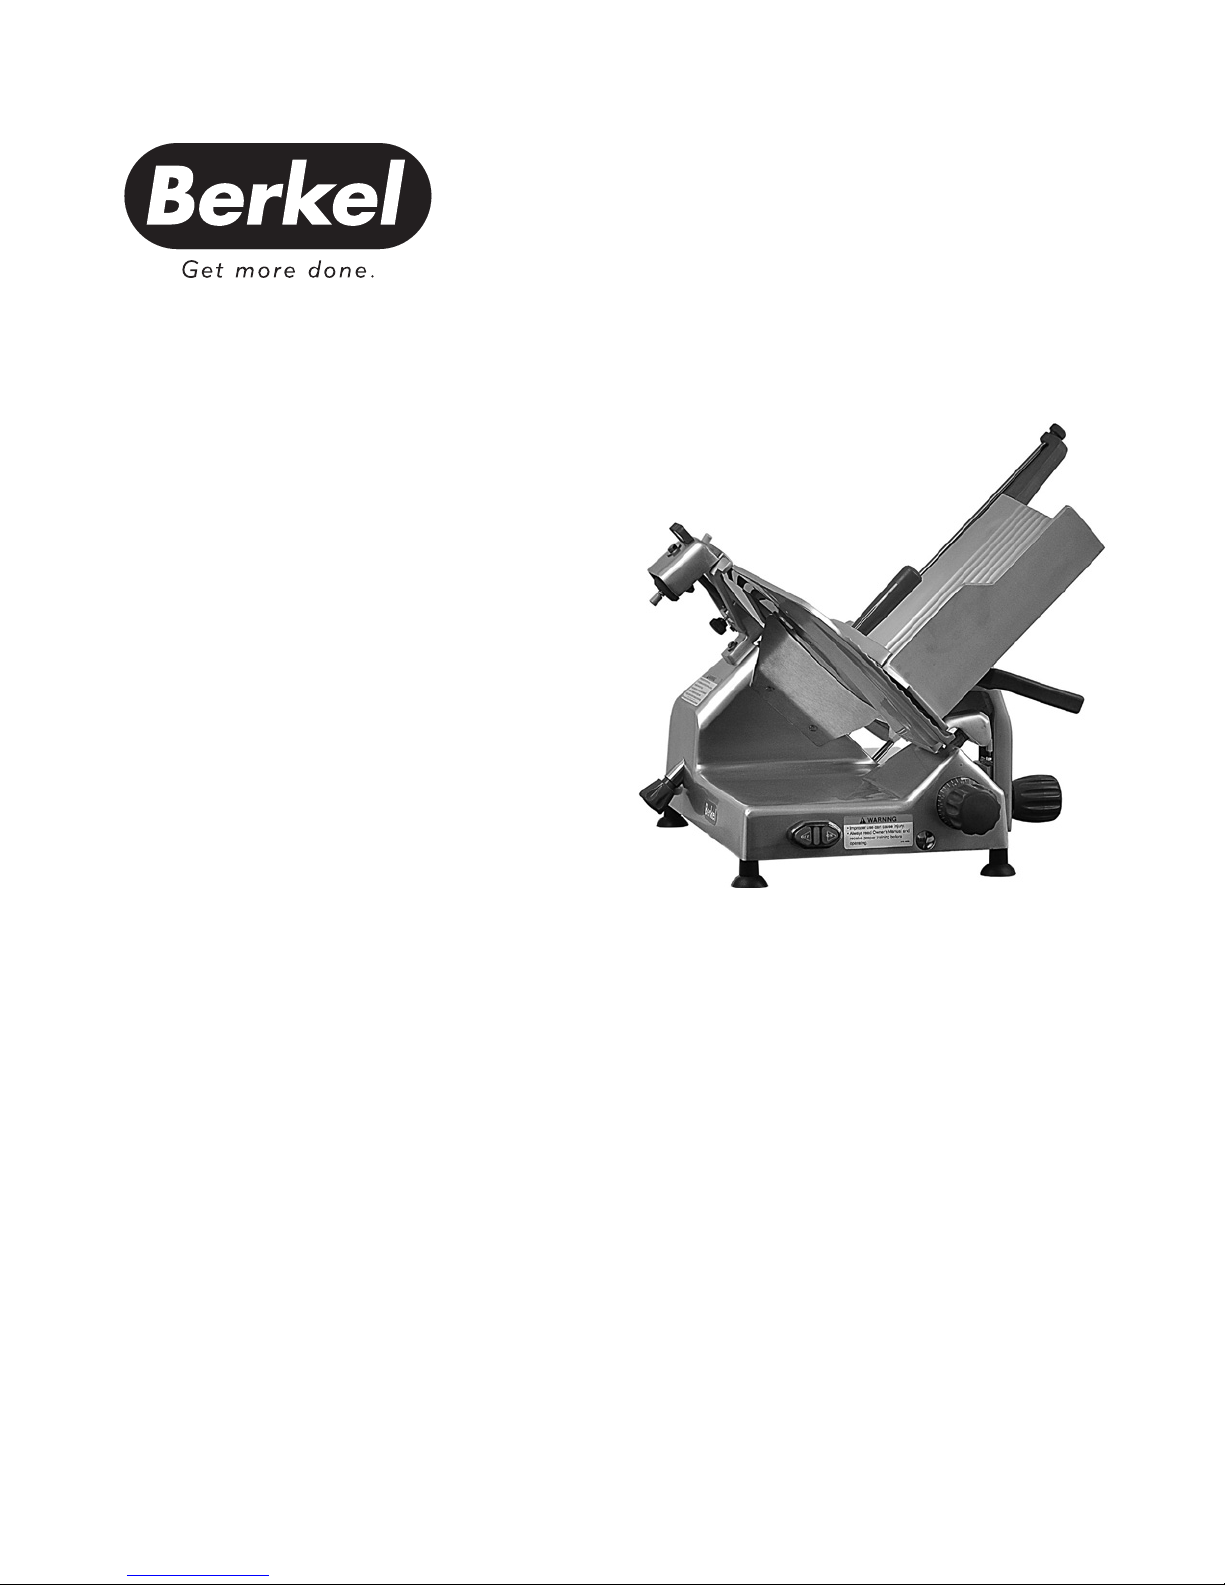
(DFKWLPHWKHVKDUSHQHULVXVHGWKHVKDUSHQLQJVWRQHVVKRXOGEHH[DPLQHGIRUFOHDQOLQHVV7XUQRIIWKH
VOLFHUFORVHWKHJDXJHSODWHXQSOXJSRZHUFRUGDQGRSHQWKHVKDUSHQHUFRYHU
,IWKHUHLVHYLGHQFHRIIDWW\RUPHWDOOLFEXLOGXSLQWKHVWRQHVWKH\PXVWEHFOHDQHG2WKHUZLVHWKH\
ZLOOQRWKDYHWKHDEUDVLYHTXDOLW\QHFHVVDU\WRVKDUSHQ
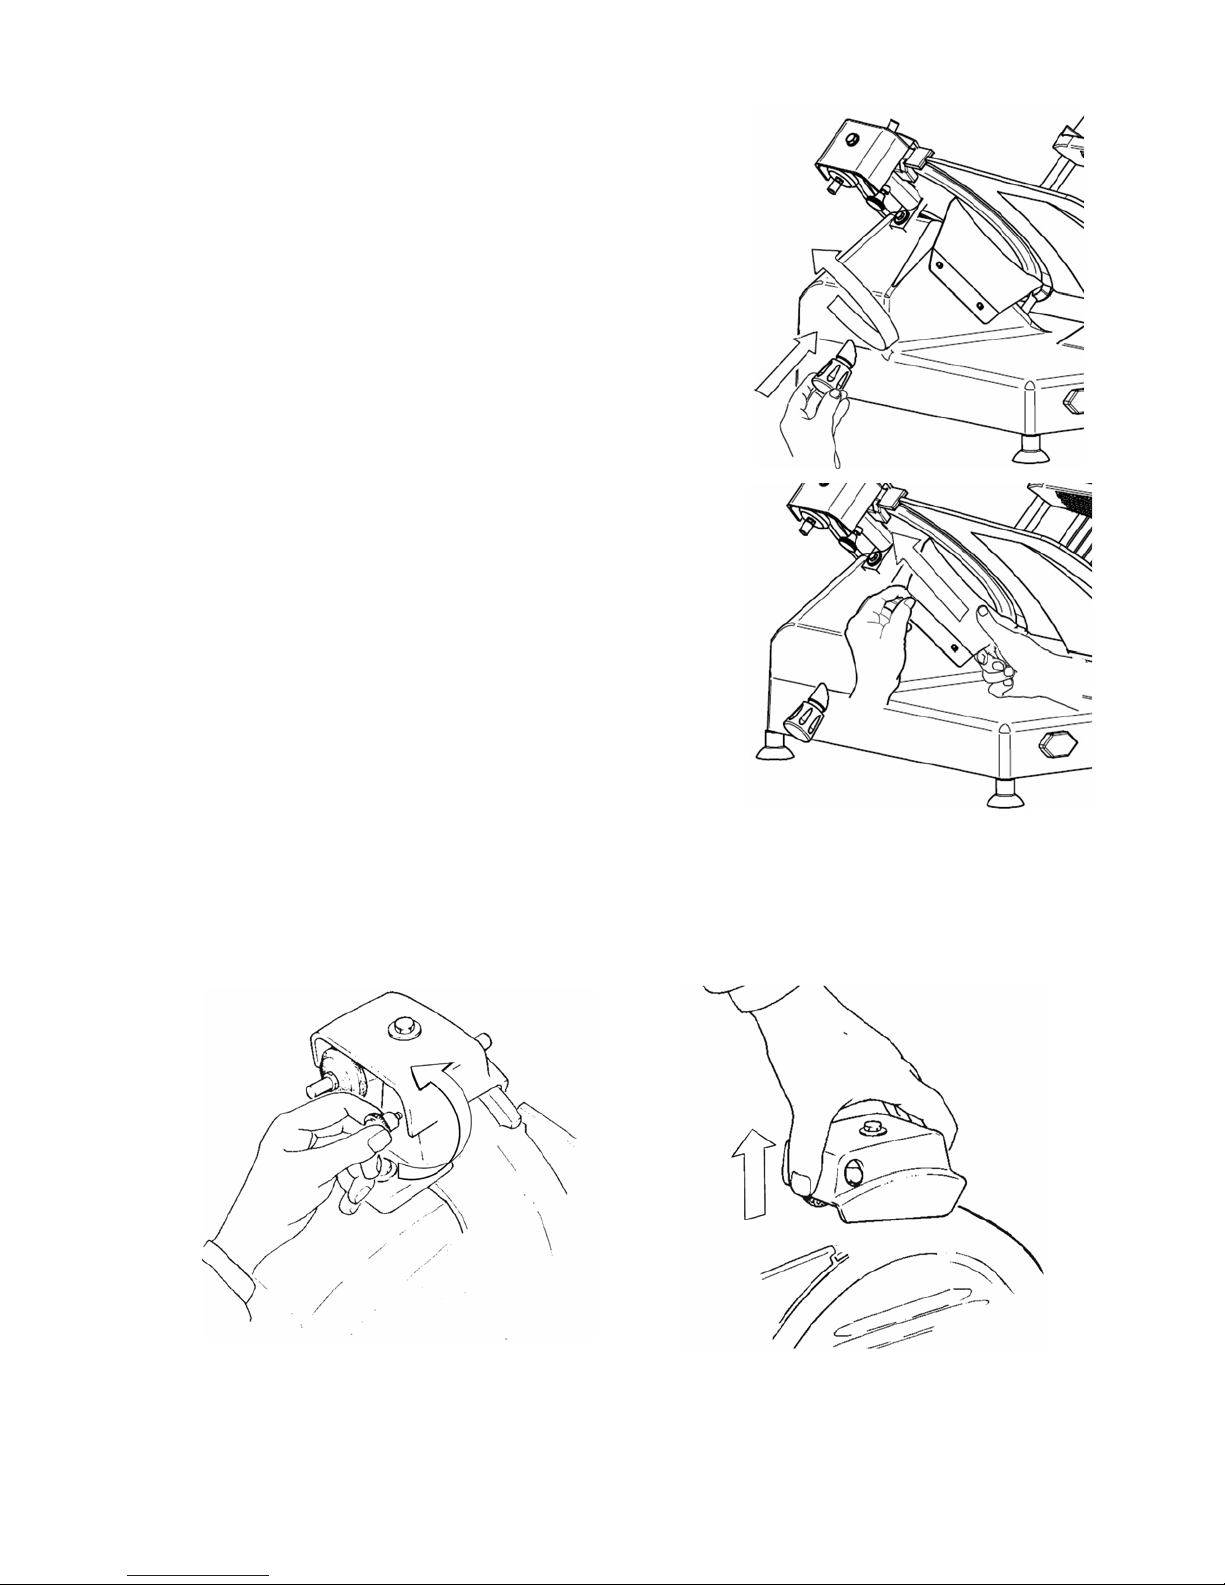
Clean as follows:
5HPRYHWKHQXWVDQGWDNHWKHVWRQHVRIIWKHVKDIWV
2. 6RDNWKHVWRQHVLQDVROXWLRQRIGLVKVRDSLH-R\'DZQHWFDQGZDWHUIRURQHKRXU
3. 6FUXEWKHVWRQHVZLWKDVWLIIEULVWOHEUXVK%HUNHO3DUW5LQVHWKRURXJKO\DWDVLQN
6KDNHH[FHVVZDWHURXWDQGSDWSDUWLDOO\GU\ZLWKSDSHUWRZHOLQJRUDFOHDQFORWKWRZHO6HW
aside to air dry.
5. 2QFHWKHVWRQHVDUHGU\DIWHUKRXUVRLOWKHVKDIWVZLWK%HUNHO)RRG0DFKLQH2LO
6. Reassemble.
%HUNHOUHFRPPHQGVWKDWDVSDUHVHWRIVWRQHV%HUNHO3DUWEHNHSWDYDLODEOHIRUWKRURXJK
cleaning procedures, and in case of breakage, so you will not lose your sharpening capabilities.

BK45760 Rev. A (02-15) OWNER/OPERATOR MANUAL •11
CLEANING THE RING GUARD
)ROGDFORWKZLSHWKDWKDVEHHQVXEPHUJHGLQIUHVKGHWHUJHQWVROXWLRQDQGZRUNLWEHWZHHQWKH
ring guard and the knife, starting at the base of the ring guard. Carefully work the cloth around
the knife, cleaning the edge of the ring guard and edge of the gauge plate. USE EXTREME
CAUTION.
2. Sanitize and allow to dry.
CLEANING THE BODY OF THE MACHINE
Clean the machine body with a damp cloth or a
sponge rinsing frequently with hot water and clean-
ing solution. Rinse with hot water. Sanitize and let air
dry.
2. &OHDQDOVRWKHJDXJHSODWHDQGWKHLQGH[LQJNQRE
While doing this operation pay attention to the knife.
Don’t open the gauge plate or you risk to be cut!
CLEANING THE COMPONENTS IN THE BASE
7KHFRPSRQHQWVFRQWDLQHGLQWKHEDVHGRQRWQHHGDQ\VSHFLDOFOHDQLQJRFFDVLRQDOO\UHPRYHWKHGXVW
that can accumulate in the end area of the carriage and of the thickness plate regulation.
CLEANING THE BLADE
WA R N I NG
8VHSURWHFWLYHJORYHVDQGFRQFHQWUDWHRQWKHMREDWKDQG'$1*(50DNHVXUHWKLFNQHVVFRQWURO
NQRELVIXOO\WRWKHULJKWVRWKHJDXJHSODWHFRYHUVWKHNQLIH
Press a damp cloth on the surface of the blade
DQGPRYHLWVORZO\IURPWKHFHQWHUWRWKHHGJHDV
VKRZQLQWKHSLFWXUHRQWKHVLGHRIWKHEODGHFRYHU
and on the other side.
2. Sanitize and dry in the same way using a dry cloth.
3. Repeat cleaning both front and back of knife with
clear water.
$OZD\VPRYHIURPWKHFHQWHURXWZDUG1(9(5
029(<285+$1'72:$5'67+(('*(
2)7+(.1,)(6DQLWL]HDQGDOORZWRGU\

12 •OWNER/OPERATOR MANUAL BK45760 Rev. A (02-15)
REASSEMBLING THE SLICING MACHINE
Reassembling the sharpener
0DNHVXUHWKHVKDUSHQHUNQREDWWKHEDVHRIWKHVKDUSHQHULVORRVHDERXWWXUQV
2. Insert the sharpener as shown in the picture until it stops at its correct position and screw the
knob.
5HDVVHPEOLQJWKHVOLFHGHÀHFWRU
3ODFHWKHVOLFHGHÀHFWRUFDUHIXOO\LQLWVSODFHDVVKRZQ
in the picture.
Reassembling the Center Plate
Replace the center plate as shown in the picture making sure the section joint is in its proper
place.
2. Insert the tension rod for locking and screw completely.
3. Reassemble carefully and do not strip the rod threads or center plate bushing threads.

BK45760 Rev. A (02-15) OWNER/OPERATOR MANUAL •13
Reassembling the product table
Insert the entire group on the carriage as shown in the
picture.
2. Tighten the locking knob.
Reassembling the meat pusher
Insert the rod in the meat pusher and in the hole of the
H[WHQVLRQ
2. Tighten the locking knob.

14 •OWNER/OPERATOR MANUAL BK45760 Rev. A (02-15)
Sharpening Instructions
CAUTION
The knife should be sharpened at a minimum on a daily basis. Do not sharpen a knife that is not
FOHDQ<RXZLOOGDPDJHWKH6KDUSHQLQJVWRQHVDQGEHXQDEOHWRVKDUSHQWKHNQLIH
6ZLWFK2))WKHSRZHU
2. Unplug the slicer.
3. Turn the thickness control knob fully to the right to place the gauge plate in the fully closed
position.
Clean the knife completely. Always clean from the center towards the outside edge of the knife.
1HYHUPRYH\RXUKDQGWRZDUGVWKHHGJHRIWKHNQLIH
5. Loosen the sharpener locking knob, raise and rotate the sharpener until the stones sit with one
on each side of the knife. Retighten the knob to hold the sharpener in its sharpening position.
6. Plug in the slicer and switch on the power.
7. Press the sharpening stone push-button to bring the stone against the knife and hold it for 5 to
VHFRQGVDQGUHOHDVH:KHQWKHVKDUSHQHULVWKHLQWKHVKDUSHQLQJSRVLWLRQWKHVKDUSHQLQJ
stone push-button is on the left side of the knife.
8. Press the deburring stone push-button to bring the stone against the knife and hold it for 2 to 3
seconds and release. When the sharpener is the in the sharpening position, the sharpening stone
push-button is on the right side of the knife.
9. 6ZLWFK2))WKHSRZHU
Return the sharpener to its stored position and lock in place.
Clean slicer before slicing product. (See “Cleaning and Sanitizing instruction”).
<RXUVOLFHULVQRZVKDUSHQHGFOHDQHGDQGVDQLWL]HG²UHDG\WRXVH
SHARPENER MAINTENANCE
7XUQ2))WKHVOLFHUWXUQLQGH[NQREIXOO\WRWKHULJKWDQGXQSOXJWKHSRZHUFRUGIURPWKH
receptacle.
2. Loosen the sharpener locking knob and lift off the sharpener.
3. &OHDQWKHFRYHUZLWKZDWHUDQGGHWHUJHQW&DUHIXOO\FOHDQWKHVKDUSHQHUDVVHPEO\DQGDURXQG
the stones. DO NOT submerge the sharpener assembly. Oil the spindle and bearing assemblies
ZLWK%HUNHO)RRG0DFKLQH2LO
Check the stones. If they do not turn freely, are greasy or are full of metallic build-up, they must
be cleaned. (See “Cleaning the Sharpening Stones”). If the stones are cracked or chipped they
must be replaced.
5. 2LOWKHVKDUSHQHUVKDIWV3ODFHDIHZGURSVRI%HUNHO)RRG0DFKLQH2LORQHDFKVKDIW0RYHWKH
VKDUSHQLQJDQGGHEXUULQJVWRQHSXVKEXWWRQVEDFNDQGIRUWKWRPDNHVXUHWKDWWKHVWRQHVPRYH
in and out easily. Also, rotate the stones to make sure they turn freely.
6. Oil the mounting post.
7. Replace the sharpener. Sharpener must be all the way down protecting the top of the knife.
Lock in place.

BK45760 Rev. A (02-15) OWNER/OPERATOR MANUAL •15
Gasket Inspection
7KHUHFRPPHQGHGLQWHUYDOEHWZHHQLQVSHFWLRQVVKDOOQRWH[FHHGVL[PRQWKVIRUFRPSRQHQWVWKDWDUH
detached for cleaning and sanitizing (all the gaskets in the images).
7KHLQVSHFWLRQVPXVWEHPDGHE\WKHPDQXIDFWXUHURULWVDXWKRUL]HGVHUYLFHDJHQW
WA R N I NG
7KHVOLFHUPXVWEHUHPRYHGIURPVHUYLFHXQWLOUHSDLUHGE\WKHPDQXIDFWXUHURULWVDXWKRUL]HGVHUYLFH
agent if any gasket or seal is found to be damaged, or missing.

16 •OWNER/OPERATOR MANUAL BK45760 Rev. A (02-15)
Repair Parts/Repair Service/Exploded Views
3OHDVHFRQWDFW+REDUW6HUYLFHRU\RXUGHVLJQDWHG%HUNHO6HUYLFH/RFDWLRQ'%6/IRUDQ\UHSDLU
SDUWVUHSDLUVHUYLFHUHTXLUHGRQ\RXU%HUNHOVOLFHU)RUWKHQHDUHVW+REDUWVHUYLFHRI¿FHSOHDVHYLVLW
ZZZKREDUWVHUYLFHFRPDQGWKHQFOLFNRQ³ORFDWHDQRI¿FH´7KHQHLWKHUHQWHU\RXU=,3&2'(RU
VHOHFWDVWDWHWR¿QGWKHFORVHVWORFDWLRQ2U\RXFDQDOVRYLVLWZZZEHUNHOHTXLSPHQWFRPDQGFOLFNRQ
WKH³6HUYLFHWDE´7KHQHQWHU\RXU=,3&2'(WREHVKRZQWKHFORVHVW+REDUWRU%HUNHO'%6/VHUYLFH
ORFDWLRQV2WKHUSURGXFWLQIRUPDWLRQVXFKDV3DUWV&DWDORJVDQG,QVWUXFWLRQ2SHUDWRU0DQXDOVDUHDOVR
DYDLODEOHRQWKHZZZEHUNHOHTXLSPHQWFRPZHEVLWH&OLFNRQWKH³5HVRXUFH&HQWHUWDE´DQGWKHQFOLFN
on the information category you want to read or download. Be sure to enter your product model num-
ber.Additional information may be obtained from:
Berkel Company
2006 Northwestern Parkway
/RXLVYLOOH.<
3KRQH
)D[
www.berkelequipment.com

BK45760 Rev. A (02-15) OWNER/OPERATOR MANUAL •17
Troubleshooting
Should your slicer fail to function properly, here are a few things you can check before calling a Berkel Ser-
YLFHPDQ
Product not slicing properly; thick and thin or irregular slices
• Is the knife sharp? If not, sharpen according to instructions in this manual. Remember, only
sharpen a clean knife.
• 'RHVWKHSURGXFWVL]HH[FHHGWKHFDSDFLW\RIWKHVOLFHU"7RRODUJHDSURGXFWPD\UXEDJDLQVWWKH
sharpener assembly causing interference to normal slicing.
• Is the product positioned correctly and held securely on the product table? If not, product may
PRYHRUURWDWHGXULQJVOLFLQJRSHUDWLRQUHVXOWLQJLQSDUWLDORUWKLFNDQGWKLQVOLFHV
• Are all components held securely in place? A loose product table or pusher can cause inconsis-
tent slices.
Knife not sharpening
• $UHVKDUSHQLQJSURFHGXUHVEHLQJIROORZHGH[DFWO\DVH[SODLQHGLQWKLVPDQXDO
• $UHVKDUSHQLQJVWRQHVFOHDQ",IQRWFOHDQDFFRUGLQJWRLQVWUXFWLRQVJLYHQLQ³6KDUSHQHU0DLQ-
tenance” section).
• Is the knife clean? If coated with food fats, sharpener stones cannot sharpen. Clean per instruc-
tions in this manual.
• $UHVKDUSHQLQJVWRQHVPDNLQJVROLGFRQWDFWZLWKWKHNQLIH",IQRWKDYH\RXU%HUNHOVHUYLFHPDQ
adjust them.
• $UHVKDUSHQLQJVWRQHVVHYHUHO\ZRUQDQGQRWPDNLQJFRQWDFWZLWKWKHNQLIH"$UHWKHVKDUSHQ-
LQJVWRQHVFUDFNHGRUFKLSSHG",IVRKDYH\RXU%HUNHOVHUYLFHPDQUHSODFHDQGDGMXVWWKHQHZ
stones to the proper position for best sharpening results.
Electrical failure
• ,VVOLFHUIXOO\SOXJJHGLQWRDSURSHUO\JURXQGHG9$&RXWOHW",ISURSHUO\FRQQHFWHGWKH
white power ON light should be illuminated when the slicer is on.
• ,QVSHFWSRZHUFRUG+DVLWEHHQGDPDJHGFXWWLQJRIIHOHFWULFDOÀRZ",IVRFDOO\RXU%HUNHO
VHUYLFHPDQWRUHSODFHWKHSRZHUFRUG
• Are you getting electricity from the wall outlet? Check by plugging in another piece of equip-
ment with the same electrical requirements. Also, check circuit breaker or fuse.
• If you are getting electrical power and your slicer is still not operating, contact your Berkel
VHUYLFHPDQ
Thickness control knob not operating gauge plate
• If the thickness control knob is not opening and closing the gauge plate properly, it is a sign that
the internal mechanism has suffered some loss of adjustment. Do not try to adjust the mecha-
QLVP\RXUVHOI&DOO\RXU+REDUWRU%HUNHO6HUYLFHPDQ
,IFRUUHFWLRQRIDQ\RIWKHDERYHFRQGLWLRQVGRHVQRWUHVXOWLQDIXQFWLRQDOVOLFHUFDOO\RXU'HVLJQDWHG
+REDUWRU%HUNHO6HUYLFH/RFDWLRQ

BK45760 Rev. A (February 2015)
Warranty
(IIHFWLYH)HEUXDU\
Berkel Company (“Berkel”) warrants to the Buyer of new equipment that said equipment,
when installed in accordance with our instructions and subjected to normal use, is free from
GHIHFWVLQPDWHULDORUZRUNPDQVKLSIRUDSHULRGRIRQH\HDUIURPWKHGDWHRIVDOH
BERKEL SPECIFICALLY DISCLAIMS ANY IMPLIED WARRANTY OF
MERCHANTABILITY OR EXPRESS OR IMPLIED WARRANTY OF FITNESS
FOR A PARTICULAR PURPOSE.
%HUNHO¶VREOLJDWLRQDQGOLDELOLW\XQGHUWKLVZDUUDQW\LVH[SUHVVO\OLPLWHGWRUHSDLULQJRUUHSODF-
LQJHTXLSPHQWWKDWSURYHVWREHGHIHFWLYHLQPDWHULDORUZRUNPDQVKLSZLWKLQWKHDSSOLFDEOH
ZDUUDQW\SHULRG%HUNHORUD'HVLJQDWHG%HUNHO6HUYLFH/RFDWLRQZLOOSHUIRUPDOOUHSDLUV
SXUVXDQWWRWKLVZDUUDQW\%HUNHOH[SUHVVO\H[FOXGHVUHVSRQVLELOLW\IRULQFLGHQWDORUFRQVH
quential damages to buyer or any third party, including, without limitation, damages arising
IURPSHUVRQDOLQMXULHVORVWSUR¿WVORVVRIEXVLQHVVRSSRUWXQLW\ORVVRISURSHUW\HFRQRPLF
ORVVHVRUVWDWXWRU\RUH[HPSODU\GDPDJHVZKHWKHULQQHJOLJHQFHZDUUDQW\VWULFWOLDELOLW\RU
otherwise.
This warranty does not apply to: periodic maintenance of equipment including but not limited
WROXEULFDWLRQUHSODFHPHQWRIZRUQEODGHVNQLYHVVWRQHVNQREVDFFHVVRULHVDQGPLVFHOOD
QHRXVH[SHQGDEOHVXSSO\LWHPVDQGRWKHUDGMXVWPHQWVUHTXLUHGGXHWRLQVWDOODWLRQVHWXSRU
normal wear.
7KHVHZDUUDQWLHVDUHJLYHQRQO\WRWKH¿UVWSXUFKDVHUIURPD%HUNHO$XWKRUL]HG&KDQQHORI
'LVWULEXWLRQ1RZDUUDQW\LVJLYHQWRVXEVHTXHQWWUDQVIHUHHV
7KHIRUHJRLQJZDUUDQW\SURYLVLRQVDUHDFRPSOHWHDQGH[FOXVLYHVWDWHPHQWRIWKHZDUUDQW\
between the buyer and seller. Berkel neither assumes nor authorizes any persons to assume any
other obligation or liability connection with said equipment. This warranty supersedes any and
all prior warranties to the subject hereof.

BK45760 Rév. A (Février 2015)
7උൺඇർඁൾඎඌൾඌ
0ඈൽජඅൾඌ
823E-PLUS, 825E-PLUS,
825A-PLUS, 827E-PLUS,
827A-PLUS, & 829E-PLUS
0ඈൽൾൽൾආඉඅඈං
3උඈඉඋංඣඍൺංඋൾ8ඌൺൾඋ
AVIS IMPORTANT
Ce manuel contient des directives de sécurité
importantes qui doivent être suivies rigoureusement
ORUVGHOXWLOLVDWLRQGHFHWDSSDUHLO

$ඏൺඇඍൽඎඍංඅංඌൾඋർൾඍൺඉඉൺඋൾංඅ
/HV WUDQFKHXVHV %HUNHO VRQW FRQoXHV SRXU WUDQFKHU GH OD YLDQGH HW GDXWUHV
SURGXLWVDOLPHQWDLUHVGHIDoRQHI¿FDFHHWVpFXULWDLUH,OVXEVLVWH WRXWHIRLV XQ
ULVTXHGHEOHVVXUHJUDYHVLOXWLOLVDWHXUQHVWSDVIRUPpHWHQFDGUpDGpTXDWHPHQW
&HVWODUHVSRQVDELOLWpGXSURSULpWDLUHGHVDVVXUHUTXHFHWWHWUDQFKHXVHHVWXWLOLVpH
c o r r e c t e m e n t e t d e m a n i è r e s é c u r i t a i r e , e t d e f a i r e e n s o r t e q u e les utilisateurs suivent
ULJRXUHXVHPHQWOHVLQVWUXFWLRQVGHFHPDQXHOHWUHVSHFWHQWODUpJOHPHQWDWLRQORFDOH
Personne ne devrait utiliser ou entretenir cette trancheuse sans une supervision
DGpTXDWH HW VDQV DYRLU VXLYL XQH IRUPDWLRQ DSSURSULpH 7RXW XWLOLVDWHXU GRLW
ELHQFRQQDvWUHOHVSURFpGXUHVSUpVHQWpHVGDQVFHPDQXHO7RXWHIRLV%HUNHOQH
peut prévoir toutes les situations ni tous les environnements dans lesquels ses
WUDQFKHXVHVVHURQWXWLOLVpHV&HVWGRQFYRXVOHSURSULpWDLUHHWOXWLOLVDWHXUTXL
GHYH]GHPHXUHUYLJLODQWVIDFHDX[GDQJHUVLQKpUHQWVjOXWLOLVDWLRQGXQHWUDQFKHXVH
HWHQSDUWLFXOLHUGHODODPHURWDWLYHWUqVWUDQFKDQWHHWGXFKDULRWPRELOH&HW
DSSDUHLOQHGRLWSDVrWUHXWLOLVpSDUXQHSHUVRQQHGHPRLQVGHDQV6LYRXVDYH]
GHVGRXWHVjO¶pJDUGG¶XQHFHUWDLQHWkFKHjHIIHFWXHUFRQVXOWH]YRWUHVXSHUYLVHXU
&H PDQXHO SUpVHQWH XQ FHUWDLQ QRPEUH GH SUDWLTXHV VpFXULWDLUHV
pQRQFpHV VRXV OD UXEULTXH © &RQVLJQHV JpQpUDOHV GH VpFXULWp ª 'H SOXV
des avertissements supplémentaires apparaissent à plusieurs endroits
GX PDQXHO LES AVERTISSEMENTS CONCERNANT VOTRE
SÉCURITÉ PERSONNELLE SONT INDIQUÉS PAR LA VIGNETTE:
AVERTISSEM ENT
6LYRXVSHUGH]GHVDXWRFROODQWVGDYHUWLVVHPHQWGHVDI¿FKHVPXUDOHV
RXGHVPDQXHOVGXWLOLVDWLRQRXHQFRUHVLOXQGHFHVGHUQLHUVVXELW
GHV GRPPDJHV RX GHYLHQW LOOLVLEOH YHXLOOH] FRQWDFWHU OH GpWDLOODQW GH
YRWUH UpJLRQ RX %HUNHO GLUHFWHPHQW TXL OHV UHPSODFHUD JUDWXLWHPHQW
Souvenez-vous toutefois QUE NI CE MANUEL NI LES AUTOCOLLANTS
'$9(57,66(0(171(6$85$,(175(03/$&(5/$1e&(66,7e
DE DEMEURER VIGILANT ET DE FAIRE PREUVE DE BON
6(16 /256 '( /87,/,6$7,21 '( &(77( 75$1&+(86(
This manual suits for next models
5
Table of contents
Other Berkel Kitchen Appliance manuals

Berkel
Berkel 829E User manual

Berkel
Berkel 180D User manual

Berkel
Berkel 823E User manual

Berkel
Berkel 450A User manual

Berkel
Berkel 330M User manual

Berkel
Berkel 936 Series User manual

Berkel
Berkel 909/1 User manual

Berkel
Berkel VOLANO B3 User manual

Berkel
Berkel 909E Owner's manual

Berkel
Berkel 850A User manual

Berkel
Berkel VOLANO TRIBUTE User manual

Berkel
Berkel 825A User manual

Berkel
Berkel 909A User manual

Berkel
Berkel 909FS Quick start guide

Berkel
Berkel DOMINA Series User manual

Berkel
Berkel HOME LINE 200 User manual

Berkel
Berkel BM +32T User manual

Berkel
Berkel 909/1 Owner's manual

Berkel
Berkel 823E User manual

Berkel
Berkel HP.1,5 CLEANABLE manual