CHEMICAR UC PRO User manual

USER MANUAL
UC PRO
ENGLISH
Operating Instructions for Undercoating/Rustproofing Pro Gun
(Model: UCpro and UCPro Plus)
Professional Undercoating and Rustproofing gun designed to apply protective coatings such as waterborne and
solvent based under coatings, noise dampening coatings ,thermal insulation, bed liners, rust prevention oils ,
underneath cars , trucks , trailers , RV’s, buses etc. and to spray wax based cavity coatings inside doors, beams,
rocker panels and other cavities. This gun allows for pressure to build up inside the tank. This pressure will assure that
the cavity coating will be atomized at the tip of the wand and provide total coverage of the rustproofing inside the cavity.
This allmetal gun was built for industrial use by body shops, car dealers and undercoating professionals.
•Die cast aluminum body
•Aluminum tank
•Stainless steel needle
•Tank capacity: 1 liter
•Air consumption: 7-10 CMF
•Working pressure: 60-90 psi
1. Spraying heavier coatings:
This gun builds up airpressure inside the tank. That allows for the application of thicker coatings i.e.
undercoatings, bed liners, sound dampening, rust proofing,fire retardants, etc.
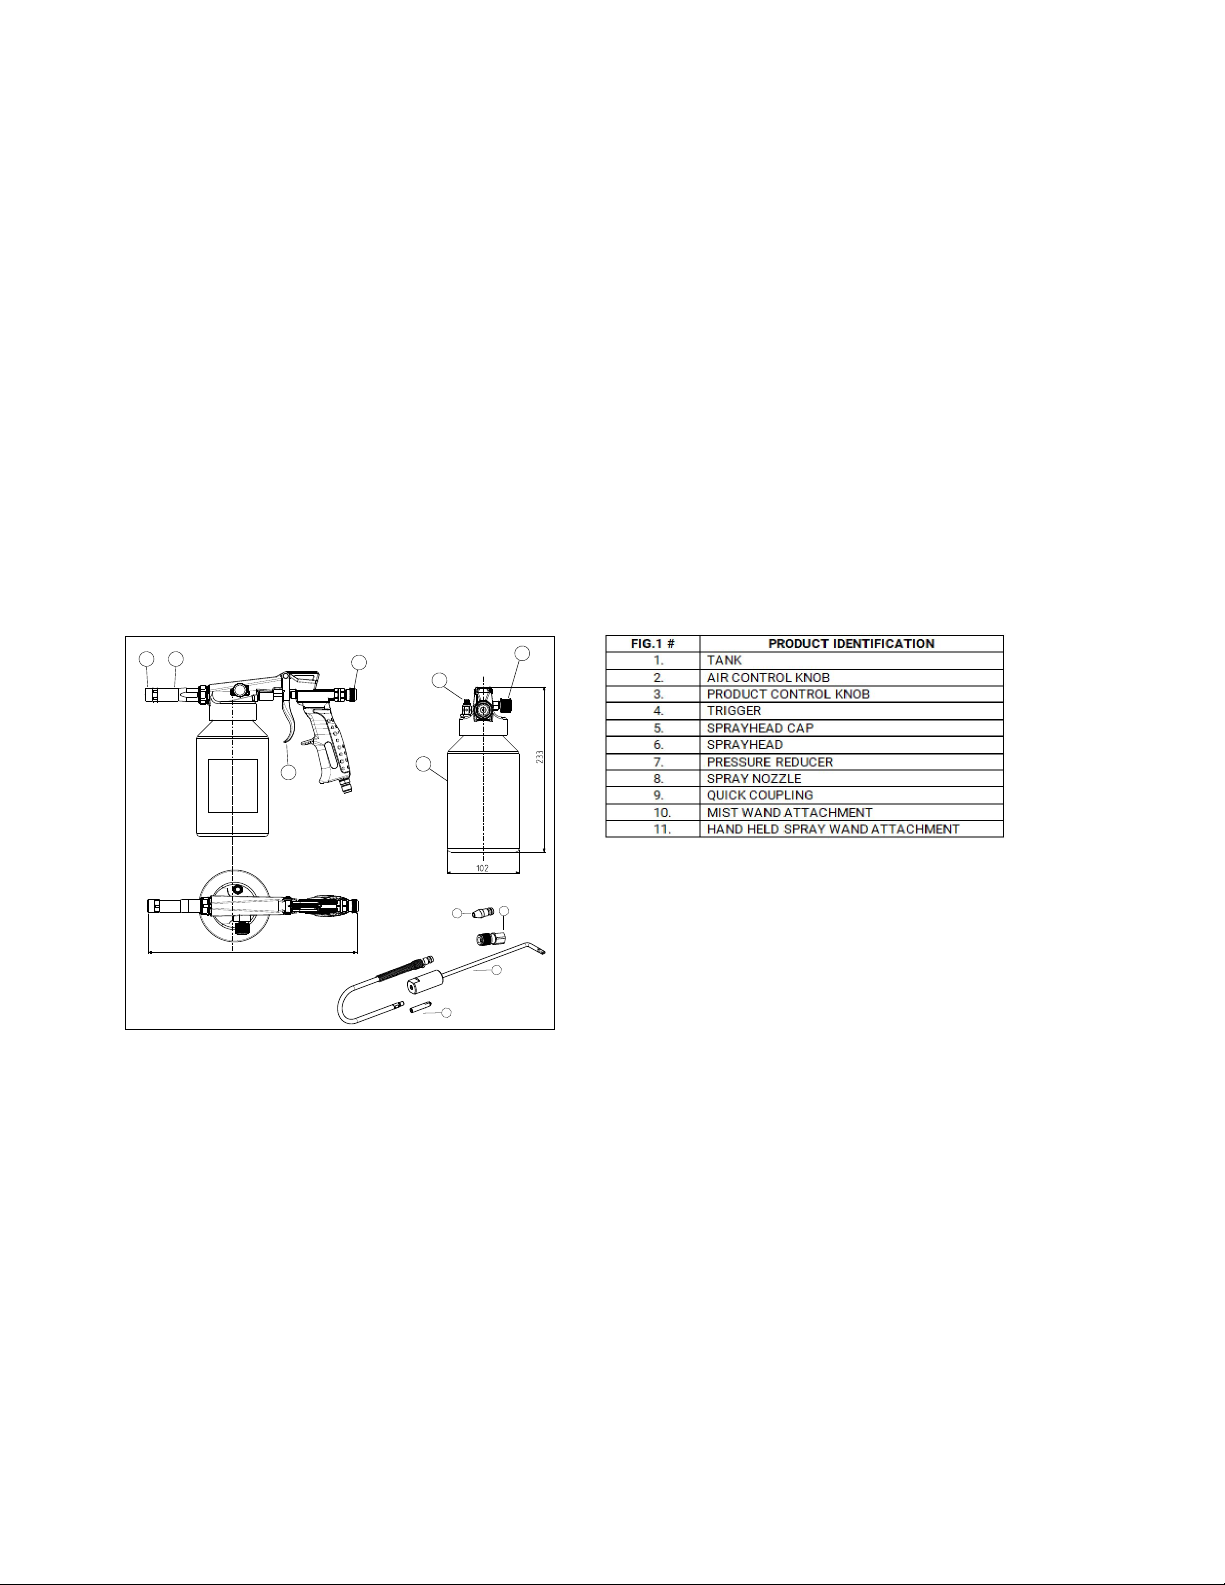
You can apply these coatings directly out of the gun with the spray cap (FIG.1 #5)and spray head
(FIG.1 #6) installed. Different textures can be obtained by changing the airpressure, product flow
(FIG.1 #3)and/or air atomizer (FIG.1 #2)settings.
In general, air pressure to the gun should be around 60 psi.
Optimal airpressure level will differ depending on the viscosity of the product to be sprayed. Keep in mind
that the viscosity might fluctuate depending on the ambient temperature.
As you open the product control knob (FIG.1 #3), the application will become more and more textured.
Fig.1
1
7
2
3
4
65
300
89
11
10
•Maximum pressure: 120 psi
•Weight: 1.07 KG / 2.36 LBS
•Air connection thread: ¼" NPT
•Nozzle size : 1.7 mm
•Maximum length of air line: 30 ft. , 10 m
•Minimum id of air line: 6 mm , ¼ inch
•Maximum noise level <80 dBA
•Made in Italy

An optional wand (item BS-39) isavailable to spray heavier coatings in hard to reach places i.e. around
mufflers and behind exhaust pipes. This wand isNOT supplied with the gun model UCPro but isincluded
with model UCPro Plus. To install this wand, unscrew the spray cap (FIG.1 #5)and screw the wand onto
the spray head (FIG.1 #6).
NOTE:
1) The wands supplied with this gun (FIG.1 #10 AND #11)are rust proofing wands developed for the
application of thinner coatings i.e. cavity wax and rust fighting oils. The inside diameter of these
wands is too small to spray heavy coatings. Only use the Undercoating wand BS-39 for this purpose.
2) Some bed liners are mixed with rubber pellets or silica crystals to make the coating more slip
resistant. These coating cannot be applied with this gun.
2. SprayingRust Proofing:
To spray Rust proofing such as Cavity Coating and rust fighting oils, remove the spray cap (FIG.1 #5)
and connect the Quick Coupling Connector (FIG.1 #9)supplied with the gun.
To spray directly out of the gun, install the rust proofing spray tip (FIG.1 #8).
Remove this spray tip by pushing the release ring on the Quick Connector backwards and holding your
hand in front of the spray tip. Connect the wands by pushing the male fitting into the Quick Connector.
Wand Cleaning:
Upon finishing the rust proofing task, purge left over product from the wands by pulling the trigger
halfway. Rinse wand with solvent /water to dissolve product left inside the wands. Always check the
MSDS and tech sheets supplied with the product sprayed to make sure you are using an appropriate
cleaner.
3. Setting the air regulator on top of the tank:
This gun was designed to apply both solvent based and water based coatings. When spraying solvent
based coatings make sure that the air regulator (FIG.1 #7)iscompletely closed. Depending on the brand
of waterborne product you are using, you might have some premature drying of the coating at the nozzle
of the gun. This could interrupt the spraying process. In this case, open the airregulator slightly to reduce
pressure in the tank.
When refilling the tank, use this regulator to release the pressure in the tank and make unscrewing
easier.
IMPORTANT!
When spraying cleaning solvents with the gun, ALWAYS close the Air Control Knob (FIG.1 #2)and the air
regulator (FIG.1 #7)first. Atomized solvents are extremely flammable. Properly dispose of cleaning
solvents as per local regulations.

4. WARNINGS
Please read carefully and follow the instructions listed in this section.
Before using the spray gun, read the operating instructions and follow them thoroughly.
Before carrying out any type of maintenance or repair operation, ask information from your retailer or from
a specifically trained technician otherwise your warranty will automatically be voided.
Always disconnect the spray gun from the air supply when stored or before starting any maintenance or
cleaning activity.
When selecting and before using the product to be sprayed with the gun, verify that it is in fact compatible
with the work environment and the individual safety devices employed, according to the product safety
sheet.
While operating the spray gun, wear the appropriate safety garments and devices (gloves, safety glasses,
masks, overalls, etc.) according to the instructions listed in the product safety sheet. The use of safety
protection glasses is always recommended.
Hang the gun on the special hook when it is not being used, so as to guarantee its vertical position. Never
tilt the spray gun at an angle greater than 45°, either while operating it or while not in use, in order to
avoid fouling of the spray gun’s ducts.
Keep the safety valve FIG.1 #7 clean and assure that itis not blocked.
DANGER OF FIRE OR EXPLOSION
Do not use solvents and/or halocarbon based detergents (1.1.1 Ethyl trichloride, Methylchloride, etc.)
since they could rust galvanized parts causing explosive chemical reactions.
Never use acidic or alkaline substances for cleaning (basics, paint-removers, etc.) Do not smoke or
produce sparks: this could cause
fi
re.
Always be sure that the painting equipment is grounded correctly.
HEALTH SAFETY EQUIPMENT AND PRECAUTION
Use the spray gun only in well ventilated areas.
Always wear suitable protective gloves and goggles as well as specific breathing
fi
lters/masks.
Use special clothing to protect the body from contact with toxic vapors, solvents or with the products in
use.
The use of paint products containing organic solvents can cause intoxication due to the toxic fumes
they emit. In every case, it is necessary to read the technical sheets for the products before use.
WARNINGS CONCERNING IMPROPER USE
After cleaning, maintenance and/or repairs and, in any case, before using the spray gun, make sure
nuts and bolts are
fi
rmly secured in their housings.
Never direct the jet towards people or animals. Never exceed the rated air pressure (120 PSI).
Before disassembly and cleaning, make sure that the spray gun has been disconnected from the air
supply unit. Do not clean the parts with abrasive brushes or sand paper.
GENERAL RISK
The product must be not used if it has been subjected to potential damage following an impact or a fall
which may have compromised its resistance, in particular regarding endurance, adjustment or
pressure parts.
Negative effects may not be immediately visible in terms of fractures, cracks or other similar effects. If
any of the said events occur do not use the product, but have inspections and testing carried out on it
before putting it back in service.
If you have any doubts please contact the salesman before using the product.

Check periodically the wear and tear of the threads in order to avoid accidental detachment of parts
like for example the tank or the product’s adjusting knobs.
5. Operating the Spray Gun
The air supply should be equipped with a pressure regulator,
fi
lter and shut off valve.
Always disconnect the air supply before storing, cleaning or doing any maintenance on the gun or
unscrewing the tank.
Secure the tank
fi
rmly before connecting the gun to the air supply.
Release the air pressure from the tank before opening by opening the safety valve (FIG.1 #7).
Do not tilt more than 45°, use spray wands in difficult to reach areas.
At the end of application, disconnect the air supply andhang the spray gun on the special hook.
Depending on the products used, there may be danger of fire; avoid smoking and open flames while
spraying potentially flammable products.
Danger of ejection of the adjustment knobs: do not exceed the specified adjustment limits.(FIG.2&3)
6. Adjustments
Adjusting ofthe product flow (Fig. 2)
Turn product control knob (Fig.2 #3)clockwise to gradually
decrease the
fl
ow of product. Turn counter-
clockwise to increase
product
fl
ow.
During this adjustment, do not exceed the maximum extension
for the product control knob. The knob is spring loaded and will
eject when turned out too far.
Knob will travel 9mm between closed and completely open position.
Adjusting product atomization (Fig. 3)
Turning control knob (Fig.3 #2)clockwise will close the air passage
gradually and reduce atomization resulting in a rougher texture.
Turn control knob (Fig.3 #2)counterclockwise to open the air passage
gradually. This will increase atomization and result in a smoother
finish
.
Never close knob (Fig.3 #2)completely during applications.
During this adjustment, do not unscrew the control knob (Fig.3 #2)
pastthe black gasket. This knob is spring loaded and will eject if
unscrewed completely. Knob will travel 8mmbetween closed and
completely open position.
Combined Adjustment
Even rougher or smoother textures can be obtained by adjusting both
knobs at the same time. Less product and more atomization gives a
smoother
fi
nish, more product and less atomization will produce a
more textured
fi
nish.
Fig.2
3
Fig. 3 2
7. Troubleshooting
8. Cleaning
1) Disconnect the spray gun from the air supply.
2) Empty out the product from the spray gun.
3) Pour into the tank the necessary amount of cleaner (usually ½ liter) suitable for cleaning the product
being used.
4) Close the tank and connect the spray gun again.
5) Spray the cleaner, directing the jet into a special container.
Make sure that the air-regulator (Fig.3 #2) is completely closed to avoid atomization of the
cleaner which may lead to pollution of the nearby environments.
Do not immerse the spray gun completely into the solvent, but rather clean it with a soft brush or
a cloth
9. Maintenance
1) In case the product leaks out around the needle packing, in front of the trigger (Fig.1 #4), clean the
fouled parts immediately.
2) Turn the packing screw clockwise to hermetically seal the packing. This will prevent the product from
leaking again. Make sure that the needle remains free to move.
3) Whenever necessary, lubricate the needle at the packing screw.
4) Occasionally, lubricate the air valve rod.
When the spraying job is finished or during a break, hang the spray gun on the special hook
5) Never use force. Using improper tools such as pipe wrench, gas torch, etc. will void any warranty. In
many cases proper repairs can only be carried out with the aid of special tools. In such cases, limit
yourself to establishing the cause of the problem and leave the repairs to the service department.
We will refuse to accept liability for faulty functioning spray gun if it is disassembled by the customer
PROBLEMS
CAUSES
CORRECTIVE ACTIONS
The gun does not spray when
trigger is pulled
No air supply
Open the hand wheel (Fig.3 #2)
Irregular spraying
Supply tube dirty or
clogged
Clean all ducts and spraying nozzle,
do not tilt the spray gun at an angle
greater than 45
°
The tank does not unscrew
Residual pressure in the tank
Open pressure valve (Fig.1 #7)


2
7
1
3
4
6
5
9
8
10
11
12
13
14
15
16
17
18
19
20
21
21
22
Wand kit
Nozzle and
needle
kit
Nozzle and
needle
kit
Trigger kit
Handle kit
Air control
knob kit
Valve kit
Packing kit
Air valve kit
Undercoating / Rustproofing Pro Gun
Parts Reference

DRAWING #
DESCRIPTION
1.
TANK
2.
AIR CONTROL KNOB
3.
PRODUCT CONTROL KNOB
4.
TRIGGER
5.
SPRAYHEAD CAP
6.
SPRAYHEAD
7.
PRESSURE REDUCER
8.
SPRAY NOZZLE
9.
QUICK COUPLING
10.
MIST WAND ATTACHMENT
11.
HAND HELD SPRAY WAND ATTACHMENT
12.
GUN BODY FOR UCPRO/UCPRO PLUS
13.
GASKET
14.
PRODUCT INTAKE TUBE
15.
TRIGGER KIT (#1050315):LOCKING WASHER, TRIGGER (#4),
TRIGGER AXLE
16.
HANDLE KIT (#1050314):AIR SUPPLY TUBE, BLACK HANDLE,
AIR SUPPLY CONNECTOR
17.
AIR CONTROL KNOB KIT (#1050313):AIR CONTROL KNOB
(#2) WITH ADDITIONAL ACCESSORIES
18.
VALVE KIT (#1050316): COMPLETE VALVE
19.
AIR VALVE KIT (#1050311):PRODUCT CONTROL KNOB (#3)
WITH ADDITIONAL ACCESSORIES
20.
PACKING KIT (#1050312): ADJUSTMENT NUT, NEEDLE
PACKING
21.
NOZZLE AND NEEDLE KIT (#1050321): SPRAYHEAD CAP (#5),
SPRAYHEAD (#6), RING, NOZZLE WITH EXTENSION, NEEDLE
22.
WAND KIT (#1050286):MIST WAND ATTACHMENT (#10),
HAND HELD SPRAY WAND ATTACHMENT (#11), STRAIGHT
WAND
This manual suits for next models
1
Table of contents


