Elemental Machines EB1 User manual

Element-B Installation Guide
Models: EB1, EB2
For White Multitron Incubator Shaker
772-00019 rev 01 Element-B, EB1 EB2 White Multitron
Incubator Shaker Installation Guide
1/8
Copyright © 2023 Elemental Machines
help@elementalmachines.com
Applicable White Multitron Incubator Shaker Models
✓Infors White Multitron
Package Contents
✓Element-B
✓Connection Cable
Safety Information
Review and abide by the safety information found in the Element-B and White
Multitron Incubator Shaker user manuals. Tidy connection cable to prevent
tripping hazards.
Installation Instructions
Receiving the Shipment
1. If this is your first time setting up the Elemental Machines system, you will receive an
email for your dashboard account verification. Save this email for when the devices arrive.
2. When devices are shipped, they will be added to your Elemental Insights Dashboard™
with default names. When you first log in you will see all your devices with a
'disconnected' status.
3. When devices arrive, carefully remove the contents from the packaging. If any of the
contents look damaged, please send a picture to help@elementalmachines.com.
4. If you have ordered multiple Element-B’s, ensure the Element-B being used is configured
as Normally Closed (NC). This can be verified by checking the device label, the dashboard
under ‘Machine Model’, or the packing list sent with your shipment.
a. Element-B’s can either be configured as Normally Closed (NC) or Normally Open (NO)
by our team here at Elemental Machines. Different assets require different
configurations. If you have ordered Element-B’s for multiple assets, you may have a
mix and need to be aware of attaching the correctly configured device to the correct
asset.

Element-B Installation Guide
Models: EB1, EB2
For White Multitron Incubator Shaker
772-00019 rev 01 Element-B, EB1 EB2 White Multitron
Incubator Shaker Installation Guide
2/8
Copyright © 2023 Elemental Machines
help@elementalmachines.com
5. Ensure there is an Elemental Machines Gateway set up in the vicinity of the Element-B.
a. Depending on your location and application, your Gateway type may vary. If you have
a tablet Gateway, brief setup instructions are given in Appendix 1: Gateway Setup
below. If you have a Gateway Model GW2 or GW3, please follow the setup instructions
in your Gateway, GW2 or GW3 User Manual
b. Note: ‘Vicinity’ is within wireless connection range. This is usually up to 30 meters but
can depend on the lab’s layout.

Element-B Installation Guide
Models: EB1, EB2
For White Multitron Incubator Shaker
772-00019 rev 01 Element-B, EB1 EB2 White Multitron
Incubator Shaker Installation Guide
3/8
Copyright © 2023 Elemental Machines
help@elementalmachines.com
Attaching Connection Cable to White Multitron Incubator Shaker
6. Locate the Stereo Jack labeled EXTERNAL ALARM on the right side of the incubator.
Make sure that the port is centered in the incubator cutout. If the port is off center, then
it will not be possible to push the Stereo cable all the way into the port. The worst case
scenario is that the port may be partially obstructed by the incubator cover.
a. Note: Please contact Infors on how to open the cutout if the port is off center or
obstructed, as shown in Figure 1 on the right. If this is the case, the stereo jack cable
cannot be fully inserted in the port and can report incorrect incubator status.
Figure 1 Left: Location of the External Alarm on the incubator. Top Right: External Alarm port is off center and
bordering circumference of cutout. Bottom Right: External Alarm port partially obstructed by incubator cover
7. Insert the stereo plug end of the connection cable into the stereo jack on the Multitron.

Element-B Installation Guide
Models: EB1, EB2
For White Multitron Incubator Shaker
772-00019 rev 01 Element-B, EB1 EB2 White Multitron
Incubator Shaker Installation Guide
4/8
Copyright © 2023 Elemental Machines
help@elementalmachines.com
Attaching Connection Cable to Element
8. Per your discretion, write the name and/or location of the equipment being monitored
on the Element-B. This can be particularly helpful if multiple devices are being installed.
Use of a Sharpie is recommended.
9. Plug the thermocouple end (Figure 2) of the connection cable into the Element-B.
a. Note Ensure the (-) and (+) prongs of the thermocouple end are properly matched.
Figure 2 Thermocouple end of Element-B connection cable
10. Pull the battery tab on the Element-B.
Positioning the Element-B
11. Determine where the Element-B should be placed so that it is not blocked, which allows
a better wireless connection, and so that the connection cable is tidy.
12. Securely position the Element-B in the chosen location. The Element-B has magnets
which make it easily mountable to magnetic surfaces.
a. Note: If applicable, an adhesive metal mounting plate available from EM may be used.

Element-B Installation Guide
Models: EB1, EB2
For White Multitron Incubator Shaker
772-00019 rev 01 Element-B, EB1 EB2 White Multitron
Incubator Shaker Installation Guide
5/8
Copyright © 2023 Elemental Machines
help@elementalmachines.com
Programming Alerts
13. Program alerts on the White Multitron Incubator Shaker. Refer to the White Multitron
Incubator Shaker user manual for which alarm conditions the White Multitron Incubator
Shaker can detect and how to set up alerts.
14. Set up alert rules on the Elemental Insights Dashboard™for the Element-B. Guidance on
how to do so is available in the Support section of the dashboard.
NOTE: Alerts must be programmed on both the asset and the Elemental Insights
Dashboard™to receive threshold alerts through the Elemental Machines platform.
Element-B Installation Guide
Models: EB1, EB2
For White Multitron Incubator Shaker
772-00019 rev 01 Element-B, EB1 EB2 White Multitron
Incubator Shaker Installation Guide
6/8
Copyright © 2023 Elemental Machines
help@elementalmachines.com
Appendix 1: Gateway Setup
Elemental Machines provides multiple styles of Gateways. If you have a Tablet Gateway
(Model GW1), please follow the setup instructions below. For Gateway-2, please follow the
setup instructions in 771-00021 Gateway (Model GW2) User Manual. For Gateway-3, please
follow the setup instructions in 771-00034 Gateway (Model GW3) User Manual.
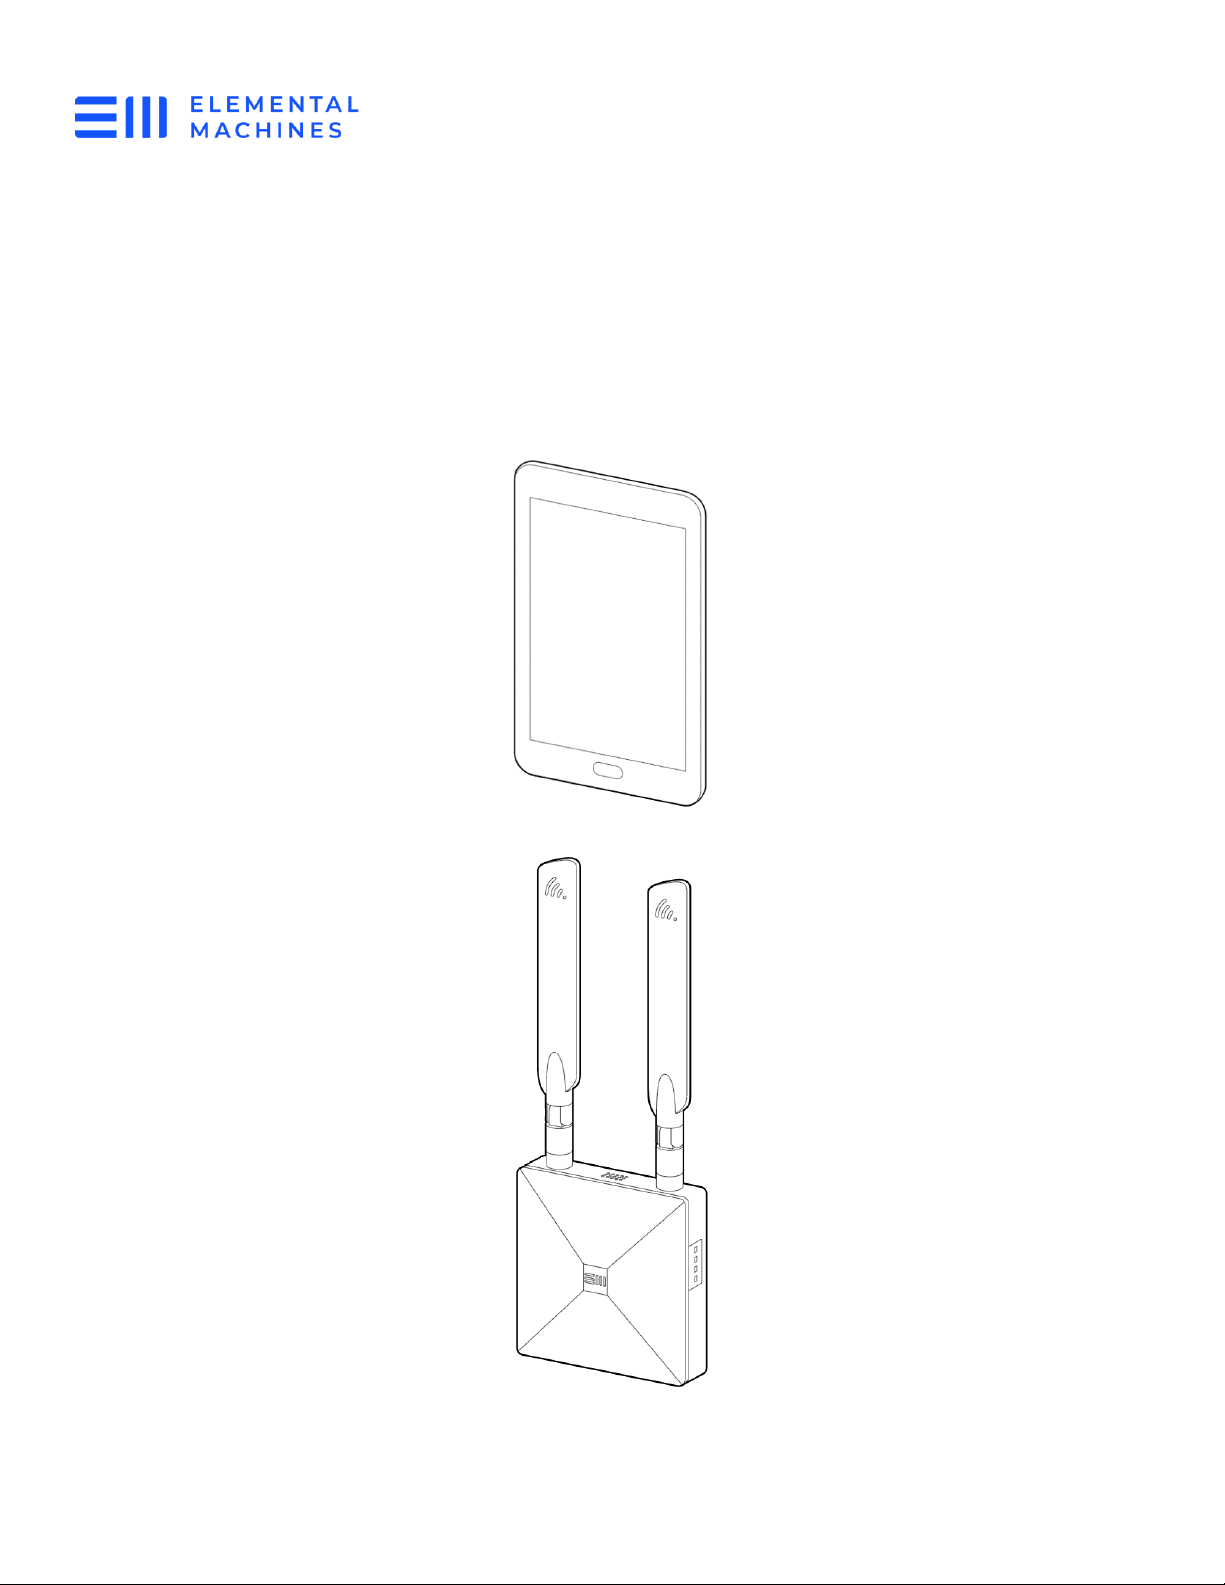
Figure 3 Tablet Gateway (Model GW1)
Figure 4 Gateway-2 (Model GW2)

Element-B Installation Guide
Models: EB1, EB2
For White Multitron Incubator Shaker
772-00019 rev 01 Element-B, EB1 EB2 White Multitron
Incubator Shaker Installation Guide
7/8
Copyright © 2023 Elemental Machines
help@elementalmachines.com
Tablet Gateway (Model GW1) Software Setup
To power on the Gateway, press and hold the upper right-hand button on the device:
1. Wait for the main screen to come up
2. Press the 'home' button when you see the Elemental Machines Logo
3. Click on the blue circle in the upper right corner (if the circle is not visible, press the
hardware home button on the bottom of the tablet to make it appear, or swipe up if you
do not have a hardware button):
4. Click on the settings icon:
Element-B Installation Guide
Models: EB1, EB2
For White Multitron Incubator Shaker
772-00019 rev 01 Element-B, EB1 EB2 White Multitron
Incubator Shaker Installation Guide
8/8
Copyright © 2023 Elemental Machines
help@elementalmachines.com
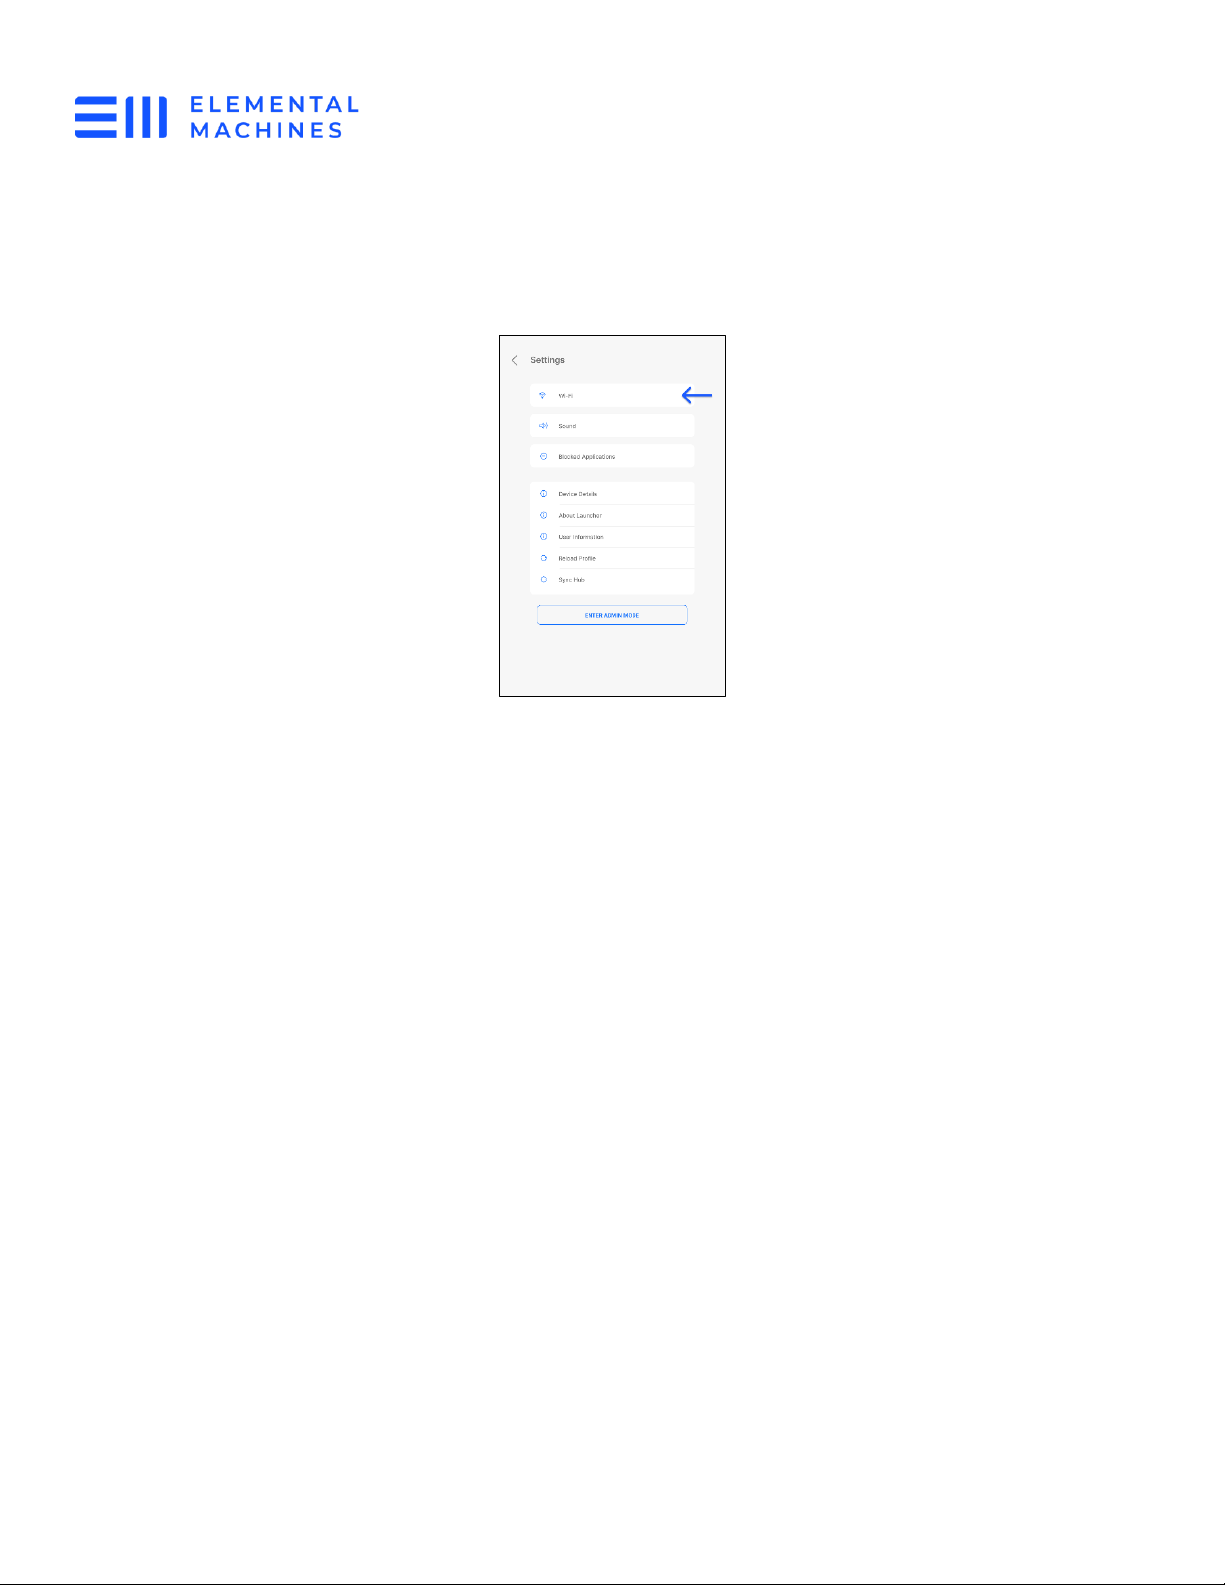
5. Select WiFi from the list:
Positioning the Tablet Gateway
Tablet Gateways collect data from the Elements, collating it and transmitting it across the
internet to Elemental Machines’ Cloud. The tablet Gateways’ default is to transmit by Wi-Fi;
for added reliability they fall back to Cellular connection when Wi-Fi connection drops out.
There is a danger of data delay or even loss if all connection is lost, so tablet Gateways should
be positioned where they are getting good Wi-Fi and Cellular connection.
The strength of the Wi-Fi and Cellular connection are displayed by the Wi-Fi icon using
Cellular bar icons. These icons are displayed on the tablet Gateway to the left of the battery
percentage.
•4 or more bars for both Wi-Fi and cell indicate good connectivity
•2 bars for both Wi-Fi and cell runs an increased risk of some data delay or loss
•<2 bars for cell or Wi-Fi carry a danger of significant data delay or loss
This manual suits for next models
1
Table of contents


