Chiayo Focus Pro User manual

CHIAYO ELECTRONICS CO., LTD.
Operation manual
FOCUS PRO/500/505
Portable Wireless PA System

1
FOCUS PRO/505/500 Portable Wireless PA System
Important safety instructions
◼Read all of the instructions before the product is operated.
◼Keep these instructions well for future reference.
◼Follow all of the warnings and instructions when installing, setting up and using the product.
◼Only clean the product when it is not connected to the power supply system. Clean only with
a dry cloth.
◼Keep ventilation openings unblocked and follow with the manufacturer’s instructions for
installation.
◼Do not immerse product in any liquid or expose to heat or moisture
◼Keep the complete polarized or grounding type plug without any modification. A polarized
plug has two blades with one wider than the other. A grounding type plug has two blades and
a third grounding prong. The wider blade or the third prong are provided for your safety. If the
provided plug does not fit into your outlet, consult an electrician for replacement of the
obsolete outlet.
◼Power supply cords should be well routed to prevent from being walked on or pinched by
items placed upon or against them, particularly at plugs, convenience receptacles, and the
point where they exit from the product.
◼Use only manufacturer authorized or recommended accessories.
◼Use only with a cart, stand, tripod or accessories specified or provided by Chiayo. Be careful
when using a cart to avoid injury from tip-over.
◼Unplug the product during an electrical strom or when unused for long periods of time.
◼Never disassemble, modify or service the product. Any unauthorized modifications may result
in personal injury and/or product failure. Additionally, your warranty will be void.
◼Please read and follow the instructions in this manual thoroughly to obtain optimum results
from this unit. We also recommend that you keep this manual handy for future reference.

2
Operation manual
Warning
Please read and follow the instructions in this manual thoroughly to obtain optimum results from
this unit. We also recommend that you keep this manual handy for future reference.
Please read and follow the instructions in this manual thoroughly to obtain optimum results from
this unit. We also recommend that you keep this manual handy for future reference.
Safety Precautions
◼Be sure to read the instructions in this section carefully before use.
◼Make sure to observe the instructions in this manual as the conventions of safety symbols and
messages regarded as very important precautions are included.
Safety symbols and messages described below are used in this manual to prevent bodily injury
and property damage which could result from mishandling. Before operating your product, read
this manual first and understand the safety symbols and messages so you are thoroughly aware
of the potential safety hazards.
WARNING
Indicates a potentially hazardous situation which, if mishandled,
could result in death or serious personal injury.
CAUTION
Indicates a potentially hazardous situation which, if mishandled,
could result in moderate or minor personal injury, and/or property
damage.
Make sure to observe the following handling precautions so that a fire or personal injury does
not result from leakage or explosion of the battery.
◼Do not short, disassemble, heat or put the battery into a fire.
◼Never charge batteries of the type which are not rechargeable.
◼Do not solder a battery directly.
◼Be sure to use the specified type of battery.
◼Note the correct polarity when inserting a battery in the unit.
◼Avoid locations exposed to the direct sunlight, high temperature and high humidity when
storing batteries.
WARNING
To prevent the electromagnetic wave from badly influencing
medical equipment, make sure to switch off the unit's power when
placing it in close proximity to the medical equipment.
CAUTION
Battery discharge naturally according to a certain pattern even not
in use. For best performance and a prolonged lifespan, battery
should be charged regularly after every use or every month when
the system is in storage and not being used!
CD player optical pick up head is a very delicate device and
sensitive to humidity. Please avoid using it in high humidity area
to avoid damage!

3
FOCUS PRO/505/500 Portable Wireless PA System
INDEX
1. Instruction...............................................................................................................................4
1-1. In the box..........................................................................................................................4
1-2. Optional related products .................................................................................................4
1-3. Parts and functions...........................................................................................................5
1-4. Charging the battery.........................................................................................................5
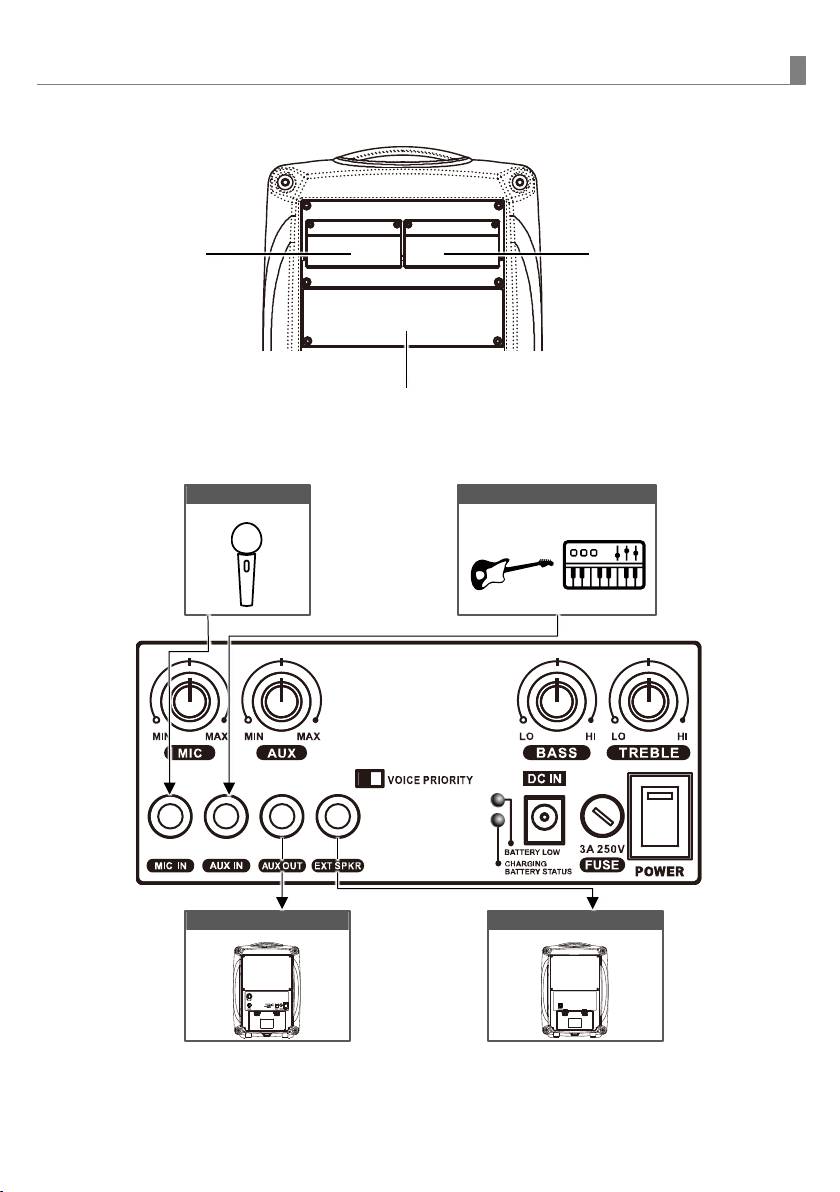
1-5. Module compartment........................................................................................................6
1-6. Connection with external audio sources...........................................................................6
2. Settings and Operations........................................................................................................7
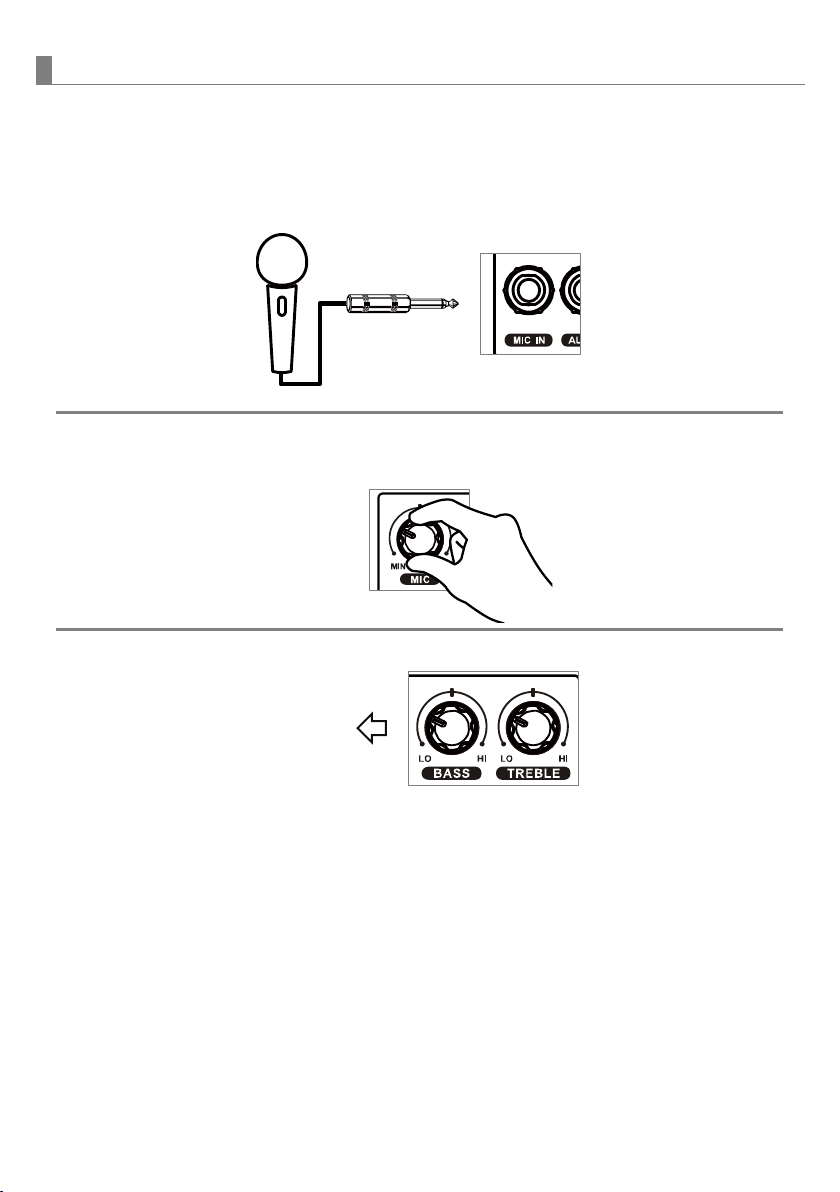
2-1. Using the wired microphone (MIC IN)...............................................................................7
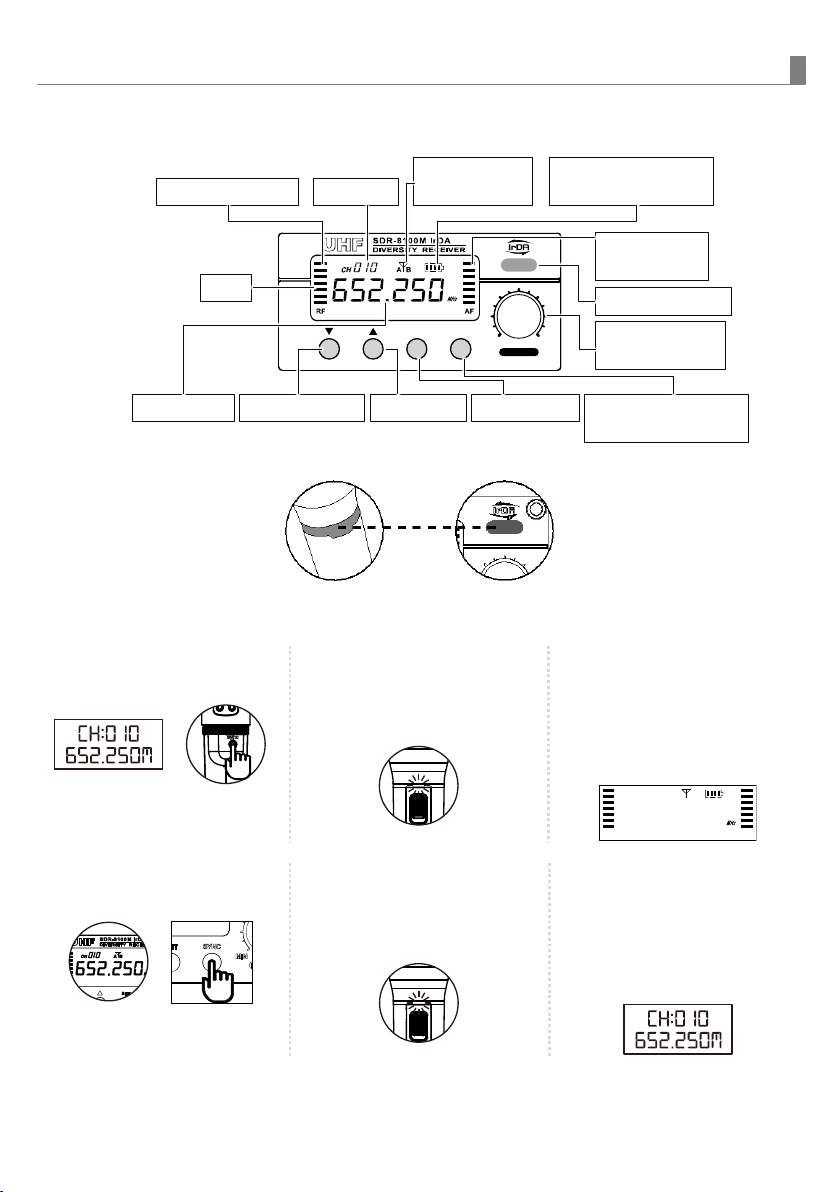
2-2. Using the wireless receiver...............................................................................................8
2-2-1. Parts and functions...................................................................................................8
2-2-2. Channel scanning.....................................................................................................9
2-2-3. Squelch (SQ) setting ................................................................................................9
2-2-4. Volume and other settings......................................................................................10
2-3. Using an electronic instrument (AUX IN)........................................................................11
2-4. EQUALIZER for WIRED and WIRELESS MICROPHONE and MUSIC..........................12
2-5. VOICE PRIORITY ..........................................................................................................12
3. Application............................................................................................................................13
3-1. Connecting a passive companion speaker SP-505........................................................13
4. Installing or replacing a receiver/repeater module............................................................14
5. FAQ & useful operation tips................................................................................................15
6. Maintenance-free Lead-acid and Lithium batteries...........................................................17

4
Instruction
1. Instruction
Congratulations and thank you for purchasing this portable wireless PA system. To ensure a
trouble-free operation, please read the manual thoroughly to fully understand its controls and
functions.
The rear panel of this portable amplifier is divided into 3 sections:
1. Module compartment
2. Control Unit compartment
3. Battery compartment
The Modules Compartment can be user configurable and user can access
the battery compartment to change battery.
1-1. In the box
FOCUS amplifier
0-2 handheld / beltpack
transmitters (optional)
Switching power supply
(plug varies from country to country)
operation manual
1-2. Optional related products
▍Modules & transmitters (For more information about transmitter, please refer to its user manual)
SDR-8200M IrDA
Ture diversity receiver module
SQ-6100 IrDA
SQ-5100 IrDA
Handheld microphone
SDR-8100M IrDA
Diversity receiver module
SM-7100 IrDA
SM-6100 IrDA
Belt-pack transmitter
DWR-5410M
2.4G digital receiver module
DH-5400
Handheld digital microphone
DB-5400
Belt-pack digital transmitter
RP-5100M
Repeater module
DPRB-500M
MP3 recorder module
▍Speaker
PA-505R
Companion powered speaker
SP-505
Passive companion speaker
▍Accessories
ST-40
Tripod stand: standard
SB-21
Tripod stand: height adjustable
SR-40
Speaker wall mount rack
DM-series
Wired microphone, please refer
to CHIAYO website.
Module
compartment
Control unit
compartment
Battery
compartment

5
FOCUS PRO/505/500 Portable Wireless PA System
1-3. Parts and functions
1-4. Charging the battery
The battery types of FOCUS series are listed below:
Model
FOCUS PRO
FOCUS 500 / 505
DC input
18V 2.7A
15V 3.75A
Battery type
LI-ION
LEAD-ACID
Battery specification
16.8V 5.2A
12V 2.9A
Battery quantity
1 pc
1 pc
Charging time
About 8 hours
About 4 hours
If the battery indicator turns solid RED, the battery might not be sustainable for long operation
and needs to be charged.
Battery low indicator Charging status indicator
Charging indicator
Condition
Flashes RED
During recharging
Solid GREEN
Fully charged
Solid YELLOW
Error or no battery detected
MICROPHONE
volume control
AUX IN
volume control
VOICE PRIORITY
switch
Battery low
indicator
BASS / TREBLE
MICROPHONE
input (6.3mm)
POWER
switch
AUX IN socket
(6.3mm)
AUX OUT socket
(6.3mm)
EXTERNAL SPEAKER
socket (4-8Ω)
CHARGING
status indicator
DC IN
DC input jack
FUSE

6
Instruction
1-5. Module compartment
1-6. Connection with external audio sources
For receiver module
For receiver /
repeater module
For Bluetooth MP3 recorder module DPRB-500M.
WIRED MIC
INSTRUMENT
ACTIVE SPEAKER
PASSIVE SPEAKER

7
FOCUS PRO/505/500 Portable Wireless PA System
2. Settings and Operations
2-1. Using the wired microphone (MIC IN)
1 Plug a wired microphone with a 6.3mm plug to MIC IN.
2 Turn on master POWER and then adjust MIC volume control to desired level.
3 BASS / TREBLE equalizer (refer to P.12) can be adjusted individually.
Equalizer

8
Settings and Operations
2-2. Using the wireless receiver
2-2-1. Parts and functions
Channel synchronization of the receiver and transmitter
Align infrared areas of the receiver and transmitter within 10~30cm.
■Changing receiver’s channel
1 Press the synchronization
button of the transmitter.
►
2 The transmitter's LED will
grow to denote
synchronization signal
transmitted.
3 The channel number on
the receiver’s LED will
become the same as the
transmitter’s, which means
the receiver has been
successfully synchronized.
■Changing transmitter’s channel
1 Press the SYNC button of
the receiver.
►
2 The transmitter's LED will
grow to denote
synchronization signal
received.
3 The channel number on
the transmitter’s LCD will
become the same as the
receiver’s, which means
the transmitter has been
successfully synchronized.
If it doesn’t work check that you have the IR sensor panels aligned, that they are facing each
other, devices are within 10~30cm of each other, and try again.
SET SYNC MIN PWR/VOL
CH
RF AF
AB
0 10
652.250
AF
RF signal meter
Channel
Diversity A/B
antenna
Transmitter battery
power
Frequency
DOWN button
UP button
SET button
IrDA synchronization
button
IR sensor area
Power switch /
volume control
LCD
Audio signal
meter
10~30cm

9
FOCUS PRO/505/500 Portable Wireless PA System
2-2-2. Channel scanning
For an interference- free operation, a cleaner channel might be necessary if the current one
receives too much interference. To operate the scanning:
1 Press ▼(down) or ▲(up) button to make
the frequency icon appear on the
bottom.
2 Hold SET button until this icon
flashes to denote readiness for setting.
3 Press ▼(down) or ▲(up) button to find and
locate a clear, interference- free channel.
4 After a channel is chosen, press SET
button or wait 5 seconds to store the
setting.
2-2-3. Squelch (SQ) setting
When interference is encountered try reducing the sensitivity of the receiver, thus less
susceptible to interference. To operate the squelch setting:
1 Press ▼(down) or ▲(up) button to turn to
the squelch setting page.
2 Hold SET button until this icon
flashes to denote readiness for setting.
3 Press ▼(down) or ▲(up) button to select a
new squelch level between 01 and 10. The
default level is 01.
4 After a level is chosen, press SET button
or wait 5 seconds to store the setting.
Since increasing the squelch level will also reduce the reception distance, it’s recommended to
choose the lowest level that can eliminate the interference.
If this still does not solve the problem it means this frequency is not suitable. Adjust the squelch
back to its default level (LE-01) and use the scan function to locate a clear, interference-free
channel.
RF
CH
FREQ
RF AF
AB
099
674.500
CH
FREQ
RF AF
AB
099
674.500
RF
CH
FREQ
RF AF
A B
089
672.000
RF
SQ
le-0 1
SQ
le-0 1
RF
SQ
le-03

11
FOCUS PRO/505/500 Portable Wireless PA System
2-3. Using an electronic instrument (AUX IN)
1 Plug an electronic guitar or keyboard with a 6.3mm plug to the AUX IN input jack.
2 Turn on master POWER and then adjust AUX volume control to a desired level.
3 BASS / TREBLE equalizer (refer to P.12) can be adjusted individually.
Equalizer
or

12
Settings and Operations
2-4. EQUALIZER for WIRED and WIRELESS MICROPHONE and MUSIC
EQUALIZER adjustment is actually used to increase or reduce the high/low frequency
component of the speaker's restored sound. It is so-called raising or attenuating TREBLE/BASS
via frequency-specific volume knobs to improve human voices or make musical instruments’
sound more prominent. According to the scale marks on the panel, clockwise adjustment is to
increase and boost and opposite direction to decrease and attenuate.
Adjust the level of high frequency (TREBLE) and low frequency (BASS) respectively. All signals
have been balanced by the high and low sounds after entering the amplifier so it is not
necessary to adjust the EQUALIZER during the output to the speaker. It is recommended to
maintain the position of BASS and TREBLE at just 12 o'clock.
KNOBS
BASS
TREBLE
FUNCTION
increase or reduce the low frequency
component of the sound
increase or reduce the high frequency
component of the sound
RANGE
-12 dB~+12 dB
DEFAULT
12 o'clock
Adjustment reference:
◼BASS: It is the basic part of the sound. It accounts for 70% of the
entire audio energy and is an important component to display the
music style. When appropriate, the BASS is relaxed and the sound is
full and soft. If you feel the sound is thin, you can moderately
increase the BASS. If you feel the sound is muffled, not clear, or too
nasal, you can moderately reduce the BASS.
◼TREBLE: It’s the frequency that affects the sound layering. If you feel
that the sounds of instruments such as Piccolo and Flute are too prominent, or the tooth
sound of the voice is too heavy and the tone is sharp, you can moderately reduce the
TREBLE.
2-5. VOICE PRIORITY
Voice Priority operation is only necessary when CD/USB/MP3 is playing.
When the Voice Priority switch is ON, the ducking function will be activated. While the music is
playing, a voice input from either a WIRED or WIRELESS MICROPHONE will temporarily
override and lower the volume of the background music and voice could be heard more clearly.
Background music will return to its original setting when no audio input is entering the
microphone after certain seconds. However, if the microphone is not switch off, the reentering of
music into the microphone will also activate the voice priority function.
ON
OFF

13
FOCUS PRO/505/500 Portable Wireless PA System
3. Application
3-1. Connecting a passive companion speaker SP-505
Plug the passive companion speaker’s audio cable with a 6.3mm connector to the speaker input
socket of SP-505 or another 4~8Ωload speaker. Max cable length less than 20m.
Connecting an active companion powered speaker PA-505R
1 Plug the active companion powered speaker’s audio cable with a 6.3mm connector to
the speaker input socket of PA-505R or another 4~8Ωload active companion powered
speaker. Max cable length less than 20m.
2 Turn on PA-505R’s POWER and then adjust its AUX volume control to a desired level.

14
Installing or replacing a receiver/repeater module
4. Installing or replacing a receiver/repeater module
There are two slots above the control panel for installing optional modules which includes
receiver and repeater modules.
1 Use a Phillips-head screwdriver (not included) to remove the screws of the blank cover
panel or current module’s panel.
or
2 To replace module, use a mini flat-head screw driver (not included) to pry up the
current module’s panel and remove the module.
3 Gently insert the module into the slot by aligning its edges to the guide rails. Then push
the panel to make sure it's been firmly connected.
4 Tighten up the screws.
→panel slot
→MB-50 slot

15
FOCUS PRO/505/500 Portable Wireless PA System
5. FAQ & useful operation tips
1 How to adjust the best volume?
Gradually adjust the volume of audio inputs from minimum to an appropriate level.
Then adjust volume according to the surrounding environment and the required sound
(microphone, MP3 ... etc.).
2 Is it possible to play music storing on external devices via wireless amplifier?
Yes. CHIAYO's wireless amplifiers have auxiliary audio input(s) LINE IN (or AUX IN)
for connection with external devices such as notebook, mobile phones or tablets.
(Medium and larger-sized wireless amplifiers (APEX, STAGE and FOCUS series) can
also be installed with MP3 recorder modules and equipped with remote control for
more versatile functionality.)
3 Is it possible to record the sound of Microphone or external devices when using
FOCUS?
Yes. Install a Bluetooth-MP3 recorder (DPRB-500M) on FOCUS to obtain recording
function.
4 How to avoid or reduce feedback?
▌Do not stand in front of the speaker
when using the microphone.
▌Do not point the wireless microphone
towards the speaker.
▌Use the microphone behind the speaker
as possible.
▌Locate the wireless amplifier between
the speaker and the audience with the
speaker facing the crowd. Place the
wireless amplifier on a tripod stand and
above the head of audience (about
180cm).
▌Turn down the volume if necessary.
180cm

16
FAQ & useful operation tips
5 Does a wireless amplifier need to be installed with a tripod? What is the ideal
height for Amplifier above the ground?
Higher position of a wireless PA will be helpful for signal reception. It can be mounted
on the tripod and above the ear or head of the audience. If the tripod is not allowed on
site, you can also raise it on a table or a flat object while the amplifier leaves the
ground by 1 meter or more.
6 Will wireless amplifier automatically power off once it is fully charged? Do I need
to unplug the power cord?
Yes. Since all CHIAYO amplifiers have an overcharge protection circuit that
automatically power off at full charge and prevent damage to the system.
However, please unplug the power cord after fully charging to ensure the safety.
7 How to charge and maintain the battery of wireless amplifier?
After plugging the power cable of the wireless amplifier into a standard outlet, the
charging LED will glow or flash indicative of charging status. The wireless amplifier
can be charged whether power on or off.
The amplifier's battery has no memory effect and can be charged any time. It is
suggested to charge the battery right after usage to make the battery life longer. If not
to use it for a long period, please charge the battery at least every three months for
lead-acid batteries and six months for lithium batteries.
The battery life is limited and affected by the environment, charging method and
battery efficiency.
8 Is it possible that FOCUS can work as amplifier only? Can I use only one or more
microphones? How many wireless microphones can be used at most?
The wireless receiver, repeater and Bluetooth-MP3 recorder (DPRB-500M) for FOCUS
are modular products which can be installed optionally according to application and
requirement.
Maximum 2 wireless microphones can be used simultaneously.
9 What is the difference between lead-acid batteries and lithium batteries?
Lithium battery: light weight, electronic circuit protection, long life and more expensive.
Lead-acid battery: heavy weight, short life and more affordable.

17
FOCUS PRO/505/500 Portable Wireless PA System
6. Maintenance-free Lead-acid and Lithium batteries
Cautions when using the battery
1. Lead-acid batteries/lithium batteries have no memory effect. Please charge them up immediately after
each use, no matter how much power they left. If the battery is not charged for a long time, it may cause
the battery to be over-discharged and damaged, making it impossible to charge normally.
2. Usage temperature can’t be lower than -10°C nor higher than 50°C.
3. It’s strictly forbidden to let the battery contact with any liquid. Do not immerse the battery in water or get it
wet. After the battery is exposed to water, a decomposition reaction may occur, which may cause battery
self-ignition or even cause an explosion.
4. It is forbidden to use the battery when it has swelled, leaked, or the packaging is damaged.
5. It is forbidden to disassemble the battery in any way or pierce the battery with a sharp object, so as not to
cause the battery to catch fire or even cause an explosion.
6. The liquid inside the battery is highly corrosive. If it leaks, please do not touch it. If the internal liquid
splashes on human skin or eyes, please immediately rinse with clean water for at least 15 minutes before
seeking medical attention.
7. It is forbidden to use wires or other metal objects to short-circuit the positive and negative electrodes of
the battery.
Cautions when charging the battery
1. Lead-acid batteries/lithium batteries have no memory effect. Please charge them up immediately after
each use, no matter how much power they left. If the battery is not charged for a long time, it may cause
the battery to be over-discharged and damaged, making it impossible to charge normally.
2. Please use the power supply specified by CHIAYO for charging.
3. The CHIAYO amplifier has a protection circuit to prevent overcharging. To ensure safety, the charging
time should not exceed 12 hours. Please disconnect the power supply when fully charged.
4. Charging temperature can’t be lower than 0°C nor higher than 40°C.
5. When charging, please place it on the hard ground, such as cement, and there should be no flammable
or combustible materials around. Please pay attention to the charging process to prevent accidents.
6. It will automatically stop charging when fully charged. After the battery is fully charged, it is recommended
to disconnect the amplifier from the power supply.
7. When the power supply is not disconnected and the amplifier is not in use, if the battery is fully charged
and then recharged again soon after, it means that the battery is aging and cannot store power. Please
replace the battery to ensure enough time for operation.
Cautions when storing the battery
1. Lead-acid batteries/lithium batteries have no memory effect. Please charge them up immediately after
each use, no matter how much power they left. If the battery is not charged for a long time, it may cause
the battery to be over-discharged and damaged, making it impossible to charge normally.
2. Lithium batteries will automatically discharge in storage. If they are not charged for a long time, they will
over discharge that causes a decrease in capacity and damage to the batteries that can no longer be
charged normally. It should be fully charged at least once every 6 months.
3. Lead-acid batteries will automatically discharge in storage. If they are not charged for a long time, they
will over discharge that causes a decrease in capacity and damage to the batteries that can no longer be
charged normally. It should be fully charged at least once every 3 months.
4. Storage temperature can’t be lower than -10°C nor higher than 40°C.
Disposing the battery
Be sure to completely discharge the battery before placing it in the designated battery recycling bin.
Batteries contains dangerous chemicals. When disposing of old batteries, be sure to follow the local battery
recycling and disposal regulations, and it is strictly forbidden to put them in a trash can.

18
Maintenance-free Lead-acid and Lithium batteries

CHIAYO ELECTRONICS CO., LTD.
Http://www.chiayo.com.tw|Email: sales@chiayo.com.tw
Office: 30, Lane 27, Section 4, Jen-Ai Road, Taipei 10685, Taiwan
Tel: 886-2-27415741|Fax: 886-2-27525242
Factory: 88, Chung-Hsiao Street 2, Chiayi 60080, Taiwan
Tel: 886-5-2711000|Fax: 886-5-5767611
This manual suits for next models
2
Table of contents
Other Chiayo Speakers System manuals