Chiayo STAGE PRO User manual

CHIAYO ELECTRONICS CO., LTD.
Operation manual
STAGE PRO
Portable Wireless Mixer PA System

1
STAGE PRO Portable Wireless Mixer PA System
Important safety instructions
⚫Read all of the instructions before the product is operated.
⚫Keep these instructions well for future reference.
⚫Follow all of the warnings and instructions when installing, setting up and using the product.
⚫Only clean the product when it is not connected to the power supply system. Clean only with
a dry cloth.
⚫Keep ventilation openings unblocked and follow with the manufacturer’s instructions for
installation.
⚫Do not immerse product in any liquid or expose to heat or moisture
⚫Keep the complete polarized or grounding type plug without any modification. A polarized
plug has two blades with one wider than the other. A grounding type plug has two blades and
a third grounding prong. The wider blade or the third prong are provided for your safety. If the
provided plug does not fit into your outlet, consult an electrician for replacement of the
obsolete outlet.
⚫Power supply cords should be well routed to prevent from being walked on or pinched by
items placed upon or against them, particularly at plugs, convenience receptacles, and the
point where they exit from the product.
⚫Use only manufacturer authorized or recommended accessories.
⚫Use only with a cart, stand, tripod or accessories specified or provided by Chiayo. Be careful
when using a cart to avoid injury from tip-over.
⚫Unplug the product during an electrical strom or when unused for long periods of time.
⚫Never disassemble, modify or service the product. Any unauthorized modifications may result
in personal injury and/or product failure. Additionally, your warranty will be void.
⚫Please read and follow the instructions in this manual thoroughly to obtain optimum results
from this unit. We also recommend that you keep this manual handy for future reference.

2
Operation manual
Warning
Please read and follow the instructions in this manual thoroughly to obtain optimum results from
this unit. We also recommend that you keep this manual handy for future reference.
Safety Precautions
⚫Be sure to read the instructions in this section carefully before use.
⚫Make sure to observe the instructions in this manual as the conventions of safety symbols
and messages regarded as very important precautions are included.
Safety symbols and messages described below are used in this manual to prevent bodily injury
and property damage which could result from mishandling. Before operating your product, read
this manual first and understand the safety symbols and messages so you are thoroughly aware
of the potential safety hazards.
WARNING
Indicates a potentially hazardous situation which, if mishandled,
could result in death or serious personal injury.
CAUTION
Indicates a potentially hazardous situation which, if mishandled,
could result in moderate or minor personal injury, and/or property
damage.
Make sure to observe the following handling precautions so that a fire or personal injury does
not result from leakage or explosion of the battery.
⚫Do not short, disassemble, heat or put the battery into a fire.
⚫Never charge batteries of the type which are not rechargeable.
⚫Do not solder a battery directly.
⚫Be sure to use the specified type of battery.
⚫Note the correct polarity when inserting a battery in the unit.
⚫Avoid locations exposed to the direct sunlight, high temperature and high humidity when
storing batteries.
WARNING
To prevent the electromagnetic wave from badly influencing
medical equipment, make sure to switch off the unit's power when
placing it in close proximity to the medical equipment.
CAUTION
Battery discharges naturally according to a certain pattern even
when not in use. For best performance and a prolonged lifespan,
battery should be charged regularly after every use or every
month when the system is in storage and not being used!
CD player optical pick up head is a very delicate device and
sensitive to humidity. Please avoid using it in high humidity area
to avoid damage!

3
STAGE PRO Portable Wireless Mixer PA System
INDEX
1. Instruction...............................................................................................................................4
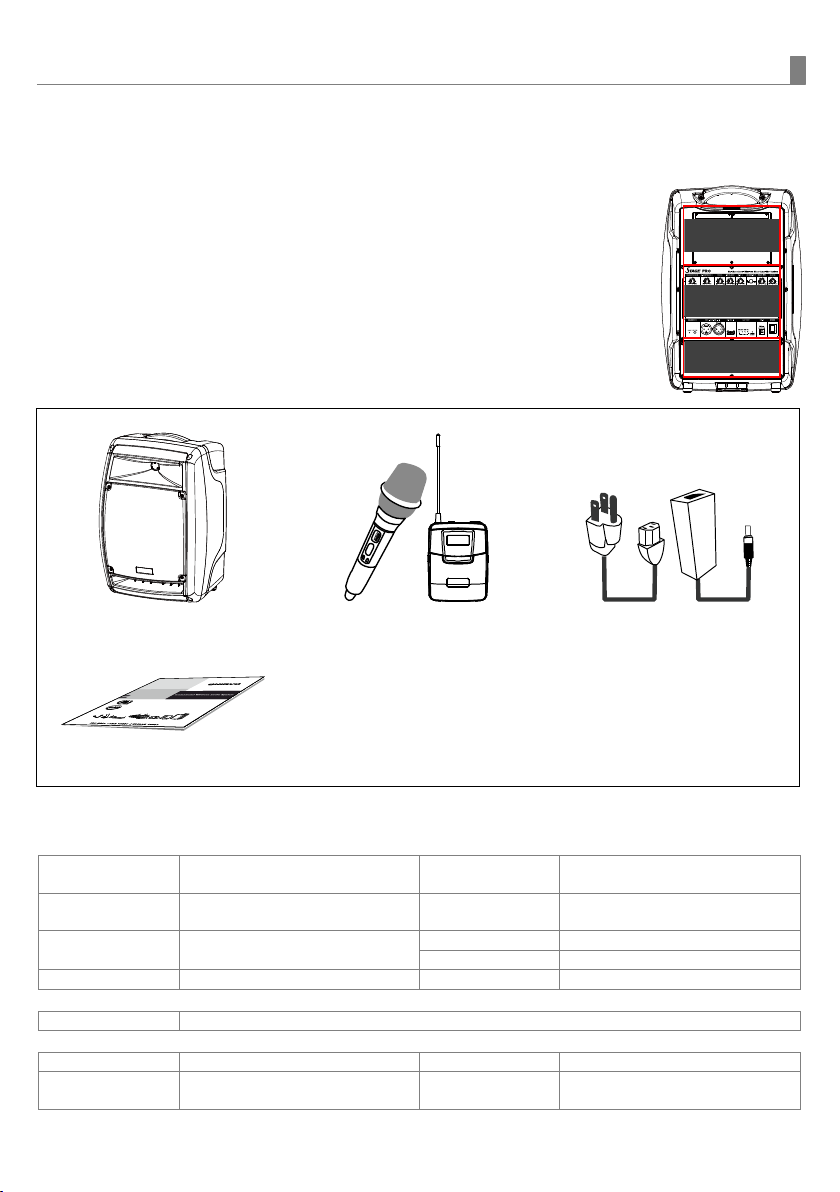
1-1. In the box..........................................................................................................................4
1-2. Optional related products .................................................................................................4
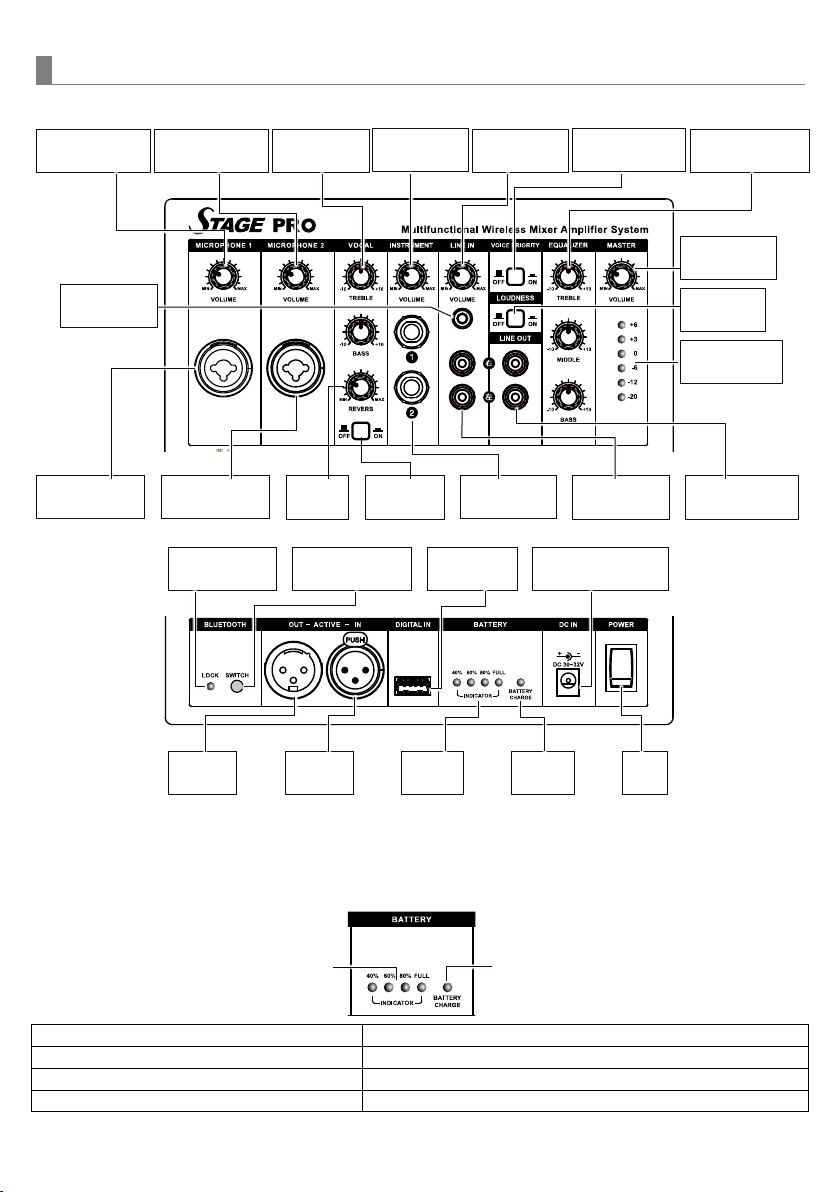
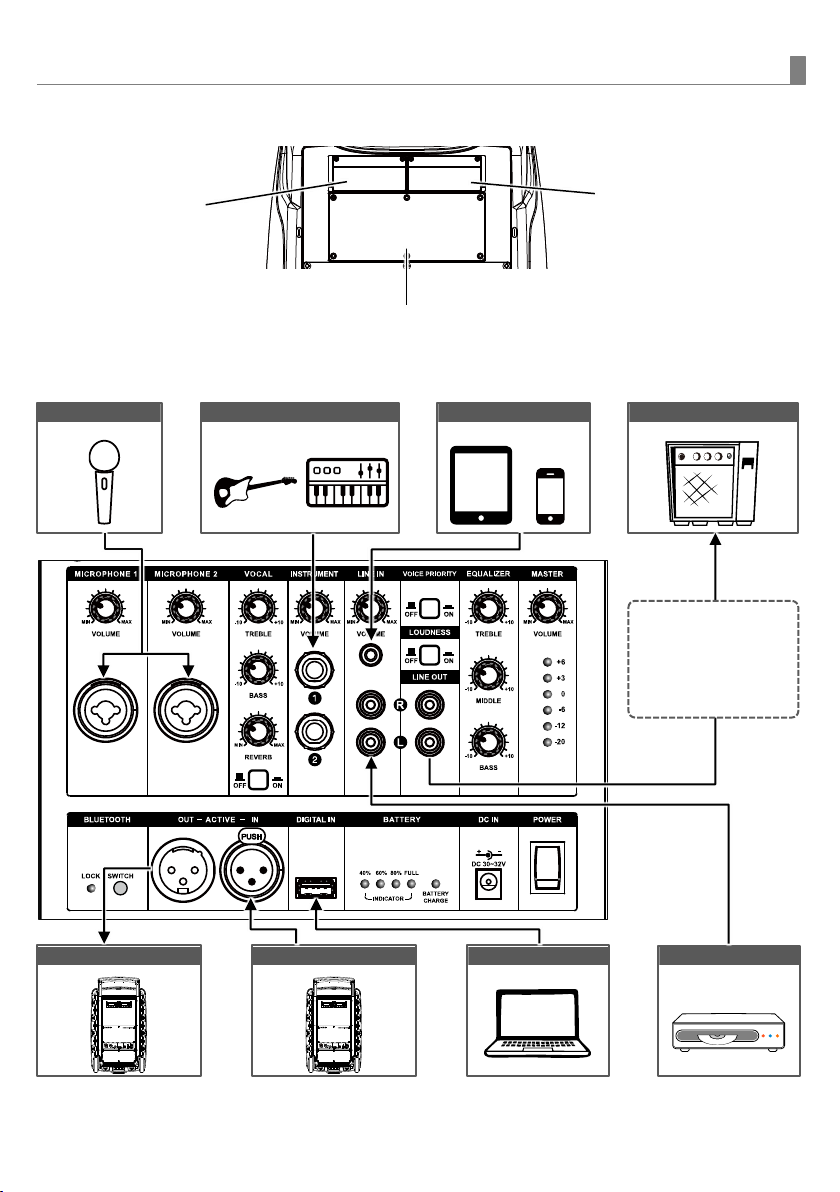
1-3. Parts and functions...........................................................................................................5
1-4. Charging the battery.........................................................................................................5
1-5. Module compartment........................................................................................................6
1-6. Connection with external audio sources...........................................................................6
2. Settings and Operations........................................................................................................7
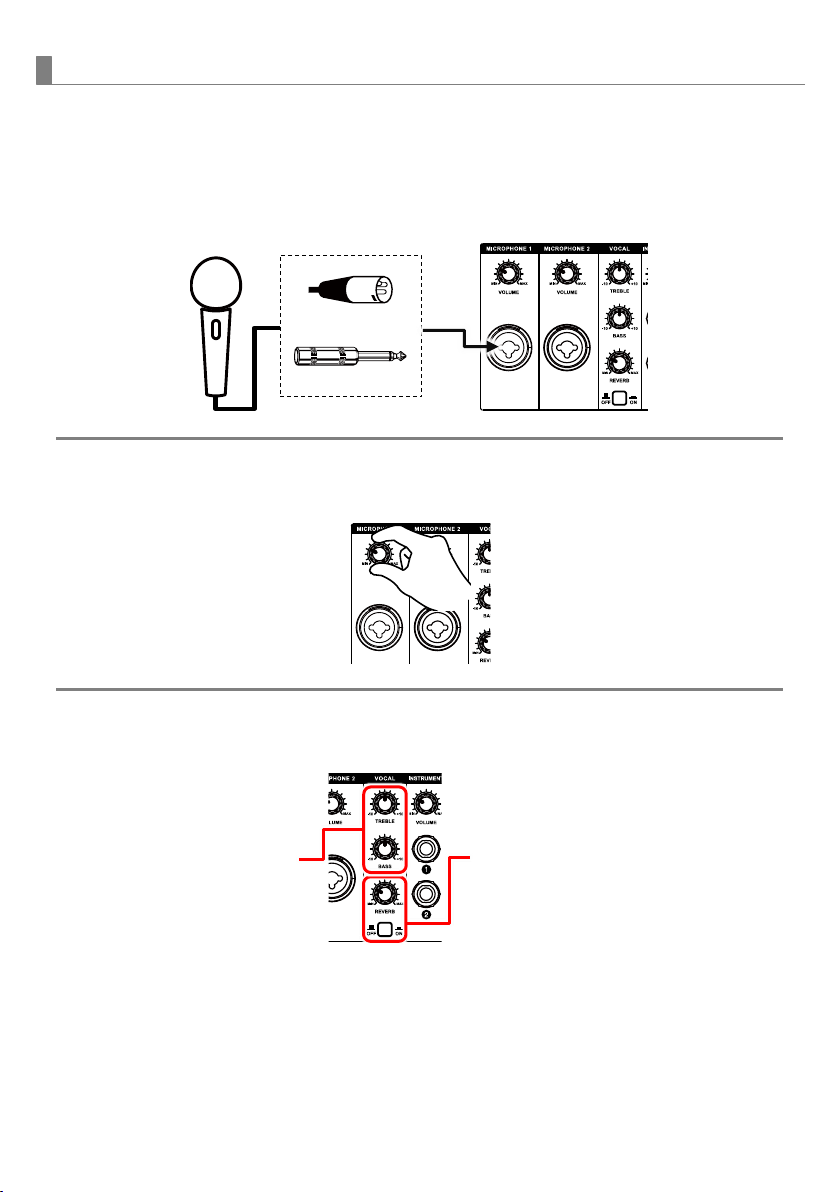
2-1. Using the wired microphone (MICROPHONE 1, MICROPHONE 2).................................7
2-2. Using the wireless receiver...............................................................................................8
2-2-1. Parts and functions...................................................................................................8
2-2-2. Channel synchronization of the receiver and transmitter..........................................8
2-2-3. Channel scanning.....................................................................................................9
2-2-4. Squelch (SQ) setting ................................................................................................9
2-2-5. Volume and other settings......................................................................................10
2-3. Using an electronic instrument (INSTRUMENT ❶,❷) ...................................................11
2-4. Music audio input (LINE IN) - Smart phone / tablet / MP3 player / DVD player..............12
2-5. Music audio input (DIGITAL IN) - Computer/notebook...................................................13
2-6. Operating Bluetooth receiver (BLUETOOTH).................................................................14
2-7. Equalizer for WIRED and WIRELESS MICROPHONE and MUSIC...............................15
2-8. Voice priority...................................................................................................................16
2-9. Reverb............................................................................................................................16
2-10. Loudness......................................................................................................................16
2-11. Limiter function.............................................................................................................16
3. Application............................................................................................................................17
3-1. Active audio link: STAGE PRO to STAGE SLAVE.........................................................18
3-2. Wireless audio link: repeat all audio to linked STAGE PRO / STAGE SLAVE ...............19
3-2-1. Parts and functions of RP-5100M...........................................................................19
3-2-2. Changing channels.................................................................................................19
3-2-3. Audio input and gain control...................................................................................20
3-2-4. Adjust internal audio gain level...............................................................................20
3-2-5. Output power setting ..............................................................................................20
3-3. More extension...............................................................................................................22
4. Installing or replacing a receiver/repeater/MP3 module ...................................................23
5. FAQ & useful operation tips................................................................................................24
6. Maintenance-free Lead-acid and Lithium batteries...........................................................26

4
Instruction
1. Instruction
Congratulations and thank you for purchasing this multi-functional wireless portable amplifier.
To ensure a trouble-free operation, please read the manual thoroughly to fully understand its
controls and functions.
The rear panel of this portable amplifier is divided into 3 sections:
1. Module compartment
2. Control Unit compartment
3. Battery compartment
The Modules Compartment can be user configurable and user can access
the battery compartment to change battery.
1-1. In the box
STAGE PRO amplifier
0-4 handheld / beltpack
transmitters (optional)
Switching power supply
(plug varies from country to country)
operation manual
1-2. Optional related products
▍Modules & transmitters (For more information about transmitter, please refer to its user manual)
SDR-8200M IrDA
Ture diversity receiver module
SQ-6100 IrDA
SQ-5100 IrDA
Handheld microphone
SDR-8100M IrDA
Diversity receiver module
SM-7100 IrDA
SM-6100 IrDA
Belt-pack transmitter
DWR-5410M
2.4G digital receiver module
DH-5400
Handheld digital microphone
DB-5400
Belt-pack digital transmitter
RP-5100M
Repeater module
DPR-500m
MP3 recorder module
▍Speaker
STAGE SLAVE
Companion powered speaker for audio link
▍Accessories
ST-50
Tripod stand: standard
ST-51A / ST-51B
Tripod stand: height adjustable
DC-35
Weather proof dust cover
DM-series
Wired microphone, please refer
to CHIAYO website.
Module
compartment
Control unit
compartment
Battery
compartment

5
STAGE PRO Portable Wireless Mixer PA System
LINE OUT socket
(RCA R/L)
DC IN
DC input (30-32V/4A)
power
switch
1-3. Parts and functions
1-4. Charging the battery
This amplifier uses either two lead-acid batteries or one lithium battery. The battery power is
leveled from 40%, 60%, 80% and FULL. If the LED stays at 40%, the battery might not be
sustainable for long operation.
Battery indicator Charging indicator
Charging indicator
Condition
Flashes RED
During recharging
Solid GREEN
Fully charged
Solid YELLOW
Error or no battery detected
MICROPHONE
①volume control
MICROPHONE
②volume control
TREBLE/BASS
(for vocal)
INSTRUMENT
volume control
LINE IN
volume control
VOICE PRIORITY
push button
TREBLE/MIDDLE/
BASS (for music)
MICROPHONE
input ①(combo)
MICROPHONE
input ②(combo)
REVERB
control
REVERB
push button
INSTRUMENT
input ①,②
LINE IN socket
(RCA R/L)
BLUETOOTH
pairing indicator
BLUETOOTH
power push button
audio input of
computer
audio link
output
audio link
input
battery
indicator
charging
indicator
MASTER limiter
indicator
LINE IN socket
(3.5mm)
LOUDNESS
push button
MASTER
volume control

6
Instruction
AMPLIFIER
DVD PLAYER
1-5. Module compartment
1-6. Connection with external audio sources
For receiver / MP3
module
For receiver /
repeater / MP3
module
For module bracket MB-50 which offers 2 slots for
adding receiver / MP3 module.
WIRED MIC
INSTRUMENT
TABLET / PHONE
ACTIVE SPEAKER
ACTIVE SPEAKER
COMPUTER
Sound control, e.g.,
volume and equalizer,
of audio output from
STAGE PRO is only
operated on this
external amplifier.

7
STAGE PRO Portable Wireless Mixer PA System
2. Settings and Operations
2-1. Using the wired microphone (MICROPHONE 1, MICROPHONE 2)
1 Plug a wired microphone with a 6.3mm or XLR connector to MICROPHONE 1 or
MICROPHONE 2.
2 Turn on master power and then adjust the specific (either MICROPHONE 1 or
MICROPHONE 2) volume control to desired level.
3 TREBLE / BASS equalizer (refer to P.15) and REVERB (refer to P.16) levels can be
adjusted individually.
Equalizer REVERB ON/OFF
or

8
Settings and Operations
2-2. Using the wireless receiver
2-2-1. Parts and functions
2-2-2. Channel synchronization of the receiver and transmitter
Align infrared areas of the receiver and transmitter within 10~30cm.
■Changing receiver’s channel
1 Press the synchronization
button of the transmitter.
►
2 The transmitter's LED will
grow to denote
synchronization signal
transmitted.
3 The channel number on
the receiver’s LED will
become the same as the
transmitter’s, which means
the receiver has been
successfully synchronized.
■Changing transmitter’s channel
1 Press the SYNC button of
the receiver.
►
2 The transmitter's LED will
grow to denote
synchronization signal
received.
3 The channel number on
the transmitter’s LCD will
become the same as the
receiver’s, which means
the transmitter has been
successfully synchronized.
If it doesn’t work check that you have the IR sensor panels aligned, that they are facing each
other, devices are within 10~30cm of each other, and try again.
SET SYNC MIN PWR/VOL
CH
RF AF
AB
0 10
652.250
AF
RF signal meter
Channel
Diversity A/B
antenna
Transmitter battery
power
Frequency
DOWN button
UP button
SET button
IrDA synchronization
button
IR sensor area
Power switch /
volume control
LCD
Audio signal
meter
10~30cm

9
STAGE PRO Portable Wireless Mixer PA System
2-2-3. Channel scanning
For an interference- free operation, a cleaner channel might be necessary if the current one
receives too much interference. To operate the scanning:
1 Press ▼(down) or ▲(up) button to make
the frequency icon appear on the
bottom.
2 Hold SET button until this icon
flashes to denote readiness for setting.
3 Press ▼(down) or ▲(up) button to find and
locate a clear, interference- free channel.
4 After a channel is chosen, press SET
button or wait 5 seconds to store the
setting.
2-2-4. Squelch (SQ) setting
When interference is encountered try reducing the sensitivity of the receiver, thus less
susceptible to interference. To operate the squelch setting:
1 Press ▼(down) or ▲(up) button to turn to
the squelch setting page.
2 Hold SET button until this icon
flashes to denote readiness for setting.
3 Press ▼(down) or ▲(up) button to select a
new squelch level between 1 and 10. The
default level is 01.
4 After a level is chosen, press SET button
or wait 5 seconds to store the setting.
Since increasing the squelch level will also reduce the reception distance, it’s recommended to
choose the lowest level that can eliminate the interference.
If this still does not solve the problem it means this frequency is not suitable. Adjust the squelch
back to its default level (LE-01) and use the scan function to locate a clear, interference-free
channel.
RF
CH
FREQ
RF AF
AB
099
674.500
CH
FREQ
RF AF
AB
099
674.500
RF
CH
FREQ
RF AF
A B
089
672.000
RF
SQ
le-0 1
SQ
le-0 1
RF
SQ
le-03

11
STAGE PRO Portable Wireless Mixer PA System
2-3. Using an electronic instrument (INSTRUMENT ❶,❷)
1 Plug an electronic guitar or keyboard with a 6.3mm plug to the INSTRUMENT input
jack ❶or ❷.
2 Turn on master power and then adjust INSTRUMENT volume control to a desired level.
3 TREBLE / MIDDLE / BASS equalizer levels can be adjusted individually. (refer to P.15)
Equalizer
or

12
Settings and Operations
2-4. Music audio input (LINE IN) - Smart phone / tablet / MP3 player / DVD player
1 Smart phone / tablet / MP3 player Connect your device to the 3.5mm jack with a
3.5mm 3-pole stereo audio cable.
DVD PLAYER Plug the audio cable with RCA R/L plugs to the RCA R/L jacks.
2 Turn on master power and then adjust LINE IN volume control to a desired level.
3 TREBLE / MIDDLE / BASS equalizer levels can be adjusted individually. (refer to P.15)
Equalizer

13
STAGE PRO Portable Wireless Mixer PA System
2-5. Music audio input (DIGITAL IN) - Computer/notebook
1 Use a USB cable to connect the unit and your PC/Notebook to make STAGE PRO the
speaker of your device
2 Turn on master power and then adjust MASTER volume control to a desired level.
3 TREBLE / MIDDLE / BASS equalizer levels can be adjusted individually. (refer to P.15)
Equalizer

14
Settings and Operations
2-6. Operating Bluetooth receiver (BLUETOOTH)
1 Turn on master POWER and then press the SWITCH button 3 seconds to turn on the
BLUETOOTH receiver. The pairing indicator will flash green.
Approximately 9 seconds later, the pairing indicator flashes green and red, which
means it is ready for pairing.
2 Activate BLUETOOTH on your device (phone, tablet, PC., etc) and pair with external
BLUETOOTH device named “BT AUDIO”. After successful linking, the pairing indicator
will be solid green and you can play your music on STAGE PRO.
3 Adjust MASTER volume control to a desired level.
4 TREBLE / MIDDLE / BASS equalizer levels can be adjusted individually. (refer to P.15)
Equalizer
Settings Bluetooth
Bluetooth
DEVICES
BT AUDIO
Now Discoverable
...
flash
RED
flash
GREEN
flash
GREEN
solid
GREEN
solid
GREEN

15
STAGE PRO Portable Wireless Mixer PA System
Important
⚫The BLUETOOTH automatically turns off after no pairing for 5 minutes.
⚫Press SWITCH button for disconnection and getting ready for new pairing.
⚫The BLUETOOTH can memorize and automatically connect to last-paired device.
2-7. Equalizer for WIRED and WIRELESS MICROPHONE and MUSIC
Equalizer adjustment is actually used to increase or reduce the high/medium/low frequency
component of the speaker's restored sound. It is so-called raising or attenuating treble/bass via
frequency-specific volume knobs to improve human voices or make musical instruments’ sound
more prominent. According to the scale marks on the panel, clockwise adjustment is to increase
and boost and opposite direction to decrease and attenuate.
Adjust the level of high frequency (Treble), middle frequency (Middle), and low frequency (Bass)
respectively. All signals have been balanced by the high and low sounds after entering the
amplifier so it is not necessary to adjust the equalizer during the output to the speaker. It is
recommended to maintain the position of BASS, MIDDLE and TREBLE at just 12 o'clock.
KNOBS
BASS
MIDDLE
TREBLE
FUNCTION
increase or reduce the low
frequency component of the
sound
increase or reduce the
medium frequency
component of the sound
increase or reduce the high
frequency component of the
sound
RANGE
-12 dB~+12 dB
DEFAULT
12 o'clock
Adjustment reference:
◼BASS: It is the basic part of the sound. It accounts for 70% of the entire audio energy and is
an important component to display the music style. When appropriate, the bass is relaxed and
the sound is full and soft. If you feel the sound is thin, you can moderately increase the BASS.
If you feel the sound is muffled, not clear, or too nasal, you can moderately reduce the BASS.
◼MIDDLE: Containing the low harmonics and overtones of most musical instruments. It is the
characteristic sound of snare drums and percussion instruments. The sound is clear and
bright when appropriate. If you feel the sound is blurred, you can moderately increase the
MIDDLE. If a phone-like sound appears, you can moderately reduce the MIDDLE.
◼TREBLE: It’s the frequency that affects the sound layering. If you feel that the sounds of
instruments such as Piccolo and Flute are too prominent, or the tooth sound of the voice is
too heavy and the tone is sharp, you can moderately reduce the TREBLE.
for WIRELESS
and WIRED
MICROPHONE
for MUSIC

16
Settings and Operations
2-8. Voice priority
Voice Priority operation is only necessary when CD/USB/MP3 is playing.
When the Voice Priority switch is ON, the ducking function will be activated.
While the music is playing, a voice input from either a WIRED or WIRELESS
MICROPHONE will temporarily override and lower the volume of the
background music and voice could be heard more clearly.
Background music will return to its original setting when no audio input is
entering the microphone after certain seconds. However, if the microphone is not switch off, the
reentering of music into the microphone will also activate the voice priority function.
2-9. Reverb
This function can add extra depth to the sound of WIRED or WIRELESS
MICROPHONE to create a realistic acoustic ambience. You can adjust the
reverb depth by using the REVERB knob. The depth range is from MIN through
MAX. The MIN level produces no effect, while MAX level produces maximum
reverb depth. When REVERB is turned off, no effect is applied.
2-10. Loudness
When the amplifiers sound is at low level, the tone might not be heard clearly
and activating the Loudness function can raise the tone level to make it clearer.
2-11. Limiter function
The function of the limiter is to maintain a certain output level of the signal below a specific
maximum in order that the output of this pre-amplified signal level is effective while preventing
sound distortion and avoiding the speaker from breaking or malfunctioning due to excessive
load. The purpose of the six input source (microphone, musical instrument or music) signal level
indicators, from -20dB (min) to +6dB (max), is to display the real-time dynamic level of the
sound signal. Please do not exceed the 5th indicator (+3dB) flashing when adjusting the volume
of each input to prevent distortion.
Normal volume
nearly distortion
distortion
+6
+3
0
-6
-12
-20
+6
+3
0
-6
-12
-20
+6
+3
0
-6
-12
-20
+6
+3
0
-6
-12
-20
+6
+3
0
-6
-12
-20
+6
+3
0
-6
-12
-20

17
STAGE PRO Portable Wireless Mixer PA System
3. Application
3-1. Active audio link: STAGE PRO to STAGE PRO
STAGE PRO operates as the MASTER as well as companion unit in an audio link (wired)
configuration.
1 Connect one STAGE PRO after the other via the ACTIVE IN and ACTIVE OUT jacks.
2 Turn on master POWER of EACH STAGE PRO and then adjust master volume control
to a desired level.
3 TREBLE / MIDDLE / BASS equalizer levels can be adjusted individually. (refer to P.15)
Equalizer
STAGE PRO
STAGE PRO
STAGE PROSTAGE PRO
Important
◼Max cable length: ≤20m
◼Recommended linking no
more than 5 units. Too
many units may result in
audio delay.

18
Application
3-2. Active audio link: STAGE PRO to STAGE SLAVE
STAGE PRO operates as the MASTER unit in an audio link (wired) configuration with active
companion powered speakers STAGE SLAVE.
1 Connect the STAGE PRO (master unit) and STAGE SLAVE (active companion
powered speakers) via ACTIVE OUT and ACTIVE IN jacks.
STAGE PRO STAGE SLAVE STAGE SLAVE
2 Turn on master POWER of STAGE PRO and EACH STAGE SLAVE and then adjust
master volume control to a desired level. Turn on power of EACH STAGE SLAVE and
then adjust the volume control to a desired level.
3 TREBLE / MIDDLE / BASS equalizer levels can be adjusted individually. (refer to P.15)
Equalizer
STAGE PRO
STAGE SLAVE
STAGE SLAVESTAGE SLAVE
Important
◼Max cable length: ≤ 20m
◼Recommended linking no
more than 5 units. Too
many units may result in
audio delay.
STAGE SLAVE
STAGE PRO

19
STAGE PRO Portable Wireless Mixer PA System
3-3. Wireless audio link: repeat all audio to linked STAGE PRO / STAGE SLAVE
STAGE PRO operates as the MASTER unit in a wireless audio link with other STAGE PRO or
active companion powered speakers STAGE SLAVE. The repeater module RP-5100M of
master STAGE PRO can transmit all audio signals, including wired/wireless microphone, music,
instrument etc., to other units installed with receiver module.
3-3-1. Parts and functions of RP-5100M
3-3-2. Changing channels
Press LEFT button to increase the TENS-digit
channel number.
Press RIGHT button to increase the UNIT-digit
channel number.
HI LOW
6 6
6 6
7 6
6 6
6 6
6 7
Channel selectors
Channel indicator
Antenna connector (TNC type)
Power push button
Unit GAIN control
Audio input (3.5mm)
AUX IN GAIN control
STAGE PRO
STAGE SLAVE
STAGE SLAVE
STAGE SLAVE
STAGE SLAVE
Output power
switch (on the
PCB). Default
at LOW.
Table of contents
Other Chiayo Speakers manuals

Chiayo
Chiayo Challenger 1000 User manual

Chiayo
Chiayo Coach 400 Series User manual

Chiayo
Chiayo Challenger 1000 User manual

Chiayo
Chiayo Focus 505 series User manual

Chiayo
Chiayo Smart 300 User manual

Chiayo
Chiayo Challenger 1000 User manual

Chiayo
Chiayo Focus 500 series User manual

Chiayo
Chiayo Smart 300 User manual

Chiayo
Chiayo VICTORY 2000 User manual

Chiayo
Chiayo Challenger 1000 User manual