Chicco STYLEGO up User manual

LIGHTNAP

3

3
1
3A
4
2A
3B
5
6B 6C
2B
3C
6A
7

4
5
A
B
C
8
10A
12B
10D
A
B
9A
11
B
10B
13A
10E
9B
12A
10C

4
5
13C
14
15
13B
13D
13E
16 17A 17B
18A 18B
18C

6
7
23
24C
18D
20
24A
25A
21
24B
25B
19
22

6
7
26
28A
27A
27B
29A
28B
29B

8
9
ISTRUZIONI D’USO
IMPORTANTE LEGGERE ATTEN
TAMENTE LE ISTRUZIONI PRIMA
DELL’USO E CONSERVARLE PER
FUTURO RIFERIMENTO.
ATTENZIONE! TENERE I SACCHET
TI DI PLASTICA LONTANI DAI BAM
BINI PER EVITARE SOFFOCAMENTO.
AVVERTENZE
• ATTENZIONE: Non lasciare mai il
tuo bambino incustodito.
• ATTENZIONE: Questo prodotto è
adatto a un bambino che non è in
grado di stare seduto autonoma-
mente, di girarsi e di tirarsi su appog-
giandosi alle mani e alle ginocchia.
Peso massimo del bambino: 9 Kg.
• Età di utilizzo indicativa: 0 – 5/6mesi.
• ATTENZIONE: Utilizzare soltanto
su una supercie stabile, orizzonta-
le, piana e asciutta.
• ATTENZIONE: Non lasciare che
altri bambini giochino senza sor-
veglianza vicino alla sacca porta
bambini.
• ATTENZIONE: Non utilizzare se
una qualsiasi parte è rotta, strappa-
ta o mancante.
• ATTENZIONE: La sacca è utilizza-
bile per il trasporto in auto solo se
si utilizza il KIT CAR in dotazione.
• Utilizzare solo parti di ricambio for-
nite o approvate dal fabbricante
• Tenere conto dei rischi derivanti da
amme e altre sorgenti di calore,
come stufe elettriche, stufe a gas,
ecc. Non lasciare la sacca vicina a
queste fonti di calore.
• ATTENZIONE: Non usare mai la sac-
ca porta bambini su un supporto.
• ATTENZIONE: Se si acquista sepa-
ratamente un materassino in sosti-
tuzione a quello esistente, vericate
che si adatti bene al prodotto. Lo
spessore massimo del materasso
non deve essere superiore a 10 mm.
• ATTENZIONE: Non aggiungere un
altro materasso sulla parte superio-
re del materasso fornito o racco-
mandato dal fabbricante.
• Vericare periodicamente l’integrità
sica e strutturale del prodotto. In
particolare delle maniglie di traspor-
to e del fondo della sacca. Nel caso
presentasse segni di danneggiamen-
to o di usura evidenti, non utilizzarlo
e tenerlo lontano dalla portata dei
bambini.
• Vericare prima dell’assemblaggio
che il prodotto e tutti i suoi compo-
nenti non presentino eventuali dan-
neggiamenti dovuti al trasporto, in
tal caso il prodotto non deve essere
utilizzato e dovrà essere tenuto lon-
tano dalla portata dei bambini.
• Prima di sollevare la sacca per
trasportare il bambino, assicurar-
si che la maniglia sia nella corret-
ta posizione d’utilizzo.
• Non applicare al prodotto acces-
sori non forniti dal costruttore.
Eventuali modiche apportate ai
prodotti sollevano il costruttore da
ogni responsabilità.
• Non lasciare all’interno della sacca
alcun oggetto che possa ridurne la
profondità.
• Questa sacca è utilizzabile solo sui
passeggini CHICCO “LOVE UP” e
“STYLEGO UP”.
• Assicurarsi che la sacca sia ssata
correttamente sul passeggino pri-
ma di mettervi il bambino.
• I prodotti lasciati al sole si surriscal-
dano; lasciarli rareddare prima di
mettervi il bambino.
• Non utilizzare la sacca per far dor-
mire il bambino per tempi prolun-
gati: questo prodotto non può so-
stituire un lettino.
• Si raccomanda di far aerare la sacca
dopo un utilizzo prolungato.
• Prima di sollevare o trasportare la
sacca, la base deve essere regolata
nella posizione più bassa.
• La testa del bambino nella sacca
non dovrebbe mai essere più bassa
rispetto al corpo.
• ATTENZIONE: Il sistema di rite-
nuta deve essere utilizzato solo ed
esclusivamente durante il traspor-
to in auto del bambino.
• ATTENZIONE: Il sistema di rite-
nuta deve essere rimosso quando
il prodotto viene usato al di fuori
dell’autovettura.
• Quando non in uso, tenere il pro-
dotto lontano dalla portata del
bambino.
CONSIGLI PER LA PULIZIA E LA MANUTENZIONE
Questo prodotto necessita di manutenzione periodica. Le
operazioni di pulizia e manutenzione devono essere eet-
tuate da un adulto.
PULIZIA
Pulire le parti in tessuto mediante una spugna umida e del
sapone neutro. Pulire le parti in plastica periodicamente
con un panno umido. Asciugare le parti in metallo, dopo
un eventuale contatto con acqua, al ne di evitare il for-
marsi di ruggine.
LAVAGGIO
Il rivestimento esterno/interno della sacca e il materassino
sono sfoderabili e lavabili; per rimuoverli, fare riferimento al
paragrafo SVESTIZIONE SACCA.
Si raccomanda di seguire attentamente le istruzioni di la-
vaggio riportate sull’etichetta inserita sul capo.
Di seguito sono riportati i simboli di lavaggio ed i relativi
signicati:
Lavare a mano in acqua fredda

8
9
ca porta bambini su un supporto.
• ATTENZIONE: Se si acquista sepa-
ratamente un materassino in sosti-
tuzione a quello esistente, vericate
che si adatti bene al prodotto. Lo
spessore massimo del materasso
non deve essere superiore a 10 mm.
• ATTENZIONE: Non aggiungere un
altro materasso sulla parte superio-
re del materasso fornito o racco-
mandato dal fabbricante.
• Vericare periodicamente l’integrità
sica e strutturale del prodotto. In
particolare delle maniglie di traspor-
to e del fondo della sacca. Nel caso
presentasse segni di danneggiamen-
to o di usura evidenti, non utilizzarlo
e tenerlo lontano dalla portata dei
bambini.
• Vericare prima dell’assemblaggio
che il prodotto e tutti i suoi compo-
nenti non presentino eventuali dan-
neggiamenti dovuti al trasporto, in
tal caso il prodotto non deve essere
utilizzato e dovrà essere tenuto lon-
tano dalla portata dei bambini.
• Prima di sollevare la sacca per
trasportare il bambino, assicurar-
si che la maniglia sia nella corret-
ta posizione d’utilizzo.
• Non applicare al prodotto acces-
sori non forniti dal costruttore.
Eventuali modiche apportate ai
prodotti sollevano il costruttore da
ogni responsabilità.
• Non lasciare all’interno della sacca
alcun oggetto che possa ridurne la
profondità.
• Questa sacca è utilizzabile solo sui
passeggini CHICCO “LOVE UP” e
“STYLEGO UP”.
• Assicurarsi che la sacca sia ssata
correttamente sul passeggino pri-
ma di mettervi il bambino.
• I prodotti lasciati al sole si surriscal-
dano; lasciarli rareddare prima di
mettervi il bambino.
• Non utilizzare la sacca per far dor-
mire il bambino per tempi prolun-
gati: questo prodotto non può so-
stituire un lettino.
• Si raccomanda di far aerare la sacca
dopo un utilizzo prolungato.
• Prima di sollevare o trasportare la
sacca, la base deve essere regolata
nella posizione più bassa.
• La testa del bambino nella sacca
non dovrebbe mai essere più bassa
rispetto al corpo.
• ATTENZIONE: Il sistema di rite-
nuta deve essere utilizzato solo ed
esclusivamente durante il traspor-
to in auto del bambino.
• ATTENZIONE: Il sistema di rite-
nuta deve essere rimosso quando
il prodotto viene usato al di fuori
dell’autovettura.
• Quando non in uso, tenere il pro-
dotto lontano dalla portata del
bambino.
CONSIGLI PER LA PULIZIA E LA MANUTENZIONE
Questo prodotto necessita di manutenzione periodica. Le
operazioni di pulizia e manutenzione devono essere eet-
tuate da un adulto.
PULIZIA
Pulire le parti in tessuto mediante una spugna umida e del
sapone neutro. Pulire le parti in plastica periodicamente
con un panno umido. Asciugare le parti in metallo, dopo
un eventuale contatto con acqua, al ne di evitare il for-
marsi di ruggine.
LAVAGGIO
Il rivestimento esterno/interno della sacca e il materassino
sono sfoderabili e lavabili; per rimuoverli, fare riferimento al
paragrafo SVESTIZIONE SACCA.
Si raccomanda di seguire attentamente le istruzioni di la-
vaggio riportate sull’etichetta inserita sul capo.
Di seguito sono riportati i simboli di lavaggio ed i relativi
signicati:
Lavare a mano in acqua fredda
Non candeggiare
Non asciugare meccanicamente
Non stirare
Non lavare a secco
MANUTENZIONE
Asciugare le parti in metallo, al ne di evitare il formarsi di
ruggine. Non immergere in acqua. Pulire le parti in plasti-
ca periodicamente, con un panno umido. Tenere pulite da
polvere e sabbia le parti di aggancio della sacca e della car-
rozzina, onde evitare attriti. Non lasciare i prodotti per lun-
go tempo al sole; i tessuti potrebbero scolorirsi. Lubricare
solo in caso di necessità con olio secco al silicone. Per la
pulizia non utilizzare prodotti solventi o abrasivi.
CARATTERISTICHE DELLA SACCA
La sacca comprende i seguenti elementi: rivestimento tes-
sile, capotte, copertina, materassino removibile, kit comfort
(due spallacci e uno sparti gambe), kit removibile per il tra-
sporto in auto.
1. La sacca viene fornita con il rivestimento tessile già mon-
tato (g. 1).
CAPOTE
La sacca è dotata di capotta parasole e paravento regolabi-
le in più posizioni e, sulla parte superiore, di un’apertura per
accedere al maniglione di trasporto.
2. Per montare la capote sulla sacca è necessario sollevare il
maniglione della sacca portandolo in posizione verticale
(g. 2A), appoggiare la capote sul maniglione e agganciare
i quattro bottoni automatici presenti sul bordo della capo-
te ai corrispettivi presenti sul tessile della sacca (g. 2B).
3. Per ssare la capote al maniglione, avvolgere il tessile del-
la capote attorno allo stesso, agganciare i due bottoni a
scatto presenti sullo snodo (g. 3A) e chiudere i velcri in-
torno al maniglione (g. 3B). Per completare l’operazione,
mettere in posizione il lembo tessile della capote oltre il
maniglione (g. 3C).
APERTURA POSTERIORE
4. Per garantire una perfetta aerazione la capote è dotata di
una apertura posteriore; per aprirla è suciente ripiegare
la patella di stoa sulla parte alta della capote (g. 4).
VISIERA
5. Nella parte interna della visiera è presente un anello tessi-
le che permette di appendere dei giochi morbidi (g. 5).
COPERTINA
6. Per ssare la copertina inlare e chiudere entrambe le
cerniere in corrispondenza dei piedi del bambino (g. 6A)
Successivamente agganciare la patella tessile della coperti-
na alla capote utilizzando i due bottoni automatici (g. 6B).
Per assicurare maggior protezione al bambino è possibile
utilizzare la patella tessile in posizione verticale, ssandola
con le apposite asole (g. 6C).
SCHIENALE REGOLABILE - COMFORT SYSTEM
7. Lo schienale della sacca è regolabile in modo graduale.
30° C

10
11
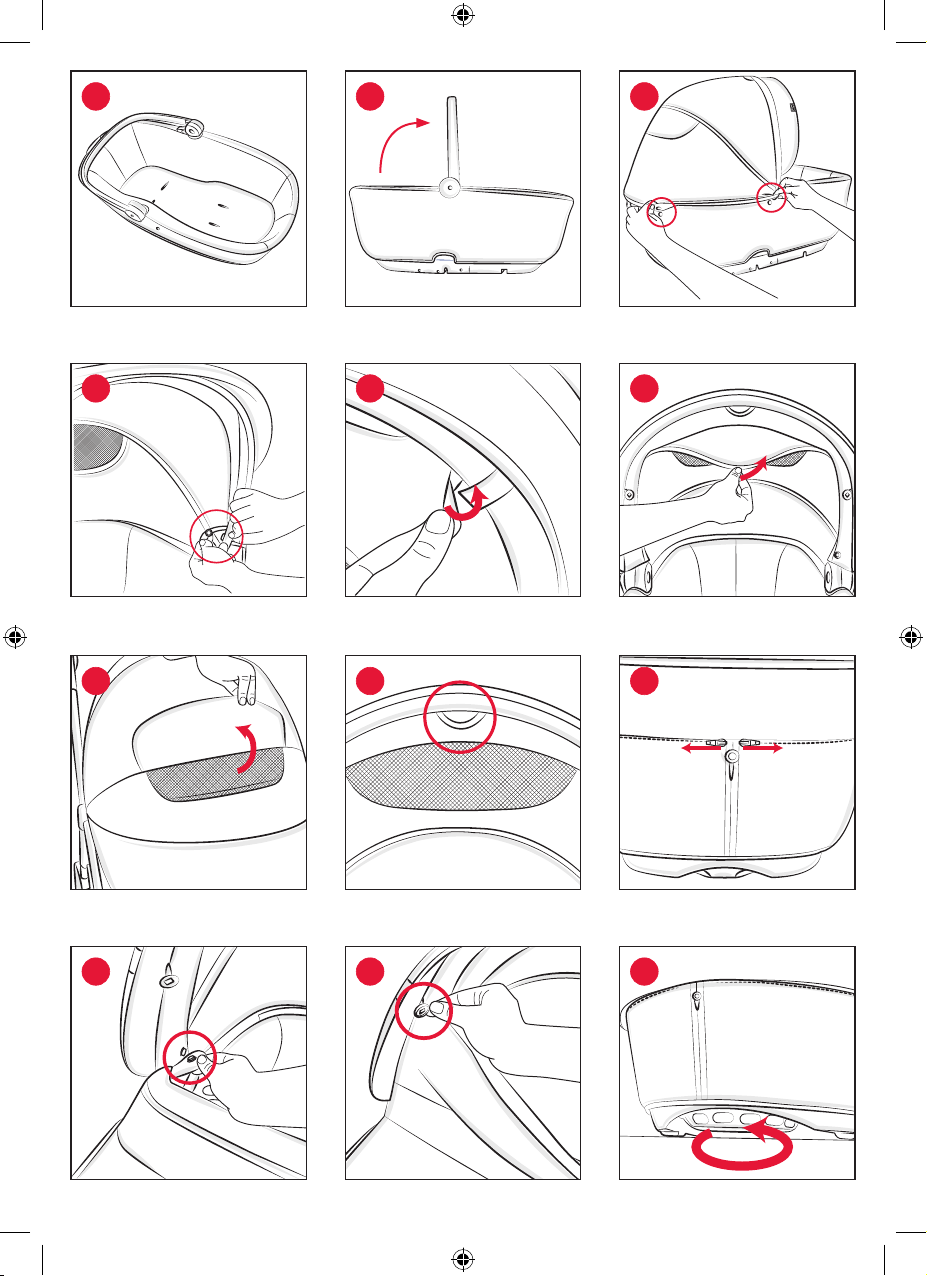
Per alzare ed abbassare lo schienale agire sulla ruota po-
sta sull’e sterno della sacca nella zona dei piedi del bam-
bino (g. 7).
MANIGLIA DI TRASPORTO
8. La sacca è dotata di una comoda maniglia di trasporto re-
golabile in tre posizioni (g. 8): A) Trasporto B) Intermedia
C) Riposo.
9. Per portare la maniglia in posizione verticale, impugnarla
centralmente e tirarla verso l’alto no a sentire il clack di
bloccaggio (g. 9A); per riportare la maniglia in posizione
intermedia, premere contemporaneamente i due pul-
santi presenti sullo snodo del maniglione; per superare
la posizione intermedia e raggiungere quella di riposo,
ripetere la stessa operazione e portare il maniglione ver-
so il basso (g. 9B).
ATTENZIONE: La sacca non deve essere trasportata con la
maniglia in posizione intermedia o di riposo, ma soltanto
con la maniglia in posizione di trasporto (verticale).
SVESTIZIONE SACCA
Prima di iniziare le operazioni di svestizione della sacca è
necessario slacciare le cinture di sicurezza (vedi paragrafo
“Utilizzo cinture sacca”) e rimuovere il kit comfort (vedi pa-
ragrafo “utilizzo della sacca in auto”). Per rimuovere la ca-
potta e la copertina, eseguire in senso inverso le operazioni
descritte al punto 2, 3 e 6.
10. Per rimuovere il tessile della sacca:
• rimuovere le patelle plastiche presenti sui lati della sac-
ca (g. 10A)
• ripiegare all’indietro il tessile interno (g. 10B)
• svincolare i due elastici presenti su entrambi i lati della
struttura dalle asole del telaio (g. 10C), facendoli pas-
sare attraverso le fessure
• rimuovere il tessile dal pin posizionato nella zona testa
della sacca (g. 10D) e procedere con l’estrazione del
tessile (g. 10E) facendolo scorrere sotto la struttura del-
la sacca no alla rimozione completa.
VESTIZIONE SACCA
Per la vestizione della sacca, eseguire le operazioni di segui-
to descritte, facendo riferimento alle immagini della svesti-
zione, in senso contrario.
Inserire il tessile partendo dalla zona piedi della sacca, far-
lo scorrere lungo la struttura, inlare gli elastici ai lati della
sacca nelle apposite fessure, inlare le patelle plastiche e
completare la vestizione, controllando che i pin e il tasto
posto nella zona della testa siano liberi dal tessile.
CINTURE DI SICUREZZA SACCA E KIT COMFORT
11. Il sistema di sicurezza (g. 11) è suddiviso in due parti:
A. Parte inferiore
B. Parte superiore
ATTENZIONE: Le cinture di sicurezza devono essere uti-
lizzate solo ed esclusivamente per il trasporto in auto del
bambino.
12. Inserire i nastri con bbia che compongono la parte inferio-
re (A) del sistema di sicurezza nelle apposite fessure del ma-
terassino e della struttura, come indicato in gura 12A, 12B.
13. Impugnare la parte superiore B dalla bbia di aggancio,
opposta al regolatore (g. 13A), ed inlarla nell’ apposita
fessura di materassino e struttura (g. 13B). Quando la
bbia di aggancio si trova oltre la struttura, far scorrere il
nastro sulla base ed inlarlo nella seconda fessura (g. 13C,
13D, 13E).
ATTENZIONE: Controllare che i nastri siano ben stesi e non
arrotolati su se stessi.
14. Posizionare il kit comfort, composto da due spallacci e
una protezione inguinale, come mostrato in gura 14.
15. Agganciare le bbie terminali della parte superiore del
sistema di sicurezza (A) con il sistema di aggancio/sgan-
cio terminale della parte inferiore del sistema di sicurez-
za (B), come mostrato in gura 15.
16. Adattare le cinture alla corporatura del bambino agen-
do sull’apposito regolatore (g. 16).
UTILIZZO DELLA SACCA IN AUTO
ATTENZIONE: Per il montaggio e l’installazione del pro-
dotto seguire scrupolosamente le istruzioni. Evitare che
qualcuno utilizzi il prodotto senza aver letto le istruzioni.
• Conservare questo manuale insieme al prodotto.
• Per l’impiego in auto agganciare la sacca utilizzando solo il
kit per il trasporto in auto fornito in dotazione; tale kit può
essere utilizzato solo per l’aggancio della sacca.
• Nessun prodotto di sicurezza in auto può garantire la tota-
le sicurezza del bambino in caso d’incidente, ma l’utilizzo
di questo prodotto riduce il rischio d’infortunio e di morte
del bambino.
• Un utilizzo non corretto del prodotto aumenta il rischio
di seri danni al bambino, non solo in caso d’incidente, ma
anche in altre situazioni.
• Nel caso in cui il prodotto fosse danneggiato, deformato o
fortemente usurato, deve essere sostituito: potrebbe aver
perso le caratteristiche originali di sicurezza.
• Non eettuare modiche o aggiunte al prodotto senza
l’approvazione del costruttore. Non installare accessori,
parti di ricambio e componenti non forniti dal costruttore.
• Non lasciare mai il bambino incustodito nella sacca in auto
per nessun motivo.
• Non lasciare mai la sacca sul sedile dell’auto non aggancia
ta: potrebbe urtare e ferire i passeggeri.
• Nel caso in cui l’auto fosse rimasta ferma sotto il sole, ispe
zionare accuratamente la sacca prima di accomodare il
bambino, vericando che alcune parti di essa non si siano
surriscaldate: in tal caso lasciarle rareddare prima di far
sedere il bambino, in modo da evitare che possa scottarsi.
• In seguito ad un incidente anche lieve, la sacca e il KIT CAR
possono subire danni non visibili ad occhio nudo: perciò
bisogna sostituirli comunque.
• Non utilizzare prodotti per la sicurezza auto di seconda
mano: potrebbero avere subito danni strutturali non visi-
bili ad occhio nudo, ma compromettenti la sicurezza del
prodotto.
• La società ARTSANA declina ogni responsabilità per un
uso improprio del prodotto.
AVVISO IMPORTANTE
• Questo è un dispositivo di ritenuta bambini “Universale”,
omologato secondo Regolamento N°44, emendamenti
serie 04. Adatto all’impiego generale nei veicoli e compa-
tibile con la maggior parte, ma non tutti, i sedili di veicolo.
• La perfetta compatibilità è più facilmente ottenibile nei
casi in cui il costruttore del veicolo dichiara nel manuale
veicolare che il veicolo prevede l’installazione di disposi-
tivi di ritenuta bambini “Universali” per la fascia di età in
questione.
• Questo dispositivo di ritenuta è stato classicato
“Universale” secondo criteri di omologazione più severi
rispetto a modelli precedenti che non dispongono del
presente avviso.
• Adatto solamente per l’impiego nei veicoli dotati di cintu-
ra di sicurezza a 3 punti, statica o con arrotolatore, omolo-
gata in base al Regolamento UN/ECE N°16 o altri standard
equivalenti.
• In caso di dubbio, contattare il produttore del dispositivo
di ritenuta oppure il rivenditore.
REQUISITI DEL SEDILE AUTO
17. Per poter agganciare la sacca al sedile, il sedile deve ave-
re i seguenti requisiti:
• deve essere rivolto in senso di marcia (g. 17A);
• deve essere un sedile posteriore dotato di almeno 2 cin-
ture passeggero a 3 punti di ancoraggio (g. 17B), omo-
logate secondo la norma UNI/ECE 16, o altra norma equi-
valente.
FISSAGGIO E RIMOZIONE DELLA SACCA IN AUTO
Per installare il KIT CAR, prima di posizionare la sacca in auto,
seguire le seguenti istruzioni di montaggio:
FIBBIE PER CINTURE AUTO
18. Per agganciare le due bbie ai perni posti alle estremità
della sacca (g. 18A), inlare ciascuna bbia nel rispetti
vo perno spingendola (g. 18B) e tirare la bbia verso il
basso no a sentire uno scatto (g. 18C).
ATTENZIONE: Non montare le bbie al rovescio! (g. 18D).
Ora la sacca è pronta per essere posizionata in auto.
FISSAGGIO DELLA SACCA IN AUTO
19. Per ssare la sacca al sedile posteriore, bisogna posizio-
narla al centro, allineata al sedile, e agganciarla median-
te le cinture dei due posti esterni (g. 19).
20. Se il sedile posteriore della vostra auto è dotato di cintu-
ra a 3 punti anche nel posto centrale, la sacca può esse-
re montata anche di lato, occupando il posto centrale e
il laterale, agganciata con le cinture di questi due sedili
(g. 20).
21. Estrarre e agganciare le due cinture auto alle rispettive
bbie del sedile (g. 21).
Reclinare completamente lo schienale interno della sacca
ATTENZIONE: Non utilizzare mai la sacca in auto con il suo
schienale rialzato! Non è garantita la sicurezza!
Eseguire su entrambi i lati le seguenti operazioni:
22. Impugnare la cintura auto e creare un’asola (g. 22);
23. Impugnare la bbia del kit auto e ruotare verso l’esterno
la barra rossa della bbia (g. 23).
24. Inlare nella bbia l’asola della cintura creata (g. 24A
– 24B) e ruotare la barra rossa nella posizione iniziale,
in modo che s’inli all’interno dell’asola stessa (g. 24C).
25. Tirare la cintura auto verso l’arrotolatore, premendo la
sacca contro il sedile, in modo da ssarla bene (g. 25A).
ATTENZIONE: Vericare che la sacca sia ben aderente allo
schienale e alla seduta.
ATTENZIONE: Vericare che le cinture siano ben tese (g.
25B).
SGANCIO DELLA SACCA DAL SEDILE
Eseguire sui due lati della sacca le seguenti operazioni.

10
11
bbia di aggancio si trova oltre la struttura, far scorrere il
nastro sulla base ed inlarlo nella seconda fessura (g. 13C,
13D, 13E).
ATTENZIONE: Controllare che i nastri siano ben stesi e non
arrotolati su se stessi.
14. Posizionare il kit comfort, composto da due spallacci e
una protezione inguinale, come mostrato in gura 14.
15. Agganciare le bbie terminali della parte superiore del
sistema di sicurezza (A) con il sistema di aggancio/sgan-
cio terminale della parte inferiore del sistema di sicurez-
za (B), come mostrato in gura 15.
16. Adattare le cinture alla corporatura del bambino agen-
do sull’apposito regolatore (g. 16).
UTILIZZO DELLA SACCA IN AUTO
ATTENZIONE: Per il montaggio e l’installazione del pro-
dotto seguire scrupolosamente le istruzioni. Evitare che
qualcuno utilizzi il prodotto senza aver letto le istruzioni.
• Conservare questo manuale insieme al prodotto.
• Per l’impiego in auto agganciare la sacca utilizzando solo il
kit per il trasporto in auto fornito in dotazione; tale kit può
essere utilizzato solo per l’aggancio della sacca.
• Nessun prodotto di sicurezza in auto può garantire la tota-
le sicurezza del bambino in caso d’incidente, ma l’utilizzo
di questo prodotto riduce il rischio d’infortunio e di morte
del bambino.
• Un utilizzo non corretto del prodotto aumenta il rischio
di seri danni al bambino, non solo in caso d’incidente, ma
anche in altre situazioni.
• Nel caso in cui il prodotto fosse danneggiato, deformato o
fortemente usurato, deve essere sostituito: potrebbe aver
perso le caratteristiche originali di sicurezza.
• Non eettuare modiche o aggiunte al prodotto senza
l’approvazione del costruttore. Non installare accessori,
parti di ricambio e componenti non forniti dal costruttore.
• Non lasciare mai il bambino incustodito nella sacca in auto
per nessun motivo.
• Non lasciare mai la sacca sul sedile dell’auto non aggancia
ta: potrebbe urtare e ferire i passeggeri.
• Nel caso in cui l’auto fosse rimasta ferma sotto il sole, ispe
zionare accuratamente la sacca prima di accomodare il
bambino, vericando che alcune parti di essa non si siano
surriscaldate: in tal caso lasciarle rareddare prima di far
sedere il bambino, in modo da evitare che possa scottarsi.
• In seguito ad un incidente anche lieve, la sacca e il KIT CAR
possono subire danni non visibili ad occhio nudo: perciò
bisogna sostituirli comunque.
• Non utilizzare prodotti per la sicurezza auto di seconda
mano: potrebbero avere subito danni strutturali non visi-
bili ad occhio nudo, ma compromettenti la sicurezza del
prodotto.
• La società ARTSANA declina ogni responsabilità per un
uso improprio del prodotto.
AVVISO IMPORTANTE
• Questo è un dispositivo di ritenuta bambini “Universale”,
omologato secondo Regolamento N°44, emendamenti
serie 04. Adatto all’impiego generale nei veicoli e compa-
tibile con la maggior parte, ma non tutti, i sedili di veicolo.
• La perfetta compatibilità è più facilmente ottenibile nei
casi in cui il costruttore del veicolo dichiara nel manuale
veicolare che il veicolo prevede l’installazione di disposi-
tivi di ritenuta bambini “Universali” per la fascia di età in
questione.
• Questo dispositivo di ritenuta è stato classicato
“Universale” secondo criteri di omologazione più severi
rispetto a modelli precedenti che non dispongono del
presente avviso.
• Adatto solamente per l’impiego nei veicoli dotati di cintu-
ra di sicurezza a 3 punti, statica o con arrotolatore, omolo-
gata in base al Regolamento UN/ECE N°16 o altri standard
equivalenti.
• In caso di dubbio, contattare il produttore del dispositivo
di ritenuta oppure il rivenditore.
REQUISITI DEL SEDILE AUTO
17. Per poter agganciare la sacca al sedile, il sedile deve ave-
re i seguenti requisiti:
• deve essere rivolto in senso di marcia (g. 17A);
• deve essere un sedile posteriore dotato di almeno 2 cin-
ture passeggero a 3 punti di ancoraggio (g. 17B), omo-
logate secondo la norma UNI/ECE 16, o altra norma equi-
valente.
FISSAGGIO E RIMOZIONE DELLA SACCA IN AUTO
Per installare il KIT CAR, prima di posizionare la sacca in auto,
seguire le seguenti istruzioni di montaggio:
FIBBIE PER CINTURE AUTO
18. Per agganciare le due bbie ai perni posti alle estremità
della sacca (g. 18A), inlare ciascuna bbia nel rispetti
vo perno spingendola (g. 18B) e tirare la bbia verso il
basso no a sentire uno scatto (g. 18C).
ATTENZIONE: Non montare le bbie al rovescio! (g. 18D).
Ora la sacca è pronta per essere posizionata in auto.
FISSAGGIO DELLA SACCA IN AUTO
19. Per ssare la sacca al sedile posteriore, bisogna posizio-
narla al centro, allineata al sedile, e agganciarla median-
te le cinture dei due posti esterni (g. 19).
20. Se il sedile posteriore della vostra auto è dotato di cintu-
ra a 3 punti anche nel posto centrale, la sacca può esse-
re montata anche di lato, occupando il posto centrale e
il laterale, agganciata con le cinture di questi due sedili
(g. 20).
21. Estrarre e agganciare le due cinture auto alle rispettive
bbie del sedile (g. 21).
Reclinare completamente lo schienale interno della sacca
ATTENZIONE: Non utilizzare mai la sacca in auto con il suo
schienale rialzato! Non è garantita la sicurezza!
Eseguire su entrambi i lati le seguenti operazioni:
22. Impugnare la cintura auto e creare un’asola (g. 22);
23. Impugnare la bbia del kit auto e ruotare verso l’esterno
la barra rossa della bbia (g. 23).
24. Inlare nella bbia l’asola della cintura creata (g. 24A
– 24B) e ruotare la barra rossa nella posizione iniziale,
in modo che s’inli all’interno dell’asola stessa (g. 24C).
25. Tirare la cintura auto verso l’arrotolatore, premendo la
sacca contro il sedile, in modo da ssarla bene (g. 25A).
ATTENZIONE: Vericare che la sacca sia ben aderente allo
schienale e alla seduta.
ATTENZIONE: Vericare che le cinture siano ben tese (g.
25B).
SGANCIO DELLA SACCA DAL SEDILE
Eseguire sui due lati della sacca le seguenti operazioni.
26. Sganciare la bbia dalla sacca, tirando la linguetta rossa
della bbia verso l’esterno e spingendo la bbia verso
l’alto (g. 26), in modo da liberare la sacca dalla cintura.
La bbia rimane ssata alla cintura dell’auto.
ATTENZIONE: Non utilizzare mai la cintura dell’auto per
allacciare un passeggero, senza aver tolto da essa la bbia
del KIT CAR: potrebbe essere pericoloso!
27. Per rimuovere la bbia dalla cintura, allentare l’asola del
la cintura (g. 27A) e ruotare la barra rossa in modo da
liberarla (g. 27B).
AGGANCIO DELLA SACCA AL PASSEGGINO
Predisporre il passeggino, per ricevere la sacca come indi-
cato nelle istruzioni speciche del passeggino.
Per l’utilizzo con il passeggino, ricordarsi di rimuovere le
cinture di sicurezza, seguendo in senso contrario le indi-
cazioni del paragrafo CINTURE DI SICUREZZA SACCA E KIT
COMFORT .
ATTENZIONE: Il sistema di ritenuta deve essere rimosso
quando il prodotto viene usato al di fuori dell’autovettura.
ATTENZIONE: Per agganciare la sacca alla struttura del
passeggino è necessario rimuovere la seduta.
28. Impugnare la maniglia in posizione di trasporto (vertica
le) e posizionare la sacca sugli appositi ganci, facendo
attenzione che i due meccanismi verticali restino all’e-
sterno della sacca, no ad udire il clack di avvenuto ag-
gancio. Posizionare la sacca con la zona piedi rivolta ver-
so l’impugnatura del passeggino (g. 28A). Per facilitare
l’aggancio della sacca al passeggino, sui lati del tessile
sono presenti delle etichette guida che indicano il cor-
retto allineamento della sacca con i ganci degli innesti
(g. 28B).
ATTENZIONE: Prima dell’utilizzo assicurarsi che la sacca sia
ben agganciata tirandola verso l’alto.
SGANCIO DELLA SACCA DAL PASSEGGINO
29. Portare la maniglia in posizione di trasporto (verticale),
tirare verso l’esterno il tasto posto nella parte anteriore
della sacca (g. 29A) e mantenendo sollevato il tasto,
rimuovere la sacca dalla struttura tirandola verso l’alto
(g. 29B).
ATTENZIONE: L’aggancio e lo sgancio si possono eettua-
re anche con il bambino nella sacca; le suddette operazioni,
con il peso del bambino, potrebbero risultare meno age-
voli. Si raccomanda attenzione nell’eettuare le operazioni
di cui sopra.
Nota importante: Le immagini e le istruzioni contenute in
questo libretto si riferiscono ad una versione della sacca;
alcune componenti ed alcune funzionalità qui descritte
possono variare a seconda della versione da voi acquistata.
GARANZIA
Il prodotto è garantito contro ogni difetto di conformità
in normali condizioni di utilizzo secondo quanto previsto
dalle istruzioni d’uso. La garanzia non sarà applicata, dun-
que, in caso di danni derivanti da un uso improprio, usura o
eventi accidentali. Per la durata della garanzia sui difetti di
conformità si rinvia alle speciche previsioni delle normati-
ve nazionali applicabili nel Paese d’acquisto

12
13
INSTRUCTIONS FOR USE
IMPORTANT READ THE IN
STRUCTIONS CAREFULLY BE
FORE USE AND KEEP THEM FOR
FUTURE REFERENCE.
WARNING! KEEP THIS PLASTIC
COVER AWAY FROM CHILDREN TO
AVOID SUFFOCATION.
WARNINGS
• WARNING: Never leave your child
unattended.
• WARNING: This product is only suit-
able for a child who cannot sit up un-
aided, roll over and cannot push up
on its hands and knees. Maximum
weight of the child: 9 Kg.
• Indicative age of use: 0 – 5/6
months.
• WARNING: Only use on a rm
ground wich is horizontal, level
and dry.
• WARNING: Do not let other chil-
dren play unattended near the car-
ry cot.
• WARNING: Do not use if any part
of the carry cot is broken, torn or
missing.
• WARNING: The carrycot can be
used for car transportation only if it
is applied to the "CAR KIT", included.
• Only use spare parts supplied or
approved by the manufacturer.
• Always be aware of the risk of open
re and other sources of strong
heat, such as electric bar res, gas
res etc. in the near vicinity of the
carry cot.
• WARNING: Never use this product
on a stand.
• WARNING: If you purchase a mat-
tress separately to replace the one
supplied, make sure it ts the prod-
uct. The maximum thickness of the
mattress must not exceed 10 mm.
• WARNING: Do not add another
mattress on the upper part of the
mattress supplied or recommend-
ed by the manufacturer.
• Check regularly the handles and bot-
tom of the carry cot in order to notice
any possible damage or wear and
tear. If any damage or signs of wear
and tear are noticeable, do not use
the product and keep out of reach of
children.
• Before assembly, check that neither
the product nor any of its compo-
nents have been damaged during
transportation. In this case, do not
use and keep out of reach of chil-
dren.
• Before lifting the carrycot to car-
ry your baby, make sure that the
handle is in the correct position
for use.
• Do not attach accessories, spare
parts or components not supplied
by the Manufacturer. Any unau-
thorised modications made to
the product will relieve the manu-
facturer from all responsibilities.
• Do not leave anything inside the
carrycot that might reduce its
depth.
• This carrycot is only suitable for
use on CHICCO “LOVE UP” and
“STYLEGO UP”strollers.
• Make sure that the carrycot is cor-
rectly attached to the stroller be-
fore placing the child inside.
• Products exposed to direct sun-
light will heat up; leave them to
cool down before placing the child
inside.
• The carrycot is not designed for
children to sleep in for a long pe-
riod of time: this product is not a
substitute for a cot.
• It is recommended to air the car-
rycot in case it has been used for a
long time.
• Before lifting or transporting the
carrycot, the base needs to be ad-
justed to the lowest position.
• The child's head in the carrycot
must never be kept lower than the
child's body.
• WARNING: The restraint system
must be used only when transport-
ing your child in the car.
• WARNING: The restraint system
must be removed when the prod-
uct is used outside the car.
• Keep the product out of children's
reach when it is not being used.
TIPS FOR CLEANING AND MAINTENANCE
This product requires periodical maintenance. Cleaning
and maintenance operations must be performed exclu-
sively by an adult.
CLEANING
Clean the fabric parts using a wet sponge and neutral soap.
Periodically wipe clean plastic parts with a soft damp cloth.
Always dry the metal parts to prevent the formation of rust
if the folding cot has come into contact with water.
WASHING
The external/internal lining of the carrycot and the mattress
are removable and washable; in order to remove them, please
refer to the paragraph REMOVING THE CARRYCOT LINING.
it is advised to carefully follow the washing instructions
shown on the item’s label.
Below are the cleaning symbols and their meanings:
Hand wash
Do not bleach
Do not tumble dry
Do not iron
Do not dry clean

12
13
• WARNING: If you purchase a mat-
tress separately to replace the one
supplied, make sure it ts the prod-
uct. The maximum thickness of the
mattress must not exceed 10 mm.
• WARNING: Do not add another
mattress on the upper part of the
mattress supplied or recommend-
ed by the manufacturer.
• Check regularly the handles and bot-
tom of the carry cot in order to notice
any possible damage or wear and
tear. If any damage or signs of wear
and tear are noticeable, do not use
the product and keep out of reach of
children.
• Before assembly, check that neither
the product nor any of its compo-
nents have been damaged during
transportation. In this case, do not
use and keep out of reach of chil-
dren.
• Before lifting the carrycot to car-
ry your baby, make sure that the
handle is in the correct position
for use.
• Do not attach accessories, spare
parts or components not supplied
by the Manufacturer. Any unau-
thorised modications made to
the product will relieve the manu-
facturer from all responsibilities.
• Do not leave anything inside the
carrycot that might reduce its
depth.
• This carrycot is only suitable for
use on CHICCO “LOVE UP” and
“STYLEGO UP”strollers.
• Make sure that the carrycot is cor-
rectly attached to the stroller be-
fore placing the child inside.
• Products exposed to direct sun-
light will heat up; leave them to
cool down before placing the child
inside.
• The carrycot is not designed for
children to sleep in for a long pe-
riod of time: this product is not a
substitute for a cot.
• It is recommended to air the car-
rycot in case it has been used for a
long time.
• Before lifting or transporting the
carrycot, the base needs to be ad-
justed to the lowest position.
• The child's head in the carrycot
must never be kept lower than the
child's body.
• WARNING: The restraint system
must be used only when transport-
ing your child in the car.
• WARNING: The restraint system
must be removed when the prod-
uct is used outside the car.
• Keep the product out of children's
reach when it is not being used.
TIPS FOR CLEANING AND MAINTENANCE
This product requires periodical maintenance. Cleaning
and maintenance operations must be performed exclu-
sively by an adult.
CLEANING
Clean the fabric parts using a wet sponge and neutral soap.
Periodically wipe clean plastic parts with a soft damp cloth.
Always dry the metal parts to prevent the formation of rust
if the folding cot has come into contact with water.
WASHING
The external/internal lining of the carrycot and the mattress
are removable and washable; in order to remove them, please
refer to the paragraph REMOVING THE CARRYCOT LINING.
it is advised to carefully follow the washing instructions
shown on the item’s label.
Below are the cleaning symbols and their meanings:
Hand wash
Do not bleach
Do not tumble dry
Do not iron
Do not dry clean
MAINTENANCE
Always let the metal dry. Do not submerge the carrycot in
water. Routinely wipe clean plastic parts with a soft damp
cloth. To avoid friction, ensure that the locking devices of
the carrycot and stroller are free from dust or sand. Do not
leave the product exposed to the sun for a long period
of time; the fabrics may discolour. Lubricate the moving
parts only if necessary, with a light application of a silicone
based lubricant. Do not use solvents or abrasive products
for cleaning.
CARRYCOT FEATURES
The carrycot is comprehensive of the following compo-
nents: fabric lining, hood, cover, detachable mattress, com-
fort kit (two shoulder straps and a crotch strap), and detach-
able kit for car transportation.
1. The carrycot is supplied with the fabric lining already t-
ted (g. 1).
HOOD
The carrycot is equipped with a sun canopy and windshield
that can be adjusted to various positions, while the upper
part features an opening to reach the carrying handle.
2. To t the hood on the carrycot, lift the carrying handle of
the carrycot into vertical position (g. 2A), place the hood
on the handle and fasten the four snap buttons on the
edge of the hood on the matching buttons in the fabric of
the carrycot (g. 2B).
3. To fasten the hood to the handle, wrap of the fabric of the
hood around it, fasten the two snap buttons on the joint
(g. 3A) and close the Velcro straps around the handle
(g. 3B). To complete the operation, pull the edge of the
hood fabric beyond the handle (g. 3C).
REAR OPENING
4. To ensure proper ventilation, the carrycot features a rear
opening; to open it, just fold the ap on the upper part of
the carrycot (g. 4).
HOOD
5. The internal part of the hood features a fabric ring that
allows you to hang soft toys (g. 5).
COVER
6. To fasten the cover close both the zips by your child’s feet
(g. 6A). Then fasten the fabric ap of the cover to the
hood using the two snap buttons (g. 6B). To ensure the
utmost safety of your child, you can use the fabric ap in
vertical position fastening it to the relevant holes (g. 6C).
ADJUSTABLE BACKREST - COMFORT SYSTEM
7. The carrycot's backrest can be adjusted gradually. To in-
cline or recline the backrest, use the wheel located on
the outer part of the carrycot near the baby’s feet (g. 7).
CARRYING HANDLE
8. The carrycot features a comfortable carry handle that
can be adjusted in three positions (g. 8): A) Transport B)
Middle C) Rest.
9. To put the handle in the vertical position, grasp it in the
centre and pull it up until you hear a click (g. 9A); to re-
turn the handle to middle position, press the two buttons
on the joint of the handle at the same time; to go from
30° C

14
15
the middle position to the rest position, repeat the step
and move the handle down (g. 9B).
WARNING: Do not transport the carrycot with the handle
in middle or rest position, but only with the handle in carry-
ing position (vertical).
REMOVING THE CARRYCOT LINING
Before starting to remove the carrycot lining, unfasten the
safety harness (see the paragraph “Using the carrycot safety
harness”) and remove the comfort kit (see the paragraph
“Using the carrycot in the car”). To remove the hood and
cover, carry out the steps shown in points 2, 3 and 6 in the
reverse order.
10. To remove the fabric of the carrycot:
• remove the plastic aps on the sides of the carrycot (g. 10A)
• fold back the inner fabric (g. 10B)
• release the two elastic straps on both sides of the struc-
ture from the holes in the frame (g. 10C), making them
pass through the slots
• Remove the fabric from the pin in the head zone of
the carrycot (g. 10D) and pull out the fabric (g. 10E)
and make it slide under the carrycot’s structure until it
comes out completely.
REPLACING THE CARRYCOT LINING
To replace the carrycot lining, repeat the steps illustrated
below in reverse order using the images for removing the
lining as guidance.
Fit the fabric starting from the feet zone of the carrycot,
make it slip along the structure, insert the elastic straps in
the relevant slots, insert the plastic aps and complete the
operation by checking that the pins and button in the head
zone are free from the fabric.
CARRYCOT SAFETY HARNESS AND COMFORT KIT
11. The safety system (g. 11) is divided into two parts:
A. Bottom part
B. Top part
WARNING: The safety harness must be used only in order
to transport the child in the car.
12. Fit the straps with buckle on the bottom part (A) of the
safety system in the relevant slots of the mattress and
structure as shown in g. 12A, 12B.
13. Grip the bottom part B from the fastening buckle opposite
the adjuster (g. 13A) and insert it in the relevant slot of the
mattress and structure (g. 13B). When the fastening strap
is beyond the structure, pass the strap on the base and in-
sert it in the second slot (g. 13C, 13D, 13E).
WARNING: Check that the straps are unwound and not
rolled around themselves.
14. Position the comfort kit, consisting of two shoulder
straps and a crotch strap, as shown in g. 14.
15. Fasten the end buckles of the top part of the safety
system (A) with the terminal fastening/release system
in the bottom part of the safety system (B), as shown
in g. 15.
16. Adapt the belts to the body of your baby by using the
relevant adjuster (g. 16).
USING THE CARRYCOT IN THE CAR
WARNING: Read these instructions carefully before install-
ing and uninstalling the product. Prevent anybody from
using the product without reading the instructions.
• Keep this manual with the product.
• For use in the car, fasten the carrycot using only the sup-
plied kit for car transportation; the kit can be used only to
fasten the carrycot.
• No car safety product can guarantee the total safety of
your baby in the event of a crash; however, the use of this
product reduces risks of injury and death.
• Incorrect use of the product increases the risk of serious
injuries to your baby, not only in case of a crash, but also
in other situations.
• If the product is damaged, deformed or worn, it must be
replaced: as its original safety features may have been
compromised.
• This product must not be modied in any way unless the
modication has been approved by the manufacturer. Do
not install accessories, spare parts, or any component not
supplied by the manufacturer.
• Never leave the child unattended in the carrycot.
• Never leave the carrycot on the car seat unfastened: it
might knock against other passengers injuring them.
• If the car has been left in the sunlight, check the carrycot
before placing your child in it, making sure that none of its
parts are too hot: in this case, let the car seat cool down
rst before placing the child into it, in order to avoid burns.
• After an accident, even a slight one, the carrycot and CAR
KIT may have been damaged, even if it is not visible. They
must be replaced.
• Never use used safety products: they may have suered
structural damage, even if this is not visible.
• ARTSANA declines all responsibility for the improper use
of its product.
IMPORTANT WARNING
• This is a “Universal” child retention device, homologated
according to Regulation no. 44, amendments of series 04.
suitable for general use in vehicles and compatible with
most but not all vehicles' seats.
• For perfect compatibility, check that the manufacturer of
your vehicle has indicated in the car manual whether your
vehicle foresees the installation of Universal child reten-
tion devices for the age group in object.
• This child restraint device has been classied as “Universal”
under more stringent conditions than those that were ap-
plied to earlier designs that do not display this notice.
• Only suitable if the vehicle is tted with 3-point static or
3-point retractor safety belts approved according to UN/
ECE Regulation No.16, or other equivalent standard.
• In case of doubts, contact the restraining device's manu-
facturer or reseller.
CAR SEAT REQUIREMENTS
17. The car seat must meet the following requirements in
order to let the carrycot be fastened to it:
- it must be positioned forward-facing (g. 17A);
- the rear seat must be equipped with at least two 3-point
seat belts (g. 17B), approved according to standard UNI/
ECE 16 or other equivalent standard.
FASTENING AND REMOVING THE CARRYCOT IN THE
CAR
To install the CAR KIT, following the assembly instructions
below before positioning the carrycot in the car:
BUCKLES FOR CAR SEAT BELTS
18. To fasten the two buckles on the pins located at the
ends of the carrycot (g. 18A), insert each buckle in the
pin pushing it (g. 18B) and pulling the buckle down
until you hear a click (g. 18C).
WARNING: Do not assemble the buckles backwards! (g. 18D).
The carrycot is now ready to be positioned in the car.
FASTENING THE CARRYCOT IN THE CAR
19. To fasten the carrycot to the rear seat, position it at the
centre, aligned with the car seat, and fasten it using the
seat belts of the two outer seats (g. 19).
20. If the rear seat of your car has a 3-point seat belt in the
middle seat too, the carrycot can be fastened also shift-
ed to one side occupying the middle seat and lateral
seat using the seat belts of these two seats (g. 20).
21. Pull and fasten the two seat belts in the seat's buckles
(g. 21).
Recline the carrycot backrest completely
WARNING: Never use the carrycot in the car with the back-
rest raised! Safety is not guaranteed!
Follow the steps below on both sides:
22. Take the seat belt and make a loop (g. 22);
23. Take the car kit buckle and rotate the buckle's red bar
outward (g. 23).
24. Insert the loop you've made in the seat belt in the buck-
le (g. 24A – 24B) and rotate the red bar to its initial po-
sition so that it ts inside the loop (g. 24C).
25. Pull the seat belt toward the retractor pressing the car-
rycot against the seat so that it is fastened well (g. 25A).
WARNING: Make sure that the carrycot is t against the
backrest and seat.
WARNING: Make sure that the belts are tensioned (g. 25B).
REMOVING THE CARRYCOT FROM THE CAR SEAT
Follow the steps below on both sides.
26. Unfasten the buckle from the carrycot pulling the buck-
le's red tab outward and pushing (g. 26) to release the
carrycot from the seat belt. The buckle is left fastened
to the seat belt.
WARNING: Never use the seat belt to fasten passenger
without removing the CAR KIT buckle: it can be dangerous!
27. To remove the buckle from the belt, loosen the loop in
the belt (g. 27A) and rotate the red bar so that it comes
out (g. 27B).
FASTENING THE CARRYCOT TO THE STROLLER
Prepare the stroller to assemble the carrycot according to
the stroller's instructions.
For use with the stroller, make sure to remove the safety
belts following the steps in paragraph CARRYCOT SAFETY
HARNESS AND COMFORT KIT in reverse order.
WARNING: The restraint system must be removed when
the product is used outside the car.
WARNING: To fasten the carrycot to the stroller structure,
remove the seat rst.
28. Hold the handle in carrying position (vertical) and posi-
tion the carrycot in the vertical joints making sure that
the two vertical mechanisms are outside the carrycot
until you hear the click conrming fastening. Place the
carrycot with the baby’s feet end facing the stroller’s
handle (g. 28A). To facilitate fastening the carrycot on
the stroller, there are labels with instructions on both

14
15
using the product without reading the instructions.
• Keep this manual with the product.
• For use in the car, fasten the carrycot using only the sup-
plied kit for car transportation; the kit can be used only to
fasten the carrycot.
• No car safety product can guarantee the total safety of
your baby in the event of a crash; however, the use of this
product reduces risks of injury and death.
• Incorrect use of the product increases the risk of serious
injuries to your baby, not only in case of a crash, but also
in other situations.
• If the product is damaged, deformed or worn, it must be
replaced: as its original safety features may have been
compromised.
• This product must not be modied in any way unless the
modication has been approved by the manufacturer. Do
not install accessories, spare parts, or any component not
supplied by the manufacturer.
• Never leave the child unattended in the carrycot.
• Never leave the carrycot on the car seat unfastened: it
might knock against other passengers injuring them.
• If the car has been left in the sunlight, check the carrycot
before placing your child in it, making sure that none of its
parts are too hot: in this case, let the car seat cool down
rst before placing the child into it, in order to avoid burns.
• After an accident, even a slight one, the carrycot and CAR
KIT may have been damaged, even if it is not visible. They
must be replaced.
• Never use used safety products: they may have suered
structural damage, even if this is not visible.
• ARTSANA declines all responsibility for the improper use
of its product.
IMPORTANT WARNING
• This is a “Universal” child retention device, homologated
according to Regulation no. 44, amendments of series 04.
suitable for general use in vehicles and compatible with
most but not all vehicles' seats.
• For perfect compatibility, check that the manufacturer of
your vehicle has indicated in the car manual whether your
vehicle foresees the installation of Universal child reten-
tion devices for the age group in object.
• This child restraint device has been classied as “Universal”
under more stringent conditions than those that were ap-
plied to earlier designs that do not display this notice.
• Only suitable if the vehicle is tted with 3-point static or
3-point retractor safety belts approved according to UN/
ECE Regulation No.16, or other equivalent standard.
• In case of doubts, contact the restraining device's manu-
facturer or reseller.
CAR SEAT REQUIREMENTS
17. The car seat must meet the following requirements in
order to let the carrycot be fastened to it:
- it must be positioned forward-facing (g. 17A);
- the rear seat must be equipped with at least two 3-point
seat belts (g. 17B), approved according to standard UNI/
ECE 16 or other equivalent standard.
FASTENING AND REMOVING THE CARRYCOT IN THE
CAR
To install the CAR KIT, following the assembly instructions
below before positioning the carrycot in the car:
BUCKLES FOR CAR SEAT BELTS
18. To fasten the two buckles on the pins located at the
ends of the carrycot (g. 18A), insert each buckle in the
pin pushing it (g. 18B) and pulling the buckle down
until you hear a click (g. 18C).
WARNING: Do not assemble the buckles backwards! (g. 18D).
The carrycot is now ready to be positioned in the car.
FASTENING THE CARRYCOT IN THE CAR
19. To fasten the carrycot to the rear seat, position it at the
centre, aligned with the car seat, and fasten it using the
seat belts of the two outer seats (g. 19).
20. If the rear seat of your car has a 3-point seat belt in the
middle seat too, the carrycot can be fastened also shift-
ed to one side occupying the middle seat and lateral
seat using the seat belts of these two seats (g. 20).
21. Pull and fasten the two seat belts in the seat's buckles
(g. 21).
Recline the carrycot backrest completely
WARNING: Never use the carrycot in the car with the back-
rest raised! Safety is not guaranteed!
Follow the steps below on both sides:
22. Take the seat belt and make a loop (g. 22);
23. Take the car kit buckle and rotate the buckle's red bar
outward (g. 23).
24. Insert the loop you've made in the seat belt in the buck-
le (g. 24A – 24B) and rotate the red bar to its initial po-
sition so that it ts inside the loop (g. 24C).
25. Pull the seat belt toward the retractor pressing the car-
rycot against the seat so that it is fastened well (g. 25A).
WARNING: Make sure that the carrycot is t against the
backrest and seat.
WARNING: Make sure that the belts are tensioned (g. 25B).
REMOVING THE CARRYCOT FROM THE CAR SEAT
Follow the steps below on both sides.
26. Unfasten the buckle from the carrycot pulling the buck-
le's red tab outward and pushing (g. 26) to release the
carrycot from the seat belt. The buckle is left fastened
to the seat belt.
WARNING: Never use the seat belt to fasten passenger
without removing the CAR KIT buckle: it can be dangerous!
27. To remove the buckle from the belt, loosen the loop in
the belt (g. 27A) and rotate the red bar so that it comes
out (g. 27B).
FASTENING THE CARRYCOT TO THE STROLLER
Prepare the stroller to assemble the carrycot according to
the stroller's instructions.
For use with the stroller, make sure to remove the safety
belts following the steps in paragraph CARRYCOT SAFETY
HARNESS AND COMFORT KIT in reverse order.
WARNING: The restraint system must be removed when
the product is used outside the car.
WARNING: To fasten the carrycot to the stroller structure,
remove the seat rst.
28. Hold the handle in carrying position (vertical) and posi-
tion the carrycot in the vertical joints making sure that
the two vertical mechanisms are outside the carrycot
until you hear the click conrming fastening. Place the
carrycot with the baby’s feet end facing the stroller’s
handle (g. 28A). To facilitate fastening the carrycot on
the stroller, there are labels with instructions on both
sides of the fabric showing you the correct alignment of
the carrycot with the fasteners (g. 28B).
WARNING: Before using, make sure that the carrycot is
properly locked on by pulling on it upwards.
REMOVING THE CARRYCOT FROM THE STROLLER
29. Position the handle in the carrying position (vertical),
pull the button on the front of the carrycot outwards
(g. 29A) and while keeping the button raised remove
the carry out from the stroller structure by pulling it up
(g. 29B).
WARNING: The fastening and releasing operations can be
carried out also with your child inside the carrycot; howev-
er, these operations may be more dicult to execute due
to the child’s weight. Pay attention when carrying out the
above mentioned operations.
Important Note:The images and instructions in this manual
refer to a single carrycot version. Some of the components
and functions described here may vary depending on the
model purchased.
WARRANTY
The product is guaranteed against any conformity defect
in normal conditions of use as provided for by the instruc-
tions for use. The warranty shall not therefore apply in the
case of damages caused by improper use, wear or acciden-
tal events. For the duration of the warranty on conformity
defects please refer to the specic provisions of applicable
national laws in the country of purchase.

16
17
NOTICE D’EMPLOI
IMPORTANT LIRE LES INSTRUC
TIONS SUIVANTES ATTENTI
VEMENT AVANT UTILISATION
ET LES CONSERVER POUR LES
BESOINS ULTÉRIEURS DE RÉFÉ
RENCE.
AVERTISSEMENT ! TENIR LES EM
BALLAGES EN PLASTIQUE HORS DE
PORTÉE DES ENFANTS POUR ÉVITER
TOUT RISQUE DE SUFFOCATION.
AVERTISSEMENTS
• AVERTISSEMENT : Ne jamais lais-
ser votre enfant sans surveillance.
• AVERTISSEMENT : Cet article
convient pour un enfant qui ne sait
pas s’asseoir seul, rouler sur lui-même
ni se redresser en appui sur les mains
et les genoux. Poids maximum du
bébé: 9 kg.
• Âge d'utilisation: 0 – 5/6 mois.
• AVERTISSEMENT : Ne poser que
sur une surface plane horizontale,
ferme et sèche.
• AVERTISSEMENT : Ne pas laisser
d'autres enfants jouer sans surveil-
lance à proximité du coun.
• AVERTISSEMENT : Ne pas utiliser
si l'un des éléments du coun est
cassé, déchiré ou manquant.
• AVERTISSEMENT : Le coun ne
peut être utilisé pour le transport
en voiture qu'en présence du CAR
KIT fourni.
• Utiliser uniquement des pièces de
rechange fournies ou approuvées
par le fabricant.
• Tenir compte des risques dérivant
de ammes ou d’autres sources de
chaleur, comme les poêles élec-
triques, à gaz, etc. à proximité im-
médiate de la nacelle.
• AVERTISSEMENT : Ne jamais poser
ce produit sur un support.
• AVERTISSEMENT : Si vous achetez
un matelas séparément pour rem-
placer celui existant, assurez-vous
qu'il s'adapte bien au produit.
L'épaisseur du matelas ne doit pas
dépasser 10 mm.
• AVERTISSEMENT : Ne pas super-
poser un autre matelas sur le ma-
telas fourni ou recommandé par le
fabricant.
• Vérier régulièrement si le produit est
enbon état,notamment lespoignées
de transport et le fond de la nacelle.
En cas de signes de dommage ou
d'usure évidents, ne pas l'utiliser et le
tenir hors de portée des enfants.
• Avant l'assemblage, vérier que
le produit et tous ses composants
ne présentent aucun endomma-
gement éventuel dû au transport ;
dans le cas contraire, le produit ne
doit pas être utilisé et il devra être
tenu hors de portée des enfants.
• Avant de soulever la nacelle
pour transporter l'enfant, s'as-
surer que la poignée est dans la
position d'utilisation correcte.
• Ne pas installer d'accessoires non
fournis par le fabricant du produit.
Toute modication du produit dé-
gage le fabricant de toute respon-
sabilité.
• Ne laisser aucun objet dans la na-
celle pouvant réduire sa profon-
deur.
• Cette nacelle ne doit être utilisée
que sur les poussettes CHICCO «
LOVE UP » et « STYLEGO UP».
• Vérier que la nacelle est correcte-
ment xée sur la poussette avant
de mettre le bébé dedans.
• Les produits laissés au soleil sur-
chauent; les laisser refroidir avant
de mettre l'enfant dedans.
• Ne jamais utiliser la nacelle pour
faire dormir l'enfant pendant des
périodes prolongées ; ce produit
ne remplace pas un lit.
• Il est conseillé d’aérer la nacelle
suite à une utilisation prolongée.
• Avant de soulever ou de transpor-
ter la nacelle, régler la base dans la
position la plus basse.
• La tête de l'enfant dans la nacelle
ne devrait jamais être plus basse
que le corps.
• AVERTISSEMENT : Le système de
retenue doit être utilisé unique-
ment pendant le transport de l'en-
fant en voiture.
• AVERTISSEMENT : Le système de
retenue doit être enlevé quand le
produit est utilisé hors de la voiture.
• Lorsqu'il n'est pas utilisé, tenir le
produit hors de portée de l’enfant.
CONSEILS DE NETTOYAGE ET D’ENTRETIEN
Ce produit doit être entretenu régulièrement. Les opéra-
tions de nettoyage et d’entretien doivent être eectuées
par un adulte.
NETTOYAGE
Nettoyer les parties en tissu avec une éponge humide et du
savon neutre. Nettoyer régulièrement les parties en plas-
tique avec un chion humide. Essuyer les parties en métal
si elles sont mouillées, pour empêcher toute formation de
rouille.
LAVAGE
Le revêtement extérieur/intérieur de la nacelle et le matelas
sont déhoussables et lavables ; avant de les ôter, consulter
le paragraphe DÉHOUSSAGE DE LA NACELLE.
Il est conseillé de s'en tenir scrupuleusement à la notice de
lavage sur l’étiquette du produit.
Les symboles de lavage et leur signication sont décrits
ci-dessous:
Laver à la main à l’eau froide

16
17
chaleur, comme les poêles élec-
triques, à gaz, etc. à proximité im-
médiate de la nacelle.
• AVERTISSEMENT : Ne jamais poser
ce produit sur un support.
• AVERTISSEMENT : Si vous achetez
un matelas séparément pour rem-
placer celui existant, assurez-vous
qu'il s'adapte bien au produit.
L'épaisseur du matelas ne doit pas
dépasser 10 mm.
• AVERTISSEMENT : Ne pas super-
poser un autre matelas sur le ma-
telas fourni ou recommandé par le
fabricant.
• Vérier régulièrement si le produit est
enbon état,notamment lespoignées
de transport et le fond de la nacelle.
En cas de signes de dommage ou
d'usure évidents, ne pas l'utiliser et le
tenir hors de portée des enfants.
• Avant l'assemblage, vérier que
le produit et tous ses composants
ne présentent aucun endomma-
gement éventuel dû au transport ;
dans le cas contraire, le produit ne
doit pas être utilisé et il devra être
tenu hors de portée des enfants.
• Avant de soulever la nacelle
pour transporter l'enfant, s'as-
surer que la poignée est dans la
position d'utilisation correcte.
• Ne pas installer d'accessoires non
fournis par le fabricant du produit.
Toute modication du produit dé-
gage le fabricant de toute respon-
sabilité.
• Ne laisser aucun objet dans la na-
celle pouvant réduire sa profon-
deur.
• Cette nacelle ne doit être utilisée
que sur les poussettes CHICCO «
LOVE UP » et « STYLEGO UP».
• Vérier que la nacelle est correcte-
ment xée sur la poussette avant
de mettre le bébé dedans.
• Les produits laissés au soleil sur-
chauent; les laisser refroidir avant
de mettre l'enfant dedans.
• Ne jamais utiliser la nacelle pour
faire dormir l'enfant pendant des
périodes prolongées ; ce produit
ne remplace pas un lit.
• Il est conseillé d’aérer la nacelle
suite à une utilisation prolongée.
• Avant de soulever ou de transpor-
ter la nacelle, régler la base dans la
position la plus basse.
• La tête de l'enfant dans la nacelle
ne devrait jamais être plus basse
que le corps.
• AVERTISSEMENT : Le système de
retenue doit être utilisé unique-
ment pendant le transport de l'en-
fant en voiture.
• AVERTISSEMENT : Le système de
retenue doit être enlevé quand le
produit est utilisé hors de la voiture.
• Lorsqu'il n'est pas utilisé, tenir le
produit hors de portée de l’enfant.
CONSEILS DE NETTOYAGE ET D’ENTRETIEN
Ce produit doit être entretenu régulièrement. Les opéra-
tions de nettoyage et d’entretien doivent être eectuées
par un adulte.
NETTOYAGE
Nettoyer les parties en tissu avec une éponge humide et du
savon neutre. Nettoyer régulièrement les parties en plas-
tique avec un chion humide. Essuyer les parties en métal
si elles sont mouillées, pour empêcher toute formation de
rouille.
LAVAGE
Le revêtement extérieur/intérieur de la nacelle et le matelas
sont déhoussables et lavables ; avant de les ôter, consulter
le paragraphe DÉHOUSSAGE DE LA NACELLE.
Il est conseillé de s'en tenir scrupuleusement à la notice de
lavage sur l’étiquette du produit.
Les symboles de lavage et leur signication sont décrits
ci-dessous:
Laver à la main à l’eau froide
Ne pas blanchir.
Ne pas sécher en machine.
Ne pas repasser.
Ne pas laver à sec.
ENTRETIEN
Sécher les parties métalliques pour empêcher toute forma-
tion de rouille. Ne pas plonger dans l'eau. Nettoyer régu-
lièrement les parties en plastique avec un chion humide.
S’assurer que les parties d’accrochage de la nacelle et de
la poussette ne sont pas recouvertes de poussière ou de
sable, pour éviter des frottements. Ne pas laisser trop long-
temps les produits au soleil ; les tissus pourraient se déco-
lorer. En cas de besoin, lubrier le produit avec de l’huile
sèche au silicone. Pour le nettoyage, ne pas utiliser de pro-
duit solvants ou abrasifs.
CARACTÉRISTIQUES DE LA NACELLE
La nacelle inclut les éléments suivants : revêtement en tis-
su, capote, couverture, matelas amovible, comfort kit (deux
épaulières et un entrejambe), kit amovible pour le transport
en voiture.
1. La nacelle est fournie avec le revêtement en tissu déjà
monté (g. 1).
CAPOTE
La nacelle est équipée d’une capote avec let pare-soleil
et pare-vent réglable sur plusieurs positions et, sur la partie
supérieure, d'une ouverture pour accéder à la poignée de
transport.
2. Pour monter la capote sur la nacelle, il faut soulever la poi-
gnée de la nacelle en la mettant en position verticale (g.
2A), poser la capote sur la poignée et accrocher les quatre
boutons-pression présents sur le bord de la capote aux
éléments correspondants situés sur le tissu de la nacelle
(g. 2B).
3. Pour xer la capote à la poignée, envelopper le tissu de
la capote autour de la poignée, accrocher les deux bou-
tons-pression situés sur le croisement (g. 3A) et fermer
les velcros autour de la poignée (g. 3B). Pour compléter
l'opération, positionner l'extrémité du tissu de la capote
au-delà de la poignée (g. 3C).
OUVERTURE AU DOS
4. La capote est équipée d'une ouverture au dos, qui per-
met d'obtenir une parfaite aération ; pour l'ouvrir, il sut
de rabattre la patte en tissu sur la partie supérieure de la
capote (g. 4).
VISIÈRE
5. La partie intérieure de la visière comporte un anneau tex-
tile qui permet d'accrocher des jouets doux (g. 5).
COUVERTURE
6. Pour xer la couverture, enler et tirer les deux fermetures
au niveau des pieds de l'enfant (g. 6A). Puis accrocher
le rabat en tissu de la couverture à la capote à l'aide des
deux boutons-pression (g. 6B). Pour une meilleure sé-
curité de l'enfant, il est possible d'utiliser le rabat en tissu
30° C

18
19
en position verticale, en l'attachant aux boutonnières
prévues à cet eet (g. 6C).
DOSSIER RÉGLABLE - SYSTÈME CONFORT
7. Le dossier de la nacelle est réglable sur plusieurs niveaux.
Pour relever et rabaisser le dossier, utiliser la molette si-
tuée à l'extérieur de la nacelle, au niveau des pieds de
l’enfant (g. 7).
POIGNÉE DE TRANSPORT
8. La nacelle est équipée d’une poignée de transport pra-
tique réglable sur trois positions (g. 8) : A) Transport B)
Intermédiaire C) Repos.
9. Pour mettre la poignée en position verticale, la saisir au
centre et la tirer vers le haut jusqu’à entendre le déclic
de xation (g. 9A) ; pour reporter la poignée en posi-
tion intermédiaire, appuyer simultanément sur les deux
boutons présents sur le croisement de la poignée ; pour
dépasser la position intermédiaire et atteindre la position
de repos, répéter l'opération et amener la poignée vers
le bas (g. 9B).
AVERTISSEMENT : la nacelle ne doit pas être transportée
lorsque la poignée est en position intermédiaire ou en po-
sition repos, mais seulement lorsqu’elle est en position de
transport (verticale).
DÉHOUSSAGE DE LA NACELLE
Avant de commencer les opérations de déhoussage de
la nacelle, déboucler les ceintures de sécurité (voir para-
graphe « Utilisation des ceintures de la nacelle») et ôter le
comfort kit (voir paragraphe « Utilisation de la nacelle en
voiture») . Pour enlever la capote et la couverture, répéter
les opérations décrites aux points 2, 3 et 6, mais dans le sens
inverse.
10. Pour déhousser la nacelle:
• ôter les pattes latérales en plastique de la nacelle (g. 10A)
• replier le tissu intérieur en arrière (g. 10B)
• dégager des boutonnières du châssis les deux élas-
tiques situés sur les côtés de la structure (g. 10C), en
les faisant passer par les fentes
• enlever le tissu de la broche située au niveau de la tête
de la nacelle (g. 10D) et continuer le déhoussage en
décrochant (g. 10E) en faisant passer le tissu sous la
structure de la nacelle jusqu’au déhoussage complet.
HABILLAGE DE LA NACELLE
Pour l’habillage de la nacelle, exécuter les opérations dé-
crites ci-après en se référant aux images du déhoussage,
mais dans le sens inverse.
Insérer le tissu à partir du niveau des pieds de la nacelle, en
le faisant passer le long de la structure, enler les élastiques
des deux côtés de la nacelle dans les fentes prévues à cet
eet, enler les pattes en plastique et compléter l’habillage
en vériant que les broches et le bouton situé au niveau de
la tête sont dégagés du tissu.
HARNAIS DE SÉCURITÉ DE LA NACELLE ET COMFORT
KIT
11. Le système de sécurité (g. 11) est divisé en deux parties:
A. Partie inférieure
B. Partie supérieure
AVERTISSEMENT : Le harnais de sécurité doit être utilisé
exclusivement pour le transport en voiture de l'enfant.
12. Introduire les sangles avec la boucle qui composent
la partie inférieure (A) du système de sécurité dans les
fentes spéciques du matelas et de la structure, comme
indiqué dans la gure 12A, 12B.
13. Saisir la partie supérieure B par la boucle d'accrochage,
opposée au régulateur (g. 13A), et l'enler dans la fente
spécique du matelas et de la structure (g. 13B). Quand la
boucle d'accrochage se trouve au-delà de la structure, faire
coulisser la sangle sur la base et l'enler dans la seconde
fente (g. 13C, 13D, 13E).
AVERTISSEMENT : Contrôler que les sangles sont bien
tendues et ne pas les entortiller.
14. Positionner le comfort kit, composé de deux épaulières
et d'une protection de l'entrejambe, comme illustré
dans la gure 14.
15. Accrocher les boucles terminales de la partie supérieure
du système de sécurité (A) au système d'accrochage/
décrochage terminal de la partie inférieure du système
de sécurité (B) comme illustré dans la gure 15.
16. Adapter le harnais à la corpulence de l'enfant en agis-
sant sur le régulateur prévu à cet eet (g. 16).
UTILISATION DE LA NACELLE EN VOITURE
AVERTISSEMENT : Pour le montage et l’installation du
produit s'en tenir scrupuleusement aux instructions. Ne pas
utiliser le produit sans avoir lu la notice.
• Conserver ce manuel avec le produit.
• Pour utiliser la nacelle en voiture, la xer en utilisant uni-
quement le kit fourni pour le transport en voiture; le kit
doit être aussi utilisé pour xer exclusivement la nacelle.
• Aucun siège auto ne peut garantir la sécurité totale de
l’enfant en cas d’accident, mais l’utilisation de ce produit
réduit les risques de blessure et protège les fonctions vi-
tales de l’enfant.
• L’utilisation non correcte du produit accroît les risques de
dommages corporels graves, non seulement en cas d’ac-
cident mais aussi dans d’autres circonstances.
• En cas de dommage, de déformation ou de forte usure
du produit, le remplacer : ses caractéristiques originales de
sécurité pourraient être compromises.
• Ne pas apporter de modications ou d’ajouts au produit
sans l’approbation du fabricant. Ne pas installer d’acces-
soires, de pièces détachées et d’éléments non fournis par
le fabricant.
• Ne jamais laisser l’enfant sans surveillance dans la nacelle.
• Ne jamais laisser la nacelle détachée sur le siège de la voi-
ture : elle risque de heurter les passagers et de les blesser.
• Si le véhicule est resté stationné longtemps au soleil, ins-
pecter soigneusement la nacelle avant d’installer l’enfant,
pour y détecter d'éventuels composants en état de sur-
chaue : si c'est le cas, les laisser refroidir avant d’y faire
asseoir l’enfant pour éviter tout risque de brûlure.
• À la suite d’un accident, même minime, la nacelle et le
CAR KIT peuvent subir des dommages non visibles à l’œil
nu : les remplacer systématiquement.
• Ne pas utiliser de produits d'occasion pour la sécurité en
voiture : Ils pourraient avoir subi des dommages structu-
raux invisibles à l’œil nu qui risquent de compromettre la
sécurité du produit.
• La société ARTSANA décline toute responsabilité en cas
d’utilisation impropre du produit.
AVERTISSEMENT IMPORTANT
• Ce dispositif de retenue pour enfant est « Universel »,
homologué conformément au Règlement N°44, amen-
dements série 04. Adapté pour un usage général sur les
véhicules et compatible avec la majeure partie (sauf ex-
ceptions) des sièges de véhicules.
• La parfaite compatibilité est plus facilement obtenue
lorsque le constructeur du véhicule spécie dans le ma-
nuel du véhicule en question que ce dernier peut recevoir
des dispositifs de retenue « Universels » pour les enfants
qui appartiennent à ce groupe d’âge.
• Ce dispositif de retenue est classé « Universel » selon des cri-
tères d’homologation plus rigoureux par rapport à des mo-
dèles précédents qui ne disposent pas de cet avertissement.
• Adapté uniquement à l’emploi dans les véhicules munis
d’une ceinture de sécurité à 3 points, statique ou à enrou-
leur, homologuée conformément au règlement UN/ECE
N°16 ou autres standards équivalents.
• En cas de doute, contacter le fabricant du dispositif de re-
tenue ou le revendeur.
CONDITIONS REQUISES POUR LE SIÈGE DUVÉHICULE
17. Pour pouvoir xer la nacelle au siège, ce dernier doit
avoir les caractéristiques suivantes :
- être tourné dans le sens de la marche (g. 17A) ;
- être un siège arrière équipé d'au moins 2 ceintures de
sécurité pour le passager possédant chacune 3 points
d'ancrage (g. 17B), homologuées conformément au rè-
glement UNI/ECE N° 16, ou autre norme équivalente.
FIXER ET DÉTACHER LA NACELLE EN VOITURE
Pour l'installation du CAR KIT, avant de placer la nacelle en
voiture, s'en tenir à la notice de montage suivante :
BOUCLES POUR CEINTURES AUTO
18. Pour attacher les deux boucles aux chevilles situées aux
extrémités de la nacelle (g. 18A), enler chaque boucle
dans sa propre cheville en la poussant (g. 18B), et les
tirer vers le bas jusqu'à entendre un déclic (g. 18C).
AVERTISSEMENT : Ne pas monter les boucles à l'envers !
(g. 18D).
Maintenant la nacelle est prête à être placée en voiture.
FIXATION DE LA NACELLE EN VOITURE
19. Pour xer la nacelle au siège arrière, on doit la placer au
centre, en veillant à ce qu'elle soit alignée par rapport
au siège, et l'attacher au travers des ceintures des deux
places extérieures (g. 19).
20. Si le siège arrière de votre voiture est aussi équipé d'une
ceinture à 3 points dans la place centrale, la nacelle
peut être montée même latéralement, en occupant les
places centrale et latérale, et attachée avec les ceintures
de ces deux sièges (g. 20).
21. Extraire et attacher les deux ceintures auto à leurs
boucles respectives du siège (g. 21).
Rabattre complètement le dossier à l'intérieur de la nacelle
AVERTISSEMENT : Ne jamais utiliser la nacelle en voiture
avec son dossier rehaussé ! La sécurité n'est pas garantie !
Eectuer ces opérations des deux côtés :
22. Saisir la ceinture de la voiture et former un œillet (gure 22) ;
23. Saisir la boucle du car kit et tourner la barre rouge de la
boucle vers l'extérieur (g. 23).
24. Enler dans la boucle l'œillet formé avec la ceinture (g.

18
19
exclusivement pour le transport en voiture de l'enfant.
12. Introduire les sangles avec la boucle qui composent
la partie inférieure (A) du système de sécurité dans les
fentes spéciques du matelas et de la structure, comme
indiqué dans la gure 12A, 12B.
13. Saisir la partie supérieure B par la boucle d'accrochage,
opposée au régulateur (g. 13A), et l'enler dans la fente
spécique du matelas et de la structure (g. 13B). Quand la
boucle d'accrochage se trouve au-delà de la structure, faire
coulisser la sangle sur la base et l'enler dans la seconde
fente (g. 13C, 13D, 13E).
AVERTISSEMENT : Contrôler que les sangles sont bien
tendues et ne pas les entortiller.
14. Positionner le comfort kit, composé de deux épaulières
et d'une protection de l'entrejambe, comme illustré
dans la gure 14.
15. Accrocher les boucles terminales de la partie supérieure
du système de sécurité (A) au système d'accrochage/
décrochage terminal de la partie inférieure du système
de sécurité (B) comme illustré dans la gure 15.
16. Adapter le harnais à la corpulence de l'enfant en agis-
sant sur le régulateur prévu à cet eet (g. 16).
UTILISATION DE LA NACELLE EN VOITURE
AVERTISSEMENT : Pour le montage et l’installation du
produit s'en tenir scrupuleusement aux instructions. Ne pas
utiliser le produit sans avoir lu la notice.
• Conserver ce manuel avec le produit.
• Pour utiliser la nacelle en voiture, la xer en utilisant uni-
quement le kit fourni pour le transport en voiture; le kit
doit être aussi utilisé pour xer exclusivement la nacelle.
• Aucun siège auto ne peut garantir la sécurité totale de
l’enfant en cas d’accident, mais l’utilisation de ce produit
réduit les risques de blessure et protège les fonctions vi-
tales de l’enfant.
• L’utilisation non correcte du produit accroît les risques de
dommages corporels graves, non seulement en cas d’ac-
cident mais aussi dans d’autres circonstances.
• En cas de dommage, de déformation ou de forte usure
du produit, le remplacer : ses caractéristiques originales de
sécurité pourraient être compromises.
• Ne pas apporter de modications ou d’ajouts au produit
sans l’approbation du fabricant. Ne pas installer d’acces-
soires, de pièces détachées et d’éléments non fournis par
le fabricant.
• Ne jamais laisser l’enfant sans surveillance dans la nacelle.
• Ne jamais laisser la nacelle détachée sur le siège de la voi-
ture : elle risque de heurter les passagers et de les blesser.
• Si le véhicule est resté stationné longtemps au soleil, ins-
pecter soigneusement la nacelle avant d’installer l’enfant,
pour y détecter d'éventuels composants en état de sur-
chaue : si c'est le cas, les laisser refroidir avant d’y faire
asseoir l’enfant pour éviter tout risque de brûlure.
• À la suite d’un accident, même minime, la nacelle et le
CAR KIT peuvent subir des dommages non visibles à l’œil
nu : les remplacer systématiquement.
• Ne pas utiliser de produits d'occasion pour la sécurité en
voiture : Ils pourraient avoir subi des dommages structu-
raux invisibles à l’œil nu qui risquent de compromettre la
sécurité du produit.
• La société ARTSANA décline toute responsabilité en cas
d’utilisation impropre du produit.
AVERTISSEMENT IMPORTANT
• Ce dispositif de retenue pour enfant est « Universel »,
homologué conformément au Règlement N°44, amen-
dements série 04. Adapté pour un usage général sur les
véhicules et compatible avec la majeure partie (sauf ex-
ceptions) des sièges de véhicules.
• La parfaite compatibilité est plus facilement obtenue
lorsque le constructeur du véhicule spécie dans le ma-
nuel du véhicule en question que ce dernier peut recevoir
des dispositifs de retenue « Universels » pour les enfants
qui appartiennent à ce groupe d’âge.
• Ce dispositif de retenue est classé « Universel » selon des cri-
tères d’homologation plus rigoureux par rapport à des mo-
dèles précédents qui ne disposent pas de cet avertissement.
• Adapté uniquement à l’emploi dans les véhicules munis
d’une ceinture de sécurité à 3 points, statique ou à enrou-
leur, homologuée conformément au règlement UN/ECE
N°16 ou autres standards équivalents.
• En cas de doute, contacter le fabricant du dispositif de re-
tenue ou le revendeur.
CONDITIONS REQUISES POUR LE SIÈGE DUVÉHICULE
17. Pour pouvoir xer la nacelle au siège, ce dernier doit
avoir les caractéristiques suivantes :
- être tourné dans le sens de la marche (g. 17A) ;
- être un siège arrière équipé d'au moins 2 ceintures de
sécurité pour le passager possédant chacune 3 points
d'ancrage (g. 17B), homologuées conformément au rè-
glement UNI/ECE N° 16, ou autre norme équivalente.
FIXER ET DÉTACHER LA NACELLE EN VOITURE
Pour l'installation du CAR KIT, avant de placer la nacelle en
voiture, s'en tenir à la notice de montage suivante :
BOUCLES POUR CEINTURES AUTO
18. Pour attacher les deux boucles aux chevilles situées aux
extrémités de la nacelle (g. 18A), enler chaque boucle
dans sa propre cheville en la poussant (g. 18B), et les
tirer vers le bas jusqu'à entendre un déclic (g. 18C).
AVERTISSEMENT : Ne pas monter les boucles à l'envers !
(g. 18D).
Maintenant la nacelle est prête à être placée en voiture.
FIXATION DE LA NACELLE EN VOITURE
19. Pour xer la nacelle au siège arrière, on doit la placer au
centre, en veillant à ce qu'elle soit alignée par rapport
au siège, et l'attacher au travers des ceintures des deux
places extérieures (g. 19).
20. Si le siège arrière de votre voiture est aussi équipé d'une
ceinture à 3 points dans la place centrale, la nacelle
peut être montée même latéralement, en occupant les
places centrale et latérale, et attachée avec les ceintures
de ces deux sièges (g. 20).
21. Extraire et attacher les deux ceintures auto à leurs
boucles respectives du siège (g. 21).
Rabattre complètement le dossier à l'intérieur de la nacelle
AVERTISSEMENT : Ne jamais utiliser la nacelle en voiture
avec son dossier rehaussé ! La sécurité n'est pas garantie !
Eectuer ces opérations des deux côtés :
22. Saisir la ceinture de la voiture et former un œillet (gure 22) ;
23. Saisir la boucle du car kit et tourner la barre rouge de la
boucle vers l'extérieur (g. 23).
24. Enler dans la boucle l'œillet formé avec la ceinture (g.
24A – 24B) et tourner la barre rouge jusqu'à sa position
initiale, en l'enlant à l'intérieur de l'œillet (g. 24C).
25. Tirer la ceinture de la voiture vers l’enrouleur, en ap-
puyant la nacelle contre le siège, en veillant à ce qu’elle
soit bien xée (g. 25A).
AVERTISSEMENT : Vérier que la nacelle adhère bien au
dossier et au siège.
AVERTISSEMENT : Vérier que les ceintures sont bien ten-
dues (g. 25B).
DÉTACHER LA NACELLE DU SIÈGE
Eectuer ces opérations des deux côtés de la nacelle :
26. Décrocher la boucle de la nacelle, en tirant la languette
rouge de la boucle vers l'extérieur, et en poussant la
boucle vers le haut (g. 26), de façon à libérer la nacelle
de la ceinture. La boucle reste xée à la ceinture de la
voiture.
AVERTISSEMENT : Ne jamais attacher un passager à la
ceinture de la voiture, sans avoir ôté la boucle du CAR KIT :
cela pourrait être dangereux !
27. Pour ôter la boucle de la ceinture, desserrer son œillet
(g. 27A) et tourner la barre rouge de façon à la libérer
(g. 27B).
FIXER LA NACELLE À LA POUSSETTE
Préparer la poussette, pour y mettre la nacelle comme indi-
qué dans la notice de la poussette.
Pour l'utiliser avec la poussette, ne pas oublier d'enlever le
harnais de sécurité en suivant les indications du paragraphe
HARNAIS DE SÉCURITÉ DE LA NACELLE ET COMFORT KIT,
mais dans le sens inverse.
AVERTISSEMENT : Le système de retenue doit être enlevé
quand le produit est utilisé hors de la voiture.
AVERTISSEMENT : pour xer la nacelle à la structure de la
poussette, il faut d'abord ôter le siège.
28. Saisir la poignée dans sa position de transport (verticale)
et placer la nacelle sur les crochets prévus à cet eet, en
faisant attention à ce que les deux mécanismes verti-
caux restent à l'extérieur de la nacelle, jusqu'à entendre
le déclic d'accrochage. Positionner la nacelle en veillant
à ce que le niveau des pieds soit orienté vers la poignée
de la poussette (g. 28A). Pour faciliter la xation de la
nacelle à la poussette, des étiquettes d'aide ont été ap-
pliquées sur les deux côtés du tissu avec l'indication de
l'alignement correct de la nacelle par rapport aux cro-
chets d'enclenchement (g. 28B).
AVERTISSEMENT : avant l’utilisation, vérier que la nacelle
est bien xée en la tirant vers le haut.
DÉTACHER LA NACELLE DE LA POUSSETTE
29. Amener la poignée en position de transport (verticale),
tirer sur le bouton situé dans la partie avant de la na-
celle vers l'extérieur (g. 29A). Ensuite, ôter la nacelle de
la structure en la tirant vers le haut, tout en tenant le
bouton relevé (g. 29B).
AVERTISSEMENT : la nacelle peut aussi être accrochée et
décrochée même si l’enfant est dedans, avec le poids de
l'enfant, les opérations susmentionnées pourraient tou-
tefois être moins aisées. Adopter des précautions particu-
lières lors des opérations décrites ci-dessus.
Note importante: les images et les instructions contenues
dans cette notice concernent une version de la nacelle ;

20
21
certains composants et certaines fonctions décrites ici pour-
raient varier en fonction du modèle choisi.
GARANTIE
Le produit est garanti contre les défauts de conformité
dans des conditions normales d'utilisation selon les indi-
cations prévues par la notice d'emploi. La garantie ne sera
donc pas appliquée en cas de dommages dérivant d'un
usage inapproprié, de l'usure ou d'événements accidentels.
En ce qui concerne la durée de la garantie contre les dé-
fauts de conformité, consulter les conditions prévues par
les normes nationales applicables dans le pays d'achat.
GEBRAUCHSANLEITUNG
WICHTIG LESEN SIE DIE AN
WEISUNGEN VOR GEBRAUCH
DER WARE SORGFÄLTIG,
UND BEWAHREN SIE SIE FÜR
SPÄTERE RÜCKFRAGEN AUF.
WARNUNG! VOR DEM GEBRAUCH
EVENTUELLE POLYBEUTEL UND
ALLE ELEMENTE, DIE TEIL DER PRO
DUKTVERPACKUNG SIND, ABNEH
MEN UND ENTSORGEN SOWIE VON
KINDERN FERNHALTEN
SICHERHEITSHINWEISE
• WARNUNG: Lassen Sie Ihr Kind nie
unbeaufsichtigt.
• WARNUNG: Dieses Produkt
ist nur für ein Kind geeig-
net, das sich noch nicht selbst
aufsetzen bzw. auf die Seite rollen
oder sich auf Hände und Knie stüt-
zen kann. Maximales Gewicht des
Kindes: 9 kg.
• Ungefähres Verwendungsalter: 0 –
5/6 Monate.
• WARNUNG: Das Produkt nur auf
einem festen, waagerechten und
trockenem Untergrund verwenden.
• WARNUNG: Lassen Sie ande-
re Kinder nicht unbeaufsich-
tigt in der Nähe der Tragetasche
spielen.
• WARNUNG: Verwenden Sie den
Kinderwagenaufsatz nicht, wenn
Teile gebrochen oder eingerissen
sind oder fehlen.
• WARNUNG: Der Kinderwagenaufsatz
kann ausschließlich für den
Transport im Auto verwendet wer-
den, wenn man den mitgelieferten
Other manuals for STYLEGO up
1
This manual suits for next models
1
Table of contents
Languages:
Other Chicco Accessories manuals
Popular Accessories manuals by other brands

G-Homa
G-Homa EMW302WFO instruction manual

Honeywell
Honeywell DT7235T Brochure & specs

OBH Nordica
OBH Nordica 9960 instruction manual

Banner
Banner U-GAGE Q45U quick start guide

Becker
Becker Centronic SensorControl SC43 operating instructions

PCB Piezotronics
PCB Piezotronics 206C Installation and operating manual