CHICK Multi-Lok User manual
Open the
Moveable Jaws
Allentare le
ganasce mobili
STEP 1
Remove the Fixed
Center Jaw
Rimuovere la ganascia
centrale fissa
STEP 2
Remove the
Moveable Jaws
imuovere le
ganasce mobili
STEP 3
Remove the Coverplate,
Seal Caps and andle Guide
Rimuovere la piastra di
coprimento ed i cappucci
laterali di protezione
STEP 4
Remove the
Slide Assembly
Rimuovere la slitta
centrale
STEP 5
Multi-Lok
Workholding Systems
QwikStart
Setting up your Multi-Lok Workholding System
takes just minutes.
The following STEPS will help guide you through the setup
procedure and show you how you can load and unload
two workpieces independently.
UsingYour CHICK
Workholding Systems
VMC and HMC Models
USER GUIDE
Refer to the User Guide for more detailed
information on how to use your Workholding System.
To download a pdf of the User Guide go to:
English: www.chick-workholding.com/support/support.html
Deutsch: www.chick-workholding.com/german.html
For more information, please call CHICK at:
1-800-33-CHICK
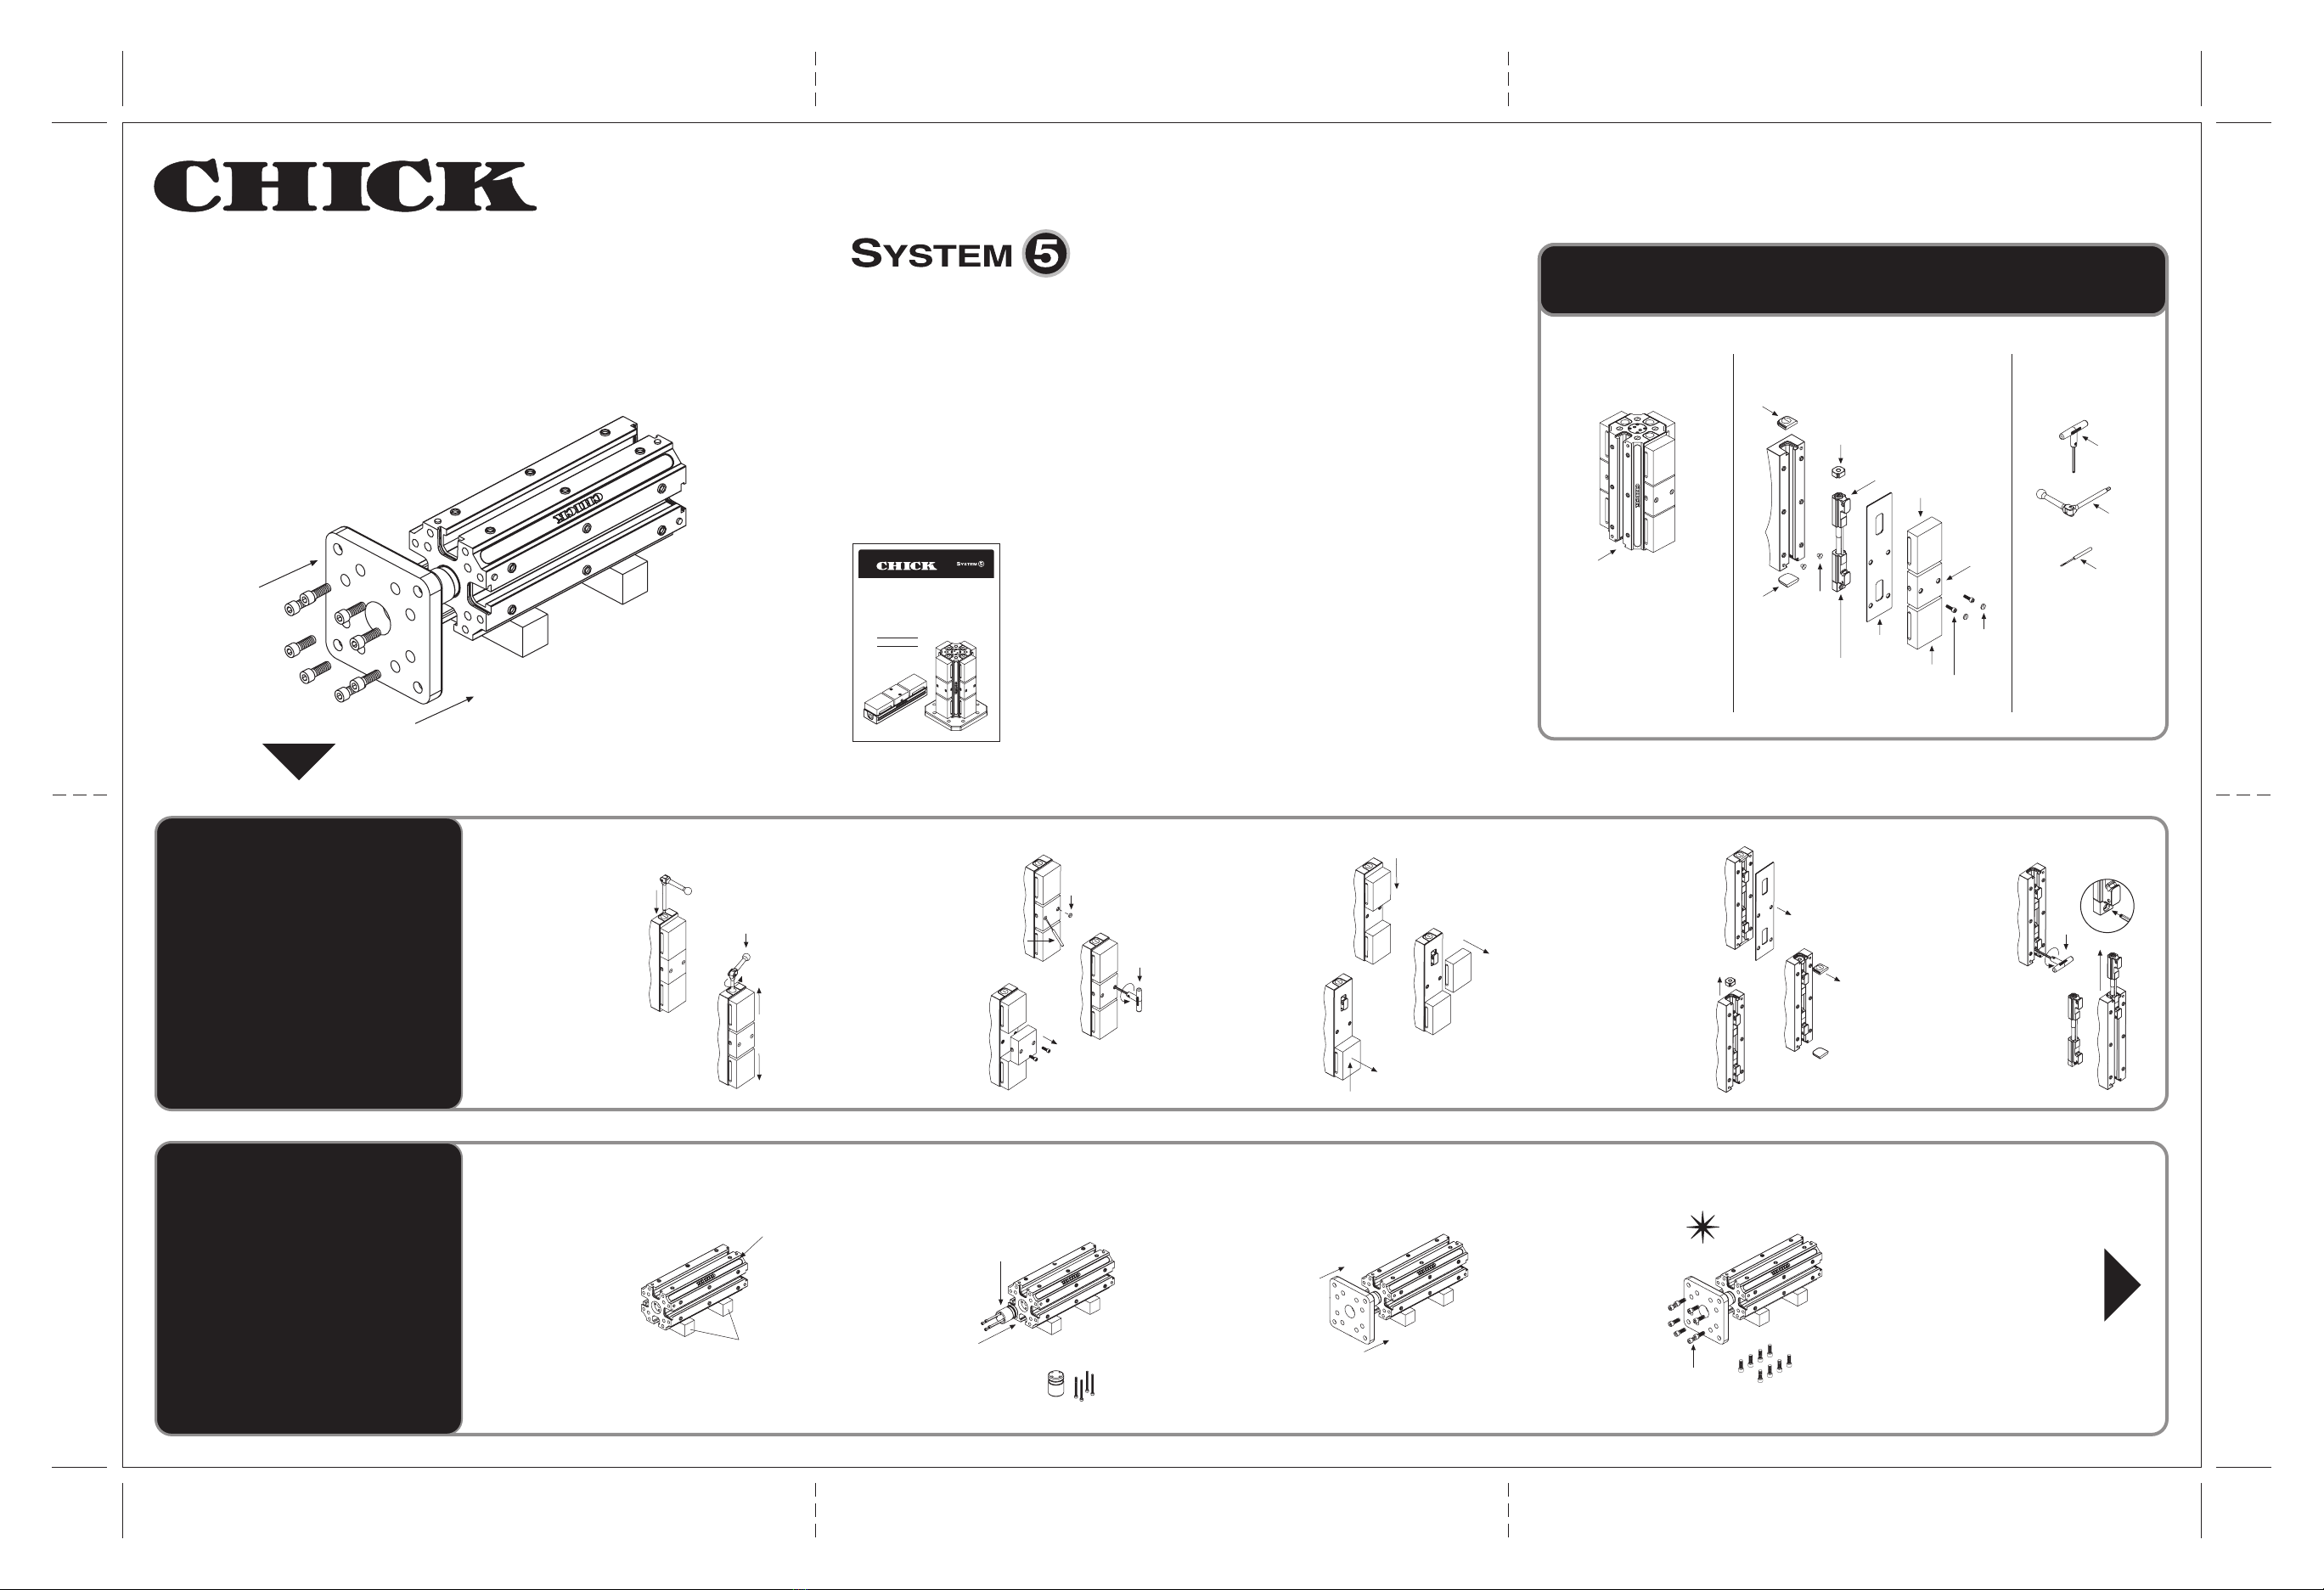
Workholding System Breakdown
Column Face Components Tools Needed
START HERE!
Maximizing Milling Profitability
Disassemble
1
One System...
Endless Opportunities
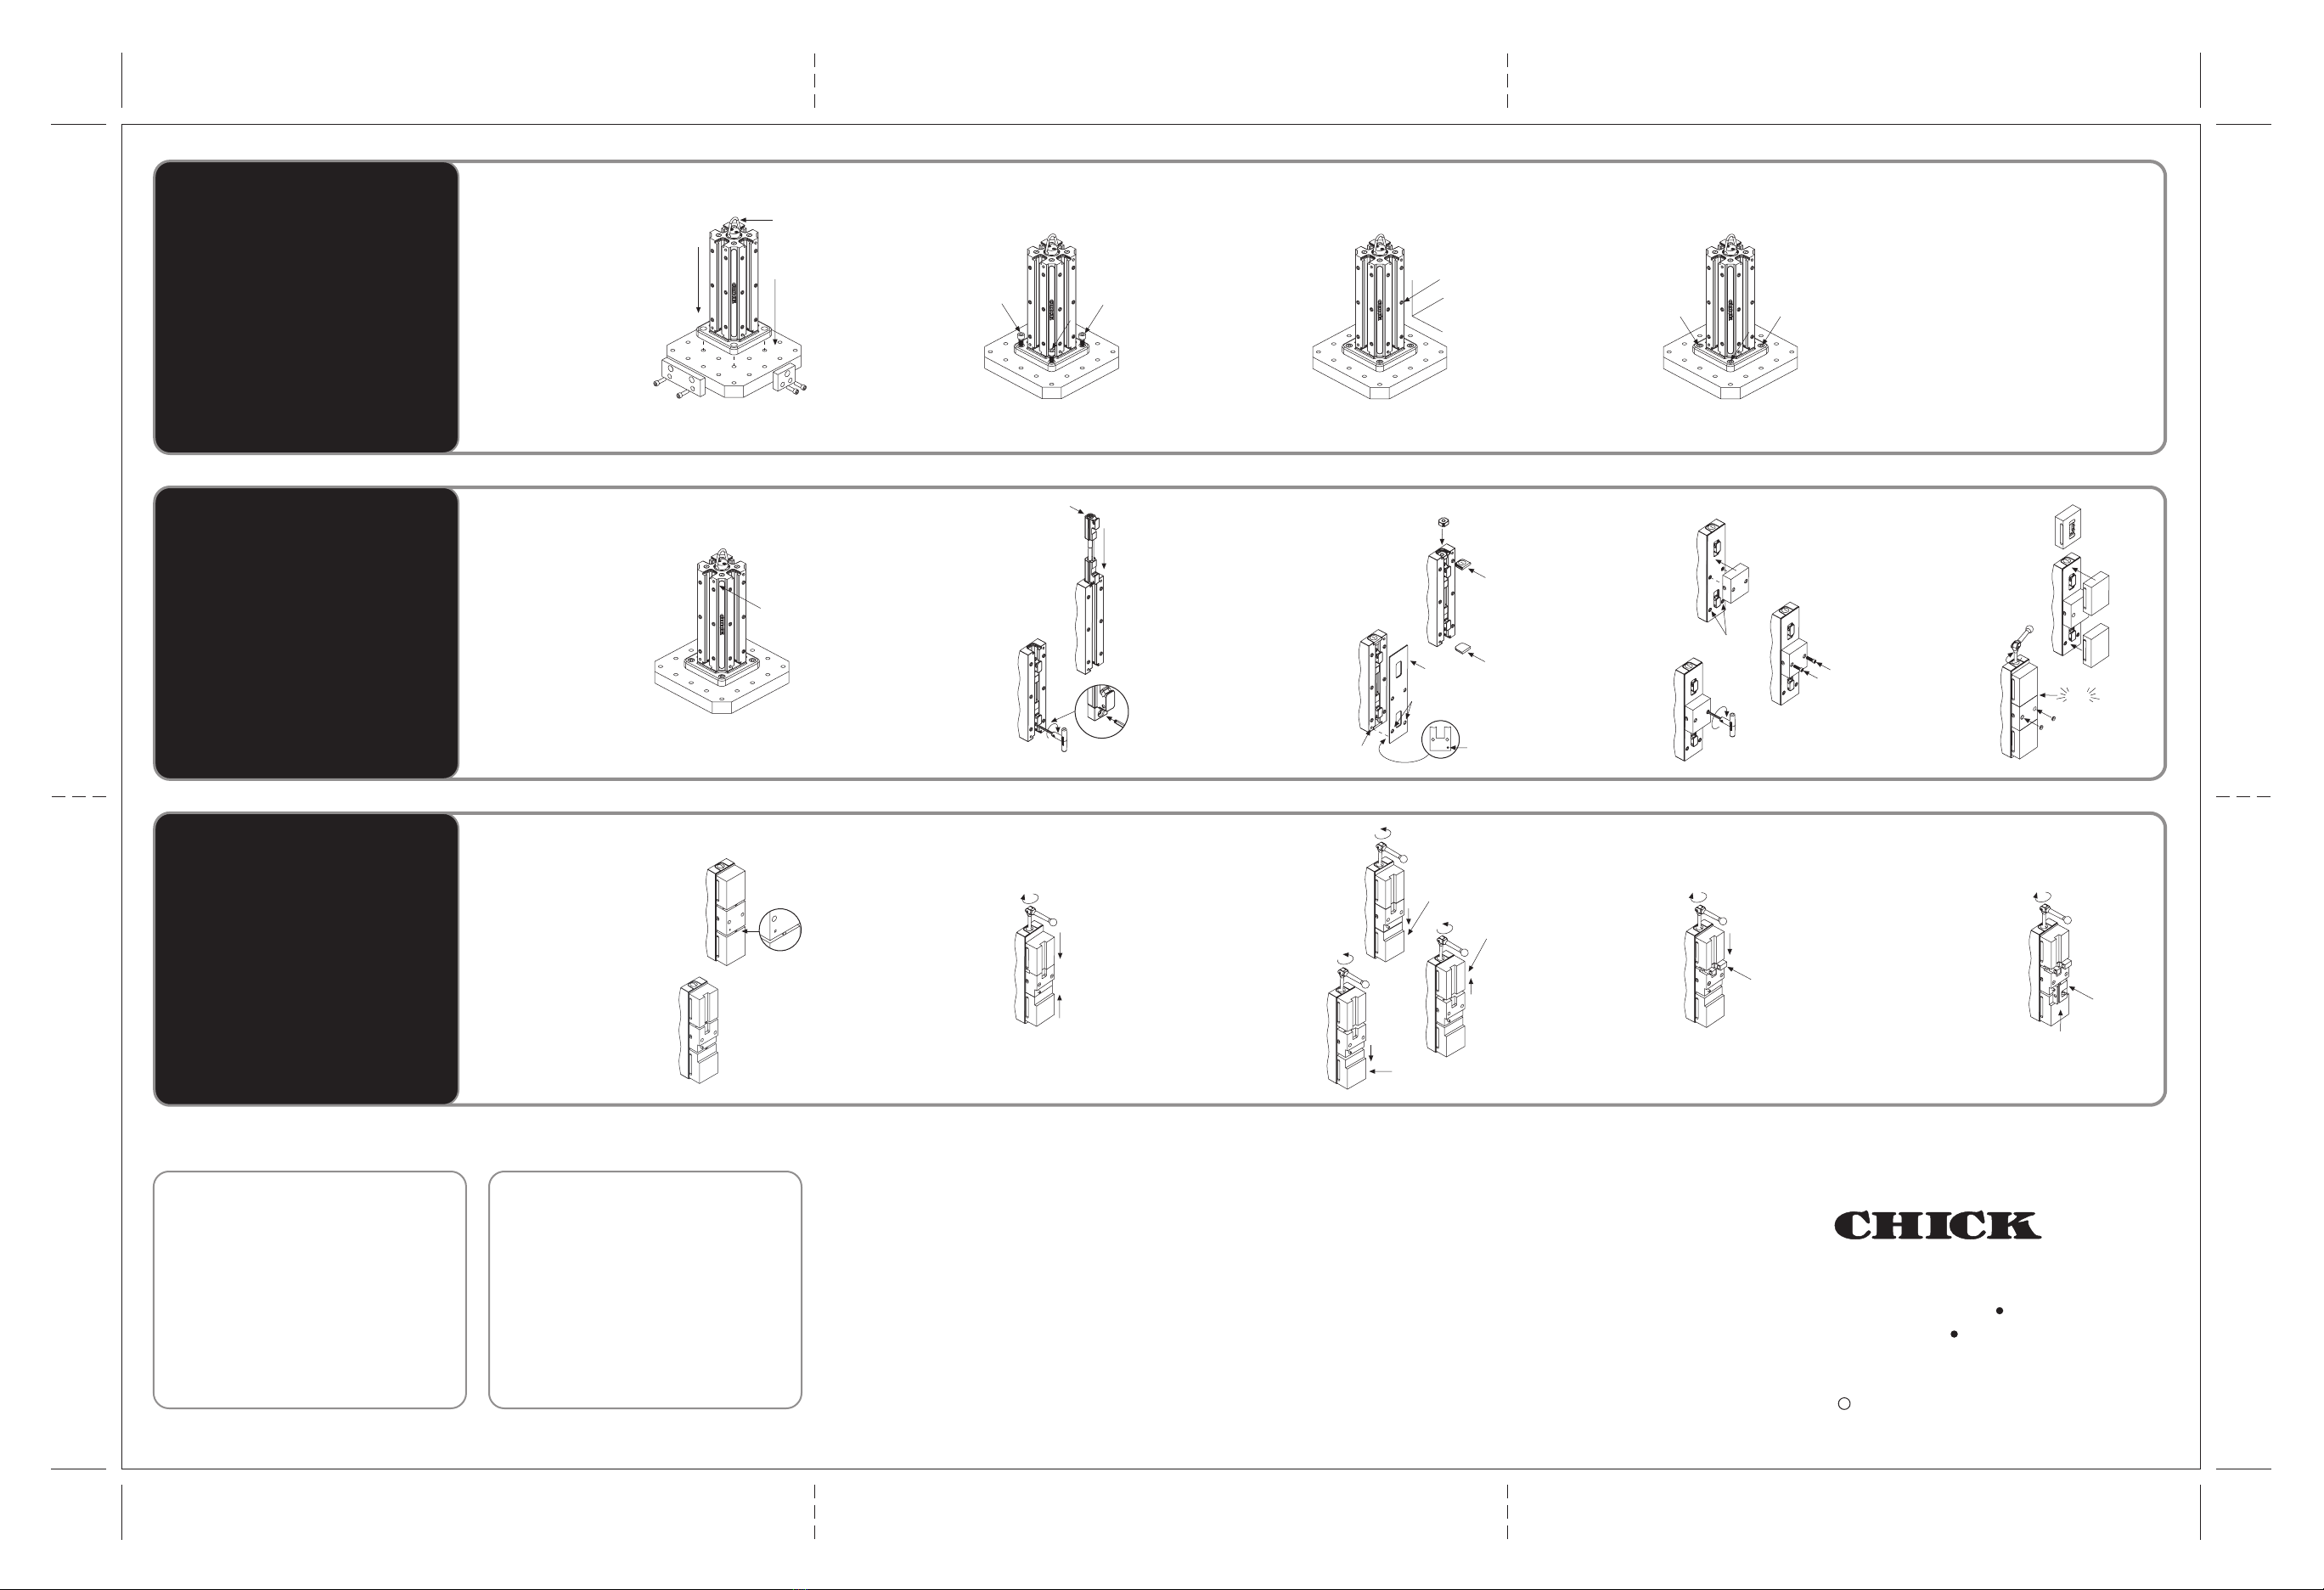
Secure the
Multi-Lok Column
Sichere den
Multi-Lok-Turm
Prendete il cubo
Multi-Lok
Secure the
Multi-Lok Column
Protêger la colomne
Multi-Lok
STEP 1
Attach Pilot Plug
to Column
Befestige den
Zentrierzapfen am Turm
Inserite il pilota neel
cubo
Attach Pilot Plug
to Column
Fixer le pilote de guidge
a la colonme
STEP 2
Attach Column to
Baseplate
Befestige die
Grundplatte am Turm
Collegate il cubo
alla base
Attach Column to
Baseplate
Fixer la colonme á la
plaque de base
STEP 3
Mounting to a
Baseplate
2
Befestigung auf einer
Grundplatte
Montare su una
Base
Mounting to a
Baseplate
Montage sur la
Plaque de base
Smontaggio
*
A
B
A
B
C
A
B
C
A
B
C
A
B
OVER
Swivel Handle Front
Moveable Jaw
Rear
Moveable Jaw
Chip Plugs
T-wrench
Screwdriver
Fixed Center
Jaw Mounting
Screws
Slide
Assembly
Multi-Lok Column-41
has 4 faces
Serial Number
Parallels
Pilot Plug
Abra las quijadas
móviles
Retire la quijada fija
central
Retire las quijadas
móviles
Retire la cubierta metálica y los
capuchones de sello
Retire la base del
conjunto
Desarmar
T-wrench
Square and Align
Column to Baseplate.
Coverplate
Handle Guide
Front
Seal Cap
Rear
Seal Cap
Chip
Plugs
Fixed Jaw
Mounting
Screws
Fixed
Center
Jaw
Front
Moveable
Jaw
Rear
Moveable
Jaw
Handle
Guide
Slide
Assembly
Coverplate
T-wrench
Rear
Seal Cap
Chip
Plugs
Front
Seal Cap
Screwdriver
Swivel
Face
Third-Hand
mechanism
Assembly
One MPP50 Column Pilot Plug
with four M6-1x70 Pilot Plug
Mounting Screws
Secure Baseplate to
Column
Verschraube die
Grundplatte mit dem Turm
Fissate la base al
cubo
Protêger la plaque de
base de la colonme
STEP 4
Secure Baseplate to
Column
Eight M12-1.75x35
Column Mounting Screws.
Tighten in
Star Pattern.
1
2
34
5
6
7
8
Ouvrir les mors
mobiles
Enlever le mors fixe Enlever les mors
mobiles
Enlever la paque detancheite
et les bouchons
Enlever lensemble
coulissean
Dimontage
Öffne die
beweglichen Backen
Entferne die feste
Mittelbacke
Nimm die beweglichen
Backen ab
Entferne die Stahlgleitplatte, die
Abdeckkappen und die
Spannkurbelführung
Ziehe den Spanntrieb
heraus
Demontage
www.chick-workholding.com
500 Keystone Drive Warrendale, PA 15086 USA
Phone: (724) 772-1644 Fax: (724) 772-1633
(800) 33-CHICK (800) 332-4425
***
Position Column/Baseplate
Assembly to Pallet
Positioniere den Turm mit
Grundplatte auf der Palette
Posizionare il cubo con la
base sul pallet
Position Column/Baseplate
Assembly to Pallet
Posikiommer la colonme et la
plaque de base sur la palette
STEP 1
Attach Assembly
to Pallet
Fixiere den Turm mit
Grundplatte auf der Palette
Collegare questo al pallet
Attach Assembly
to Pallet
Fixer sur la palette
STEP 2
Align Assembly
to Pallet
Richte den Turm mit
Grundplatte auf der Palette aus
Fare lallineamento
al pallet
Align Assembly
to Pallet
Degauchir sur la
palette
STEP 3
Secure Assembly
to Pallet
Befestige den Turm mit
Grundplatte auf der Palette
Serrare la base al pallet
Secure Assembly
to Pallet
Protêger l'ensemble
STEP 4
Mounting to a
Pallet
3
Befestigung auf einer
Palette
Montare su una
Pallet
Mounting to a
Pallet
Montage sur la
Palette
Properly Position
your System
Posizionare
lattrezzo
STEP 1
Insert Slide Assembly,
tighten Third- and Screw
Inserire la slitta
assemblata
STEP 2
Install andle Guide,
Seal Caps and Coverplate
Inserire i cappucci di
protezione e la piastra di
STEP 3
Install the Fixed
Center Jaw
Installare la ganascia
centrale fissa
STEP 4
Install Moveable Jaws
and Chip Plugs
Installare le ganasce
mobili
STEP 5
Reassemble
4Riassemblaggio
Machine Jaws
using a spacer
PriorTo:
Close the
Moveable Jaws
STEP 1
Set the System to
hold Workpieces
STEP 2
Load the Front
Workpiece
STEP 3
Load the Rear
Workpiece
STEP 4
Set Third-Hand
5
**
***
Swivel Handle
Bottom View
of Jaw
Front
Moveable
Jaw
Rear
Moveable
Jaw
Fixed
Center Jaw
Mounting
Screws
T-wrench
Handle Guide
Slide
Assembly
T-wrench
Chip Plugs
Rear
Moveable Jaw
Front
Moveable
Jaw
Rear
Moveable Jaw
*
A
B
A
B
C
A
B
A
B
AA
B
C
Made in the USA
Copyright 2003 800-0247 May 2003
c
B
Optional
Hoist Ring
Y
X
Z
Indicate
Mounting
Screws
Female
Hex
Front
Rear
CLICK
Prima...Lavorare le ganasce
bloccate su uno spaziatore
Serrare le ganasce mobili Preparare lattrezzo al
ricevimento dei pezzi
Montare il pezzo sulla
ganascia frontale
Montare laltro pezzo
sulla ganascia più lontana
Attivare la ter a mano
Repeat STEPS on every face of your workholding
system.
Auf jeder Seite des Werkst ck-Spannsystems m ssen
die SCHRITTE wiederholt werden.
Ripetete le procedure per ogni faccia del vostro sistema
di bloccaggio.
Repita LOS PASOS en cada cara de sus sistema de
sujecion.
Repeter les etapes sur chaque faces de votre systeme
de serrage.
Make sure the Third-Hand screw was tightened in
STEP 2B of Reassemble.
Es muß sichergestellt sein, dass die 3te-Hand-Schraube
im Schritt 2B der Montagebeschreibung angezogen
wurde.
Accertarsi che il dispositivo della terza mano sia serrato
al punto 2B del Riassemblaggio.
Asegurese que el tornillo de la tercera mano ha sido
apretado en el proceso de rearmado 2B.
Sassurer que la vis troisième main sort serre sufiamen
(dans letape 2B du remantage).
Maquine las quijadas usando un
espaciador
Cierre las quijadas
móviles
Ajuste el sistema para
colocar dos piezas
Cargar la pieza de trabajo Cargar la pieza de trabajo
trasera
Colocando la tercera mano
Posicione adecua
damente su sistema
Inserte la base del
ensamble
Inserte los capuchones de sello y
la placa metálica de protección
Instale la quijada
central fija
Instale las quijadas
móviles
Rearmado
Front
Seal Cap
Rear
Seal Cap
Coverplate
Guide
Single Station
Holes
Blind
Hole
Coverplate
Single Station
Locating Holes
Baseplate
Mounting Screws
Either
M12-1.75X35 (1/2-13)
M16-2x35 (5/8-11)
Finger Tighten
Third-Hand Mechanism
Serial Number
Remettre en position le
systeme
Mettre densemble
coullisseau
Mettre les bouchons et la
plaque detancheite
Mettre le mors
durs
Mettre les mors
mobiles
Remontage
Avant dusiner les mors
uholeser une cale
Fermer les mors mobiles Regler le systeme pour
serrer une pieces
Charger la piece avant Charger la piece arriere
Regler lensemble troisieme main
Befestige das System
sorgfältig
Setze den Spanntrieb ein und
fixiere die 3te- and
Installiere die Spannkurbelführung,
die Abdeckkappen und die
Stahlgleitplatte
Befestige die feste
Mittelbacke
Montiere die beweglichen
Backen
Montage
Benutze zur Bearbeitung
ein Distanzstück
Schließe die
beweglichen Backen
Stelle die
3te- and ein
Spanne das vordere
Werkstück
Spanne das hintere
Werkstück
Einstellen der 3ten-Hand
Popular Industrial Equipment manuals by other brands

Siemens
Siemens simovert EMC-Filter Compact PLUS operating instructions

Armstrong
Armstrong ASF Series Operation manual

SCHUNK
SCHUNK ROTA NCK plus Assembly and operating manual

ABB
ABB HT609588 Operation manual

Graco
Graco Series A Instructions-parts list

SUHNER MACHINING
SUHNER MACHINING BEM 20 Technical document


