Childcare 143100 User manual

www.childcareproducts.com.au www.childcareproducts.com.au
Instruction Booklet
Video Baby Monitor
143100
12
Keep this booklet in a safe place for future reference
Note: Colour and features of product may differ from the diagrams shown
Model
Video Baby Monitor
Additional products and accessories available in leading department stores
and nursery speciality shops include:-
Cots, Portable Cots, Change Tables, Highchairs, Hook on Highchairs, Safety
Gates, Bed Guards, Rockers, Pramettes, Strollers, Walkers, Nappy Bags,
Rain Covers and Wooden Cots.
Warranty
The manufacturer warrants this product to be free from defects in material
and workmanship under normal use and service following the date of
purchase for 12 months. This warranty shall not apply to damage arising from
neglect, incorrect assembly, accidental damage to, or misuse of the product.
This warranty does not apply to the rechargeable battery.
Features:
Due to our continuing programme of development, Childcare reserves the right to
alter the specifications, colour or design without further notice.
Due to variations in the style and design of our products, the illustrations used in
this instruction manual are generic.
Childcare Nursery Products
PO Box 544 Tullamarine Vic 3043
Customer Service Number: 1300 667 137
e-mail: [email protected]
This product is not intended for commercial use.
• Full colour adjustable LCD screen.
• Infra-red night vision so you can view your baby in a darkened
room.
• Transmits up to 100 metres (open space).
• Three channels to select from for minimising interference.
• Rechargeable recevier unit (batteries supplied).
•Connects to a home TV so you can work around the house
and still have the comfort of seeing your child.
• Use to record precious milestones as your child grows.
• Video unit can be mounted onto a wall to ensure line of sight
to your baby.
• Can also be used as a sound monitor only.
If you are experiencing a problem with your monitor do not return the unit to your
point of purchase, please contact us on : 1300 667 137 for any assitance and after
sales service.

www.childcareproducts.com.au www.childcareproducts.com.au
211
WARNING
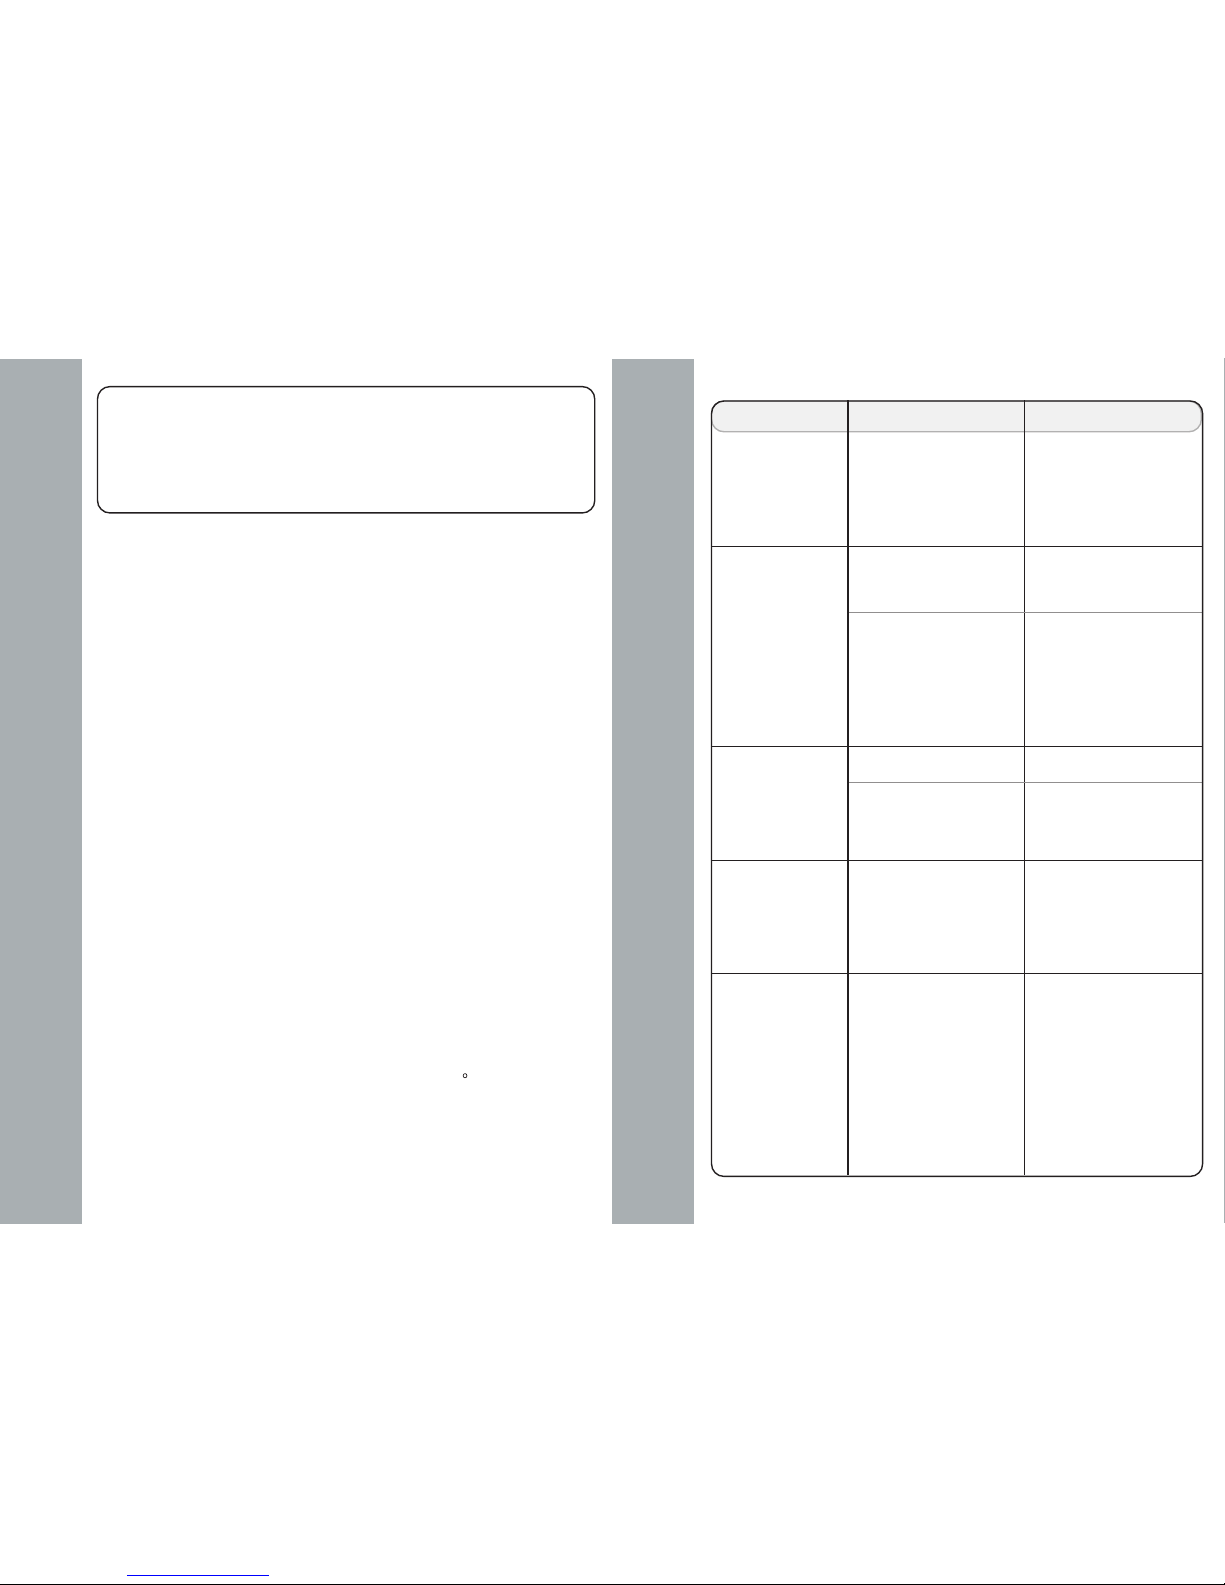
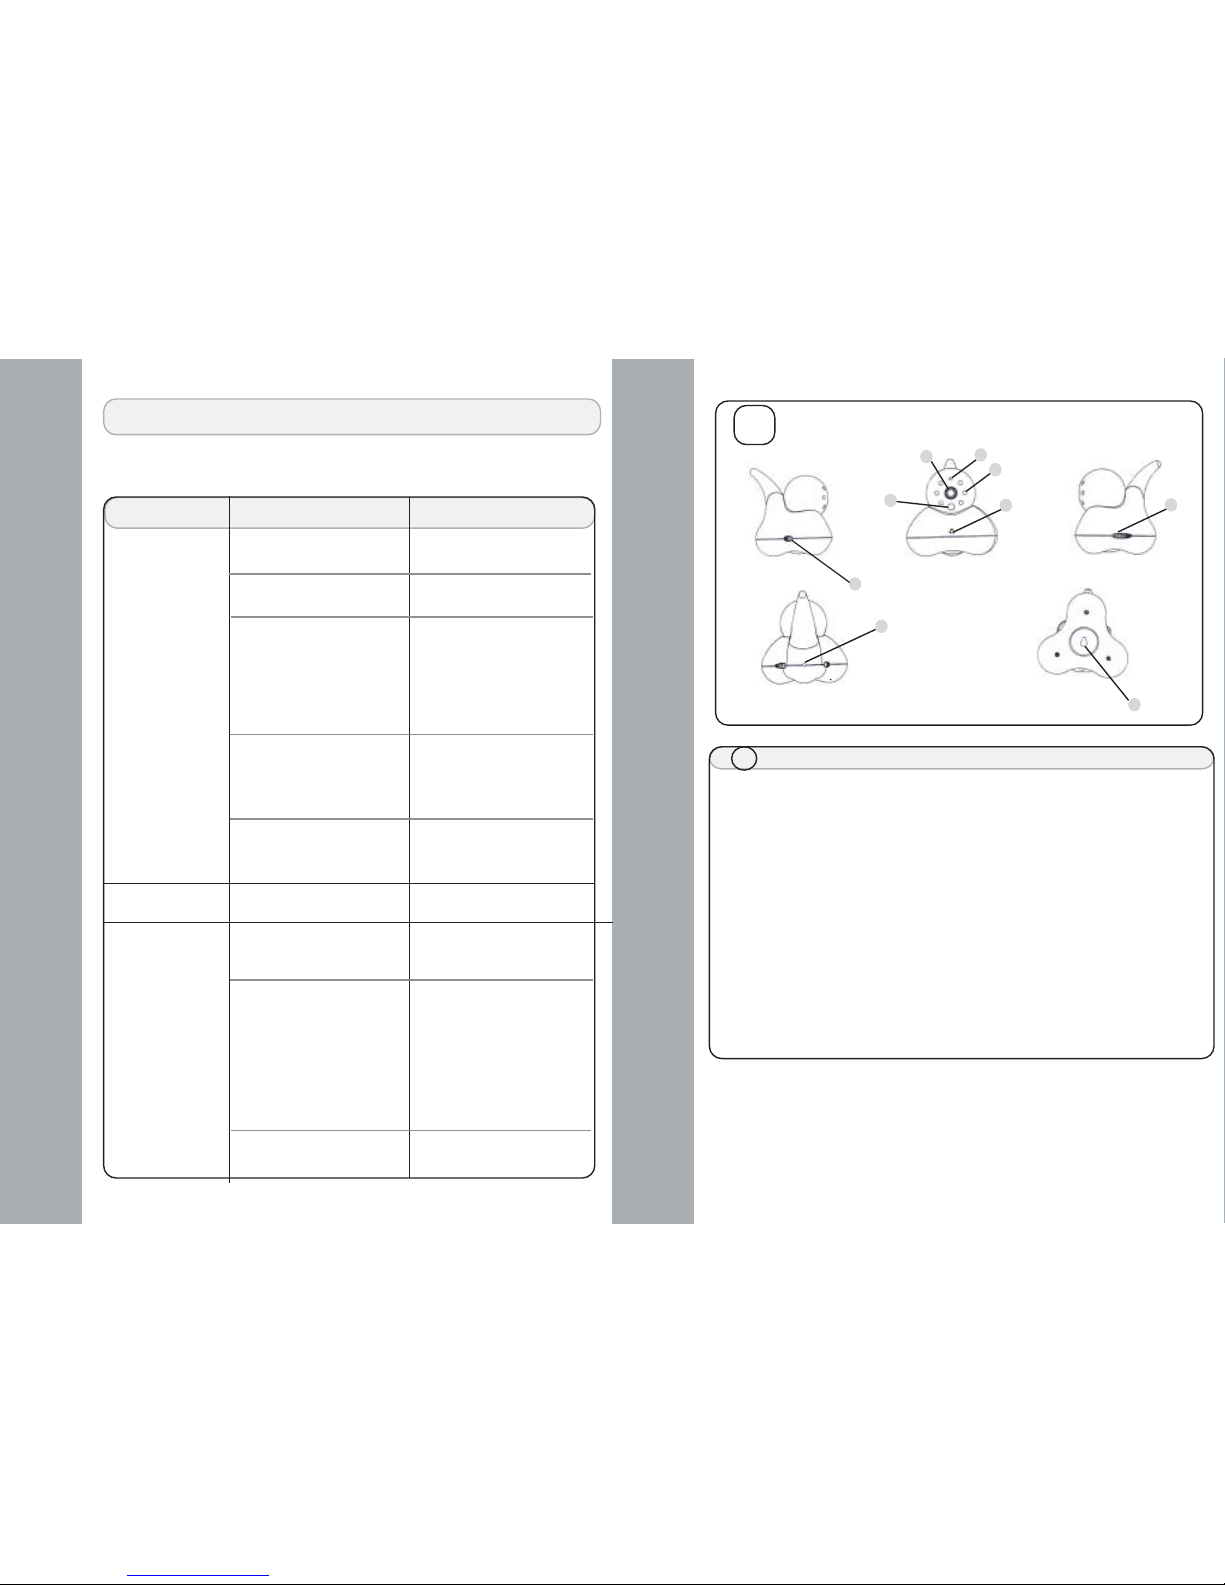
Problem Possible Cause Solution
Audio feedback
(squealing)
Receiver’s Unit is too
close to the Transmitter’s
Unit.
Move the Receiver’s
Unit further away from
the Transmitter’s Unit.
Lower the volume on the
Receiver’s Unit.
Power indicator
does not illuminate
on Transmitter’s
Unit
Transmitter’s Unit is not
turned on.
Slide the switch on the
side of the Transmitter’s
Unit to ON position.
Change both the
Receiver’s and
Transmitter’s Units to an
alternate channel
(1,2 or 3).
• Follow the manufacturer’s instructions.
• Due to the fact that different countries authorise use of different transmission
frequencies, this device may not be useable in countries other than the place where it
was purchased.
• Always check that the signal can effectively be received in the area and at the maximum
distance where you will be located.
• Mains adaptors must be connected to easily accessible power outlets.
IMPORTANT
AC Adapter not properly
connected.
Make certain that any
light switches that
control the power flow to
the wall outlet are on
(when using AC) Check
AC Adapter
connections.
Weak sound
coming from
Receiver’s Unit
Battery may be low. Recharge batteries.
Baby is too far away from
Transmitter’s Unit.
Move the Transmitter’s
Unit within 1-1.5 metres
of baby.
Transmitter’s Unit is
picking up noises or
displaying
interference from
outside your home
Receiver’s Unit is picking
up noises from outside
your home.
• This device is intended for use as an aid in the supervision of children; all other uses must be
considered improper.
• This monitor does not replace adult supervision of children.
• This monitor will stop working when there is a power outage, if it is plugged in, if its batteries
are insufficiently charged or improperly installed.
• The Transmitter is intended for indoor use only.
• Always keep this monitor and accessories out of the reach of children.
• Do not use the transmitter, the receiver or the adaptors in the presence of excessive humidity
or expose them to rain. Do not immerse in water or wet them.
• Do not place the devices close to sources of heat such as radiators or windows in the
sunshine.
• Do not use the devices in the proximity of fluorescent (neon) lights or other electrical
appliances such as televisions, motors, etc., which could affect transmission/reception
quality.
• Check that any ventilation openings in the transmitter, receiver and adaptors are always clear.
• Always unplug the AC adapters from wall outlets during long periods of non-use.
• Use only the AC adapters provided. Use of any other adapters may damage the Transmitter
and/or Receiver. Plug the AC adapters into standard household current only (240V AC outlet).
• To prevent entanglement and overheating, DO NOT use extension cords.
• The AC adapters may become slightly warm to touch during operation, this is normal.
• This device operates using public frequencies (as permitted by current laws). This means
that the receiver could capture signals or voices coming from other devices in the vicinity; in
the same way, the sounds emitted by your transmitter could be captured by other devices in
the vicinity. If this should occur, switch to other transmission channels available.
• Do not short circuit the poles or power supply to the devices.
• Do not attempt to open the devices. The transmitter, receiver and power adaptors contain no
user-serviceable parts. Contact our service personnel in the event of a fault.
• The adaptor cable could constitute a strangling hazard; keep it out of the reach of children.
• Periodically inspect the adaptors. If the power supply cable or plastic parts appear damaged,
do not use.
• Always unplug the adaptors when not in use.
• The mains adaptor may be used while batteries are in the unit.
• Use only mains adaptors and/or batteries of the type specified in these instructions or an
equivalent type. Use of different types of adaptors and/or batteries could cause damage to
the device and create a hazard for the user.
• Operating temperature for these monitors should be between 10-50 C.
• Note: The LEDs emit IR (infra red) light that is not harmful.
• Infra red LEDs will not light up- verify they are working correctly by examining video monitor
when the transmitter is in a dark room.
• Please keep your sales receipt to provide proof of purchase.
The receiver
switches on and off
repeatedly
This is not a fault, it is
within the normal
operation of the vox
system. It indicates that
the baby is making short
noises, but stops for
longer than four seconds
before another sound is
made.
Check baby.

www.childcareproducts.com.au www.childcareproducts.com.au
A-1Power LED-----------------------------------------
A-2 IR LED----------------------------------------------
A-3 Camera lens--------------------------------------
A-4 Brightness sensor-------------------------------
A-5 Microphone----------------------------------------
A-6 Channel 1-2-3------------------------------------
A-7 Power on/off---------------------------------------
A-8 DC Power (9V)------------------------------------
A-9 Wall hook hole-----------------------------------
TRANSMITTER UNIT (BABY’S UNIT)
lights when unit is switched on.
select channel 1, 2 or 3 (whichever
has less interference).
power input socket.
can be mounted to a wall.
A
high-sensitivity microphone.
3
10
A
7
Problem Solving
Problem Possible Cause
Receiver’s Unit
has no sound /
picture or static
Receiver is not turned on.
Volume is too low.
Channel switches are not
on the setting (1,2 or 3).
Signal interference due to
microwaves, monitors,
mobile or cordless
telephones, etc...
Out of range.
Turn Receiver on at the
side of the Receiver’s Unit.
Adjust the volume control
on the Reciever’s Unit.
Check the channel
switches on the
Transmitter’s Unit and
Receiver’s Unit to confirm
they are on the same
channel (1,2 or 3).
Try one of the other
channels.
Bring Receiver’s Unit
closer to Transmitter’s
Unit.
Power/low battery
indication is amber
Receiver’s Unit is not
turned on.
Turn the volume on/off
the side of th Receiver’s
Unit to the ON position.
Solution
Transmitter (baby’s unit)
If you are experiencing a problem with your monitor do not return the unit to
your point of purchase, please contact us on: 1300 667 137 for any
assistance and after sales service.
Batteries are low.
31
2
456
8
9
Recharge batteries.
Batteries too low/are
dead/Power is turned off.
Charge battery / Make
certain that any light
switches that control
the power flow to the
wall outlet are on (when
using AC). If batteries
are dead, replace
batteries.
AC Adapter not properly
connected.
Check AC Adapter
connections.
Receiver’s Unit
power indication
not on
high-sensitivity camera lens.
automatically switches on night
vision in the darkened room.
switches off power to the unit.
Infra-red night vision sensors.

www.childcareproducts.com.au www.childcareproducts.com.au
49
RECEIVER UNIT (PARENT/CARER’S UNIT)
B-1 Brightness control--------------------------------
B-2 Brightness control-------------------------------
B-3 Volume control/Off/On switch-----------------
B-4 DC power 9V--------------------------------------
B-5 Power / Charge LED----------------------------
B-6 Speaker--------------------------------------------
B-7 Channel Switch 1-2-3--------------------------
B-8 Vox. control switch------------------------------
B-9 Channel LED 1-2-3-----------------------------
B-10 Vox on-off light-----------------------------------
B-11 1.5” Display LCD--------------------------------
B-12 Battery Compartment--------------------------
B-13 A/V output-----------------------------------------
B-14 Wall / Belt mounting clip----------------------
set speaker level, switches off the
power to the unit completely.
B
Belt/Wall mounting clip.
When the batteries of the receiver unit are charged, the unit can be
carried around giving you freedom of movement while still monitoring your
baby, Use the belt clip (A-9) to attach the unit to your clothing, or hang on
the wall with appropriate fixture.
Adjustable volume control
The level at which you want to hear your baby’s sounds can be set and
adjusted via the rotary control (B-3) on the receiver.
Receiver (parent/carer’s unit)
B
12 13
11
10
8
7
6
5
4
3
2
1
9
14
select channel 1, 2, or 3
(whichever has less interference).
increases brightness.
decreases brightness.
plug mains adaptor connector into
this socket.
lights when unit is switched on.
provides clear sounds.
sound activation system.
supplied with Ni-MH batteries.
clips onto belt or can be wall mounted.
Place your Transmitter’s Unit (1.5 to 2 metres) away from the baby. Be
certain the Receiver’s Unit and Transmitter’s Unit are set on the same
channel. Check reception regulary by following the previous step above.
Adjust the volume to a comfortable level for your environment. Use the
Receiver’s Unit far enough away from the Transmitter’s Unit so as not to
get feedback. During use of the monitor, if the sound or picture quality
deteriorates you may be reaching the limits of the monitor’s range. If this
happens, you will need to move the Receiver’s Unit in closer proximity to
the Baby’s Unit. If one channel has poor reception try one of the other
channels. Test the Automatic Night Vision (infra red sensors around the
lens) by darkening the room where the Baby’s Unit is located.
NOTE: It is possible for the Receiver’s Unit to pick up sounds or display
interference from other signal producing devices which broadcast in the 2.4
GHz frequency range. To minimise this potential problem, three
independent channels have been provided. If you experience interference
while using one channel setting, simply switch the Receiver’s Unit and
Transmitter Unit, to another channel. Selecting a channel is usually a one
time adjustment. If interference persists on all channels, please refer to
the Troubleshooting section at the end of these instructions.
Guidelines for Good Reception
connects to TV set in via AV cable.
indicates if sound activation
system is on or off.
display screen.
channel selection lights.

www.childcareproducts.com.au www.childcareproducts.com.au
85
IMPORTANT: The first time you use your Transmitter’s Unit, two adults
should test it by following the below step.
1. Place the Receiver’s Unit at least (6 metres) away from transmitter’s
unit. Have an adult speak into the Transmitter’s Unit at various levels
(soft to loud) while another adult checks the Transmitter’s Unit for the
proper sound and picture reception. Place the VOX/CON button on the
Recever’s Unit in CON position. Try the Receiver’s Unit in every
location that it will be used. It is best to follow these guidelines for good
reception.
To Test the Reception
NOTE:
The camera transmitter is equipped with a night vision photo sensor.
The automatic night vision feature which provides black and white images is
ideal for monitoring a baby in the dark. No need to worry if it is day or night.
Installing Your Portable Video Monitor
plug into mains socket.
plug into DC power supply
socket.
C-1 Adaptor plug-----------------------------------------
C-2 Adaptor pin------------------------------------------
CAC POWER ADAPTER x 2
D
D-1 Parent unit connection cable-------------------
D-2 Video connection cable (yellow)---------------
D-3 Audio connection cable (white & red)---------
DAV CABLE
1
3
2
C
12
plug into parent unit.
plug into audio.
plug into video.
VOX / CON Button
A design feature which enhances the monitor’s usability by
conserving power and reducing unneccessary electromagnetic
interferences by switching to stand-by mode if no noise is made
by the baby.
The VOX lights on the Receiver’s Unit indicate VOX On after pressing the
VOX / CON button down. The more noise your Transmitter makes, the
Receiver’s colour screen turns ON. The less noise your Transmitter
makes, the Receiver’s colour screen turns OFF automatically.
CAUTION: Test the Parent’s Unit before each use. It is essentials to
check reception regularly.
To use the Transmitter’s Unit and Receiver’s Unit.
1. Turn the Transmitter’s Unit (Figure A-7) and the Receiver’s Unit (Figure
B-3) to the “ON” position. Choose a channel. Be sure that the same
channel is selected on both units (Figure A-6 and Figure B-7).
NOTE: Press the channel button on front of the Receiver’s Unit
(Figure B-7), the channel can be selected and displayed by LED
indications (Figure B-9).
2. Adjust the volume (Figure B-3) and brightness (Figure B-1 / B-2) by using
the controls on the side and front of the Receiver’s unit. Pivot the
Transmitter until desired picture displays. To save batteries, push down
the VOX / CON button to VOX mode (Figure B-8).
Operating your Portable video monitor
Note: The power adapter for the transmitter and the receiver are not
interchangable as they are supplied with different adapter pins.
3

www.childcareproducts.com.au www.childcareproducts.com.au
67
To Set up Receiver’s Unit
NOTE: The Receiver’s unit may use either the AC adapter or batteries.
When plugged in, the AC adapter will be the source of power and the
batteries will recharge.
1. For AC power use: locate the Parent’s Unit and its AC adapter.
Connect the AC adapter into the side of the Receiver’s Unit
(Figure B-4). Connect the AC adapter into a power outlet.
.
1. Connect the AC adapter into the DC Jack (rear of the Transmitter’s
Unit) (Fig A-8).
2. Connect the AC adapter into a power outlet and place cord out of the
way.
3. Wall or Desk Mount: Transmitter’s Unit can be mounted on a wall
(Figure A-9) by “wall hook hole” or desk.
To Set Up the Transmitter’s Unit
WARNING:
• To prevent entanglement, only mount the Transmitter Unit in a
location where it and its AC Adapter cord are OUT OF REACH
OF CHILDREN.
• Allow adequate ventilation of the Transmitter when mounted on a
wall.
• DO NOT mount the Transmitter Unit directly above heating
vents, other heat producing sources or in direct sunlight.
• To prevent entanglement and overheating, NEVER use an
extension cord.
• Mount the Transmitter’s Unit in a location where the camera lens
will have an unobstructed view.
• Make certain that the Transmitter’s Unit will be mounted so that
the AC Adapter cord will reach an outlet.
• The Transmitter’s Unit can be easily mounted on a wall, or it can
be placed on a stable, flat surface, such as a dresser or a table
top (hardware not included).
• Use the tilt and swivel adjustment to properly aim the
Transmitter’s Unit camera.
CAUTION
• Amber LED indicates the batteries are low. DO NOT use
Receiver’s Unit when batteries are low. Charge batteries
immediately.
• For Battery Use: The Receiver’s Unit comes with
rechargeable batteries. To charge the batteries, connect the
AC adapter into a power outlet for no less than 12 hours. For
faster charging turn off the LCD screen.
• DO NOT use alkaline batteries, only use Ni-MH batteries as
supplied. Contact our Customer Service Department on
1300 667 137 for replacement batteries, should they be
required.
• DO NOT use an adapter that did not come with this product.
• For best sound and picture quality place the Transmitter’s Unit
out of reach of child, 1.5 to 2 meters away from the baby.
• Use the Receiver’s Unit far enough away from the
Transmitter’s Unit so as not to get feedback.
• During use of the monitor, if the sound or picture quality
deteriorates you may be reaching the limits of the monitor’s
range. If this happens, you will need to move the Receiver’s
Unit in closer proximity to the Transmitter’s Unit.
Table of contents
Other Childcare Baby Monitor manuals