Childcare 143300-003 User manual

IMPORTANT:
RETAIN FOR FUTURE REFERENCE,
READ CAREFULLY
SMART BABY
CAMERA
Full HD 1080p Wi-Fi®
Video Baby Camera
Model # 143300-003

2
Device SET UP & USE:
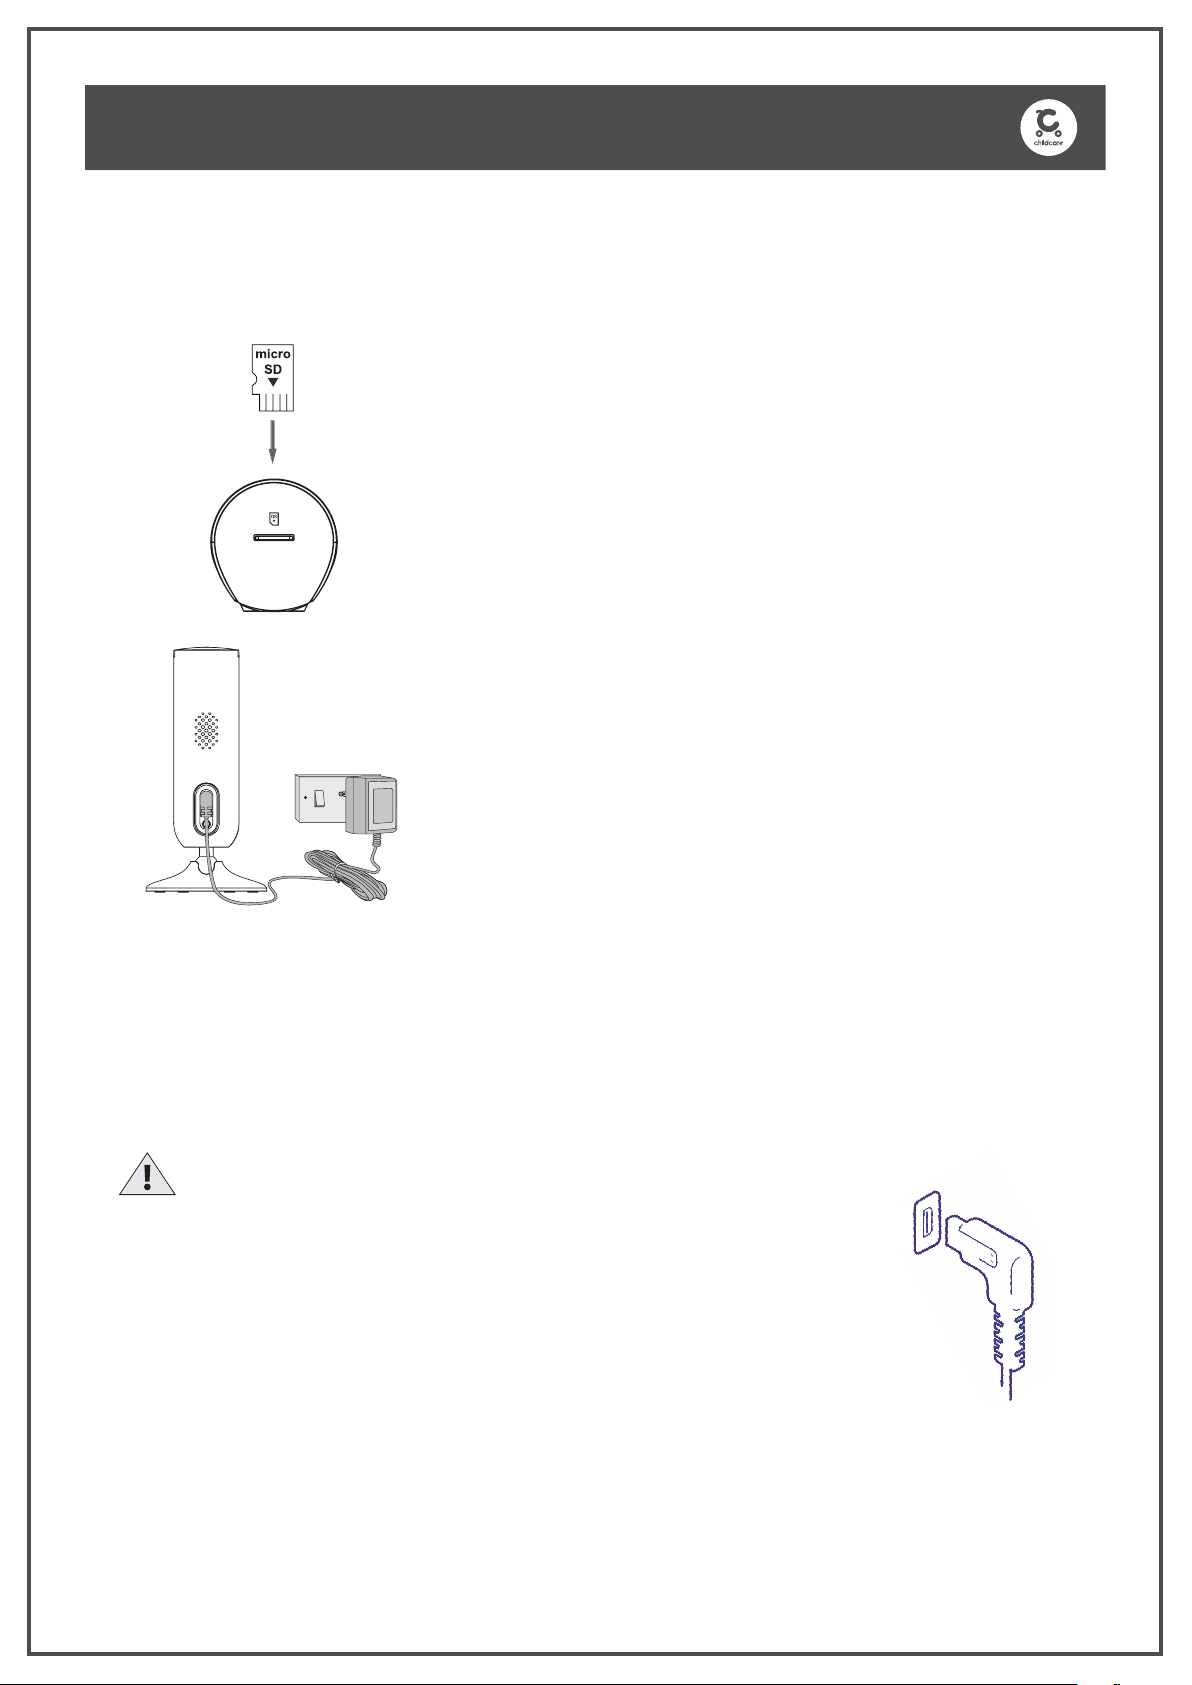
Choose a location for Smart Baby Monitor that will provide the best audio reception of your baby in his/her sleeping area.
Place the device on a at surface,such as a dresser,bureau or shelf,or mount the Unit on a wall securely using the
keyhole slots under the stand.
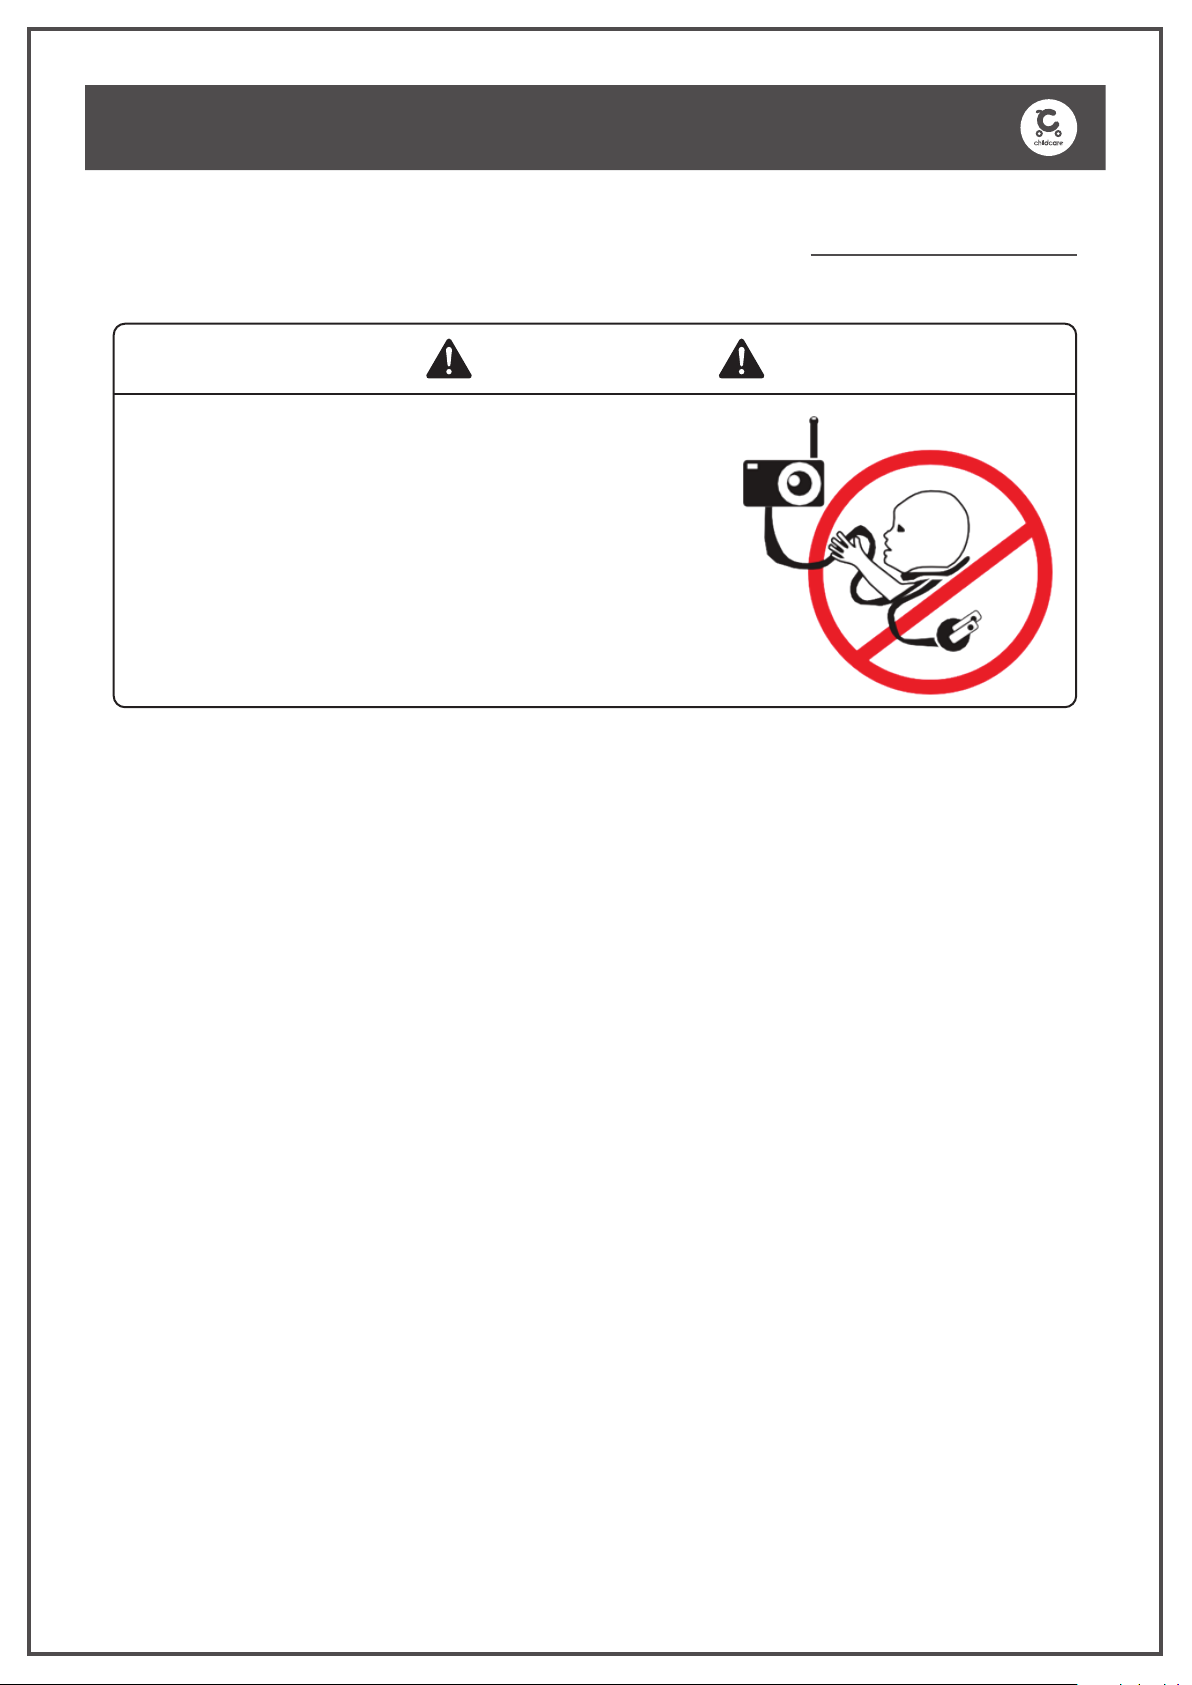
NEVER place the Unit or cords within the sleeping area.
WARNING
This Smart Baby Monitor is compliant with all relevant standards regarding electromagnetic elds and is,when handled
as described in the User’s Guide,safe to use.Therefore,always read the instructions in this User’s Guide carefully before
using the device.
Adult assembly is required. Keep small parts away from children when assembling.
This product is not a toy. Do not allow children to play with it.
This device is not a substitute for responsible adult supervision.
Keep this user’s guide for future reference.
Keep the cords out of reach of children.
Do not cover the device with a towel or blanket.
Test this product and all its functions so that you are familiar with it prior to actual use.
Do not use the device in damp areas or close to water.
Do not install the device in extreme cold or heat,direct sunlight,or close to a heat source.
Only use the chargers and power adapters provided.Do not use other chargers or power adapters as this may damage
the device and battery pack.
Do not touch the plug contacts with sharp or metal objects.
Connect the power adapters to easily accessible mains power.
Read all instructions before assembly and use of the Smart Baby Monitor.
Keep instructions for future use.
STRANGULATION HAZARD:
CHILDREN HAVE STRANGLED IN CORDS.KEEP
THIS CORD OUT OFTHE REACH OF CHILDREN
(MORETHAN 1M AWAY).
NEVER USE EXTENSION CORDS WITH AC
ADAPTERS.ONLY USETHE AC ADAPTERS
PROVIDED.
SAFETY PRECAUTIONS
WARNING

3
Due to variations in the style and design of our products, the photographs and illustrations shown in this
instruction manual are generic,therefore product fabrics,colour and design may vary from images shown.
CNP Brands reserves the right to alter product specications without notice as a result of our ongoing
policy of product improvement.
Contents
Assembly contents list
Assembly / Operating instructions
How to care for your Smart Baby Monitor
Congratulations on your purchase of the Smart Baby
Monitor
This product has been designed and developed with safety,
comfort and functionality in mind. Please take the time to read
this manual carefully before using this product and keep it in a
safe place for future reference.
CONGRATULATIONS

4
ASSEMBLY CONTENTS
Check what you have received...
You have received 1 box. Please check the contents of the
box against the list below. If anything is missing, please contact
Customer Service.
In Australia, contact CNP Brands on 1300 667 137.
Supplied loose in box:
Smart Baby
Monitor Unit
Quick Start
Guide
Adapterx 1
x 1
x 1
Quick Start
Guide

5
ASSEMBLY CONTENTS
Overview of Smart Baby Monitor:
Important guidelines for installing your Camera Unit
• Any large metal object, like a refrigerator, a mirror, a filing cabinet, a metallic
door or reinforced concrete, between the Camera Unit and Wi-Fi® Router may
block the radio signal.
• The signal strength may also be reduced by other solid structures, like walls, or
by radio or electrical equipment, such as TVs, computers, cordless or mobile
phones, uorescent lights or dimmer switches.
• Other 2.4GHz products, such as Bluetooth™ systems, microwave ovens or other
Baby Monitors, may cause interference with this product, so keep the Camera
Unit at least 5ft (1.5m) away from these types of product, or switch them off if
they appear to be causing interference.
3
4
6
5
2
7
8
1
9
1 . Micro-SD Card Slot - accepts
up to 32GB
2 . Infrared LEDs (for night vision)
3 . Microphone
4 . Camera Lens
5 . Speaker
6 . Light Sensor (for night mode
detection)
7 . Power Socket
8 . PAIR Button
9 . Camera base

6
GETTING STARTED INSTRUCTIONS
1 . Getting Started
1.1 SD card installation
As an option, the Unit provides video
recording on up to 32GB microSD card (NOT
PROVIDED) when image motion is detected.
Insert the microSD card into the SD slot as
shown.
1.2 Connecting the Power Supply for the Unit
• Insert the micro-USB plug of the power
adapter into the micro-USB socket on the
back of the Camera Unit.
• Connect the other end of the power
adapter to mains power socket.
• The Unit turns on and the power indicator
lights in Blue colour.
Note
Only use the supplied power adapter
(DC5V/1000mA).
Important
Please take care when inserting and removing
the power connector from the product. Ensure the
connector is plugged into the camera unit as shown
here to avoid damage.
When removing the connector, please do not use
excessive force or pull from an angle.
DC 5V

7
WI-FI® INTERNET VIEWING
2 . Wi-Fi® Internet Viewing
2.1 Minimum System Requirements
Android™ System
• Version 7.0 or above
iPhone®/iPad® iOS
• Version 10.0 or above
High Speed (Wi-Fi®) Internet
• At least 0.6 Mbps upload bandwidth per camera (you can test
your internet speed on this site: http://www.speedtest.net)
2.2
Getting started - Connecting Devices
How does it work?
Access your
Camera locally
View your Camera from any
compatible device remotely
Wi-Fi RouterWi-Fi®
Camera
Hubble
Service
When a user tries to access the Camera, our Hubble server
authenticates the user’s identity and permits access to the Camera.
2.3 Setup
Connect the Wi-Fi® Camera to the Power Adapter, then plug into mains
power socket. The Camera must be within range of the Wi-Fi® router
with which you want to connect. Make sure the password of the router is
available for entering during the in-app setup process.

8
WI-FI® INTERNET VIEWING
Status of LED Indication:
- Pair / Setup state: LED is ashing in Red and Blue alternately.
- Unconnected state: LED is Red and Flashing.
- Connected state: LED is Blue and always on.
- Video streaming: LED is Blue and Flashing.
Note:You can only setup via a compatible smartphone or tablet and
not via a PC.
2.4 User Account and Camera Setup on Android™ Devices
or iPhone®/iPad®
What you need
• Wi-Fi®Camera Unit
• Power adapter for the Camera
• Device with Android™ system version 7.0 and above
• Or iPhone®/iPad®with iOS version 10.0 and above
2.4.1 Power ON and Connect the Camera
• Connect the power adapter to mains power socket and insert the
plug into the power socket on the back of the Camera Unit, the
unit turns on.
2.4.2 Download Hubble Connected App
• Scan the QR code with your smart device
and download Hubble Connected App
from the App Store for iOS devices or from
the Google Play™ Store for Android™
devices.
• Install Hubble Connected App on your
device.
2.4.3 Sign up with Hubble on your smart device
• Ensure that your smart device is connected to your Wi-Fi® router.
• Run Hubble Connected App, tap Sign Up with Hubble (fig.1), read
through the Privacy Policy,Terms and Conditions, by signing up

9
WI-FI® INTERNET VIEWING
• you agree to our terms of service before tap Done (fig. 2), enter
your account information to sign up with Hubble.
Note: If you already have a Hubble App account, please tap Log in
with Hubble to go to the next steps.
g. 1 g. 2
2.4.4 Add the Camera to your account
• Log in your Hubble Account by entering “User Name” and
“Password” (fig. 3).
• Tap on the screen of your device to add new Camera (fig. 4)

10
WI-FI® INTERNET VIEWING
g. 3 g. 4
• To select your device for setting up by tapping Baby Monitoring (fig.
5).
• Tap Smart Baby Camera to add the new camera (fig. 6).
g. 5 g. 6
• The following setup instructions will appear on the screen, select your
Wi-Fi network and enter “Password” (fig. 7).
• Power on your camera and wait for the Red LED flashing on the
camera. (fig. 8)

11
WI-FI® INTERNET VIEWING
g. 7 g. 8
• Press and hold the PAIR button at the back of Camera, you will hear
a voice prompt “Ready for Pairing” then tap Continue. (fig. 9)
g. 9
• Tap Generate QR code on your device (fig. 10) and hold the QR
code 15 to 30 cm in front of Camera to get scanned till you will
hear confirmation message “ Scanning Sucess” from your device.
(fig. 11)

12
WI-FI® INTERNET VIEWING
g. 10 g. 11
• It will take a few minutes for the Camera to connect to the Wi-Fi®
network before showing the connection status (fig. 12).
• The Camera has been successfully connected, name your
Camera (fig. 13).

13
WI-FI® INTERNET VIEWING
g. 12 g. 13
• If connection fails, please tap Retry and repeat the steps starting
from 3.4.4.

14
PROCEDURE FOR RESETTING THE CAMERA
3 . Procedure for Resetting the
Camera
Note: If your Camera is moved from one router (e.g. home) to another
(e.g. ofce) or you have Camera setup issues, then the Camera must
be reset. Please reset the Camera with the following procedures:
• Unplug power adapter to turn off the camera unit.
• Press and hold the PAIR button, and then plug in the adapter to
power up, please do not release PAIR button until you hear a long
beep tone, wait for the Camera Unit to complete an internal reset
procedure.The Red LED will begin to flash when the Camera Unit is
reset successfully.
• You can add your Camera again by following the steps in section
3.4.4.

15
CLEANING
4 . Cleaning
Clean the Unit with a slightly damp cloth or with an anti-static cloth.
Never use cleaning agents or abrasive solvents.
Cleaning and care
• Do not clean any part of the product with thinners or other solvents
and chemicals – this may cause permanent damage to the
product which is not covered by the warranty.
• Keep the Unit away from hot, humid areas or strong sunlight, and
don’t let it get wet.
• Every effort has been made to ensure high standards of reliability
for your Smart Baby Camera. However, if something does go wrong,
please do not try to repair it yourself – contact Customer Service
for assistance.
IMPORTANT
Always switch off and disconnect the power adapter before cleaning
your camera unit.

16
HELP
5 . Help
Noise interference on your device
• To avoid background noise or echoes, ensure that there is enough
distance between your device and the Wi-Fi® Camera Unit.
• Use of other 2.4 GHz products, such as Bluetooth™ systems or
microwave ovens, may cause interference with this product.
Keep the Wi-Fi® Camera Unit at least 1.5 metre away from these
types of products, or switch them off if they appear to be causing
interference.
Lost connection
• Check your Wi-Fi® settings. If necessary, reconnect your Wi-Fi®.
Ensure that the Camera Unit is switched ON. Wait a few minutes to
make the connection with the Wi-Fi® system.
If you forgot your password
• If you do not remember your password, tap Forgot Password and
submit your e-mail address. A new password will be sent to your
e-mail address immediately.

17
CLEANING
Troubleshooting for Wi-Fi®Internet Viewing
Category Problem
Description / Error
Solution
Account I am unable to
login even after
registration.
Please check your user name
and password.
Account I receive an error
message saying:
“Email ID is not
registered”.
Please ensure that you have
registered with us.Tap Create
Account to create an account.
Account What do I do
if I forgot my
password?
Tap “Forgot Password ?” on your
Android™ or iOS application.
An email will be sent to your
registered email address.
Account I am unable to
receive a new
password although
I have used the
“Forgot password”
option.
1. The e-mail might have been
sent to your Junk Mail Folder.
Please check your Junk Mail
Folder.
2. There might be a delay in
getting your e-mail. Please
wait a few minutes and
refresh your email account.
I get a message:
We are having
problems accessing
your camera.This
could be due to
lack of internet
connection. Please
wait and try again
later.
1. Please try again in a few
minutes.This could be
because of any issue with
your internet connection.
2. If the problem remains,
please restart your Camera
to check if this fixes the
problem.
3. Please restart your Wireless
Router.

18
HELP
Viewing
Camera
When I am in
“remote mode”, the
video stops after 5
minutes. How do I
view for longer?
When you are accessing your
Camera via a network different
from your home network (over
the internet) your video times out
after 5 minutes.
You can click on the Camera
again from the Android™/iOS
application to start streaming
again.
If you are accessing from your
webbrowser, then you can press
on the Reload button to start
viewing your Camera video
stream again.
Features The sound alert
setting threshold is
not right.
You can Adjust Sound Sensitivity
to trigger notifications under
Camera Setting menu.
Setting Up While I am adding
a new Camera to
my account, I am
not able to nd any
Cameras to add.
If you are trying to add a
Camera which has previously
been added into your account
or another account, you will rst
have to reset the Camera.This
can be done by following the
re-setting procedure stated in
section 4 of this guide.

19
TROUBLESHOOTING
General What is the
signicance of the
camera LED?
The LED indicates the following
status:
LED ashing Red:Your Camera is
booting up.After a voice prompt
the camera is booted up and
ready for pairing.
LED Cycling Blue/Red:Your
camera is in pairing mode.
LED Solid Blue:The camera
is paired and set up to your
account.
LED Flashing Blue:The camera is
live streaming.
LED Off - No Power to camera.
I am not able to
access my Camera.
Please check if the Camera is
within Wi-Fi®range. Please try
to move the Camera closer
to the router for better Wi-Fi®
connectivity and try again.
Setting Up During setup
on devices for
Android™ and iOS, I
am not able to nd
my Camera during
the last step and
the setup fails.
Please reset the Camera to setup
mode according to Section 4
and restart the setup from your
smartphone again.

20
TROUBLESHOOTING
General What is the
meaning of “Local
Camera” and
“Remote Camera”?
When you are accessing your
Camera from the same wireless
network (Home) in which it is
congured, it is a Local Camera.
When you are accessing your
Camera away from your home
it is a Remote Camera. You may
be using 3G, 4G or 4G LTE or a
Wi-Fi®connection outside of
your home.
General How do I download
the App for
Android™ and iOS
devices?
Android™:
– Open the Google Play Store on
your Android™ device.
– Select Search
– Type in “Hubble Connected”
– The results will show the Hubble
App
– Select to install it
iOS Device:
– Open the App StoreTM
– Select Search
– Type in “Hubble Connected”
– The results will show the Hubble
App
– Select to install it
Setting up When the video
is cut off, the
application
attempts to
reconnect and this
results in lost sound
and choppy video.
You will need to turn off the Auto
Lock function of your device to
ensure continuous video/audio
streaming.
Table of contents
Other Childcare Baby Monitor manuals