Chiltern Invadex TransAqua User manual
Shower Chairs
userguide
Self propelled &
Attendant propelled models
TransAqua
TransAqua

UserGuideChilternInvadexShowerChairs
1
Contents
Assembly Instructions - Attendant Propelled ...2
Disassembly Instructions-Attendant Propelled .4
Assembly Instructions - Self Propelled .............6
Disassembly Instructions - Self Propelled .........8
Things to consider before using the
Shower Chair...................................................10
Cleaning and Maintenance ..............................17
Parts Guide - Attendant Propelled model .......18
Parts Guide - Self Propelled model ................20
Seat Options ....................................................22
Warranty ..........................................................24
Shower Chairs
These products have been designed to the
highest standards with safety, strength and
quality in mind.
Follow the recommendations in this guide to
ensure maximum benefit from your Chiltern
Invadex Shower Chair.

UserGuideChilternInvadex TransAquaShowerChairs
2
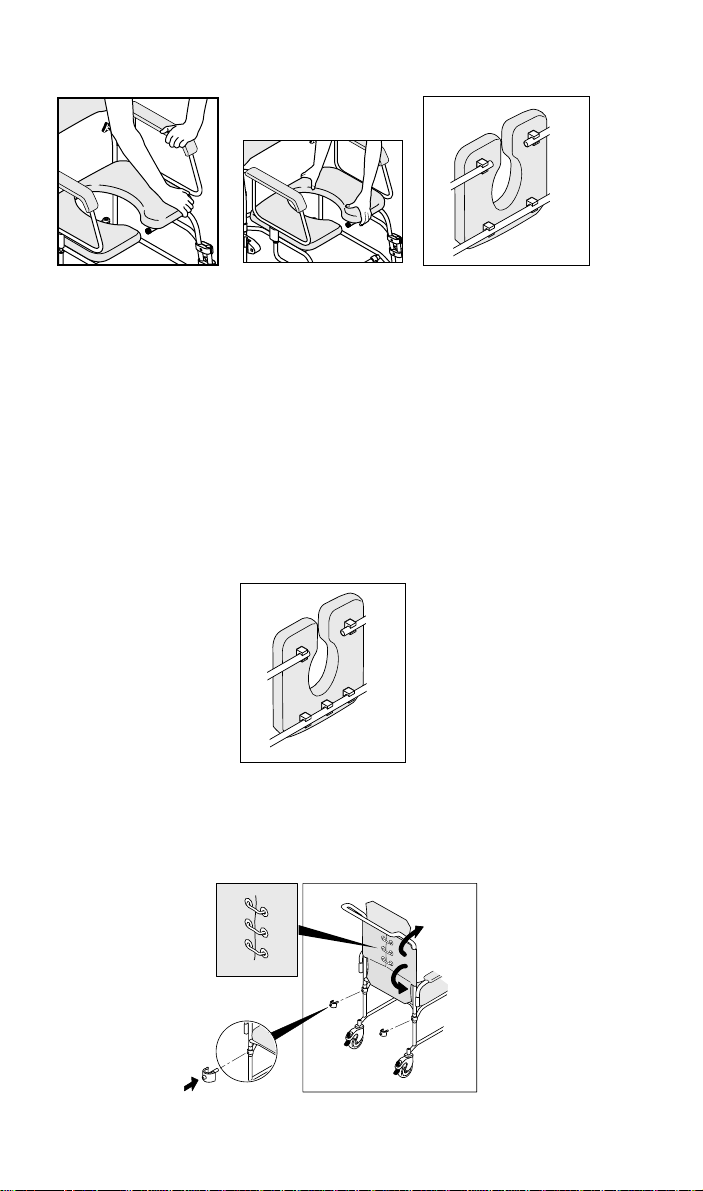
Locate the right hand side frame (3) on
the cross bar, make sure the holes align
and snap home the grey securing pins (4)
from the front.
Safety Note: Check to ensure the
securing pins are fully inserted.
Apply brakes on rear wheels (5).
Place the backrest (6) over the spigot (7)
at the rear of the shower chair (make
sure the orientation of the backrest
is as shown).
Push the backrest into the frame
assembly until the holes are in line
and snap home the grey securing
pins (8).
Safety Note: Check to ensure
securing pins are fully inserted.
Note: Follow the drawings carefully
to ensure correct orientation.
Holding the left hand side frame assembly
of the shower chair (1) push the cross bar (2 )
into place. Make sure the holes align.
1
2
3
5
4
6
7
88
Assembly Instructions
Attendant Propelled Model
UserGuideChilternInvadex ShowerChairs
3
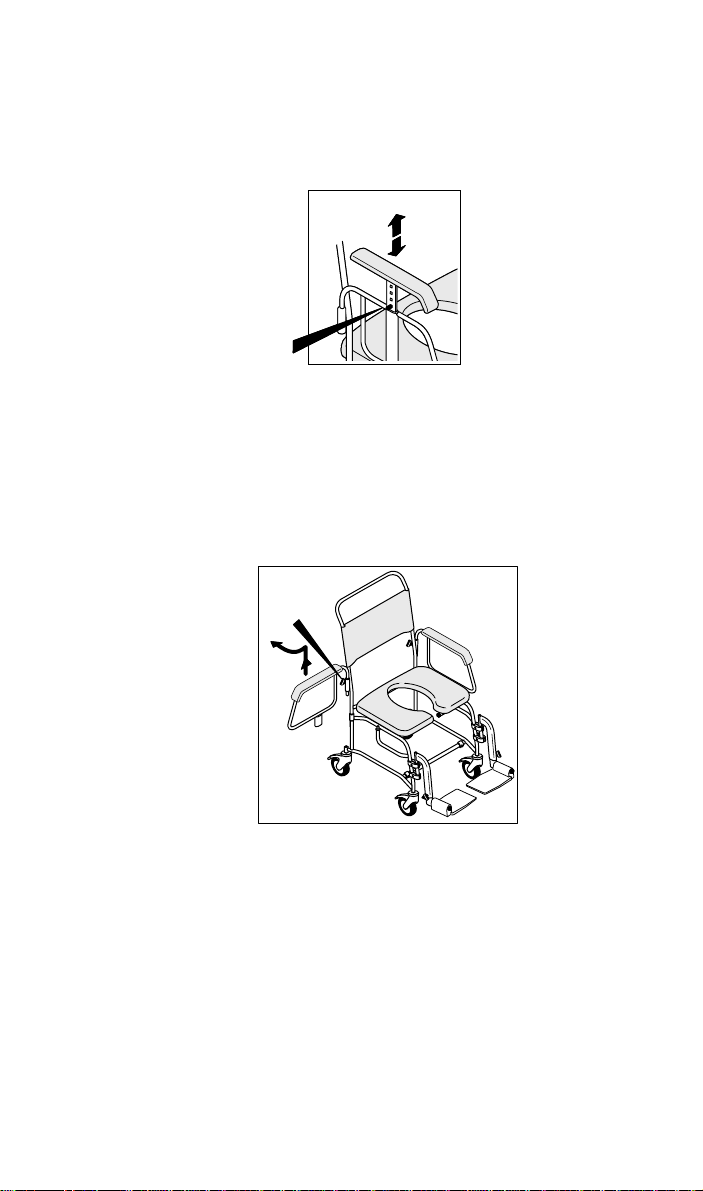
14
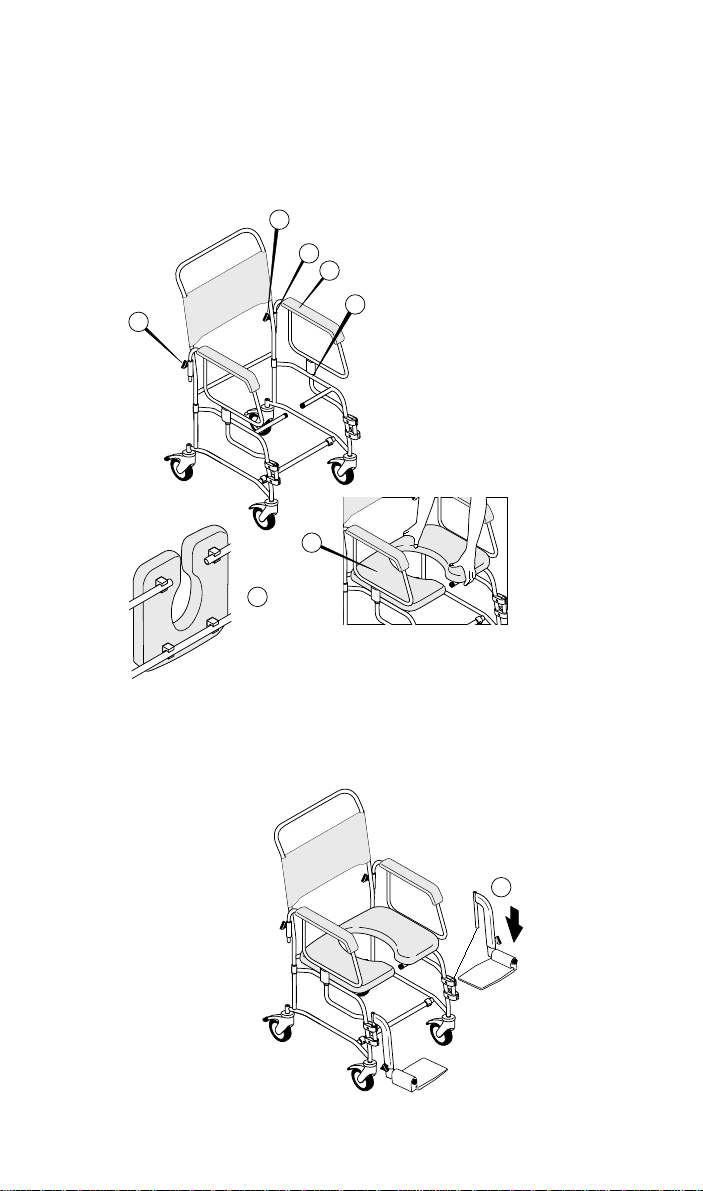
Fit the armrest (9) in the socket (10) and
pin (11) and tighten locking knob (12)
repeat for other side.
9
12
Safety Note: Put one hand at front of seat
and one at rear to avoid trapping fingers
under armrest
Tip the chair backward to visually
check all clamps are secured.
FIXINGTHE SEAT
13
Fit footrests (15) into sockets.
15
Snap on the seat (13) ensuring correct
orientation, centralise the seat in the frame.
There are 2 lots of snap-on fixings on the
underside of the seat, 2 at the front and 2
at the rear of the seat (3 fixings at the rear
on the extended seat option) (14).
10
11
12
FITTING COMMODE PAN CRADLE
Fit the commode pan cradle (if supplied) prior to
fixing the seat, as shown on page 11.

UserGuideChilternInvadex TransAquaShowerChairs
4
Disassembly Instructions
Attendant Propelled Model
Slacken the armrest locking knobs (4)
and remove both armrests (5) by
lifting
Remove the grey securing pins - 2 at
the rear (6) and 2 on the lower crossbar
at the front (7).
Remove the seat, releasing the clips
by grasping the front of the seat
while holding down the armrest (3),
you may need assistance when
removing the seat.
REMOVINGTHE SEAT
Apply brakes on rear wheels (1).
Remove footrests (2)
1
2
3
4
5
67

UserGuideChilternInvadex ShowerChairs
5
Remove the right hand side frame (9) from
the cross bar.
Remove the backrest by lifting
upwards (8).
Remove cross bar (10).
8
9
10
UserGuideChilternInvadex TransAquaShowerChairs
6
3
Assembly Instructions
Self Propelled Model
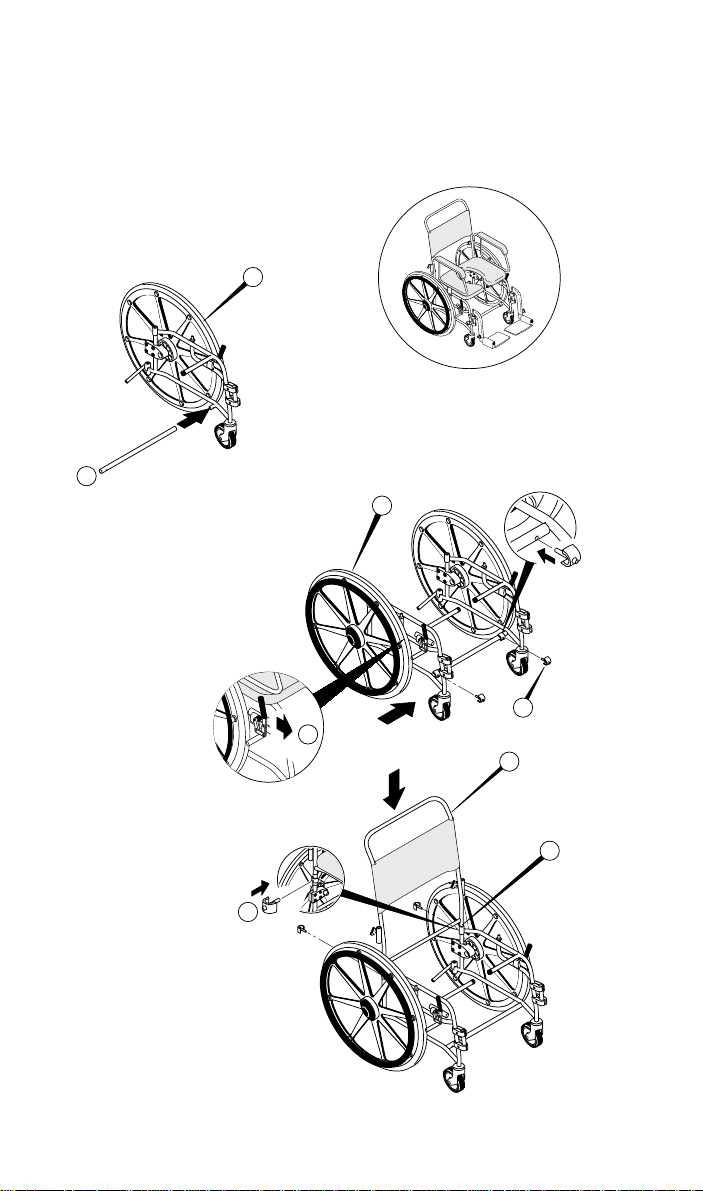
Place the backrest (6) over the spigot (7)
at the rear of the shower chair (make
sure the orientation of the backrest
is as shown).
Push the backrest into the frame
assembly until the holes are in line
and snap home the grey securing
pins (8).
Safety Note: Check to ensure
securing pins are fully inserted.
Note: Follow the drawings carefully
to ensure correct orientation.
Locate the right hand side frame (3) on
the cross bar, make sure the holes align
and snap home the grey securing pins (4)
from the front.
Safety Note: Check to ensure the
securing pins are fully inserted.
Apply brakes on rear wheels (5).
1
2
3
4
5
6
7
8

UserGuideChilternInvadex ShowerChairs
7
Snap on the seat (13) ensuring correct
orientation, centralise the seat in the frame.
There are 2 lots of snap-on fixings on the
underside of the seat, 2 at the front and 2
at the rear of the seat (3 fixings at the rear
on the extended seat option) (14).
Safety Note: Put one hand at front of seat
and one at rear to avoid trapping fingers
under armrest.
Tip the chair backward to visually
check all clamps are secured.
FIXINGTHE SEAT
Fit the armrest (9) in the socket (10) and
pin (11) and tighten locking knob (12)
repeat for other side.
FITTING COMMODE PAN CRADLE
Fit the commode pan cradle (if supplied) prior to
fixing the seat, as shown on page 11.
14
13
15
9
12
11
12
10

UserGuideChilternInvadex TransAquaShowerChairs
8
Disassembly Instructions
Self Propelled Model
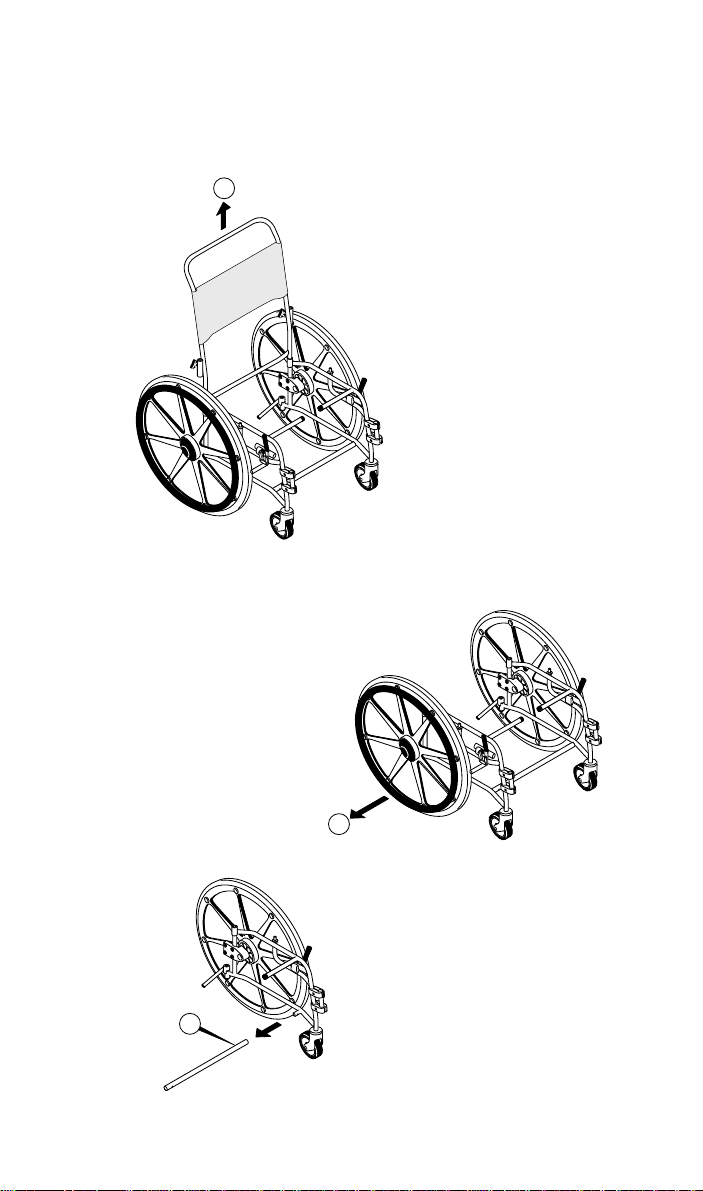
Slacken the armrest locking knobs (4)
and remove both armrests (5) by
lifting
Remove the grey securing pins - 2 at
the rear (6) and 2 on the lower crossbar
at the front (7).
Apply brakes on rear wheels (1).
Remove footrests (2)
Remove the seat, releasing the clips
by grasping the front of the seat
while holding down the armrest (3),
you may need assistance when
removing the seat.
REMOVINGTHE SEAT
4
5
67
3
2
1
UserGuideChilternInvadex ShowerChairs
9
Remove the right hand side frame (9) from
the cross bar.
Remove the backrest by lifting
upwards (8).
Remove cross bar (10).
9
10
8

UserGuideChilternInvadex TransAquaShowerChairs
10
Things to consider before
using the Shower Chair
Safety - all models
•The backrest must be used at all times when the chair is occupied.
•Armrests should be used at all times when the chair is occupied.
•The swing out, removable footrests are designed for resting feet on,
not for standing on, or full weight bearing.
•Ensure the cross member clips are always in place before using the
chair, as shown below left.
SelfPropelledModel
•Tyres are solid and do not require inflating.
•Check that the wheel and castor fixings are secure.
•At all times when transferring onto the shower chair and when the
chair is stationary, ensure both brakes are in the on position.
Brake shown here in the off position, to engage push lever fully
forward, as shown below right.
NOTE: If required, wheel rims on the self propelling model can be
removed to reduce the overall chair width.

UserGuideChilternInvadex ShowerChairs
11
1
3
Remove the seat
4
2Clip pan holder onto
front and rear cross
bars as shown
Replace the seat
Slide pan onto cradle
from rear of chair
To fit a commode pan (if fitted with cradle)
SAFETY NOTE: To avoid the possibility of trapping, do not slide
the commode pan on or off the rails whilst someone is sitting
on the chair.
UserGuideChilternInvadex TransAquaShowerChairs
12
Removing the seat
•Release the clips by grasping the front of the seat while holding down
the armrests, as Fig 1.
Snapping on the seat
•Safety Note: Put one hand at front of seat and one at rear to avoid
trapping fingers under armrest, as Fig 2.
Snap on the seat ensuring correct orientation as Fig 3 (Fig 4 for
extended seat option), and centralise the seat in the frame.
Tip the chair backward to visually check all clamps are secured, as
Figs 3 and 4.
Visual Check
•The backrest cover must be fully attached (clips and straps) as shown
below.
•Always ensure clips on the backrest are in place before sitting on the
chair.
Fig1
Fig2 Fig3
Standard seat
Extended seat
Fig4
UserGuideChilternInvadex ShowerChairs
13
•Ensure the armrests are locked before use, with the aid of the locking
knobs (A) above.
•Armrests should be used at all times when the chair is occupied.
•The armrests swing out and can be removed for easy transfer, as shown
below.
•To remove the armrest slacken the armrest locking knob (A) and lift the
armrest upwards from the rear of the armrest pad, as shown.
Adjusting the armrests
•If the (optional) adjustable armrest is fitted, adjust and lock in position
as shown.
A
UserGuideChilternInvadex TransAquaShowerChairs
14
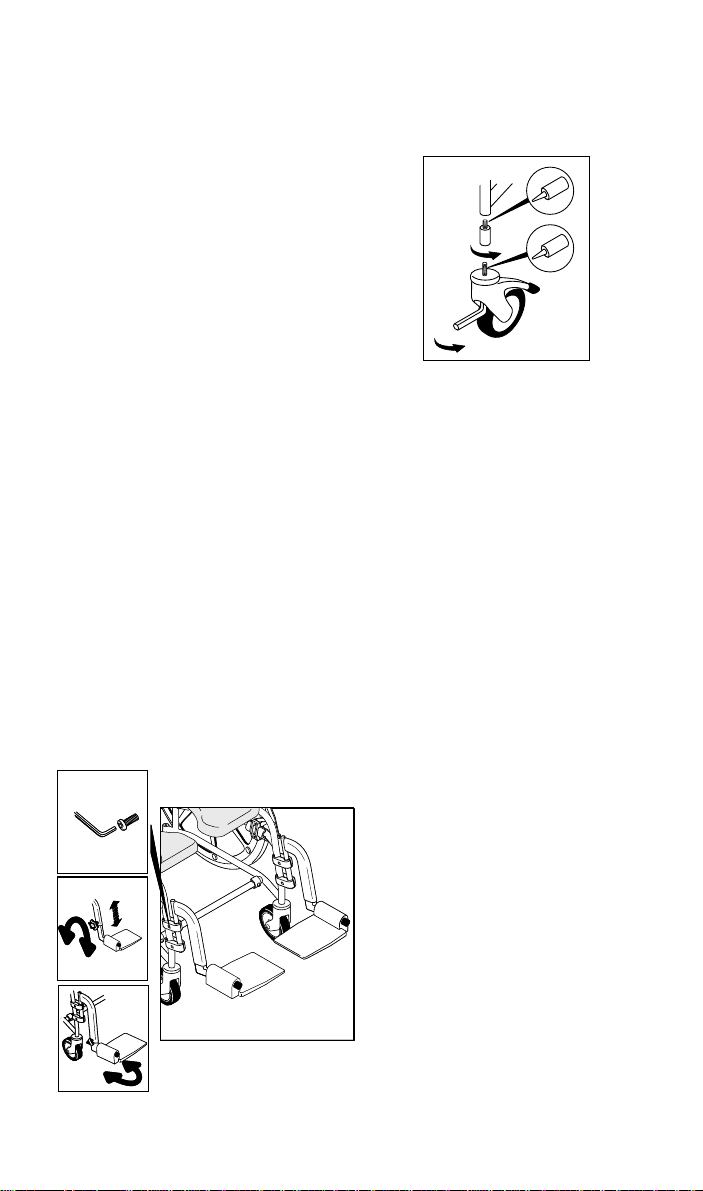
Fig1
•Remove the castors using a short reach
8mm Allen key (available from Chiltern Invadex).
•Reassemble with the leg extension pin in
position, as shown.
•If the castors are replaced at any time, the
bolts should also be replaced at that time.
Locktite treated bolts are available as spare
parts. Please contact Chiltern Invadex for details.
Important safety notes:
All adjustment pins used must be of the same
length. Use only one adjustment pin for each
castor. Use thread locking fluid* to lock the
assembly securely. Ensure assembly is tight and
there is no gap between the spacer and the frame.
*Chiltern Invadex recommend ‘Nutlock 242 with Loctite
activator 7471’
Rotating the angle and adjusting the height of the footest
1. Loosen the Allen bolts as Fig 1 using a 6mm Allen key
(available from Chiltern Invadex).
2. Rotate the footrest to the desired angle as Fig 3 (to suit the user).
3. To adjust the height of the footrest loosen the footrest locking
knob, reposition the footrest at the desired height and retighten the
locking knob, see Fig 2.
4. Retighten the Allen bolts using a 6mm Allen key (available
from Chiltern Invadex).
Fig3
Fig2
Chair height adjustment - castors
(to be carried out by qualified personnel only)

UserGuideChilternInvadex ShowerChairs
15
Applying braked castors
Applying wheel brake
Releasing wheel brake
(optional if straight
steering castors are
fitted.)
Applying straight-
line steering device (optional)
Releasing straight-
line steering device (optional)
•Depress the lever to apply the straight line steering device, and release
as shown above.
•Check that castor fixings are secure.
•Ensure that at least two castors are braked before a user transfers to or
from the chair.
UserGuideChilternInvadex TransAquaShowerChairs
16
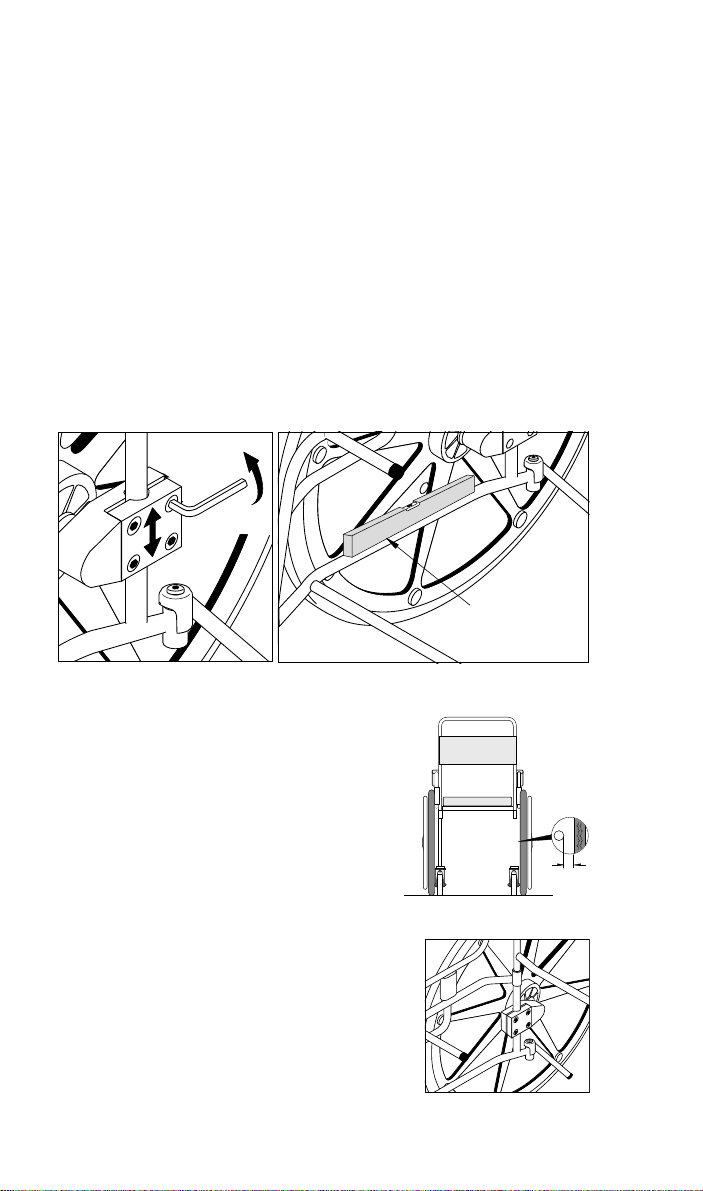
•Wheel base adjustment
To change the wheelbase length e.g to set the
wheels back for increased stability, undo the
four screws on each clamp and remove each
wheel assembly in turn.
Rotate the large wheel clamp 180 degrees and
retighten the 4 screws.
wheel gap
•Check the gap between the tyre and the frame to ensure the wheel is
tracked correctly.
500mm (20") wheel gap=28mm
560mm (22") wheel gap=44mm
610mm (24") wheel gap=38mm
Chair height adjustment - Self propelling wheels
(To be carried out by qualified personnel)
Note: Adjusting the self propelling wheels will require adjustment to the
position of the brakes.
•Slacken the 4 clamp screws with a short reach 6mm Allen key
(available from Chiltern Invadex)
•Slide the bracket and wheel assembly up or down to the desired height
•Re-tighten the 4 clamp screws to secure wheel in place (below left)
•The frame longitudinals must be horizontal after height adjustment
(below right)
Check level

UserGuideChilternInvadex ShowerChairs
17
Cleaning and Maintenance
It is recommended that your shower chair is serviced annually by
Chiltern Invadex or an authorised, competent service agent, in addition:
1. Regularly inspect all parts of the chair for defects. Any defective
part should be removed promptly.
2.Clean the seat using a damp cloth and a mild cleanser. Always read the
manufacturers instructions prior to applying the cleanser.
Using Sodium Hypochlorite on the seat
A solution of 0.1% Sodium Hypochlorite should have no adverse effects
on the cleaning of chairs covered in Ambla/Amblon. However, when
using a solution of 1.0%, care should be taken to rinse the chairs
thoroughly with clean water after application. Over a period of time
bleaching may occur, but the integrity of the product will remain unaffected.
3.Dry off the shower chair after use.
4.Do not oil or grease any parts.
5.Keep the castors free from limescale, soap residue and hair by
cleaning after use in the shower.
Caring for stainless steel
Stainless steel has excellent corrosion resistance, but it is not stain or
rust proof. Regular maintenance will keep stainless steel clean and free
of contaminants. In mosts applications stainless steel will not rust or stain
even after many years of service, but when used in certain
environments such as concentrated chlorine or other corrosive elements
stainless steel requires proper care and maintenance.
1. Clean stainless steel frequently with soap and water. Any cleaner
safe for glass is usually safe for stainless steel; apply with a cotton cloth.
2. Use a coating such as a good wax to help safeguard the stainless steel.
3. Remove discolouration or rust spots as soon as possible with a brass,
silver or chrome cleaner. Irreversible pitting will develop under rust that
remains on stainless steel for any period of time. Apply a mild cleaner
such as Ajax or an equivalent with a wet cotton cloth in the direction of
the grain of the finish. Rinse thoroughly and wipe dry.
4. Do not use abrasives such as sandpaper or steel wool on stainless steel.
5. Do not clean with mineral acids or bleaches.
6. Do not leave stainless in contact with iron, steel or other metals.
7. Do not store near any chlorine product.

UserGuideChilternInvadex TransAquaShowerChairs
18
Parts Guide
- Attendant Propelled
item description qty partno
1HF Welded Seat Assemblies
450mm (18”) Seat flat padded 1 211-01000
450mm (18”) Seat medium horseshoe 1 211-01001
450mm (18”) Extended seat medium horseshoe 1 211-01005
450mm (18”) Seat large horseshoe 1 211-01002
450mm (18”) Extended seat large horseshoe 1 211-01006
450mm (18”) Seat medium aperture 1 211-01003
450mm (18”) Seat large aperture 1 211-01004
525mm (21”) Seat flat padded 1 213-01000
525mm (21”) Seat large horseshoe skirted 1 213-01002
525mm (21”) Extended seat large horseshoe 1 213-01006
525mm (21”) Seat large aperture 1 213-01004
Skirted seats for use with Clos-o-Mat
450mm (18”) Seat medium horseshoe skirted 1 211-01007
450mm (18”) Seat large horseshoe skirted 1 211-01008
450mm (18”) Seat medium aperture skirted 1 211-01009
450mm (18”) Seat large aperture skirted 1 211-01010
450mm (18”) Extended seat medium horseshoe skirted 1 211-01011
450mm (18”) Extended seat large horseshoe skirted 1 211-01012
525mm (21”) Seat large horseshoe skirted 1 213-01008
525mm (21”) Seat large aperture skirted 1 213-01010
525mm (21”) Extended seat large horseshoe skirted 1 213-01012
2 Pram Handle backrest assembly stainless steel (18”)1 211-00505
2 Pram handle bracket assembly stainless steel (21”)1213-00501
3 M8 x 15 Hand Wheel 4 CH0208
4 Straight armrest stainless steel assembly 2 211-00500
5 Straight adjustable armrest stainless steel assembly 2 211-00512
6 Tube locks 7/8”x 1”grey 4 002-00010
7 Braked grey plastic castor assembly 4 202-00520
7 Braked grey plastic castor assembly for use with
25mm,50mmleg extensionpins 4 202-00521
8 Directional / lock castor grey series 851 assembly 1 202-00519
8 Directional / lock castor grey series for use with
25mm,50mmleg extensionpins 1 202-00522
9 Leg extension pin (1”) 25mm stainless steel 4 211-00507
9 Leg extension pin (2”) 50mm stainless steel 4 211-00508
10 Footrest (LH) assembly stainless steel 18 degree 1 211-00503
11 Footrest (RH) assembly stainless steel 18 degree 1 211-00504
12 Side frame assembly (LH) stainless steel 1 211-00502
13 Side frame assembly (RH) stainless steel 1 211-00501
14 Cross member (18”) 450mm stainless steel c/w 2 clips 1 211-00506
14 Cross member (21”) 525mm stainless steel c/w 2 clips 1 213-00500
15 Footrest bracket 4 201-00510
15 Footrest holder 2 201-00501
Allen Key (not illustrated) 1 COM1625

UserGuideChilternInvadex ShowerChairs
19
This user guide covers the standard models listed.
If you need a replacement part that is not shown, or if you have a query
regarding your chair, please contact your supplier for assistance.
For an efficient response it will help if you have the chair Serial Number to
hand, when you call. This can be found on the sideframe.
Parts Guide - Attendant Propelled Model
11
3
1
8 (optional)
9
9
2
6
3
14
6
10
13
12
4
5
7
15
item description qty part no
Commode pan cradle 1 211-00513
Other manuals for TransAqua
1
This manual suits for next models
4
Table of contents
Other Chiltern Invadex Wheelchair manuals


Popular Wheelchair manuals by other brands


AUSnew
AUSnew G6 Excel quick start guide

Invacare
Invacare A-4 Series Owner's operator and maintenance manual

Sunrise Medical
Sunrise Medical QUICKIE Easy Life T Directions for use

R82
R82 Stingray seat user guide

Comfort Company
Comfort Company ACTA-EMBRACE Back manual

Quickie
Quickie argon Directions for use