Chimei TL-24L6000T User manual
User’s Manual Multimedia LCD Display
Content
Important Safety Instructions................................................................................... 02
Cleaning and Maintenance...................................................................................... 04
Repair Service......................................................................................................... 05
Descriptions and accessories.................................................................................. 06
Operation of Multimedia LCD Display
Connectors and sockets..................................................................................... 07
Control panel...................................................................................................... 12
Remote Control.................................................................................................. 13
Favorite Channels.............................................................................................. 15
LCD Display Menu
Advanced LCD Display menu ............................................................................ 16
PICTURE............................................................................................................ 17
ADVANCE.......................................................................................................... 18
AUDIO................................................................................................................ 19
TV....................................................................................................................... 20
GEOMETRY....................................................................................................... 21
SETUP ............................................................................................................... 22
Other Information
Trouble-shooting ................................................................................................ 23
Specifications..................................................................................................... 24

02 .............................................................................................................................................................
Important Safety Instructions
Read and comply with all instructions, bear the warnings in mind and keep the manual
properly.
This logo indicates that there is un-insulated “dangerous voltage” inside the product
and may incur the risk of electric shock.
The exclamation point within an equilateral triangle is intended to alert the user to the
important operating and maintenance (servicing) instructions in the literature
accompanying the appliance.
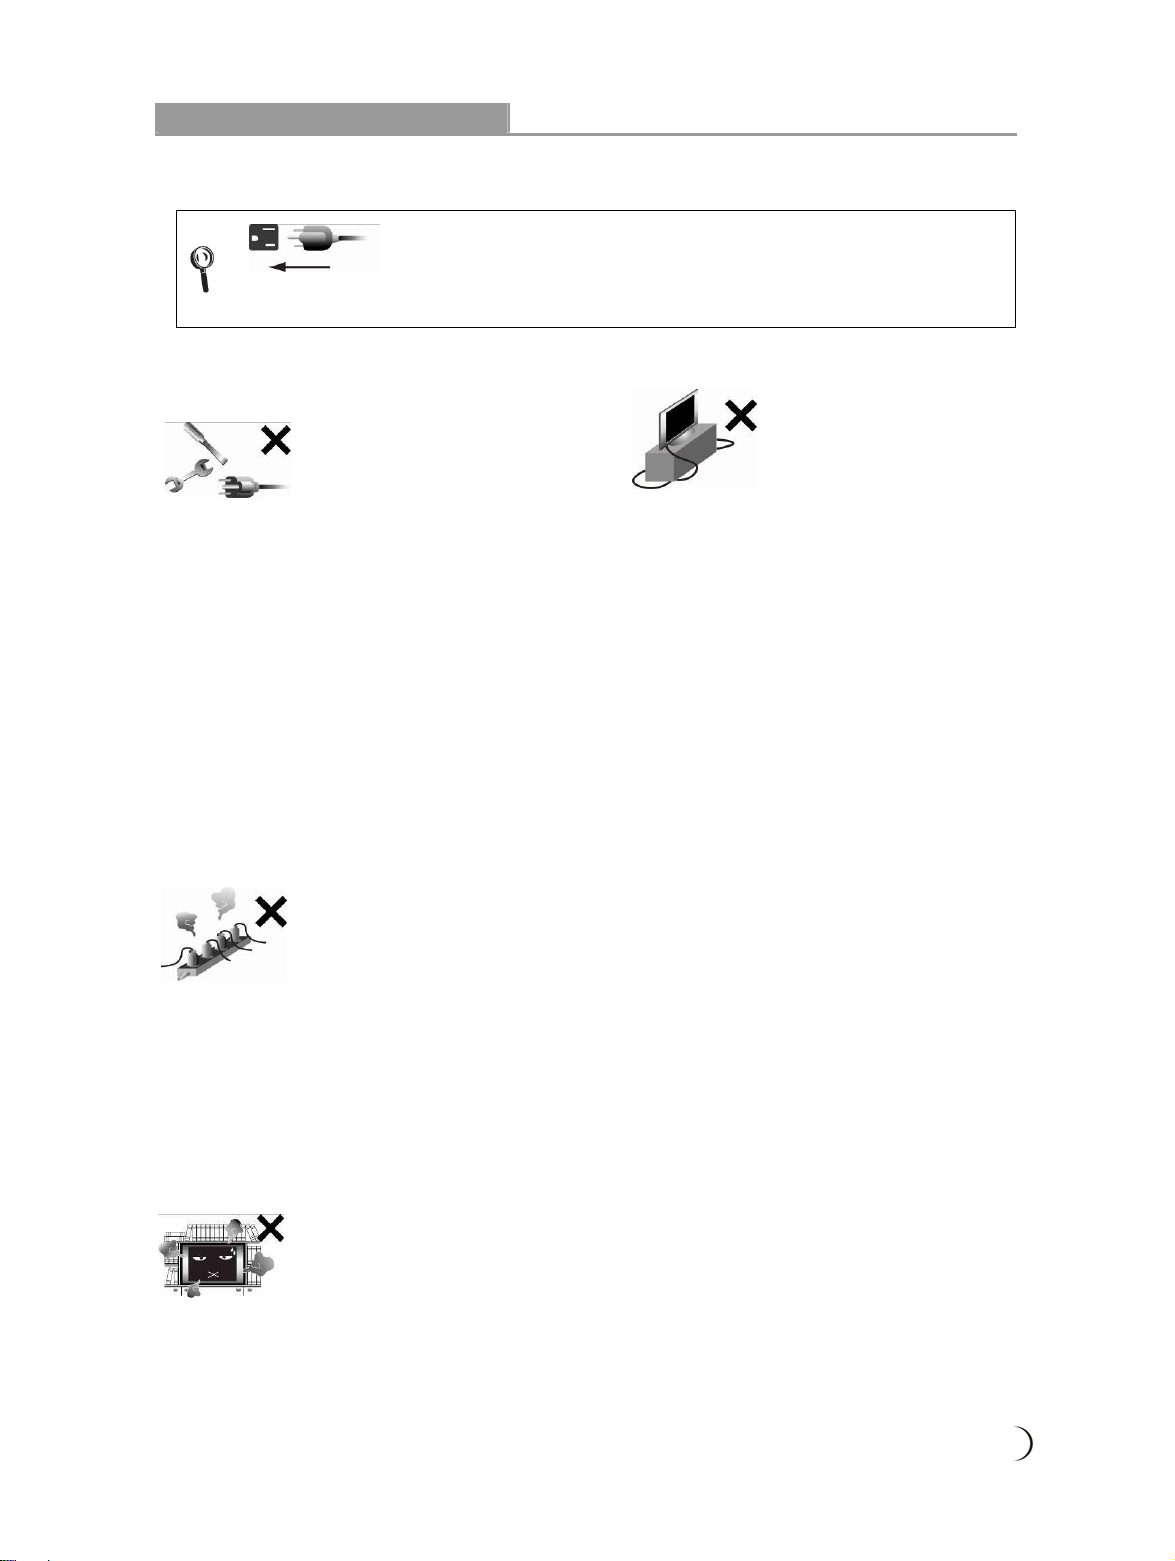
[Installation and Usage]
Notice
RISK OF ELECTRIC
SHOCK DO NOT OPEN
WARNING: TO REDUCE THE RISK OF FIRE OR
ELECTRIC SHOCK, DO NOT EXPOSE
THIS PRODUCT TO RAIN OR
MOISTURE.
1. Install as per the
manufacturer’s instructions.
Only use
attachments/accessories
specified by the
manufacturer.
2. This device shall be
mounted on a table or wall in
accordance with the
installation instructions. Do
not place the device on an
unstable stand or table as
the device may fall and
cause injuries.
3. Use only with the cart, stand,
tripod, bracket, or table
specified by the
manufacturer, or supplied
with the apparatus. When a
cart is used, use caution
when moving the
cart/apparatus combination
to avoid injury from tip-over.
4. When transporting the Multimedia LCD Display,
be sure to carry it by two people with two hands
to avoid falling and damage.
5. Keep away from objects that may stab the
Multimedia LCD Display to avoid the high-
voltage device or the internal parts inside it from
getting damaged.
6. Do not install near any heat
sources such as radiators,
heat registers, stoves, or
other apparatus that
produce heat.
7. Do not install
Multimedia LCD Display
near high-temperature
objects or flam sources
(such as lighted
candles).
8. The apparatus shall not
be exposed to dripping
or splashing and no
objects filled with water,
such as vases, shall be
placed on the
apparatus.
9. NEVER install the
Multimedia LCD Display
in the bathroom or
shower room; otherwise
there might be risks of
fire or electric shock.
10.Do not allow the Multimedia Display to lean
tightly against the wall. Ensure appropriate
space for heat dissipation to avoid aging of
the power cord.
11. Please clean the back of the Multimedia
Display regularly (once a month is
suggested). Avoid the dust and cotton into
the machine which may cause damage.
............................................................................................................................................................. 03
Important Safety Instructions
[Power Supply]
[Ventilation]
For safety sake, the plug of the Multimedia LCD Display is designed in
such a manner that you can plug into a socket in a certain direction; To
protect your device from electrical shock, be sure to plug the cord into the
socket securely. If you have problems plugging into the socket, please
contact your distributor.
1. Do not defeat the safety purpose of
the polarized or grounding type
plug. Polarized type plug has two
flat pins, one wide and the other
narrow. Grounding type plug has
two flat pins and one round
grounding pin. The wider flat pin
and round grounding pin are
designed for safety. If the provided
plug does not fit into your outlet,
consult an electrician for
replacement of the obsolete outlet.
The apparatus must be connected
to a main socket outlet with a
protected earthed connection.
2. Check the Multimedia LCD Display power
specification shown on the serial No./model tag.
Be sure to use the power according to the
specification. If you are unsure about the power
requirement, please contact your distributor or
local power company.
3. DO NOT overload powers sockets
or extension cords. Overloading
poses a risk of electric shock or
fire. Please purchase optional
extension cord that can switch off
automatically upon overloading.
4. The power cords shall be checked and cleaned
regularly. Check if they are gnawed by pets or
rats. If this occurs, change the power cord
immediately.
5. Prevent the power cord from
being pressed or kinked by a
foreign object. Do not bundle
or roll up the power cord to
avoid dissipation interruption.
Keep your Multimedia LCD
Display away from any place
where the power cord is
easily scuffed. Use only the
correct power cord.
6. Protect the power cord from being walked on
or pinched particularly at plugs, convenience
receptacles, and the point where they exit
from the apparatus. If there’s any flaw,
change a new one immediately.
7. In case of thunderstorm or if the device is
not used for a long time, remove the power
plug to prevent damage of the Multimedia
LCD Display due to abnormal surge.
8. DO NOT put the power cord around any
apparatus that generates heat. If the
protective jacket of the power cord is melted
or burnt, there might be risks of fire or
electric shock. Do NOT pile inflammable
things (like paper) near the power cord.
9. The readily operable appliance coupler will
serve as the disconnecting device of this
apparatus.
10.When the product is purchased or used in
different countries, you should use an
appropriate power cord which is compliant
with local laws and regulations.
1. The ventilation openings on the
back of Multimedia LCD Display are
provided for ventilation and heat
dissipation and a 10 cm space shall
be provided around them. Do not
block any vent and keep it clear.
2. DO NOT place the Multimedia LCD Display on
beds, sofas or carpet, as this may block the vent.
3. DO NOT use the Multimedia LCD Display in
enclosed or confined spaces such as a
bookshelf, bookcase or LCD Display cabinet.
4. Keep the Multimedia LCD Display from direct
sunlight.
04 .............................................................................................................................................................
Important Safety Instructions
[LCD Display]
[CATV]
1. Be sure to acquire due authorization from the broadcaster/CATV service provider/program owner
before using the TV receiver to watch programs through UHF, VHF, or CATV.
2. You’re advised not to use TV signal splitters to avoid inferior signal quality.
Cleaning and Maintenance
[Tips for cleaning the Multimedia LCD Display]
zThe LCD screen/enclosure/outer frame are fine products that have undergone special surface
treatment and need to be maintained and cleaned regularly. Be sure to read the following
instructions carefully before cleaning. Any damage due to improper or wrong cleaning methods is
not covered by the warranty.
zBefore cleaning the LCD screen/enclosure/outer frame, remove the AC power from theAC power
socket.
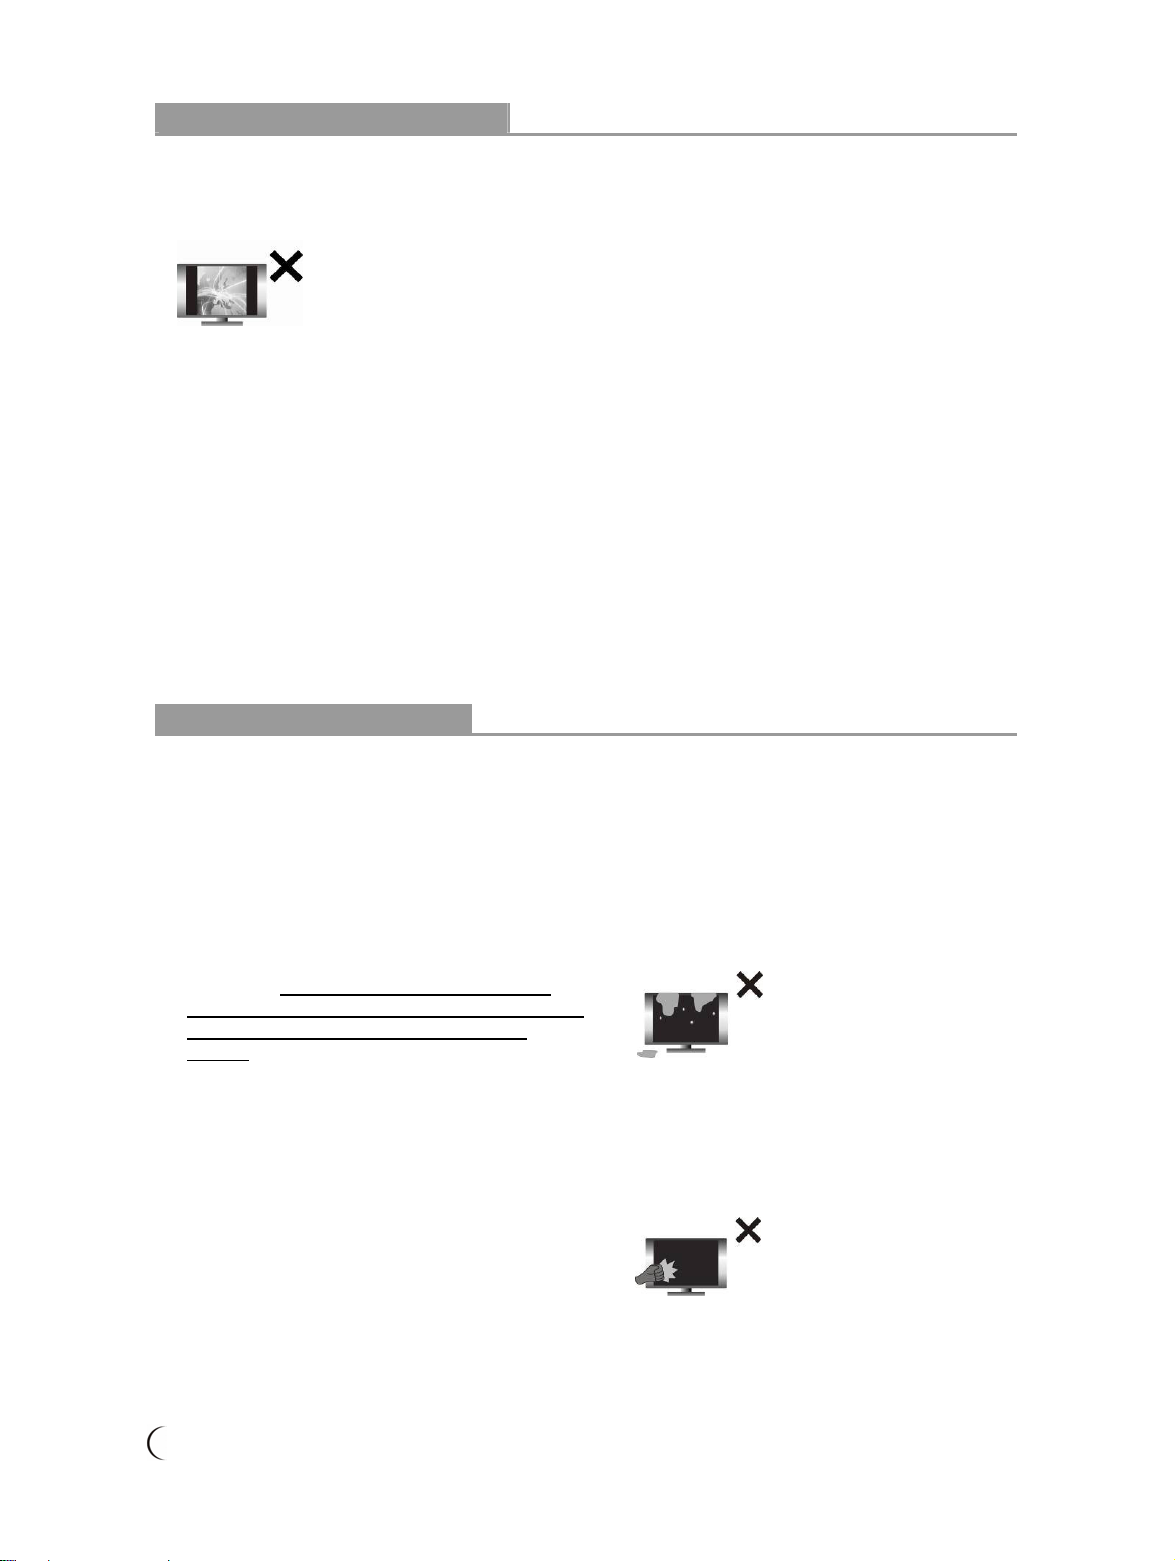
1. Due to the liquid-crystal
characteristics of the LCD panel,
if one watches at a 4:3 picture
aspect ratio or the same picture
stays frozen for a long time, it will
lead to image sticking.
Therefore, you are advised not to
watch TV at a 4:3 picture aspect
ratio for a long time or leave the
picture frozen. Otherwise, any
image sticking or abnormity
cannot be repaired and will not
be covered under warranty.
2. The LCD Display panel is manufactured
using high precision technologies. However,
since no manufacture technology that can
ensure the LCD Display panel is 100% free
from bright spots or shadows is available in
the market, we cannot provide guarantee for
the LCD Display panel free from bright spots.
Your understanding will be appreciated.
3. As this model features a self-protection
mechanism, users have to wait about 10
seconds for the screen to appear after power
on.
4. This equipment is for entertainment use only.
Not recommended for professional image
work.
1. When wiping the dust off the LCD screen or
enclosure, please remove most of the dust
with the blower and then wipe the screen softly
with the ultra-thin fiber cloth for the LCD
Display. If the dust is difficult to remove, wipe
with some special neutral cleanser for LCD
Display. Please follow the instructions of the
cleaning product; moreover, small dust on the
wiping cloth may scratch the surface of the
screen. Please wash the wiping cloth regularly.
Never wipe the LCD screen/enclosure with
thick fiber cloth to avoid damages or scratches.
2. Avoid using any type of alkaline/acidic cleaner,
washing powder, toluene, or volatile solvents
such as alcohol, gasoline, diluter, or pesticide.
Otherwise, the surface of the screen and the
enclosure of the Multimedia LCD Display may
be damaged.
3. When cleaning the LCD
screen or enclosure, do not
pour or apply large amount of
liquid onto the LCD screen
directly to avoid unexpected
damages to the LCD screen.
In case that the screen is
stained with water droplets,
remove them with a soft cloth
immediately.
4. As the structure of the LCD
screen is delicate, do not
press the screen or touch the
surface with screwdrivers,
pen tips or other sharp
objects to avoid breaking the
screen.

............................................................................................................................................................. 05
Repair Service
[Repair]
Please do not attempt to repair the Multimedia LCD Display by yourself.
There are high-voltage components inside the housings of this Multimedia
LCD Display that may cause an electric shock.
[History of Use]
Please carefully read and follow all of the warnings and instructions in this manual.
Failure to read and follow them will void the warranty. Modification of the
Multimedia LCD Display without authorization will void the warrant immediately.
Please recycle used
batteries.
[Disposal of Waste Displays]
In accordance with the requirements of the Environmental Protection Administration, waste displays
must be disposed of properly to avoid harmful effects to the environment.
When you want to discard your display, please follow the waste disposal methods:
1. When purchasing a new display, you can have the discarded one recycled by the distributor.
2. You can consult the Recycling Fund Management Board for electronic & electrical items. The
service hotline is 0800-085-717.
1. You can find the serial number and model tag
on the back of the Multimedia LCD Display.
Please tell your distributor or qualified service
personnel the serial number when you contact
them.
2. Used or discharged batteries must be properly
disposed of or recycled in compliance with all
applicable laws. For detailed information, please
contact your local solid waste disposal authority.
1. If any of following occurs, unplug the
Multimedia LCD Display and contact your
distributor or qualified service personnel from
the original manufacturer to repair the
Multimedia LCD Display:
1.1 The power cord or plug is damaged or
scuffed.
1.2 Liquid enters the Multimedia LCD Display.
1.3 Multimedia LCD Display is damp or wet.
1.4 The enclosure of the Multimedia LCD
Display is damaged.
1.5 Multimedia LCD Display malfunctions.
1.6 Drop from a high place.
1.7 Fume or sparkles occur to cause safety
concerns.
2. Refer all servicing to qualified service
personnel from the original manufacturer.
3. Do not use parts or components other than
those supplied by qualified service personnel
of the original manufacturer as they may
shorten the life of the product, or result in
electrical abnormality which may affect safety.
4. Safety inspection
When there is a need for checking the safety
during the use of the Multimedia LCD Display
or to repair the display due to faults, please
notify the qualified service personnel of the
original manufacturer for check and repair
services.
5. In case of any fault of the Multimedia LCD
Display after the expiration of the warranty
period, please notify the qualified service
personnel of the original manufacturer for
check and repair services.
6. These servicing instructions are for use by
qualified service personnel only. To reduce the
risk of electric shock, do not perform any
servicing other than that contained in the
operating instructions unless you are qualified
to do so.
06 .............................................................................................................................................................
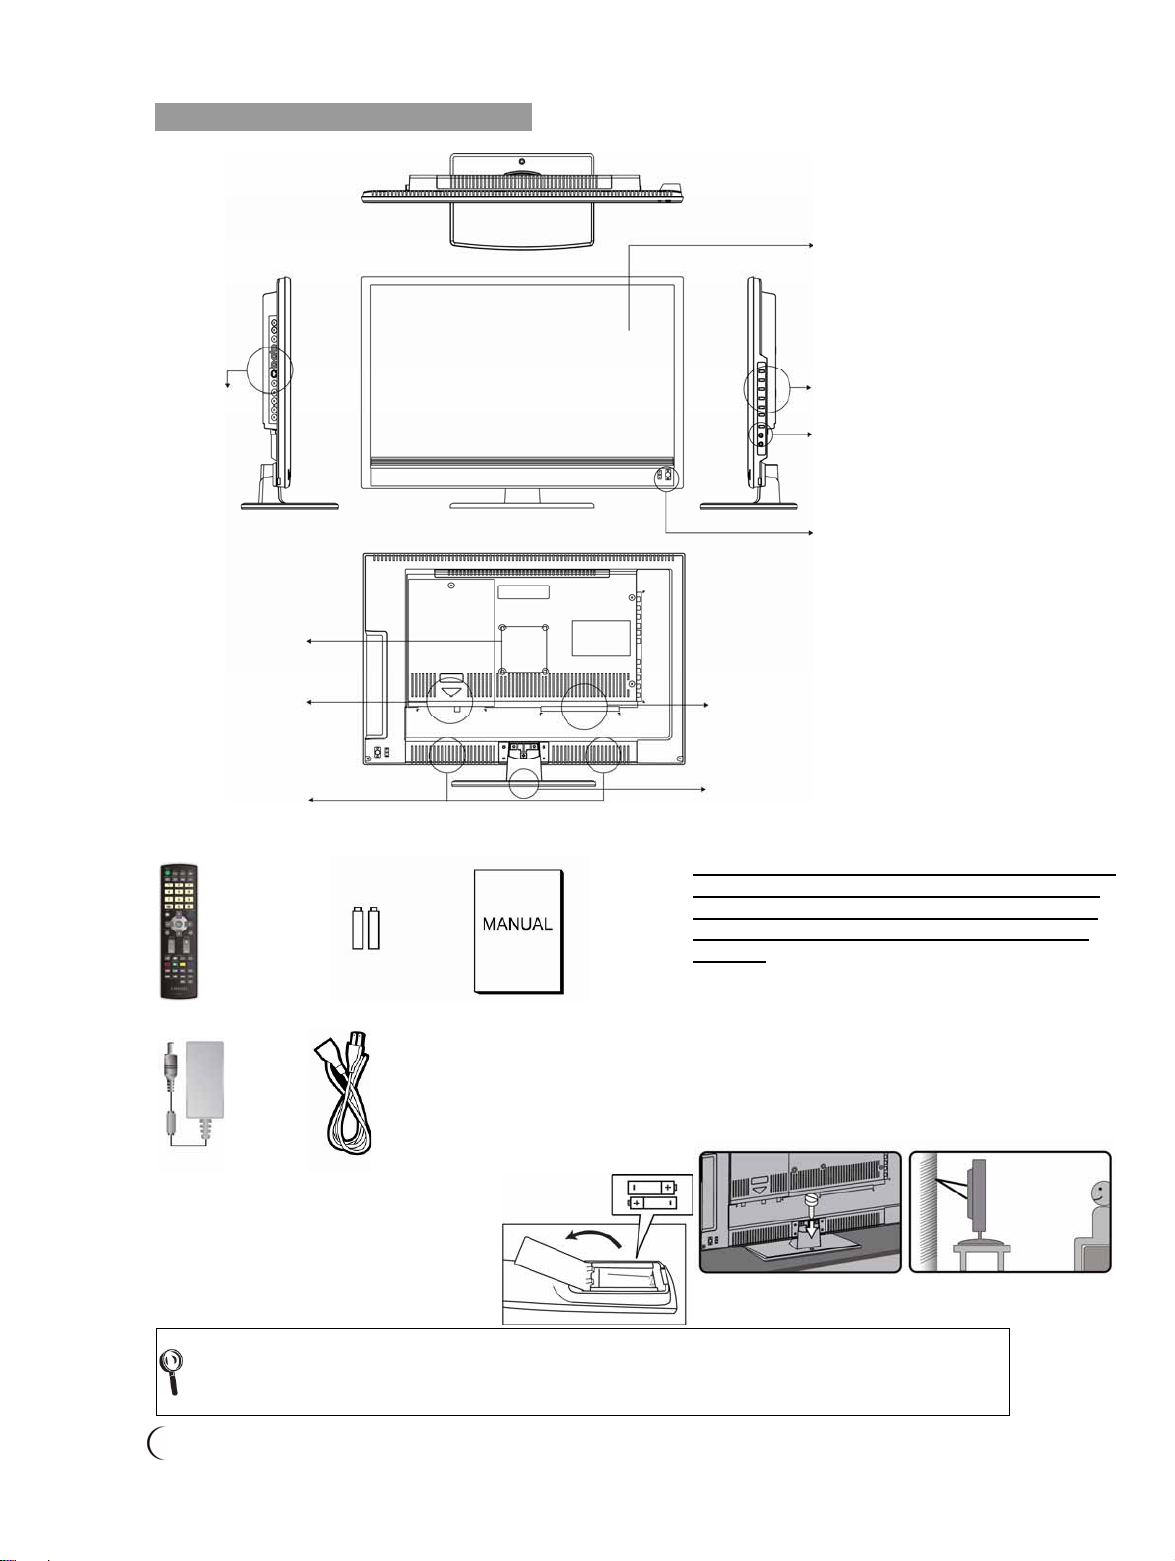
Descriptions and accessories
Accessories
Installation of batteries
1. Insert two AAA batteries into the
remote control. Make sure positive
electrode and negative electrode are
facing the proper direction.
2. Replace the cover.
If the remote control will not to be used for a long time, remove the batteries to avoid the
damage caused by liquid leaks.
Use the remote control carefully. Please do not drop the remote control on the ground. Avoid
humidity, direct sunlight and heat.
1. Remote Control 2. Batteries x 2 3. User Manual
4. Power Adapter 5. Power Cord (For TW SP-301 + IS-14 VCTF
1.25/3C)
A
nti-tip Precaution
※In order to prevent this equipment from falling
over in case of unexpected natural disasters
or serious accidents, you are advised to use
the anti-tip auxiliary screw holes for secure
fixation.
1. Before your operation, screw installation must be
done on a stable table (recommended size: T4 x
12) (Fig. 1).
2. In the event of failure to fasten the screws on the
table, please use another two bolts
(recommended size: M4 x 16) and fasten them on
the wall mount hole, then fix the LCD Display to
the wall (Fig. 2) with a wire for safety.
(Fig. 1) (Fig. 2)
Speakers
Front View
Rear View
Side View
Wall Mount Hole
Power Indicator
IR Remote receiver
Control panel
Video Connectors
LCD Panel
A
ntenna Connector
A
nti-tip Auxiliary Screw Hole
(Support Hole)
PC&Rear I/O Connector
Power
Top View

............................................................................................................................................................. 07
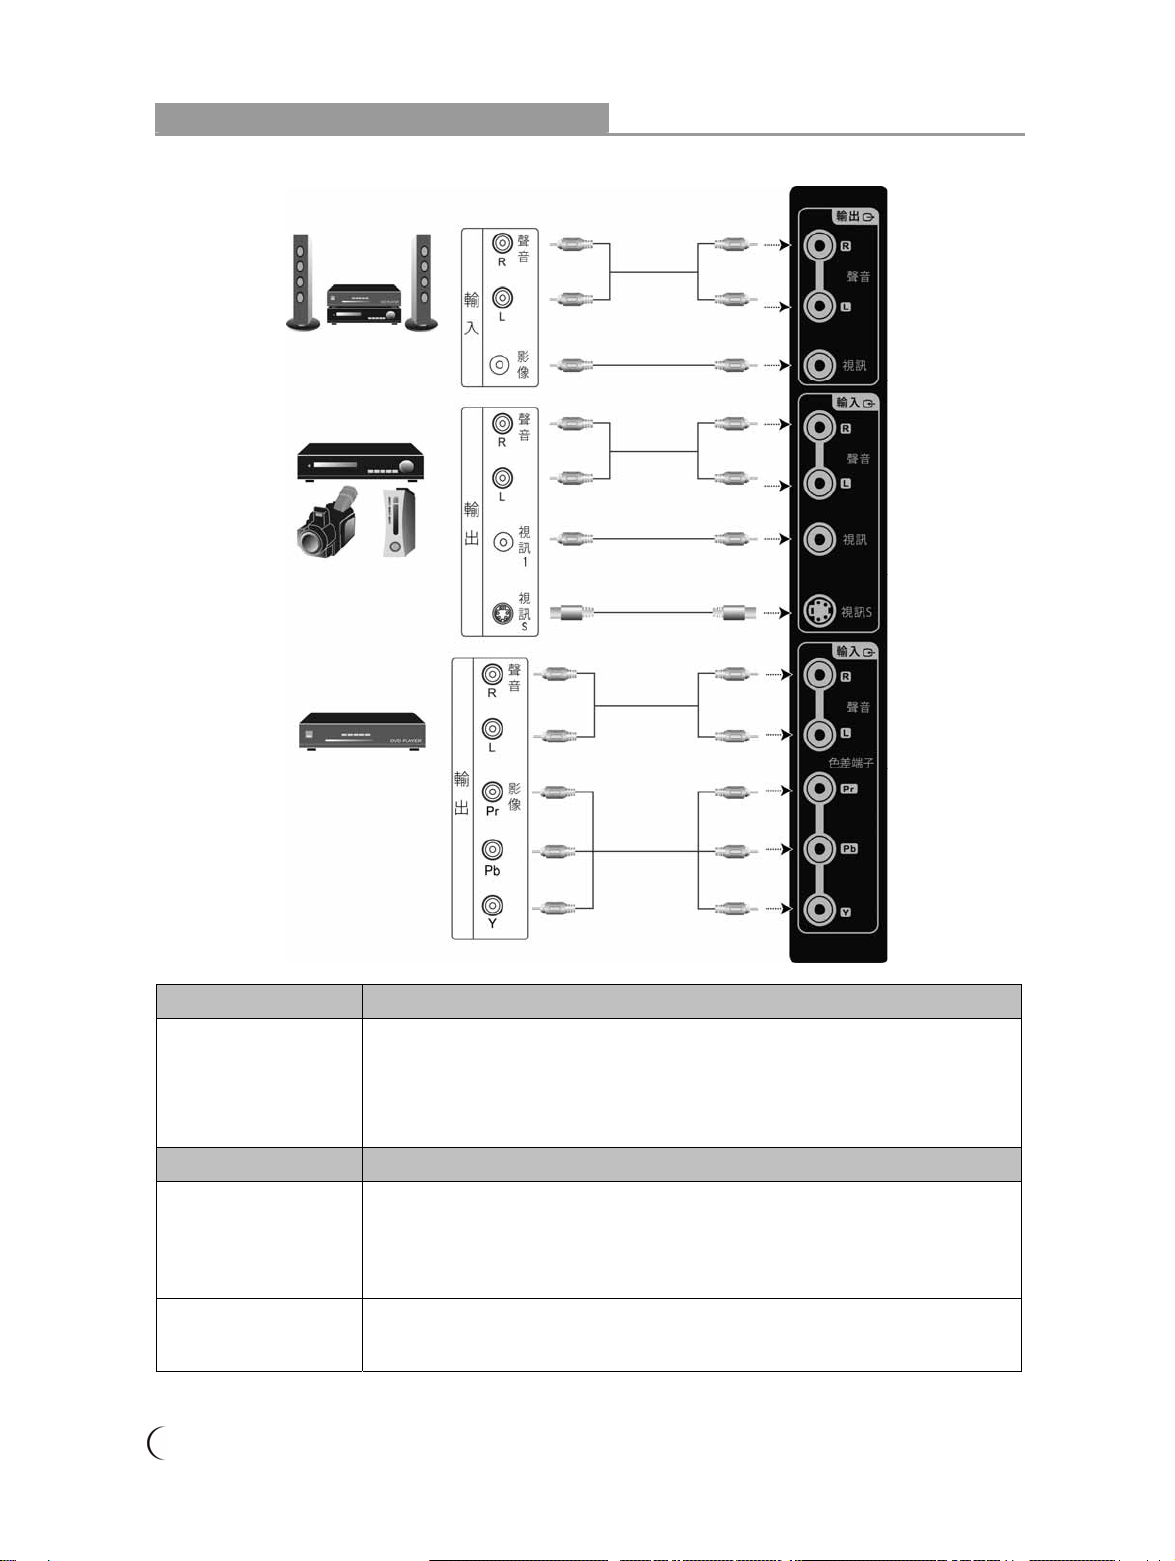
Operation of Multimedia LCD Display Connectors and sockets
Bottom I/O Connectors
Port (Input) Functions
HDMI
High Definition Multimedia Interface (HDMI):
This port accepts devices with high definition video/audio signal-HDMI
terminal output.
This connection port supports HDTV video signals or PC-DVI signals.
※The DVI signals come through HDMI input, the DVI connection wire for
HDMI shall be used, and the sound connection shares the VGA-sound
input terminal.
VGA terminal
VGA terminal and Audio Input:
Can be connected to devices with VGA (RGB analog signals) terminals and
sound output, for instance, computers and other devices.
※The sound input terminal is shared by VGA/DVI (HDMI) and the terminal
is 3.5 mm jack.
※ For details about the supportive signals, please refer to the specification pages of this User
Manual.
HDMI Input
Output DVD Player
08 .............................................................................................................................................................
Operation of Multimedia LCD Display Connectors and sockets
Video & Antenna Connectors
Port (Output) Functions
Video
Can be connected to amplifier or video recording device with image (AV)
and sound input terminals.
※Image output is limited to: Video (AV/S signal), TV signal.
Other signal sources can output their sound only.
※Sound output is not limited by the sound volume of the LCD.
Port (Input) Functions
Video 1/Video S
AV image terminal/SV image terminal and sound terminal:
Connects to devices with the AV terminal (composite signal) and audio R
(right)/L (left) output.
Connects to devices with composite S-Video (Y/C) terminal and audio R
(right)/L (left) output.
Component Component Video Connector and sound terminal:
Connects to devices with Component Video connector (YPbPr) and audio R
(right)/L (left) output.
※For details about the supportive signals, please refer to the specification pages of this User Manual.
Video Recorder or
DVD Player (Use
when you record TV
programs)
Component
Video
connector input
Audio Input
Audio Input
Video S Input
Video Recorder,
Video Game Console
or Camera, etc.
Audio Output
DVD Player
Video Output
Video Input

............................................................................................................................................................. 09
Operation of Multimedia LCD Display Connectors and sockets
Antenna Connectors
Port Functions
Analog signal input Connected to analog TV antenna.
Analog signal input
(Antenna)

10 .............................................................................................................................................................
Operation of Multimedia LCD Display Connectors and sockets
Turn ON the Multimedia LCD Display
1. Plug the power cord into input connector on the back of the Multimedia LCD display. Plug the
other end of the power cord into an outlet.
2. Press the power button (I) at the back of the Multimedia LCD Display to turn on the power and
press the other end to turn off the power.
3. Press the POWER button on the front lower right of the TV to turn on or off Multimedia LCD
Display.
- When the power is ON, the LED indicator will turn
green.
- When the power is OFF, the Multimedia LCD
display will enter STANDBY mode, and the LED
indicator will turn amber or red. (Depending on the
models)
Power
A
C 100 ~ 240V
Note (1) Power outlets differ from region to region.
(2) Please identify before using the plug of the
adapter to avoid causing damage to the machine.

..............................................................................................................................................................11
Operation of Multimedia LCD Display Connectors and sockets
Channel Scan (Analog TV)
The auto channel scan must be performed for the first installation. (This product requires an
optional LCD TV box to enable the TV function)
1. Press the “TV/Visual-Audio” button on the remote control or the “Input Source” button on the
control panel of the Multimedia LCD Display to select the TV mode.
2. Press the “Menu” button to open the OSD (On Screen Display) screen.
3. Press the button to select “TV”. Then press the button to move to the “Channel
Scan” option.
4. Press the ENTER button to start auto channel scan. (During the auto channel scan, it will take a
few minutes to scan available channels)
5. After the auto channel scan is completed, you may start watching TV. Press the “CH” button
on the remote control to select a channel.
Step 1
Step 3
Step 4
Step 2
Step 5
Few minutes

12................................................................................................................................................................
Operation of Multimedia LCD Display Control panel
Button Functions
MENU
Adjustment Menu
Press the MENU button on the LCD panel to show the menu to adjust the settings
of the Multimedia LCD Display. To show the screen control window of the
Multimedia LCD Display, please press the MENU button. Press the Adjust
STWX buttons to adjust the content of each quick menu item.
CH
(FUNCTION S/T)
Channel Selection (Only under the TV mode)
Use the CHANNEL button on the LCD panel to select a channel.
(Only under the TV mode. This product requires an optional LCD TV box to
enable the TV function.)
※Under the MENU mode, the function works as Up and Down buttons of the
selection function.
VOL
(ADJUST W/ X)
Volume Adjustment
Use the VOLUME button to adjust the volume of the Multimedia LCD
Display.
※Under the MENU mode, the function works as Left and Right buttons of the
adjustment function.
SOURCE
Signal Input Source Selection
Press the SOURCE button on the top of the LCD Display or the button on
the remote control to select one of the following modes in order of: TV/Video/Video
S/Component/HDMI Computer Mode.
※Under the MENU mode, you can use this button for the function of ENTER button.
POWER Power on/off the TV.
Earphone Output
This connection port connects to earphones (16 Ωor 32 Ω) for the audio
output signal.
Once the earphone is connected, the speaker of the Multimedia LCD Display
will stop sound output.
............................................................................................................................................................. 13
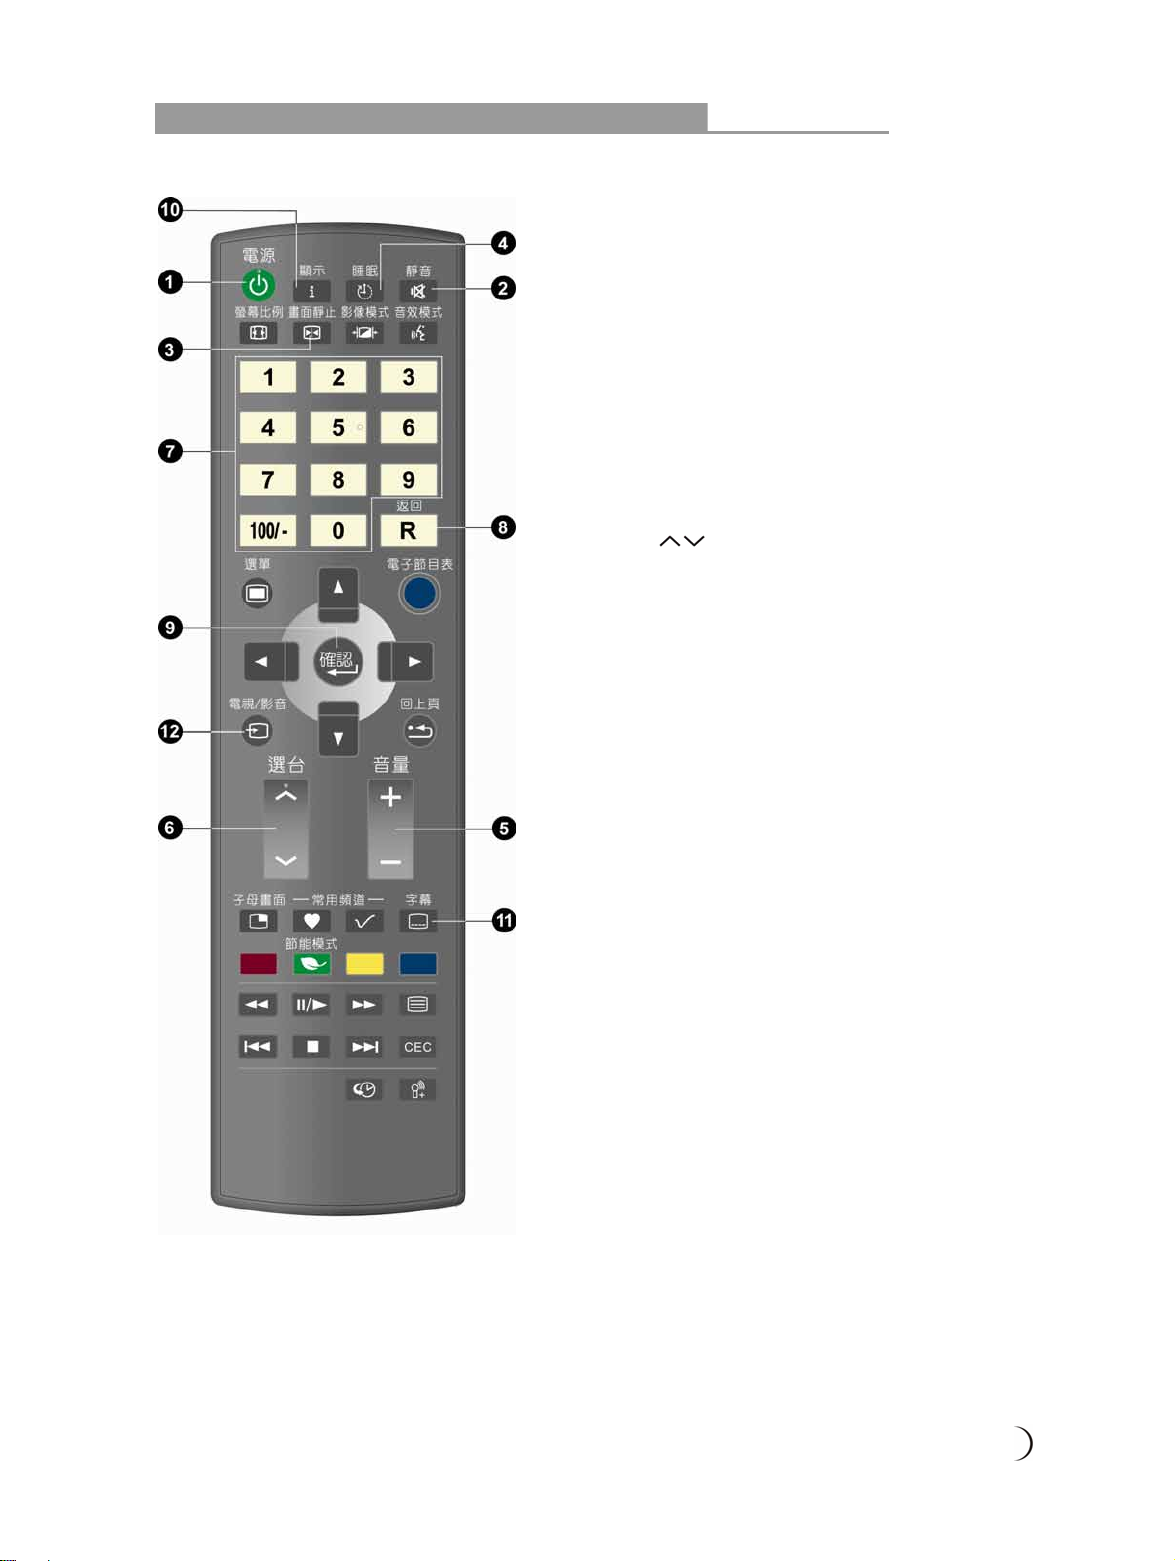
Multimedia LCD DISPLAY installation & operation Remote Control
1. POWER
Turn on the Multimedia LCD Display or enter
STANDBY mode.
2. MUTE
Press to toggle audio on and off. You can also press
volume +/- to restore the previous volume level.
3. FREEZE
Press to freeze the main screen and press again to
restore live viewing.
4. SLEEP
Press repeatedly to select one of the available sleep
OFF/30/60/90/120 minutes modes.
5. VOL +/- <Volume +/->
Press to adjust the volume.
6. Channel
Press to select the channels.
7. 0 ~ 9, 100/- Numeric key
Using the numeric buttons (0 to 9 and 100/-) to
select from CH 02 to CH 125. When the channel
selected exceeds CH 125, the window will stay on
the channel set and won’t be switched.
8. RETURN
Return to the previous channel.
9. ENTER
When entering CH 1 to CH 9, you may just enter
number 1 to 9 and wait for a few seconds for auto
changing; or you may simply press number 1 to 9
then the ENTER key to switch to the channel
directly.
10.Display
Press the DISPLAY button to display the current
mode. Including input source/channel/aspect/audio
mode.
11.C.C.: Close Caption
This allows you to enable the caption function. (This
function only applies to the NTSC system used in
North America)
12.TV/VIDEO
For the signal source of main screen.
1.You can use the “TV/VIDEO” button on the
remote control to switch the signal source of main
screen.
The switching sequences of main screen are
TV/Video/S Video/YPbPr/HDMI/PC respectively.
2.The selected signal source will be displayed on
upper right of the screen.
3.The special items to the OSD MENU under each
display mode can be selected.

14................................................................................................................................................................
Multimedia LCD DISPLAY installation & operation Remote Control
13.<MENU> and Adjustment button STWX and
Back
This allows you to activate the menu of the
Multimedia LCD Display. Press again to exit the
menu. Use the STWX button to select the menu
item and adjust its setting. Press the “ ” button to
return to the last page.
14.Favorite Channels
To display the “Favorite Channels” in order of your
previous setup.
Favorite channel editing button .
For adding, deleting, or changing channels
* Refer to Page 16 for more information about operation.
15.ASPECT
The ASPECT modes include:
16:9/Zoom 1/Zoom 2/Game/4:3.
16.PICTURE
For advanced picture setup, including
Vivid/Movie/Sport/Game/User modes.
17.MTS
The MTS modes include STEREO/MONO/SAP.
If no second language is available to be chosen
from the received signals, the MONO audio output
will apply.
18.EPG
(This function is only available for models with digital
TV function)
19.PIP (Picture in picture)
Display PIP Function Menu.
(Only for PIP function supported devices)
Not available for this model.
20.CEC <Consumer Electronics Control>
Linked with a CEC function supported device to take
control for operation.
(Only for CEC function supported devices)
21.Reserved
22.Time-Shift
To record real-time while watching the TV.
(Only for Time-shift function supported devices)
23.Energy Saving Mode
Power Saving function. The screen brightness will
decrease dramatically on this mode. It includes:
On/Off.
(Only for energy-saving function supported devices)

............................................................................................................................................................. 15
Operation of Multimedia LCD Display Favorite Channels
Favorite Channels (Only under the Analog TV mode):
Press the favorite channel editing button on the remote control and open the favorite channel
list:
The operating method is as follows:
Add a Channel:
1. Select the TV channel to be added first.
2. Press the “Favorite Channels” editing button on the remote control and the screen will
display the favorite channel list (as shown in the figure above).
3. Press the buttons on the remote control and move to the position to be remembered.
4. Press the button to finish favorite channel adding.
5. The position will display the channel that you previously set. The position not set will display “0”.
Remove a Channel:
1. Press the “Favorite Channels” editing button on the remote control and the screen will
display the favorite channel list (as shown in the figure above).
2. Press the buttons on the remote control and move to the position to be removed.
3. Press the button to finish favorite channel removing.
Watch Favorite Channels:
1. Press the “Favorite Channel” button on the remote control to watch all the channels (9
channels) in the favorite channel list in sequence (cycle).
Remote Control

16................................................................................................................................................................
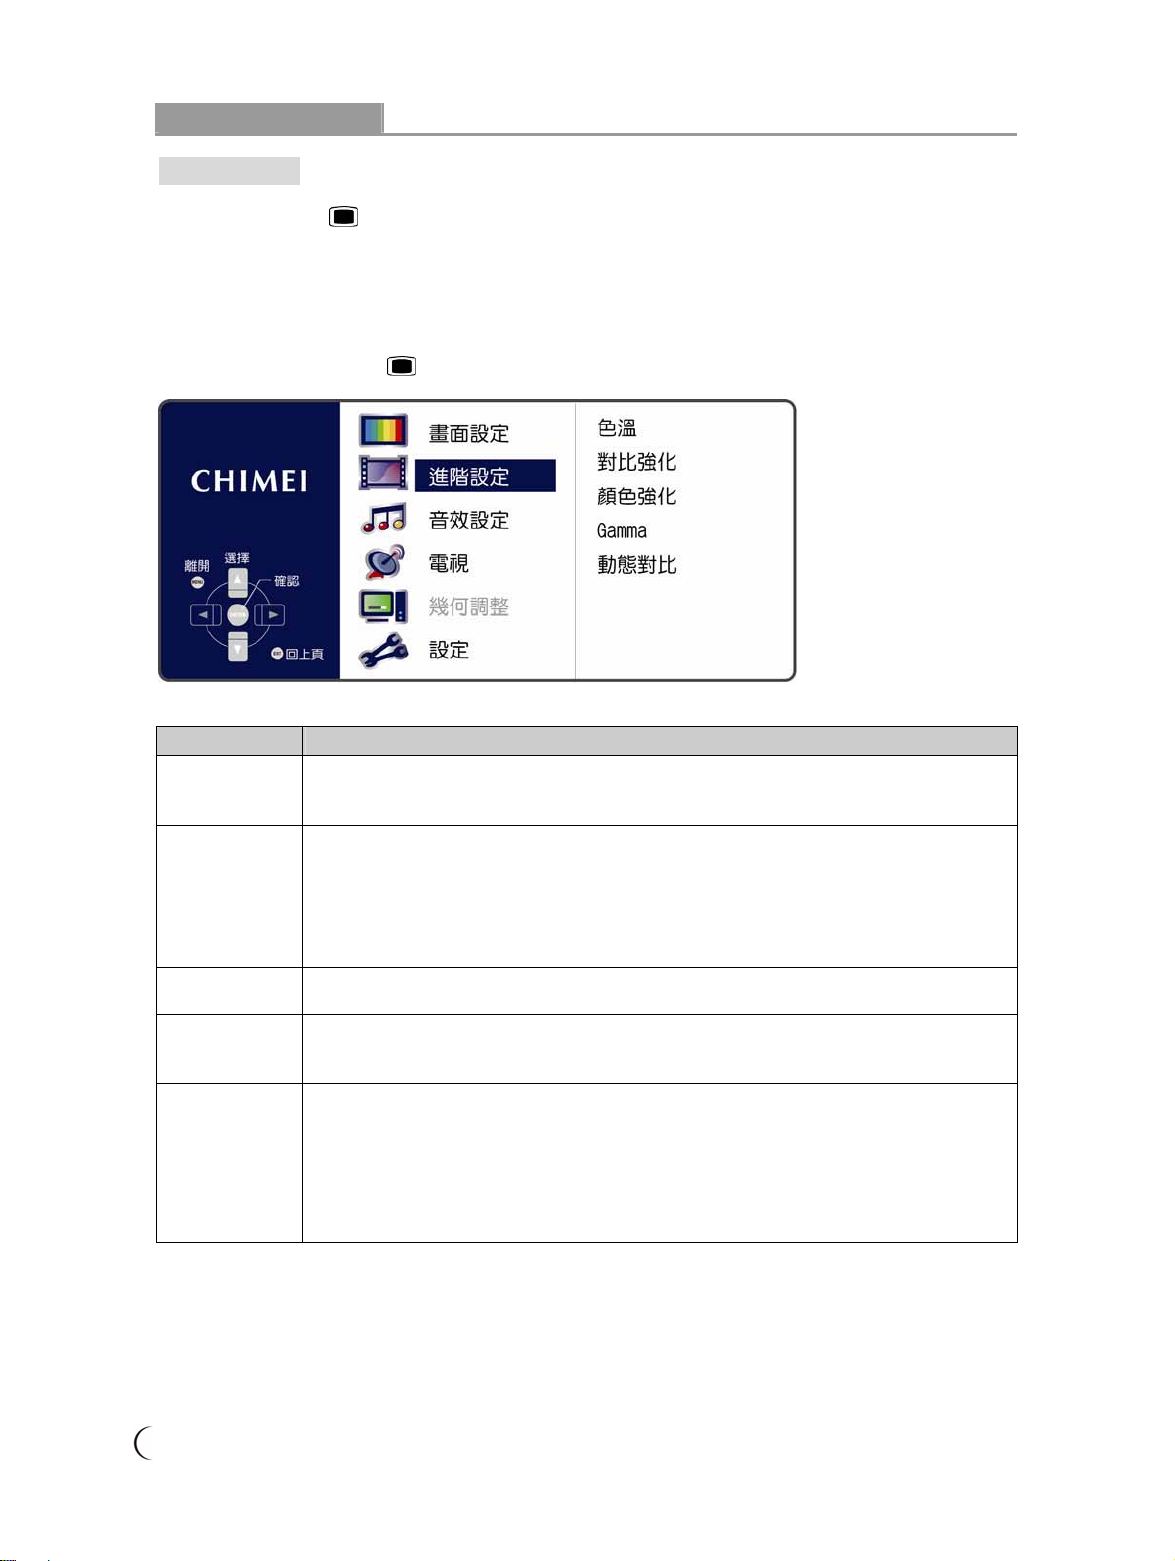
LCD Display Menu Advanced LCD Display menu
1. You can use the TV/VIDEO button on the remote control to select the signal source.
Once the signal source is detected, the selected system mode will appear in the upper right corner
of the screen.
2. After the system mode is selected, press the MENU button to perform the following functions:
PICTURE
According to the type of TV program you are watching, it provides more picture
modes and functions for adjusting color and brightness.
ADVANCE
According to the type of program you are watching, it provides advanced setup
for adjusting color and brightness.
AUDIO
Provide more audio selections. You can also set the audio environment of the
Multimedia LCD Display.
TV (for use under TV mode)
Set up your favorite channels.
GEOMETRY: For use under PC mode.
SETUP
Set the screen display language, menu background and other functions.

............................................................................................................................................................. 17
LCD Display Menu PICTURE
PICTURE
1. Press the menu button on the remote control to show the main menu.
2. Use the ST buttons to select the main item to be adjusted, “PICTURE”.
Use the Xbutton to move to the sub item to be adjusted.
3. Use the ST buttons on the remote control to select the item to be adjusted.
Press the ENTER button to enter the item to be adjusted.
4. Use the WX buttons on the remote control to adjust the value of the item.
5. Press the menu button to exit the screen.
Menu Descriptions
Contrast Press the WX buttons to increase or decrease the picture contrast.
Brightness Press the WX buttons to make the picture brighter or darker.
Saturation Press the WX buttons to adjust color saturation.
Hue Press the WX buttons to change the hue to make it redder or greener.
Sharpness Press the WX buttons to make the picture sharper or softer.
BackLight Press the WX buttons to adjust the brightness of BackLight. (The less
bright the BackLight, the more energy saved and the longer lifetime)
Reset Press the WX buttons to restore all parameters of this menu to default
settings.
18................................................................................................................................................................
LCD Display Menu ADVANCE
ADVANCE
1. Press the menu button on the remote control to show the main menu.
2. Use the ST buttons to select the main item to be adjusted, “ADVANCE”.
Use the Xbutton to move to the sub menu to be adjusted.
3. Use the ST buttons on the remote control to select the item to be adjusted.
Press the ENTER button to enter the item to be adjusted.
4. Use the WX buttons on the remote control to adjust the value of the item.
5. Press the menu button to exit the screen.
Menu Descriptions
Color
Temperature Press the WX buttons to adjust the color temperature: Cool/Normal/Warm.
Super Contrast
Press the WX buttons to adjust the contrast of picture: Off/Low/Middle/High.
※ PC (DVI, VGA) model does not support the function.
※ Opening Super Contrast function may cause slight brightness modulation
temporarily at running high frequency pattern. It is a normal phenomenon.
Super Color Press the WX buttons to adjust color tone: Off/Natural/Vivid/Movie.
Gamma Press the WX buttons to adjust the gray scale curve on the picture:
HDTV/Normal/Game.
Dynamic
Contrast
Press the WX button to select OFF or ON. For improvement of dynamic contrast.
※ Opening Super Contrast function may cause slight brightness modulation
temporarily at running high frequency pattern. It is a normal phenomenon.
※ Dynamic Contrast: This mode saves 25% of energy in average and increases
the lifetime of the lamp.

............................................................................................................................................................. 19
LCD Display Menu AUDIO
AUDIO
1. Press the menu button on the remote control to show the main menu.
2. Use the ST buttons to select the main item to be adjusted, “AUDIO”.
Use the Xbutton to confirm the main item to be adjusted.
3. Use the ST buttons on the remote control to select the item to be adjusted.
Press the ENTER button to enter the item to be adjusted.
4. Use the WX buttons on the remote control to adjust the value of the item.
5. Press the menu button to exit the screen.
Menu Descriptions
Balance Press the WX buttons to adjust the balance between left and right
speakers.
Bass Press the WX buttons to adjust the audio bass level.
Treble Press the WX buttons to adjust the audio treble level.
SRS TruSurround XT
(Surround Mode)
Press the WX buttons to adjust the SRS TruSurround XT: ON/OFF.
(When SRS is on, the bass/treble adjustment function will be
disabled)
Reset Press the WX buttons to restore all parameters of this menu to
default settings.
Table of contents
Other Chimei Monitor manuals


