manuals.online logo
Brands
  1. Home
  2. •
  3. Brands
  4. •
  5. Chinavision
  6. •
  7. Baby Monitor
  8. •
  9. Chinavision CVXR-I241 User manual

Chinavision CVXR-I241 User manual

Item Value
GENERAL
Transmission Frequency 2400MHz-2480MH2
Transmission Power 17dBm
Operating Frequency 2450MHz
Unobstructed Effective Range 250m
Modulation Mode FHSS
Operating Temperature 0'-60'
Storaoe Temoerature 250
Operating Humidity 20o/-80Y"RH
CAMERA
lmaging Sensor Type 1/3 CMOS
Picture Total Pixels 628x582(PAL) 51 0X492(NTSC)
Horizontal Resolution 360Line
View Angle 60'
Minimum lllumination 1.5Lux
BandWidth 4MHz
Nioht Vision Ranoe 3-5m
Battery Working Time 8 hours
Motion Detection Distance >5m
Sound Control Sensitivity >60dBA
Consumption Current 150mA +15mA
Power Supply DC 6V
Dimensions(WxDxH) 100.86-86(mm)
Frame 25
Weight 1419
RECEIVER
LCD Screen Tvpe 7"TFT-LCD
Effective Pixels 480x234
Receivinq Sensitivitv -85dBm
Video Svstem NTSC/PAL
Color Confiouration R.G,B.
Consumption Current 150mA+15mA
Power Supply DC 12V
lrri I nHtqttut-ilfi{-tt,
Fffiffiffiffif;iffiffiffiffinr
r
i
I2,4GHZ Wireless
7" LCD Digital baby
monitor kit
-12-
Contents ln order to prevent improper operation of DC Converter, Please read user
manual carefully.
Caution
For you safety, please use only the DC converter provided. (The manufacturer
will not responsible for any losses caused by DC converter not provided by the
manufacturer).1! lmportant !! Please only use the socket match with DC
converter. Use of improper socket may cause electrical and fire damager.
O Do not use damaged Charger
O Do not use battery over the specified time period
O First use or the battery has not been for past several months; please recharge
the battery before use
O ln order to protect your battery, please fully charge your battery before you
use. The battery must be fully discharge it before you charge it again
O Over charge and over discharge will shorten the life of battery. lf the usage
period of fully charged battery is shorten than new battery, you need to
change your battery
O Battery is consumable item, its life will be shorten from the time it is being
used
O Don't touches the DC converter with conductors e.g. rings etc
. 100% digital baby monitor kit
* lnterference-free
* 4 Channels,support 4 cameras for one monitor
* Video to see your baby with 7" LCD color screen
* lnfrared night vision
. High sensitivity microphone
* 2-way communication
. VOX function
-2- -3-
2.4G wireless digital camera Camera power On/OFF
1 pc * Wireless Camera
1 pc * Wireless Monitor
O 6V DCAdapter
. 12 V DC Adapter
O 7" Wireless LCD baby monitor
a 2.4G wireless camera
O lnstruction Manual
o AV Cable
2 pcs * PowerAdapter
(depend on diffrent countries above
pricture only for reference)
1 pc * AV Cable
1 pc * lnstruction Manual
* lpcs
* lpcs
* 1pc
" 1pc
* 1pc
* 1pc
7" LCD digital baby monitor receiver
6V DC PORT
Pair key
Press M key to show
main menu and it is also
confirm key .
Press up/down
Naviagtion key can ajusl
Monitor Voice High/Low
Press left and right navigation
key can select Channels,
press hold right navigation key
for 3 seconds aslo can auto
scan channels
Press POWER key to turn on /turn off
-4-
allcom
-5-
Power light
Press TALK key to two
way cgmunication
AV Cable port
12V DC Port
PresS "POWER" button on the wireless camera and the LCD monitor after the
adapter connnects to the camera and the monitor.
Signalstrength/Channels Status will show on the LCD monitor.
Press M button to display the main menu
O Baby UnitVolume mode
O Effect SET mode
O Setup mode
Press M button to display the main menu,and then select the "baby unit
volume" mode by UP/Down navigation key.
press M button to entry ,press UP/Down navigation key to adjust the
voice level (O-9,volume level)
press M button to confirm volume level
press left navigation key to Exit and return to monitor screen
l.Vertical mode
Press M button to display the main menu,and then select the "EFFECT SET'
mode by Down navigation key,
press M button to entry.press right navigation key to convert Vertical on/off .
press M button to confirm.
press left navigation key to Exit .
-6 -7 -
2.Horizontal mode
Press M button to display the main menu,and then select the "EFFECT
SET" mode by Down navigation key.
press M button to entry,press Down Navigation key to select Horizontal
mode,press right navigation key to convert Horizontal on/off.
press M button to confirm.
press left navigation key to Exit.
S.Contrast mode
Press M button to display the main menu,and then select the "EFFECT
SET" mode by Down navigation key,
press M button to entry ,press Down Navigation key to select Gontrast
mode,press left navigation key to decrease the image contrast, press
right navigation key to increase the image contrast(O-8 , contrast level).
press M button to confirm.
press left navigation key to Exit.
4.Saturation mode
Press M button to display the main menu,and then select the "EFFECT
SET" mode by Down navigation key,
press M button to entry ,press Down Navigation key to select Saturation
mode.press left navigation key to decrease the image Saturation, press
right navigation key to increase the image Saturation (0-6, saturation
level).
press M button to confirm.
press teft navigation key to Exit.
-8- 9-
rrlra)*r*;***l*tlrlll**r1,1*'lrlllItj;'l*rrr]1*,
'ffi
ffi{&fr {Ni&ry&&ffilil$t$xfr r
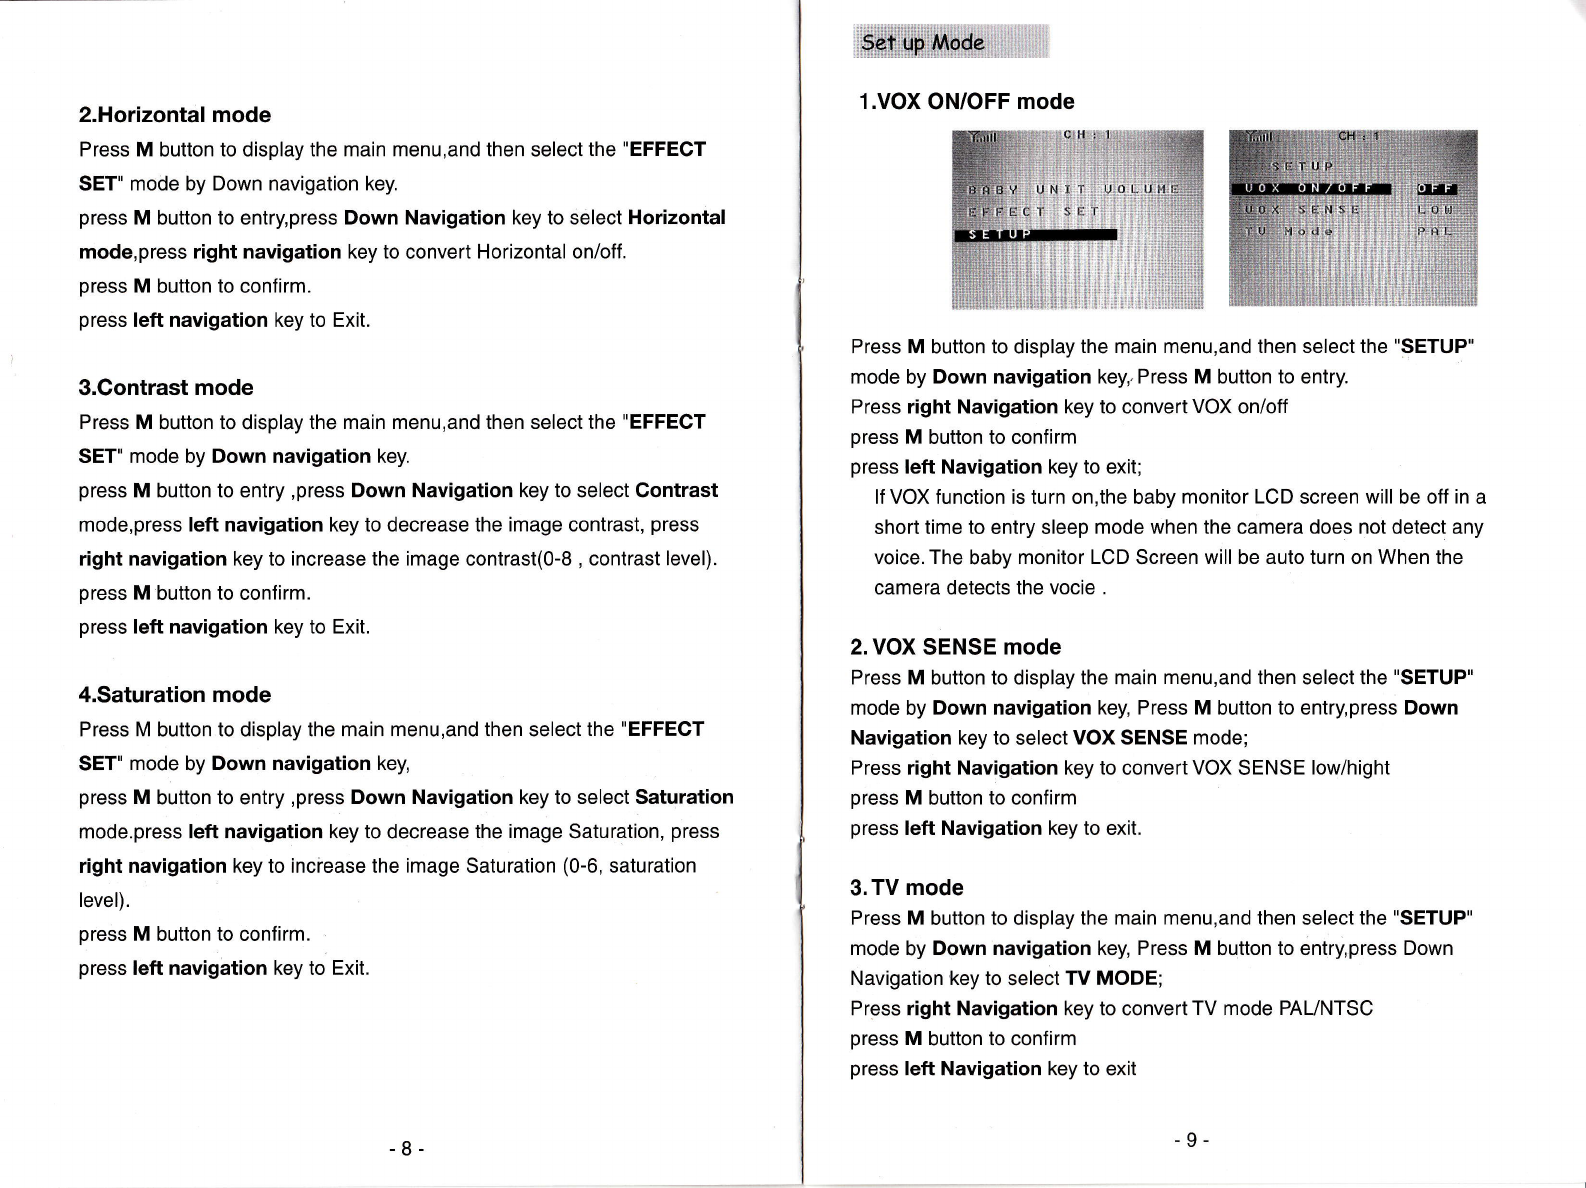
1.VOX ON/OFF mode
Press M button to display the main menu,and then select the "SETUP"
mode by Down navigation key,. Press M button to entry.
Press right Navigation key to convert VOX on/off
press M button to confirm
press left Navigation key to exit;
lf VOX function is turn on,the baby monitor LCD screen will be off in a
short time to entry sleep mode when the camera does not detect any
voice. The baby monitor LCD Screen will be auto turn on When the
camera detects the vocie .
2.VOX SENSE mode
Press M button to display the main menu,and then select the "SETUP"
mode by Down navigation key, Press M button to entry,press Down
Navigation key to select VOX SENSE mode;
Press right Navigation key to convert VOX SENSE low/hight
press M button to confirm
press left Navigation key to exit.
3.TV mode
Press M button to display the main menu,and then select the "SETUP"
mode by Down navigation key, Press M button to entry,press Down
Navigation key to select TV MODE;
Press right Navigation key to convert TV mode PAUNTSC
press M button to confirm
press left Navigation key to exit
Please make sure the baby LCD monitor connect with the LCDiTV by AV Cable
So the other LCD/TV can hear voice and watch video ,meanwhile the baby monitor LCD
aslo can do so .
Method one:
Press Pair key on the Monitor backside(see above icon),then can see the monitor power
led to flicker,it means can pair up with the camera. press the pair key on the camera
backside.the pairing is successful when the power led of the monitor stops to flicker.
Method two:
Press the pair key on the camera backside, then can see the camera power led to flicker,it
means can pair up with the monitor. Press Pair key on the monitor backside(see above
icon), the pairing is successful when the power led of camera stops to flicker.
*NOTE : lf want to pair more cameras with the monitor,so please select next channel by right
navigation button on the monitor to pair with another camera,so you can see next
channel(CH2 or CH3 or CH4) on the top of the Monitor ,the pairing method same as above
process.
Note: when you take care ofyour baby sleeping by our baby monitor kit,
you should note the singal strength indicators on the LCD monitor
to make sure baby safty more . Please reference to above table.
Signal Strength lndicators Description
Y'rtll Perfect signal
Y,l Low signal
YNo signal
Problem Solution
No video Check the DC power of camera or batteries of the
camera if works well.
Make sure the camera and monitor in effective range.
When the camera works by battery
and then change to works by DC,
when insert DC to DC port on
camera,but the camera does not
work and power off .
Please press power button on the camera backside to
turn on it .
when camera works by battery and then insert DC to
DC port , the camera stops to work,so turn off the
battry working due to pretect the batteries which are
in the camera , you know the batteries in the camera
can not charge by DC.
Two ways talk -- low volum Adjust the volum by UP/DOWN key on monitor or
press ok button entry the main menu ,then select
baby unit volum mode to adjust the volum by
UP/DOWN Navigation key.
When camera works in dark night ,lR
lights will auto work ,but lR lights do
not light.
lR lights work in dark night, the lR lights will not
light,but they are working well.
Ripple wave on the monitor when
the camera works by 4pcs AA
battery
Make sure the battrey'capacity is enough
Can not pairing up with extra
cameras when camera works by
4pcs AA battery
Make sure the battrey'capacity is enough or the
camera works instead of the adapter
10- 11

Popular Baby Monitor manuals by other brands

Tesla SMART CAMERA BABY B500 user manual

Tesla

Tesla SMART CAMERA BABY B500 user manual

Fisher-Price T4838 instruction sheet

Fisher-Price

Fisher-Price T4838 instruction sheet

Motorola VM36XL user guide

Motorola

Motorola VM36XL user guide

Baby Control Digital BC-200 Instructions for use

Baby Control Digital

Baby Control Digital BC-200 Instructions for use

iBaby H1 user manual

iBaby

iBaby H1 user manual

Fisher-Price M5578 owner's manual

Fisher-Price

Fisher-Price M5578 owner's manual

Sharper Image Baby Bath OQ005 instructions

Sharper Image

Sharper Image Baby Bath OQ005 instructions

Axvue E600 instruction manual

Axvue

Axvue E600 instruction manual

Alecto DVM-50 user manual

Alecto

Alecto DVM-50 user manual

Motorola MBP50-4 user guide

Motorola

Motorola MBP50-4 user guide

Philips SCD488/05 user manual

Philips

Philips SCD488/05 user manual

Angelcare AC 420 owner's manual

Angelcare

Angelcare AC 420 owner's manual

Motorola MBP169-2 user guide

Motorola

Motorola MBP169-2 user guide

Soon CARE SBM-010WP user manual

Soon

Soon CARE SBM-010WP user manual

Summer Ultrasight instruction manual

Summer

Summer Ultrasight instruction manual

Summer PANORAMA quick start guide

Summer

Summer PANORAMA quick start guide

switel BCF4368 user manual

switel

switel BCF4368 user manual

Oricom CU875 user guide

Oricom

Oricom CU875 user guide

manuals.online logo
manuals.online logoBrands
  • About & Mission
  • Contact us
  • Privacy Policy
  • Terms and Conditions

Copyright 2025 Manuals.Online. All Rights Reserved.