CHIYU BF-480 User manual
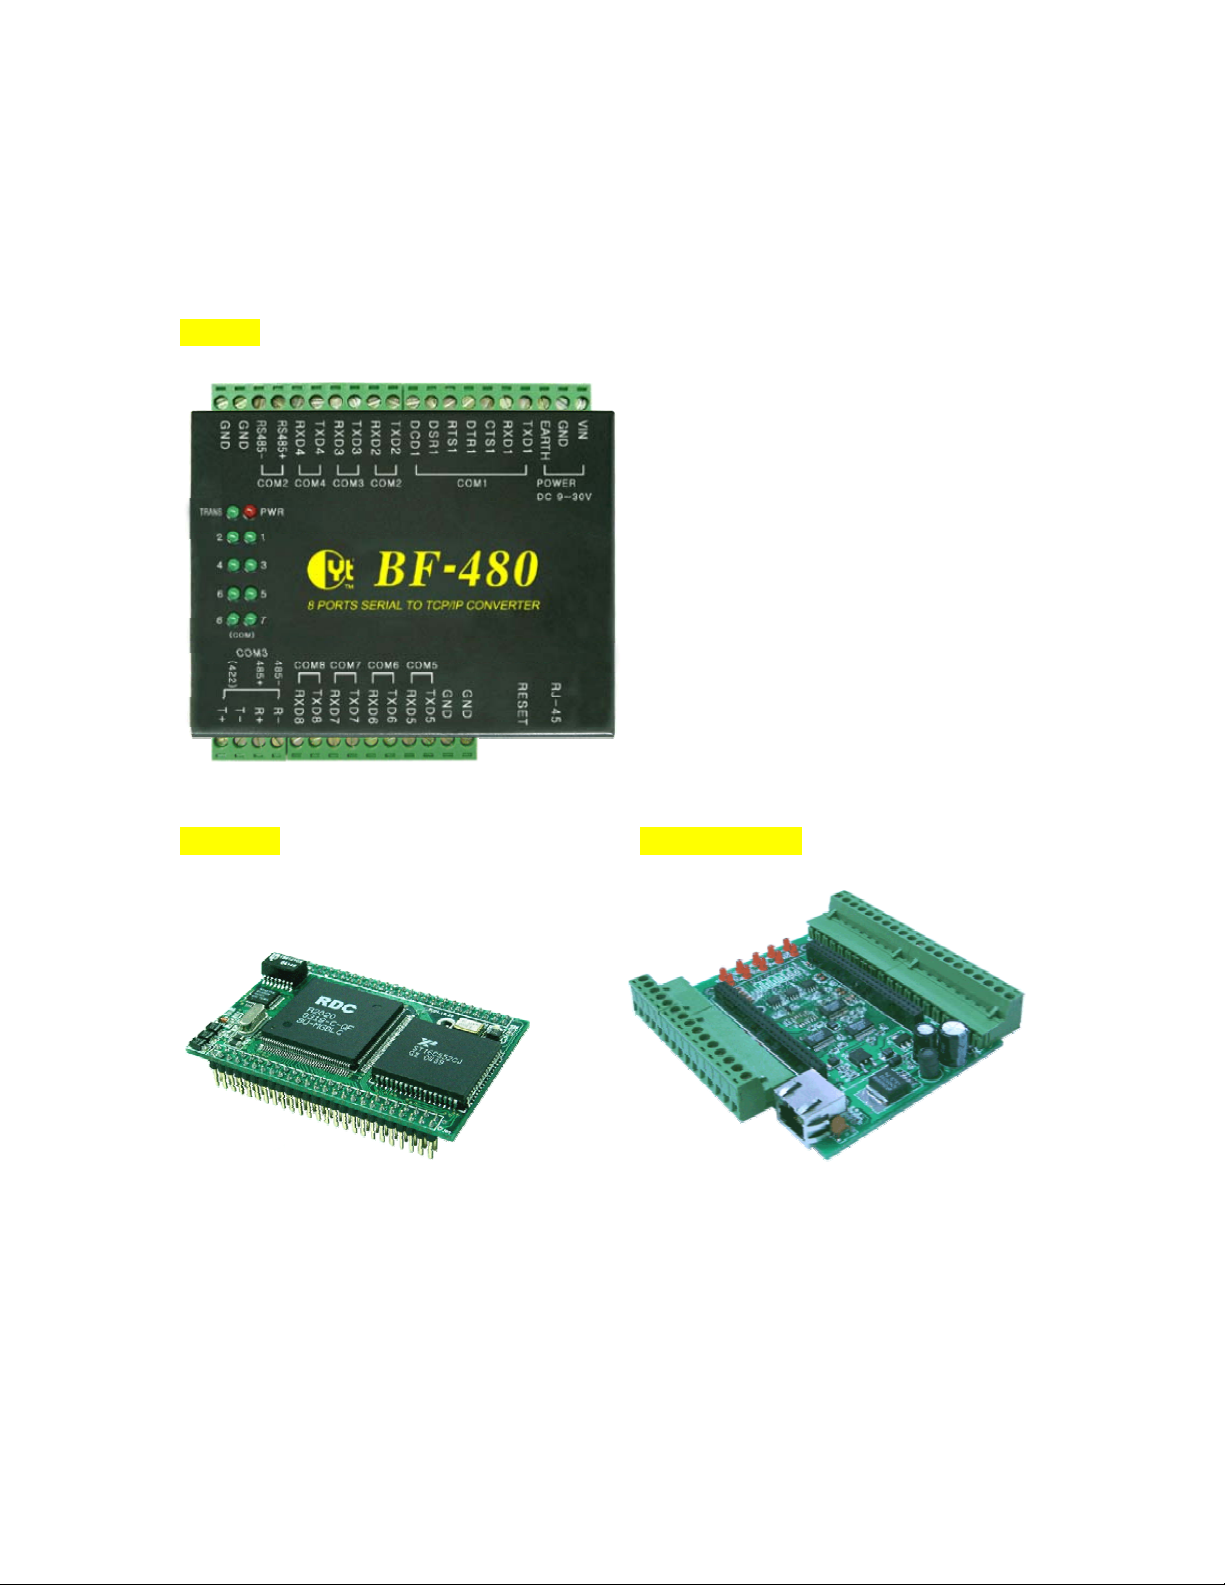
BF-480
8 ports serial To TCP/IP Gateway
User’s Guide
2005
CHIYU TECHNOLOGY CO., LTD
http://www.chiyu-t.com.tw
TAIPEI >> TEL:886-2-25491289 | CHIAYI >> TEL:886-5-2835460

【Table of Content】
1. Getting to Know your BF-480…………………………...1
1.1 Introduction
1.2 Main features
1.3 Applications for BF-480…………………………….......4
2. Hardware Installation & Initial Setup…………………….5
2.1 Hardware Installation
2.2 LED status………………………………………………………6
2.3 Initial Setup
2.3.1 Installing the TCP/IP Protocol………………………............5
2.3.2 Fixed IP Addresses Configuration…………………….........7
2.3.3 Configure your BF-480……………………………….........10
3. BF-480 Configuration Setup……………………………....11
3.1 Network Setting
3.2 Operation mode………………………………………….........13
3.3 Serial Type……………………………………………………...15
3.4 Dynamic DNS…………………………………………………...17
4. BF-480 Management Setup………………………………...18
4.1 Device Admin
4.2 Device Status……………………………………………………...19
4.3 Backup and Restore………………………………………......21
4.4 Upgrade Firmware
4.5 Ping………………………………………………………………..22
5. Troubleshooting………………………………………………….23
Appendix B: DDNS
Appendix C: Glossary…………………………………………….30
Appendix D: Finding the MAC Address and IP Address for Your
Ethernet Adapter……………………………………………............35

Copyright by Chiyu Technology Co., Ltd., all rights reserved.
The information in this document has been carefully checked and is believed to
be correct as of the date of publication. Chiyu Technology Co., Ltd. reserves the
right to make changes in the product or specification, or both, presented in this
publication at any time without notice.
Chiyu assumes no responsibility or liability arising from the specification listed
herein. Chiyu makes no representations that the use of its products in the
manner described in this publication will not infringe on existing or future patents,
trademark, copyright, or rights of third parties. Implication or other under any
patent or patent rights of Chiyu Technology Co., Ltd grants no license.
All other trademarks and registered trademarks are the property of their
respective holders.

1. Getting to Know your BF-480
1.1 Introduction
BF-480 serial device servers are designed to make your industrial serial devices
Internet ready instantly. The compact size of BF-480 device servers makes them the
ideal choice for connecting your RS-232 or RS-422/485 serial devices—such as
PLCs, meters, and sensors—to an IP-based Ethernet LAN, making it possible for
your software to access serial devices anywhere over a local LAN or the Internet.
BF-480 serial device servers ensure the compatibility of network software that uses
a standard network API (Winsock or BSD Sockets) by providing TCP Server Mode,
TCP Client Mode, and UDP Mode. And using Chiyu’s virtual COM drivers, software
that works with COM ports can be set up to work over a TCP/IP network in no time.
This excellent feature preserves your software investment and lets you enjoy the
benefits of networking your serial devices instantly.
BF-480 serial device servers support automatic IP configuration protocols (DHCP,
BOOTP) and manual configuration via Chiyu’s web browser console. Both methods
ensure quick and effective installation. BF-480 support special design for PPPoE +
DDNS that could let your device to connect to Internet without static IP address.
1.2 Main features
Package Checklist
BF-480 is shipped with the following items:
Standard Accessories
1 BF-480 8-port serial device server
Document & Software CD
Quick Installation Guide
Product Warranty Booklet
Optional Accessories
Power adaptor
NOTE: Notify your sales representative if any of the above items is missing or damaged.
Product Features
BF-480 enjoys the following features:
Make your serial devices Internet ready
Versatile socket operation modes, including TCP Server, TCP Client, and UDP
Easy-to-use Windows Utility for mass installation
Supports 10/100 Mbps Ethernet—auto detectable
6 port RS-232, one RS-232/485 port and one RS-232/485/422 port
Built-in 15 KV ESD protection for all serial signals
BF-480 has 2 KV isolation protection

Product Specifications
CPU 16 bit CPU, 100MHz
Memory 256 KB ROM & 768KB SDRAM
Hardware
Watch Dog Support watch Dog, system never halt
Ethernet 10/100Base-T,half/full duplex, Auto Cross Over, 1.5 KV Magnetic
protected
Serial
Port Interface Port
Type signals protection
COM1 RS-232 Screw
TerminalTxD,RxD,RTC,CTS,DTR,DSR,DCD,GND 15KV ESD
COM2 RS-232/485 Screw
Terminal
TxD,RxD,GND(RS-232)
D+, D-(RS-485) 15KV ESD
COM3 RS-232/485/422
Screw
Terminal
TxD,RxD,GND(RS-232)
D+, D-(RS-485) T+, T-, R+, R-(RS-422) 15KV ESD
COM4 RS-232 Screw
TerminalTxD, RxD, GND 15KV ESD
COM5 RS-232 Screw
TerminalTxD, RxD, GND 15KV ESD
COM6 RS-232 Screw
TerminalTxD, RxD, GND 15KV ESD
COM7 RS-232 Screw
TerminalTxD, RxD, GND 15KV ESD
COM8 RS-232 Screw
TerminalTxD, RxD, GND 15KV ESD
Interface
Baud
rate 1200 bps ~230.4Kbps
Parity Check None, even, odd, Mark, Space
Data bits 5, 6, 7, 8
Stop bits 1, 2
Configuration
Flow Control RTS/CTS, XON/XOFF
Supported OS Windows XP, Windows 2000, Windows NT, Windows95/98 ME,
Linux, UNIX
Protocol TCP, IP, UDP, Telnet, ARP, DHCP, ICMP、SMTP、PPPoE、
HTTP、DDNS
Support TCP/UDP Server/Client mode
User name & password protected for web management
Built-in Http server for set up and remote management via any
browser easily
Support backup & restore system configuration data
Management
Support Windows 95/98/ME/NT/2000/XP/2003 virtual COM
drivers
Power requirement DC 9-30V ,500mA
Operation Temp. 0 ~ 55℃
Operation Humidity 5 ~ 95%RH
Storage Temp. -20 ~ 85℃
Size 81X103X30 mm
Magnetic protected Ethernet port 1.5 KV
Power
&
Environment
A
pproval FCC, CE

The following are the main features of BF-480
TCP server/client & UDP mode support
The BF-480 support four types of connection: TCP server, TCP client and UDP mode, user can
select one of types to meet application requirement.
DHCP Client
DHCP (Dynamic Host Configuration Protocol) client obtains the TCP/IP configuration at start-up
from a centralized DHCP server, which means it can get IP address, an IP default gateway and
DNS server.
PPP Over Ethernet
PPPoE is a protocol for connecting remote hosts to the Internet over DSL connection by
simulating dial-up connection.
Dynamic DNS
With dynamic DNS support, you can have a static hostname alias for a dynamic IP address,
allowing the host to be more easily accessible from various locations on the Internet.
Auto-negotiating 10/100Mbps Ethernet
The Ethernet interface automatically detects if it is on a 10 or a 100 Mbps Ethernet.
Full Network Management via Web
This feature allows you to access or manage device through IE or Netscape on any platform. The
firmware also can be upgraded via Web browser.
Backup and Restore configuration
This feature allows you to backup system configuration to a file and restores it, for the security
issue, the file which backup from system is an encryption format.
1.3 Applications for BF-480
Figure 1 Standalone BF-480’s application through Internet

2. Hardware Installation & Initial Setup
2.1 Hardware Installation
BF-480
BF-480M Testing Board

2.2 LED status
LED Color(s) Activity Desc.
Off Power OFF
Red
Blinking Booting/System Self-Test
Power Red
Red On Device Ready
Off No Ethernet Link
Link Green
Green On Ethernet Link established
Off 10 Mbps
SPD Green
Green 100 Mbps
Off No collision
Collision
Red Red Collision
Off No data activity
Ethernet
(on the RJ-45
connector)
ACT Green Green
Blinking Transmitting/Receiving
Off No TCP/IP session link
Green On TCP/IP session link established
Transaction
Link
Green
Green
Blinking
Data Sending/Receiving between Serial
and Ethernet
COM Port No.1-8 Green On The COM port is connected
2.3 Initial Setup
Use this section to set up your computer to assign it a static IP address in the 192.168.168.1 to
192.168.168.254 range with a subnet mask of 255.255.255.0. This is necessary to ensure that
your computer can communicate with your BF-480.
Your computer must have an Ethernet card and TCP/IP installed. TCP/IP should already be
installed on computer using Windows 98/2000/XP and later operating systems.
Note: Connect a computer to BF-480 Ethernet port directly should be with crossover
Ethernet cable, if both connect to hub/switch should be with straight-through Ethernet
cable.

2.3.1 Installing the TCP/IP Protocol
If you are not sure whether the TCP/IP Protocol has been installed, follow these steps to check,
and if necessary, install TCP/IP onto your PCs.
Step 1:Click the “Start” button. Choose “Settings”, then “Control Panel”. Double-click the
“Network Connections” icon. Your Network window should appear as follows:
Step 2:
For Windows 98 and Millennium
On the “Configuration” tab (if using Windows 98 and Millennium PCs), select the TCP/IP line
for the applicable Ethernet adapter. Do not choose a TCP/IP entry whose name mentions
PPPoE, VPN. If the word TCP/IP appears by itself, select that line. Click the Properties button.

Important:
For Windows 2000 & Windows XP Setting, you will find that they differ with Windows 98/ME/NT
slightly. See the following for reference.
For Windows XP and Windows 2000
Click the “Local Area Connection” icon on the lower right hand side of your desktop screen.
In the “Local Area Connection Status” window, click the “Properties” button then your
Network window will appear.
There are two tabs, “General” ”Support”,in the Network window.

Step 3:Check whether the TCP/IP Protocol has already been installed onto your computer’s
Ethernet card. Note that TCP/IP Protocol can be installed for a computer’s Dial-Up Adapter as
well as for the Ethernet card.
*If yes, go to section 2.3.2.
*If no, click the “Install” button.
Step 4:Double-click “Protocol” in the Select Network Component Type or highlight “Protocol”
then click “Add”.
Step 5:Highlight “Microsoft” under the list of manufacturers. Double-click “TCP/IP” from the
list on the right or highlight “TCP/IP” then click “OK” to install TCP/IP.
Step 6:After a few seconds, you will be returned to the Network window. The TCP/IP Protocol
should now be on the list of installed network components (see 3 above).
2.3.2 Fixed IP Addresses Configuration
For Windows 98 and Millennium
Step 1:To set up computers with fixed IP Addresses, click the “Properties”button. The TCP/IP
Properties window consists of several tabs. Choose the “IP Address” tab as shown below.

Step 2:Select “Specify an IP address” and enter “192.168.168.xxx” (the default value of 480 is
192.168.168.125) in the “IP Address” location (where xxx is a number between 1 and 254 used
by the High-Performance BF-480 to identify each computer), and the default “Subnet Mask”
“255.255.255.0”. Note that no two computers on the same LAN can have the same IP address.
For Windows XP and Windows 2000
Step 1:Make sure the box next to Internet Protocol (TCP/IP) is checked. Highlight
Internet Protocol (TCP/IP), and click the Properties button

Step 2:Select “Specify an IP address” and enter “192.168.168.xxx” (the default value of 480 is
192.168.168.125) in the “IP Address” location (where xxx is a number between 1 and 254 used
by the High-Performance BF-480 to identify each computer), and the default “Subnet Mask”
“255.255.255.0”. Note that no two computers on the same LAN can have the same IP address.
Click “OK”. to complete the TCP/IP installation.
2.3.3 Configure your BF-480
Step 1:Open your web browser and type http://192.168.168.125 in the browser’s address box.
This address is the factory set IP Address of your BF-480. Press “Enter”.
Step 2:The “Username and Password required” prompt box will appear. Typing “admin”
(default username) in the Username field and typing “admin” (default password) in the Password
field. Click “OK”. The setup screen will then appear.

Step 3:It is highly recommended you change the default username and password when you login
successfully first time.
Note: Don’t forget click Apply button to save your changing when you complete your
configuration setting each time, the BF-480 will restart automatically in 10 seconds with
your new setting.
3. BF-480 Configuration Setup
This chapter will show you how to configure BF-480 to function in your network and gain access
to your device through Intranet or Internet.
3.1 Network setting
The BF-480 support three IP connection types: Static IP, DHCP and PPPoE. These types are
listed in the drop-down menu for the IP Configuration setting. Each setup screen and available
features will differ depending on what kind of IP connection types you select. Default is Static IP
Static (or Fixed) IP
IP Address: default 192.168.168.125
Subnet mask: default 255.255.255.0
Gateway: default 192.168.168.254
Primary DNS: default 168.95.1.1
If you are connecting through a static or fixed IP from your network environment, perform these
steps:
Step 1: Enter IP address
Step 2: Enter Subnet mask
Step 3: Enter Gateway IP address
Step 4: Enter Primary DNS IP address
Step 5: click Apply button

DHCP
Host Name (Optional): default CHIYU, maximum length 15 characters
If there is a DHCP Server existing in your network environment or you subscribe a CABLE
service from your ISP, you can set IP configuration to DHCP to get a dynamic IP address. The
Host Name is an optional item, depending on your DHCP Server setting.
Note 1: to gain CABLE service, you also need to change the MAC address of BF-480 to the
MAC address of register in ISP. Please refer to Chapter 4 Device Admin/Mac Address
Change
PPPoE
User Name: no default, maximum length 47 characters
Password: no default, maximum length 35 characters
Service Name (optional): no default, maximum length 47 characters
Close Connection when Idle Time Over (second): default 0, range 0to 4294967295
PPPoE with Fixed IP Address: default DISABLE
If you subscribe a DSL service with PPPoE connection from ISP, you can set IP configuration to
PPPoE to get a dynamic IP address. Your ISP will provide you the User Name and Password,
some ISP will also need the Service Name to authenticate. But this item is optional and
depending on your ISP.
If you want to keep the connection always on between BF-480 and your ISP, then set the value of
item Close Connection When Idle Time Over to 0, otherwise, when the idle time of no any
traffic on line is over the setting value, BF-480 will terminate this PPPoE connection.
If your ISP can provide you fixed IP address when PPPoE connection established each time, you
can select PPPoE with Fixed IP Address as ENABLE and enter the IP address given from ISP.

3.2 Operation mode
The BF-480 support four operation mode: TCP Server, TCP Client, UDP Server and UDP Client.
These modes are listed in the drop-down menu for the Operation Mode setting. Each setup
screen and available features will differ depending on what kind of operation mode you select.
Default is TCP Server.
TCP Server
Listen Port Number: default 50000, range 0to 65535
If your device is acted as passive to accept commands from remote and the data be guaranteed
to be received by peer is your concern, then you can set BF-480 as TCP Server. Be sure the
value of item Listen Port Number is same as your remote control application using.
Close Connection When Remote Idle (second): default 300, range 0 to 32768
If you want to keep the connection between BF-480 and your remote control application always
on, then set the value of item Close Connection When Remote Idle to 0, otherwise, when the
idle time of no any traffic on line reach the setting value, BF-480 will terminate this connection.
For security concern, you can input Access Password to protect your device,
BF-450(M)/BF-430/431 will authenticate whether this TCP connection is valid by this password.
Keep Alive Check: default Disable
Disable: Disable the check of TCP connection is still alive or not.
Enable: BF-450(M)/430/431 automatically send a Ping request to peer per each 30 seconds, the
TCP connection will be terminated if no response of Ping reply from peer.
Max TCP Connection: default 1, range from 1 to 4
The allowed TCP connections accept by BF-450(M)/430/431 simultaneously. It is usually used
when user needs to receive data from different hosts simultaneously. When multiple hosts
establish TCP connection to BF-450(M)/430/431 at the same time, it will duplicate serial data and
transmit to all hosts. When data comes from Ethernet port, it is sent on first-in-first-out basis to

serial port.

TCP Client
Remote Connection Port Number: default 50000, range 0to 65535
Remote Host IP Address: default 0.0.0.0
If your device is acted as active to report real-time status to remote and the data be guaranteed to
be received by peer is your concern, then you can set BF-480 as TCP Client. Be sure the value of
item Remote Connection Port Number is same as your remote control application using and set
the correct value of Remote Host IP Address.
TCP Connection: default Start Up
Start Up means BF-450(M)/430/431 attempts to establish a TCP connection as soon as powered
on.
Any Character means BF-450(M)/430/431 attempts to establish a TCP connection as soon as
starts receiving data from serial port.

UDP Mode
Local Listen Port : default 50000, range 0 to 65535
The UDP port that BF-480 listens to and those other devices must use it to contact BF-480. To
avoid conflicts with well know UDP ports, the default is set to 50000
Destination IP Address (1-4): default 0.0.0.0
BF-480 allows 4 UDP connections for each COM port; please input each destination IP address
and port number.

3.3 Serial Type
The BF-480 support three serial types: RS232, RS422 and RS485, These types are listed in the
drop-down menu for the Serial Type setting. Each setup screen and available features will differ
depending on what kind of Serial Types you select and BF-480 product model you buy. Default is
RS232
RS232/422
Baud Rate: default 19200, range 1200bps to 230.4Kbps, Others
If no suitable Baud Rate in the drop-down menu chose others, input the value you want.
Data Bits: 5, 6, 7, 8 (default)
Parity Check: None (default), even, odd, mark, space
Stop Bits: 1 (default), 2
Flow Control: None (default), CTS/RTS (or Hardware), XON/XOFF (or Software)
Force Packet Transmit Time (ms): default 20, range 0 to 65535
The timing of transmitting an Ethernet packet, in order to get the whole data in on packet,
you can tune this setting value to fit the data length of your device per transmission. The
more small value be set will get more less data in one packet.
Delimiter 1(00 to FF): default 0x00
Delimiter 2(00 to FF): default 0x00
Once receive delimiter 1 or both delimiters through its serial port, BF-450(M)/430/431
immediately packs all data currently in buffer and send it to Ethernet port.
Force Packet Transmit Length (bytes): default 0, range 0 to 65535
The length of transmitting an Ethernet packet, in order to get a fix length data in on packet,
you can tune this setting value to fit the data length of your device per transmission.
RS485 Only
RS485 Transmission Delay Time (ms): default 0, range 0 to 65535
Due to different device has different capability in handling data received from serial port. So
you can tune this setting value to slow down the speed of BF-450(M)/BF-430/431 to fit the
speed of your device handling.
Table of contents