CHUANDA CD-2006A User manual
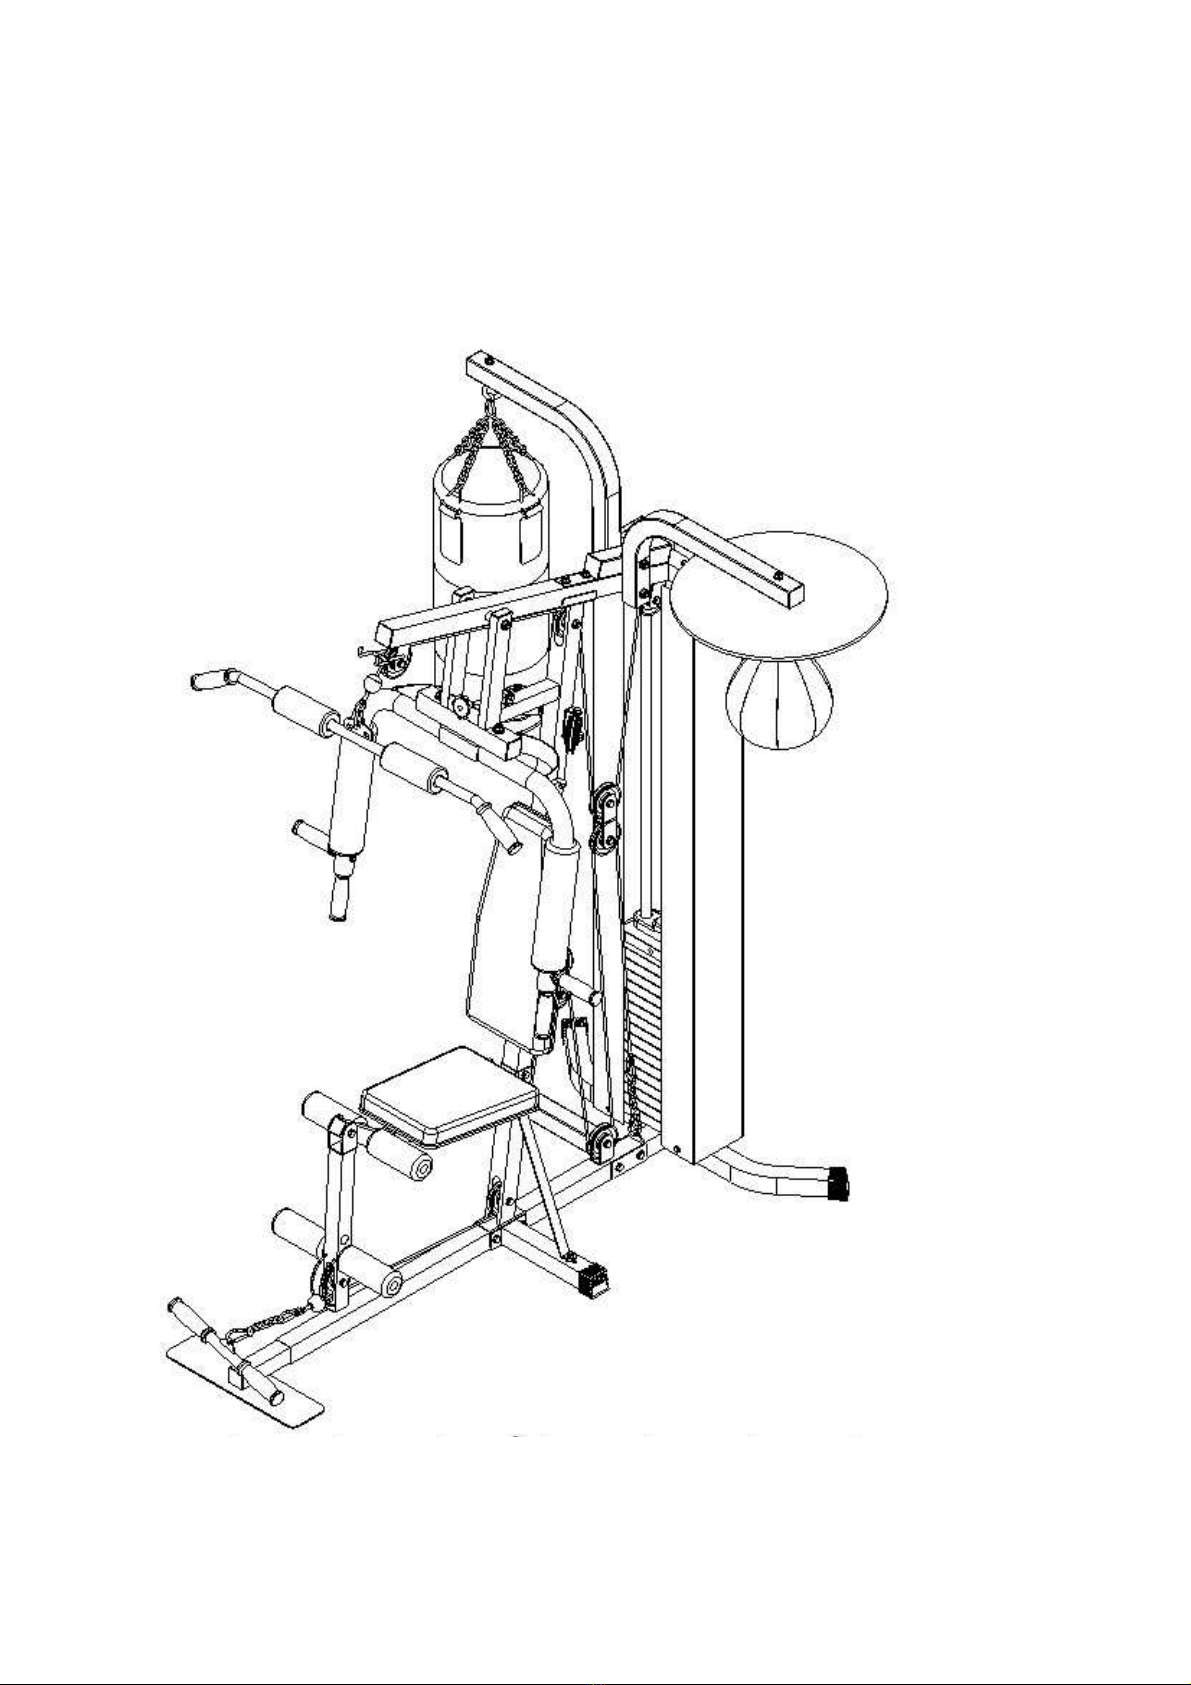
Deluxe Stationary Home Gym
Owner’s Manual
Model#CD-2006A
The specifications of this product may vary from this photo, subject to change without
notice.
Nov 25.2008

1
PAGE OF CONTENTS
Warranty 1
Important Precautions 2
Overview Drawing 3
Parts List 4
Hardware Packing List 6
Assembly Instructions 8
Cable Loop Diagram 14
Install the Weight Stack Covers 18
Warm Up and Cool Down Routine 19
ONE YEAR LIMTED WARRANTY
CHUANDAInc. warrants to the original purchaser that this product is free from defects in
material and workmanship when used for the purpose intended, under the conditions
that it has been installed and operated in accordance with CHUANDA Owner's Manual.
CHUANDA obligation under this warranty is limited to replacing or repairing, free of
charge, any parts which may prove to be defective under normal home use. This
warranty does not include any damage caused by improper operation, misuse or
commercial application.
From the date of purchase, the frame is warranted to be free from defects for 1 (one)
year. All parts and workmanship, including electronics and its console cases,
upholstery, foam, ball bearings, pulleys, cables, shocks, all tension mechanisms, wheels,
pedals and hardware are to be free from defects for 90 days. This warranty is
extended only to the original owner and is not transferable.
When ordering replacement parts please have the following information ready:
1. Owner's Manual
2. Model Number
3. Description of Parts
4. Part Number
5. Date of Purchase

2
IMPORTANT PRECAUTIONS
WARNING:
To reduce the risk of serious injury, read the following
important precautions before using this stationary home gym.
1. Read all instructions in this manual before using this stationary home gym.
2. This stationary home gym is intended for home use only.
3. Only one person at a time should use this stationary home gym.
4. The stationary home gym should be placed on the level surface when using.
5. Inspect and tighten all parts each time before using the stationary home gym.
6. Keep children and pets away from the stationary home gym at all times. The
minimum free space required for safety operation is not less than two meters.
7. Keep hands and feet away from the moving parts.
8. Always wear proper clothes and athletic shoes while exercising.
9. If you feel pain or dizziness at any time while exercising, stop immediately and
begin cooling down.
10. Before using this stationary home gym to exercise, please do stretching exercises
to properly warm up.
WARNING: Before beginning this or any exercise program, consult your physician. This
is especially important for people who are over the age of 35 or people with pre-existing
health problems.

3
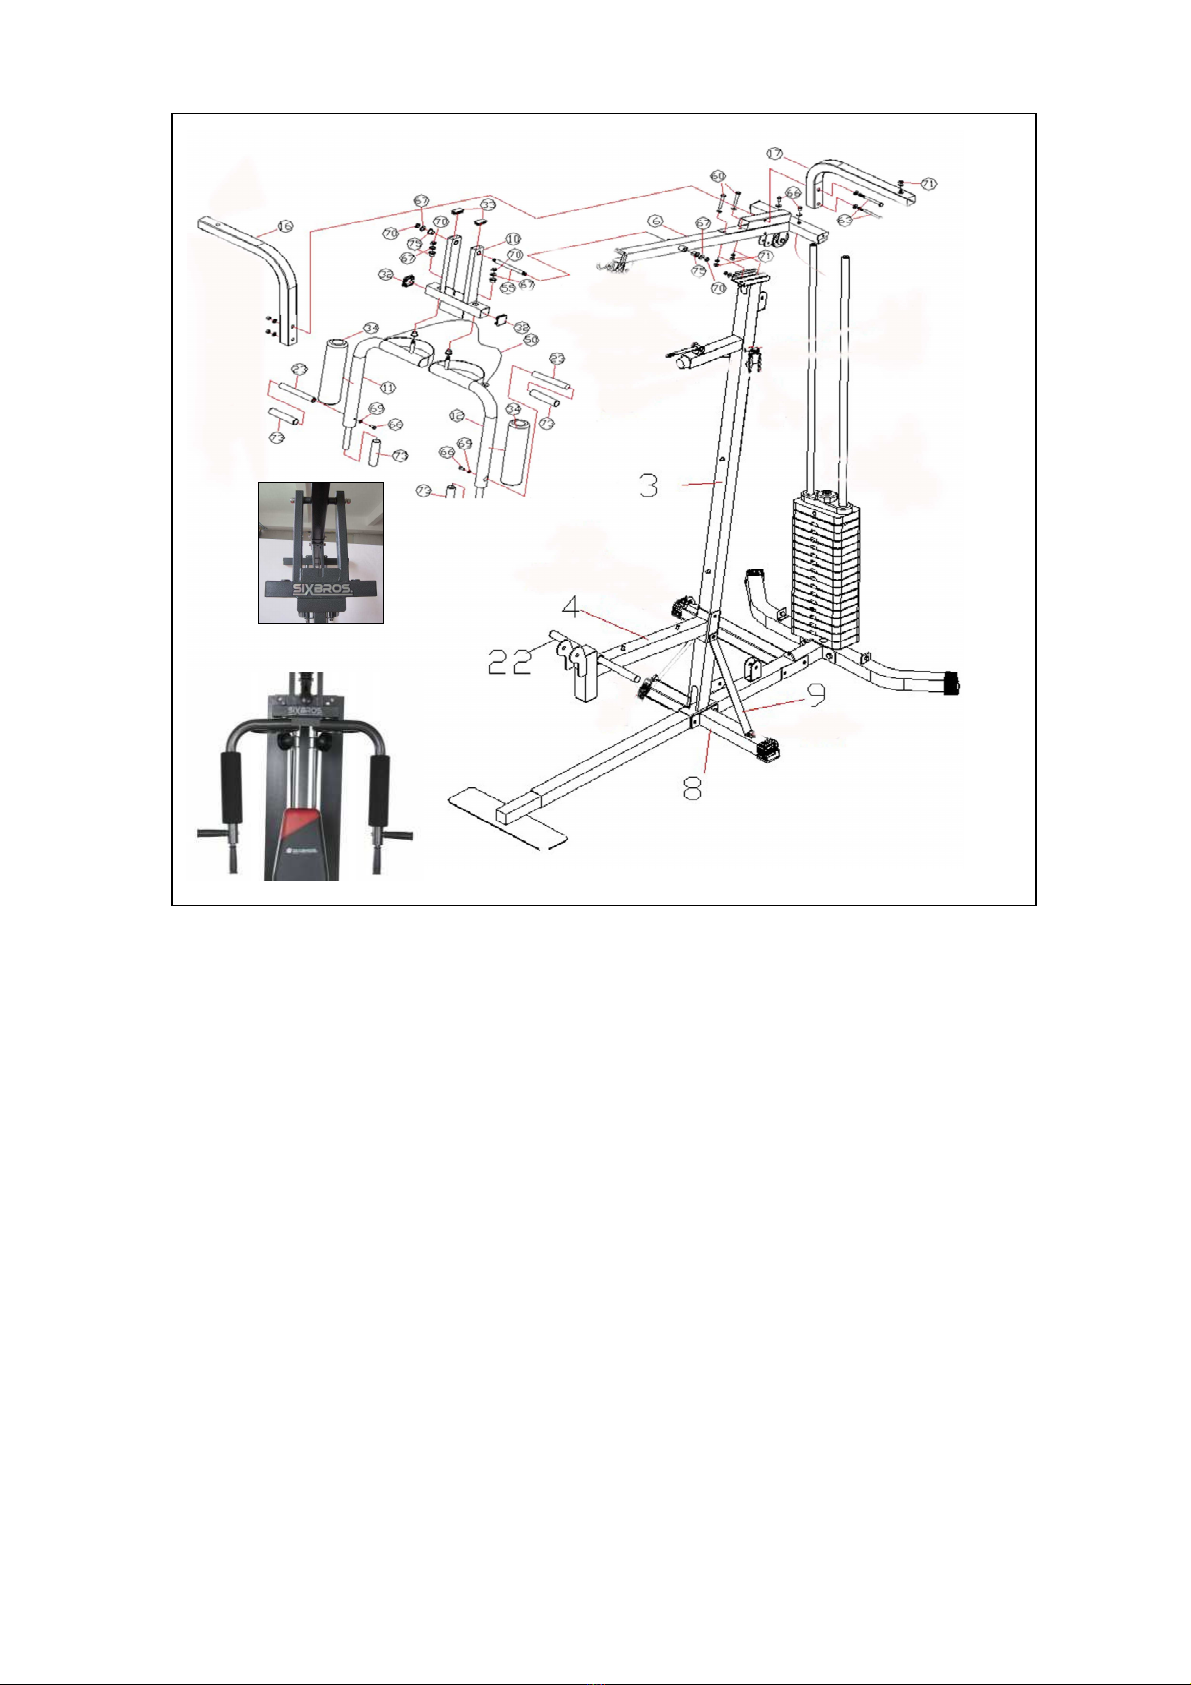
OVERVIEW DRAWING
4
PARTS LIST
No.
Description Qty
No.
Description Qty
1 Base Tube 1 22 Roll Pad Tube 2
2 Weight Support 1 23 Front Press Handle 2
3 Main Support Tube 1 24 Swivel Pulley Bracket 2
4 Seat Support Tube
1 25 Double Floating Pulley Bracket 1
5 Leg Developer 1 26 Crossed Double Floating Pulley
Bracket 1
6 Upper Fram 1 27 Pin for Main Support Tube 1
7 Base Tube for Punching bags 1 28 top Weight Stack 1
8 Left &Right Base Tube 2 29 Weight Stack 9
9 Support iron sheet (L/R)2 30 Pulley 12
10 Support Tube for Butterfly Arm 1 31 Square End Cap (□50x50) 5
11R
Right Butterfly Arm 1 32 Square End Cap(1) (□50x50) 11
12L
Left ButterflyArm 1 33 Square End Cap(2) (□25x50) 2
13 Weight Sliding Tube 2 34 Butterfly Arm Foam Roll 2
14 35 Heel Holder 4
15 Weight Pick Up Pole 1 36 Handgrip∮25 4
16 Sand bag Support Tube 1 37 Backrest 1
17 Seed ball Support Tube 1 38 Seat Pad 1
18 Right/Left Weight Stack Cover 2 39 Punching bags 1
19 Lat Bar 1 40 Seed ball Round plate 1
20 Foot Bar 1 41 Seed ball 1
21 Foot Plates 1 42 Big Washer 1

5
No.
Description Qty
No.
Description Qty
43 Deck Bumper ∮32*26*M10 1 62 Hexagon Head Bolt M10x80 3
44 Knob M10 1 63 Hexagon Head Bolt M10x170 2
45 Weight Sliding Tube
Rubber Bumper∮60*∮26*h30
2 64 Hexagon Head Bolt M8x55
Hexagon Head Bolt M8x65 2
2
46 Square End Cap(1) (□45*45)
Square End Cap(1) (□40*40) 3
1 65 Hexagon Head Bolt M8x45 1
47 Chain φ5x3 3 66 Hexagon Head Bolt M8x20 16
48 Cable A 1 67 Washer 13∮4
49 Cable B 1 68 Washer 1∮1 61
50 Cable C 1 69 Washer ∮9 22
51 Stretch cord 1 70 Nylon Nut M12 4
52 C-Clip φ6x60 8 71 Nylon Nut M10 29
53 Hooks use Sand bag 1 72 Nylon Nut M8 1
54 Hooks use Seed ball 1 73 Handgrip 4
55 Shaft Bolt 1 74 Washer∮16 2
56 Round Shaped Pin 1 75 Sleeve∮16 6
57 Round End Cap 5 76 Wrench 2
58 Hexagon Head Bolt M10x20 2
59 Hexagon Head Bolt M10x45
M10x60 10
1
60 Hexagon Head Bolt M10x70 9
61 Hexagon Head Bolt M10 x65
2

6
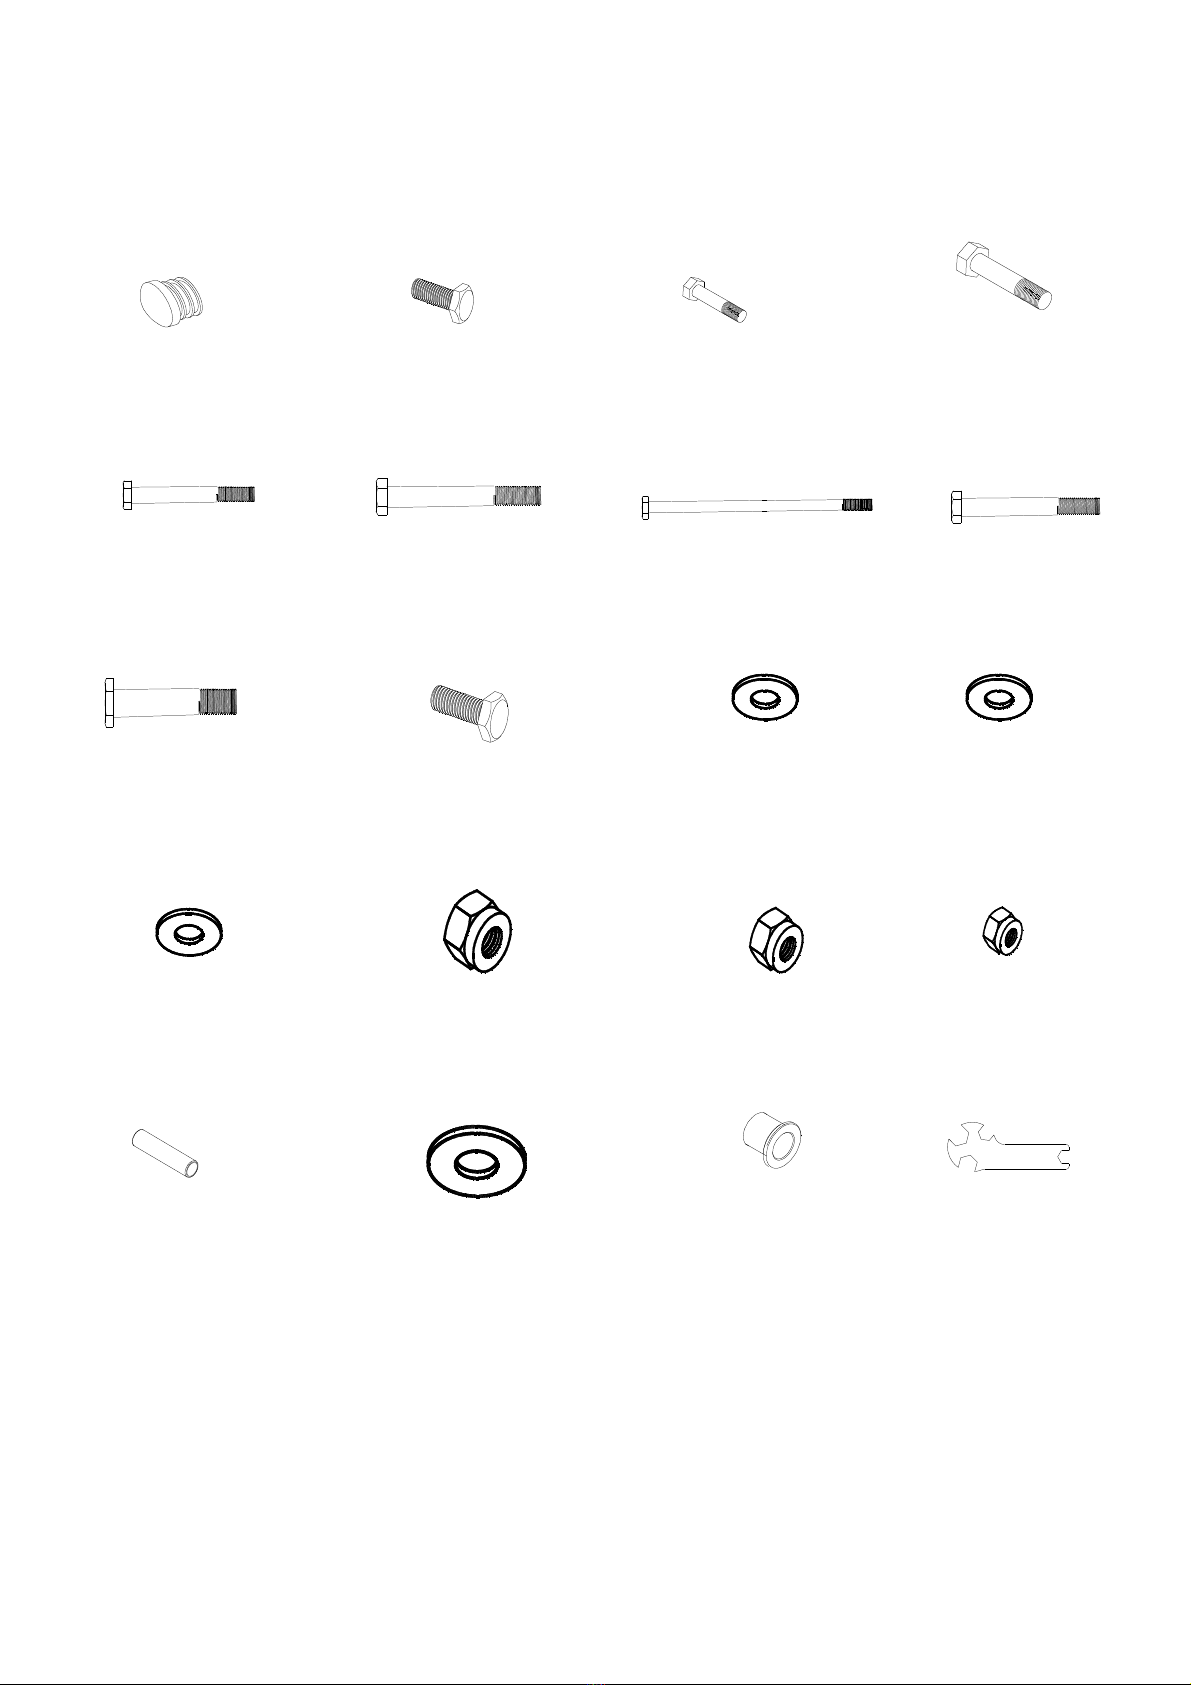
HARDWARE PACKING LIST
28.top Weight Stack 29. Weight Stack 30. Pulley、
31. Square End Cap
(□50x50)、
1PCS 9PCS 12PCS 5PCS
32
. Square End
(□50x50)
7
9PCS
33.
Square End Cap
(□25x50)
2PCS
34. Butterfly Arm
Foam Roll
2PS
35.
Heel Holder
Φ47*300 (□50x50)
4PS
36.
Handgrip ∮25
7 4 PCS
42.
Big washer
7 1 PCS
43.
Deck Bumper
7
1 PCS
44.
Knob M10
7
1PCS
45. Weight Sliding Tube
Rubber Bumper
2 PCS
46.
Square End Cap(1)
(□45*45) 1 PCS
(□40*40) 1 PCS
47. Chain φ5x4cm
1 PCS 48. Cable A
1 PCS
49. Cable B
1 PCS 50. Cable C
1 PCS
51. Stretch cord
1 PCS 52. C-Clip φ6x60
8 PCS
53. Hooks use
Sand bag
1 PCS
54. Hooks use Sand
bag
1 PCS
55. Shaft Bolt
1 PCS
56. Round Shaped
Pin
1 PCS
7
HARDWARE PACKING LIST
Hardware Pack 2
57. Round End Cap
4PCS
71. Nylon Nut M10
29 PCS
73. Handgrip
4PCS
58 Hexagon Head Bolt
M10x20
2PCS
59.Hexagon Head Bolt
M10x45 10 PCS
M10x60 1 PCS
60.Hexagon Head Bolt
M10x70
9 PCS
61.Hexagon Head Bolt
M10x65 2 PCS 62.Hexagon Head Bolt
M10x80
3 PCS
63. Hexagon Head
Bolt M10x170
2 PCS
64. Hexagon Head Bolt
M8x55 2pcs
M8x65 2pcs
65. Hexagon Head Bolt
M8x45
1 PCS
66. Hexagon Head Bolt
M8x20
16 PCS
67. Washer 13∮
4 PCS
68. Washer 1∮1
61 PCS
69. Washer ∮9
22 PCS
70. Nylon Nut M12
4 PCS
72. Nylon Nut M8
1 PCS
76. Wrench
2PCS
74. Washer 1∮6
4 PCS
75. sleeve∮16
6PCS
8
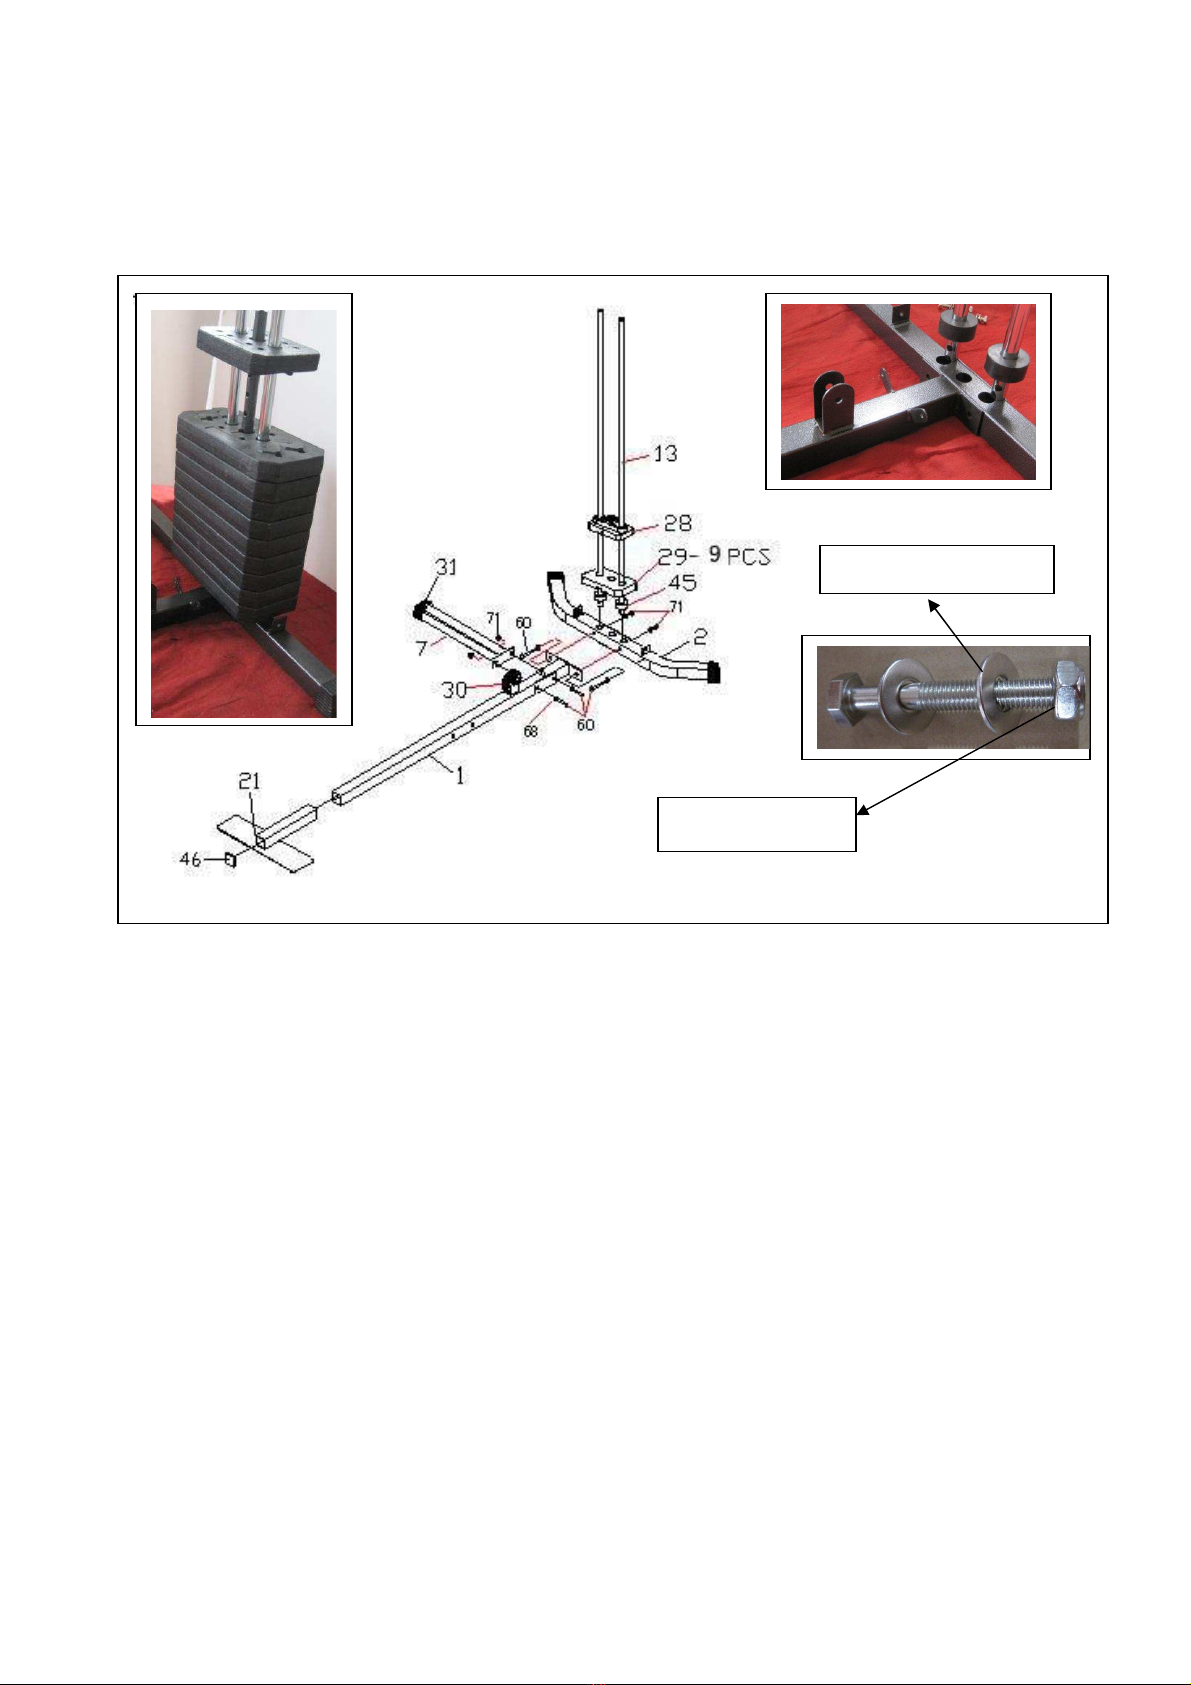
ASSEMBLY INSTRUCTIONS
NOTE: It is strongly recommended this stationary home gym to be
assembled by two or more people to avoid possible injury.
Step 1(FIG.1)
1)Install three Square End Cap (□50x50) (31) onto the Weight Support (2) and Left
Base Tube.
2)Push two φ27xφ64x24 Weight Sliding Tube Rubber Bumpers (45-2pcs) onto the
Weight Sliding Tubes (13) from the bottom of Weight Sliding Tubes (13). Attach Weight
Sliding Tubes (13) to the Weight Support (2)
3)Attach the Base Tube (1) to the Weight Support (2) with Hexagon Head Bolts M10x70
(60-2pcs), M10 Nylon Nuts (71-2pcs), and φ11 Washers (68-4pcs).
4) Slide the Weight Stacks (29&28-10pcs) onto the Weight Sliding Tubes (13) from
the top of Weight Sliding Tubes (13). Align the holes of the Weight Stacks.
5) Attach the Base Tube for Punching bags (7)to the Base Tube (1) with Hexagon Head
Bolts M10x70 (60-2pcs), M10 Nylon Nuts (71-2pcs), andφ11 Washers (68-4pcs).Attach
the Foot Plates(21) to the Base Tube (1).
6) Attache the Weight Pick Up Pole (15) Weight Stacks (29) and one top Weight
Stack(28). Use the Round-Shaped Pin (56) to select the number of Plates
Note: The bottom of Weight Plate is 45 kgs, The top of Weight Plate is 4.5kg Each piece
decrease 5kgs by turn.
FIG.1
φ11 Washers (68)
M10 Nylon Nuts
9
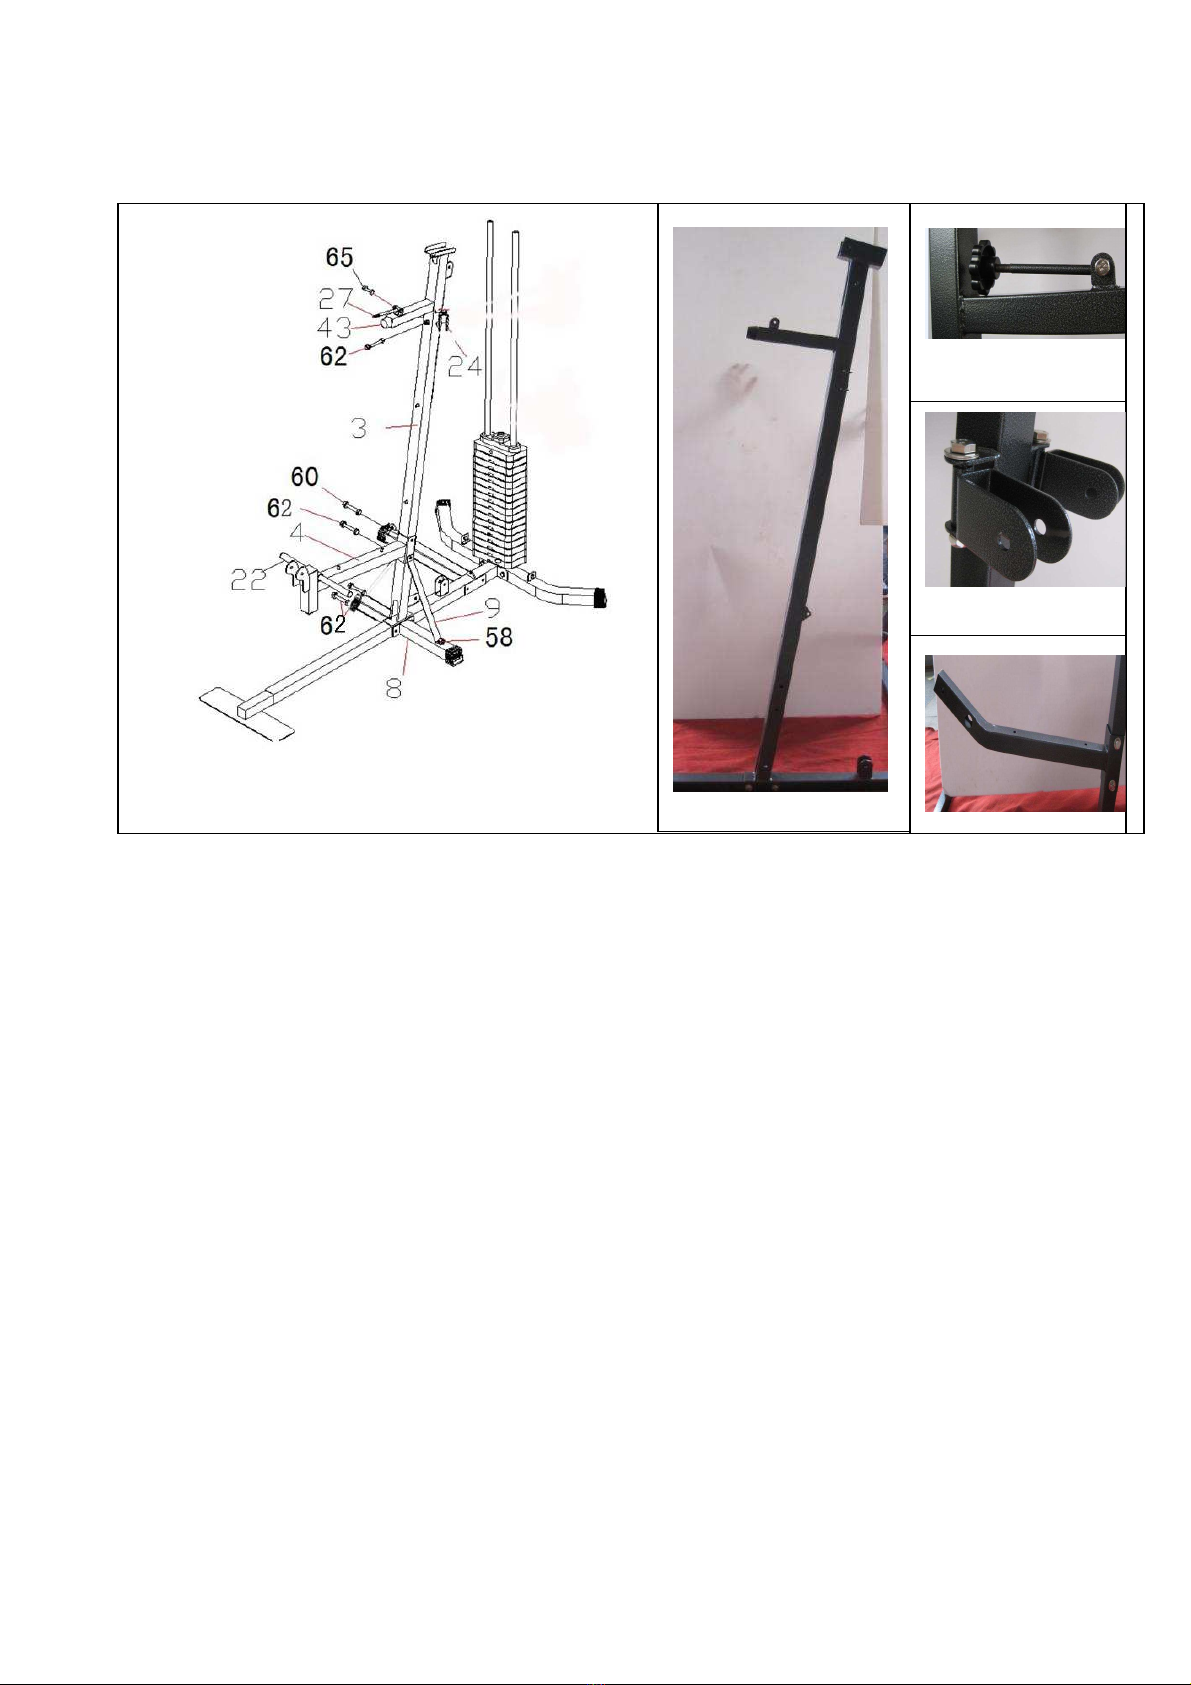
Step 2 (
((
(FIG.2)
FIG.2)FIG.2)
FIG.2)
1)Attach the Main Support Tube(3) and L/Right Base Tube (8) to the Base Tube (1) with
Carriage Bolts M10x80 (62-2pcs) φ11 Washers (68-4pcs), and M10 Nylon Nuts
(71-2pcs).
2)Fasten the∮32*26*M10 Deck Bumper (43) to the Main Support Tube (3). Attach the
Pin for Main Support Tube (27) to the Main Support Tube (3) with Hexagon Head Bolt
M8x45 (65), M8 Nylon Nut (72), and φ9 Washers (69-2pcs).
3) Attach Swivel Pulley Brackets (24-2pcs) to each of to the Main Frame Support (3)
with Hexagon Head Bolts M10x70 (60-2pcs), M10 Nylon Nuts (71-2pcs), and φ11
Washers (68-4pcs). Do not over tighten; make sure the Swivel Pulley Brackets (24) are
able to swivel freely.
4) Attach the Seat Support Tube (4) to the Main Support Tube (3) with M10x70 Hexagon
Head Bolts (60), M10 Nylon Nuts (71), and φ11 Washers (68-2pcs).attach the Support
iron sheet(9-2pcs) to the Main Support Tube (3) with Hexagon Head Bolts M10x80
(62), M10 Nylon Nuts (71), and φ11 Washers (68-2pcs).
5) The L&R Support iron sheet(9)and to the L/Right Base Tube (8) with 10×20 Hexagon
Head Bolts(58-2pcs) M10 Nylon Nuts (71), and φ11 Washers(68-2pcs)
PARTS 27
PART 16
FIG.2
10
Step 3 (FIG 3)
1)Attach the Upper Frame (6) to the both Weight Sliding Tubes (13) with Hexagon Head
Bolts M8x20 (66-2pcs) and φ9 Washers (69). then attach the Upper Frame (6) to the
top of Main Frame support (3) with Hexagon Head Bolts M10x70 (60-2pcs), M10 Nylon
Nuts (71-2pcs), and φ11 Washers (68-4pcs).
2) Attach the Support Tube for Butterfly Arm (10) to the Upper Frame (6) with Shaft Bolt
(55),∮16 sleeve (75-2pcs) ∮16 Washers, with φ13 Washers (67-2pcs), and
M12Nylon Nuts (70-2pcs).
3) Slide Butterfly Arm Foam Rolls (34-2pcs) onto the Right and Left Butterfly Arms
(11R,12L).
4) Attach the Right and Left Butterfly Arms (11R,12L) to the Support Tube for Butterfly
Arm (10), with φ13 Washers (67-2pcs), φ16 Washers (74-2pcs) and M12Nylon Nuts
(70-2pcs).
5)Attach Front Press Handles (23-2pcs) to the Right and Left Butterfly Arms (11R,12L)
with M8x20 Hexagon Head Bolts (66-2pcs) and φ9Washers (69-2pcs).
6) Attach the Punching bags Support Tube(16) and Seed ball Support Tube(17) to the
Upper Frame (6)with Hexagon Head Bolts M10x170 (63-2pcs) and φ11 Washers
(68-4pcs) and M10 Nylon Nuts (71-2pcs)
PART 10
FIG 3

11
Step 4(FIG .4)
1) Attach the Leg Developer (5) to the Seat Support Tube (4) with Hexagon Head Bolt
M10x65 (61), M10 Nylon Nut (71), andφ11 Washers (68-2pcs).
2) Insert Roll Pad Tube (20-2pcs) halfway through the holes on the Seat Support Tube
(4) and Leg Developer (5). Push Heel Holders (35-4pcs) onto the Roll Pad.
3) Attach the Seat Pad (38) onto the Seat Support Tube (4) with Hexagon Head Bolts
M8x55 (64-2pcs) and φ9Washers (69-2pcs).
4) Attach the Backrest (37) to the Main Support Tube (3) with Hexagon Head Bolts
M8x65 (64-2pcs) and φ9Washers (69-2pcs).
Step 5(FIG 5)
1)Attach the Hooks use Punching bags (53) to the Punching bags Support Tube(16)
with M10 Nylon Nuts (71),Attach the Punching bags (39) to the C-Clip (52) to the
Hooks use Punching bags (53),than take the Stretch cord(51)to the C-Clip (52) to Base
Tube for Punching bags .
2) Attach the Seed ball Round plate (40) to the Seed ball Support Tube(17) with Hooks
use Seed ball(54) ,and one Handgrip∮25(42),and M10 Nylon Nuts (71),Attach the
Seed ball (39) Seed ballg (41)to the Hooks use Seed ball(54)
6 1
5 9 5 9
5 9
5 9 7 1
7 1
5 9
5 9
5 9
5 9
FIG. 4 FIG. 5

12
Step 6(FIG .6)
CABLE LOOP DIAGRAM
INSTALL THE CABLE A(48)
1)Attach the Cable A (48) to the opening at the front of the Pulley A(60). Note: 1)The
Ball Stopper on the cable should be underneath the Upper Frame (6).
Attach the Pulley (30) to the Upper Frame (6) with Hexagon Head Bolt M10x45 (59),
M10 Nylon Nut (71), and φ11 Washers (68-2pcs).
2) Draw the Cable A (48) towards the back of the machine to the open bracket on the
Main Support Tube (3).
Attach the Pulley (30) to the Main Support Tube (3) with Hexagon Head Bolt M10x65
(61), M10 Nylon Nut (71), and φ11 Washers (68-2pcs).
3) Draw the Cable A(48) around the Pulley (30) then pull it down towards to the opening
on the Double Floating Pulley Bracket (25).
Attach one Pulley (30) to the Double Floating Pulley Bracket (25) with Hexagon Head
(FIG .6)

13
Bolt M10x45 (59), M10 Nylon Nut (71), and φ11 Washers (68-2pcs).
4) Draw the Cable A (48) around the Pulley (30) on the Double Floating Pulley Bracket
(25) then pull it up towards to the opening on the Upper Frame (6).
Attach two Pulleys (30) to the Upper Frame (6) with Hexagon Head Bolts M10x45
(59-2pcs), M10 Nylon Nuts (71), and φ11 Washers (68-4pcs).
5) Draw the Cable A (48) around these two Pulleys (30) on the Upper Frame (6) then
pull the Cable A (48) downwards to the Weight Pick Up Pole (15). Thread the bolt at
the end of the Cable into the opening on top of the Weight Pick Up Pole (15) to
secure the Cable.
6) Attach the C-Clip (52) to the CableA(48) by using a Chain(52). Attach the Lat Bar
(18) to the Chain (47) by using another C-Clip (52). Adjust the Chain (47) to the
desired length.
INSTALL THE CABLE B(49)
1) Attach the CableB (49) to the open bracket on the bottom of the Leg Developer (5).
Note: The Ball Stopper on the cable should be underneath the Pulley (30).
Attach the Pulley (30) to the Leg Developer (5) with Hexagon Head Bolt M10x60 (59),
M10 Nylon Nut (71), and φ11 Washers (68-2pcs).
2) Draw the Cable B (49) underneath the Pulley (30) to the open bracket on the Main
Support Tube (3).
Attach the Pulley (30) to the Main Support Tube (3) with Hexagon Head Bolt M10x45
(59), M10 Nylon Nut (71), and φ11Washers (68-2pcs).
3)Pull the CableB (49) up to the open bracket on the Crossed Double Floating Pulley
Bracket (26).
Attach the Pulley (30) to the Crossed Double Floating Pulley Bracket (26) with
Hexagon Head Bolt M10x45(59), M10 Nylon Nut (71), and φ11 Washers (68-2pcs).
4) Draw the Cable B around the Pulley (30) on the Crossed Double Floating Pulley
Bracket (26) to the open bracket on the Base Tube (1).
Attach the Pulley (30) to the Base Tube (1) with Hexagon Head Bolt M10x45 (59), M10
Nylon Nut (71), and φ11 Washers (68-2pcs).
5) Draw the Cable B(49) around the Pulley (30) on the Base Tube (1) and then pull it up
towards to the open bracket on the Double Floating Pulley Bracket (25).
Attach one Pulley (30) to the Double Floating Pulley Bracket (25) with Hexagon Head
Bolt M10x45 (59), M10 Nylon Nut (71), and φ11Washers (68-2pcs).
6)Draw the CableB (49) around the Pulley (30) on the Double Floating Pulley Bracket
(25) and then pull it downwards to the triangle plate on the Base Tube (1).
Connect the Cable B (49) to the C-Clip (52) then connect on the Base Tube (1) with
Cable B (49) and one end of Chain (47). Connect the C-Clip (52) to the other end of

14
Chain (47).
7)Attach a Chain (47) to the Cable B (49) by using a C-Clip (52). Attach the Arm Curl
Handle (20) to the Chain (47) by using another C-Clip (52). Adjust the Chain (47) to the
desired length.
Remove the Chain (47) and the Handle when using the Leg Developer.
INSTALL THE CABLE C(50)
Attach one end of the Cable B (50) to the hook on the Right Butterfly Arm (11R).
1) Draw the CableC (50) to the right Swivel Pulley Bracket (24).
Attach a Pulley (30) to the right Swivel Pulley Bracket (24) with Hexagon Head Bolt
M10x45 (59), M10 Nylon Nut (71), and φ11Washers (68-2pcs).
2) Draw the Cable C (50) around the Pulley (30) on the right Swivel Pulley Bracket (24)
then pull it downwards to the Crossed Double Floating Pulley Bracket (26).
Attach the Pulley (30) to the Crossed Double Floating Pulley Bracket (26) with
Hexagon Head Bolt M10x45 (59), M10 Nylon Nut (71), andφ11 Washers (68-2pcs).
3) Draw the CableC (50) around the Pulley (30) on the Crossed Double Floating Pulley
Bracket (26) then pull it upwards to the left Swivel Pulley Bracket (24).
Attach a Pulley (30) to the left Swivel Pulley Bracket (24) with Hexagon Head Bolt
M10x45 (59), M10 Nylon Nut (71), and φ11Washers (68-2pcs).
Draw the CableC (50) around the Pulley (30) on the left Swivel Pulley Bracket (24)
then pull it forwards to the Left Butterfly Arm (12L).
Attach the other end of the CableC (50) to the hook on the Left ButterflyArm (12L).
4)Finally, tighten the M10 Knob (44) onto the Pin for Main Support Tube (27).
15
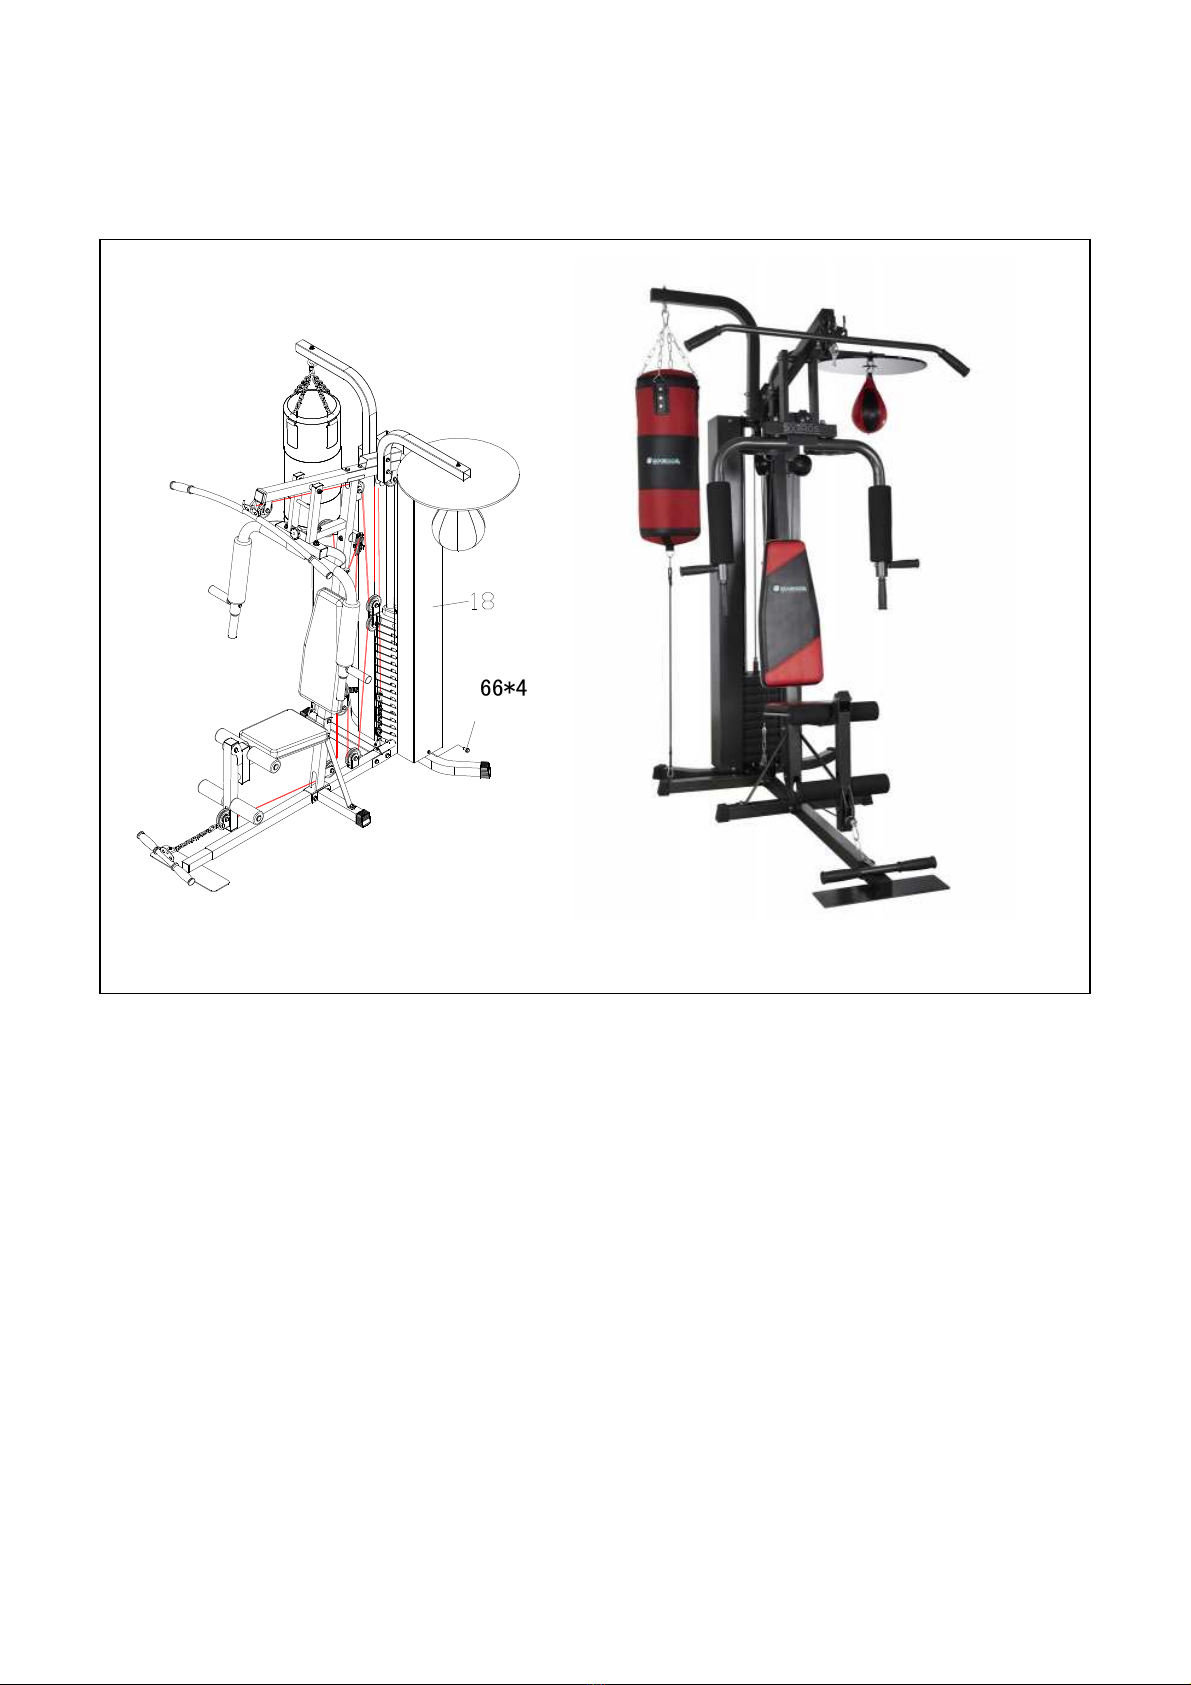
INSTALL THE WEIGHT STACK COVERS
Step 7(FIG .7)
Attach the bottom ends of the Right and Left Weight Stack Covers (18R, 18L) to the
Weight Support (2) with M8x20 Hexagon Head Bolts (66-2pcs) and φ9 Washers (69).
Attach the top ends of the Right and Left Weight Stack Covers (18R, 18L) to the Upper
Frame (6) with M8x20 Hexagon Head Bolts (66-2pcs) and φ9 Washers (69).
6 6 * 4
16
WARM UP AND COOL DOWN ROUTINE
A good exercise program consists of a warm-up, aerobic exercise, and a cool down.
Do the entire program at least two to three times a week, resting for a day between
workouts. After several months you can increase your workouts to four or five times
per week.
AEROBIC EXERCISE is any sustained activity that sends oxygen to your muscles via
your heart and lungs. Aerobic exercise improves the fitness of your lungs and heart.
Aerobic fitness is promoted by any activity that uses your large muscles eg: legs, arms
and buttocks. Your heart beats quickly and you breathe deeply. An aerobic exercise
should be part of your entire exercise routine.
The WARM-UP is an important part of any workout. It should begin every session to
prepare your body for more strenuous exercise by heating up and stretching your
muscles, increasing your circulation and pulse rate, and delivering more oxygen to your
muscles.
COOL DOWN at the end of your workout, repeat these exercises to reduce soreness in
tired muscles.
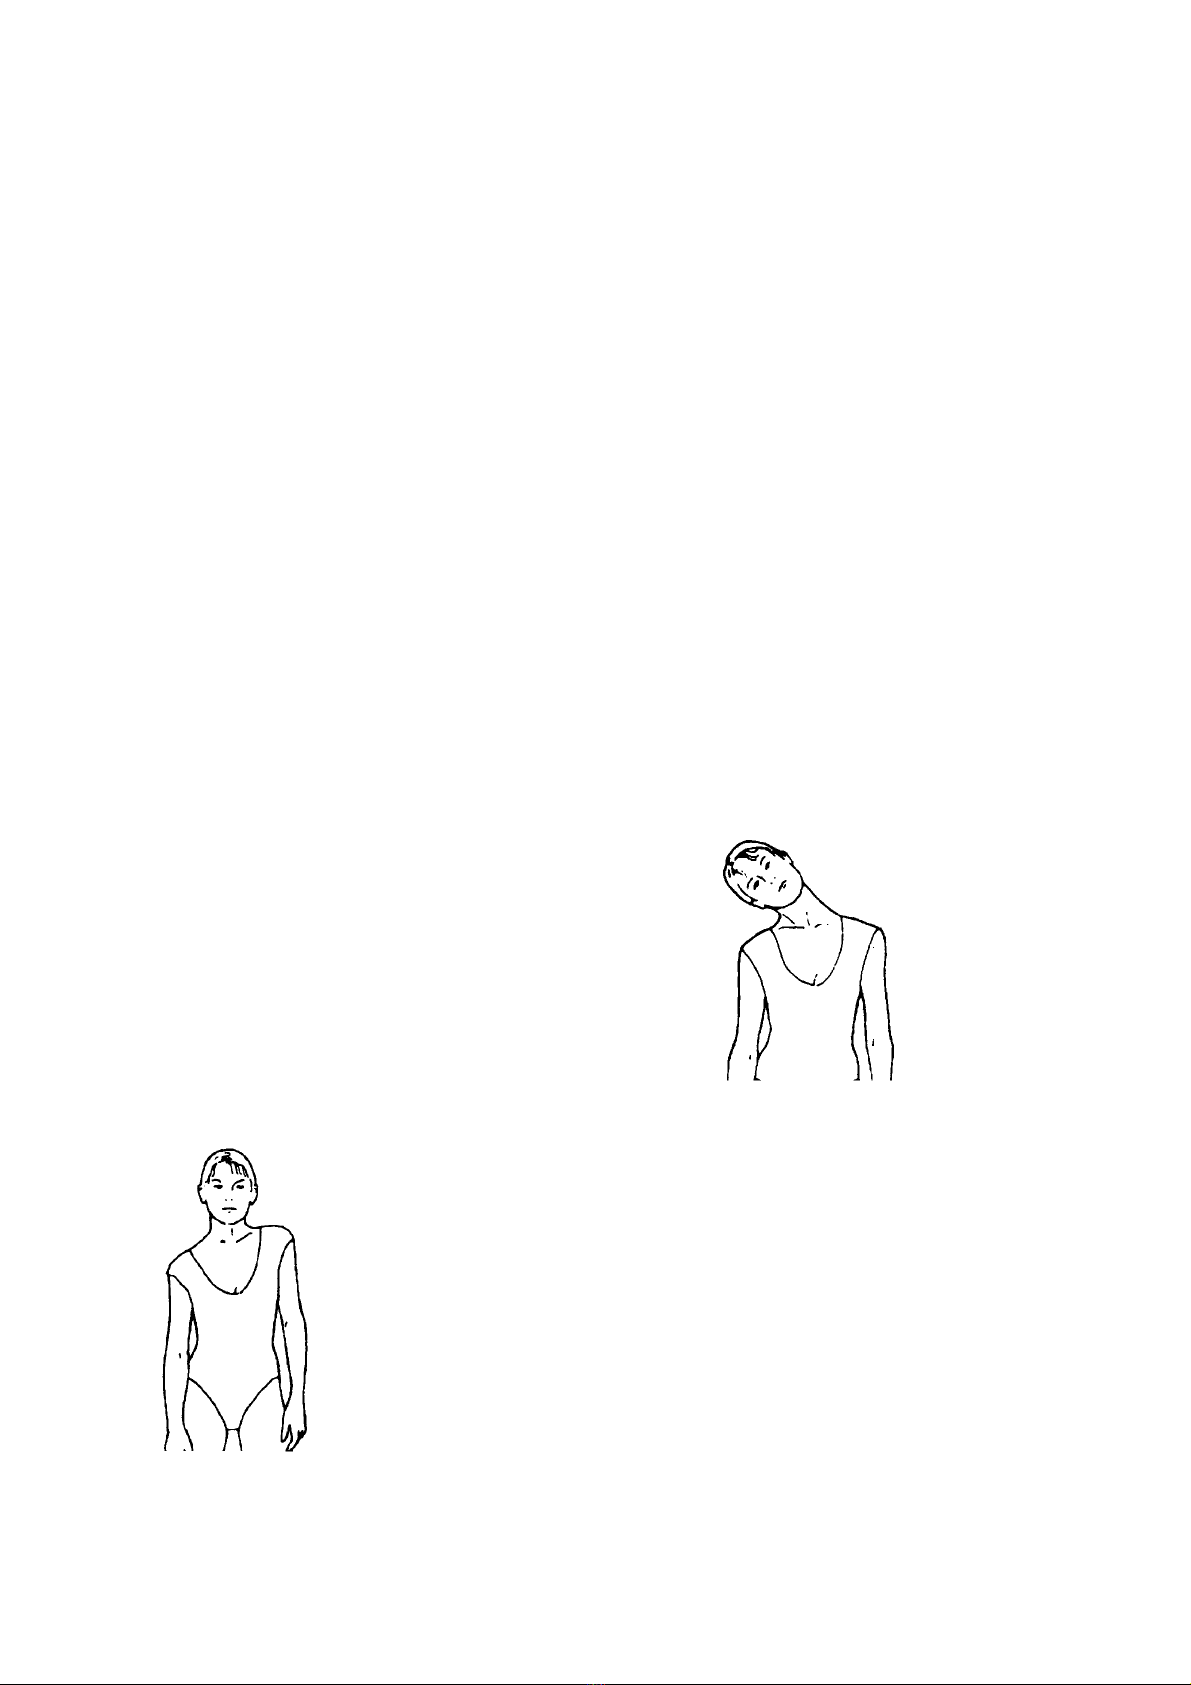
HEAD ROLLS
Rotate your head to the right for one count,
feeling the stretch up the left side of your neck,
then rotate your head back for one count,
stretching your chin to the ceiling and letting
your mouth open. Rotate your head to the left
for one count, then drop your head to your chest
for one count.
SHOULDER LIFTS
Lift your right shoulder toward your ear for one
count. Then lift your left shoulder up for one
count as you lower your right shoulder.
17
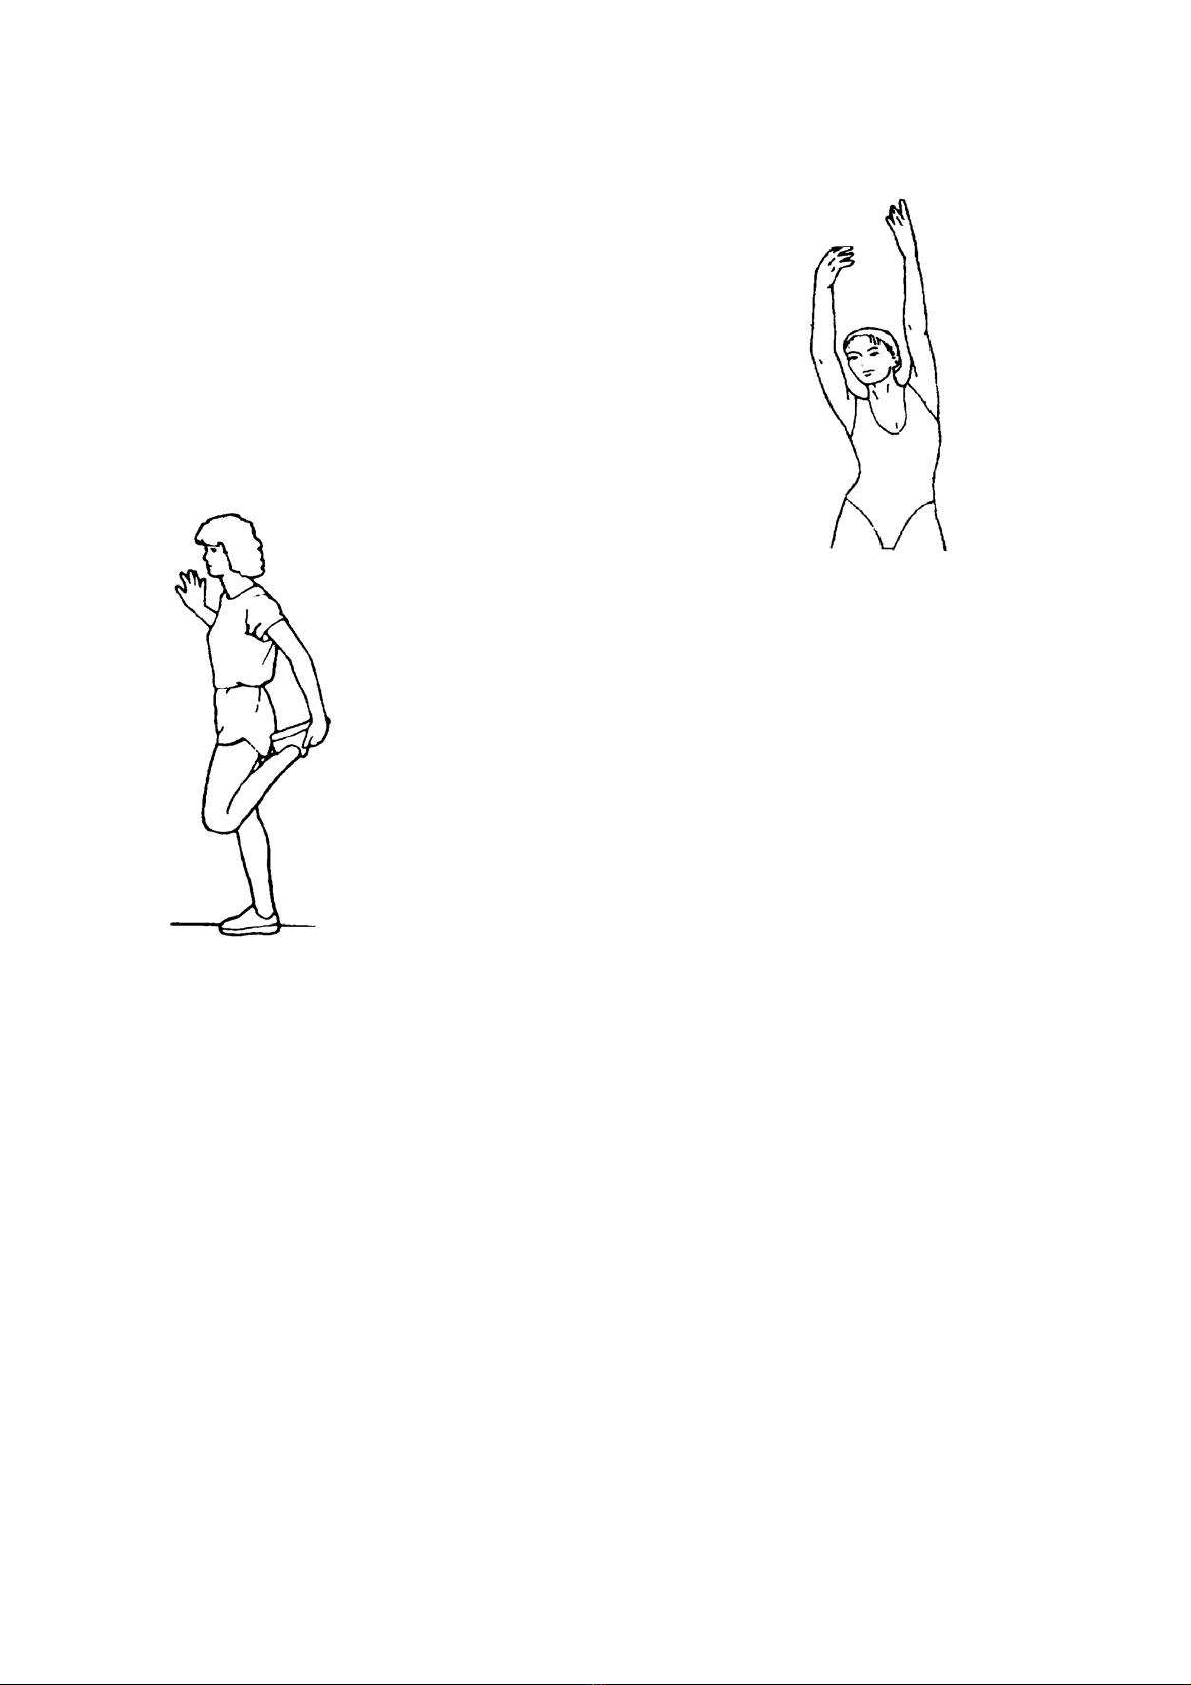
SIDE STRETCHES
Open your arms to the side and lift them until
they are over your head. Reach your right arm
as far toward the ceiling as you can for one
count. Repeat this action with your left arm.
QUADRICEPS STRETCH
With one hand against a wall for balance, reach
behind you and pull your right foot up. Bring
your heel as close to your buttocks as possible.
Hold for 15 counts and repeat with left foot.
INNER THIGH STRETCH
Sit with the soles of your feet together and your
knees pointing outward. Pull your feet as close
to your groin as possible. Gently push your
knees toward the floor. Hold for 15 counts.

18
TOE TOUCHES
Slowly bend forward from your waist, letting
your back and shoulders relax as you stretch
toward your toes. Reach as far as you can and
hold for 15 counts.
HAMSTRING STRETCHES
Extend your right leg. Rest the sole of
your left foot against your right inner
thigh. Stretch toward your toe as far as
possible. Hold for 15 counts. Relax
and then repeat with left leg.
CALF/ACHILLES STRETCH
Lean against a wall with your left leg in front of
the right and your arms forward. Keep your
right leg straight and the left foot on the floor;
then bend the left leg and lean forward by
moving your hips toward the wall. Hold, then
repeat on the other side for 15 counts.
Popular Home Gym manuals by other brands


Body Solid
Body Solid Pro Club STBR500 Assembly instructions & owner's manual

Weider
Weider Pro 2000 Bedienungsanleitung

Extreme Products Group
Extreme Products Group ISA 2300 manual

Weider
Weider Easy Compact 90 Bedienungsanleitung

Weider
Weider PRO 900 Gebruikershandleiding

Weider
Weider WESY75741 user manual