Chubu Pro Chef SW-820B User manual

NegiSlicerSW‐820B
(SpringOnionSlicer)
Model SW-820B
INSTRUCTIONMANUAL
Negi(SpringOnion) Slicer

FORSAFETY
WARNING
CAUTION
Incorrectoperationofmachineisdangerousandcancauseserious injuryor
death.
Incorrectoperationofmachineisdangerousandcancauseserious injuryof
personor*materialdamages.
ExamplesofMark/Pictograph:
Note:"Material damages"meansdamagestobuildings,furnitureandeffects,pets,etc.
ElectricShock
DoNot Disassemble
Unplug
△represents"CAUTION"(includingdangerandwarning).
Thespecificcontentsofcautionareshownnearthe△markbypictographorletters.
The markillustratedleftrepresents"ELECTRICSHOCK".
represents"PROHIBITEDOPERATION".
Thespecificcontentsof"Prohibited" areshownwithinornearthismarkbypictograph
orletters.Themarkillustratedatleftrepresents"DONOTDISASSEMBLE".
●represents"ENFORCEMENT"(Thingstodo).
Thespecificcontentsof"Enforcement"areshownnearthe●markbypictograph
orletters. The markillustratedleftrepresents"Unplugfromoutlet".
WARNING
●Donotoperatethemachineoutside.
Operatingthemachineoutside
orintherainwillcauseelectric
bleeding orelectricshock.
●Donot installthemachineinadamporwetplace.
Itcancauseelectric
bleedingorelectric
shock.
●Donotinstall/placethemachineclose toanyheating
appliance.
Never install/placethe
machineclosetoanyheating
appliancesuchasagasburner.
Itcancausemeltingand/or
burningofplasticcover.
●Dedicated(Exclusive‐use)outlet.
Always useanoutletdedicatedto
eachmachine.Neveruseextension
cordsorconnectseveralplugsinto
thesameoutlet.Itmaycausepower
supplycordtooverheatand
melt/burnorelectricshockorfire.
Plug
●Thismachineisfor"COMMERCIALUSE".
Besuretokeepthemachine
awayfromchildrento avoid
electricshockorinjury.
●Confirmthat themachinehasnotransportation
damageassoonasitisdelivered.
If ithasanydamage,
contactthesupplier
withtheinformation.
Itcancauseinjurybyusingthe
damagedmachine.
●Beforeoperating themachine,pleasereadthefollowing"InstructionsforSafety"inthemanual
verycarefully,andoperatethemachinecorrectly.
●Eachinstructionspecifiedinthemanual isveryimportantforsafety,sobesuretofolloweach
instructionasspecified.
●Attentionmarksandtheirmeaningsareasfollows:
1

WARNING
●Forcleaninginsidethecutting cabinet orchanging
theblades,besuretoTURN OFFthemainswitchand
alwaysputongroveswhilecleaning/changingblade
works.
Nevertouchthe blades
directly.Theyareverysharp
andcancauseinjury.
●BesuretoTURN OFFthemainswitchwhensetting
andinsertingNegitotheinlet.
Itcancauseinjury.
●Donotpourwater overthemachineorimmersethe
machineinwater.
Itcancauseashortcircuitor
electricshock,aswellas
rustandotherwaterrelated
problems.
●Neverusethemachinewithout theNegiconveyor
unit/theweight.
Itcancauseinjury.
●Donotdamagepowersupplycord.
Neverworkonpowercordand
never pull,twistorbundleit.
Donotplaceaheavythingsonit.
Itcandamagethepowercord
andcancauseelectric
shockorfire.
●Intheeventofcircuitbreakermovingto"OFF"
position,pleasecontactthemachinevendor.
Switchingbreakerto
"ON"positionincorrectly
orbyforcecancause
electricshockorfire.
●Keepplugcleanandplugintooutlet correctly.
Always keepplugcleanandplug
intooutletcorrectly.Dirtyplugsor
imperfectlyconnectedplugs
cancauseelectricshock
orfire.
Attention
todust
●Donottouchanyelectricalparts(suchasplugor
switch)with wethands.
Itcancauseelectric shock.
●Nevertrytodisassembleorrepair themachineby
yourself.
Alwayscallaqualifiedtechnician.
Incorrectrepairwill likely
causeirregularoperation
orelectricshock,fireorinjury.
●Donotattempttoalterthemachine inanyway.
Itcancause electricshockorfire
2
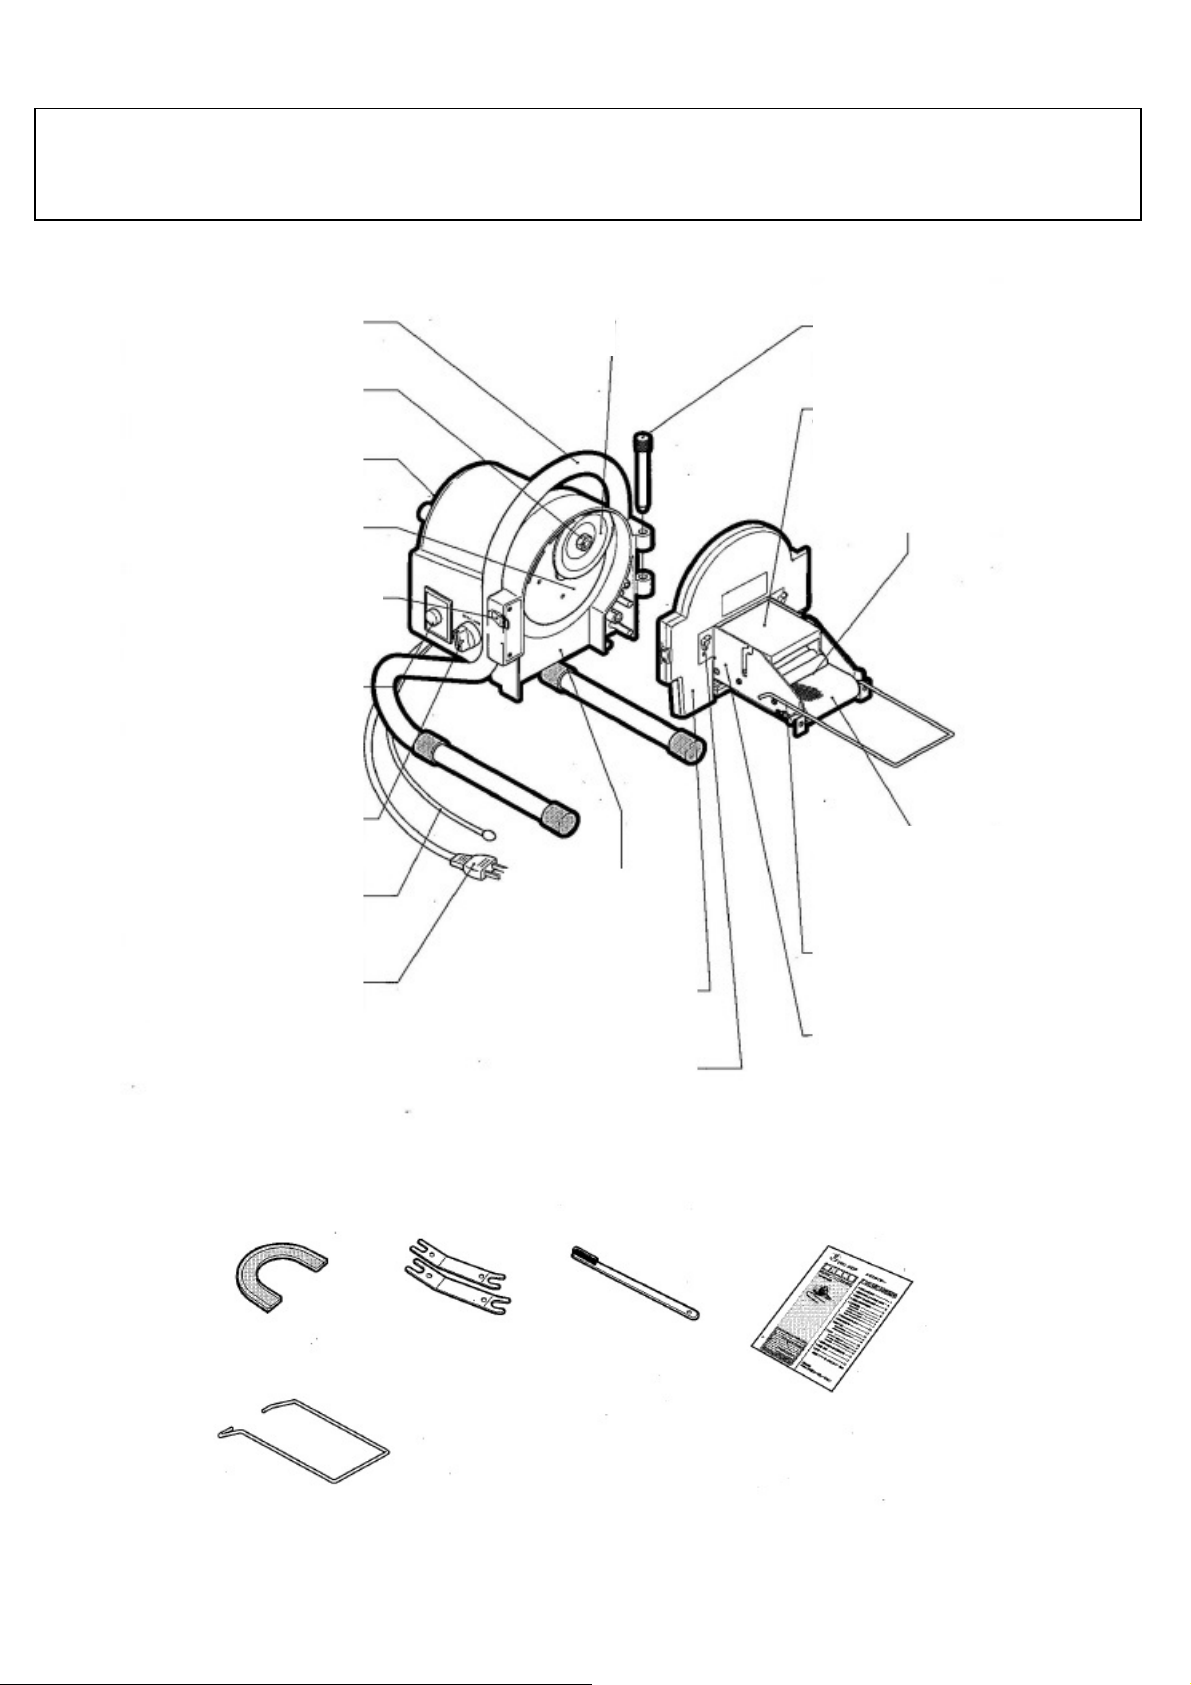
PARTNAME
BladeFixingNut
(front)
Handle Blade
BladeSharpeningUnit
CuttingCabinet
Hook
(locking thecabinetcover)
Thickness AdjustmentKnob
PowerSwitch
Pin
(fixingcabinetcover)
EarthCable
PowerCord
Weight
(pressing Negitoconveyorbelt)
NegiInlet
ExtensionArm
(holding uplongNegi)
NegiOutlet
Cutting CabinetCover
NegiConveyorBelt
NegiConveyorUnit
ButterflyBolt
(fixingNegiconveyorunit)
Blade Cover(red) Spanners(2pcs.) BambooBrush Manual
ExtensionArm
3
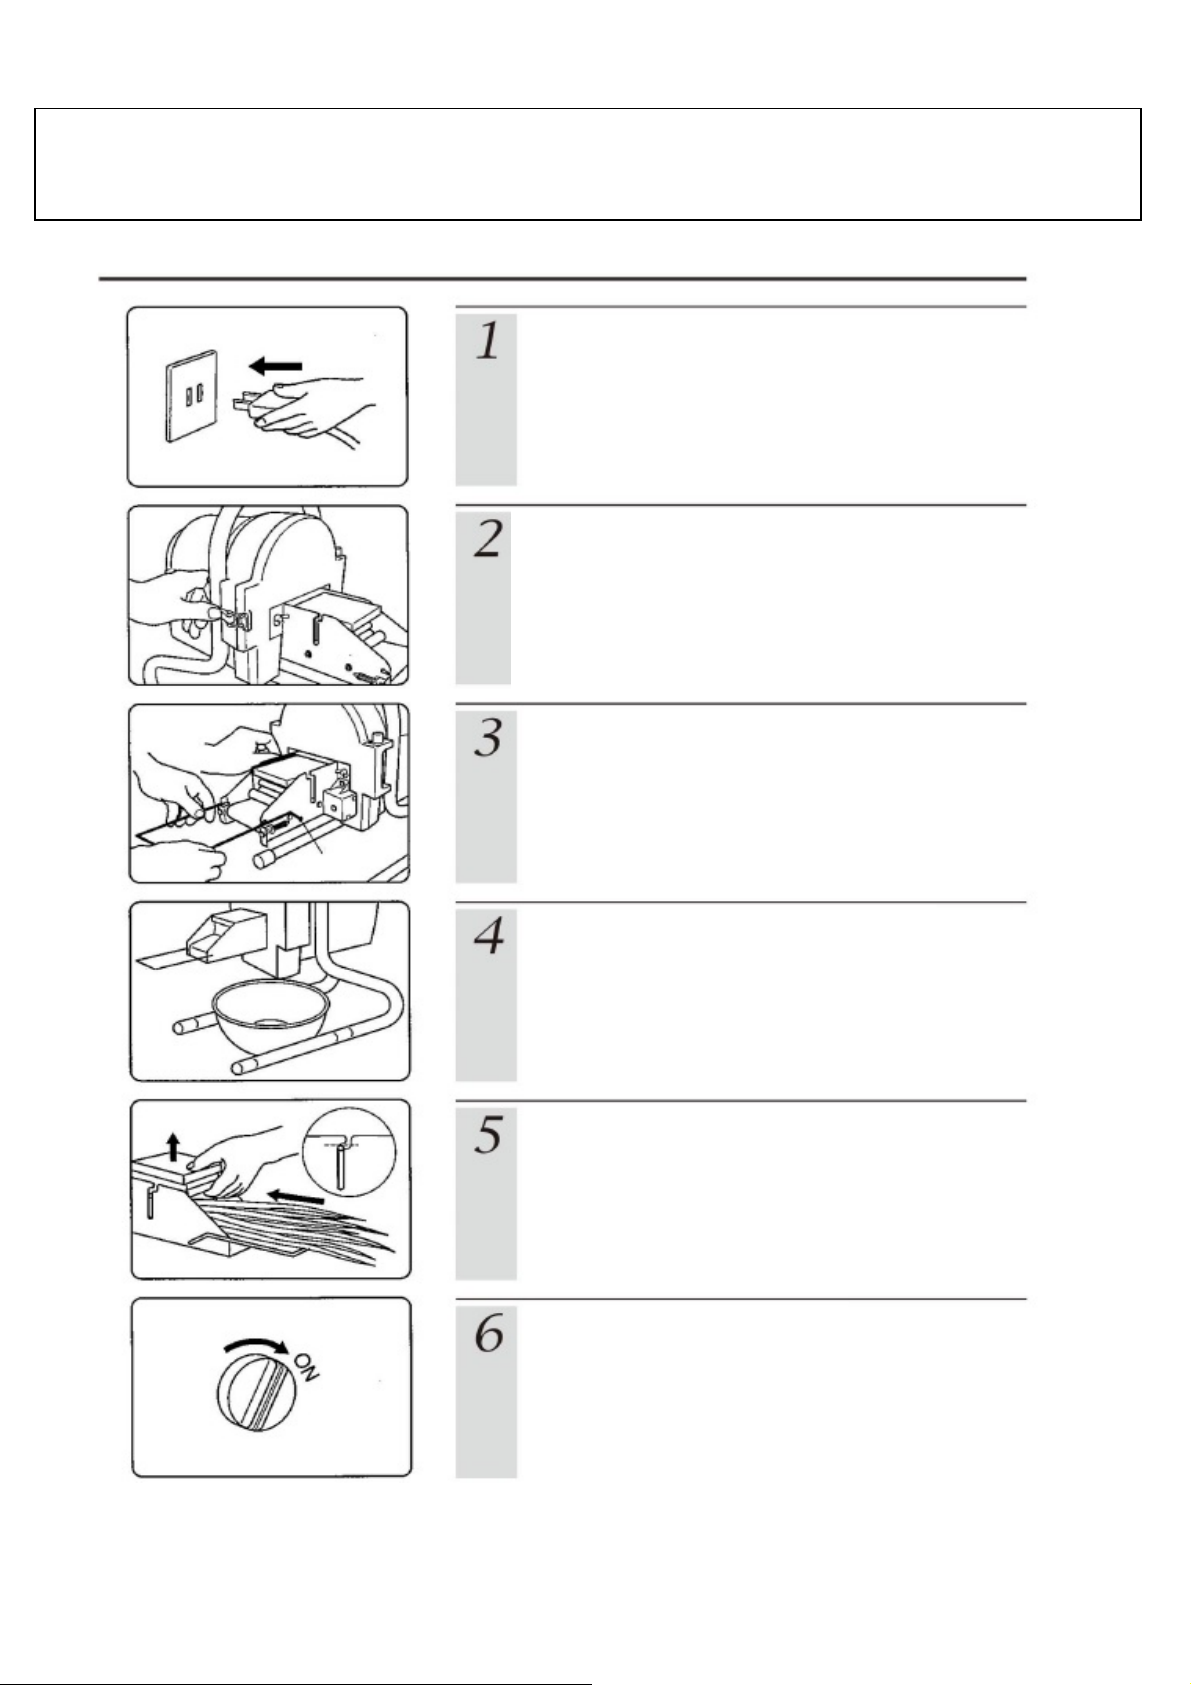
OPERATION
Pluginthemachine.
Make surethatthepowerswitchitturnedtoOFF
positionbeforepluggingtheunit.
CloseCuttingCabinetCover,andlockit
withahook.
‐Ifitisnotfullyclosed,asafetyswitchactivatesthe
unitnottoworkevenwhenitisswitchedon.
‐Whenitishardtocloseit,donotcloseitbyforceand
refertopage5.
CheckthepositionofNegiConveyor Unitand
placeExtensionArm.
‐BesuretofixtheNegiConveyorUnittothecuttingcabinet
coverbyaButterflyBolt.
‐OpentheExtensionArmslightlyandplaceittothemounting
holesontheNegiconveyorunit.Negidoesnothangdownand
canbesentsmoothly.
PrepareNegiandabowl.
‐WashawaythedirtonNegiandcutofftheroots.
RemovewitheredNegi.
‐PlaceabowlundertheNegioutlettoreceivethesliced
Negi.
PutNegiintotheNegiInlet.
‐LiftuptheweightandinsertNegibetweentheNegi
conveyorbelt.
‐Theweightcanbelifteduptotheupperlimitinthe
picture.
Puton thepowerswitch.
‐Thebladestartsrotating, andtheconveyorbeltsends
Negiforslicing.
*DonotputyourhandstoNegiinletoroutletwhile
operating.Thismaycauseinjury.
4

Adjustthethicknessofslicing.
Turnthethicknessadjustmentknobforthedesiredthickness.
Formakingitthicker,turntheknobclockwise,orturnit
counterclockwiseforthinner.Thenumbers1‐10arejust
roughindicationsforyourreference.
*BesuretoswitchOFFtheunitwhenyouaddanotherNegi.
SwitchOFFandunplugtheunit.
Turnofftheswitchtostopworking.
Pullouttheplugfromtheoutletwhenthejobisfinished
fortheday.
●Theratedtimeofthismodelis“25minutes”.Whenitisusedcontinuouslyformorethantherated
time,themotor getsoverheatedandtheprotectorreactsittostoptheoperation.Theprotectoralso
reactstooverloadofthemotor.
●Themotorhas aprotectorbuiltin.
●Followtheinstructionsbelowwhentheprotectorworks.
TurnOFF thepower
switchandunplug
theunit.
Removethecauseof
theoverload (any
materialsotherthan
Negi)andcheckthe
conditionoftheblade.
LeavetheunitswitchedOFF
forhalfanhourandthenit
restoresitself.Themachine
willautomaticallyreactivate.
*Iftheprotectorworksoften,pleaseconsultwith thedistributor.
ABOUTTHEPROTECTOR
WhentheCuttingCabinetCoverdoes
notclose,sendtheNegiConveyorBelt
slightlybyhand.Donotcloseitby
force.
NOTE
Drive shaftofbelt Drive shaftofbelt
Pin Pin
Thecovercanbeclosed
whenthepinfitsinthe
groove.
Thecovercannotbe
closedunlessthepinfits
inthegroove.
5
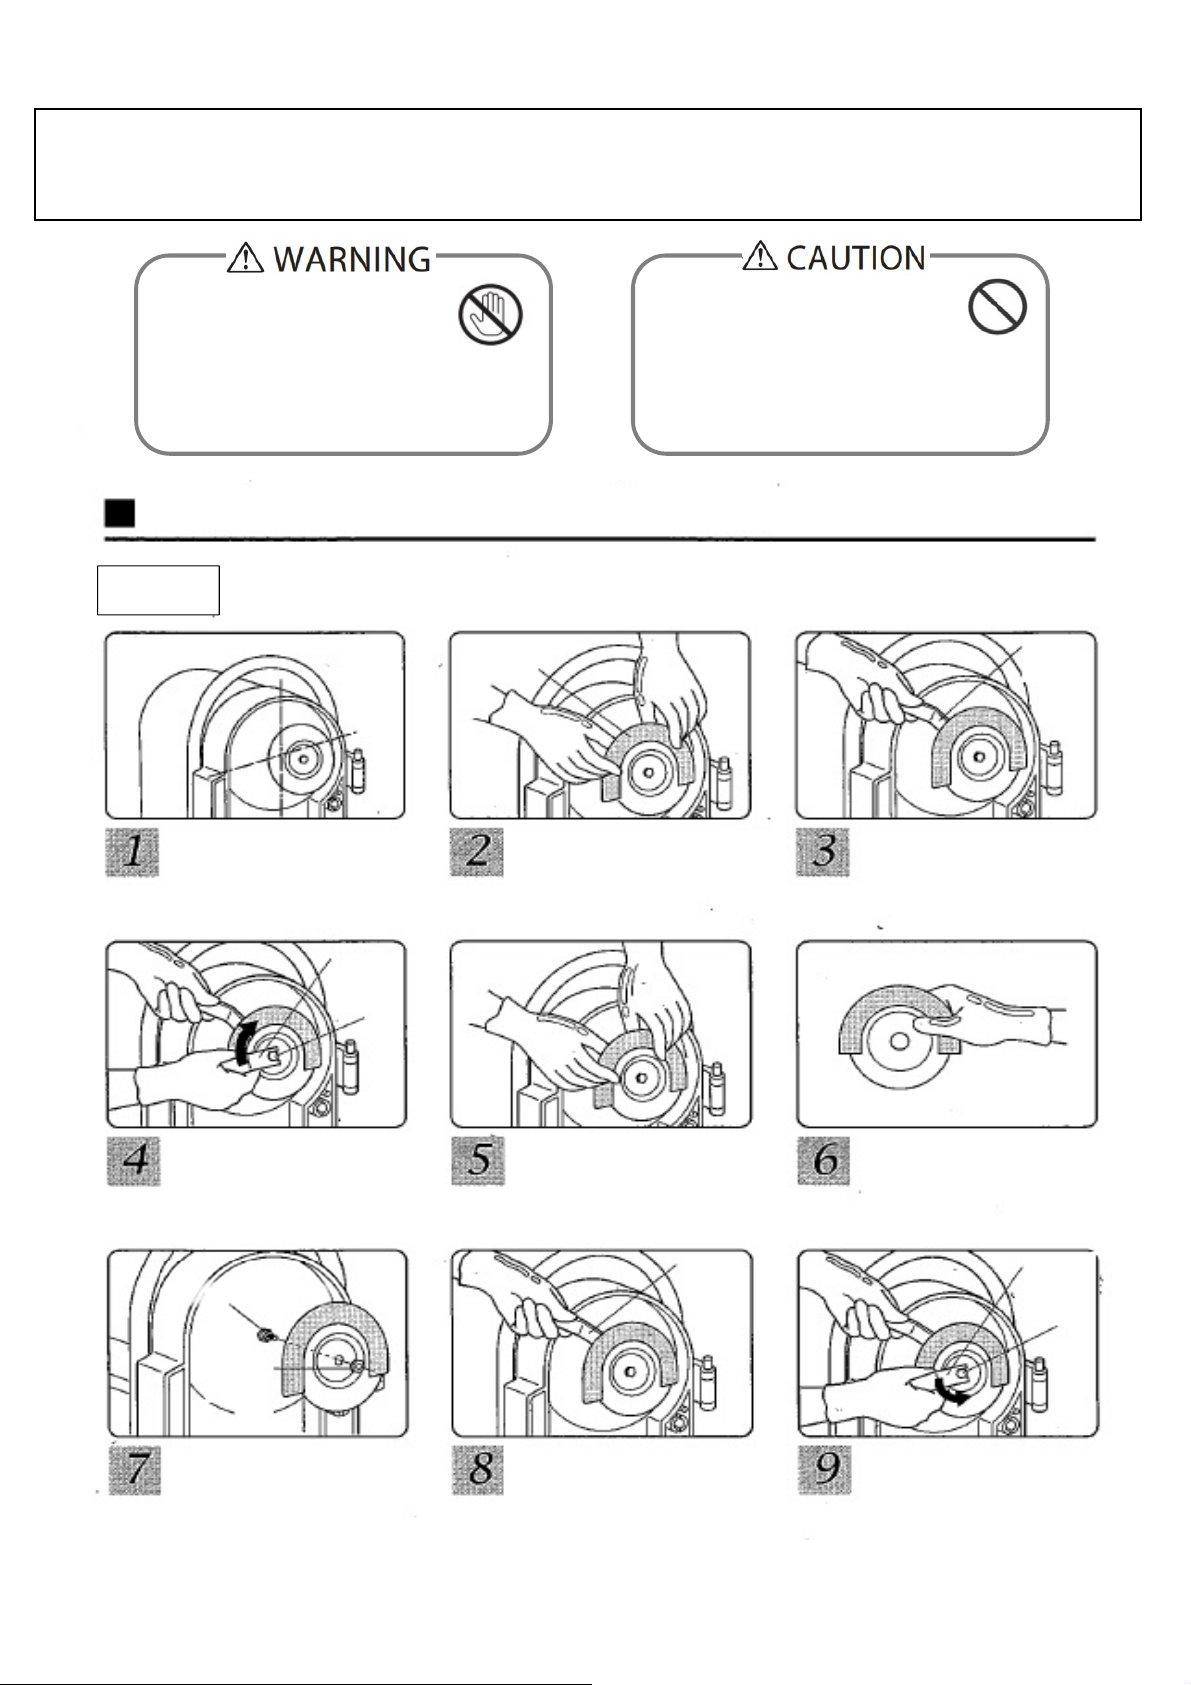
HOWTOCHANGETHEBLADES
Forcleaninginsidethecutting
cabinet orchangingtheblades,be
suretoTURN OFFthemainswitch
andalwaysputongroveswhile
cleaning/changingbladeworks.
Thismaycauseaninjury.
Be suretoputBladeCover(red)
whenchangingtheblade,andhold
thebladeitselfwhencarryingit.
WhenholdingtheBladeCoveronly,
theblademayfallandcausean
injury.
Howtoremove/installblades.
NOTE InstalltheBladeFixingNut(front)withtheletters"ゆるむ(loose)"and"しまる(tighten)"facingyou.
Ifitisinstalledinreverse,thebladecannotbefixedandmaycauseamalfunctionorinjury.
Placethebladeinthelower
rightpositionoftheCutting
Cabinet(seethefigure).
PuttheBladeCover(red)on
theblade.
Insertthelongbentsideof
theSpannerintothebackof
theblade.
TurntheBladeFixingNut(front)
clockwisetoloosenitwith
usingtheotherspanner’sshort
bentside.
Holdthebladefromtheabove
andremovethenut.Donot
holdthebladecover.Theblade
willfallandyouwillbeinjured.
PuttheBladeCovertothe
newblade.
FixthebladeintotheBlade
FixingMetalPlate(front)and
temporarilyfixtheBladeFixing
Nut(front).
Insertthelongbentsideof
theSpannerintothebackof
theblade.
TurntheBladeFixingNut(front)
counterclockwisetotightenit
withusingtheotherspanner’s
shortbentside.
BladeCover Spanner
(longbent
side)
Spanner
(shortbent
side)
Blade
Fixing
Nut
BladeFixingMetalPlate
Blade
Fixing
Nut
Spanner
(longbent
side)
Spanner
(shortbent
side)
Blade
Fixing
Nut
6
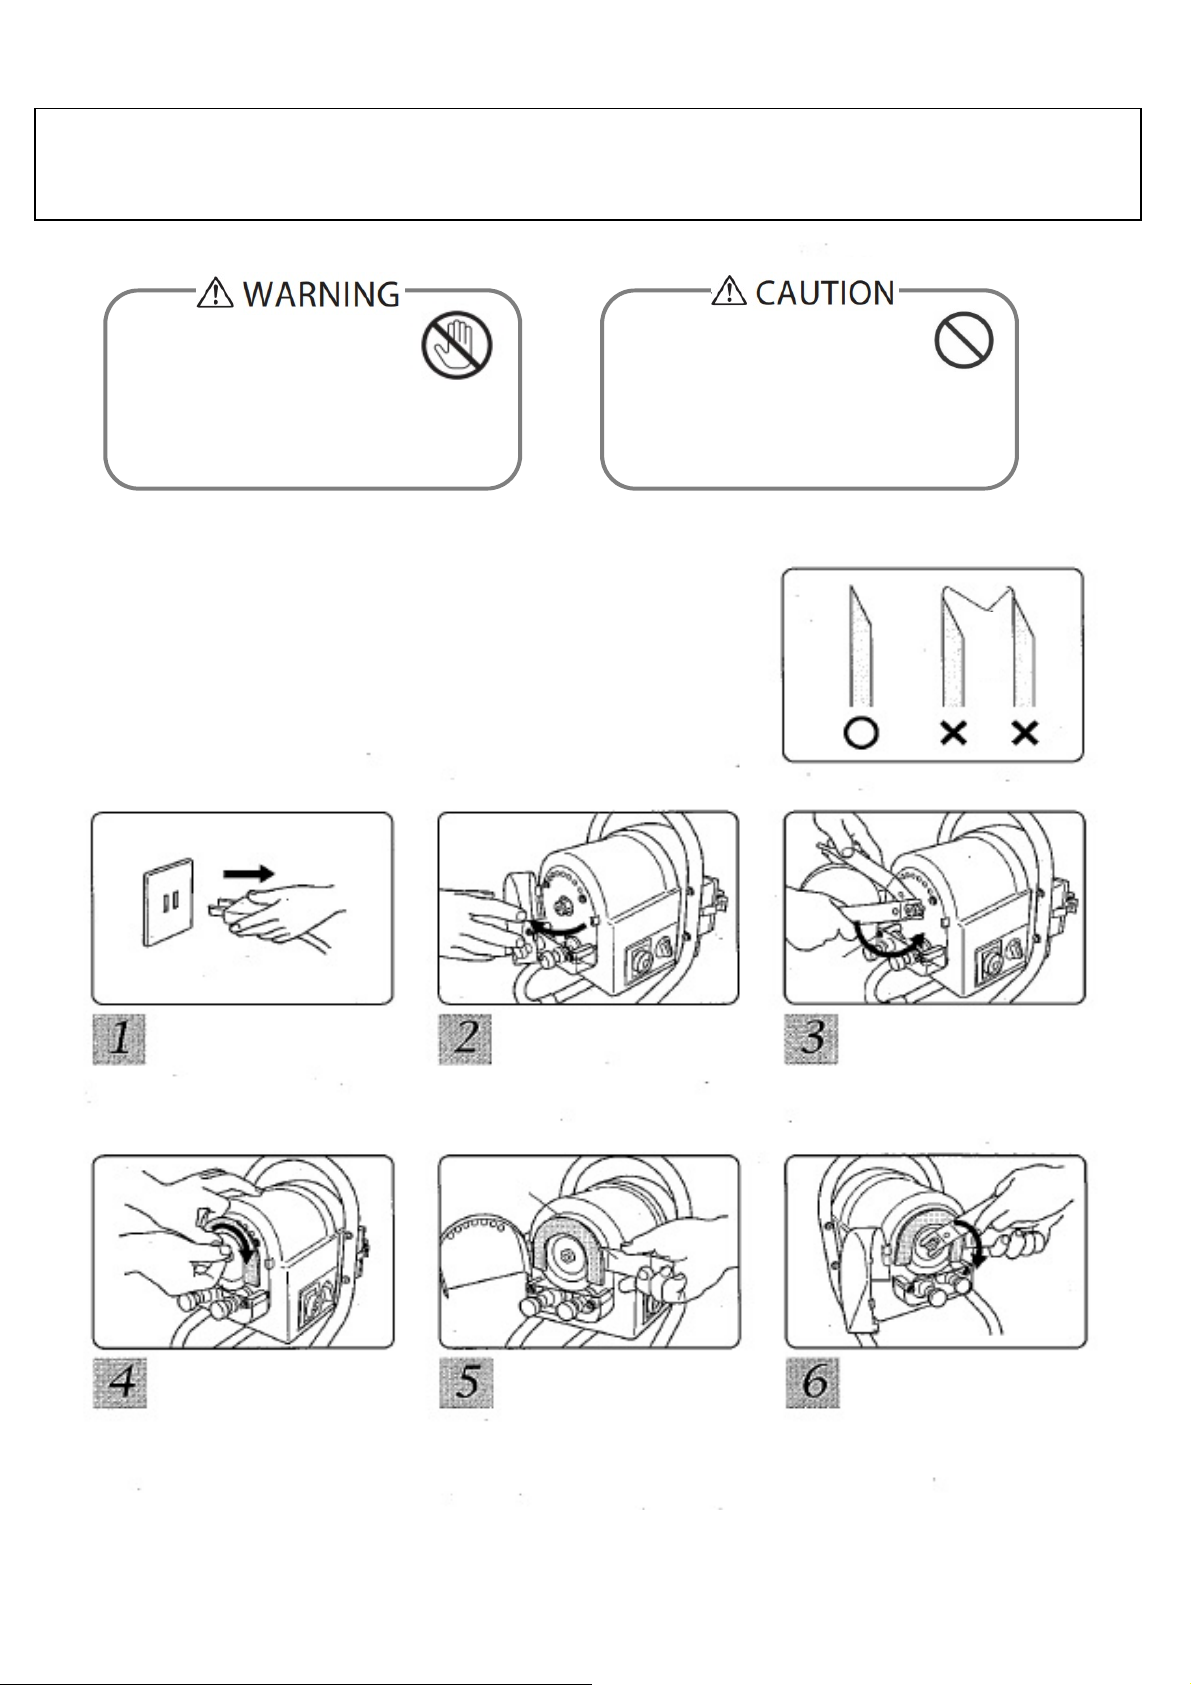
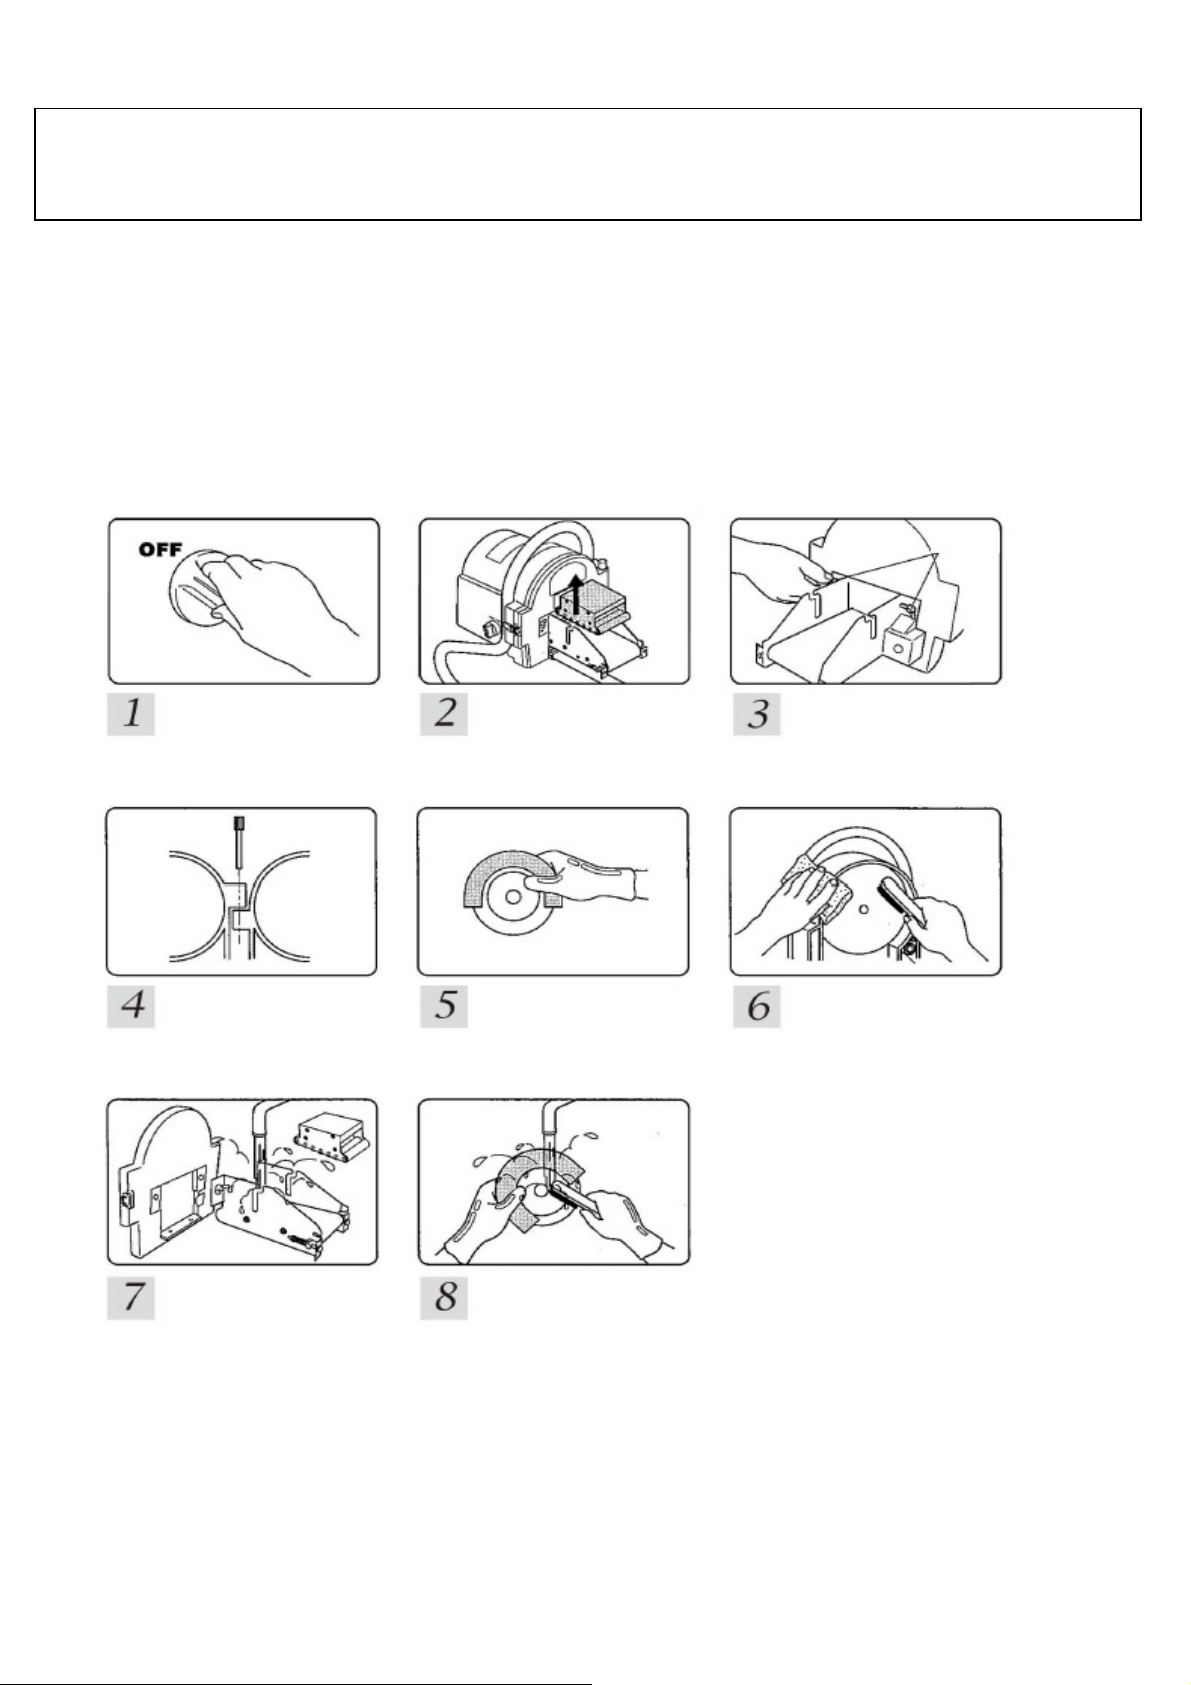
HOWTOSHARPENTHEBLADES
Forcleaninginsidethecutting
cabinet orchangingtheblades,be
suretoTURN OFFthemainswitch
andalwaysputongroveswhile
cleaning/changingbladeworks.
Thismaycauseaninjury.
Be suretoputBladeCover(red)
whenchangingtheblade,andhold
thebladeitselfwhencarryingit.
WhenholdingtheBladeCoveronly,
theblademayfallandcausean
injury.
●InstalltheBladeFixingNut(front)withtheletters"ゆるむ(loose)"and"しまる(tighten)"facing
you.Ifitisinstalledinreverse,thebladecannotbefixedandmaycauseamalfunctionorinjury.
●Whensharpeningablade,donotpressthegrindstonestronglyorkeep
pressingitforalongtime.Ifthebladegetsheat,itmaybecomedull.
●Aftersharpeningtheblade,checkthecuttingedgeforburrs.If
thereareburrs,thesharpnesswillnotimprove.(Seethefigureonthe
right)
TurnOFF thepower
switchandunplugthe
unit.
Open thecoverofBlade
SharpeningUnit.
RemovetheBladeFixingNut
(back)byturningit
counterclockwisewiththe
attachedspanner.
FixthebladeintotheBlade
FixingMetalPlate(back)and
temporarilyfixtheBladeFixing
Nut(back)byhand.
Insertthelongbentsideof
theSpannerintothebackof
theblade.
TurntheBladeFixingNut(back)
clockwisetotightenitwith
usingtheotherspanner.
burrs
Blade
Fixing
Nut(back)
Spanner
(longbent
side)
7
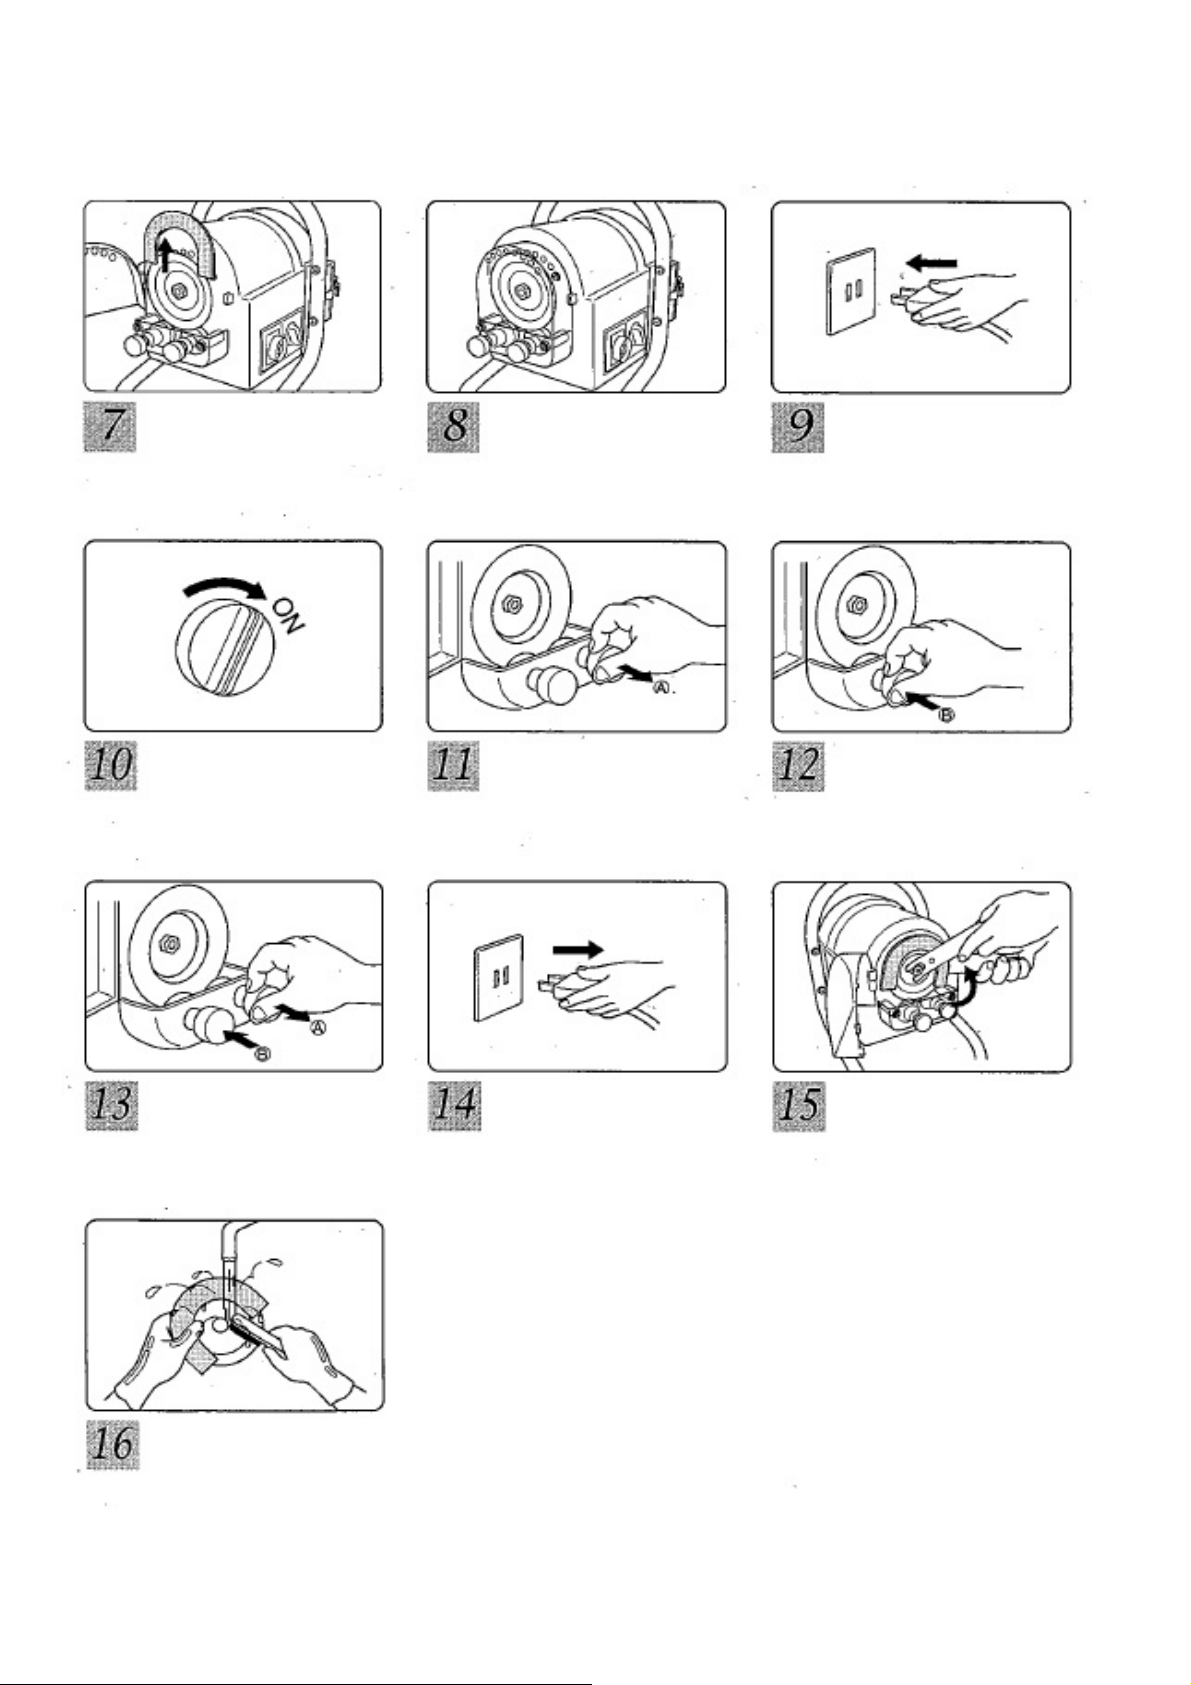
RemovetheBladeCover
fromtheblade.
ClosethecoverofBlade
SharpeningUnit.
Pluginthemachine.
Putonthepowerswitch.
Thebladestartsrotating.
PulltheBladeSharpening
KnobAtowardyouand
applythemagnettothe
blade5to6timesfor2to3
seconds.
Toremoveburrsonthe
blade,lightlypresstheBlade
SharpeningKnobBandapply
thegrindstonetotheblade
2‐3timesfor1to2seconds.
Ifthebladeisheavilyworn,
repeatsteps11and122‐3
times.
SwitchOFFandunplug
theunit.
Removethebladefrom
BladeSharpeningUnit.
Cleanthebladetoremove
dustaftersharpening.
8
DAILYMAINTENANCE
●Besuretocleanthe machine afteruse.IfNegiremains,sanitaryconditionswillgetworse.
●Ifyoufindnoticeabledirtontheoutsideofits body,wipewithaclothsoakedinlukewarmwater
containinganeutraldetergent.Andthenwipewithaclothsoakedinwatersothatnodetergent
remains.
SwitchOFF.
TurnOFF thepower
switchandunplugthe
unit.
RemovetheWeight.
Liftitupand removeit.
RemovetheNegiConveyorUnit.
Unscrew the2butterflyboltsand
removetheNegiConveyorUnit.
RemovetheCutting
CabinetCover.
Openthecuttingcabinet
coverandpulloutthePin.
RemovetheBlade.
Refer topage6.Be
suretoputongroves.
Clean theCuttingCabinet.
RemovewasteswithBamboo
Brush,moistenedsponge,etc.,
wipeoffthemoisturewithadry
cloth,anddryitwell.Donot
washwithwaterdirectly.Itmay
causeelectricleakageor
malfunction.
WashtheCutting Cabinet
Cover,BeltConveyorUnit,
Weight.
Rinsethemwithtapwater
andwipethemwithadry
cloth.
Washtheblade.
PutontheBladeCover
ontheblade andwashit.
Wipeoffthemoisture
withadrycloth.
9

80/80W
25min.
12kgs.
258x562xH426mm
1‐5mm
POWERCONSUMPTION
RATEDTIME
WEIGHT
DIMENSIONS
SLICINGTHICKNESS
SPECIFICATIONS
NAMEOFPRODUCT Negi(SpringOnion)Slicer
MODEL
ELECTRICAL
SW‐820B
AC100V50/60Hz
10
Table of contents


