ci IR D5 User manual
Dehydrator Manual User Guide
Bedienungsanleitung Dörrgerät
Manuel de l’utilisateur du déshydrateur
Deshidratador Manual de guía del usuario


English

INFORMATION
07
WARNING
09
FEATURES of IR D5
13
CLEANING GUIDELINES
19
PREPARATION
20
DEHYDRATING GUIDELINES
21
STORING DRIED FOODS
25
TROUBLESHOOTING GUIDELINES
26
5
7
11
17
18
19
23
24

INFORMATION
Congratulations.
And thank you for your purchase. You are about to experience the
simplest, healthiest, and most efficient way to dehydrate food. This user’s
guide is your source for understanding important safety information,
product features and modes, recommended dehydration times, cleaning
tips, and more. Please read all safety instructions, tips, and warnings found
in this guide, before operation.
Before use, wash all trays and crumb tray.
DO NOT IMMERSE
APPLIANCE INTO WATER
OR ANY OTHER LIQUID.
INFORMATION
If you have any further inquiries,
please contact us
ADDRESS
21, Yangpyeong-ro, 12-gil,
Yeongdeungpo-gu, Seoul, Korea
150-810
TEL +82-2-2061-1344
WEBSITE
www.counterintelligence.co.kr
E-MAIL counterintell@
counterintelligence.co.kr
According to the Food and Drug
Administration (FDA), the nutrient
conservation rates by food’s process
methods are as follows.
• Dehydrated: 96%
• Canned Food: 20~30%
• Frozen Food: 40~60%
You can easily dehydrate fresh
fruits, vegetables, meat and many
more with CI’s Food Dehydrator and
enjoy the taste and nutrients for
a longer period.
7
5

IMPORTANT SAFEGUARDS
When using electrical appliances,
basic safety precautions should
always be followed including the
following:
1 Read all instructions.
2 Do not touch hot surfaces. Use
handles or knobs.
3 To protect against electrical
shock, do not immerse cord, plugs,
or the base in water or other
liquids.
4 Close supervision is necessary
when any appliance is used by or
near children.
5 Unplug from outlet when not in
use and before cleaning. Allow to
cool before putting on or taking off
parts.
6 Do not operate the appliance
with a damaged cord or plug or
after the appliance malfunctions or
has been damaged in any manner.
Return the appliance to the nearest
authorized service facility for
examination, repair, or adjustment.
7 The use of accessory
attachments is not recommended
by the appliance manufacturer may
cause injuries.
8 Do not use outdoors.
9 Do not let the cord hang over
the edge of tables, counters and
keep it away from hot surfaces.
10 Do not place on or near a hot
gas or electric burner or in a heated
oven.
11 Extreme caution must be
used when moving an appliance
containing hot oil or other hot
liquids.
12 Always attach plug to appliance
first, then plug cord into the wall
outlet. To disconnect, turn the
machine “off”, then remove plug
from wall outlet.
13 Do not use appliance for other
than intended use.
14 Save theses instructions and
keep them in convenient and dry
place.
Household Use Only
Do not immerse in liquids.
If the supply cord is damaged,
it must be replaced by the
manufacturer, its service agent or
similarly qualified persons in order
to avoid a hazard.
This appliance can be used by
children aged from 8 years and
above and persons with reduced
physical, sensory or mental
capabilities or lack of experience
and knowledge if they have been
given supervision or instruction
concerning use of the appliance
in a safe way and understand the
hazards involved. Children shall not
play with the appliance. Cleaning
and user maintenance shall not be
done by children unless they are
older than 8 and supervised.
Keep the appliance and its cord
out of reach from children less than
8 years.
86
Make sure the wet areas of your ingredients(especially those with salt) are
mostly vaporized before using the dehydrator. Water flowing to the dehydrator
could cause electrical shock and fire. Excessive ingredients could decrease the
performance of the dehydrator and cause failure of the product. Do not overload
the trays.
WARNING
By not following the instructions, it could cause serious injury or accidents caused
by negligence.
Do not immerse the appliance
in water or any other liquid. Do
not use the appliance in a humid
atmosphere as it could cause fire,
electrical shock and failure of the
appliance.
Do not use voltage converters.
Use the correct voltage and plug
for the electrical outlet. Incorrect
voltage could cause malfunction
and fire. Do not run parallel with
other appliance as it could cause
fire and electric shock.
Do not use a damaged power
plug.Make sure the plug is free of
damage, as it could cause fire. If
there is any damage, discontinue
use of the dehydrator and contact
the nearest customer service.
9
7

Do not operate if the air inlet is
blocked. The inlet should be free
of obstruction during use. Blocking
the air inlet could cause the
alteration of the appliance, fire and
malfunction through overheating.
Do not expose the appliance to any
environment exceeding 176℉(80℃).
Make sure the power switch is ‘OFF’
before plugging the appliance.
Do not attempt to dehydrate other
ingredients or materials that are not
recommended.
Make sure foreign substances
doesn’t go into the air inlet. It could
cause fire or malfunction.
By not following the instructions, it could cause serious injury or accidents caused
by negligence.
10
8
5
25cm
While in use, this product should
be in a well ventilated place and at
least 25cm away from any walls.
By not following instructions, may
cause performance degradation,
fire electrical shock and abnormal
operation.
Do not dehydrate wet food.
It could increase the dehydrating
time and decrease the output.
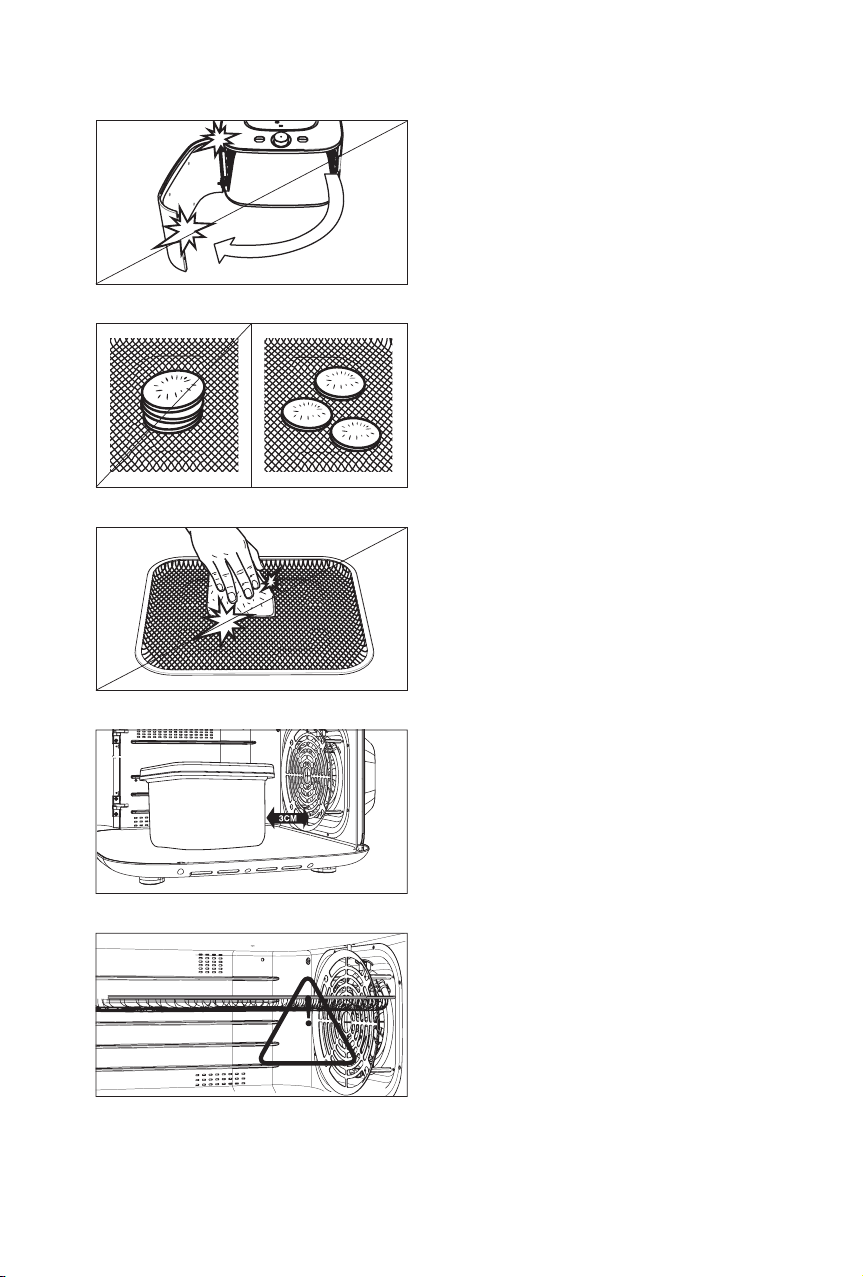
The corner(edge) of the door is
sharp and could cause injury to the
user by negligence or misuse.
Place the product on a flat, even,
hard surface. Do not operate on
carpet, cushion, mat or wood floor.
It could cause fire and malfunction.
When operating your dehydrator,
use the Silicon Gloves to remove
trays. Do not handle the trays
without gloves, as the inside of the
unit and the trays are very hot.
By not following the instructions, it could cause serious injury or accidents caused
by negligence.
11
9
When cleaning the trays, do not
use abrasive cleaners. Using such
cleaners could damage the surface
and cause it to rust.
Place the product at a flat, even,
hard surface. Do not operate on
carpet, cushion, mat or wood floor.
It could cause fire and malfunction.
Load the ingredients separately
instead of stacking. Stacking
your ingredients will not allow for
efficient dehydration.
All trays could be removed
for producing yogurt or other
fermentation with a big container.
Never attempt to touch the inside of
the dehydrator or alter ingredients
while it is in operation. It could
cause burn, electrical shock or other
serious injuries.
HOT
By not following the instructions, it could cause serious injury or accidents caused
by negligence.
12
10

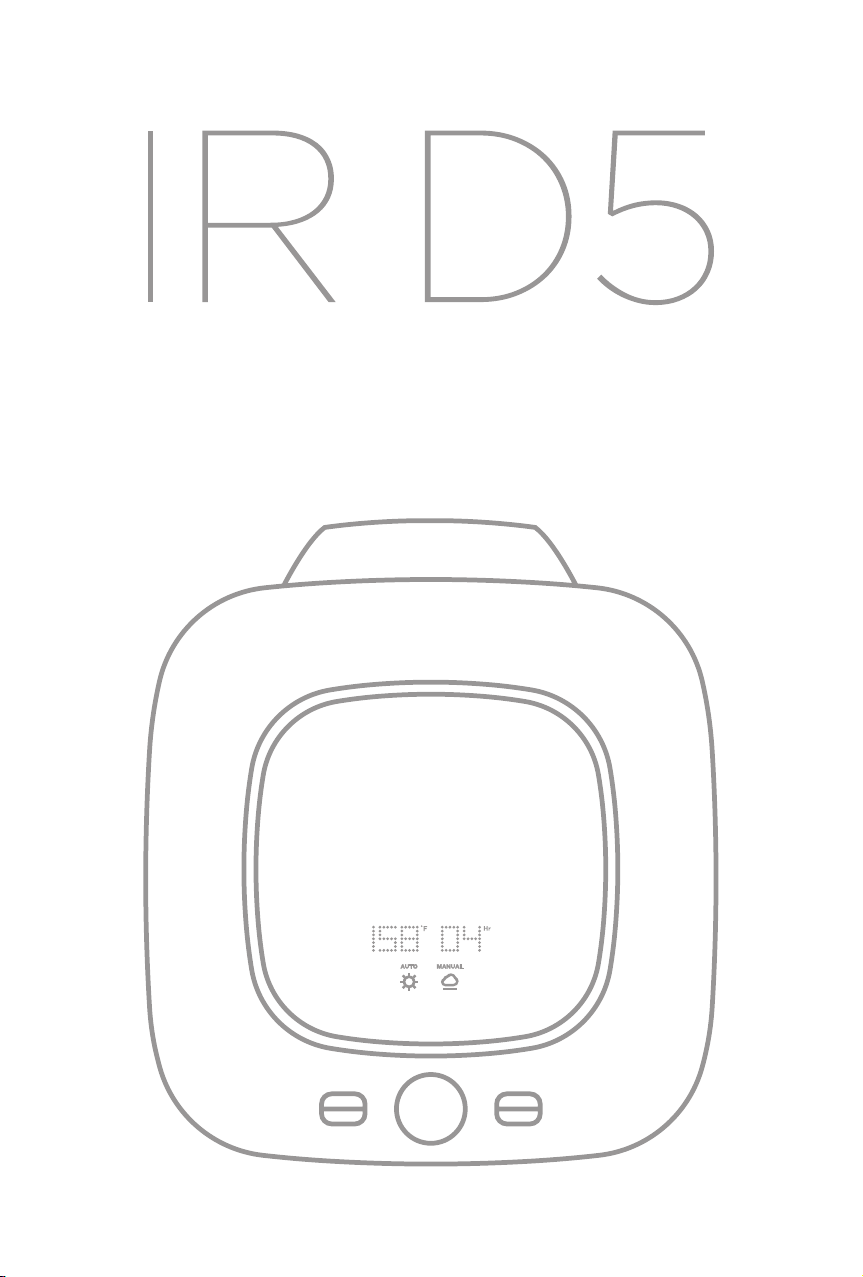
FEATURES of
IR D5
Body
Air Filter
This product is for household appliance, handle with care.
For household use only
Door
Door handle
Model Body Color Tray material Trays Air Filter ETC.
IR D5 Black & White Stainless Steel 5 pcs 1 set
Crumb tray 1 pc
1 set of silicon
gloves (2pcs)
13
11

Air inlet
Filter case
Foot
FEATURES
Stainless Steel Tray (STS Tray)
Tray made with stainless steel to
load ingredients.
Crumb Tray
This tray catches crumbs or small
pieces that may fall to the bottom
while loading or removing trays.
1
2
Power switch
Power plug
All additional accessories are optional.
14
12

Solar/Shade
display lamp
Temperature display
Auto mode
display lamp
Auto/ Manual
switch
Solar/Shade switch
Temperature/ Time
switch
Solar/Shade display lamp
Start/Stop(Press button) &
Temperature and time control knob
Time display
Manual mode
display lamp
Solar/Shade display lamp
ON/OFF switch
Silicon Gloves
These included gloves are for
removing hot trays from your
dehydrator. They are protective,
but thin enough to be flexible.
Always wear protective gloves when
handling trays or any surfaces that
may be hot.
Air Filter
Prevents air pollutants, dirt small
debris from flowing into your
dehydrator.
3
4
Please follow the Operation Method before using the appliance.
15
13
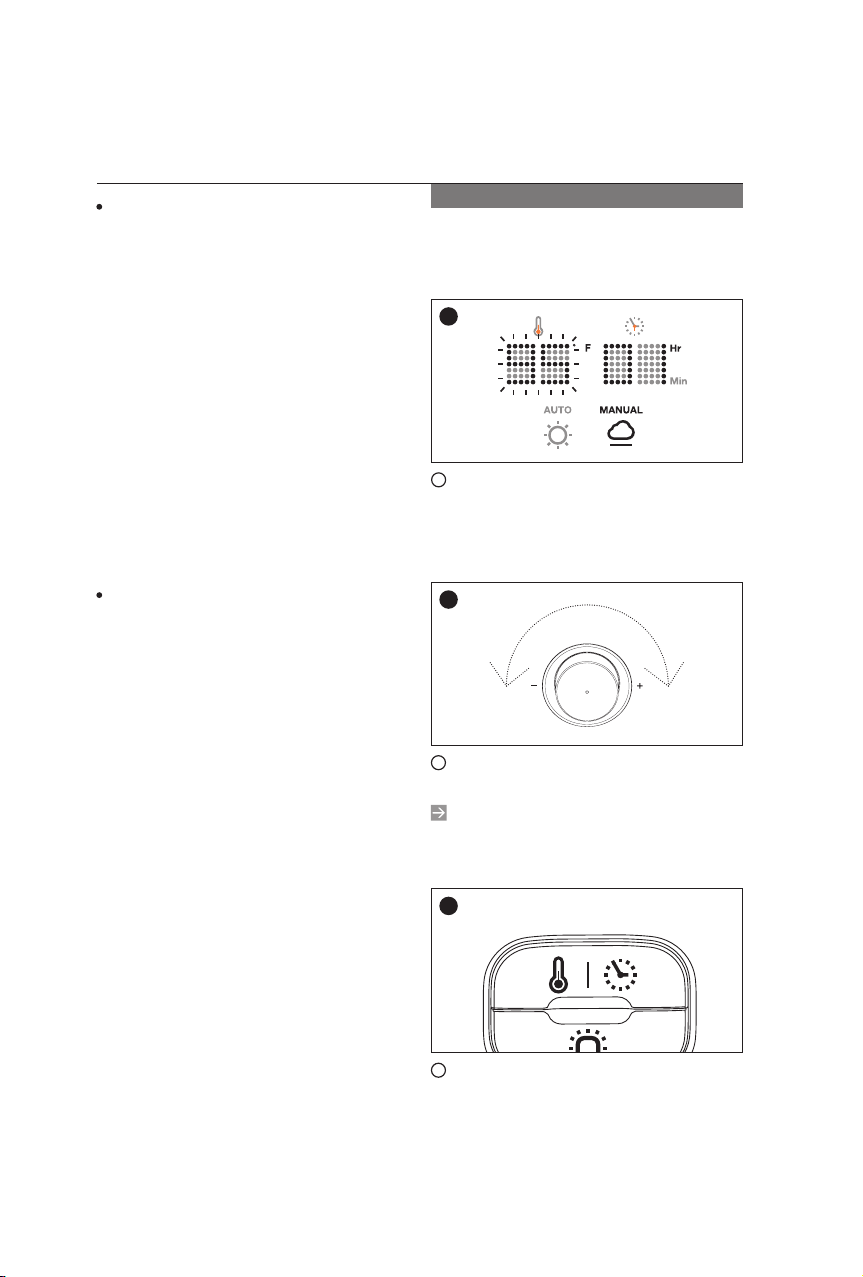
OPERATING METHOD
The IR D5 functions in two
primary methods of control :
Auto or Manual mode.
- Manual mode allows you to
control time and temperature
(example : 13 hrs. at 110℉).
- Auto mode helps take some
of the guess work out of
dehydrating by utilizing
moisture detection sensors to
regulate time and temperature
to efficiently dehydrate your
food and stop when the optimal
level of dehydration has been
reached.
Operation
- Turn on the appliance by pushing
the on/off switch, located in the
back of the unit, into the ‘ON’
position.
- The green lamp will be
illuminated, temperature & time
display will blink, and the center
lamp of the control knob and the
dry mode icon will be illuminated
as well.
- When the door is opened while
operation, ‘OPEN’ will appear
on the LED display and stop
operating.
User can set the time and
temperature desired through the
following steps.
1 Turn on the appliance using the
switch in the rear. Temperature
display will blink and be ready to
set the temperature.
2 Temperature & time is adjusted
by turning the control knob.
The minimum and maximum
temperature range is 35Ë to 70Ë
(86~158ĕ).
3 Temperature & time switch is
used to select the mode from one
another. (Temperature & time is
changed every time the switch is
pressed)
1
2
3
Manual Mode
16
14

PUSH
The appliance will operate
automatically until it reaches a
certain humidity.
1 If you press AUTO/MANUAL
switch, the display will show ‘AUTO’
and blinks.
2 Without any other settings, push
the control knob and it will operate
automatically.
In the temperature display will
show ( - - ) and the time display
shows how much humidity is
remaining. The temperature will
rise and fall automatically when
using automatic mode.
Automatic Mode
1
2
The minimum and maximum time
range is 1 to 99 hours.
The timer can be manually disabled
to allow for continuous dehydration.
To enable continuous dehydration,
turn the dial clockwise from 99 house
and the display will show ( - - ). The
unit will stay on until you physically
turn it off.
4 Once time and temperature has
been selected, simply push the
control knob to start dehydration.
PUSH
5 After the set time runs out, ‘END’
sign will appear and blink along
with a buzzer. The dehydrator will
continue to run until cools down to
86℉(35℃).
6 To power the unit off, once the
dehydration is complete, just push
the control knob.
5
4
17
15
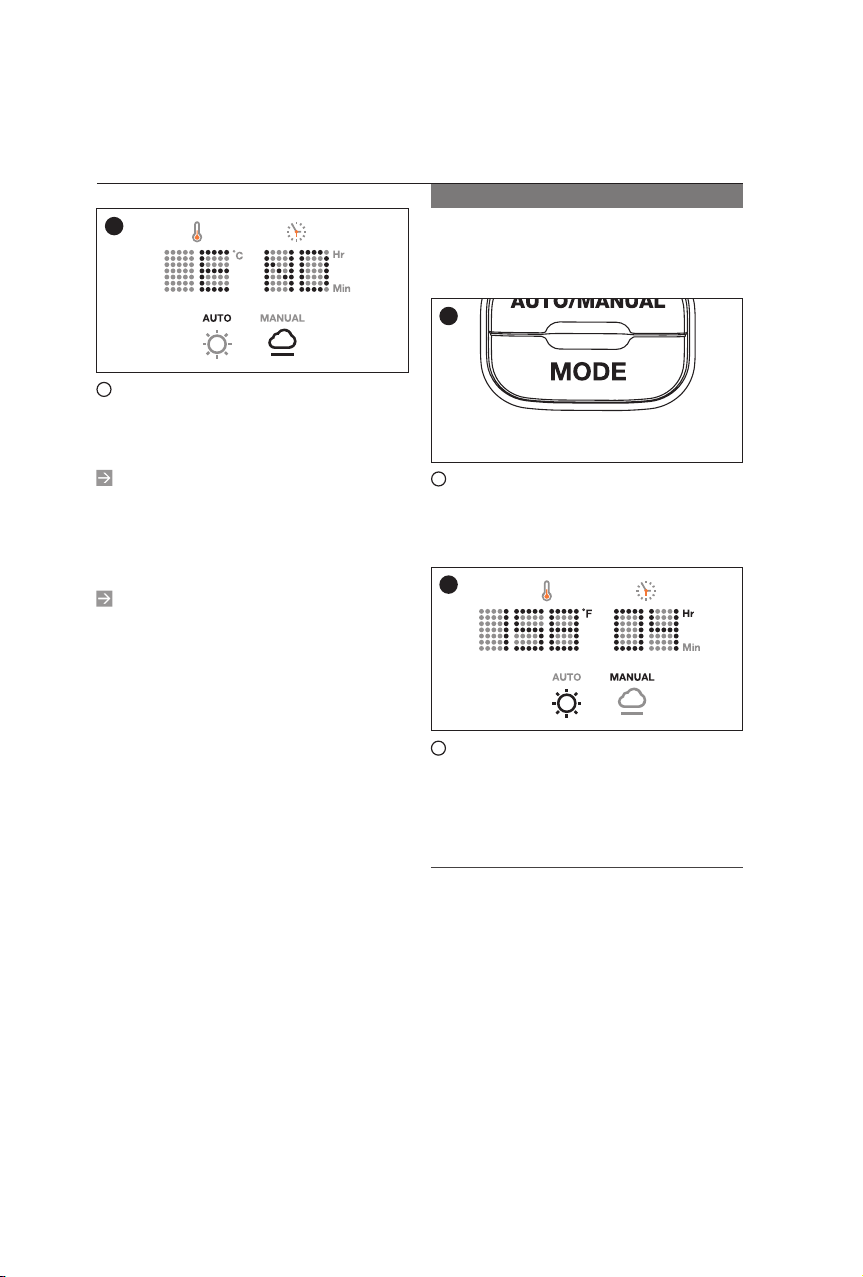
‘Solar mode’ dehydrates your food
as if it was dried from sun light.
1 Press ‘MODE’ and the lamp will
show a yellow light and the sun
image will illuminate.
2 While the dehydrator is operating,
the mode can be changed by simply
pressing the MODE button.
Tips for IR D5
It has a front door with stainless
steel drawer trays. Therefore, all the
trays could be taken out and use all
the space for such as fermenting
dough and etc. Also by taking out
some trays, you will be able to
dehydrate ingredients with various
heights or sizes.
Solar Mode
1
2
3 After it reaches the certain
humidity, ‘END’ sign will appear and
blink along with a buzzer.
If you are not satisfied with the
dehydrated state, press AUTO/
MANUAL switch to change it to
manual mode and operate with manual
drying.
The humidity sensor recognize
the relative humidity and will stop
operating until the internal humidity
reaches under 3%.
3
18
16
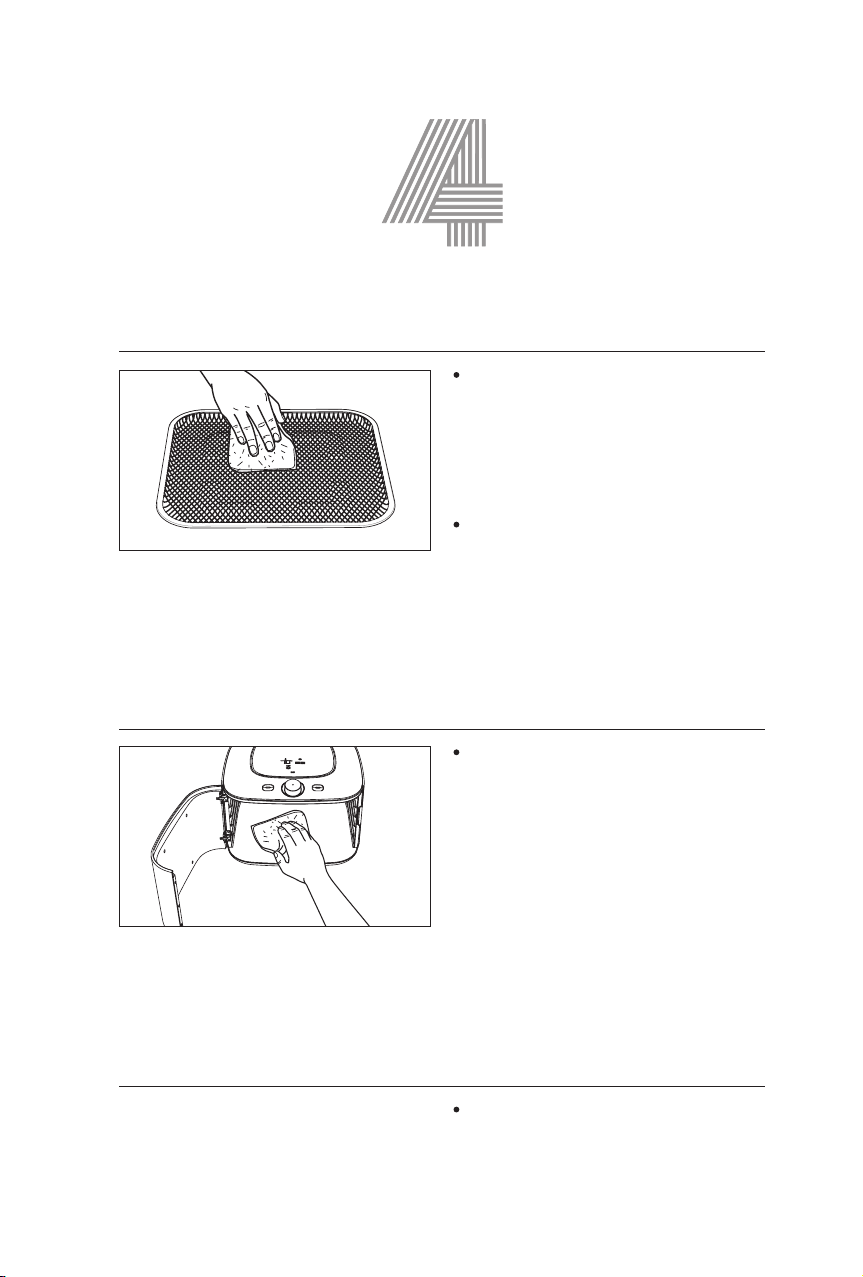
Your dehydrator trays are easy
to clean : simply soak in warm
water with a mild detergent for
several minutes. A soft-bristle
brush will loosen food particles
that resist softening by soaking.
Don’t clean any parts with
scouring pads, abrasive cleaners,
or sharp utensils, as they tend to
damage the surface. Trays/base
can be washed on the top rack of
you dishwasher if you remove them
before the drying cycle.
Use a damp soft cloth or towel
to remove any dried food residue
from the bottom of the unit. Avoid
dripping any water or other liquid
into electrical parts.
BE SURE POWER HEAD UNIT IS
UNPLUGGED BEFORE CLEANING.
Should you experience any
problems with your dehydrator,
please call Customer Service Center.
DO NOT IMMERSE POWER
UNIT IN WATER OR OTHER
LIQUIDS!
DO NOT REMOVE ANY
PARTS FROM THE POWER
HEAD UNIT!
TRAYS Including crumb tray
APPLIANCE
SERVICE
CLEANING
GUIDELINES
19
17

PREPARATION
PREPARATION
REFERENCES
Load your sliced fruit or vegetable onto the trays. All frozen products must
be defrosted before dehydration.
Containers
Use the yogurt cup for yogurt, puree and all other fermentable items.
Dehydration Time
Please refer to ‘Dehydrating Guidelines’.
There may be a difference in required dehydration time due to the
thickness, sugar, moisture, environment, etc. On average, you can assume
that Vegetables takes 4~6 hours, fruits take 10~14 hours, fish and meats
take approximately 4 hours at 70℃(158℉).
There is a air inlet in the rear of the appliance. Cold air may come out but it
is not a malfunction. There are two air outlets on the side of the appliance.
Air Filter
The filter placed at the back prevents foreign substances from flowing
into the appliance. Depending on the user environment, the filter needs
to be replaced periodically as it could block the air and decrease the
performance.(We recommend replacement when the appliance is used
10hours every day for 3months)
Water drops inside the appliance is natural as it evaporates the moisture
from the ingredient.
CAUSE 1 Too much content in the appliance.
CAUSE 2 Too much moisture content in the ingredient.
It is not a malfunction if there is water droplets inside the appliance.
It could be reduced if the dehydration time is increased and a more
moderate amount of ingredients are dehydrated. Please wipe off the water
drops with a soft cloth after use.
20
18

DEHYDRATING
GUIDELINES
Many variables can contribute to a large difference in drying time.
21
19

FRUIT
Dry fruit at 55~60˚C (130~140˚F). Use average times only as general guideline.
FRUIT PREPARATION AVG. DRY
TIME(HRS) TEST FOR DRYNESS
Apples Peel if desired. Core. Cut slices, rings or
chop into pieces 5-7 Leathery, no
moisture when cut
Apricots Do not peel. Halve and pit. Turn inside
out or cut slices 10-12 Leathery, pliable
Bananas Peel. Cut into slices 1/8”– 1/4” 8-10 Leathery, slightly sticky in
the center, brittle
Firm Skin
Berries
(Blueberries, cranberries, etc) Sort.
Poke skin or place in boiling water for
1-2min. Blot dry
13-15 Hard
Uneven Drying Leave whole 13-15 Hard
Cantaloupe Cut in half. Remove seeds and peel. Cut
slices. Blot dry on paper towel 15-17 Leathery, suede-like
Cherries
Wash, pit and remove stems. Poke skin
or place in boiling water for 1-2min.
Blot dry.
22-24
Citrus Fruit Peel, if desired. Cut into slices 8-10 Hard
Coconut Remove outer skin. Slice 13-14
Cranberries Wash. Remove stems. Place in boiling
water for 1-2min. Blot dry 17-19
Grapes
Cut in half. Remove seeds. Place cut
side up. Seedless green are better
than red or black. Poke skin or place in
boiling water 1-2min. Blot dry
22-24 Raisin-like texture
Kiwi Peel. Cut into slices. Slice 1/4”–3/8”
thick. 14-16
Mangos Remove skin and slice 14-16
Melons
Remove skin and seeds. Use deepest
tray for water melon. Cut in slices as
thick as expander tray size will allow
13-15
Peaches
Peel, if desired. For easy peeling, dip in
boiling water until skin cracks.
Cut in half. Pit. Cut in slices
10-12 Leathery, may be slightly
sticky in center
Pears Wash. Peel if desired. Core.
Cut in slices or rings 10-12 Leathery, no moisture
when cut
Pineapple
Remove crown, skin&eyes.
Cut in half. Cut in slices, leaving core in
or remove, dice or chop and use Net
8-10
Pliable, still slightly
sticky. No visible signs of
moisture
Plums Do not peel. Cut in half. Pit.
Turn inside out or cut in slices 10-12 Leathery, pliable
Rhubarb Trim. Wash. Slice diagonally into
3/4”pieces. Steam 3-4min. Use Net. 8-10 Brittle
Strawberries Wash. Cut in half. Place cut side up 8-10 Hard, brittle
22
20
Table of contents
Other ci Kitchen Appliance manuals


