CIAM 6040 Series User guide

Refrigerated Pastry
Showcase
6040 SERIES
Maintenance
And Use Manual
CIAMspa
06081 Petrignano d'Assisi
PG – Italy
tel. 075 80161
Fax 075 8016215
http //www.ciamgroup.it
e-mail [email protected]

1. INTRODUCTION
PRESENTATION
Dear Client,
Ciam S.p.A. is pleased to number you among its customers and relies the bought machine will match your expectation. In order to get the best
performances of the machine, we recommend you to follow all suggestions and instructions, which are included in this manual.
1.2. HOW TO USE THE MACHINE
PERMITTED USES
This refrigerated display cabinet has been manufactured for pastry products presentation and sell.
NOT PERMITTED USES
It is absolutely forbidden the use of the refrigerated display cabinet for pharmac utical products.
1.3. RESPECTED NORMS
The refrigerated display cabinet has been manufactured in respect of the safety issues relevant to the following norm
Dir ctiv N° 2006/95/CE Low tension
Dir ctiv N° 2004/108/CE Electro-magnetic Compatibility
Dir ctiv N° 97/23/EC (P.E.D.) European Pressure Equipment
Norm CEI 17-13/1 (EN 60439/1) Realization of Electric Installations
Norm CEI EN 60335-1 (CEI 61-150) Safety of household and similar electrical appliances
Norm CEI EN 60335-2-24 (CEI 61-56) Special norms for refrigerators, freezers and ice machines
1.4. RESPONSIBILITY
Ciam declines any responsibility relevant to damages on persons, animals and/or products in case of
•No respect of in force norms
•Installation, which is not conform to the instructions manual
•No observance of all maintenance operations, which are suggested in this manual
•No previously agreed change operations with the manufacturer
•
No proper use of the refrigerated display cabinet, for which the machine has been produced.
1.5. WARNING
Anytime Ciam reserves the right to up-date the content of this manual and/or to modify the product in order to improve its quality and performance,
without any previous notice and/or communication.
2. DISPLAY CASE DATA PLATE
2.1. DATA PLATE CONTENT
1. Commercial name of the unit
2. Identification number
3. Production date
4. Voltage
5. Phases
6. Frequency
7. Compressor type
8. Number of compressor
9. Refrigerant type
10. Refrigerant weight
11. Climatic rate (Cl.3 = +25°C/60% U.R.; Cl. 4 = +30°C/55% U.R.)
12. Test pressure – system high pressure side
13. Test pressure – system low pressure side
14. Nominal power/current absorbed during defrost
15. Max. power absorbed during defrost
16. Nominal power absorbed by heating elements (only if higher than 100W)
17. Lighting nominal power

3. INSTALLATION
3.1. MACHINE HANDLING
The chocolate display cabinet handling, from the truck to the final place, has to be made
by any truck-lift, which is proper to its weight. The display cabinet shall be always
balanced in order to ensure personnel integrity and machine functionality
The cabinet can be shipped with or without wood packaging, in case wood crate will be
used, will have a pallet base for an easy fork-lift handling. The pallet, however should be
handle in the central position
During the shipment, it is necessary to avoid any crash or/and shake of the display
cabinet in order to not damage its frame, especially its glasses.
Do not drag the display cabinet on the floor and do not push it on the upper glasses
.
3.2. STOCK OF THE DISPLAY CABINET
Whenever the cabinet has to be stoked, follow carefully what suggested before.
Environmental temperature during the cabinet stock can have following range - 5°C and + 55°C and humidity between 30% and 90%.
The display cabinet has always to be protected by sunrays and raining.
In case the display cabinet has to remain in stock quite long time before its use, keep it with its packaging in order to maintain its protection.
3.3. PACKAGING REMOVE
Before getting the display cabinet from the forwarding agent, check its conditions. In case it will be some damages, inform the driver and sign it on
shipping documents. Eventua damages re evant to the shipment and/or to the wrong stock, have not to be ascribed to the manufacturer.
3.4. DISPLAY CABINET POSITION
The refrigerated display cabinet needs particular environmental conditions in order to offer the right performance, so that the area where it will be
used has to respect following indications
Floor has to be le
velled perfectly, on the contrary keep the display cabinet on the horizontal position in order to guarantee a perfect defrost
ing
water drain and avoid boring compressor noises.
The display cabinet has to not be under the sun
-
rays in order to have its be
tter refrigeration performance, has to remain inside the local or to
be sheltered by window curtain. If what described above is not observed, it can determinate an increase of temperature of displayed product
and an increasing power consume.
The display
cabinet has not to be under air currents due to open doors or windows, or under roof ventilators or under air condition outle
ts.
In case will be not respected the above suggestions it can arise an increasing of temperature of the displayed product and/or an increasing ice
phenomena on the evaporator and internal fans, which compromise the correct cold air circulation and product consistence.
The display cabinet has not to be placed close any heat source as heaters, ovens, etc.
The display cabinet has t
o have a sufficient place in order to ensure a correct custom service, to make an easy maintenance operation, to
guarantee the right air flow necessary to make cold the condenser. Besides the warm air which flows out has to no have any obstacle or to
invest other equipments in order to not reduce the correct functions.

3.5. REMOTE CONDENSING UNIT PLACING
According to the model of ice cream display cabinet you have No. or No.2 internal, or remote, condensing units.
The remote condensing unit has to be checked by specialised technicians and according to the required refrigerating power and their position
respect the cabinet.
The condensing unit has to be placed following these points:
The condensing unit has to be located at least 250 mm f
rom any eventual wall.
(pic.
3
.5)
Air flow direction has to be from the eventual wall towards compressor.
The local, in case will be closed, has to be with enough air circulation.
By the condenser has to be guaranteed in any case as much as possible cold air.
In case will be necessary it has to be foreseen a forced air exchange by any fan according
to the air flow of condenser.
The condensing units of display cabinets have to be fixed properly.
The generated noise has not exceed the admitted noise levels relevant to the public
places, especially in case of domestic buildings.
It is always necessary a sufficient place along the four sides of the display cabinet in order
to make easy any type of check and maintenance operations.
When the condensing units are external will be necessary a frame holder that has to be
fixed in a proper way and eventually added with amortising elements. Besides this frame
has to be closet with no-water protection grid and sufficient opening holes for ventilation.
3.6. ELECTRICAL CONNECTION
Before proceeding with electrical connection, be sure that the available electric power and tension are what is required on technical label of the
cabinet.
The electric connection has to be made by qualified personnel and following manufacturer’s instructions taking into
consideration the relevant norms in force.
The display cabinet has already a general switch, however it is necessary an omni
polar switch, with a minimum distance among the contacts of 3mm.
It is obligatory that the display cabinet will be connected properly with an efficient
ground socket.
WARNING!
A wrong connection may occur always to persons, animals and things,
where the manufacturer cannot be considered as responsible.
WARNING!
The disp ay cabinet has no main switch breaking both the phases.
Before any maintenance operation disconnect the e ectrica supp y of the
disp ay cabinet (see abe on the rear of the disp ay cabinet).
pic
.
3.6
pic
3.5

4.
ROUTINE MAINTENANCE AND PERIODIC CHECKS
These kinds of operations are at client s expenses.
In case some malfunctioning of the unit are observed, please make sure this is not due to non-maintenance reasons, before you apply to qualified
assistance.
The accurate and periodic cleaning of the unit will reduce the risk of damages to the unit itself and to the products stored within.
See following tab for reference.
ATTENTION !
Before starting any maintenance and cleaning operation make sure you operate on the
main switch in order to deactivate tension (pic. 4)
(pic.4)
MAINTENANCE OPERATIONS AND THIR FREQUENCY. A SUMMARY TAB.
OPERATION DESCRIPTION FREQUENCY
Surfaces cleaning •Wash exclusively with warm water and neutral soup; rinse abundantly and wipe off with a soft
cloth.
•Do not use abrasive products
weekly
Plastic surfaces cleaning •Wash exclusively with warm water and neutral soup; rinse abundantly and wipe off with a soft
cloth.
•Do not use alcohol, acetone and any solvent that might spoil the look and structure of the
material.
weekly
Glass surfaces cleaning •Use only specific products for glass cleaning
•Using water alone might lead to calcareous deposits on the glass surfaces
daily
Wooden surfaces cleaning •Use exclusively a wet cloth. weekly
Additional defrost
•Under particular conditions of temperature and humidity, the frost that normally forms on the
evaporator and fans might increase in volume, so leading to a faulty functioning the unit.
•If these conditions should last, the assistance of a qualified technician shall be needed. Waiting
for this service, it is suggested to operate one or more defrost cycles (despite the damages this
might cause to the stored product)
Waiting for
qualified
assistance
Periodic defrost
•In order to obtain the best performance from the cooling system, we suggest to operate an
extended defrost cycle.
•Before you do that, please remove displayed products from inside the cabinet; always operate
an additional defrost cycle in order to remove from the evaporator the largest possible amount
of frost or ice. Turn the main switch off for 5 hours (min.)
•Before re-starting the unit, make sure that frost has totally melted and wipe carefully.
max. 15 DAYS
ATTENTION! DO NOT CLEA
N THE UNIT WITH WATER JETS
5. EXTRAORDINARY MAINTENANCE
This type of operation has to be made by qualified technician only.
ATTENTION!
Before operating any maintenance, make sure the tension is deactivated. (pic.11).
Lamps replacement: qualified technician needed.
Air condenser cleaning: qualified technician needed. When the fan is switched off you can clean the condenser
with a compressed air jet. Never use metallic brushes. Use protection gloves (pic.5).
(Pic. 5.)

Leg.Man.Uso Man.ENG-CIAM-12/2010-R01
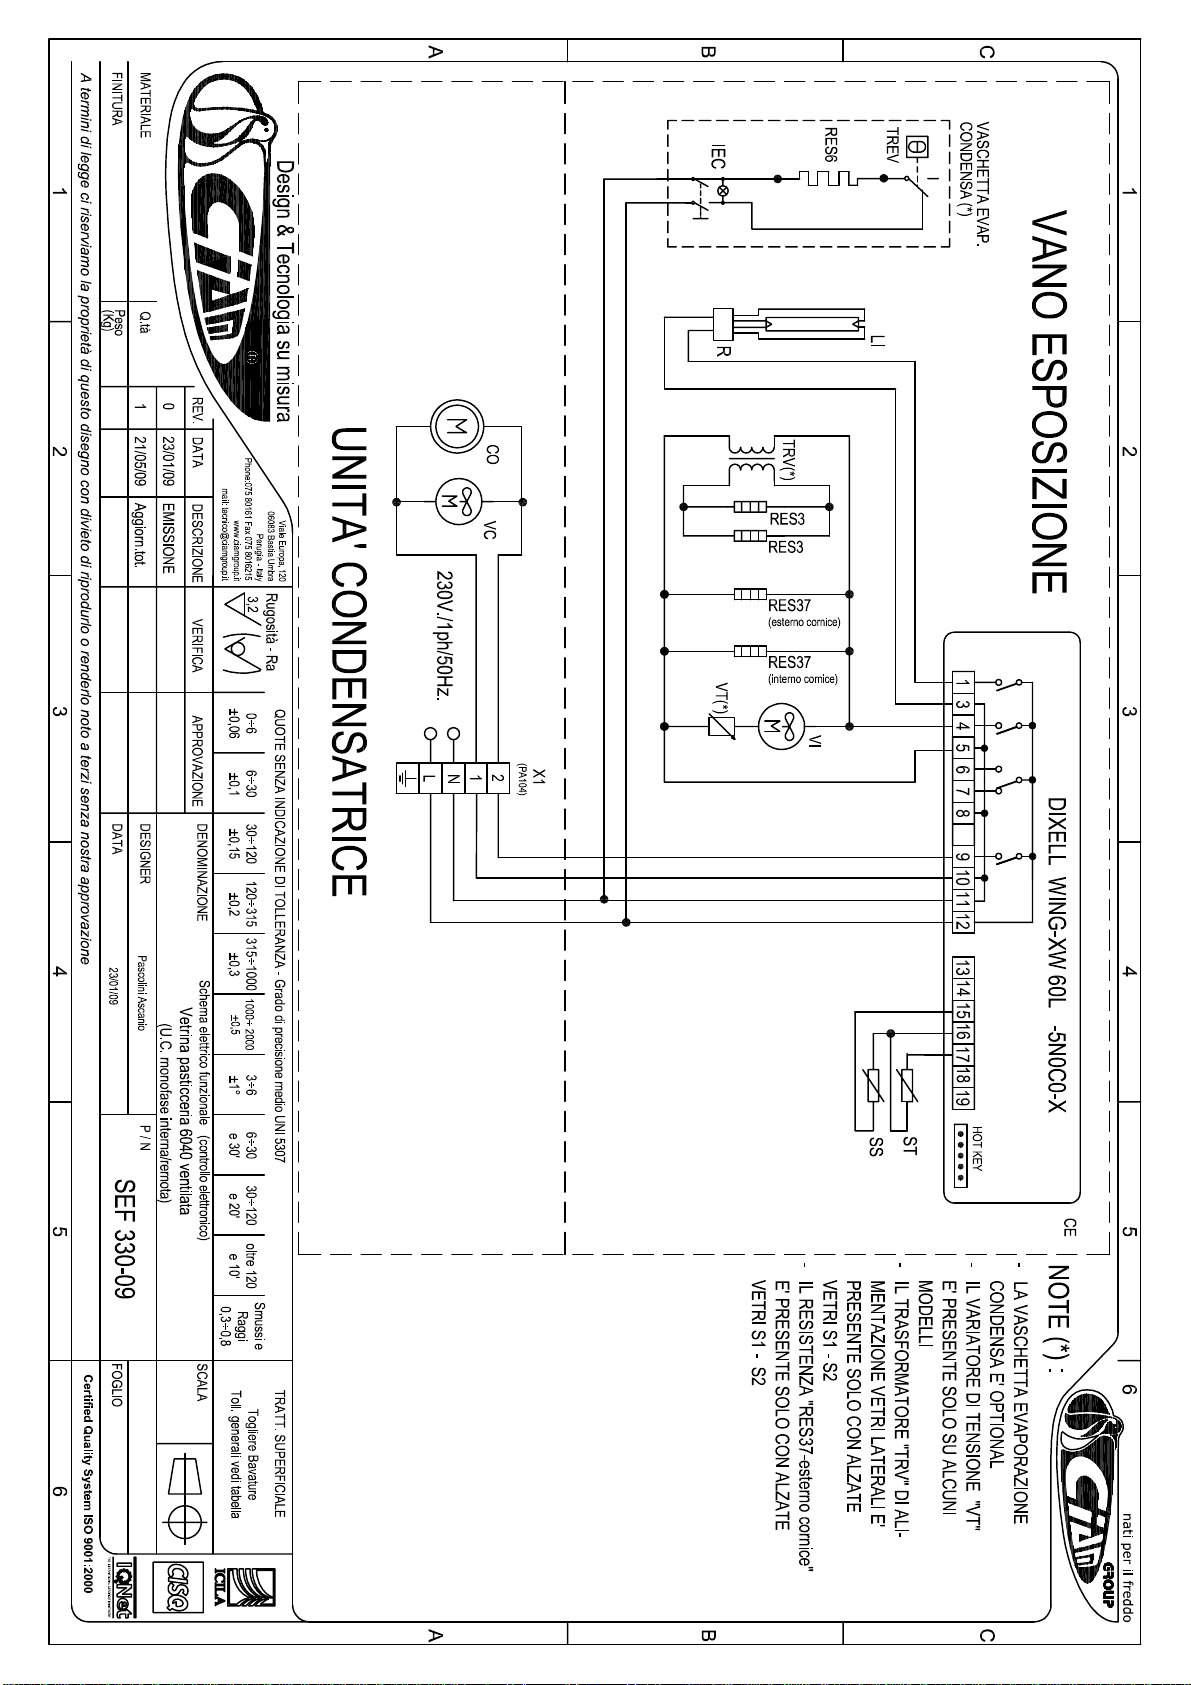
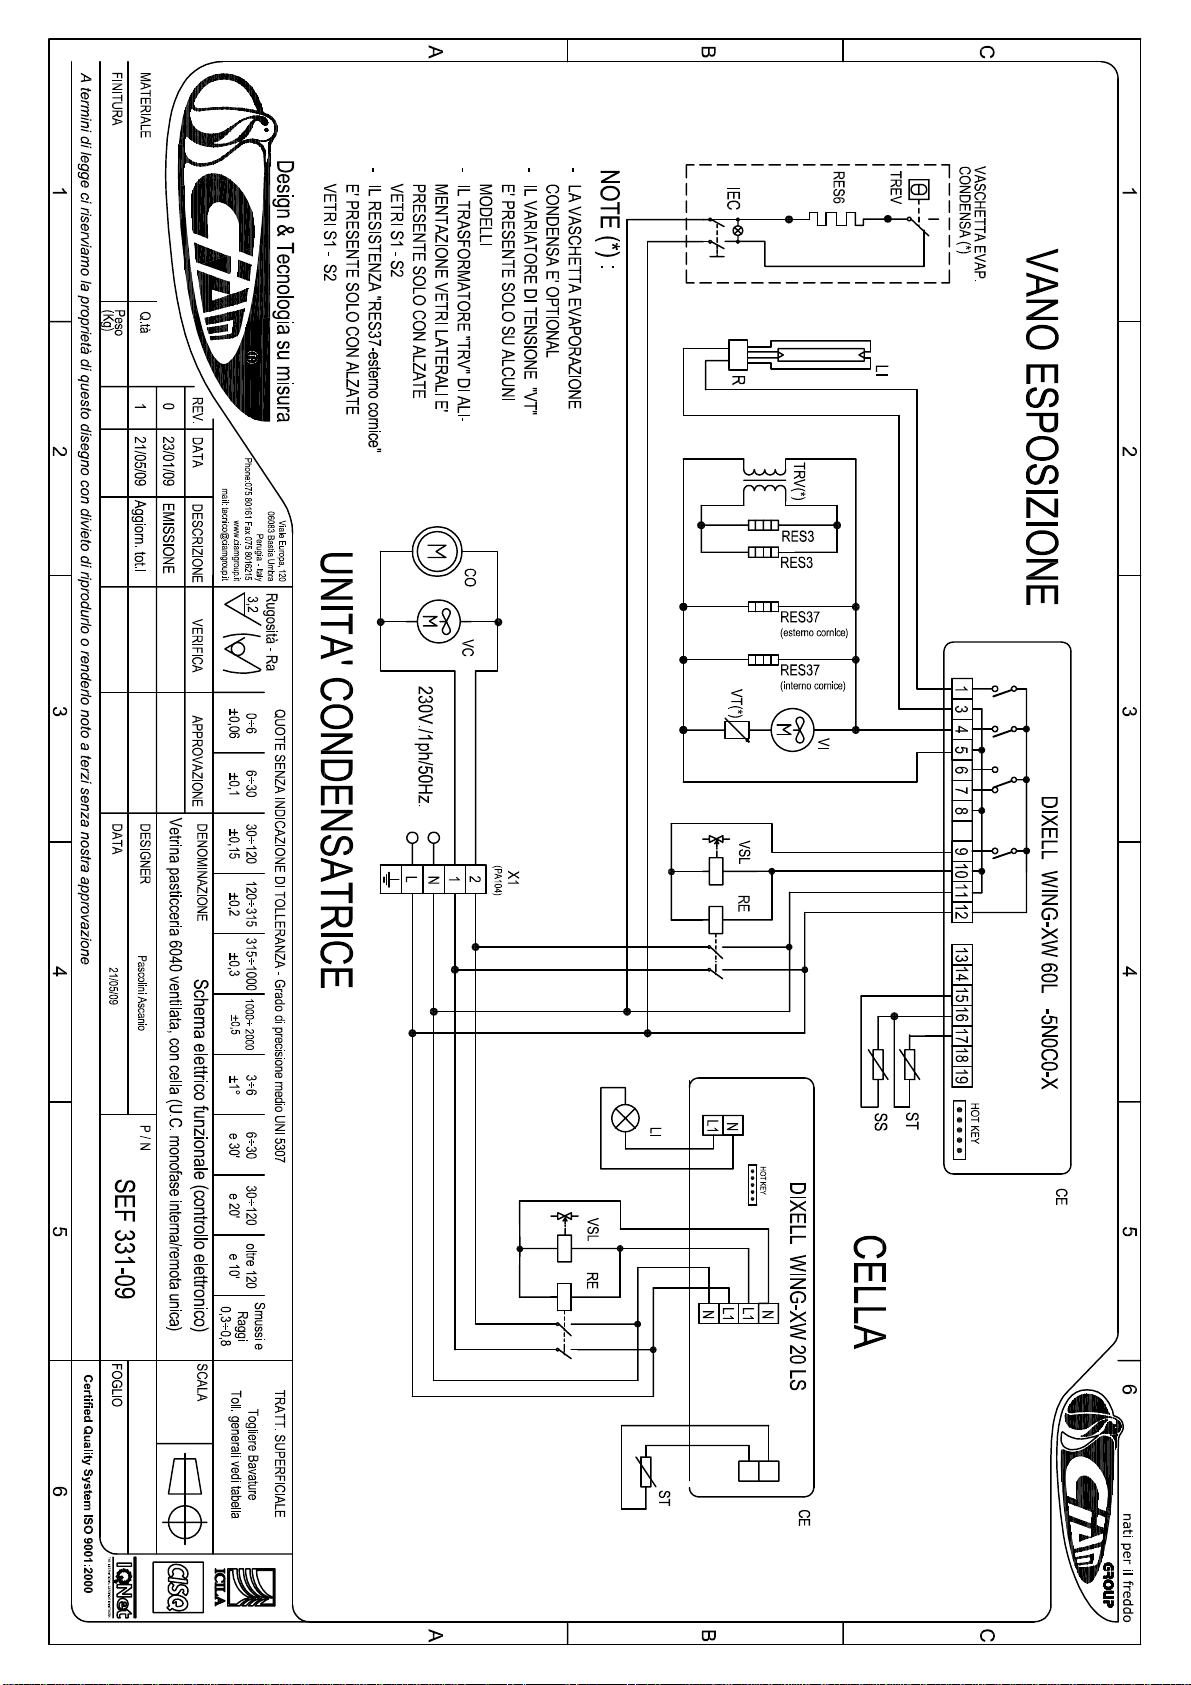
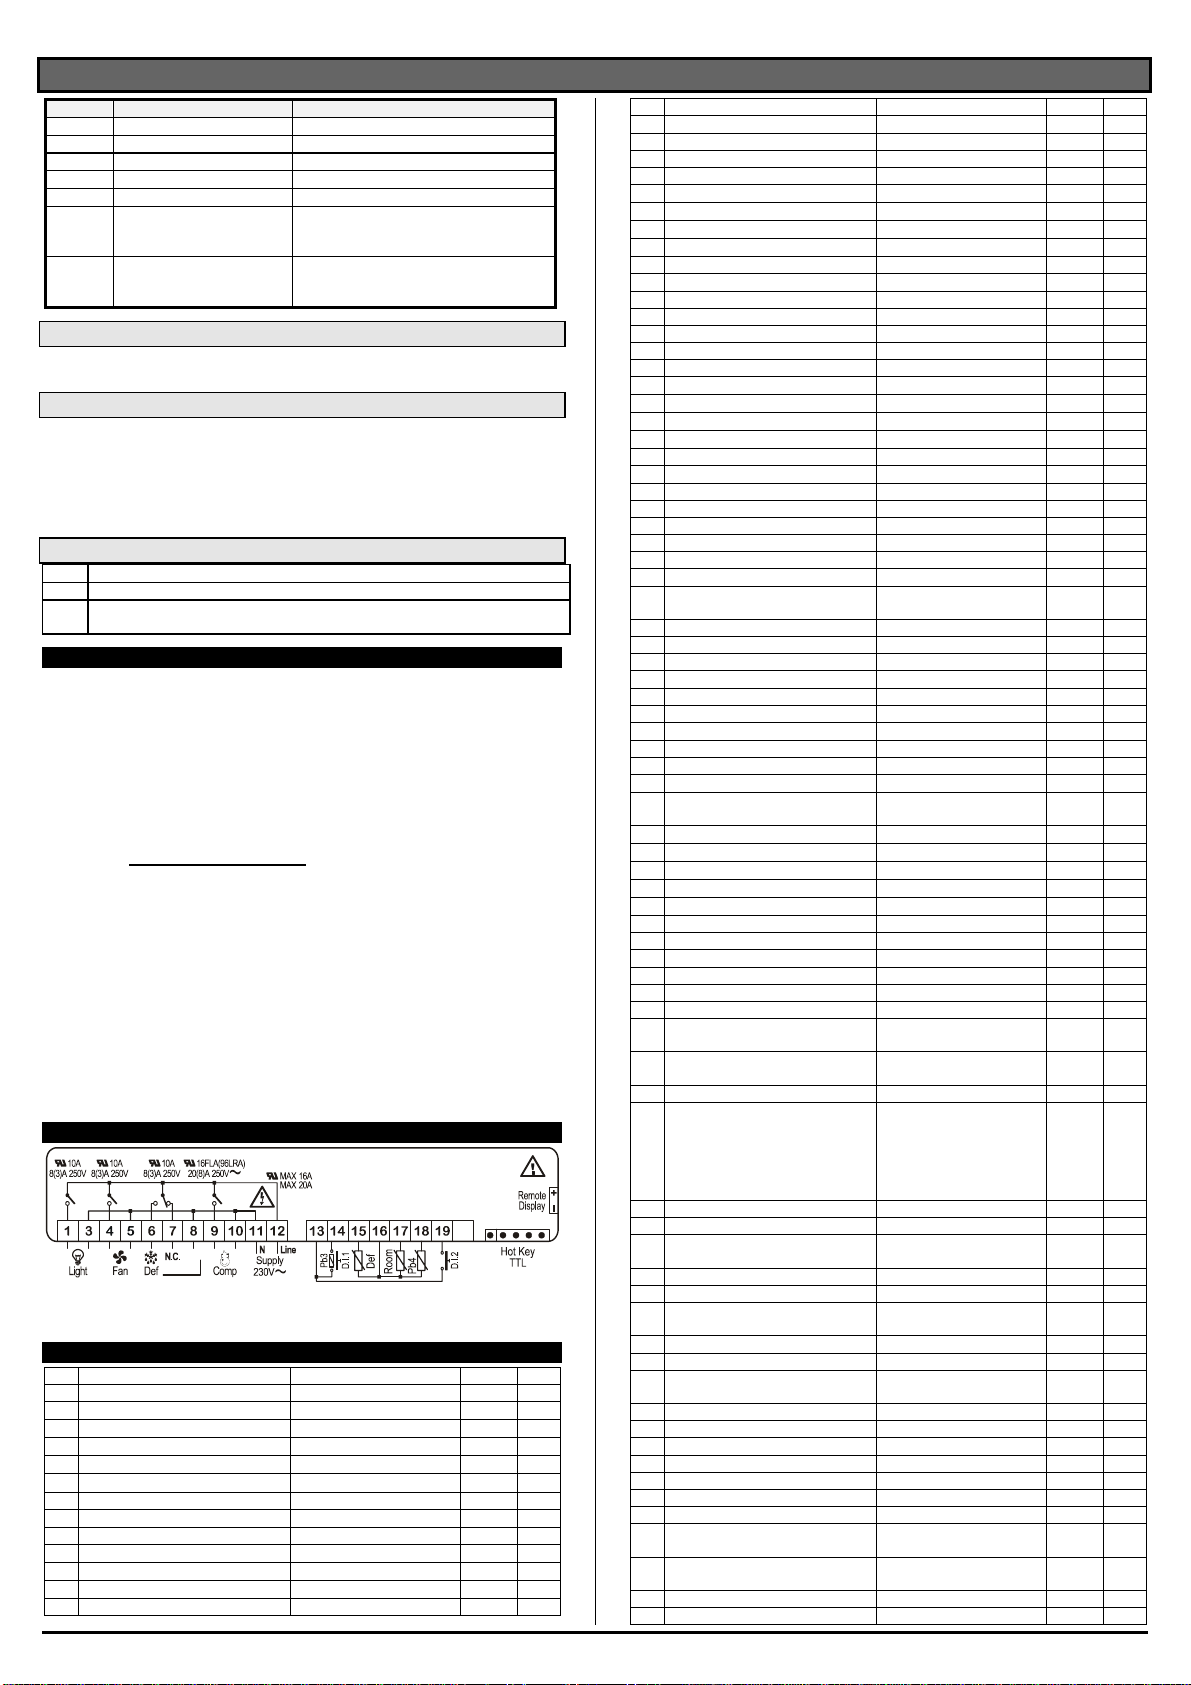
REFRIGERATION AND ELECTRICAL SYSTEM CABLE CONNECTION GUIDE
AGD
AEL
AP
CA
CAR
CE
CN
CO
D
DEV
DR
EM
EV
F
FD
FLU
FR
HL
I
IEC
IGD
II
IL
IMC
INV
IR
IRP
IV
KM
LF
LI
LIA
LIG
LIP
MDIG
MM
MUC
PA
PD
PO
QE
QF
R
RADD
RE
REL
REP
RES1
RES2
RES3
RES4
RES5
RES6
RES7
RES8
RES9
RES10
RES11
RES12
RES13
RES14
RES15
RES16
RES17
RES18
RES19
RES20
RES21
RES22
RES23
RES24
RES25
RES26
RES27
DIGITAL FLAVOURS DISPLAY FEEDER
ELECTRONIC BALLAST
SERVICE VALVE
SUPPLY CABLE
AIR CONDENSER
ELECTRONIC CONTROL
MULTIPOLAR CONNECTOR
COMPRESSOR
DIOD
SHUNT
REMOTE DISPLAY
PHOTOCELL EMITTER
EVAPORATOR
FUSE
FILTER DRIER
WATER FLOW SWITCH
COMPRESSOR THERMAL PROTECTION
COMPRESSOR ALARM LIGHT
GENERIC SWITCH
WATER EVAPORATION BIN SWITCH
DIGITAL FLAVOURS DISPLAY
LIGHTING SWITCH
SIGHT GLASS
WARM SHELF SWITCH
INVERTER
REFRIGERATION SWITCH
LIGHT REFRIGERATION SWITCH
INTERNAL FAN SWITCH
CONTACTOR
FRONT LIGHTING
INTERNAL UPPER LIGHTING
FRONT LIGHTING
FLAVOURS DISPLAY LIGHTING
REAR LIGHTING
DIGITAL MODULE FOR FLAVOURS DISPLAY
SPINNING SHELVES ELECTRIC MOTOR
CONDENSING UNIT ELECTRIC CONNECTIONS
HIGH PRESSURE CONTROL
HIGH-LOW PRESSURE CONTROL
WATER PUMP
EXTERNAL ELECTRIC PANEL
MAGNETIC-THERMIC SWITCH
LIGHTING BALLAST
RECTIFIER
GENERIC RELAY
ELECTRONIC BALLAST
ELECTRONIC CONTROL TEMPERATURE REPEATER
COLD AIR DISCHERGE HEATING ELEMENT
FRONT PROFILE HEATING ELEMENT
RIGHT/LEFT GLASS HEATING ELEMENT
FRONT GLASS HEATING ELEMENT
DEFROST HEATING ELEMENT
WATER EVAPORATION HATING ELEMENT
TOP LIGHTING FIXTURE HEATING ELEMENT
LATERAL GLASS SUPPORT HEATING ELEMENT
FRONT BAND HEATING ELEMENT
COUPLING BAND HEATING ELEMENT
SERVICE TOP HEATING ELEMENT
UPPER BAND/DOOR FRAME HEATING ELEMENT
HOT DRY/BAIN MARIE DISPLAY HEATING ELEMENT
ANTI-FOG SUCTION AIR BAND HEATING ELEMENT
WARM SHELF HEATING ELEMENT
SIDE BANDS/ FRONT GLASS HINGE HEATING ELEMENT
DEHUMIDIFICATION HEATING ELEMENT
DEFROSTING WATER DRAIN HEATING ELEMENT
RING FRAME HEATING ELEMENT
SIDE BAND HEATING ELEMENT
SUCTION AIR GLASS HEATING ELEMENT
OUTLET AIR HEATING ELEMENT
REAR GLASS HEATING ELEMENT
INTERNAL GLASS HEATING ELEMENT
FRONT GLASS UPPER FRAME HEATING ELEMENT
FRONT GLASS LATERAL/LOWER FRAME HEATING
ELEMENT
FRONT GLASS LATERAL FRAME HEATING ELEMENT
RES28
RES29
RES30
RES31
RES32
RES33
RES34
RES35
RES36
REV
REVC
RI
RIC
RICV
RIS
RL
RLA
RO
SAA
SC
SD
SDC
SE
SEC
SFV
SIDG
SL
SLA
SPC
SPMC
SPR
SPS
SS
ST
STR
SU
T
TI
TC
TE
TER
TF
TMC
TP
TRA
TRC
TREV
TS
TVC
V
VC
VEC
VES
VI
VPA
VR
VRA
VRE
VS
VSA
VSAB
VSIC
VSL
VSS
VT
VV
X1
X2
X3
FRONT GLASS LOWER FRAME HEATING ELEMENT
FRONT GLASSES COUPLING PROFILE HEATING ELEMENT
DOORS FRAME MIDDLE POST HEATING ELEMENT
GLASSES PERIMETRAL FRAME HEATING ELEMENT
HEATED DOORS HEATING ELEMENTS
WATER DRAIN HEATING ELEMENT
DOORS FRAME HEATING ELEMENT
COMPRESSOR CRANKCASE HEATING ELEMENT
FRONT GLASS FRAME HEATING ELEMENT
CONDENSER FAN SPEED CONTROL
CONDENSER FAN RELAY
REFRIGERANT TAP
COMPRESSOR DELAYER
PHOTOCELL RECEIVER
RESERVE , ANTI-FOG HEATER ELEMENT
LIQUID RECEIVER
WATER LEVEL ELECTRONIC CONTROL
OIL HEATER ELEMENT
ABSENCE OF WATER LIGHT
CONDENSER PROBE
TERMINAL BOX
COMPRESSOR TERMINAL BOX
PROXIMITY SENSOR
MAIN SWITCH
TANK BOTTOM HEATING COIL
FLAVOURS DISPLAY DIGITAL SYSTEM
LIQUID SEPARATOR
WATER LEVER PROBE
COMPRESSOR LIGHT
WARM SHELF LIGHT
ELECTRIC SUPPLY LIGHT
DEFROSTING LIGHT
DEFROSTING PROBE
TEMPERATURE PROBE
LIGHTING STARTER
HUMIDITY PROBE
TEMPERATURE CONTROL
WINTER THERMOSTAT
CAPILLARY TUBE
TIMER
THERMOMETER
FUSIBLE PLUG
WARM SHELF THERMOSTAT
LIGHTING FIXTURES REGRIGERATOR THERMOSTAT
TRANSFORMER
ELECTRONIC CONTROL TRANSFORMER
WATER EVAPORATION HEATER ELEMENT THERMOSTAT
SECURITY THERMOSTAT
CONDENSER FAN THERMOSTAT
COMPRESSOR FAN / GENERAL USE
CONDENSER FAN
WATER EVAPORATION BIN
EXPANSION VALVE
INTERNAL FAN
CONDENSING PRESSURE CONTROL WATER VALVE
CHECK VALVE
SUCTION PRESSURE REGULATION VALVE
EVAPOTATING PRESSURE REGUTATION VALVE
GENERAL USE SOLENOID VALVE
SOLENOID WATER VALVE
BY-PASS SOLENOID WATER VALVE
REVERSING CYCLE SOLENOID VALVE
LIQUID SOLENOID VALVE
DEFROSTING SOLENOID VALVE
POWER REGULATOR
GLASS FAN
CABINET CONNECTIONS
EXTERNAL ELECTRIC PANEL CONNECTIONS
CONDENSING UNIT CONNECTIONS

dIXEL
Installing and Operating Instructions 1592027050
1592027050 XW60L RTC GB r1.0 27.06.2008.doc XW60L 1/6
Digital controller for medium-low temperature
refrigeration applications
XW60L
1. GENERAL WARNING
1.1 PLEASE READ BEFORE USING THIS MANUAL
•This manual is part of the product and should be kept near the instrument for easy and quick reference.
•The instrument shall not be used for purposes different from those described hereunder. It cannot be
used as a safety device.
•Check the application limits before proceeding.
1.2 SAFETY PRECAUTIONS
•Check the supply voltage is correct before connecting the instrument.
•Do not expose to water or moisture: use the controller only within the operating limits avoiding sudden
temperature changes with high atmospheric humidity to prevent formation of condensation
•Warning: disconnect all electrical connections before any kind of maintenance.
•Fit the probe where it is not accessible by the End User. The instrument must not be opened.
•In case of failure or faulty operation send the instrument back to the distributor or to “Dixell S.p.A.” (see
address) with a detailed description of the fault.
•Consider the maximum current which can be applied to each relay (see Technical Data).
•Ensure that the wires for probes, loads and the power supply are separated and far enough from each
other, without crossing or intertwining.
•In case of applications in industrial environments, the use of mains filters (our mod. FT1) in parallel with
inductive loads could be useful.
2. GENERAL DESCRIPTION
Model XW60L, format 38x185mm, is microprocessor based controller, suitable for applications on
medium or low temperature ventilated refrigerating units. It has 4 relay outputs to control
compressor, fan, defrost, which can be either electrical or reverse cycle (hot gas) and light
(configurable). It could be provided with a Real Time Clock which allows programming of up to 6 daily
defrost cycles, divided into holidays and workdays. A “Day and Night” function with two different set
points is fitted for energy saving. It is also provided with up to four NTC or PTC probe inputs, the first
one for temperature control, the second one, to be located onto the evaporator, to control the defrost
termination temperature and to managed the fan. One of the 2 digital inputs can operate as third
temperature probe. The fourth probe is used to signal the condenser temperature alarm or to display
a temperature.
The HOT KEY output allows to connect the unit, by means of the external module XJ485-CX, to a
network line ModBUS-RTU compatible such as the dIXEL monitoring units of X-WEB family. It
allows to program the controller by means the HOT KEY programming keyboard.
The instrument is fully configurable through special parameters that can be easily programmed
through the keyboard.
3. CONTROLLING LOADS
3.1 COMPRESSOR
The regulation is performed according
to the temperature measured by the
thermostat probe with a positive
differential from the set point: if the
temperature increases and reaches set
point plus differential the compressor is
started and then turned off when the
temperature reaches the set point value
again.
Time
Temper.
Compr.
SET
ON
In case of fault in the thermostat probe the start and stop of the compressor are timed through
parameters “COn” and “COF”.
3.2 DEFROST
Two defrost modes are available through the “tdF” parameter: defrost through electrical heater (tdF
= EL) and hot gas defrost (tdF = in).
The defrost interval depends on the presence of the RTC (optional). If the RTC is present is
controlled by means of parameter “EdF”:
-with EdF=in the defrost is made every “IdF” time – standard way for controller without RTC.
-with EdF = “rtc”, the defrost is made in real time depending on the hours set in the parameters
Ld1..Ld6 on workdays and in Sd1…Sd6 in holidays;
Other parameters are used to control defrost cycles: its maximum length (MdF) and two defrost
modes: timed or controlled by the evaporator’s probe (P2P).
At the end of defrost dripping time is started, its length is set in the Fdt parameter. With Fdt =0 the
dripping time is disabled.
3.3 CONTROL OF EVAPORATOR FANS
The fan control mode is selected by means of the “FnC” parameter:
FnC = C_n: fans will switch ON and OFF with the compressor and not run during defrost;
FnC = o_n fans will run even if the compressor is off, and not run during defrost;
After defrost, there is a timed fan delay allowing for drip time, set by means of the “Fnd” parameter.
FnC = C_Y fans will switch ON and OFF with the compressor and run during defrost;
FnC = o_Y fans will run continuously also during defrost
An additional parameter “FSt” provides the setting of temperature, detected by the evaporator probe,
above which the fans are always OFF. This is used to make sure circulation of air only if his
temperature is lower than set in “FSt”.
3.3.1 Forced activation of fans
This function managed by the Fct parameter is designed to avoid short cycles of fans, that could
happen when the controller is switched on or after a defrost, when the room air warms the
evaporator. Functioning: if the difference of temperature between the evaporator and the room
probes is more than the value of the Fct parameter, the fans are switched on. With Fct=0 the function
is disabled.
3.3.2 Cyclical activation of the fans with compressor off.
When Fnc = c-n or c-Y (fans in parallel to the compressor), by means of the Fon and FoF
parameters the fans can carry out on and off cycles even if the compressor is switched off. When the
compressor is stopped the fans go on working for the Fon time. With Fon =0 the fans remain always
off, when the compressor is off.
3.4 LIGHT RELAY CONFIGURATION
The functioning of the auxiliary relay (terminals. 1-3) can be set by the oA3 parameter, according to
the kind of application. In the following paragraph the possible setting:
3.4.1 Auxiliary thermostat
I.E.. anti condensing heater) with the possibility of switching it on and off also by keyboard
Parameters involved:
- ACH Kind of regulation for the auxiliary relay: Ht: heating; cL: cooling;
- SAA Set point for auxiliary relay
- SHy Differential for auxiliary relay
-ArP Probe for auxiliary relay
- Sdd Auxiliary output off during defrost
By means of these 5 parameters the functioning of the auxiliary relay can be set.. The differential is
given by the SHy parameter.
The auxiliary relay can be switched on also by the AUX button. In this case it remains on till it’s
manually switched off.
NOTE: Set oA3 =AUS and ArP= nP (no probe for auxiliary output).
In this case the relay 1-3 can be activated only by digital input with i1F or i2F = AUS.
3.4.2 On/off relay – oA3 = onF
In this case the relay is activated when the controller is turned on and de-activated when the
controller is turned off.
3.4.3 Neutral zone regulation
With oA3 = db the relay 1-3 can control a heater element to perform a neutral zone action.
oA3 cut in = SET-HY
oA3 cut out = SET
3.4.4 Second compressor
With oA3 = CP2, the relay 1-3 operates as second compressor: it is activated in parallel with the
relay of the first compressor, with a possible delay set in the AC1 parameter. Both the compressors
are switched off at the same time.
3.4.5 Alarm relay
With oA3 = ALr the relay 1-3 operates as alarm relay. It is activated every time an alarm happens.
Its status depends on the tbA parameter: if “tbA = y”, the relay is silenced by pressing any key.
If “tbA = n”, the alarm relay remains on until the alarm condition recovers.
3.4.6 Night blind management during energy saving cycles
With oA3 = HES, the relay 1-3 operates to manage the night blind: the relay is energised when the
energy saving cycle is activated , by digital input, frontal button or RTC (optional)
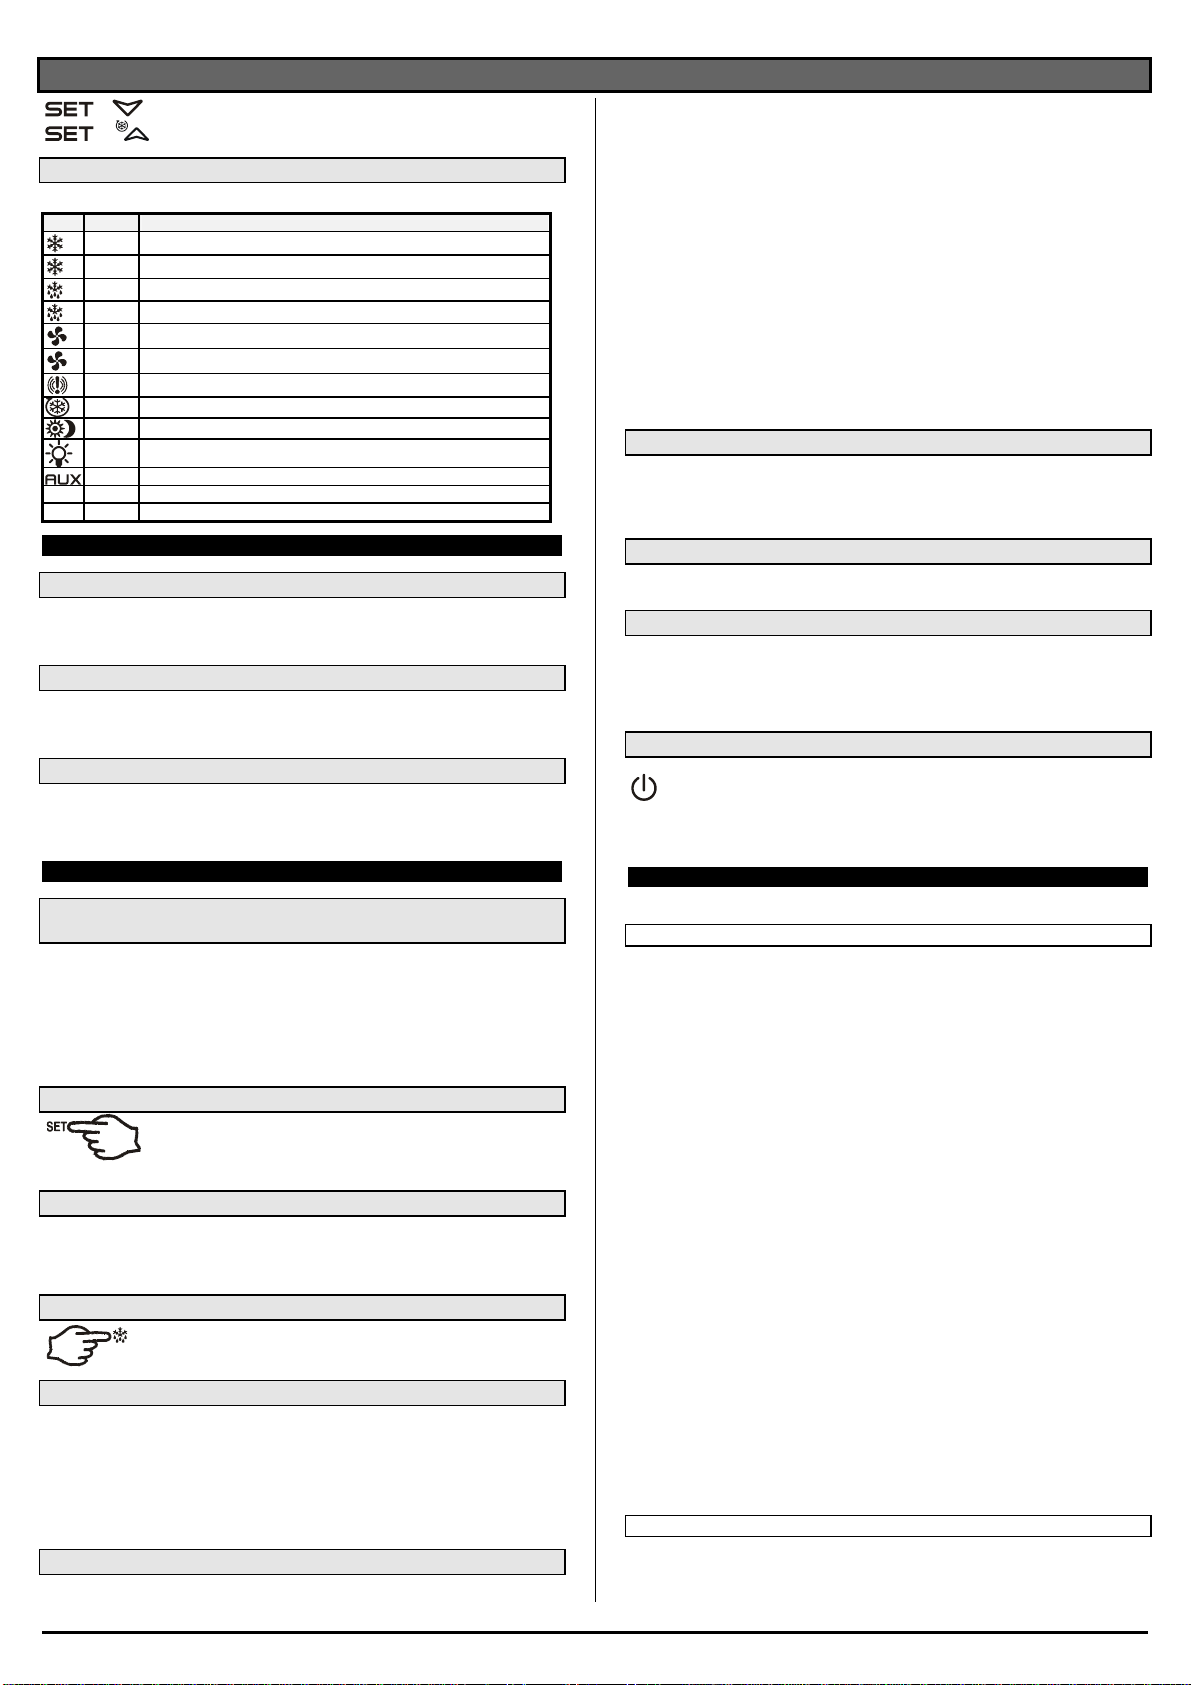
4. FRONT PANEL COMMANDS
4.1 STANDARD FRONTAL PANEL
4.2 STEEL FINISHING
: To display target set point; in programming mode it selects a parameter or confirm an
operation.
(DEF) To start a manual defrost
(UP): To see the max. stored temperature; in programming mode it browses the parameter
codes or increases the displayed value.
(DOWN) To see the min stored temperature; in programming mode it browses the parameter
codes or decreases the displayed value.
To switch the instrument off, if onF = oFF.
To switch the light, if oA3 = Lig.
KEY COMBINATIONS:
+ To lock & unlock the keyboard.
dIXEL
Installing and Operating Instructions 1592027050
1592027050 XW60L RTC GB r1.0 27.06.2008.doc XW60L 2/6
+To enter in programming mode.
+To return to the room temperature display.
4.3 USE OF LEDS
Each LED function is described in the following table.
LED MODE FUNCTION
ON Compressor enabled
Flashing Anti-short cycle delay enabled
ON Defrost enabled
Flashing Drip time in progress
ON Fans enabled
Flashing Fans delay after defrost in progress.
ON An alarm is occurring
ON Continuous cycle is running
ON Energy saving enabled
ON Light on
ON Auxiliary relay on
°C/°F ON Measurement unit
°C/°F Flashing Programming phase
5. MAX & MIN TEMPERATURE MEMORIZATION
5.1 HOW TO SEE THE MIN TEMPERATURE
1. Press and release the nkey.
2. The “Lo” message will be displayed followed by the minimum temperature recorded.
3. By pressing the nkey again or by waiting 5s the normal display will be restored.
5.2 HOW TO SEE THE MAX TEMPERATURE
1. Press and release the okey.
2. The “Hi” message will be displayed followed by the maximum temperature recorded.
3. By pressing the okey again or by waiting 5s the normal display will be restored.
5.3 HOW TO RESET THE MAX AND MIN TEMPERATURE RECORDED
1. Hold press the SET key for more than 3s, while the max. or min temperature is displayed. (rSt
message will be displayed)
2. To confirm the operation the “rSt” message starts blinking and the normal temperature will be
displayed.
6. MAIN FUNCTIONS
6.1 TO SET THE CURRENT TIME AND DAY (ONLY FOR INSTRUMENTS
WITH RTC)
When the instrument is switched on, it’s necessary to program the time and day.
1. Enter the Pr1 programming menu, by pushing the SET + n keys for 3s.
2. The rtc parameter is displayed. Push the SET key to enter the real time clock menu.
3. The Hur (hour) parameter is displayed.
4. Push the SET and set current hour by the UP and Down keys, then push SET to
confirm the value..
5. Repeat the same operations on the Min (minutes) and dAy (day) parameters.
To exit: Push SET+UP keys or wait for 15 sec without pushing any keys.
6.2 HOW TO SEE THE SET POINT
1. Push and immediately release the SET key: the display will show the
Set point value;
2. Push and immediately release the SET key or wait for 5 seconds to
display the probe value again.
6.3 HOW TO CHANGE THE SET POINT
1. Push the SET key for more than 2 seconds to change the Set point value;
2. The value of the set point will be displayed and the “°C” or “°F” LED starts blinking;
3. To change the Set value push the o or narrows within 10s.
4. To memorise the new set point value push the SET key again or wait 10s.
6.4 HOW TO START A MANUAL DEFROST
Push the DEF key for more than 2 seconds and a manual defrost will start.
6.5 HOW TO CHANGE A PARAMETER VALUE
To change the parameter’s value operate as follows:
1. Enter the Programming mode by pressing the Set + nkeys for 3s (the “°C” or “°F” LED starts
blinking).
2. Select the required parameter. Press the “SET” key to display its value
3. Use “UP” or “DOWN” to change its value.
4. Press “SET” to store the new value and move to the following parameter.
To exit: Press SET + UP or wait 15s without pressing a key.
NOTE: the set value is stored even when the procedure is exited by waiting the time-out to expire.
6.6 THE HIDDEN MENU
The hidden menu Includes all the parameters of the instrument.
6.6.1 HOW TO ENTER THE HIDDEN MENU
1. Enter the Programming mode by pressing the Set + nkeys for 3s (the “°C” or “°F” LED starts
blinking).
2. Released the keys, then push again the Set+nkeys for more than 7s. The Pr2 label will be
displayed immediately followed from the HY parameter.
NOW YOU ARE IN THE HIDDEN MENU.
3. Select the required parameter.
4. Press the “SET” key to display its value
5. Use o or nto change its value.
6. Press “SET” to store the new value and move to the following parameter.
To exit: Press SET + o or wait 15s without pressing a key.
NOTE1: if none parameter is present in Pr1, after 3s the “noP” message is displayed. Keep the keys
pushed till the Pr2 message is displayed.
NOTE2: the set value is stored even when the procedure is exited by waiting the time-out to expire.
6.6.2 HOW TO MOVE A PARAMETER FROM THE HIDDEN MENU TO THE
FIRST LEVEL AND VICEVERSA.
Each parameter present in the HIDDEN MENU can be removed or put into “THE FIRST LEVEL”
(user level) by pressing “SET + n”.
In HIDDEN MENU when a parameter is present in First Level the decimal point is on.
6.7 HOW TO LOCK THE KEYBOARD
1. Keep pressed for more than 3 s the UP + DOWN keys.
2. The “POF” message will be displayed and the keyboard will be locked. At this point it will be
possible only to see the set point or the MAX o Min temperature stored
3. If a key is pressed more than 3s the “POF” message will be displayed.
6.8 TO UNLOCK THE KEYBOARD
Keep pressed together for more than 3s the o and nkeys, till the “Pon” message will be
displayed.
6.9 THE CONTINUOUS CYCLE
When defrost is not in progress, it can be activated by holding the “o” key pressed for about 3
seconds. The compressor operates to maintain the “ccS” set point for the time set through the “CCt”
parameter. The cycle can be terminated before the end of the set time using the same activation key
“o” for 3 seconds.
6.10 THE ON/OFF FUNCTION
With “onF = oFF”, pushing the ON/OFF key, the instrument is switched off. The “OFF”
message is displayed. In this configuration, the regulation is disabled.
To switch the instrument on, push again the ON/OFF key.
WARNING: Loads connected to the normally closed contacts of the relays are always
supplied and under voltage, even if the instrument is in stand by mode.
7. PARAMETERS
rtc Real time clock menu (only for controller with RTC): to set the time and date and defrost
start time.
REGULATION
Hy Differential: (0,1 ÷ 25,5°C / 1÷255 °F) Intervention differential for set point. Compressor Cut IN
is Set Point + differential (Hy). Compressor Cut OUT is when the temperature reaches the set
point.
LS Minimum set point: (- 50°C÷SET/-58°F÷SET): Sets the minimum value for the set point.
US Maximum set point: (SET÷110°C/ SET÷230°F). Set the maximum value for set point.
Ot Thermostat probe calibration: (-12.0÷12.0°C; -120÷120°F) allows to adjust possible offset of
the thermostat probe.
P2P Evaporator probe presence: n= not present: the defrost stops by time; y= present: the defrost
stops by temperature.
OE Evaporator probe calibration: (-12.0÷12.0°C; -120÷120°F). allows to adjust possible offset of
the evaporator probe.
P3P Third probe presence (P3): n= not present:, the terminals 13-14 operate as digital input.; y=
present:, the terminals 13-14 operate as third probe.
O3 Third probe calibration (P3): (-12.0÷12.0°C; -120÷120°F). allows to adjust possible offset of
the third probe.
P4P Fourth probe presence: (n = Not present; y = present).
o4 Fourth probe calibration: (-12.0÷12.0°C) allows to adjust possible offset of the fourth probe.
OdS Outputs activation delay at start up: (0÷255min) This function is enabled at the initial start up
of the instrument and inhibits any output activation for the period of time set in the parameter.
AC Anti-short cycle delay: (0÷50 min) minimum interval between the compressor stop and the
following restart.
AC1 2nd compressor delay at start up (0÷255s) Used only if oA3 = cP2 Time interval between the
switching on of the first compressor and the second one.
rtr Percentage of the second and first probe for regulation (0÷100; 100 = P1, 0 = P2 ): it
allows to set the regulation according to the percentage of the first and second probe, as for the
following formula (rtr(P1-P2)/100 + P2).
CCt Compressor ON time during continuous cycle: (0.0÷24.0h; res. 10min) Allows to set the
length of the continuous cycle: compressor stays on without interruption for the CCt time. Can be
used, for instance, when the room is filled with new products.
CCS Set point for continuous cycle: (-50÷150°C) it sets the set point used during the continuous
cycle.
COn Compressor ON time with faulty probe: (0÷255 min) time during which the compressor is
active in case of faulty thermostat probe. With COn=0 compressor is always OFF.
COF Compressor OFF time with faulty probe: (0÷255 min) time during which the compressor is
OFF in case of faulty thermostat probe. With COF=0 compressor is always active.
DISPLAY
CF Temperature measurement unit: °C=Celsius; °F=Fahrenheit. WARNING: When the
measurement unit is changed the SET point and the values of the parameters Hy, LS, US, Ot,
ALU and ALL have to be checked and modified if necessary).
rES Resolution (for °C): (in = 1°C; dE = 0.1 °C) allows decimal point display.

dIXEL
Installing and Operating Instructions 1592027050
1592027050 XW60L RTC GB r1.0 27.06.2008.doc XW60L 3/6
Lod Instrument display: (P1; P2, P3, P4, SET, dtr): it selects which probe is displayed by the
instrument: P1 = Thermostat probe; P2 = Evaporator probe; P3 = Third probe(only for model
with this option enabled); P4 = Fourth probe, SET = set point; dtr = percentage of
visualization.
rEd X- REP display (optional): (P1; P2, P3, P4, SET, dtr): it selects which probe is displayed by
X- REP: P1 = Thermostat probe; P2 = Evaporator probe; P3 = Third probe(only for model with
this option enabled); P4 = Fourth probe, SET = set point; dtr = percentage of visualization.
dLy Display delay: (0 ÷20.0m; resul. 10s) when the temperature increases, the display is updated
of 1 °C/1°F after this time.
dtr Percentage of the second and first probe for visualization when Lod = dtr (0÷100; 100 =
P1, 0 = P2 ): if Lod = dtr it allows to set the visualization according to the percentage of the
first and second probe, as for the following formula (dtr(P1-P2)/100 + P2).
DEFROST
EdF Defrost mode (only for controller with RTC):
rtc = Real Time Clock mode. Defrost time follows Ld1÷Ld6 parameters on workdays and
Sd1÷Sd6 on holidays.
in = interval mode. The defrost starts when the time “Idf” is expired.
tdF Defrost type: EL = electrical heater; in = hot gas
dFP Probe selection for defrost termination: nP = no probe; P1 =thermostat probe; P2 =
evaporator probe; P3 =configurable probe; P4 = Probe on Hot Key plug.
dtE Defrost termination temperature: (-50÷50 °C/
-58÷122°F) (Enabled only when EdF=Pb) sets the temperature measured by the evaporator
probe, which causes the end of defrost.
IdF Interval between defrost cycles: (0÷120h) Determines the time interval between the
beginning of two defrost cycles.
MdF (Maximum) length for defrost: (0÷255min) When P2P = n, (not evaporator probe: timed
defrost) it sets the defrost duration, when P2P = y (defrost end based on temperature) it sets
the maximum length for defrost.
dSd Start defrost delay: ( 0÷99min) This is useful when different defrost start times are necessary
to avoid overloading the plant.
dFd Temperature displayed during defrost: (rt = real temperature; it = temperature at defrost
start; SEt = set point; dEF = “dEF” label)
dAd MAX display delay after defrost: (0÷255min). Sets the maximum time between the end of
defrost and the restarting of the real room temperature display.
Fdt Drip time: (0÷120 min) time interval between reaching defrost termination temperature and the
restoring of the control’s normal operation. This time allows the evaporator to eliminate water
drops that might have formed due to defrost.
dPo First defrost after start-up: (y = immediately; n = after the IdF time)
dAF Defrost delay after continuous cycle: (0÷23.5h) time interval between the end of the fast
freezing cycle and the following defrost related to it.
FANS
FnC Fans operating mode: C-n= runs with the compressor, OFF during defrost;
o-n = continuous mode, OFF during defrost;
C-Y = runs with the compressor, ON during defrost;
o-Y = continuous mode, ON during defrost;
Fnd Fans delay after defrost: (0÷255min) Interval between end of defrost and evaporator fans
start.
Fct Temperature differential avoiding short cycles of fans (0÷59°C; Fct=0 function disabled). If
the difference of temperature between the evaporator and the room probes is more than the
value of the Fct parameter, the fans are switched on.
FSt Fans stop temperature: (-50÷50°C/122°F) setting of temperature, detected by evaporator
probe, above which fans are always OFF.
Fon Fan ON time: (0÷15 min) with Fnc = C_n or C_y, (fan activated in parallel with compressor). it
sets the evaporator fan ON cycling time when the compressor is off. With Fon =0 and FoF ≠0
the fan are always off, with Fon=0 and FoF =0 the fan are always off.
FoF Fan OFF time: (0÷15 min) with Fnc = C_n or C_y, (fan activated in parallel with compressor). it
sets the evaporator fan off cycling time when the compressor is off. With Fon =0 and FoF ≠0
the fan are always off, with Fon=0 and FoF =0 the fan are always off.
FAP Probe selection for fan management: nP = no probe; P1 =thermostat probe; P2 = evaporator
probe; P3 =configurable probe; P4 = Probe on Hot Key plug.
AUXILIARY THERMOSTAT CONFIGURATION (terms. 1-3) – OA3 = AUS
ACH Kind of regulation for auxiliary relay: Ht = heating; CL = cooling
SAA Set Point for auxiliary relay: (-50,0÷110,0°C; -58÷230°F) it defines the room temperature set
point to switch auxiliary relay.
SHy Differential for auxiliary output: (0,1 ÷ 25,5°C / 1÷255 °F) Intervention differential for
auxiliary output set point.
With ACH = cL AUX Cut in is SAA + SHy; . AUX Cut out is SAA
With ACH = Ht AUX Cut in is SAA - SHy; . AUX Cut out is SAA
ArP Probe selection for auxiliary: nP = no probe, the auxiliary relay is switched only by button; P1
= Probe 1 (Thermostat probe); P2 = Probe 2 (evaporator probe); P3 = Probe 3 (display probe);
P4 = Probe 4 fourth probe.
Sdd Auxiliary relay off during defrost: n = the auxiliary relay operates during defrost.
y = the auxiliary relay is switched off during defrost.
ALARMS
ALP Probe selection for alarm: nP = no probe, the temperature alarms are disabled; P1 = Probe 1
(Thermostat probe); P2 = Probe 2 (evaporator probe); P3 = Probe 3 (display probe); P4 =
Fourth probe.
ALC Temperature alarms configuration: (Ab; rE)
Ab= absolute temperature: alarm temperature is given by the ALL or ALU values. rE =
temperature alarms are referred to the set point. Temperature alarm is enabled when the
temperature exceeds the “SET+ALU” or “SET-ALL” values.
ALU MAXIMUM temperature alarm: (SET÷110°C; SET÷230°F) when this temperature is reached
the alarm is enabled, after the “ALd” delay time.
ALL Minimum temperature alarm: (-50.0 ÷ SET °C; -58÷230°F when this temperature is reached
the alarm is enabled, after the “ALd” delay time.
AFH Differential for temperature alarm/ fan recovery: (0,1÷25,5°C; 1÷45°F) Intervention
differential for recovery of temperature alarm. It’s also used for the restart of the fan when the
FSt temperature is reached
ALd Temperature alarm delay: (0÷255 min) time interval between the detection of an alarm
condition and alarm signalling.
dAO Exclusion of temperature alarm at start-up: (from 0.0 min to 23.5h) time interval between the
detection of the temperature alarm condition after instrument power on and alarm signalling.
CONDENSER TEMPERATURE ALARM
AP2 Probe selection for temperature alarm of condenser: nP = no probe; P1 =thermostat probe;
P2 = evaporator probe; P3 =configurable probe; P4 = Probe on Hot Key plug.
AL2 Low temperature alarm of condenser:(-55÷150°C) when this temperature is reached the
LA2 alarm is signalled, possibly after the Ad2 delay.
Au2 High temperature alarm of condenser:(-55÷150°C) when this temperature is reached the
HA2 alarm is signalled, possibly after the Ad2 delay.
AH2 Differential for temperature condenser alarm recovery:(0,1÷25,5°C; 1÷45°F)
Ad2 Condenser temperature alarm delay: (0÷255 min) time interval between the detection of the
condenser alarm condition and alarm signalling.
dA2 Condenser temperature alarm exclusion at start up: (from 0.0 min to 23.5h, res. 10min)
bLL Compressor off with low temperature alarm of condenser:n = no: compressor keeps on
working; Y = yes, compressor is switched off till the alarm is present, in any case regulation
restarts after AC time at minimum.
AC2 Compressor off with high temperature alarm of condenser:n = no: compressor keeps on
working; Y = yes, compressor is switched off till the alarm is present, in any case regulation
restarts after AC time at minimum.
AUXILIARY RELAY
tbA Alarm relay silencing (with oA3 =ALr):
n= silencing disabled: alarm relay stays on till alarm condition lasts,
y =silencing enabled: alarm relay is switched OFF by pressing a key during an alarm
oA3 Fourth relay configuration (1-3): dEF, FAn: do not select it!. ALr: alarm; Lig: light; AuS:
Auxiliary relay; onF: always on with instrument on; db= neutral zone; cP2 = second
compressor; dEF2: do not select it!;. HES:. night blind
AoP Alarm relay polarity: it set if the alarm relay is open or closed when an alarm happens. CL=
terminals 1-3 closed during an alarm; oP = terminals 1-3 open during an alarm
DIGITAL INPUTS
i1P Digital input polarity (13-14): oP: the digital input is activated by opening the contact; CL: the
digital input is activated by closing the contact.
i1F Digital input configuration (13-14): EAL= external alarm: “EA” message is displayed; bAL=
serious alarm “CA” message is displayed. PAL= pressure switch alarm, “CA” message is
displayed; dor= door switch function; dEF= activation of a defrost cycle; AUS=not enabled;
Htr= kind of action inversion (cooling – heating); FAn=not set it; ES=Energy saving; HdF =
Holiday defrost (enable only with RTC); onF = to switch the controller off.
did (0÷255 min) with i1F= EAL or i1F = bAL digital input alarm delay (13-14): delay between the
detection of the external alarm condition and its signalling.
with i1F= dor: door open signalling delay
with i1F= PAL: time for pressure switch function: time interval to calculate the number of
the pressure switch activation.
i2P 2nd digital input polarity (13-19): oP: the digital input is activated by opening the contact; CL:
the digital input is activated by closing the contact.
i2F 2nd digital input configuration (13-19): EAL= external alarm: “EA” message is displayed;
bAL= serious alarm “CA” message is displayed. PAL= pressure switch alarm, “CA” message is
displayed; dor= door switch function; dEF= activation of a defrost cycle; AUS=not enabled;
Htr= kind of action inversion (cooling – heating); FAn=not set it; ES=Energy saving; HdF =
Holiday defrost (enable only with RTC); onF = to switch the controller off.
d2d (0÷255 min) with i2F= EAL or i2F= bAL 2nd digital input alarm delay (13-19): delay between
the detection of the external alarm condition and its signalling.
with i2F= dor: door open signalling delay
with i2F= PAL: time for pressure switch function: time interval to calculate the number of
the pressure switch activation.
nPS Pressure switch number: (0 ÷15) Number of activation of the pressure switch, during the “did”
interval, before signalling the alarm event (I2F= PAL).
If the nPS activation in the did time is reached, switch off and on the instrument to
restart normal regulation.
odc Compressor and fan status when open door: no = normal; Fan = Fan OFF; CPr =
Compressor OFF; F_C = Compressor and fan OFF.
rrd Outputs restart after doA alarm: no= outputs not affected by the doA alarm; yES = outputs
restart with the doA alarm.
HES Temperature increase during the Energy Saving cycle:
(-30,0°C÷30,0°C) it sets the increasing value of the set point during the Energy Saving cycle.
TO SET CURRENT TIME AND WEEKLY HOLIDAYS (ONLY FOR MODELS WITH RTC)
Hur Current hour (0 ÷ 23 h)
Min Current minute (0 ÷ 59min)
dAY Current day (Sun ÷ SAt)
Hd1 First weekly holiday (Sun ÷ nu) Set the first day of the week which follows the holiday
times.
Hd2 Second weekly holiday (Sun ÷ nu) Set the second day of the week which follows the
holiday times.
N.B. Hd1,Hd2 can be set also as “nu” value (Not Used).
TO SET ENERGY SAVING TIMES (ONLY FOR MODELS WITH RTC)
ILE Energy Saving cycle start during workdays: (0 ÷ 23h 50 min.) During the Energy Saving
cycle the set point is increased by the value in HES so that the operation set point is SET +
HES.
dLE Energy Saving cycle length during workdays: (0 ÷ 24h 00 min.) Sets the duration of the
Energy Saving cycle on workdays.
ISE Energy Saving cycle start on holidays. (0 ÷ 23h 50 min.)
dSE Energy Saving cycle length on holidays (0 ÷ 24h 00 min.)
TO SET DEFROST TIMES (ONLY FOR MODELS WITH RTC)
Ld1÷Ld6 Workday defrost start (0 ÷ 23h 50 min.) These parameters set the beginning of the 6
programmable defrost cycles during workdays. Ex. When Ld2 = 12.4 the second defrost starts
at 12.40 during workdays.
Sd1÷Sd6 Holiday defrost start (0 ÷ 23h 50 min.) These parameters set the beginning of the 6
programmable defrost cycles on holidays. Ex. When Sd2 = 3.4 the second defrost starts at
3.40 on holidays.
N.B. :To disable a defrost cycle set it to “nu”(not used). Ex. If Ld6=nu ; the sixth defrost
cycle is disabled
OTHER
Adr Serial address (1÷244): Identifies the instrument address when connected to a ModBUS
compatible monitoring system.
dIXEL
Installing and Operating Instructions 1592027050
1592027050 XW60L RTC GB r1.0 27.06.2008.doc XW60L 4/6
PbC Type of probe: it allows to set the kind of probe used by the instrument: PbC = PBC probe, ntc
= NTC probe.
onF on/off key enabling: nu = disabled; oFF = enabled; ES = not set it.
dP1 Thermostat probe display
dP2 Evaporator probe display
dP3 Third probe display- optional.
dP4 Fourth probe display.
rSE Real set point: it shows the set point used during the energy saving cycle or during the
continuous cycle.
rEL Software release for internal use.
Ptb Parameter table code: readable only.
8. DIGITAL INPUTS
The first digital input 13-14 is enabled with P3P = n.
With P3P = n and i1F = i2F the second digital input is disabled
The free voltage digital inputs are programmable by the “i1F” and i2F parameters.
8.1 GENERIC ALARM (i1F or i2F = EAL)
As soon as the digital input is activated the unit will wait for “did” time delay before signalling the
“EAL” alarm message. The outputs status don’t change. The alarm stops just after the digital input is
de-activated.
8.2 SERIOUS ALARM MODE (i1F or i2F = bAL)
When the digital input is activated, the unit will wait for “did” delay before signalling the “CA” alarm
message. The relay outputs are switched OFF. The alarm will stop as soon as the digital input is de-
activated.
8.3 PRESSURE SWITCH (i1F or i2F = PAL)
If during the interval time set by “did” parameter, the pressure switch has reached the number of
activation of the “nPS” parameter, the “CA” pressure alarm message will be displayed. The
compressor and the regulation are stopped. When the digital input is ON the compressor is always
OFF. If the nPS activation in the did time is reached, switch off and on the instrument to
restart normal regulation.
8.4 DOOR SWITCH INPUT (i1F or i2F = dor)
It signals the door status and the corresponding relay output status through the “odc” parameter: no
= normal (any change); Fan = Fan OFF; CPr = Compressor OFF; F_C = Compressor and fan OFF.
Since the door is opened, after the delay time set through parameter “did”, the door alarm is
enabled, the display shows the message “dA” and the regulation restarts is rtr = yES. The alarm
stops as soon as the external digital input is disabled again. With the door open, the high and low
temperature alarms are disabled.
8.5 START DEFROST (i1F or i2F = dEF)
It starts a defrost if there are the right conditions. After the defrost is finished, the normal regulation
will restart only if the digital input is disabled otherwise the instrument will wait until the “MdF” safety
time is expired.
8.6 SWITCH THE AUXILIARY RELAY (i1F or i2F = AUS)
With oA3 = AUS the digital input switched the status of the auxiliary relay
8.7 INVERSION OF THE KIND OF ACTION: HEATING-COOLING (i1F or
i2F=Htr)
This function allows to invert the regulation of the controller: from cooling to heating and viceversa.
8.8 ENERGY SAVING (i1F = ES)
The Energy Saving function allows to change the set point value as the result of the SET+ HES
(parameter) sum. This function is enabled until the digital input is activated.
8.9 HOLIDAY DEFROST (i1F or i2F = HDF) –ONLY FOR MODELS WITH RTC
This function enabled the holiday defrost setting.
8.10 ON OFF FUNCTION (i1F or i2F = onF)
To switch the controller on and off.
8.11 DIGITAL INPUTS POLARITY
The digital input polarity depends on the “i1P” and “i2P” parameters.
i1P or i2P =CL: the input is activated by closing the contact.
i1P or i2P=OP: the input is activated by opening the contact
9. TTL SERIAL LINE – FOR MONITORING SYSTEMS
The TTL serial line, available through the HOT KEY connector, allows by means of the external
TTL/RS485 converter, XJ485-CX, to connect the instrument to a monitoring system ModBUS-RTU
compatible such as the X-WEB500/3000/300.
10. X-REP OUTPUT – OPTIONAL
As optional, an X-REP can be connected to the instrument, trough the dedicated
connector.
To connect the X-REP to the
instrument the following
connectors must be used
CAB/REP1(1m), CAB/REP2
(2m), CAB/REP5 (5m),
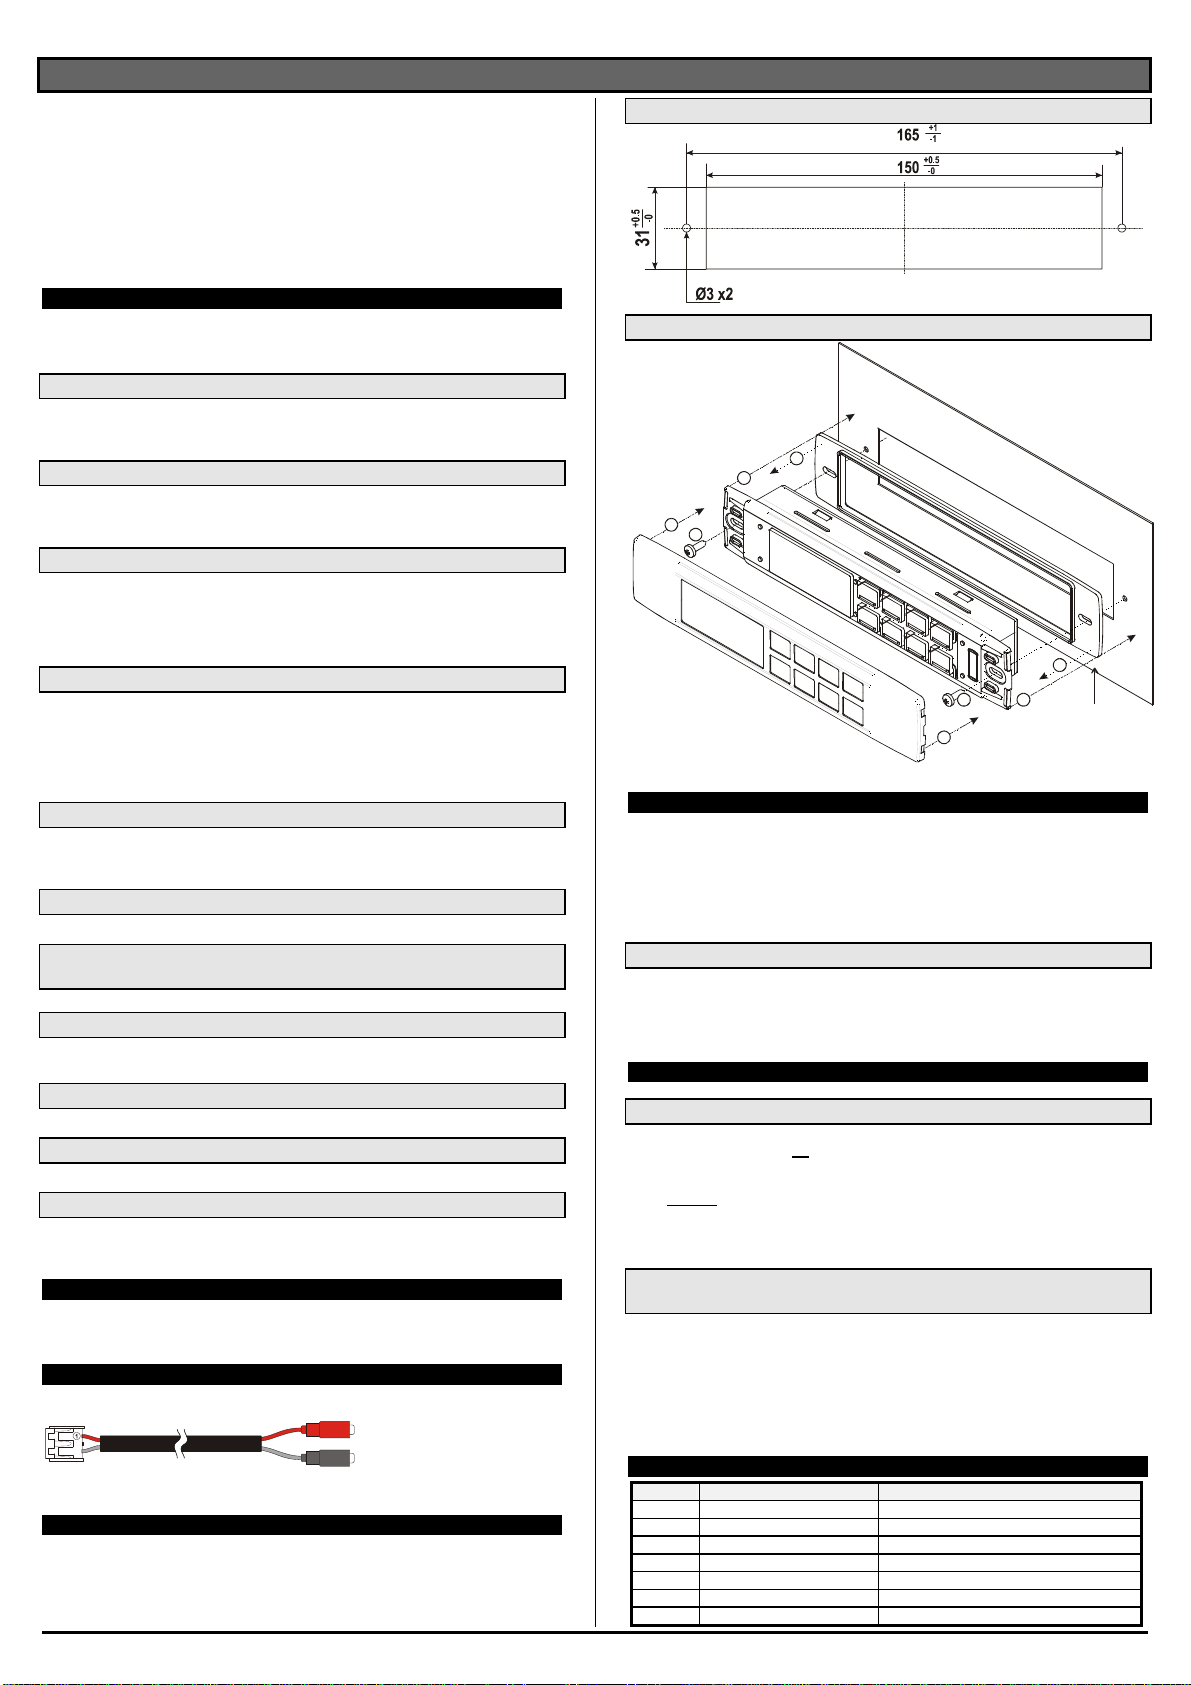
11. INSTALLATION AND MOUNTING
The controller XW60L, shall be mounted on vertical panel, in a 150x31 mm hole, and fixed using two
screws ∅3 x 2mm. To obtain an IP65 protection grade use the front panel rubber gasket (mod. RG-
L). The temperature range allowed for correct operation is 0 - 60 °C. Avoid places subject to strong
vibrations, corrosive gases, excessive dirt or humidity. The same recommendations apply to probes.
Let the air circulate by the cooling holes.
11.1 CUT OUT
11.2 STEEL FINISHING MOUNTING
1
1
2
23
3
4
4
RG-LX gascke
(optional)
12. ELECTRICAL CONNECTIONS
The instruments are provided with screw terminal block to connect cables with a cross section up to
2,5 mm2 for the digital and analogue inputs. Relays and power supply have a Faston connection
(6,3mm). Heat-resistant cables have to be used. Before connecting cables make sure the power
supply complies with the instrument’s requirements. Separate the probe cables from the power
supply cables, from the outputs and the power connections. Do not exceed the maximum current
allowed on each relay, in case of heavier loads use a suitable external relay.
N.B. Maximum current allowed for all the loads is 20A.
12.1 PROBE CONNECTION
The probes shall be mounted with the bulb upwards to prevent damages due to casual liquid
infiltration. It is recommended to place the thermostat probe away from air streams to correctly
measure the average room temperature. Place the defrost termination probe among the evaporator
fins in the coldest place, where most ice is formed, far from heaters or from the warmest place during
defrost, to prevent premature defrost termination.
13. HOW TO USE THE HOT KEY
13.1 HOW TO PROGRAM A HOT KEY FROM THE INSTRUMENT (UPLOAD)
1. Program one controller with the front keypad.
2. When the controller is ON, insert the “Hot key” and push okey; the "uPL" message
appears followed a by flashing “End”
3. Push “SET” key and the End will stop flashing.
4. Turn OFF the instrument remove the “Hot Key”, then turn it ON again.
NOTE: the “Err” message is displayed for failed programming. In this case push again okey if you
want to restart the upload again or remove the “Hot key” to abort the operation.
13.2 HOW TO PROGRAM AN INSTRUMENT USING A HOT KEY
(DOWNLOAD)
1. Turn OFF the instrument.
2. Insert a programmed “Hot Key” into the 5 PIN receptacle and then turn the Controller ON.
3. Automatically the parameter list of the “Hot Key” is downloaded into the Controller memory,
the “doL” message is blinking followed a by flashing “End”.
4. After 10 seconds the instrument will restart working with the new parameters.
5. Remove the “Hot Key”..
NOTE the message “Err” is displayed for failed programming. In this case turn the unit off and then
on if you want to restart the download again or remove the “Hot key” to abort the operation.
14. ALARM SIGNALS
Message Cause Outputs
“P1” Room probe failure Compressor output acc. to par. “Con” and “COF”
“P2” Evaporator probe failure Defrost end is timed
“P3” Third probe failure Outputs unchanged
“P4” Fourth probe failure Outputs unchanged
“HA” Maximum temperature alarm Outputs unchanged.
“LA” Minimum temperature alarm Outputs unchanged.
"HA2" Condenser high temperature It depends on the “Ac2” parameter
dIXEL
Installing and Operating Instructions 1592027050
1592027050 XW60L RTC GB r1.0 27.06.2008.doc XW60L 5/6
Message Cause Outputs
"LA2" Condenser low temperature It depends on the “bLL” parameter
“dA” Door open Compressor and fans restarts
“EA” External alarm Output unchanged.
“CA” Serious external alarm (i1F=bAL) All outputs OFF.
“CA” Pressure switch alarm (i1F=PAL) All outputs OFF
“rtc” Real time clock alarm Alarm output ON; Other outputs unchanged;
Defrosts according to par. “IdF” Set real time clock
has to be set
rtF Real time clock board failure Alarm output ON; Other outputs unchanged;
Defrosts according to par. “IdF” Contact the
service
14.1 SILENCING BUZZER / ALARM RELAY OUTPUT
If “tbA = y”, the buzzer and the relay are is silenced by pressing any key.
If “tbA = n”, only the buzzer is silenced while the alarm relay is on until the alarm condition recovers.
14.2 ALARM RECOVERY
Probe alarms P1”, “P2”, “P3” and “P4” start some seconds after the fault in the related probe; they
automatically stop some seconds after the probe restarts normal operation. Check connections
before replacing the probe.
Temperature alarms “HA”, “LA” “HA2” and “LA2” automatically stop as soon as the temperature
returns to normal values.
Alarms “EA” and “CA” (with i1F=bAL) recover as soon as the digital input is disabled.
Alarm “CA” (with i1F=PAL) recovers only by switching off and on the instrument.
14.3 OTHER MESSAGES
Pon Keyboard unlocked.
PoF Keyboard locked
noP In programming mode: none parameter is present in Pr1
On the display or in dP2, dP3, dP4: the selected probe is nor enabled
15. TECHNICAL DATA
Housing: self extinguishing ABS.
Case: facia 38x185 mm; depth 76mm
Mounting : panel mounting in a 150x31 mm panel cut-out with two screws. ∅3 x 2mm.
Distance between the holes 165mm
Protection: IP20; Frontal protection: IP65 with frontal gasket mod RG-L. (optional)
Connections: Screw terminal block ≤2,5 mm2heat-resistant wiring and 6,3mm Faston
Power supply: 230Vac or. 110Vac or 24Vac ±10%
Power absorption: 5VA max.
Display: 3 digits, red LED, 14,2 mm high.
Display: 3 digits, red LED, 14,2 mm high; Inputs: Up to 4 NTC or PTC probes.
Digital inputs: 2 free voltage
Relay outputs: Total current on loads MAX. 20A
compressor: relay SPST 20(8) A, 250Vac
light: relay SPST 8 or 16(3) A, 250Vac
fans: relay SPST 8(3) A, 250Vac
defrost: relay SPST 8(3) A, 250Vac
Other output : buzzer (optional)
Serial output : TTL standard; Communication protocol: Modbus - RTU
Data storing: on the non-volatile memory (EEPROM).
Internal clock back-up: 24 hours (only for model with RTC)
Kind of action: 1B; Pollution grade: 2;Software class: A.;
Rated impulsive voltage: 2500V; Over voltage Category: II
Operating temperature: 0÷60 °C; Storage temperature: -30÷85 °C.
Relative humidity: 20÷85% (no condensing)
Measuring and regulation range: NTC probe: -40÷110°C (-40÷230°F);
PTC probe: -50÷150°C (-58÷302°F)
Resolution: 0,1 °C or 1°C or 1 °F (selectable); Accuracy (ambient temp. 25°C): ±0,7 °C ±1 digit
16. CONNECTIONS
Supply: 120Vac or 24Vac: connect to terminals 11-12
The X-REP output is optional
The light relay can be also 16(5)A according to the model
17. DEFAULT SETTING VALUES
Label
Name Range °C/°F Level
Set Set point LS÷US -5.0 - - -
rtc* Real time clock menu - - Pr1
Hy Differential 0,1÷25.5°C/ 1÷255°F 2.0 Pr1
LS Minimum set point -50°C÷SET/-58°F÷SET -50.0 Pr2
US Maximum set point SET÷110°C/ SET ÷230°F 110 Pr2
Ot Thermostat probe calibration -12÷12°C /-120÷120°F 0.0 Pr1
P2P Evaporator probe presence n=not present; Y=pres. Y Pr1
OE Evaporator probe calibration -12÷12°C /-120÷120°F 0.0 Pr2
P3P Third probe presence n=not present; Y=pres. n Pr2
O3 Third probe calibration -12÷12°C /-120÷120°F 0 Pr2
P4P Fourth probe presence n=not present; Y=pres. n Pr2
O4 Fourth probe calibration -12÷12°C /-120÷120°F 0 Pr2
OdS Outputs delay at start up 0÷255 min 0 Pr2
Label
Name Range °C/°F Level
AC Anti-short cycle delay 0 ÷50 min 1 Pr1
Ac1 Second compressor start delay 0÷255s 5 Pr2
rtr P1-P2 percentage for regulation 0 ÷ 100 (100=P1 , 0=P2) 100 Pr2
CCt Continuous cycle duration 0.0÷24.0h 0.0 Pr2
CCS Set point for continuous cycle (-55.0÷150,0°C) (-67÷302°F) -5 Pr2
COn Compressor ON time with faulty probe 0 ÷255 min 15 Pr2
COF Compressor OFF time with faulty probe 0 ÷255 min 30 Pr2
CF Temperature measurement unit °C ÷°F °C Pr2
rES Resolution in=integer; dE= dec.point dE Pr1
Lod Probe displayed P1;P2 P1 Pr2
rEd2 X-REP display P1 – P2 – P3 – P4 – SEt – dtr P1 Pr2
dLy Display temperature delay 0 ÷ 20.0 min (10 sec.) 0.0 Pr2
dtr P1-P2 percentage for display 1 ÷ 99 50 Pr2
EdF* Kind of interval for defrost rtc ÷in in Pr2
tdF Defrost type EL=el. heater; in= hot gas EL Pr1
dFP Probe selection for defrost termination nP; P1; P2; P3; P4 P2 Pr2
dtE Defrost termination temperature -50 ÷50 °C 8 Pr1
IdF Interval between defrost cycles 1 ÷120 ore 6 Pr1
MdF (Maximum) length for defrost 0 ÷255 min 30 Pr1
dSd Start defrost delay 0÷99min 0 Pr2
dFd Displaying during defrost rt, it, SEt, DEF it Pr2
dAd MAX display delay after defrost 0 ÷ 255 min 30 Pr2
Fdt Draining time 0÷120 min 0 Pr2
dPo First defrost after start-up n=after IdF; y=immed. n Pr2
dAF Defrost delay after fast freezing 0 ÷ 23h e 50’ 0.0 Pr2
Fnc Fan operating mode C-n, o-n, C-y, o-Y o-n Pr1
Fnd Fan delay after defrost 0÷255min 10 Pr1
Fct Differential of temperature for forced
activation of fans
0÷50°C 10 Pr2
FSt Fan stop temperature -50÷50°C/-58÷122°F 2 Pr1
Fon Fan on time with compressor off 0÷15 (min.) 0 Pr2
FoF Fan off time with compressor off 0÷15 (min.) 0 Pr2
FAP Probe selection for fan management nP; P1; P2; P3; P4 P2 Pr2
ACH Kind of action for auxiliary relay CL; Ht cL Pr2
SAA Set Point for auxiliary relay -50,0÷110°C / -58÷230°F 0,0 Pr2
SHy Differential for auxiliary relay 0,1÷25.5°C/ 1÷255°F 2,0 Pr2
ArP Probe selection for auxiliary relay nP / P1 / P2 / P3/P4 nP Pr2
Sdd Auxiliary relay operating during defrost n÷y n Pr2
ALP Alarm probe selection nP; P1; P2; P3; P4 P1 Pr2
ALc Temperat. alarms configuration rE= related to set;
Ab = absolute Ab Pr2
ALU MAXIMUM temperature alarm Set÷110.0°C; Set÷230°F 110,0 Pr1
ALL Minimum temperature alarm -50.0°C÷Set/ -58°F÷Set -50,0 Pr1
AFH Differential for temperat. alarm recovery (0,1°C÷25,5°C) (1°F÷45°F) 2,0 Pr2
ALd Temperature alarm delay 0 ÷255 min 15 Pr2
dAO Delay of temperature alarm at start up 0 ÷23h e 50’ 1,3 Pr2
AP2 Probe for temperat. alarm of condenser nP; P1; P2; P3; P4 P4 Pr2
AL2 Condenser for low temperat. alarm (-55 ÷ 150°C) (-67÷ 302°F) -40 Pr2
AU2 Condenser for high temperat. alarm (-55 ÷ 150°C) (-67÷ 302°F) 110 Pr2
AH2 Differ. for condenser temp. alar. recovery [0,1°C ÷ 25,5°C] [1°F ÷ 45°F] 5 Pr2
Ad2 Condenser temperature alarm delay 0 ÷ 254 (min.) , 255=nU 15 Pr2
dA2 Delay of cond. temper. alarm at start up 0.0 ÷ 23h 50’ 1,3 Pr2
bLL
Compr. off for condenser low
temperature alarm n(0) - Y(1) n Pr2
AC2
Compr. off for condenser high
temperature alarm n(0) - Y(1) n Pr2
tbA Alarm relay disabling n=no; y=yes y Pr2
oA3 Fourth relay configuration
A
Lr = alarm; dEF = do not select
it; Lig =Light; AUS =AUX;
onF=always on; Fan= do not
select it; db = neutral zone; cP2
= second compressor; dF2 = do
not select it; HES = night blind
Lig Pr2
AoP Alarm relay polarity (oA3=ALr) oP; cL cL Pr2
i1P Digital input polarity (13-14) oP=opening;CL=closing cL Pr1
i1F Digital input 1 configuration (13-14) EAL, bAL, PAL, dor; dEF; Htr,
AUS dor Pr1
did Digital input alarm delay (13-14) 0÷255min 15 Pr1
i2P Digital input polarity (13-19) oP=opening;CL=closing cL Pr2
i2F Digital input configuration (13-19) EAL, bAL, PAL, dor; dEF; Htr,
AUS EAL Pr2
d2d Digital input alarm delay (13-19) 0÷255min 5 Pr2
Nps Number of activation of pressure switch 0 ÷15 15 Pr2
odc Compress and fan status when open
door
no; Fan; CPr; F_C F-c Pr2
rrd Regulation restart with door open alarm n – Y y Pr2
HES Differential for Energy Saving (-30°C÷30°C) (-54°F÷54°F) 0 Pr2
Hur* Current hour 0 ÷ 23 - rtc
Min* Current minute 0 ÷ 59 - rtc
dAY*
Current day Sun ÷ SAt - rtc
Hd1* First weekly holiday Sun÷ SAt – nu nu rtc
Hd2* Second weekly holiday Sun÷ SAt – nu nu rtc
ILE* Energy Saving cycle start during
workdays
0 ÷ 23h 50 min. 0 rtc
dLE* Energy Saving cycle length during
workdays
0 ÷ 24h 00 min. 0 rtc
ISE* Energy Saving cycle start on holidays 0 ÷ 23h 50 min. 0 rtc
dSE* Energy Saving cycle length on holidays 0 ÷ 24h 00 min. 0 rtc

dIXEL
Installing and Operating Instructions 1592027050
1592027050 XW60L RTC GB r1.0 27.06.2008.doc XW60L 6/6
Label
Name Range °C/°F Level
Ld1* 1st workdays defrost start 0 ÷ 23h 50 min. - nu 6.0 rtc
Ld2* 2nd workdays defrost start 0 ÷ 23h 50 min. - nu 13.0 rtc
Ld3* 3rd workdays defrost start 0 ÷ 23h 50 min. - nu 21.0 rtc
Ld4* 4th workdays defrost start 0 ÷ 23h 50 min. - nu 0.0 rtc
Ld5* 5th workdays defrost start 0 ÷ 23h 50 min. - nu 0.0 rtc
Ld6* 6th workdays defrost start 0 ÷ 23h 50 min. - nu 0.0 rtc
Sd1* 1st holiday defrost start 0 ÷ 23h 50 min. - nu 6.0 rtc
Sd2* 2nd holiday defrost start 0 ÷ 23h 50 min. - nu 13.0 rtc
Sd3* 3rd holiday defrost start 0 ÷ 23h 50 min. - nu 21.0 rtc
Sd4* 4th holiday defrost start 0 ÷ 23h 50 min. - nu 0.0 rtc
Sd5* 5th holiday defrost start 0 ÷ 23h 50 min. - nu 0.0 rtc
Sd6* 6th holiday defrost start 0 ÷ 23h 50 min. - nu 0.0 rtc
Adr Serial address 1÷247 1 Pr2
PbC Kind of probe Ptc; ntc ntc Pr2
onF on/off key enabling nu, oFF; ES oFF Pr2
dP1 Room probe display -- - Pr2
dP2 Evaporator probe display -- - Pr2
dP3 Third probe display -- - Pr2
dP4 Fourth probe display -- - Pr2
rSE Real set actual set - Pr2
rEL Software release -- 1.8 Pr2
Ptb Map code -- Pr2
* Only for model with real time clock
2Only for XW60L with X-REP output
Dixell S.p.A. Z.I. Via dell’Industria, 27
32010 Pieve d’Alpago (BL) ITALY
tel. +39 - 0437 - 98 33 - fax +39 - 0437 - 98 93 13

dIXEL
Installing and Operating Instructions 1592027320
1592027320 XW20LS RTC GB r1.0 10.07.2008.doc XW20LS 1/5
Digital controller with off cycle defrost
XW20LS
1. GENERAL WARNING
1.1 PLEASE READ BEFORE USING THIS MANUAL
•This manual is part of the product and should be kept near the instrument for easy and quick reference.
•The instrument shall not be used for purposes different from those described hereunder. It cannot be
used as a safety device.
•Check the application limits before proceeding.
1.2 SAFETY PRECAUTIONS
•Check the supply voltage is correct before connecting the instrument.
•Do not expose to water or moisture: use the controller only within the operating limits avoiding sudden
temperature changes with high atmospheric humidity to prevent formation of condensation
•Warning: disconnect all electrical connections before any kind of maintenance.
•Fit the probe where it is not accessible by the End User. The instrument must not be opened.
•In case of failure or faulty operation send the instrument back to the distributor or to “Dixell S.p.A.” (see
address) with a detailed description of the fault.
•Consider the maximum current which can be applied to each relay (see Technical Data).
•Ensure that the wires for probes, loads and the power supply are separated and far enough from each
other, without crossing or intertwining.
•In case of applications in industrial environments, the use of mains filters (our mod. FT1) in parallel with
inductive loads could be useful.
2. GENERAL DESCRIPTION
Model XW20LS, format 38x185mm, is a digital thermostat with off cycle defrost designed for
refrigeration applications at normal temperature. It has 2 relay outputs to control compressor and
light.. It could be provided with a Real Time Clock which allows programming of up to 6 daily defrost
cycles, divided into holidays and workdays. A “Day and Night” function with two different set points is
fitted for energy saving. It is also provided with up to 2 NTC or PTC probe inputs, the first one for
temperature control, the second one, to be located onto the evaporator and to control the defrost
termination temperature. The digital input can operate as third temperature probe, to signal the
condenser temperature alarm or to display a temperature.
The HOT KEY output allows to connect the unit, by means of the external module XJ485-CX, to a
network line ModBUS-RTU compatible such as the dIXEL monitoring units of X-WEB family. It
allows to program the controller by means the HOT KEY programming keyboard.
The instrument is fully configurable through special parameters that can be easily programmed
through the keyboard.
3. CONTROLLING LOADS
3.1 COMPRESSOR
The regulation is performed according
to the temperature measured by the
thermostat probe with a positive
differential from the set point: if the
temperature increases and reaches set
point plus differential the compressor is
started and then turned off when the
temperature reaches the set point value
again.
Time
Temper.
Compr.
SET
ON
In case of fault in the thermostat probe the start and stop of the compressor are timed through
parameters “COn” and “COF”.
3.2 DEFROST
Defrost is performed through a simple stop of the compressor. The defrost interval depends on the
presence of the RTC (optional). If the RTC is present is controlled by means of parameter “EdF”:
-with EdF=in the defrost is made every “IdF” time – standard way for controller without RTC.
-with EdF = “rtc”, the defrost is made in real time depending on the hours set in the parameters
Ld1..Ld6 on workdays and in Sd1…Sd6 in holidays;
Other parameters are used to control defrost cycles: its maximum length (MdF) and two defrost
modes: timed or controlled by the evaporator’s probe (P2P).
4. FRONT PANEL COMMANDS
4.1 STANDARD FRONTAL PANEL
4.2 STEEL FINISHING
: To display target set point; in programming mode it selects a parameter or confirm an
operation.
(DEF) To start a manual defrost
(UP): To see the max. stored temperature; in programming mode it browses the parameter
codes or increases the displayed value.
(DOWN) To see the min stored temperature; in programming mode it browses the parameter
codes or decreases the displayed value.
To switch the instrument off.
To switch the light.
KEY COMBINATIONS:
+ To lock & unlock the keyboard.
+To enter in programming mode.
+To return to the room temperature display.
4.3 USE OF LEDS
Each LED function is described in the following table.
LED MODE FUNCTION
ON Compressor enabled
Flashing Anti-short cycle delay enabled
ON Defrost enabled
Flashing Drip time in progress
ON An alarm is occurring
ON Continuous cycle is running
ON Energy saving enabled
ON Light on
°C/°F ON Measurement unit
°C/°F Flashing Programming phase
5. MAX & MIN TEMPERATURE MEMORIZATION
5.1 HOW TO SEE THE MIN TEMPERATURE
1. Press and release the nkey.
2. The “Lo” message will be displayed followed by the minimum temperature recorded.
3. By pressing the nkey again or by waiting 5s the normal display will be restored.
5.2 HOW TO SEE THE MAX TEMPERATURE
1. Press and release the okey.
2. The “Hi” message will be displayed followed by the maximum temperature recorded.
3. By pressing the okey again or by waiting 5s the normal display will be restored.
5.3 HOW TO RESET THE MAX AND MIN TEMPERATURE RECORDED
1. Hold press the SET key for more than 3s, while the max. or min temperature is displayed. (rSt
message will be displayed)
2. To confirm the operation the “rSt” message starts blinking and the normal temperature will be
displayed.
6. MAIN FUNCTIONS
6.1 TO SET THE CURRENT TIME AND DAY (ONLY FOR INSTRUMENTS
WITH RTC)
When the instrument is switched on, it’s necessary to program the time and day.
1. Enter the Pr1 programming menu, by pushing the SET + n keys for 3s.
2. The rtc parameter is displayed. Push the SET key to enter the real time clock menu.
3. The Hur (hour) parameter is displayed.
4. Push the SET and set current hour by the UP and Down keys, then push SET to
confirm the value..
5. Repeat the same operations on the Min (minutes) and dAy (day) parameters.
To exit: Push SET+UP keys or wait for 15 sec without pushing any keys.
6.2 HOW TO SEE THE SET POINT
1. Push and immediately release the SET key: the display will show the
Set point value;
2. Push and immediately release the SET key or wait for 5 seconds to
display the probe value again.
6.3 HOW TO CHANGE THE SET POINT
1. Push the SET key for more than 2 seconds to change the Set point value;
2. The value of the set point will be displayed and the “°C” or “°F” LED starts blinking;
3. To change the Set value push the o or narrows within 10s.
4. To memorise the new set point value push the SET key again or wait 10s.
6.4 HOW TO START A MANUAL DEFROST
Push the DEF key for more than 2 seconds and a manual defrost will start.
6.5 HOW TO CHANGE A PARAMETER VALUE
To change the parameter’s value operate as follows:
1. Enter the Programming mode by pressing the Set + nkeys for 3s (the “°C” or “°F” LED starts
blinking).
2. Select the required parameter. Press the “SET” key to display its value

dIXEL
Installing and Operating Instructions 1592027320
1592027320 XW20LS RTC GB r1.0 10.07.2008.doc XW20LS 2/5
3. Use “UP” or “DOWN” to change its value.
4. Press “SET” to store the new value and move to the following parameter.
To exit: Press SET + UP or wait 15s without pressing a key.
NOTE: the set value is stored even when the procedure is exited by waiting the time-out to expire.
6.6 THE HIDDEN MENU
The hidden menu Includes all the parameters of the instrument.
6.6.1 HOW TO ENTER THE HIDDEN MENU
1. Enter the Programming mode by pressing the Set + nkeys for 3s (the “°C” or “°F” LED starts
blinking).
2. Released the keys, then push again the Set+nkeys for more than 7s. The Pr2 label will be
displayed immediately followed from the HY parameter.
NOW YOU ARE IN THE HIDDEN MENU.
3. Select the required parameter.
4. Press the “SET” key to display its value
5. Use o or nto change its value.
6. Press “SET” to store the new value and move to the following parameter.
To exit: Press SET + o or wait 15s without pressing a key.
NOTE1: if none parameter is present in Pr1, after 3s the “noP” message is displayed. Keep the keys
pushed till the Pr2 message is displayed.
NOTE2: the set value is stored even when the procedure is exited by waiting the time-out to expire.
6.6.2 HOW TO MOVE A PARAMETER FROM THE HIDDEN MENU TO THE
FIRST LEVEL AND VICEVERSA.
Each parameter present in the HIDDEN MENU can be removed or put into “THE FIRST LEVEL”
(user level) by pressing “SET + n”.
In HIDDEN MENU when a parameter is present in First Level the decimal point is on.
6.7 HOW TO LOCK THE KEYBOARD
1. Keep pressed for more than 3 s the UP + DOWN keys.
2. The “POF” message will be displayed and the keyboard will be locked. At this point it will be
possible only to see the set point or the MAX o Min temperature stored
3. If a key is pressed more than 3s the “POF” message will be displayed.
6.8 TO UNLOCK THE KEYBOARD
Keep pressed together for more than 3s the o and nkeys, till the “Pon” message will be
displayed.
6.9 THE CONTINUOUS CYCLE
When defrost is not in progress, it can be activated by holding the “o” key pressed for about 3
seconds. The compressor operates to maintain the “ccS” set point for the time set through the “CCt”
parameter. The cycle can be terminated before the end of the set time using the same activation key
“o” for 3 seconds.
6.10 THE ON/OFF FUNCTION
With “onF = oFF”, pushing the ON/OFF key, the instrument is switched off. The “OFF”
message is displayed. In this configuration, the regulation is disabled.
To switch the instrument on, push again the ON/OFF key.
WARNING: Loads connected to the normally closed contacts of the relays are always
supplied and under voltage, even if the instrument is in stand by mode.
7. PARAMETERS
rtc Real time clock menu (only for controller with RTC): to set the time and date and defrost
start time.
REGULATION
Hy Differential: (0,1 ÷ 25,5°C / 1÷255 °F) Intervention differential for set point. Compressor Cut IN
is Set Point + differential (Hy). Compressor Cut OUT is when the temperature reaches the set
point.
LS Minimum set point: (- 50°C÷SET/-58°F÷SET): Sets the minimum value for the set point.
US Maximum set point: (SET÷110°C/ SET÷230°F). Set the maximum value for set point.
Ot Thermostat probe calibration: (-12.0÷12.0°C; -120÷120°F) allows to adjust possible offset of
the thermostat probe.
P2P Evaporator probe presence: n= not present: y= present:
OE Evaporator probe calibration: (-12.0÷12.0°C; -120÷120°F). allows to adjust possible offset of
the evaporator probe.
P3P Third probe presence (P3): n= not present:, the terminals operate as digital input.; y=
present:, the terminals operate as third probe.
O3 Third probe calibration (P3): (-12.0÷12.0°C; -120÷120°F). allows to adjust possible offset of
the third probe.
OdS Outputs activation delay at start up: (0÷255min) This function is enabled at the initial start up
of the instrument and inhibits any output activation for the period of time set in the parameter.
AC Anti-short cycle delay: (0÷50 min) minimum interval between the compressor stop and the
following restart.
rtr Percentage of the second and first probe for regulation (0÷100; 100 = P1, 0 = P2 ): it
allows to set the regulation according to the percentage of the first and second probe, as for the
following formula (rtr(P1-P2)/100 + P2).
CCt Compressor ON time during continuous cycle: (0.0÷24.0h; res. 10min) Allows to set the
length of the continuous cycle: compressor stays on without interruption for the CCt time. Can be
used, for instance, when the room is filled with new products.
CCS Set point for continuous cycle: (-50÷150°C) it sets the set point used during the continuous
cycle.
COn Compressor ON time with faulty probe: (0÷255 min) time during which the compressor is
active in case of faulty thermostat probe. With COn=0 compressor is always OFF.
COF Compressor OFF time with faulty probe: (0÷255 min) time during which the compressor is
OFF in case of faulty thermostat probe. With COF=0 compressor is always active.
CH Type of action: CL = cooling; Ht = heating.
DISPLAY
CF Temperature measurement unit: °C=Celsius; °F=Fahrenheit. WARNING: When the
measurement unit is changed the SET point and the values of the parameters Hy, LS, US, Ot,
ALU and ALL have to be checked and modified if necessary).
rES Resolution (for °C): (in = 1°C; dE = 0.1 °C) allows decimal point display.
Lod Instrument display: (P1; P2, P3, P4, SET, dtr): it selects which probe is displayed by the
instrument: P1 = Thermostat probe; P2 = Evaporator probe; P3 = Third probe(only for model
with this option enabled); P4 = NOT SET IT, SET = set point; dtr = percentage of visualization.
rEd X- REP display (optional): (P1; P2, P3, P4, SET, dtr): it selects which probe is displayed by
X- REP: P1 = Thermostat probe; P2 = Evaporator probe; P3 = Third probe(only for model with
this option enabled); P4 = NOT SET IT, SET = set point; dtr = percentage of visualization.
dLy Display delay: (0 ÷20.0m; resul. 10s) when the temperature increases, the display is updated
of 1 °C/1°F after this time.
dtr Percentage of the second and first probe for visualization when Lod = dtr (0÷100; 100 =
P1, 0 = P2 ): if Lod = dtr it allows to set the visualization according to the percentage of the
first and second probe, as for the following formula (dtr(P1-P2)/100 + P2).
DEFROST
EdF Defrost mode (only for controller with RTC): rtc = Real Time Clock mode. Defrost time
follows Ld1÷Ld6 parameters on workdays and Sd1÷Sd6 on holidays.
in = interval mode. The defrost starts when the time “Idf” is expired.
dFP Probe selection for defrost termination: nP = no probe; P1 =thermostat probe; P2 =
evaporator probe; P3 =configurable probe; P4 = NOT SET IT.
dtE Defrost termination temperature: (-50÷50 °C/ -58÷122°F) (Enabled only when EdF=Pb) sets
the temperature measured by the evaporator probe, which causes the end of defrost.
IdF Interval between defrost cycles: (0÷120h) Determines the time interval between the
beginning of two defrost cycles.
MdF (Maximum) length for defrost: (0÷255min) When P2P = n, (not evaporator probe: timed
defrost) it sets the defrost duration, when P2P = y (defrost end based on temperature) it sets
the maximum length for defrost.
dFd Temperature displayed during defrost: (rt = real temperature; it = temperature at defrost
start; SEt = set point; dEF = “dEF” label)
dAd MAX display delay after defrost: (0÷255min). Sets the maximum time between the end of
defrost and the restarting of the real room temperature display.
ALARMS
ALP Probe selection for alarm: nP = no probe, the temperature alarms are disabled; P1 = Probe 1
(Thermostat probe); P2 = Probe 2 (evaporator probe); P3 = Probe 3 (display probe); P4 = NOT
SET IT.
ALC Temperature alarms configuration: (Ab; rE)
Ab= absolute temperature: alarm temperature is given by the ALL or ALU values. rE =
temperature alarms are referred to the set point. Temperature alarm is enabled when the
temperature exceeds the “SET+ALU” or “SET-ALL” values.
ALU MAXIMUM temperature alarm: (SET÷110°C; SET÷230°F) when this temperature is reached
the alarm is enabled, after the “ALd” delay time.
ALL Minimum temperature alarm: (-50.0 ÷ SET °C; -58÷230°F when this temperature is reached
the alarm is enabled, after the “ALd” delay time.
AFH Differential for temperature alarm recovery: (0,1÷25,5°C; 1÷45°F) Intervention differential
for recovery of temperature alarm.
ALd Temperature alarm delay: (0÷255 min) time interval between the detection of an alarm
condition and alarm signalling.
dAo Exclusion of temperature alarm at start-up: (from 0.0 min to 23.5h) time interval between the
detection of the temperature alarm condition after instrument power on and alarm signalling.
CONDENSER TEMPERATURE ALARM
AP2 Probe selection for temperature alarm of condenser: nP = no probe; P1 =thermostat probe;
P2 = evaporator probe; P3 =configurable probe; P4 = NOT SET IT.
AL2 Low temperature alarm of condenser:(-55÷150°C) when this temperature is reached the
LA2 alarm is signalled, possibly after the Ad2 delay.
Au2 High temperature alarm of condenser:(-55÷150°C) when this temperature is reached the
HA2 alarm is signalled, possibly after the Ad2 delay.
AH2 Differential for temperature condenser alarm recovery:(0,1÷25,5°C; 1÷45°F)
Ad2 Condenser temperature alarm delay: (0÷255 min) time interval between the detection of the
condenser alarm condition and alarm signalling.
dA2 Condenser temperature alarm exclusion at start up: (from 0.0 min to 23.5h, res. 10min)
bLL Compressor off with low temperature alarm of condenser:n = no: compressor keeps on
working; Y = yes, compressor is switched off till the alarm is present, in any case regulation
restarts after AC time at minimum.
AC2 Compressor off with high temperature alarm of condenser:n = no: compressor keeps on
working; Y = yes, compressor is switched off till the alarm is present, in any case regulation
restarts after AC time at minimum.
DIGITAL INPUT
i1P Digital input polarity: oP: the digital input is activated by opening the contact; CL: the digital
input is activated by closing the contact.
i1F Digital input configuration: EAL= external alarm: “EA” message is displayed; bAL= serious
alarm “CA” message is displayed. PAL= pressure switch alarm, “CA” message is displayed;
dor= door switch function; dEF= activation of a defrost cycle; AUS=not enabled; Htr= kind of
action inversion (cooling – heating); FAn=not set it; ES=Energy saving; HdF =Holiday
defrost (enable only with RTC); onF = to switch the controller off.
did (0÷255 min) with i1F= EAL or i1F = bAL digital input alarm delay (1-3): delay between the
detection of the external alarm condition and its signalling.
with i1F= dor: door open signalling delay
with i1F= PAL: time for pressure switch function: time interval to calculate the number of
the pressure switch activation.
nPS Pressure switch number: (0 ÷15) Number of activation of the pressure switch, during the “did”
interval, before signalling the alarm event (i1F= PAL).
If the nPS activation in the did time is reached, switch off and on the instrument to
restart normal regulation.
odc Compressor status when open door: no, Fan = normal; CPr, F_C = Compressor OFF.
rrd Outputs restart after doA alarm: no= outputs not affected by the doA alarm; yES = outputs
restart with the doA alarm.
HES Temperature increase during the Energy Saving cycle:
(-30,0°C÷30,0°C) it sets the increasing value of the set point during the Energy Saving cycle.
TO SET CURRENT TIME AND WEEKLY HOLIDAYS (ONLY FOR MODELS WITH RTC)
Hur Current hour (0 ÷ 23 h)
Min Current minute (0 ÷ 59min)
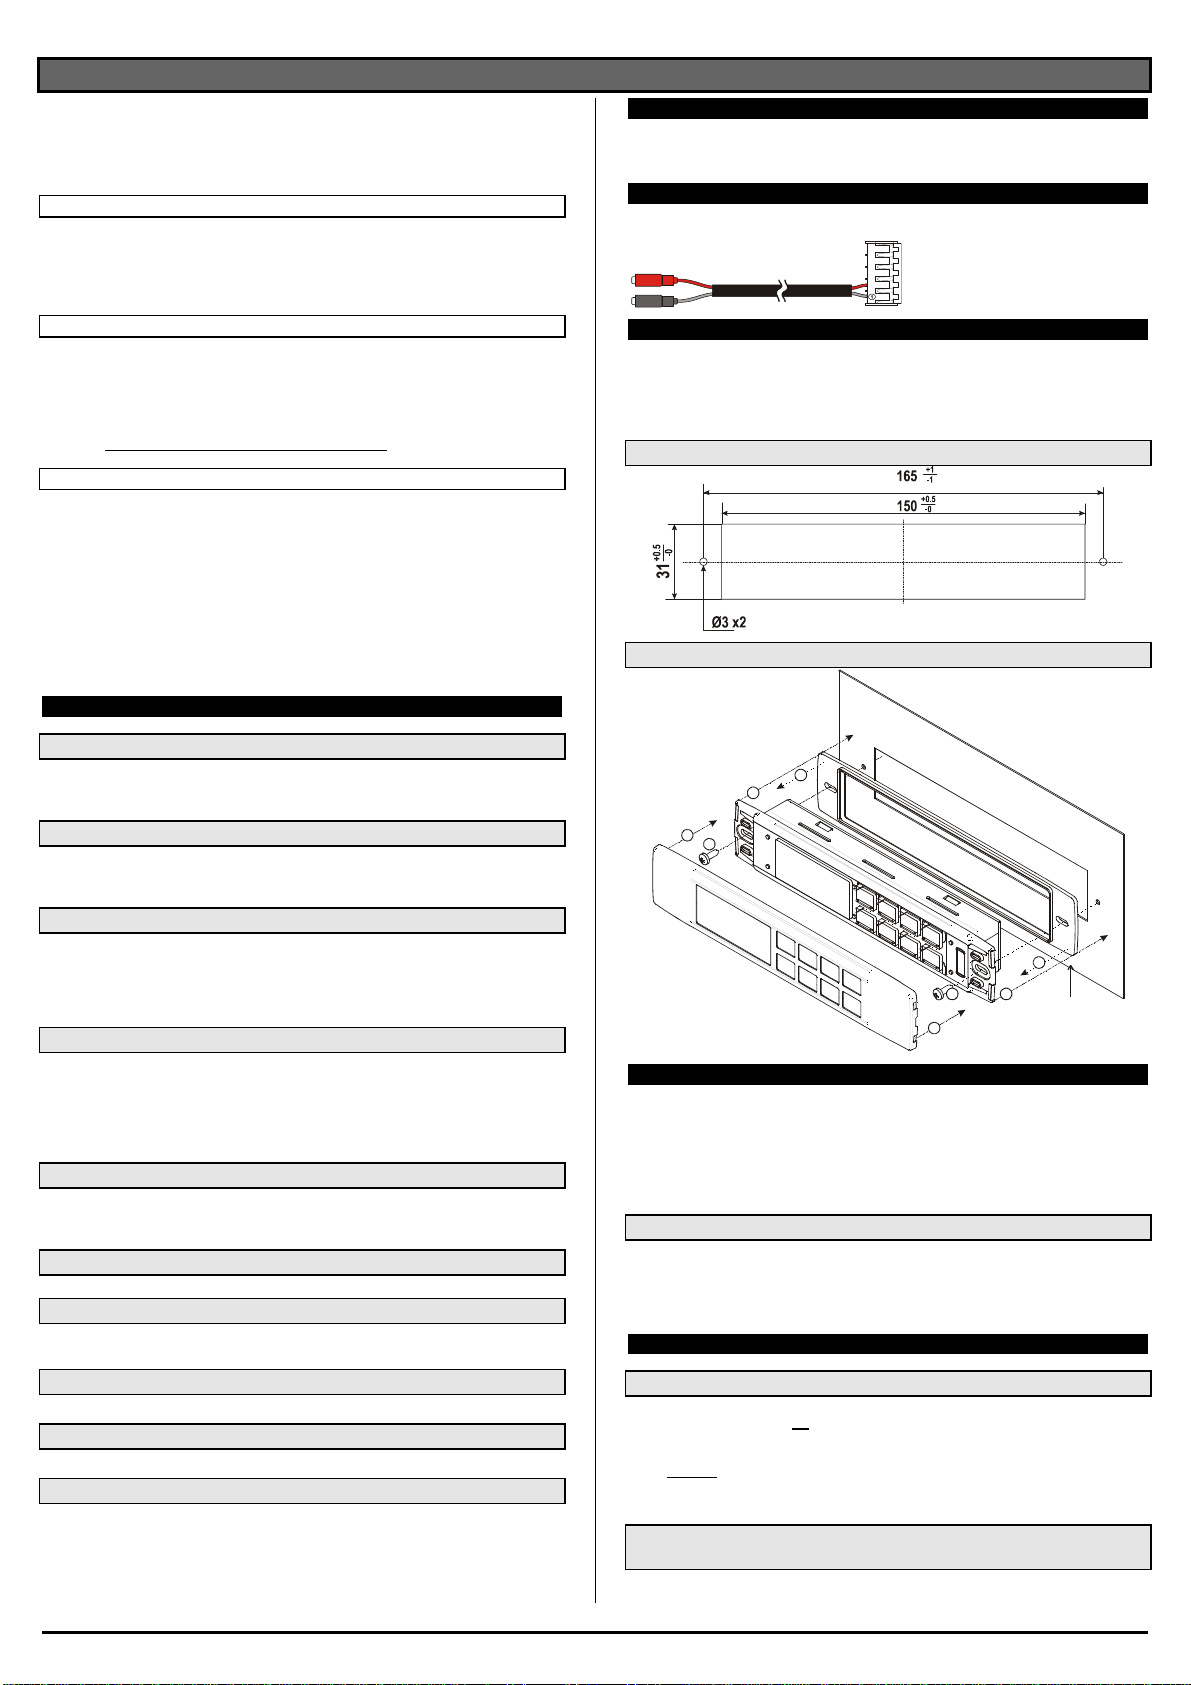
dIXEL
Installing and Operating Instructions 1592027320
1592027320 XW20LS RTC GB r1.0 10.07.2008.doc XW20LS 3/5
dAY Current day (Sun ÷ SAt)
Hd1 First weekly holiday (Sun ÷ nu) Set the first day of the week which follows the holiday
times.
Hd2 Second weekly holiday (Sun ÷ nu) Set the second day of the week which follows the
holiday times.
N.B. Hd1,Hd2 can be set also as “nu” value (Not Used).
TO SET ENERGY SAVING TIMES (ONLY FOR MODELS WITH RTC)
ILE Energy Saving cycle start during workdays: (0 ÷ 23h 50 min.) During the Energy Saving
cycle the set point is increased by the value in HES so that the set point is SET + HES.
dLE Energy Saving cycle length during workdays: (0 ÷ 24h 00 min.) Sets the duration of the
Energy Saving cycle on workdays.
ISE Energy Saving cycle start on holidays. (0 ÷ 23h 50 min.)
dSE Energy Saving cycle length on holidays (0 ÷ 24h 00 min.)
TO SET DEFROST TIMES (ONLY FOR MODELS WITH RTC)
Ld1÷Ld6 Workday defrost start (0 ÷ 23h 50 min.) These parameters set the beginning of the 6
programmable defrost cycles during workdays. Ex. When Ld2 = 12.4 the second defrost starts
at 12.40 during workdays.
Sd1÷Sd6 Holiday defrost start (0 ÷ 23h 50 min.) These parameters set the beginning of the 6
programmable defrost cycles on holidays. Ex. When Sd2 = 3.4 the second defrost starts at
3.40 on holidays.
N.B. :To disable a defrost cycle set it to “nu”(not used). Ex. If Ld6=nu ; the sixth defrost
cycle is disabled
OTHER
Adr Serial address (1÷244): Identifies the instrument address when connected to a ModBUS
compatible monitoring system.
PbC Type of probe: it allows to set the kind of probe used by the instrument: PbC = PBC probe, ntc
= NTC probe.
onF on/off key enabling: nu = disabled; oFF = enabled; ES = not set it.
dP1 Thermostat probe display
dP2 Evaporator probe display
dP3 Third probe display- optional.
rSE Real set point: it shows the set point used during the energy saving cycle or during the
continuous cycle.
rEL Software release for internal use.
Ptb Parameter table code: readable only.
8. DIGITAL INPUT (ENABLED ONLY IF P3P = N)
8.1 GENERIC ALARM (i1F = EAL)
As soon as the digital input is activated the unit will wait for “did” time delay before signalling the
“EAL” alarm message. The outputs status don’t change. The alarm stops just after the digital input is
de-activated.
8.2 SERIOUS ALARM MODE (i1F = bAL)
When the digital input is activated, the unit will wait for “did” delay before signalling the “CA” alarm
message. The relay outputs are switched OFF. The alarm will stop as soon as the digital input is de-
activated.
8.3 PRESSURE SWITCH (i1F = PAL)
If during the interval time set by “did” parameter, the pressure switch has reached the number of
activation of the “nPS” parameter, the “CA” pressure alarm message will be displayed. The
compressor and the regulation are stopped. When the digital input is ON the compressor is always
OFF. If the nPS activation in the did time is reached, switch off and on the instrument to
restart normal regulation.
8.4 DOOR SWITCH INPUT (i1F = dor)
It signals the door status and the corresponding relay output status through the “odc” parameter: no,
Fan = normal (any change); CPr, F_C = Compressor OFF.
Since the door is opened, after the delay time set through parameter “did”, the door alarm is
enabled, the display shows the message “dA” and the regulation restarts is rtr = yES. The alarm
stops as soon as the external digital input is disabled again. With the door open, the high and low
temperature alarms are disabled.
8.5 START DEFROST (i1F = dEF)
It starts a defrost if there are the right conditions. After the defrost is finished, the normal regulation
will restart only if the digital input is disabled otherwise the instrument will wait until the “MdF” safety
time is expired.
8.6 INVERSION OF THE KIND OF ACTION: HEATING-COOLING (i1F =Htr)
This function allows to invert the regulation of the controller: from cooling to heating and viceversa.
8.7 ENERGY SAVING (i1F = ES)
The Energy Saving function allows to change the set point value as the result of the SET+ HES
(parameter) sum. This function is enabled until the digital input is activated.
8.8 HOLIDAY DEFROST (i1F = HDF) –ONLY FOR MODELS WITH RTC
This function enabled the holiday defrost setting.
8.9 ON OFF FUNCTION (i1F = onF)
To switch the controller on and off.
8.10 DIGITAL INPUTS POLARITY
The digital input polarity depends on the “i1P”parameter.
i1P =CL: the input is activated by closing the contact.
i1P =OP: the input is activated by opening the contact
9. TTL SERIAL LINE – FOR MONITORING SYSTEMS
The TTL serial line, available through the HOT KEY connector, allows by means of the external
TTL/RS485 converter, XJ485-CX, to connect the instrument to a monitoring system ModBUS-RTU
compatible such as the X-WEB500/3000/300.
10. X-REP OUTPUT – OPTIONAL
As optional, an X-REP can be connected to the instrument, trough the HOY KEY
connector. The X-REP output EXCLUDES the serial connection.
To connect the X-REP to the
instrument the following connectors
must be used CAB-51F(1m), CAB-
52F(2m), CAB-55F(5m),
11. INSTALLATION AND MOUNTING
The controller XW20LS, shall be mounted on vertical panel, in a 150x31 mm hole, and fixed using
two screws ∅3 x 2mm. To obtain an IP65 protection grade use the front panel rubber gasket (mod.
RG-L). The temperature range allowed for correct operation is 0 - 60 °C. Avoid places subject to
strong vibrations, corrosive gases, excessive dirt or humidity. The same recommendations apply to
probes. Let the air circulate by the cooling holes.
11.1 CUT OUT
11.2 STEEL FINISHING MOUNTING
1
1
2
23
3
4
4
RG-LX gascke
(optional)
12. ELECTRICAL CONNECTIONS
The instruments are provided with screw terminal block to connect cables with a cross section up to
2,5 mm2 for the digital and analogue inputs. Relays and power supply have a Faston connection
(6,3mm). Heat-resistant cables have to be used. Before connecting cables make sure the power
supply complies with the instrument’s requirements. Separate the probe cables from the power
supply cables, from the outputs and the power connections. Do not exceed the maximum current
allowed on each relay, in case of heavier loads use a suitable external relay.
N.B. Maximum current allowed for all the loads is 20A.
12.1 PROBE CONNECTION
The probes shall be mounted with the bulb upwards to prevent damages due to casual liquid
infiltration. It is recommended to place the thermostat probe away from air streams to correctly
measure the average room temperature. Place the defrost termination probe among the evaporator
fins in the coldest place, where most ice is formed, far from heaters or from the warmest place during
defrost, to prevent premature defrost termination.
13. HOW TO USE THE HOT KEY
13.1 HOW TO PROGRAM A HOT KEY FROM THE INSTRUMENT (UPLOAD)
1. Program one controller with the front keypad.
2. When the controller is ON, insert the “Hot key” and push okey; the "uPL" message
appears followed a by flashing “End”
3. Push “SET” key and the End will stop flashing.
4. Turn OFF the instrument remove the “Hot Key”, then turn it ON again.
NOTE: the “Err” message is displayed for failed programming. In this case push again okey if you
want to restart the upload again or remove the “Hot key” to abort the operation.
13.2 HOW TO PROGRAM AN INSTRUMENT USING A HOT KEY
(DOWNLOAD)
1. Turn OFF the instrument.
2. Insert a programmed “Hot Key” into the 5 PIN receptacle and then turn the Controller ON.

dIXEL
Installing and Operating Instructions 1592027320
1592027320 XW20LS RTC GB r1.0 10.07.2008.doc XW20LS 4/5
3. Automatically the parameter list of the “Hot Key” is downloaded into the Controller memory,
the “doL” message is blinking followed a by flashing “End”.
4. After 10 seconds the instrument will restart working with the new parameters.
5. Remove the “Hot Key”..
NOTE the message “Err” is displayed for failed programming. In this case turn the unit off and then
on if you want to restart the download again or remove the “Hot key” to abort the operation.
14. ALARM SIGNALS
Message Cause Outputs
“P1” Room probe failure Compressor output acc. to par. “Con” and “COF”
“P2” Evaporator probe failure Defrost end is timed
“P3” Third probe failure Outputs unchanged
“HA” Maximum temperature alarm Outputs unchanged.
“LA” Minimum temperature alarm Outputs unchanged.
"HA2" Condenser high temperature It depends on the “Ac2” parameter
"LA2" Condenser low temperature It depends on the “bLL” parameter
“dA” Door open Compressor and fans restarts
“EA” External alarm Output unchanged.
“CA” Serious external alarm (i1F=bAL) All outputs OFF.
“CA” Pressure switch alarm (i1F=PAL) All outputs OFF
“rtc” Real time clock alarm Alarm output ON; Other outputs unchanged;
Defrosts according to par. “IdF” Set real time clock
has to be set
rtF Real time clock board failure Alarm output ON; Other outputs unchanged;
Defrosts according to par. “IdF” Contact the
service
14.1 SILENCING BUZZER / ALARM RELAY OUTPUT
If “tbA = y”, the buzzer and the relay are is silenced by pressing any key.
If “tbA = n”, only the buzzer is silenced while the alarm relay is on until the alarm condition recovers.
14.2 ALARM RECOVERY
Probe alarms P1”, “P2”, “P3” start some seconds after the fault in the related probe; they
automatically stop some seconds after the probe restarts normal operation. Check connections
before replacing the probe.
Temperature alarms “HA”, “LA” “HA2” and “LA2” automatically stop as soon as the temperature
returns to normal values.
Alarms “EA” and “CA” (with i1F=bAL) recover as soon as the digital input is disabled.
Alarm “CA” (with i1F=PAL) recovers only by switching off and on the instrument.
14.3 OTHER MESSAGES
Pon Keyboard unlocked.
PoF Keyboard locked
noP In programming mode: none parameter is present in Pr1
On the display or in dP2, dP3, dP4: the selected probe is nor enabled
15. TECHNICAL DATA
Housing: self extinguishing ABS.
Case: facia 38x185 mm; depth 48mm
Mounting : panel mounting in a 150x31 mm panel cut-out with two screws. ∅3 x 2mm.
Distance between the holes 165mm
Protection: IP20; Frontal protection: IP65 with frontal gasket mod RG-L. (optional)
Connections: Screw terminal block ≤2,5 mm2heat-resistant wiring and 6,3mm Faston
Power supply: 230Vac or. 110Vac or 24Vac ±10%; Power absorption: 5VA max.
Display: 3 digits, red LED, 14,2 mm high; Inputs: Up to 3 NTC or PTC probes.
Digital input: 1 free voltage
Relay outputs: Total current on loads MAX. 20A
compressor: relay SPST 20(8) A, 250Vac
light: relay SPST 7 A, 250Vac
Other output : buzzer (optional)
Serial output : TTL standard; Communication protocol: Modbus - RTU
Data storing: on the non-volatile memory (EEPROM).
Internal clock back-up: 24 hours (only for model with RTC)
Kind of action: 1B; Pollution grade: 2;Software class: A.;
Rated impulsive voltage: 2500V; Over voltage Category: II
Operating temperature: 0÷60 °C; Storage temperature: -30÷85 °C.
Relative humidity: 20÷85% (no condensing)
Measuring and regulation range: NTC probe: -40÷110°C (-40÷230°F);
PTC probe: -50÷150°C (-58÷302°F)
Resolution: 0,1 °C or 1°C or 1 °F (selectable); Accuracy (ambient temp. 25°C): ±0,7 °C ±1 digit
16. CONNECTIONS
16.1 XW20LS – DRY CONTACTS
Supply: 120Vac or 24Vac: connect to terminals 7-8
The X-REP output is optional
16.2 XW20LS – DIRECT CONNECTIONS OF LOAD
Supply: 120Vac or 24Vac: connect to terminals 5-6
The X-REP output is optional
17. DEFAULT SETTING VALUES
Label Name Range °C/°F Level
Set Set point LS÷US 3.0 - - -
rtc* Real time clock menu - - Pr1
Hy Differential 0,1÷25.5°C/ 1÷255°F 2.0 Pr1
LS Minimum set point -50°C÷SET/-58°F÷SET -50.0 Pr2
US Maximum set point SET÷110°C/ SET ÷230°F 110 Pr2
Ot Thermostat probe calibration -12÷12°C /-120÷120°F 0.0 Pr1
P2P Evaporator probe presence n=not present; Y=pres. Y Pr1
OE Evaporator probe calibration -12÷12°C /-120÷120°F 0.0 Pr2
P3P Third probe presence n=not present; Y=pres. n Pr2
O3 Third probe calibration -12÷12°C /-120÷120°F 0 Pr2
OdS Outputs delay at start up 0÷255 min 0 Pr2
AC Anti-short cycle delay 0 ÷50 min 1 Pr1
rtr P1-P2 percentage for regulation 0 ÷ 100 (100=P1 , 0=P2) 100 Pr2
CCt Continuous cycle duration 0.0÷24.0h 0.0 Pr2
CCS Set point for continuous cycle (-55.0÷150,0°C) (-67÷302°F) 3.0 Pr2
COn Compressor ON time with faulty probe 0 ÷255 min 15 Pr2
COF Compressor OFF time with faulty probe 0 ÷255 min 30 Pr2
CH Kind of action cL÷Ht cL Pr1
CF Temperature measurement unit °C ÷°F °C Pr2
rES Resolution in=integer; dE= dec.point dE Pr1
Lod Probe displayed P1;P2 P1 Pr2
rEd2 X-REP display P1 – P2 – P3 – P4 – SEt – dtr P1 Pr2
dLy Display temperature delay 0 ÷ 20.0 min (10 sec.) 0.0 Pr2
dtr P1-P2 percentage for display 1 ÷ 99 50 Pr2
EdF* Kind of interval for defrost rtc ÷in in Pr2
dFP Probe selection for defrost termination nP; P1; P2; P3; P4 nP Pr2
dtE Defrost termination temperature -50 ÷50 °C 3 Pr1
IdF Interval between defrost cycles 1 ÷120 ore 8 Pr1
MdF (Maximum) length for defrost 0 ÷255 min 20 Pr1
dFd Displaying during defrost rt, it, SEt, DEF it Pr2
dAd MAX display delay after defrost 0 ÷ 255 min 30 Pr2
ALP Alarm probe selection nP; P1; P2; P3; P4 P1 Pr2
ALc Temperat. alarms configuration rE= related to set;
Ab = absolute Ab Pr2
ALU MAXIMUM temperature alarm Set÷110.0°C; Set÷230°F 110,0 Pr1
ALL Minimum temperature alarm -50.0°C÷Set/ -58°F÷Set -50,0 Pr1
AFH Differential for temperat. alarm recovery (0,1°C÷25,5°C) (1°F÷45°F) 2,0 Pr2
ALd Temperature alarm delay 0 ÷255 min 15 Pr2
dAO Delay of temperature alarm at start up 0 ÷23h e 50’ 1,3 Pr2
AP2 Probe for temperat. alarm of condenser nP; P1; P2; P3; P4 nP Pr2
AL2 Condenser for low temperat. alarm (-55 ÷ 150°C) (-67÷ 302°F) -40 Pr2
AU2 Condenser for high temperat. alarm (-55 ÷ 150°C) (-67÷ 302°F) 110 Pr2
AH2 Differ. for condenser temp. alar. recovery [0,1°C ÷ 25,5°C] [1°F ÷ 45°F] 5 Pr2
Ad2 Condenser temperature alarm delay 0 ÷ 254 (min.) , 255=nU 15 Pr2
dA2 Delay of cond. temper. alarm at start up 0.0 ÷ 23h 50’ 1,3 Pr2
bLL Compr. off for condenser low temper. alarm n(0) - Y(1) n Pr2
AC2 Compr. off for condenser high temper alarm n(0) - Y(1) n Pr2
i1P Digital input polarity (13-14) oP=opening;CL=closing cL Pr1
i1F Digital input 1 configuration (13-14) EAL, bAL, PAL, dor; dEF; Htr, AUS dor Pr1
did Digital input alarm delay (13-14) 0÷255min 15 Pr1
Nps Number of activation of pressure switch 0 ÷15 15 Pr2
odc Compress status when open door no; Fan; CPr; F_C F-c Pr2
rrd Regulation restart with door open alarm n – Y y Pr2
HES Differential for Energy Saving (-30°C÷30°C) (-54°F÷54°F) 0 Pr2
Hur* Current hour 0 ÷ 23 - rtc
Min* Current minute 0 ÷ 59 - rtc
dAY* Current day Sun ÷ SAt - rtc
Hd1* First weekly holiday Sun÷ SAt – nu nu rtc
Hd2* Second weekly holiday Sun÷ SAt – nu nu rtc
ILE* Energy Saving cycle start during workdays 0 ÷ 23h 50 min. 0 rtc
dLE* Energy Saving cycle length during workdays 0 ÷ 24h 00 min. 0 rtc
ISE* Energy Saving cycle start on holidays 0 ÷ 23h 50 min. 0 rtc
dSE* Energy Saving cycle length on holidays 0 ÷ 24h 00 min. 0 rtc
Ld1* 1st workdays defrost start 0 ÷ 23h 50 min. - nu 6.0 rtc
Ld2* 2nd workdays defrost start 0 ÷ 23h 50 min. - nu 13.0 rtc
Ld3* 3rd workdays defrost start 0 ÷ 23h 50 min. - nu 21.0 rtc
Ld4* 4th workdays defrost start 0 ÷ 23h 50 min. - nu 0.0 rtc
Ld5* 5th workdays defrost start 0 ÷ 23h 50 min. - nu 0.0 rtc
Ld6* 6th workdays defrost start 0 ÷ 23h 50 min. - nu 0.0 rtc

dIXEL
Installing and Operating Instructions 1592027320
1592027320 XW20LS RTC GB r1.0 10.07.2008.doc XW20LS 5/5
Label Name Range °C/°F Level
Sd1* 1st holiday defrost start 0 ÷ 23h 50 min. - nu 6.0 rtc
Sd2* 2nd holiday defrost start 0 ÷ 23h 50 min. - nu 13.0 rtc
Sd3* 3rd holiday defrost start 0 ÷ 23h 50 min. - nu 21.0 rtc
Sd4* 4th holiday defrost start 0 ÷ 23h 50 min. - nu 0.0 rtc
Sd5* 5th holiday defrost start 0 ÷ 23h 50 min. - nu 0.0 rtc
Sd6* 6th holiday defrost start 0 ÷ 23h 50 min. - nu 0.0 rtc
Adr Serial address 1÷247 1 Pr2
PbC Kind of probe Ptc; ntc ntc Pr2
onF on/off key enabling nu, oFF; ES oFF Pr2
dP1 Room probe display -- - Pr2
dP2 Evaporator probe display -- - Pr2
dP3 Third probe display -- - Pr2
rSE Real set actual set - Pr2
rEL Software release -- 1.8 Pr2
Ptb Map code -- Pr2
* Only for model with real time clock
2Only for XW20LS with X-REP output
Dixell S.p.A. Z.I. Via dell’Industria, 27
32010 Pieve d’Alpago (BL) ITALY
tel. +39 - 0437 - 98 33 - fax +39 - 0437 - 98 93 13
This manual suits for next models
7
Table of contents
Other CIAM Display Case manuals


