CIMCO GENiUS 2.0 User manual

1
Operating instructions for
CIMCO-Werkzeugfabrik - D-42855 Remscheid - www.cimco.de

3
3
2
Contents
1 General information
1.1 Components of these operating instructions
1.2 Before start-up
1.3 Reading these operating instructions
1.4 Illustrations and technical alterations
1.5 Translations
1.6 Storage
1.7 Safety information in complience with EN
1.8 Emphasis in these operating instructions
1.9 Intended use
1.10 Residual risk
2 Technical data
3 Description of appliance and functional
principle
3.1 Functional principle
3.2 Scope of delivery / performance features
3.3 Changing crimping inserts
3.4 Start-up
3.5 Crimping
3.6 Cutting
3.7 Hole punching
3.8 Permitted / not permitted
3.9 LED function
4 Scope of application
5 Rechargeable battery
5.1 Rechargeable battery technology
5.2 Type of battery
5.3 Charging the battery
5.4 Safety information for Li-Ion rechargeable
batteries
5.5 Disposal of Li-Ion rechargeable batteries
6 Packaging, storage and
disposal
6.1 Sensitivity
6.2 Packaging and temporary storage
6.3 Disposal
7 Cleaning, monitoring, repairs,
inspections
7.1 Regular cleaning after use
7.2 Regular monitoring
7.3 Faults / correction of faults
7.4 Inspection and maintenance of the GENiUS
2.0 hydraulic system
8 Customer service
9 EC Declaration of Conformity
1 General information
1 General information
WARNING Please read all safety informa-
tion and instructions. Failure to comply with the
safety information and instructions may cause
electric shock, fire and/or serious injury.
Please keep all safety information and instruc-
tions for future reference.
The term „electric tool“
used in the safety information refers to mains-ope-
rated electric tools (with mains cable) and to batte-
ry-operated electric tools (without mains cable)
1.1 Components of these operating
instructions
The following form part of these operating instruc-
tions:
• GENiUS 2.0 hydraulic system
• Crimpinghead,300mm2and 185 mm2
• Cuttingandpunchinghead
• Rechargeablebattery
, appropriate for the GENiUS
2.0 hydraulic system
Instructions for the battery charger and the battery
supplied are fully covered by the producer‘s opera-
ting instructions (see mention on the charger and
the battery). CIMCO Werkzeugfabrik does not pro-
vide a guarantee of completeness.
1.2 Before start-up
It is essential to keep the following in mind:
• Checkingthecompletenessofdeliveryandmo-
nitoring
the delivery with regard to any transport
damage
• Thesafetyregulations
• Theoperatinginstructions
1.3 Reading these
operating instructions
For use and charging of the battery, read the
producer‘s operating instructions for the charger
and the battery. If you have any questions after
reading these operating instructions, please get in
touch with the producers or your nearest customer
service point (see guarantee card for addresses).
We will not accept any liability for damage or faulty
operation resulting from disregard of the operating
instructions.
1.4 Illustrations and technical alterations
Illustrations may deviate from actual appliances
and are not binding on our part. In order to comply
with rapidly changing customer demands, we re-
serve the the right to make technical alterations to
the machines without prior notice.
1.5 Translations
The German language version of these operating
instructions is the sole legally valid version.
1.6 Storage
Store these operating instructions in
a safe place.
1.7 General safety information
1) Safety in the workplace
a) Keep your work space clean and well lit. Un-
tidy and poorly lit work spaces can lead to acci-
dents.
b) Do not work with the electric tool in an envi-
ronment where there is danger of explosion,
or which contains flammable liquids, gases
or various kinds of dust. Electric tools create
sparks that may ignite dust or vapour.
c) Keep children and other persons away while
using the electric tool.
If distracted, you may lose control of the appli-
ance.
2) Electrical safety
a) Avoid physical contact with earthed sur-
faces, such as those of pipes, heaters, sto-
ves and refrigerators. There is an increased
risk of electric shock if your body is earthed.
b) Keep electric tools away from rain or
moisture. If water penetrates the electric tool,
this will increase the risk of electric shock.
3) Safety of persons
a) Be observant, pay attention to what you are
doing and be sensible when working with an
electric tool. Do not use an electric tool if
you are tired or under the influence of drugs,
alcohol or medication. A moment‘s inattention
when using the electric tool can lead to serious
injury.
b) Wear personal protective equipment and al-
ways wear safety glasses. Wearing personal
safety equipment, such as a dust filter mask,
non-slip safety shoes, safety helmet or ear pro-
tectors, appropriate to the type of tool and its
use will reduce the risk of injury.
c) Avoid accidental start-up. Make sure that the
electric tool is switched off before you con-
nect it to the power supply and/or the batte-
ry, pick it up or carry it. If you have your finger
on the switch when carrying the electric tool or
connect the appliance to the power supply when
it is switched on, this may lead to accidents
d) Remove any adjustment tools or spanners
before switching on the electric tool. A tool or
spanner in a rotating part of the appliance can
lead to injuries.
e) Avoid any unusual posture or position. En-
sure that you are standing securely and keep
your balance at all times. If you do so, you will
be able to control the tool better in unexpected
situations.

3
3
f) Wear suitable clothing. Do not wear wide
clothing or jewellery. Keep your hair,
clothing and gloves away from moving
parts. Loose clothing, jewellery or long hair
may be caught up in moving parts.
4) Use and handling of the electric tool
a) Do not overload the appliance. Use the elec-
tric tool appropriate for your task. If you use
the appropriate tool, you will work better and
more safely in the specified area of work.
b) Do not use any electric tool with a defective
switch. An electric tool that cannot be switched
on and off is dangerous and must be repaired.
c) Pull the plug out of the socket and/or remo-
ve the battery before adjusting the appli-
ance, exchanging accessories or putting
the appliance away. These safety precautions
will prevent accidental start-up of the tool.
d) Keep electric tools not in use out of the re-
ach of children. Do not allow any person to
use the appliance who is not familiar with it
or has not read these instructions. Electric
tools are dangerous if used by inexperienced
persons.
e) Take good care of electric tools. Check
whether the moving parts are functioning per-
fectly and without jamming, whether parts are
broken or damaged in such a way as to have
a detrimental effect on the function of the tool.
Have damaged parts repaired before using
the appliance. Many accidents are caused by
poorly maintained electric tools.
f) Keep the cutting tools sharp and clean.
Well-maintained cutting tools with sharp cutting
edges will jam less frequently and are easier to
guide.
g) Use the electric tool, accessories, inserted
tools etc. according to these instructions.
Take the operating conditions and the task
to be carried out into account. Using electric
tools for tasks other than those for which they
were intended can lead to dangerous situa-
tions.
5) Use and handling of the battery tool
a) Only charge the batteries in chargers re-
commended by the producer. There is a risk
of a charger intended for a particular type of
battery catching fire if it is used for other batte-
ries.
b) In electric tools, use only the batteries in-
tended for the tool. Using other batteries may
lead to injuries and the risk of fire.
c) Keep batteries not in use away from paper
clips, coins, keys, nails, screws or other
small metal objects that could cause a brid-
ging of the contacts. A short-circuit between
battery contacts can cause burns or fire.
d) If the battery is used wrongly, it may leak fluid.
Avoid skin contact with the battery. If the flu-
id accidentally comes in contact with skin,
rinse off with water. If the fluid comes in
contact with the eyes, also get medical at-
tention. Leaking battery fluid may cause skin
irritation or burns.
6) Service
a) Only allow CIMCO authorizied Customer
Service to repair your electric tool, using
only authentic replacement parts. This will
ensure that the safety of the tool is retained.
1.8 Special emphasis in these operating
instructions
Read the safety information in these operational
instructions and always keep it in mind! Special
emphasis in this safety information is shown as
follows:
Marks an instruction that may lead to
injury or death if not complied with..
Marks an instruction that may lead to
damage to the appliance or property if not complied
with.
Do not immerse in liquid!
Do not heat or burn!
For environmentally-friendly disposal,
send the hydraulic system to your nearest
customer service point (see guarantee card for
addresses) or pass it on to a recycling company.
Hydraulic systems must not be disposed of as scrap
or household waste.
Marks explanatory information or a special
instruction.
Listed points
Straightforward listed points are
marked with the symbol
•beforetheline:
• 1.Sampleline
• 2.Sampleline
Steps (where you do something!) are marked with
an arrow in front of the line:
1. Step
2. Step
Follow the sequence of stepsn.
1.9 Intended use
The GENiUS 2.0 are electro-hydraulic tools, which
when used with appropriate interchangeable heads
perform a variety of functions, such as crimping
electrical compression connections, cutting
electrical cables and hole punching operations.
When operated, an internal electric motor powers a
hydraulicpumpwhichsuppliesuidtothecylinder
of the
tool, moving the ram forward and applying force to
specially designed interchangeable heads. The
tools are equipped with the QuickChange System
(QCS) for installing the various interchangeable
heads. This also allows interchangeable heads to
be rotated 360° for better access in tight spaces.
There are different QCS types. Make sure that the
tool and interchangeable head QCS types are
compatible. The tools come with two fabric loops
that can be used with appropriate attachments such
as shoulder straps or tie off lanyard. The tools are
equipped with a bright LED work light that lights up
when the run switch is pulled.This allows the user to
easily illuminate the work area. The tool LED display
indicates the tool’s status (tool ON/OFF, temperatu-
re out of range, service required.)
1.10 Residual risk
If the machine is used improperly, the operator may
crush his/her fingers.
2 Technical data
GENiUS 2.0 hydraulic system
Nominal capacity 320W
Voltage 18 V DC
Machine monitoring electronic
Sound pressure level 81 dB
Uncertainty 3 dB
Sound power level 92 dB
Uncertainty 3 dB
Vibration level 1.16m/s2
Uncertainty (K) 1.5m/s2
Power transmission hydraulic
Shear force min. 60 kN
Weight with battery 2.750 kg
Li-Ion rechargeable battery capacity 18V/2.0 Ah
(Guideline values, we reserve the right to make
changes)
The vibration emission value given was measured
in accordance with EN 60745-1 and can be used
for comparison with other electric tools.
During use of the hydraulic system, the
vibration emission value may diverge from the
given value. The vibration emission value is
independent of the manner in which the hy-
draulic system is used.
The term electromagnetic compatibility is
taken to mean the capability of the product to
function smoothly in an environment where
electromagnetic radiation and electrostatic
discharges are present and without causing
electromagnet interference to other equipment.
The GENiUS 2.0 conform to all applicable EMC
standards. However, the possibility of it cau-
sing interference in other devices cannot be
precluded.

5
4 5
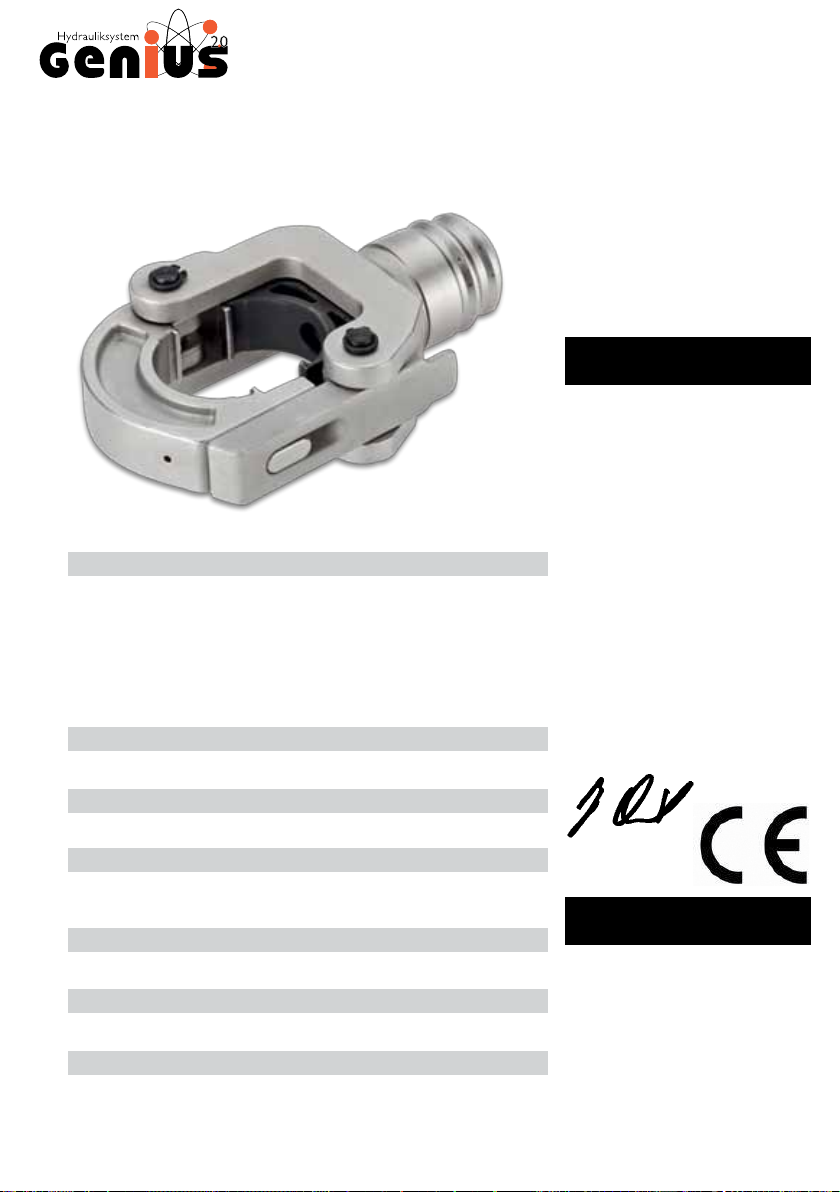
Loops for
carrying strap Upper and lower
crimping inserts
Emergency stop
Start switch
Locking ring
Crimping head
LED
On / Off switch
3 Description of appliance and
functional principle
3.1 Functional principle
GENiUS 2.0 hydraulic system
60 kN pressing strength
Max. 3
crimping,
punching and
cutting
processes
per minute
Machine‘s year
of construction
=

5
5
3 Description of appliance and
functional principle
3.2 Performance features
Rechargeable
battery
GENiUS 2.0 hydraulic system
Crimping head
Performance features:
- Heads can be rotated a full 360°!
- Automatic return after
maximum pressing strength of 60 kN is reached
- Quick change system for crimping, cutting and
hole punching head
- It is possible to interrupt the crimping, cutting
or punching process
(by releasing the start switch)

7
6 7
3 Description of appliance and
functional principle
3.3 Changing crimping inserts
1. Open the crimping
head
3. Place the crimping
insert in the lower
section of the
crimping head
4. Place the crimping
insert in the upper
section of the
crimping head
5. Close the crimping head
Additional safety instructions:
Before changing the crimping inserts, remove the battery or take the crimping head out
of the machine. Do not change the crimping inserts until this has been done.
2. To remove the crimping
insets, push them out
to the side

7
7
1. Pull back the locking
ring and insert the
appropriate head
2. Check that the head is correctly locked.
The edge of the locking device on the head
must be covered by the locking ring.
4. Switch on machine,
green LED lights up
3 Description of appliance and
functional principle
3.4 Start-up
3. Insert battery

9
8 9
3 Description of appliance and
functional principle
3.5 Crimping
1. Insert cable into
the crimping head
3. Carry out crimping while the start switch is pressed.
The crimping process has been correctly completed
when the lower cheek plate returns to the home
position by itself
2. Push terminal lug onto
the cabl
Emergency stop function
Pressing the release button
will automatically retract the
lower crimping insert.

9
9
3 Description of appliance and
functional principle
3.6 Cutting
1. Place the cable in the
cutting head
2. Carry out cutting procedure while pressing the start
switch. The cut has been correctly completed when
the cutting knife returns to home position by itself or
the cable has been completely cut through.
Emergency stop function
Pressing the release button
will retract the cutting
knives automatically

11
10 11
3 Description of appliance and
functional principle
3.7 Hole punching
1. The sheet metal hole
puncher to be used is to
be mounted in the
punching head..
4. Carry out punching while pressing the start switch.
The punching process has been correctly completed
once the sheet metal has been punched right through
without any residue.
Important:
The punching process
must then be stopped
immediately If it is
continued until automatic
switch-off, it can lead to
destruction of the hole
punchers.
2. After an appropriate hole has been pre-drilled, the
hole puncher plus the die and the tie bolt are
introduced into the hole and then locked finger-tight
with the punch
Emergency stop function
Pressing the release button
will retract the hole puncher
automatically..

11
11
3 Description of appliance and
functional principle
3.8 Permitted / not permited
X
X
Ready for crimping!
The crimping process must
not be started without
crimping inserts!
The appliance must not be
started without a head!
Piston rod in home position
If the machine has been started
without a head having been
inserted, the piston rod must be
returned to the home position by
pressing the emergency stop
If an almost discharged battery is
used during crimping, the machine
will automatically stop the crimping
procedure. This will protect the
battery from exhaustive discharge
Important: In this case the crimping head must be returned to the home position by
pressing the emergency stop. If this is not done, the machine‘s electronics may be
damaged. Now exchange the discharged battery for a charged one and the crimping
procedure can be started again.

13
12 13
3 Description of the
appliance and function
3.9 LED function
The hydraulic system is monitored electronically to
protect against operating errors and to ensure
fault-free pressing. The condition or the event is
displayed by light-emitting diodes (LEDs).
The following are monitored:
• Voltage/batterycapacity
• Serviceinterval
• Operatingtemperature
Condition displays after switching on the hy-
draulic system
Push battery into the hydraulic system.
Press the «ON-OFF» switch. To monitor the
function of the three LEDs, the LED display will
light up when the «ON-OFF» switch is pressed.
«ON-OFF» switch
• The«ON-OFF»switchcanbeusedatanytimeto
switch the machine on and off.
• IfthemachineisinONconditionandnotbeing
used, the electronics will switch to the OFF conditi-
on in 10 minutes.
4 Scope of application
The GENiUS 2.0 hydraulic system is used as a
crimping, cutting and punching tool. The original
tools, as described here, are to be used.
Crimping: GENiUS 2.0 crimping heads
for 300 mm2
and 185 mm2cable cross-sections
(CIMCO article no. 10 6301 and 10 6298)
Punching: GENiUS 2.0 punching head
(CIMCO article no. 10 6308)
Cutting: GENiUS 2.0 cutting head
(CIMCO article no. 10 6306)
Machines and parts are to be ordered through
CIMCO Werkzeugfabrik!
5 Rechargeable battery
5.1 Rechargeable battery technology
The GENiUS 2.0 hydraulic system is operated by
Li-Ion rechargeable battery technology.
5.2 Type of battery
Only the original-Li-Ion 18V/2.0Ah rechargeable
battery may be used.
5.3 Charging the battery
The battery may only be charged with the original
charger. See operating instructions for the
charger.
5.4 Safety information for
Li-Ion rechargeable batteries
Please note the following safety information for the
use of Li-Ion rechargeable batteries;
1. Do not crush!
2. Do not heat or burn!
3. Do not short-circuit!
4. Do not immerse in liquid!
5. Charging temperature from 5° C to 35° C
6. Only charge with the original charger!
7. Do not use Batteries with damaged housing
8. Do not disassemble Batteries
9. For EU-Countries defective or used batteries
must be recycled according standard 2006/66/EG
5.5 Disposal of Li-Ion
rechargeable batteries
The batteries must be disposed of in the same way
as the hydraulic system (
see Point 7.3).
6 Packaging, storage
and disposal
6.1 Sensitivity
The hydraulic system and the charger must be pro-
tected from hard impact, wet, damp, dirt, dust, ex-
treme cold, extreme heat (65° C), chemical solu-
tions and gases.
6.2 Packaging and temporary storage
The appliance is supplied in a plastic case.
If the hydraulic system is not in use, the battery must
be removed, and both are to be stored temporarily in
the case.
After a longer period of storage, the battery
will only reach its full theoretical capacity after
being fully charged 1-5 times.
If the hydraulic system is not put to use immediate-
ly after delivery, it should be stored in its original
packaging in a dry place (0° C - 40° C).
3.9 LED function
LED Condition Description
green Lit
Flashing
Machine ON
18V: charge battery
red
Lit Outside temperature range
-5 °C – +50 °C
yellow Flashing
Lit
Service display after 30,000 strokes
Machine is blocked – Service after
32,000 strokes or a defect
13
13
Store the hydraulic systems out of the
reach of unauthorised persons in dry
, lockable
storage places!
Hydraulic systems that have not been used
for a longer period of time (6 months or more) are
to be dry-wiped clean. You should also check their
functioning capacity on first use by carrying out the
checks as in Point 7.2.
6.3 Disposal
For environmentally-friendly disposal, send the
hydraulic system to your nearest customer service
point (see guarantee card for addresses) or pass it
on to a recycling company. Hydraulic systems must
not be disposed of as scrap or household waste.
7 Cleaning, monitoring,
repairs, inspections
Before cleaning operations, always dis-
connect the machine from the mains or remove
the battery from the hydraulic system!
7.1 Regular cleaning after use
Clean off dirt and metallic residues
from the heads using a cleaning oil.
Never use fluids (water or chemicals) or
damp cloths to clean the hydraulic system. The
outside of the housing can be cleaned by
wiping with a damp cloth (plastic parts).
7.2 Regular monitoring
Ensure that when crimping the cheek plates
close completely.
After every use, monitor the geometry of the
crimping inserts for damage or visible wear.
In the case of faults, contact an
authorised customer service point (see guarantee
card for addresses).
7.3 Faults / Fault correction
Faults: it may become difficult to insert the ap-
propriate head into the machine due to conta-
mination of the crimping, cutting or punching
head or respectively the holder for the head.
Fault correction: clean dust and dirt off the crim-
ping, cutting or punching head with a dry cloth and
do the same for the head holder.
Do not carry out any repair
works yourself, but pass repairs on to an
authorised customer service point (for addres-
ses, see guarantee card)
7.4 Inspection and maintenance
Perfect crimped connections require a well-functio-
ning and regularly maintained hydraulic system.
The hydraulic system should therefore be sent to
the CIMCO Werkzeugfabrik or authorizied custo-
mer services for inspection and maintenance when
the service display lights up.
The service display (green LED and yellow LED
flash) automatically draws your attention to the
need for maintenance after 30,000 pressings.
After 32,000 pressings, the GENiUS 2.0 hydraulic
tool will be locked by the electronic monitoring
system (yellow LED is lit).
If the machine is defective, the GENiUS 2.0-
hydraulic tool will be blocked immediately by the
electronic monitoring system and should be sent to
a customer service point for inspection
(it is essential to refer to Chapter 4.4).
8 Customer service
For CIMCO customer services, see
the guarantee card.
9 EC Declaration of
Conformity
We as producers of the machine declare that the
machine named below conforms to the following
listed directives and standards.
Name of appliance
GENiUS 2.0 hydraulic system
Type of appliance
CIMCO article no. 10 6300
Directives
2006/42/EC, 2004/108/EC
Applicable standards
EN 60745-1:09 / EN 55014-1:06 + A1:09 + A2:11 /
EN 62233:08 / EN 61000-6-2:05
Responsible for documentation
Arnd Diedrichs
Remscheid, 28.02.2014
CIMCO-Werkzeugfabrik - 42855 REMSCHEID
Joachim Quirl
Geschäftsführer
Producer
CIMCO-Werkzeugfabrik
Carl Jul. Müller GmbH & Co.KG
D - 42855 Remscheid
15
14 15
Crimping head 10 6301
Operating instructions
Original operating instructions
9 EC Declaration of
Conformity
We as producers of the product
declare that the exchangeable item of
of equipment named below conforms to
the following directives listed.
Name of product
Crimping head
Type of appliance
CIMCO article no. 10 6301
Directive
2006/42 EC
Responsible for documentation
Arnd Diedrichs
Remscheid, 28.02.2014
CIMCO-Werkzeugfabrik - 42855 REMSCHEID
Joachim Quirl
Geschäftsführer
Producer
CIMCO-Werkzeugfabrik
Carl Jul. Müller GmbH & Co.KG
D - 42855 Remscheid
1 Technical product data
Name: Crimping head
Type: 10 6301
Max. pressing strength: 60 kN
Max. cable cross-section: 300 mm2
Dead weight: 1.5 kg.
Use: exclusively in
CIMCO GENiUS 2.0 pressing tool
2 Description of crimping head
The 10 6301 crimping head forms part of the CIMCO pressing tool GENiUS 2.0.
3 Intended use
The 10 6301 crimping head is used for crimping connecting materials.
4 Residual risk
If the tool is used improperly, the operator may
crush his/her fingers.
5 Functional principle
See from page 4 on
6 Safety information
See from page 2 on
7 Faults and fault correction
See page 13

15
15
Crimping head 10 6298
Operating instructions
Original operating instructions
9 EC Declaration of
Conformity
We as producers of the product
declare that the exchangeable item of
of equipment named below conforms to
the following directives listed.
Name of product
Crimping head
Type of appliance
CIMCO article no. 10 6298
Directive
2006/42 EC
Responsible for documentation
Arnd Diedrichs
Remscheid, 28.02.2014
CIMCO-Werkzeugfabrik - 42855 REMSCHEID
Joachim Quirl
Geschäftsführer
Producer
CIMCO-Werkzeugfabrik
Carl Jul. Müller GmbH & Co.KG
D - 42855 Remscheid
1 Technical product data
Name: Crimping head
Type: 10 6298
Max. pressing strength: 60 kN
Max. cable cross-section: (for crimping use as per DIN 48086-6M)185 mm2
Dead weight: 1.5 kg.
Use: exclusively in CIMCO GENiUS 2.0 pressing tool
2 Description of crimping head
The 10 6298 crimping head forms part of the CIMCO pressing tool GENiUS 2.0.
3 Intended use
The 10 6298 crimping head is used for crimping connecting materials.
4 Residual risk
If the tool is used improperly, the operator may
crush his/her fingers.
5 Functional principle
See from page 4 on
6 Safety information
See from page 2 on
7 Faults and fault correction
See page 13

17
16 17
Cutting head 10 6306
Operating instructions
Original operating instructions
1 Technical product data
Name: Cutting head
Type: 10 6306
Max. cutting strength: 60 kN
Max. cable diameter: 50 mm
Dead weight: 2.9 kg
Use: exclusively in CIMCO GENiUS 2.0 pressing tool
2 Description of cutting head
The 10 6306 cutting head forms part of the CIMCO pressing tool. GENiUS 2.0.
3 Intended use
The 10 6306 cutting head is used for cutting electrical cables.
4 Residual risk
If used improperly, the machine operator may cut his/her fingers.
5 Functional principle
See from page 4 on
6 Safety information
See from page 2 on
7 Faults and fault correction
See page 13
9 EC Declaration of
Conformity
We as producers of the product
declare that the exchangeable item of
of equipment named below conforms to
the following directives listed.
Name of product
Cutting head
Type of appliance
CIMCO article no. 10 6306
Directive
2006/42 EC
Responsible for documentation
Arnd Diedrichs
Remscheid, 28.02.2014
CIMCO-Werkzeugfabrik - 42855 REMSCHEID
Joachim Quirl
Geschäftsführer
Producer
CIMCO-Werkzeugfabrik
Carl Jul. Müller GmbH & Co.KG
D - 42855 Remscheid

17
17
Punching head 10 6308
Operating instructions
Original operating instructions
1 Technical product data
Name: Punching head
Type: 10 6308
Max. punching pressure: 60 kN
Max. punching area: ISO63 or 92 x 92 mm
Dead weight: 1.6 kg
Use: exclusively in CIMCO GENiUS 2.0 pressing tool
2 Description of punching head
The 10 6308 punching head forms part of the CIMCO pressing tool. GENiUS 2.0.
3 Intended use
The 10 6308 punching head is used for punching sheet metal.
4 Residual risk
If the tool is used improperly, the operator may
crush his/her fingers.
5 Functional principle
See from page 4 on
6 Safety information
See from page 2 on
7 Faults and fault correction
See page 13
9 EC Declaration of
Conformity
We as producers of the product
declare that the exchangeable item of
of equipment named below conforms to
the following directives listed.
Name of product
Punching head
Type of appliance
CIMCO article no. 10 6308
Directive
2006/42 EC
Responsible for documentation
Arnd Diedrichs
Remscheid, 28.02.2014
CIMCO-Werkzeugfabrik - 42855 REMSCHEID
Joachim Quirl
Geschäftsführer
Producer
CIMCO-Werkzeugfabrik
Carl Jul. Müller GmbH & Co.KG
D - 42855 Remscheid

19
18 19

19
19

Carl Jul. Müller GmbH & Co. KG
Hohenhagener Str. 1-5 • D-42855 Remscheid
P.O. Box 10 02 63 • D-42802 Remscheid
Tel.: +49 (0) 21 91/37 18 01 • Fax: +49 (0) 21 91/37 18 86
E-Mail: info@cimco.de • Internet: www.cimco.de
09 1852-E
This manual suits for next models
1
Table of contents
Popular Crimping Tools manuals by other brands


TE Connectivity
TE Connectivity ERGOCRIMP 4-1579001-1 instruction sheet

TOOLCRAFT
TOOLCRAFT 43 04 61 operating instructions

Greenlee
Greenlee GATOR EK628LX Operation manual

molex
molex AT-200 Operating and maintenance instructions

molex
molex 207128 Series Specification sheet

Deutsch
Deutsch DTT-16-03 instruction manual

HRS
HRS HT601/TM21P-88P operating instructions

Westward
Westward 13H894 Operating instructions and parts manual

Hilti
Hilti NPR 032 IE-A22 operating instructions

molex
molex 63816-1900 Operation manual

FRIEDHELM LOH
FRIEDHELM LOH Rittal L8 operating instructions

Tyco Electronics
Tyco Electronics PRO-CRIMPER III 58603-1 instruction sheet