cimuka CT Series User manual

CiMUKA EGG INCUBATORS
USER MANUAL
CT Series Models ….................................2
Parts of Models ……………………….….3-4
Quick Guide…………………………….......5
Placement of Models………………….…..6
Ventilation……………………………….….6
Egg Handling……………………………….7
Temperature/ Humidity Controller …... 7-10
USB connection/ Room sensor……….…11
Humisonic
TM
Auto-humidity control ..…. 12
Humidity tray…………………………....…13
Egg Turning / Conturn
TM
30………..…..14-17
Active Periodic Cooling (APC)…….…18-21
Setting and Hatching ……………..…..22-23
Incubation Records……………………...24
Factors Affecting Hatchability…………..24
Cleaning up and Service………………..25
Safety Labeling………………………..…25
Product Information……………………...26
Recommended Incubation values….…..27
Please read the following instruction manual carefully before use.
IMPORTANT! Keep this user manual safe for future reference.
CT
SERIES
CT60
/
CT120
/
CT180

2
CT
SERIES
CT Series Models
Setter Models (S types)
CT60 S
Hatcher Models (H types)
CT120
S CT180 S CT60 H
CT120 H CT180 H
•
SH coded models include all turning and hatchery accessories.
CT
SERIES
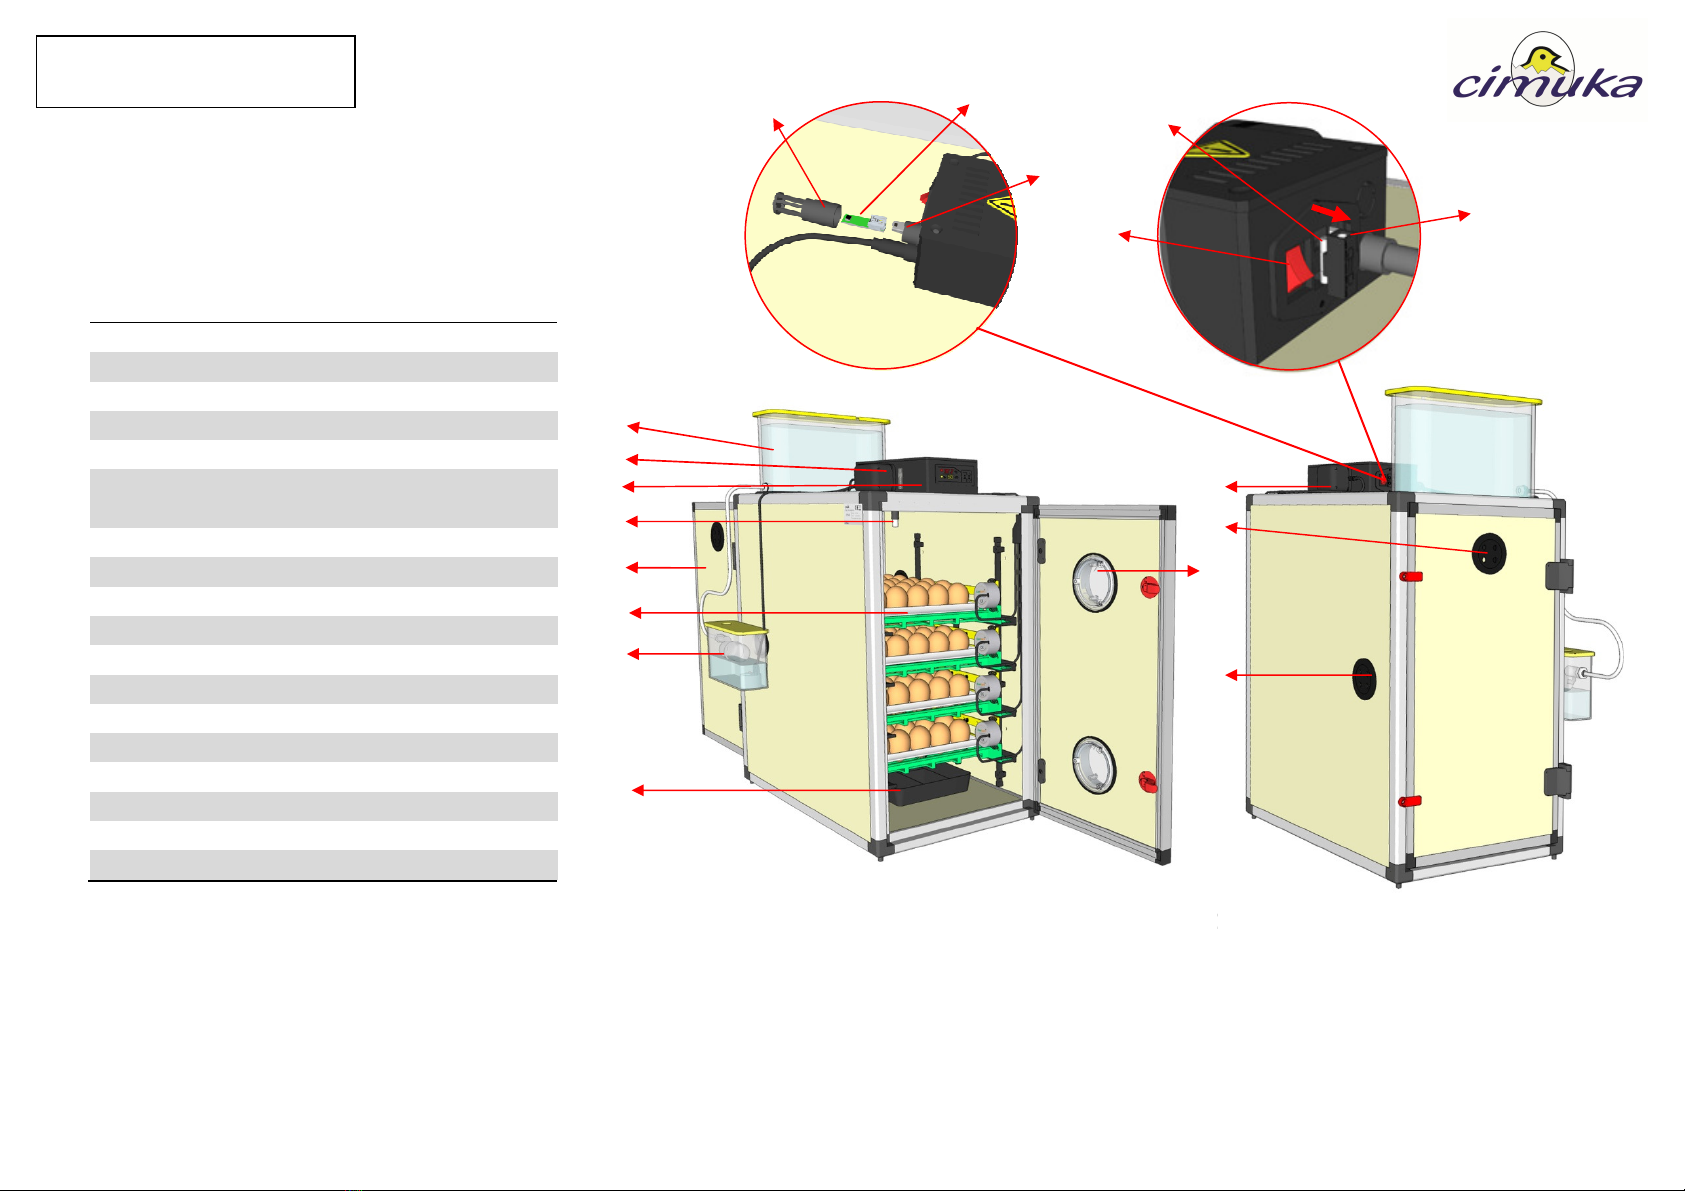
Parts of Models
1
Water reservoir - 4lt ( 1 Gallon)
2
Humisonic
TM
Adapter
3
Control Panel
4
Temperature/Humidity sensor
5
ack Door for cleaning and service
6
Conturn
TM
30 ( SH and S types)
CS30 Hatchery asket ( SH and H types)
7
Humisonic
TM
reservoir
8
Humidity tray
9
Conturn
TM
Adapter
10
Adjustable Air-out holes
11
Observation windows
12
Adjustable air-in hole
13
Power inlet module ( on/off button)
14
Protection fuse ( F type)
15
Spare fuse (F type)
16
US connection
17
Room sensor chip
18
Room sensor cover
1
2
3
4
5
6
7
8
3
1
2
3
4
5
6
7
9
8
10
11
1
2
13
14
16
17
18
Showing CT120 Model
10
11
2
15
Showing CT120 Model

4
CT
SERIES
Accessories
CT60 CT120 CT180
SH S H SH S H SH S H
Conturn
TM
30 2 pc 2 pc - pc pc - 6 pc 6 pc -
Conturn
TM
Adapter 1 pc 1 pc - 1 pc 1 pc - 1 pc 1 pc -
Distribution cable 1 pc 1 pc - 1 pc 1 pc - 1 pc 1 pc -
CS30 2 pc - 2 pc pc - pc 6 pc - 6 pc
Humisonic
TM
System 1 pc 1 pc 1 pc 1 pc 1 pc 1 pc 1 pc 1 pc 1 pc
Power Cable 1 pc 1 pc 1 pc 1 pc 1 pc 1 pc 1 pc 1 pc 1 pc
Water tray WT01 1 pc 1 pc 1 pc 1 pc 1 pc 1 pc 1 pc 1 pc 1 pc
QT13- Quail Rack optional optional optional optional optional optional optional optional optional
GT03- Goose Rack optional optional optional optional optional optional optional optional optional
CS15 optional optional optional optional optional optional optional optional optional
Conturn
TM
30 CS30
Conturn
TM
Adapter
Humisonic
TM
Unit
Power Cable
Humidity Tray WT01 CS15
Distribution cables
QT13- Quail Rack GT03-Goose Rack
CAUTION!
Any damaged part must not be used.

5
CT
SERIES
Quick Guide
- Remove all packing material carefully.
- Please identify and check all parts of model.
(see page 2-4 )
- Install Humisonic
TM
unit onto cabinet.
(see page 12 )
- Fill humidity tray with water (1 channel). Picture 1
- Insert Conturn
TM
30 units and connect them to distribution cable.
Picture 2
Note: If your eggs are bigger than chicken eggs, Conturn30 racks should
be adjusted for your egg type. (see page 14-17)
- Plug your Conturn
TM
30 / Humisonic
TM
adapters to control the panel
and plug your machine to electric supply. Picture 3
CAUTION! Do not use the equipments with high electric consumption in the
same electrical line as your egg incubator.
CAUTION! Always use a grounded power line for your incubator.
- Press power button than set temperature and humidity. Picture 4
(see page 8)
- The incubator must be worked for 3 - 4 hours to check all parts and
functions before first setting.
Conturn
TM
Adapter
Humisonic
TM
Adapter
Power
Cable
12
3
4
This manual suits for next models
9
Table of contents
Other cimuka Accessories manuals


