cimuka PRODI CT Series User manual

1
PRODI EGG INCUBATORS
USER MANUAL
CT Series Models………2
Parts of Models …….. 3 - 4
Quick Guide……..5
Placement of Models……..6
Ventilation…….6
Egg Handling…….7
Temperature/ Humidity Controller….. 7-10
Humisonic
TM
Auto-humidity control …. 11
Humidity tray………………………12
Egg Turning / Conturn
TM
30………..13-16
Setting and Hatching ……..17-18
Incubation Records……..19
Factors Affecting Hatchability……..19
Cleaning up and Service……..20
Safety Labeling………20
Product Information…..21
Recommended Incubation values……..22
Please read the instructions in this user manual carefully before use your incubator.
IMPORTANT! Keep this user manual safe for future reference.
CT
SERIES
CT60
/
CT120
/
CT180
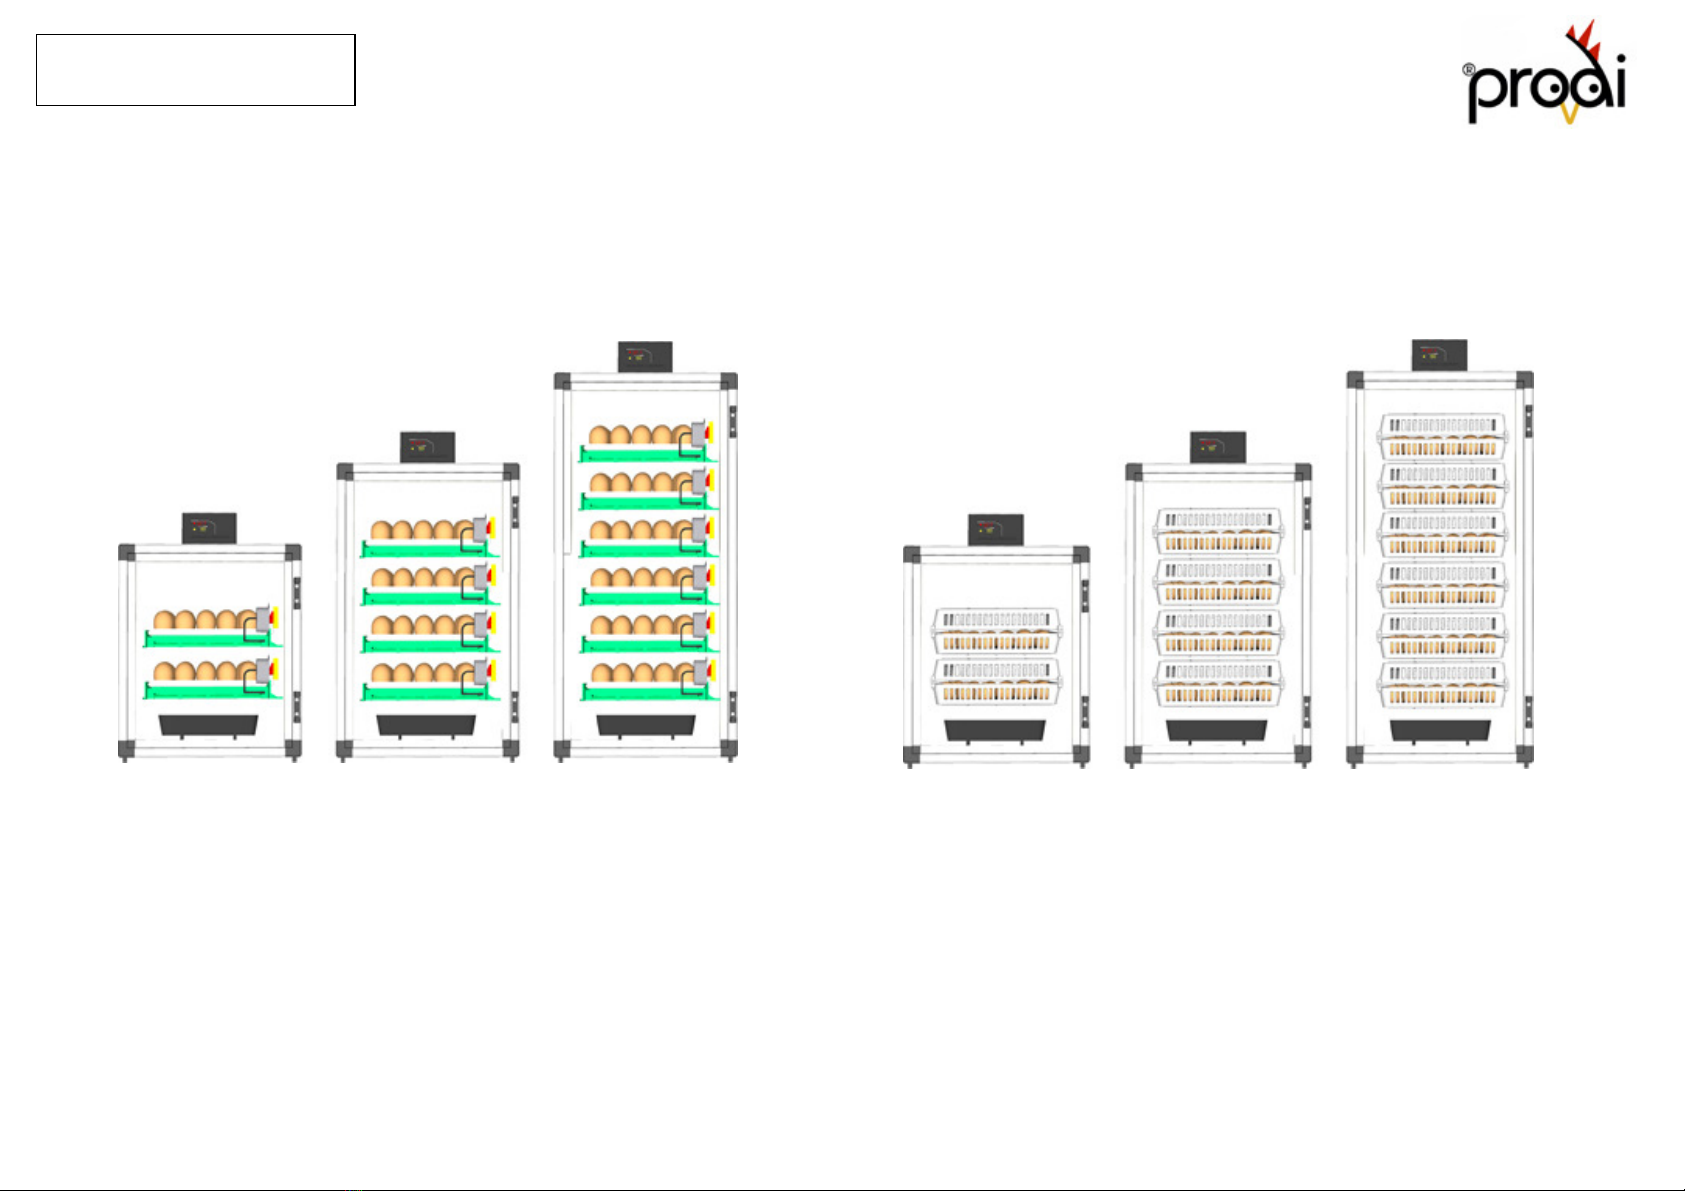
2
Models
CT
SERIES
Setter Models (S types)
CT60 S
Hatcher Models (H types)
CT120
S CT180 S CT60 H
CT120 H CT180 H
•
SH coded models includes all turning and hatchery accessories.

3
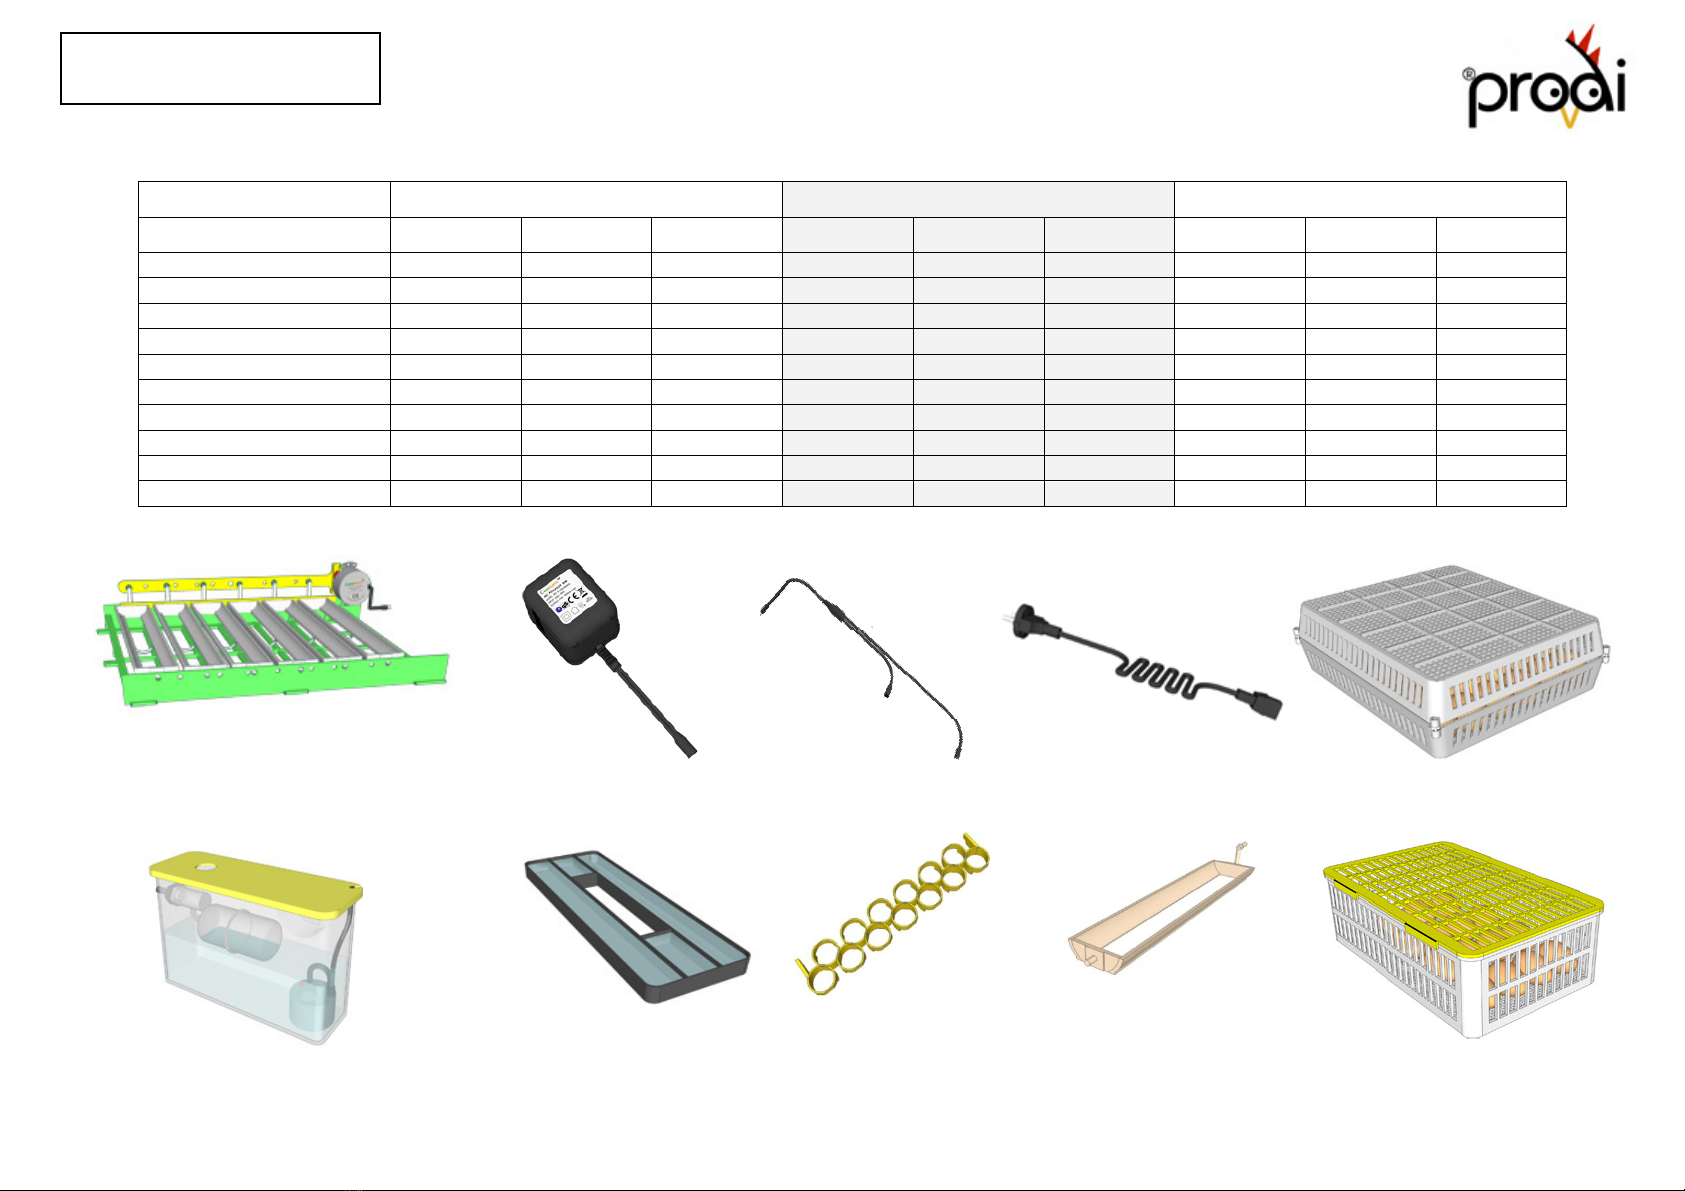
Parts of Models
CT
SERIES
1
Water reservoir - 4lt
2
Humisonic
TM
Adapter
3
Control Panel
4
Temperature/Humidity sensor
5
Back Door for cleanin and service
6
Conturn
TM
30 ( SH and S types)
CS30 Hatchery Basket ( H types)
7
Humisonic
TM
reservoir
8
Humidity tray
9
Conturn
TM
Adapter
10
Adjustable air-out holes
11
Observation windows
12
Adjustable air-in hole
13
Power inlet module ( on/off button)
14
Protection fuse ( F type)
15
Spare fuse (F type)
1
2
3
4
5
6
7
9
8
10
11
12
13
14
15
4
CT
SERIES
Accessories
CT60 CT120 CT180
SH S H SH S H SH S H
Conturn
TM
30 2 pc 2 pc - pc pc - 6 pc 6 pc -
Conturn
TM
Adapter 1 pc 1 pc - 1 pc 1 pc - 1 pc 1 pc -
Distribution cable 1 pc 1 pc - 1 pc 1 pc - 1 pc 1 pc -
CS30 2 pc - 2 pc pc - pc 6 pc - 6 pc
Humisonic
TM
System 1 pc 1 pc 1 pc 1 pc 1 pc 1 pc 1 pc 1 pc 1 pc
Power Cable 1 pc 1 pc 1 pc 1 pc 1 pc 1 pc 1 pc 1 pc 1 pc
Water tray WT01 1 pc 1 pc 1 pc 1 pc 1 pc 1 pc 1 pc 1 pc 1 pc
QT13- Quail Rack optional optional optional optional optional optional optional optional Optional
GT03- Goose Rack optional optional optional optional optional optional optional optional Optional
CS15 optional optional optional optional optional optional optional optional Optional
Conturn
TM
30 CS30
Conturn
TM
Adapter
Humisonic
TM
Unit
Power Cable ( 2 m)
Humidity Tray WT01 CS15
Distribution cables
QT13- Quail Rack GT03-Goose Rack
CAUTION!
Any damaged part must not be used.
5
CT
SERIES
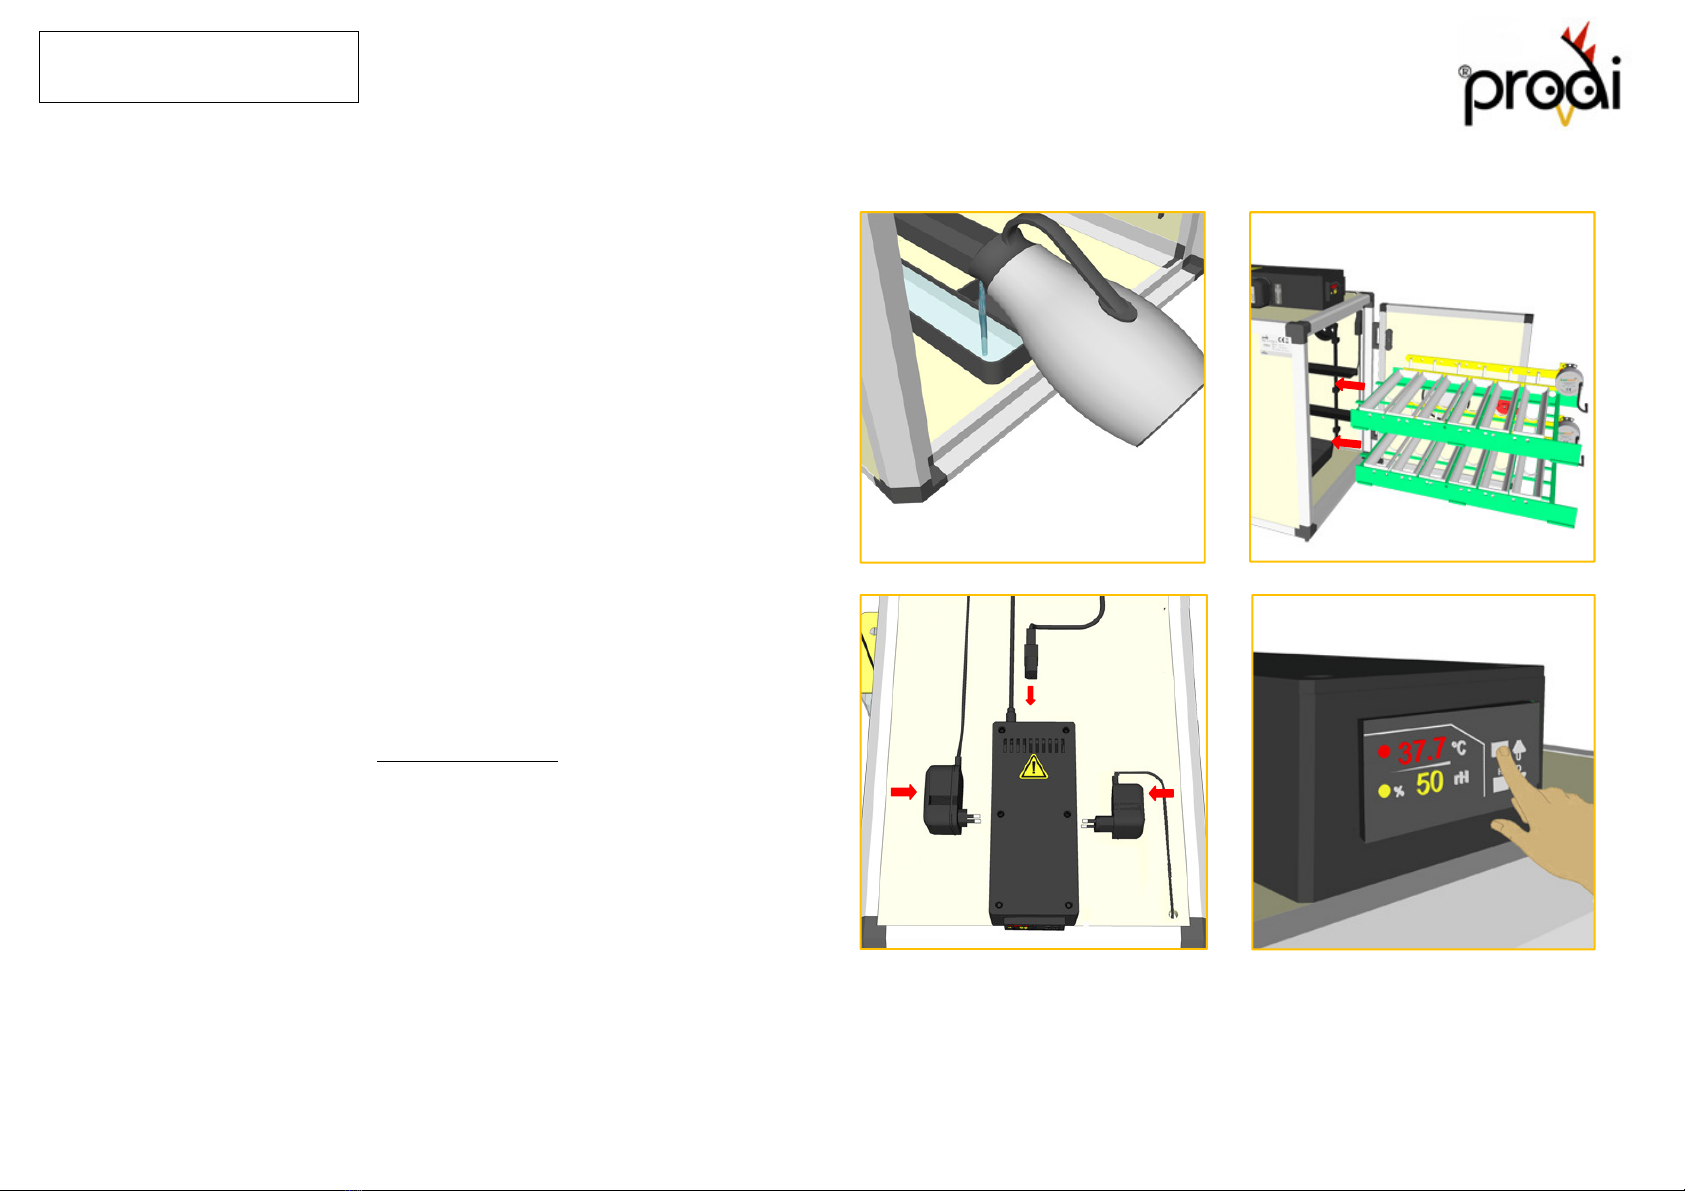
Quick Guide
- Remove all packing material carefully.
- Please identify and check all parts of model.
(see page 2-4 )
- Install Humisonic
TM
unit to Cabinet
(see page 11 )
- Fill humidity tray with water (1 channel). Picture 1
- Place Conturn
TM
30 units to the incubator and connect them to
distribution cable Picture 2
Note: if your eggs is bigger than chicken egg, Conturn30 racks should be
adjusted for your egg type (see page 12-15)
- Plug your Conturn
TM
30 / Humisonic
TM
adaptes to control panel and
Plug your machine to electric supply Picture 3
CAUTION! Don’t use the equipments that need high electric current in the
same electrical line with your egg incubator.
CAUTION! Always use a grounded power line for your incubator.
- Press power button and set temperature and humidity for your
eggs. Picture 4
(see page 8-9)
- The incubator must be worked for 3 - 4 hour to check all parts and
functions
before first setting.
Conturn
TM
Adapter
Humisonic
TM
Adapter
Power
Cable
12
3
4
6
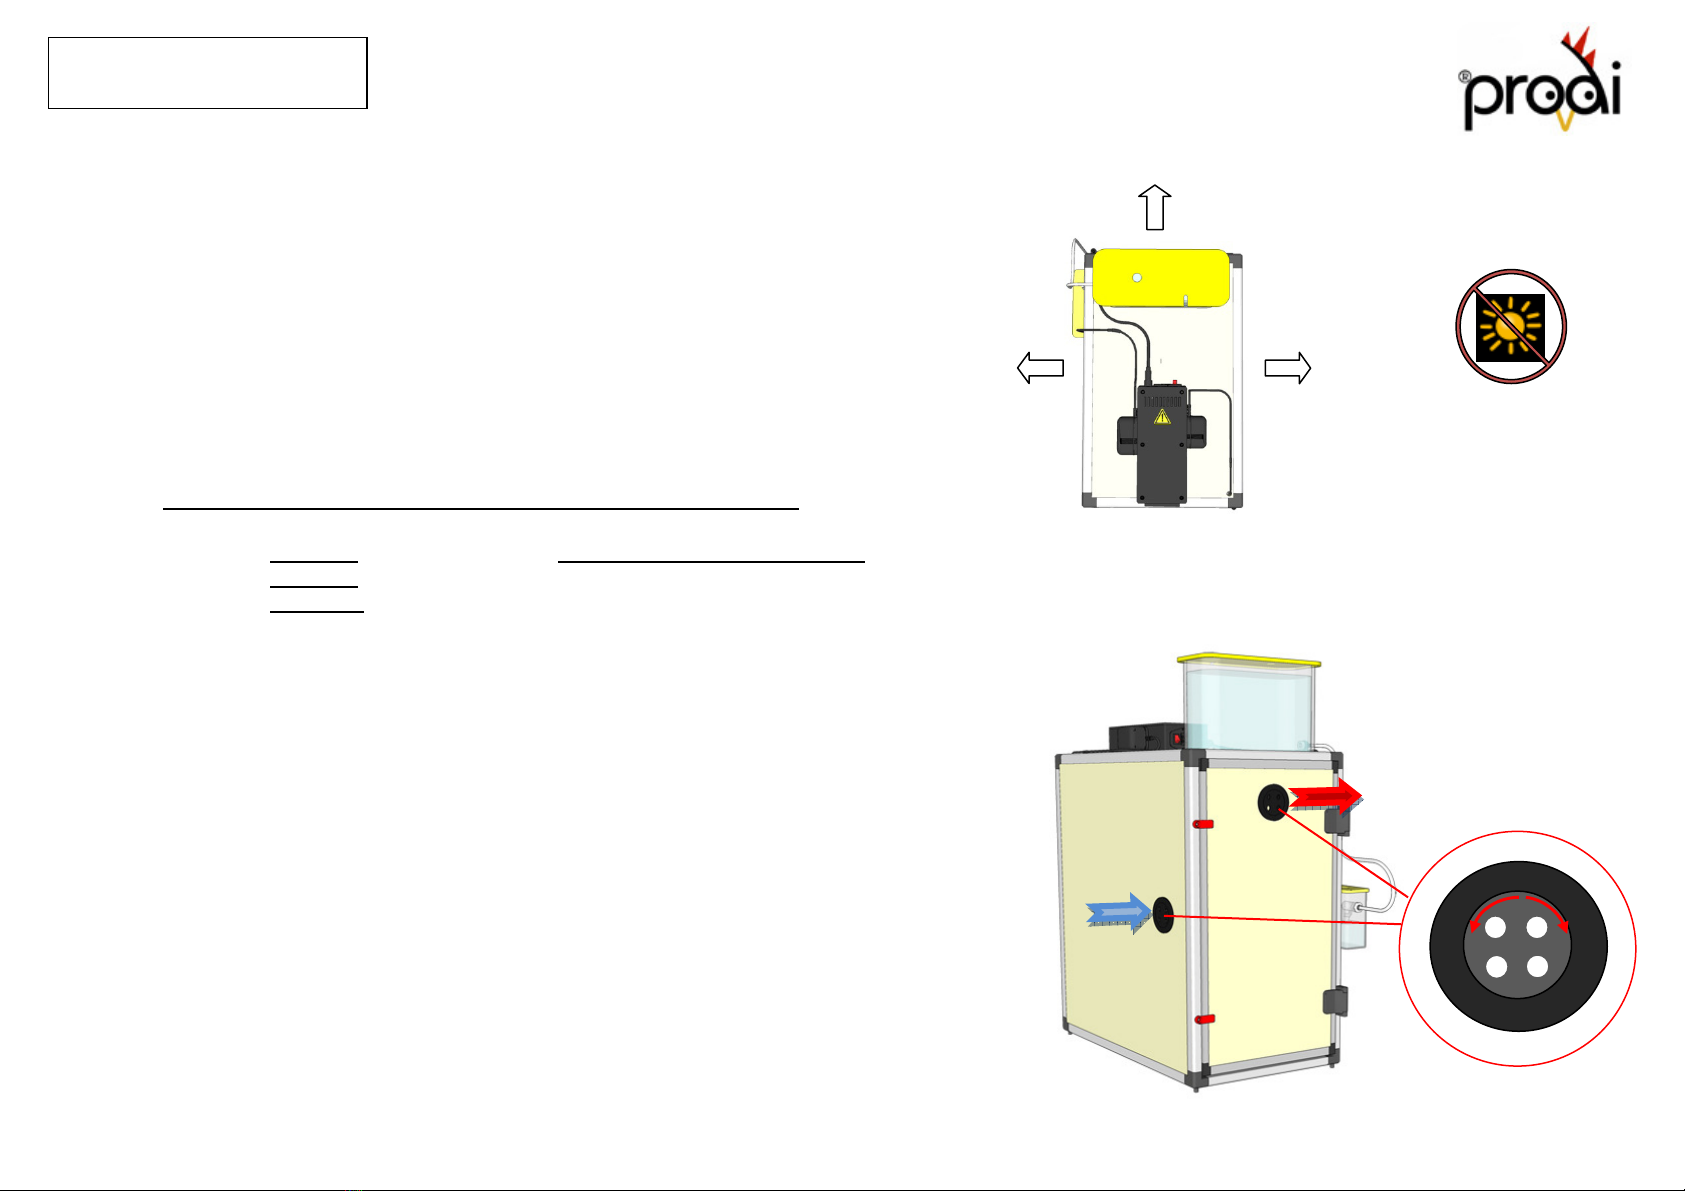
CT
SERIES
Placement of Model
Ventilation
Your incubator must be located in an indoor area. The area must be
clean and ventilated. Ideal distance from walls is 50 cm. Don’t place
machine close to the walls of incubation room. The Incubator must not
be exposed to direct sunlight and not subject to splashes of water or
high humid conditions.
Place your incubator to a flat surface far from doors and windows.
Ideal incubation room temperature is 20–25 °
°°
°C. Wide temperature
variations in the room affect your incubation results. If your area is
very cold or hot, use air condition system in room.
Be sure that room is being ventilated adequately for fresh air
intake.
Embryo needs proper oxygen levels and produce carbon dioxide during incubation.
To supply oxygen in proper level and remove carbon dioxide, ventilation is
essential.
In CT series models, ventilation is supplied automatically with fan and air-in / air out
holes. Air in/out ventils are adjustable.
Air in/out ventils can be adjusted by left / right turn to decrease air in/out by
considering egg amount in your incubator.
Caution! Never close air- in / out holes.
Caution! Always keeps air- in / out holes fully open during hatching period.
Caution! Never make animal breeding in incubation room.
Caution! Be sure incubation room has adequate air intake.
Caution! Don’t let room temperature below 15 °
°°
°C and above 30 °
°°
°C
Caution! Don’t let reaching of animals and insects to the incubator.
Caution! Don’t let accessing of children or person that have physically or mentally
problems to the incubator.
Air out
Air in
50cm
50cm
50cm

7
CT
SERIES
Egg Handling
Temperature / Humidity Controller
Eggs must be collected carefully and stored in good conditions up to setting. Quality of eggs is very important for hatchery results. Sanitizing
eggs before storage is an effective method for killing or decreasing the amount of microorganisms in egg surface. You must know that
sanitation processes does not only kill the bacteria, but it can also kill the chick embryo in the egg. Use proper sanitary procedures.
Ideal egg storage temperature is 12–13 °
°°
°C. Store eggs in cool condition (between 10 to 20 C) and never let them be exposed to sunlight.
Daily turning of eggs is suggested during storage to maintain hatchability.
Caution! The eggs never be stored in refrigerator. (4
°
°°
°
C is very low)
Caution! Storage of eggs in bad conditions higher than 7 day decrease egg quality and so hatchability.
Caution! Eggs must be stored 1 day minimum before setting.
Caution! For dirty eggs, never use cloths to clean and improper washing procedures.
In egg incubation, the most important factor is temperature. Temperature control is provided by electronic controller which manages heater
units with high precise electronic control system.
Embryos tolerate short term temperature drops, however higher temperatures than ideal affect embryos detrimentally. Be sure that your
temperature setting is true and don’t concern about short term cooling of eggs when cover open for water adding or inspections.
Humidity RH%
Temperature
0
C
50
37.7
Rh
0
C
%
T
H
Heater active led
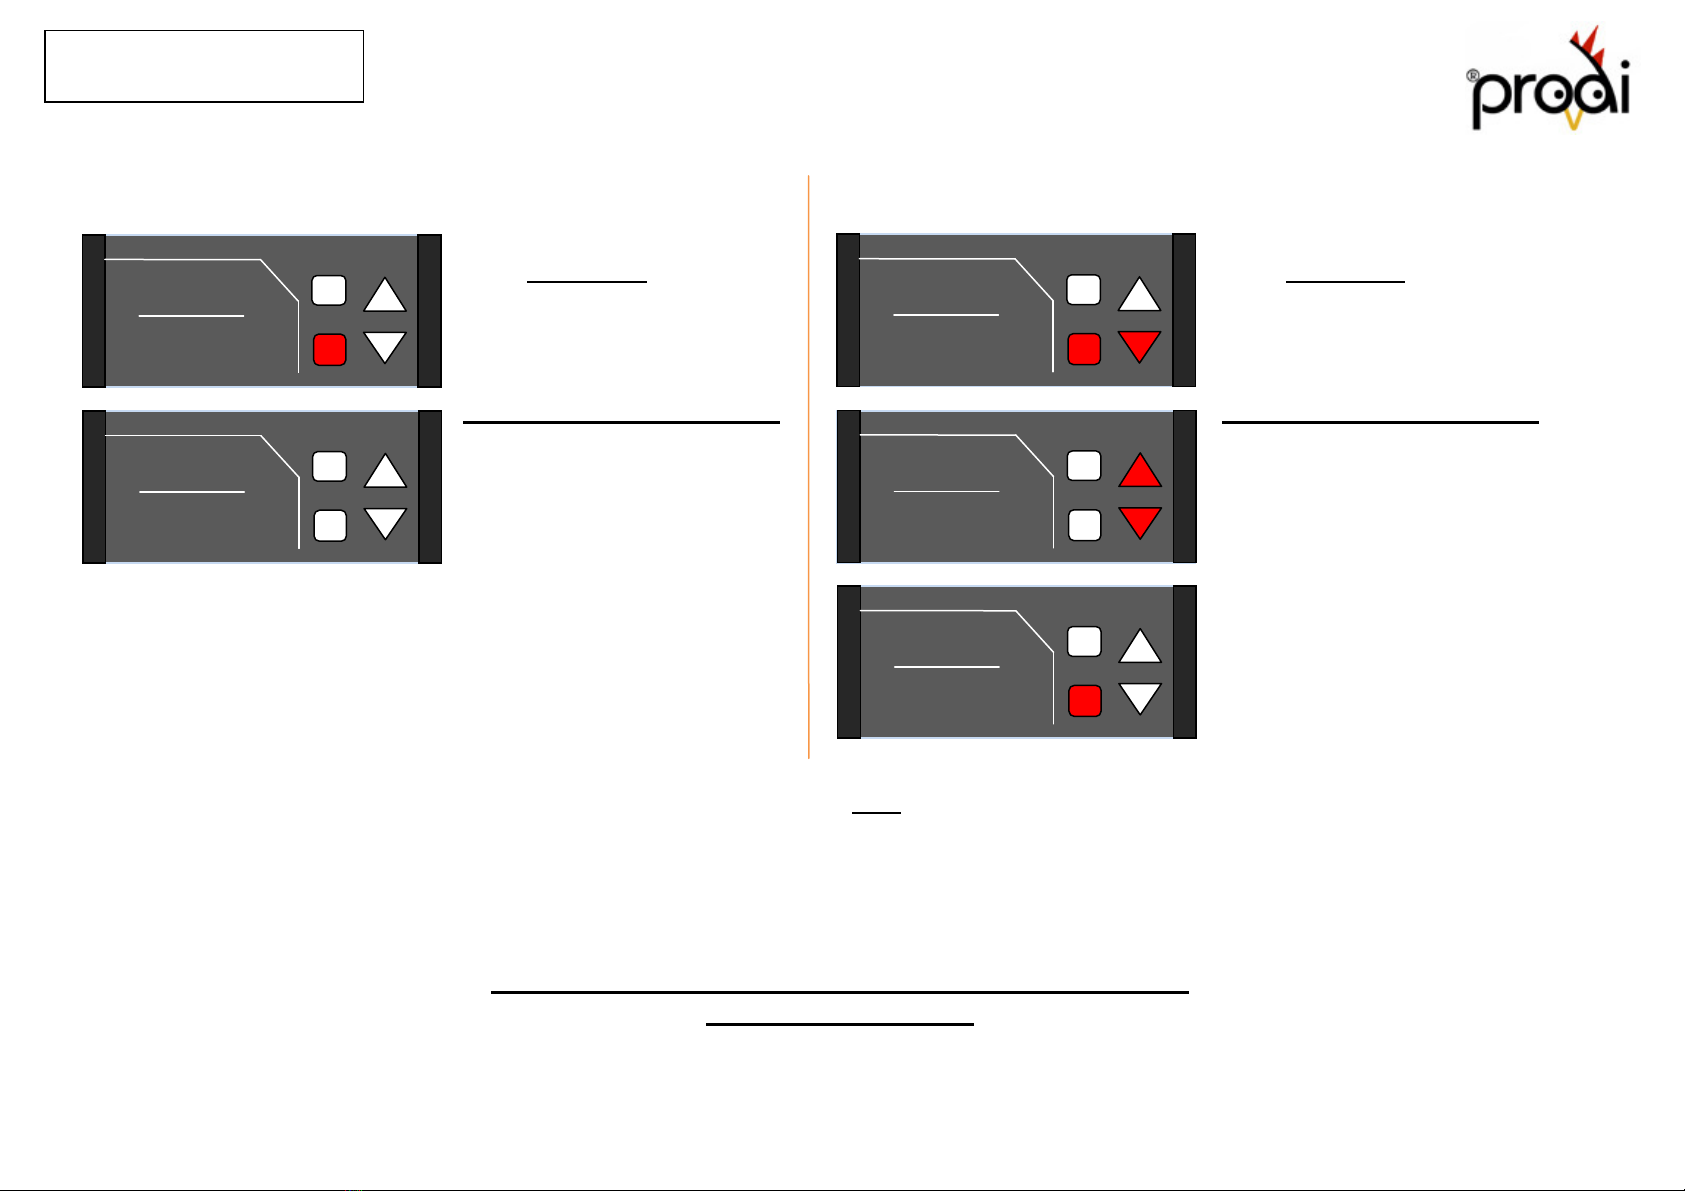
U - Up
D – Down / light
T- Temperature et
H - Humidity et
U
D
Humidifier active led

8
CT
SERIES
To check temperature set point To change temperature set point
50
37.7
T
H
U
D
37.7
t S P
T
H
U
D
50
37.7
T
H
U
D
37.2
T
H
U
D
SAV
T
H
U
D
When Main screen is active,
Press
T
button / 1 s
Tsp – Temperature Set Screen
will appear 2 s and turn back to
main screen.
Down value is temperature set
point.
When Main screen is active,
Press
T + U
button together / 2 s
Tsp – Temperature Set Screen
will appear 10s
Press
U / D
buttons to adjust
temperature set point
when finished adjustment,
press
T
button to “save” adjusted value.
t S P
Recommended temperature values for different species
are given at page 22
Note: There is a protection mode in the controller not to change set
values by unauthorized persons. If needed power-off model and
power-on again to enter temperature set screen.
To Light on
50
37.7
T
H
U
D
When Main screen is active,
Press
D
button to light on and
off.
Note: If you forget light on
controller will close bulb
automatically after 1 minute.
9
CT
SERIES
To check humidity set point To change humidy set point
50
37.7
T
H
U
D
50
h
S P
T
H
U
D
50
37.7
T
H
U
D
70
T
H
U
D
SAV
T
H
U
D
When Main screen is active,
Press
H
button / 1 s
hsp – Temperature Set Screen
will appear 2 s and turn back to
main screen.
Down value is humidity set point.
When Main screen is active,
Press
H + D
button together / 2 s
Tsp – Temperature Set Screen
will appear 10s
Press
U / D
buttons to adjust humidity
set point
when finished adjustment,
press
H
button to “save” adjusted value.
h
S P
Recommended Humidity values for different species
are given at page 22
Note: There is a protection mode in the controller not to change set
values by unauthorized persons. If needed power-off model and
power-on again to enter humidity set screen.

10
Temperature - Humidity Alarms / Calibration Parameters
CT
SERIES
50
37.7
Rh
0
C
%
T
H
U
D
SAV
Rh
0
C
%
T
H
U
D
Press T + H together / 2 S
to enter parameter screen
Press T + H together / 2 s
to save changes
Press U / D buttons to change parameter values
Press
H
Press
H
Press
H
Press
H
Press
H
Press
H
Note: There is a protection mode in controller not to change
parameter values by unauthorized person. If needed power-off
model and power-on again to enter parameter screen.
tLo
–
low temperature alarm
/
lower values gives alarm
tHi – high temperature alarm / higher values gives alarm
tCo – temperature calibration value
hLo – low humidity alarm / lower values gives alarm
hHi – high humidity alarm / higher values gives alarm
hCo – humidity calibration value
CAUTION!
tCo / hCo values are very critical parameters and
changing this values can results with chick looses.
CAUTION!
pls use qualified and calibrated glass or electronic
thermometers for calibration purpose. And always check
temperature and humidity values periodically.
36.6
%
T
H
U
D
t L o
l o
*.*
%
T
H
U
D
t C o
o
50
%
T
H
U
D
t H i
38.3
*.*
%
T
H
U
D
h C o
80
%
T
H
U
D
h H i
0
%
T
H
U
D
h L o
CAUTION!
CAUTION!

11
CT
SERIES
Humisonic
TM
Automatic Humidity Control
Humidity adjustment in incubators is for
providing
adequate water loss from egg
s
. And also
high humidity levels for last 2
-
3 day
are
also very important. Egg needed to lose between 13-16 % water depending on the species during incubation period. Weighing of eggs
during incubation is most trustable method to find proper humidity needed to good hatching results for particular poultry species.
Different from temperature, short term humidity changes during incubation are not important. Providing an average humidity in desired level
during all incubation period is enough to achieve good results. However, high humidity levels during hatching period ( last 2-3 day) is very
important. When the chick started to hatch, inner membrane of egg dries quickly. This makes membranes harden and chick can stick to
shell. To prevent drying of membranes, humidity must be adjusted to high levels depending on species for last 2-3 day of incubation.
Installation
- Connect Humisonic
TM
reservoir right side of the incubator.
- Place stainless Humisonic
TM
unit to the bottom of reservoir.
- Connect top reservoir 4 lt with Humisonic
TM
reservoir by flexible hose.
- Connect Humisonic
TM
cable to Adapter and adapter to the control panel.
-
The float valve in Humisonic
TM
reservoir will keep water level 1 - 2 cm above water level sensor.
Humisonic
TM
Adapter
1-2 cm
level sensor
Humisonic
TM
unit
Humisonic
TM
reservoir
Humisonic
TM
cable
Flexible hose
Float valve
Reservoir
4 lt
CAUTION!
Don’t use hard and limy waters for humidifier system and for humidity tray and change humidifier disks periodically.
Humisonic
TM
humidifier units design for on – off work. Don’t let it working continuously for long time. This will decrease service
life of unit and power adapter.

12
CT
SERIES
Lowest humidity
Highest humidity
Don’t forget that humidity values depend on temperature values, always check humidity values at temperature set point.
You could not decrease humidity below a point and could not increase above a point . This low and up limits depend on humidity level of
your incubation room.
CAUTION!
Never fill humidity trays with cold water. Use warm water close to incubator temperature set point. Ideally 25-30
0
C
Humidity Tray
CAUTION!
Don’t forget that humidity tray is a part of the incubator and always keep it in bottom, even empty. Advisable to fill
one channel of humidity tray during setting period ( Setters / combined types) and full fill for hatching period last 2-3 day.
( hatchers / combined models)
Keeping water in humidity tray gives many advantages to user and decrease the risk of incubation,
- Humisonic
TM
automatic system water can be finish out of your control,
- Humisonic
TM
automatic system life will increase with low working,
- Any failure on automatic system, water in humidity tray keeps humidity in acceptable level,
- System consume less power so low energy cost for your incubation process.

13
1
Conturn
TM
30 base
2
Conturn
TM
Egg Rack
3
Rack fixing bar
4
Rack fixing pins
5
Main turner bar
6
Conturn
TM
Motor
7
Conturn
TM
Adapter
Egg Turning / Conturn
TM
30
Adjustment
Conturn
TM
30 Adjustment
Conturn
TM
motor provides
continuous turning,
(1 turn per 4 hour )
1
3
4 5 6 7
Conturn
TM
30 comes with 6 rack installation in standard, if you have bigger eggs than chicken eggs, racks must be adjusted.
•Remove the rack fixing bar(3) and pins(4).
•Remove main turner bar(5) from motor
•Adjust the egg racks(2) for your egg size .
•Fix main turning bar(5) to motor arm and racks.
•Fix the rack fixing bar(3) and pins(4).
CAUTION!
It is important that Conturn
TM
30 trays must be settle truly. Before connecting
Conturn
TM
30 to power, be sure that channels are in same angel.
2
CT SERIES
4 hours

14
5 pc- Standard Rack
Big Duck / Turkey
Hole no: 1-4-7-10 -13
6 pc- Standard Rack
Chicken or smaller eggs
Hole no: 1-3-6-8-11-13
9 quail egg x 6 rack
5 chicken/duck egg x 6 rack
4 turkey/big duck egg x 5 rack
7 partridge egg x 6 rack
6 pheasant egg x 6 rack
EGG CAPACITIES
CT
SERIES
Conturn
TM
30 base and main turner bar have holes for adjustments of channels. In standard, it comes with 6 channels.
It can be used for hen and smaller eggs without any change.
C
onturn
TM
30 has 13 holes shown below.
Use Hole numbers given above to adjust tray for your egg size.
CAUTION !
Channels must be adjusted for biggest size egg that you will set.
Never set big eggs that can fall down during turning.
1
2
13
4 5
6
8
9
7
11
10 12
3
1
3
6
8 11 13
1
4
7
10
13
15
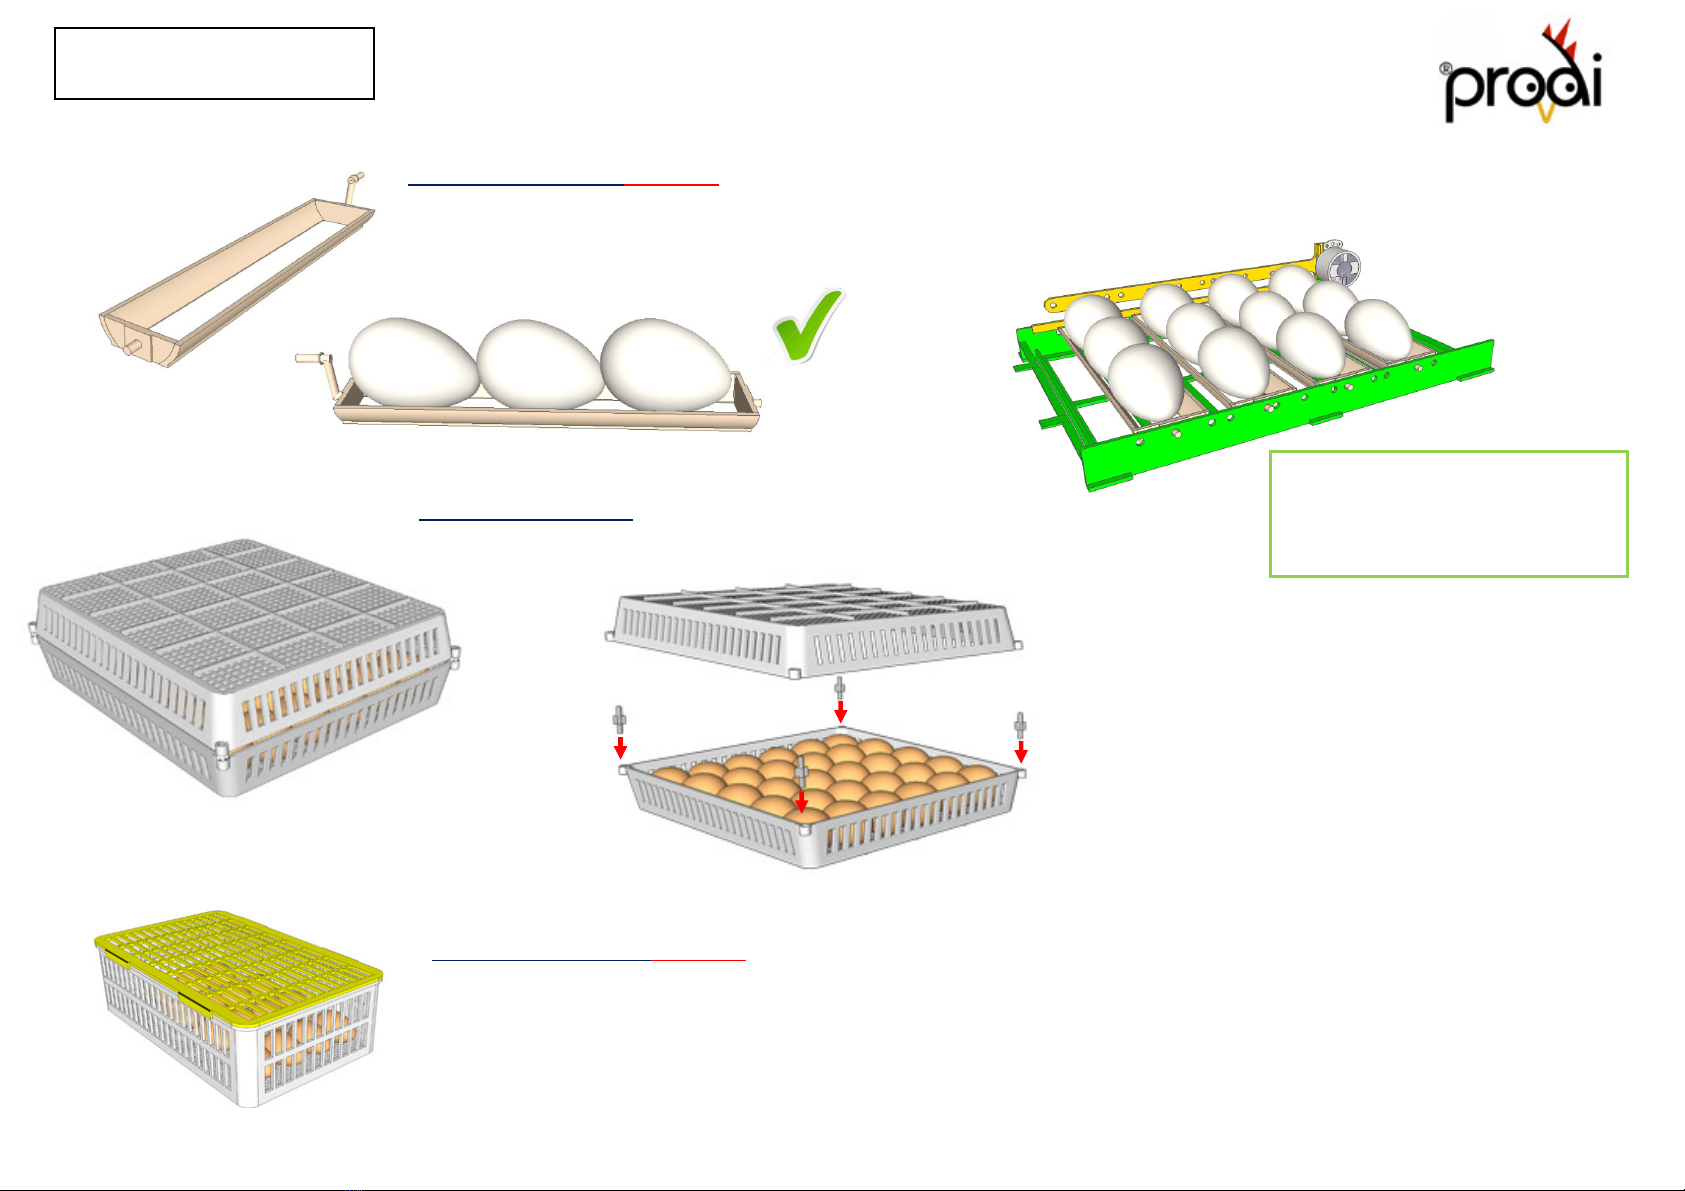
Standard Egg Rack
QT13
-
Quail Egg Tray
(optional)
Standard egg rack holds 9 pc quail egg, QT13 quail rack are placed directly onto the
standard channel and holds 13 quail eggs in one rack and help you to place smaller size
quail eggs than normal.
QT13
CT
SERIES
CAUTION !
Never set eggs on the position small end top. Eggs must be set small end down or horizontal.
16
2
5
9
12
GT03
–
Goose Egg Rack
( optional)
GooseEgg Rack has been designed for large goose eggs. Goose eggs must set racks as horizontal
position, small end a bit lower about 10 degree. This helps chicks for easy hatching. And
periodic cooling of goose eggs is advisable.
GT03
CT
SERIES
4 pc- Goose Egg Rack
Goose-peacock
Hole no: 2-5-9-12
C 15
CS15
–
Hatchery Basket
( optional)
CS15 hatchery baskets give chance to user separate different species hatching in same shelf .
2 pc of CS15 can be used in one shelf instead of CS30 hatchery basket.
C 30
CS30
–
Hatchery Basket
Eggs transferred to CS30 hatchery baskets for last 2 -3 day of incubation. .
17
50
70
Setting and Hatching
All Set / All Hatch
19
TH
DAY
transfer eggs
To CS30
Hatchery
Baskets
First 18 day
Temp: 37.7
0
C
Humidity: 50 % RH ( 50-55)
Last 3 day
Temp: 37.2
0
C
Humidity: 70 % RH ( 65-70)
T
H
U
D
37.7
T
H
U
D
37.2
Example : Chicken Egg ( incubation time 21 day)
CT
SERIES
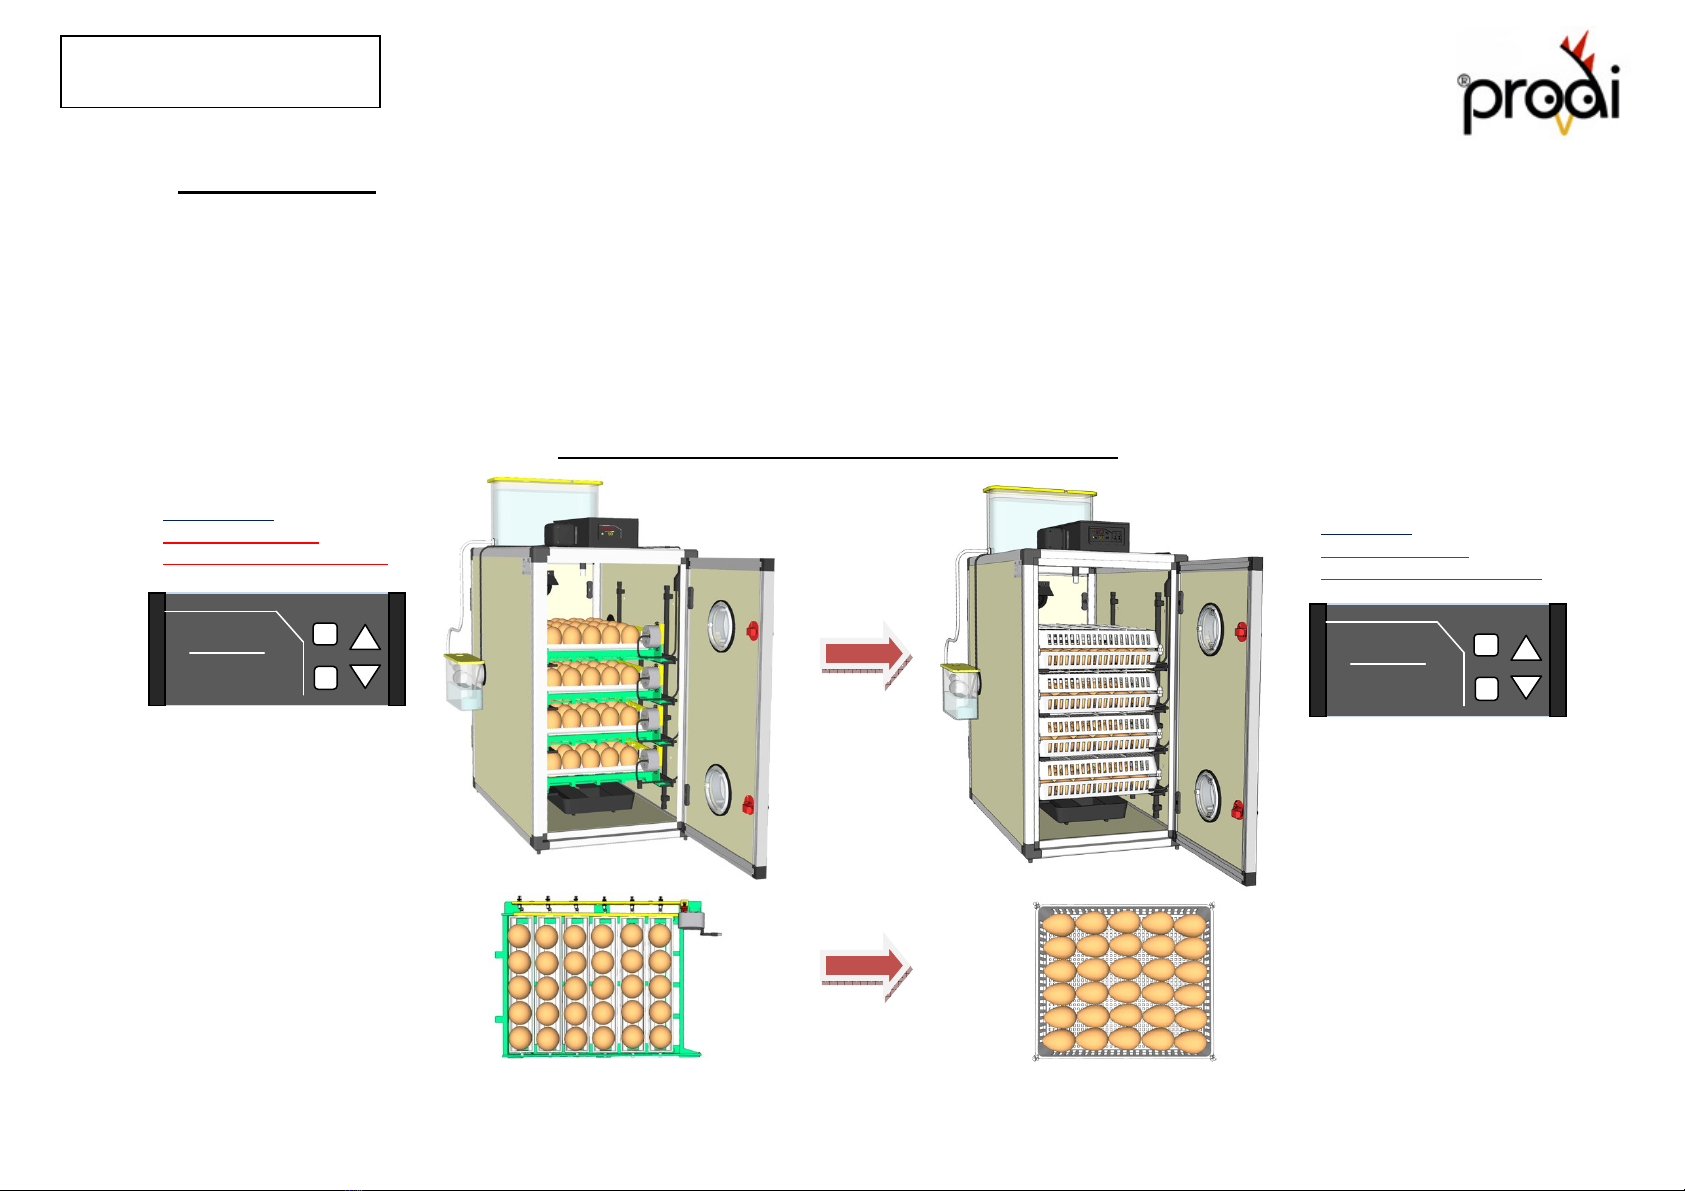
Eggs are set to Conturn
TM
30 automatic turning cradle and kept up to last 3 day of incubation, then transferred to CS30 hatchery baskets for last 3 day
of incubation.
CT series also offers Setter (S) and Hatcher (H) models in 3 different capacities from 60 to 180 chicken egg.Using a separate hatcher gives
advantage user to work with exact temperature and humidity values for embryo needs. And also a separate hatcher decreases microbial cross
contamination risk between eggs in setter and hatcher.
Eggs of different species which have different incubation time can set together by adjusting the transfer date to the same day.
Conturn30
TM
CS30

50
CT
SERIES
Partial Setting
Example : Model CT120 SH / setting 30 chicken egg per 7 day
SH type models can also be used by partial setting. To decrease egg storage times, eggs can be set partially and periodically
per 5-
7 day. Eggs must be transferred to hatchery baskets for last 2 day of incubation.
CAUTION!
In partial setting, the time
Day1
Day8
Days , no
hatching
Temperature: 37.7
0
C
Humidity 50 % RH ( 50-55)
37.7
18
Example : Model CT120 SH / setting 30 chicken egg per 7 day
SH type models can also be used by partial setting. To decrease egg storage times, eggs can be set partially and periodically
7 day. Eggs must be transferred to hatchery baskets for last 2 day of incubation.
In partial setting, the time
between sets must be minimum 5 day.
Day8
Day15
Day20
Eggs set at day1 are transfered to
hatchery basket at day 20 and new
eggs can be set to empty part
T
H
U
D
70
Example : Model CT120 SH / setting 30 chicken egg per 7 day
SH type models can also be used by partial setting. To decrease egg storage times, eggs can be set partially and periodically
Day20
Eggs set at day1 are transfered to
hatchery basket at day 20 and new
eggs can be set to empty part
New Eggs
During Hatching
Temperature: 37.2
0
C
Humidity 70 % RH (65-70)
T
H
U
D
37.2

19
CT
SERIES
Incubation Records
Incubation records are very important to identify performance and also problems of incubation.
Name of species, setting date, transfer date, hatching date, number of egg set, number of fertile egg, number of chicks, % hatchability,
can be recorded for future reference. Eggs must be controlled for fertility, early and late dead identification.
%hatchability can change for different species. Hatchability can be calculated by dividing number of chicks to number of fertile eggs.
Sample table (Quail incubation time 17 day, chicken incubation time 21 day.)
Species
Date of
Number of
Hatchability
%
Not
es
Hatching times, Early, middle and late
death, problem in chicks
Set Transfer Hatching Eggs fertile
eggs chicks
Quail 1.1.2000 15.1.2000 18.1.2000 25 20 19 95 16-17 day hatch, no death
Hen 5.1.2000 23.1.2000 26.1.2000 5 4 4 100 20-21 day hatch, 1 early death
- Incorrect incubation settings.
- Turning problems.
- Very low or very high incubation room temperature.
- Inadequate room ventilation.
- High egg storage times .
- Electric cut offs.
- Inadequate or wrong sanitary procedures for eggs or machine.
- Very old or very young parents
- Improper or poor parent feeding
- General problems for health of parents
- Illnesses and genetic problems in parents
- Wrong male / female ratio.
Factors Affecting Hatchability
20
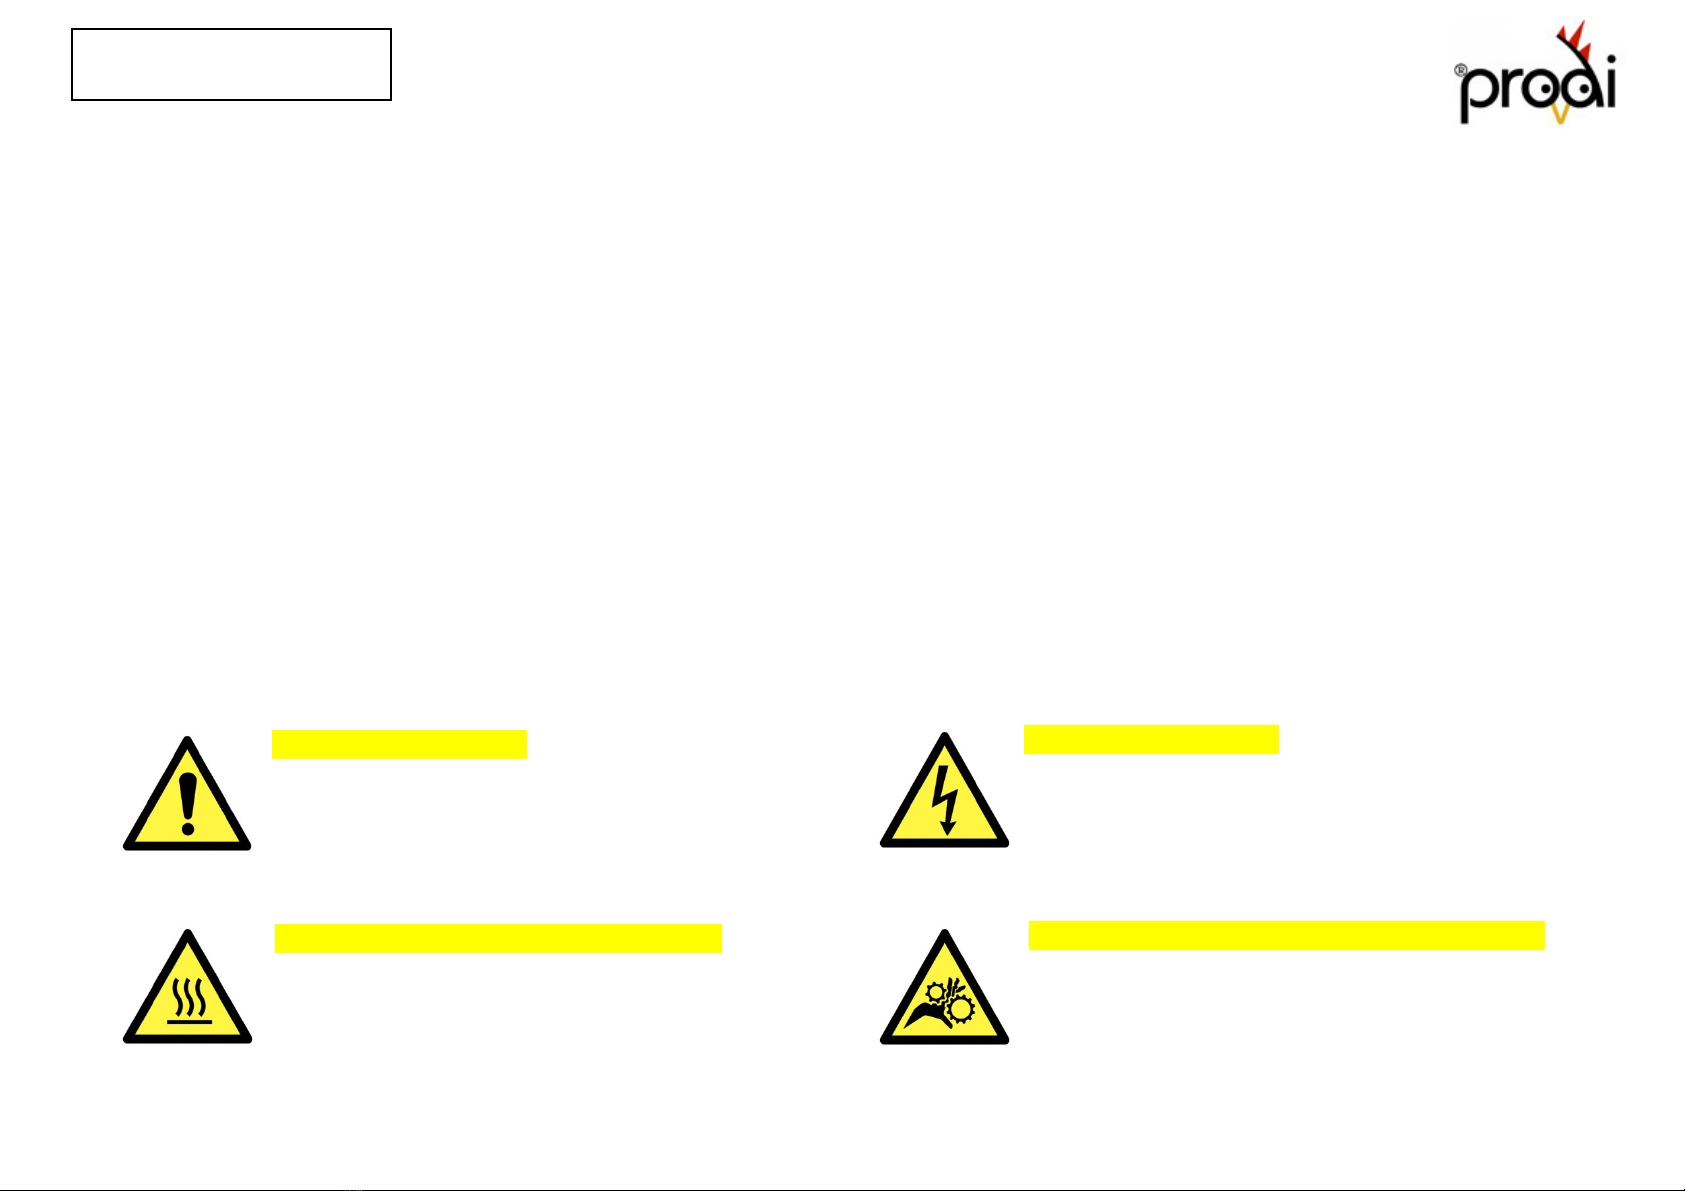
RISK OF ELECTRIC SHOCK!
NEVER ATTEMPT ANY KIND OF SERVICING UNLESS THE MACHINE
IS DISCONNECTED FROM THE MAINS ELECTRICITY SUPPLY.
The cables, heater,fan and bulb are at main voltage.
RISK OF ELECTRIC SHOCK!
ALWAYS OPERATE YOUR EGG INCUBATOR WITH GROUNDED POWER
SOCKET. NEVER ATTEMPT TO TOUCH OR SERVICING UNLESS THE
MACHINE IS DISCONNECTED FROM THE MAINS ELECTRICITY SUPPLY.
Connections inside of control panel at main voltage.
RISK OF BURN! HOT SURFACE. DON’T TOUCH
NEVER ATTEMPT TO TOUCH THE HEATHER INSIDE OF
VENTILATION PANEL. THE MACHINE MUST BE DISCONNECTED
FROM THE MAINS ELECTRICITY SUPPLY AND WAIT MIN 5
MINUTES.
RISK OF INJURY! KEEP HANDS AND FINGERS AWAY.
NEVER ATTEMPT TO TOUCH OR SERVICING FAN UNIT UNLESS
THE MACHINE IS DISCONNECTED FROM THE MAINS ELECTRICITY
SUPPLY.
CT
SERIES
Caution!
Disconnect the incubator from electric supply during cleaning or service.
Caution!
Service and spare part changings must be carried out only by a qualified person.
Internal parts of cabinet and egg trays must be cleaned after every hatch with a proper sanitary solution. Apply recommended
sanitation methods and chemicals for cleaning.
Caution!
Never use water higher than 50 C for cleaning. Electrical parts of machine must be kept dry during cleaning.
If you are using your model seasonally, after egg season have finished, clean your incubators and keep it open to dry all parts for min
1 day. For control panel and fan panel cleaning, use dry soft brush and alternatively vacuum cleaner.
Always check inside temperature and humidity of your model periodically with a high quality calibrated glass or electronic
thermometer. if needed.carry out a proper calibration procedure.
Egg Incubation is a continuous work. Please keep your model in your control. Cimuka or sale agents will not be held responsible for
any loss of eggs or chicks under any circumstances. Almost all parts of Prodi series incubators have easy spare changing and plug
and play features. Always keep critical parts as spares For your spare part and service needs, contact with your dealer.
Safety Labeling
Cleaning Up and Service
This manual suits for next models
3
Table of contents
Other cimuka Accessories manuals


