Cinelex DESK-TX8 User manual
1 | P a g e
CINELEX PRODUCT OPERATION GUIDE
Cinelex DESK-TX8 Wireless DMX transmitter
Thank you purchasing the Cinelex Desk-TX8. The DESK-TX8 is an 8 fader portable wireless
transmitter using theLumenRadio CRMX standard protocol. It will transmitDMX512 industry
standard DMX signals to any LumenRadio compatible wireless receiver such as the Cinelex
Skynode or TRX, as well as any other compatible receiver or light fixture.
Features
TRULY WIRELESS - The “Go Anywhere” portable wireless DMX control desk.
OPERATE WITH PAGES - Activate up-to 512 DMX channels, controlled through 64 Pages.
LumenRadio COMPATIBLE - Syncs seamlessly to any Cinelex SKYNODE or TRX or any light or
receiver with an integral LumenRadio receiver chipset.
PROFESSIONAL READY - Robust design, constructed with extruded aluminium - built to withstand
tough rental & on-set environments.
MULTIPLE POWER INPUTS –5~30V operation allows for multiple power options, including over 24
hours run-time from 4x AA batteries.
STANDARDS COMPLIANT
All Cinelex products meet international regulatorystandards including FCC, CE & RoHS

2 | P a g e
Contents
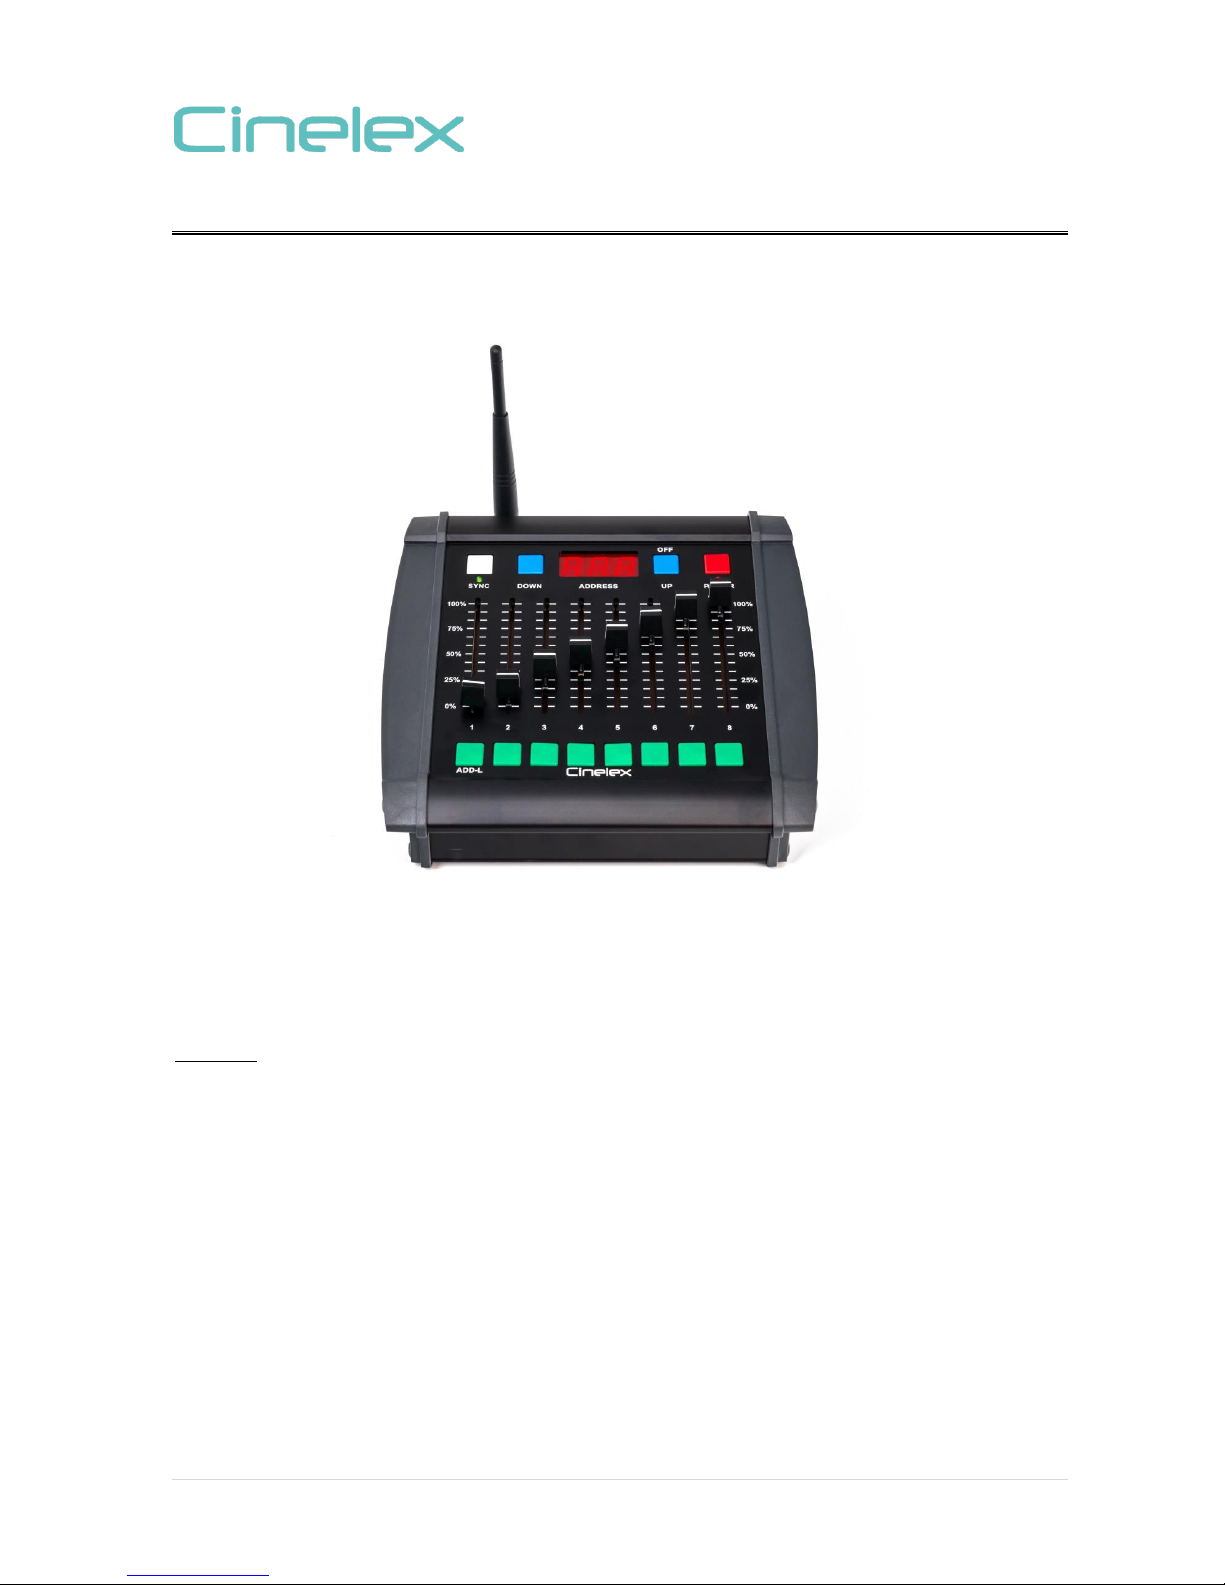
fig 1.
Shipped from the factory the DESK-TX8 contains
Desk-TX8 x1
Antenna x1
AC Adaptor x1 (with 4x multi-country plug adaptors)
(Desk-TX8 as shipped does not include AA batteries)
Power On
To power the DESK-TX8 insert either 4 standard AA size 1.5v batteries (not included) or connect the
included AC Adaptor.
To insert the batteries remove the battery compartment cover, located at the base of the DESK-
TX8, using a small flat screwdriver tolever the cover off. Insert the 4 batteries noting the correct
polarity and voltage (shown inside the battery compartment). Use new batteries or batteries of
same charge condition.
To connect the AC Adaptor first fit the adaptor plug appropriate for your country. The plug adaptor
snaps in by first hinging the plug into one end of the PSU (the end away from the release button) and
then snapping it intolocation. To remove or changethe plug adaptorslide the small release button
(marked ‘open) outwards and the plug will spring out. Insert the 2.1mm dia. connector into the DC-in
socket at the back of the DESK-TX8 (see fig 2)
Press the red POWER button. The red power led will light and the ADDRESS will display.
fig 2.
Connect the supplied antenna, for optimal signal reception and distance.

3 | P a g e
Power Off
To power off the DESK-TX8 press and hold POWER (red) button until OFF appears in the display.
Then confirm by pressing the OFF (Blue) button. The DESK-TX8 is now powered down. Remove the
batteries if the DESK will not be used again for a long time.
Operation
With the batteries inserted, or AC Adaptor connected, press the POWER (red) button.
The led under the power button will light red. The display will show the last selected DMX channel,
or PAGE number, and the led under the white SYNC button will light green.
fig 3.
As default setting the DESK-TX8 is shipped from the factory in Standard quick 8-Channel mode. To
switch between Standard and PAGE modes see page 4.
In Standard Mode
•Power up DESK-TX8 using 4 x AA batteries or supplied AC Adaptor
•Switch on DESK-TX8 by pressing the red power button
•Select the DMX channel you wish to assign to fader No1 (001 –512) by holdingdown the
green ADDL (Address Lock ) button, see fig 4, andusing the blue UP / DOWNkeys to scroll
up and down. When desired channel is reached release the ADDL key tolock in address.
•The next 8 channels will automatically be sequentially assigned to the other faders No2~7.
So if, for example, 1st fader is assigned to DMX address 005 then next faders are
automatically DMX addresses 006~012.
fig 4.

4 | P a g e
SYNC
•To clear previous sync press and hold downthe SYNC button for 5 seconds then release,
This will clear any previous sync held in stored memory. The green LED will flash slowly for
a few seconds then go solid.
•To establish new sync quickly press the SYNC button once (do not hold) and then release,
The LED will flash quickly for a few seconds then go solid.
Slow Blink = No DMX
Fast Blink = Acquiring Sync (Linking)
Full LED = DMX Sync’d (or Pending)
Pressing Sync (Linking)
Press once Sync Search (Link time usually 5~7 secs)
Press and Hold for 5 secs Clears Sync
•To sync with the Cinelex Skynode or Cinelex TRX (if using TRX make sure TRX is in the
receive mode with RX button depressed) first clear the Skynode or TRX Sync by holding
down their respective Sync buttons for 5 secs. Then press the DESK-TX8 and Skynode / TRX
Sync buttons simultaneously to start Sync process. If linking more than onSkynode or TRX
to the DESK-TX8 follow the same procedure.
•A new Skynode or fixture can be added in at any time. Just do not clear the DESK-TX8Sync,
just the Skynode’s. Then press both units Sync button once to add in the new Skynode. The
Desk-TX8 will remain sync’d to the previous Skynodes (as long as the Desk-TX8 Sync is not
cleared).
•To sync with lights that have an integral Lumens Radio chipset, prepare the light as per
manufacturer’s instructions so that it searches for a sync connection and indicates when to
press Sync on the DESK-TX8
PAGES (EXTENDED) MODE
As default setting the DESK-TX8 is shipped from the factory in Standard quick 8-Channel mode.
Standard Mode canbe identified by 3 number digits in the display e.g. 001 up to 512. PAGES Mode can
be identified byletter P and 2 number digits in they display so P01 up to P64
To switch between Standard and PAGE modes:
Make sure the desk is off. Press and hold the blue “Down” button while turning the desk red Power
button on. Once the red power LED is on you can let go of the buttons.
The display will now show P 01
P 01 = page 1 which is DMX channels 1-8
P 02 = page 2 which is DMX channels 9-16
P 03 = page 3 which is DMX channels 17-24
P 04 = page 4 which is DMX channels 25-32
P 05 = page 5 which is DMX channels 33-40
to
P 64 = page 64 which is DMX channels 505-512

5 | P a g e
To move between pages press the Upand Down (Blue) buttons. The new page no. will be displayed.
To activate a slider on a new page you must press the flash (Green) button beneath the slider
Once you move to a new page, using the address up or down buttons, all sliders become inactive
until you press the corresponding flash button.
To power off press the Power button.
The display will show “Str” which means its stores all the pagevalues into internal memory.
Once stored the displaywill then show “off” you then press the OFF button.
The DESK-TX8 will remain in the PAGES (Extended) mode even after the power is turned off and
back on, unless itis manually put back into Standard (Basic) Mode.
All DMX values areretained in memoryso when you power up again it will remember the settings
from previously.
To CLEAR / RESET
To clear the memory and/or return to basic mode
1. Power off the desk as usual
2. Press and hold flash buttons 7 and 8 then press power on.
3. The display will show “Clr” this means the memory is being wiped and the desk will return to
Standard mode operation (Display will show 001). DESK can now be used as normal is
Standard Mode.
4. To return to PAGES mode, power off the DESK-TX8 again, and the Power on while holding
down the blue DOWN button.

6 | P a g e
Specifications
Protocol LumenRadio
Operational Frequency 2.4GHz (2402-2480MHz)
Range Up to 100m (environment dependent)
DMX DMX512, DMX512 (1990) & DMX512-A
DC in 5-30V
Power Consumption 1W
1x “SYNC” Button (White) Synchronise DESK-TX8 with a LumenRadio Receiver
1x “UP” Button (Blue) Increase DMX Address ID (or Page)
1x “DOWN” Button (Blue) Decrease DMX Address ID (or Page)
1x “POWER” Button (Red) Turns on DESK-TX8
8x ADD-L Button(s) (Green) DMX Address Lock
8x Control Slider(s) Adjust Assigned Parameter between 0-100%
1x 2.1mm DC-In External Power-in Socket
1x AA Battery Compartment (4x AA) (Batteries Not Included)
1x Antennae RP-TNC Male Connector (Antennae Included)
1x 3-Digit Numeric Display Active DMX Address / Page No. ID
1x “SYNC” LED Synchronisation Status
1x “POWER” LED ‘Power On’ Confirmation
Weight 765g
Dimensions 195mm x 190mm x 70mm (L x W x D)
Specifications are subject to changes with notice. E.&.O.E.
All trademarks remain the property of their respective holders
Cinelex, Unit 10, Sky Business Park, Eversley Way, Egham, Surrey, TW20 8RF, United Kingdom
v1.04 Feb 2018
Table of contents
Popular Transmitter manuals by other brands

REL
REL 518-D instruction manual

Thor Broadcast
Thor Broadcast F-RF-TX-MN-2Mw user manual

Harris
Harris Intelligent Transmitter Platinum-i Series Technical manual

Electronic Broadcast Equipment
Electronic Broadcast Equipment SIRIO 2000T User and maintenance manual

AFi
AFi MT-388SL instruction manual

iKarus
iKarus Opticc 6 Sport instruction manual

Rice Lake
Rice Lake Advanced Series Technical manual

Hoffer Flow Controls
Hoffer Flow Controls CAT1 Series user manual

Ashcroft
Ashcroft ZT11 Installation and maintenance instructions

Meinberg
Meinberg DCF77 PCI511 operating instructions

Hollyland
Hollyland Mars 4K quick guide

Retekess
Retekess TT117 instructions


