CINEMOOD CNMD0020 User manual

Technical Characteristics
Dimensions
Size: 3.3 in x 3.3 in x 3.3 in
Weight: 95 lbs
Performance
Up to 5 hours of battery life
Type-C connector
Memory: 8/40/72/136/264 GB
(depends on model)*
Built-In 3W speaker
Wi-Fi 802.11 b/g/n 2.4/5 GHz
Bluetooth 4.1
MIC(Echo cancelling
Max charging: 2Amp
*Available storage is less due to device software.
CNMD0020
EN V 3.0
**Your information is 100% secure via reputable third party sites
and you will not receive spam.
Basic Controls and Functions***
Button Action Result
Short Click Go to VR games folder
Hold for 5 sec
Hold for 5 sec
Hold for 2 sec
Startup / Boot Device
Power Off Screen
Ok / Select
Additional Menu Screen
Short Click
Short Click Navigates Left / Right
Click in Main
Menu
Click when
viewing content
Navigates Up / Down
Volume Up / Down
Pause, then Exit
Content
Click when
viewing content
What’s in the Box
CINEMOOD TV
USB Type-C cable
Handler
Getting Started
Press and hold the CENTER button for 5 seconds
to switch the device on or off.
Turn off or dim your room’s lights to get the best quality
video resolution
Direct the projector beam of the CINEMOOD onto the
surface you want to watch with, such as a wall or ceiling
and adjust focus using the buttons on the right side of
the device (#8).
You can control your CINEMOOD using buttons on the
top of the device (see controls graphic).
Congratulations!
You have finally got your hands on the CINEMOOD TV —
the mini projector with 360 capability for family
entertainment. We have developed this product with
inspiration and care so that you can enjoy more time
with your family.
You are just one button away from bringing magic into
your home. To get started with your CINEMOOD,
carefully read this Quick Start Guide.
See
www.cinemood.com/support
for more details.
If you have any issues or questions, before you return the
product, contact us at
or call us
directly at 1-800-350-6107. Support Hours are M-F 9am
-10pm EST or 24/7 via email.t
You can find a more in-depth User Manual
as well as an extensive list of videos
tutorials to support you getting started
and using your CINEMOOD TV by scanning
the QR Code or going to
www.cinemood.com/support
Set Up Your Device
Download the CINEMOOD App from Apple Store or Google
Play to set up your device easily. You must enable bluetooth
on your smartphone to connect with the device via the App.
Follow the onscreen instructions in the CINEMOOD App
or on the device.
During setup connect your CINEMOOD TV to your Wi-Fi
network. This will allow you to update software, watch
preloaded content from the cloud, download embedded
content, and install applications like Netflix or Prime Video
immediately after setup.
You can add your bank card under “Settings” allowing you
to subscribe to integrated services and make it easier to
purchase additional content.**
After initial setup, check for and install any updates by
navigating to the “About” section under “Settings” to
ensure your device has the current firmware to avoid
potential issues or errors using internal content or
applications.
To charge the CINEMOOD TV battery, you should:
Switch off the device and plug-in the charging cable and the
power adaptor supplied with the CINEMOOD. A red light will
appear to indicate that your mini cinema projector is charging.
Wait until the power indicator light changes from red
to green. This means that the CINEMOOD is fully charged
and ready for use.
The CINEMOOD will only charge when it is switched off.
Note: you can still operate the device when it is plugged in it
but it will not be actively charging.
Charging the Battery
***We are constantly improving your experience; therefore, control
functions might change. For the latest functionalities, please visit
www.cinemood.com/support
Instructions and Safety
Do not block the ventilation grids of your CINEMOOD.
This may cause overheating.
Do not expose your CINEMOOD to direct sunlight
for extended periods of time.
Keep your CINEMOOD away from water, other liquids,
and dust.
Do not disassemble your CINEMOOD. This will void your
warranty and could cause electric shock.
Be careful with your projector lens. Scratches are possible
from the excess force and may affect your overall viewing
experience.
Store your CINEMOOD in room temperature, stable,
and safe area.
Do not look directly into the beam as prolonged exposure
could damage eyesight.
Avoid dropping the device or exposing the device to
extreme vibrations as it may damage internal components.
Additional Information
All CINEMOOD products have the required certificates and
are fully compliant with the relevant norms and standards.
CINEMOOD Trendsetters co. 2711 Centerville Road, Suite 400,
Wilmington, New Castle County, Delaware 19808.
Assembled in China.
For more details on the product’s certificates, see
www.cinemood.com
Date of production is the first four characters of the serial
number (YYMM).
Controls
Central Button
VR Button
Back Button
Type-C for Charging with
included USB cable
1
2
3
4
Navigation Buttons – Left,
Right, UP, Down, Center
SIM slot
Microphones
Focus Adjustment for picture
clarity
5
6
7
8
6
1
5 7
2
3
4
8
CINEMOOD CNMD0020
FCC ID: 2AKIN-CNMD0020
Welcome to our family!
Join our communities of 80,000 families
across 140 countries.
facebook.com/groups/cinemood
instagram.com/cinemood_usa

FCC Caution:
Any Changes or modifications not expressly approved by the party responsible for compliance could void the user’s authority to operate the equipment.
This device complies with part 15 of the FCC Rules. Operation is subject to the following two conditions: (1) This device may not cause harmful interference, and
(2) this device must accept any interference received, including interference that may cause undesired operation.
Note: This equipment has been tested and found to comply with the limits for a Class B digital device, pursuant to part 15 of the FCC Rules. These limits are designed
to provide reasonable protection against harmful interference in a residential installation. This equipment generales, uses and can radiate radio fre-quency energy
and, if not installed and used in accordance with the instructions, may cause harmful interference to radio communications. However, there is no guarantee that
interference will not occur in a particular installation. lf this equip-ment does cause harmful interference to radio or television reception, which can be determinad by
turning the equipment off and on, the user is encouraged to try to correct the interference by one or more of the following measures:
1)Reorient or relocate the receiving antenna.
2)lncrease the separation between the equipment and receiver. Connect the equipment into an outlet on a circuit different from that to which the receiver is
connected.
3)Consult the dealer or an experienced radio/TV technician for help.
Specific Absorption Rate (SAR) information:
This Optical projector meets the government's requirements for exposure to radio waves. The guidelines are based on standards that were developed by independent
scientific organizations through periodic and thorough evaluation of scientific studies. The standards include a substantial safety margin designed to assure the safety
of all persons regardless of age or health. FCC RF Exposure Information and Statement the SAR limit of USA (FCC) is 1.6 W/kg averaged over one gram of tissue.
Device types: Optical projector has also been tested against this SAR limit(Max SAR:0.723W/kg). This device kept 10mm from the body. . The use of accessories
that do not satisfy these requirements may not comply with FCC RF exposure requirements, and should be avoided.
Popular Projection Screen manuals by other brands
Elite Screens
Elite Screens Planate Tab-Tension Series Adjustment instructions
Draper
Draper Ultimate Access Series E Installation & operating instructions

V-TAC
V-TAC 11077 instruction manual
Dynamobel
Dynamobel CORONA manual
Draper
Draper Piper Portable Screen datasheet
REMACO TECHNOLOGIES
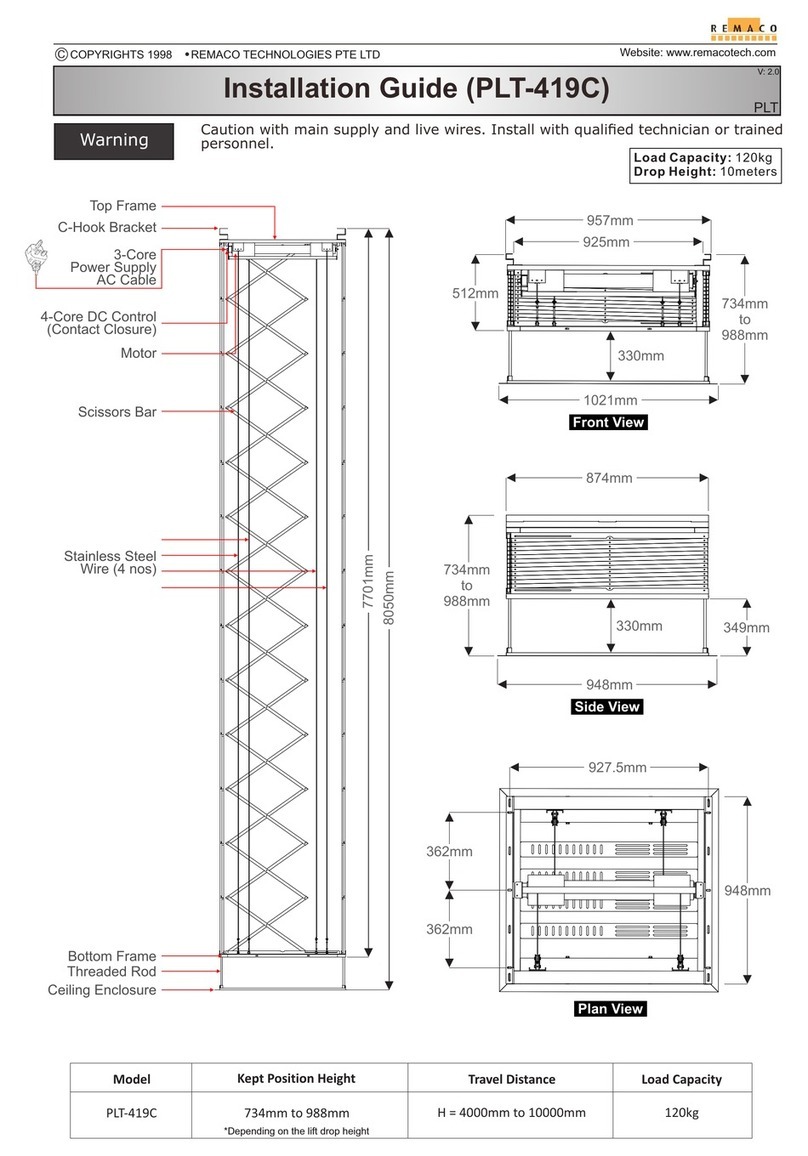
REMACO TECHNOLOGIES PLT-419C installation guide
