Cirris signature 1100R+ User manual

Signature 1100R+
Performance Verification Manual
Version 2012.3.0
June 25, 2013
(ISO 9001 Certified)

Signature 1100R+
Performance Verification Manual
Version 2012.3.0
Copyright 2004 by Cirris Systems Corporation
All Rights Reserved
Cirris Systems Corporation
1991 W. Parkway Boulevard
Salt Lake City, Utah 84119
USA

Table of
Contents
Introduction ___________________________________________________________ 1
Disclaimer__________________________________________________________________ 1
Parts List ___________________________________________________________________ 1
Setting Up _____________________________________________________________ 2
Performance Verification Certificate and Data Sheet _______________________________ 2
Install Add-on Scanners _______________________________________________________ 2
Plug in the Tester ____________________________________________________________ 2
Signal Routing Sytem Test ________________________________________________ 3
Resistance Measurement System Test ______________________________________ 5
Resistance Threshold System Test __________________________________________ 7
500k Threshold Test __________________________________________________________ 7
1M Threshold Test ___________________________________________________________ 8
5M Threshold Test ___________________________________________________________ 9
Capacitance Measurement System Test ____________________________________ 10
4-Wire Measurement System Test ________________________________________ 12
Appendix_____________________________________________________________ 13

1
Introduction
The 1100R+ Performance Verification Kit allows you to verify the calibration and proper
operation of the 1100R+ tester. Each performance verification kit has a life cycle of two
years from the time of purchase. At the end of two years, the kit can be recalibrated or
replaced. All components for this performance verification kit are tested with instruments
traceable to the National Institute of Standards and Technology (NIST).
You should run performance verification on your 1100R+ tester at least once a year,
and any time you suspect that the tester is not operating properly. If any step in the
performance verification procedure fails, send the tester back to Cirris for repair.
No external adjustments can be made to fix the tester.
For information on setting up a quality system that meets national calibration standards
such as ANSI/NCSL Z540-1, and ISO 10012-1, see the appendix of this manual.
Disclaimer
All calibration procedures are performed in-house at the factory. Older versions of the
software may use the word “calibration” during the verification process. Note that in these
instances “calibration” means “verification”.
Parts List
Make sure you received the following parts:
Zero Ohm Adapter
Resistor Leak Adapter
Capacitance/Fourwire Adapter

2
Setting Up
Performance Verification Certificate and Data Sheet
The Easy Touch Performance Verification Certificate and the Easy Touch Verification
Data Sheet are at the end of this manual. You can record verification data on these
documents for your records. If you choose to use these documents, make photocopies to
maintain master copies for future use.
Install Add-on Scanners
The examples in this manual use an Easy Touch with no expansion boxes.
1. Install any add-on scanners you
want to use. For instructions, see
the 1100R+ Getting Started Guide.
Plug in the Tester
1. Connect the power cord to the
power supply and connect the
power supply to the tester. Plug the
tester into a grounded power outlet.

3
Signal Routing
Sytem Test
1. From the tester’s Main Menu, press Set Up Test Program, Create New Test, and
then press Set Learn Settings. Set the Learn Settings to the following values:
Learn Settings
Setting
Value
Connection Resistance
.1 Ω
LV Insulation Resistance
5M Ω
Set Components
OFF for all components
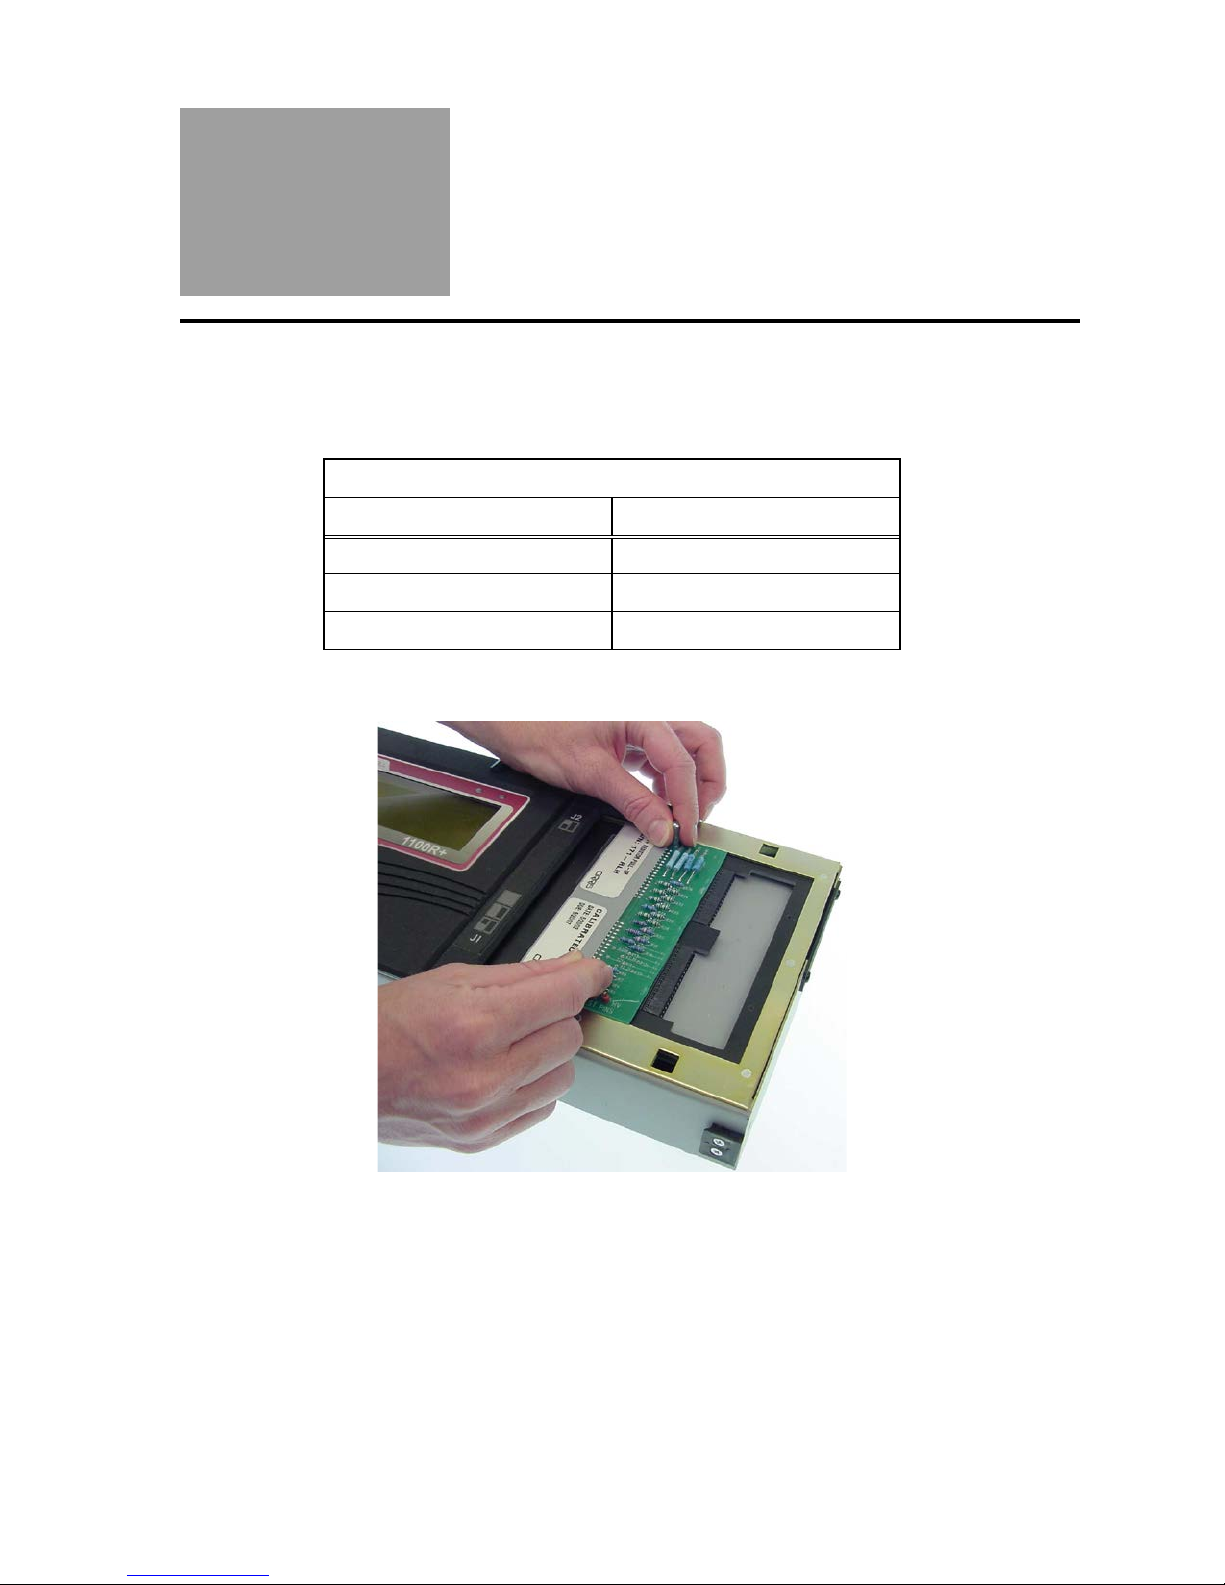
2. Install the Zero Ohm Adapter in the J1-J2 position as shown.
3. Press the BACK button and then press LEARN. The tester will learn the cable and
display the CABLE LEARNED screen. The screen will display TEST:7F5527-
6M020 where 7F5527-6M020 is the cable signature. Write the signature you see
on the verification sheet. Compare it with the Correct Signature shown on the
sheet and check off either Pass or Fail.

Signal Routing System Test 4
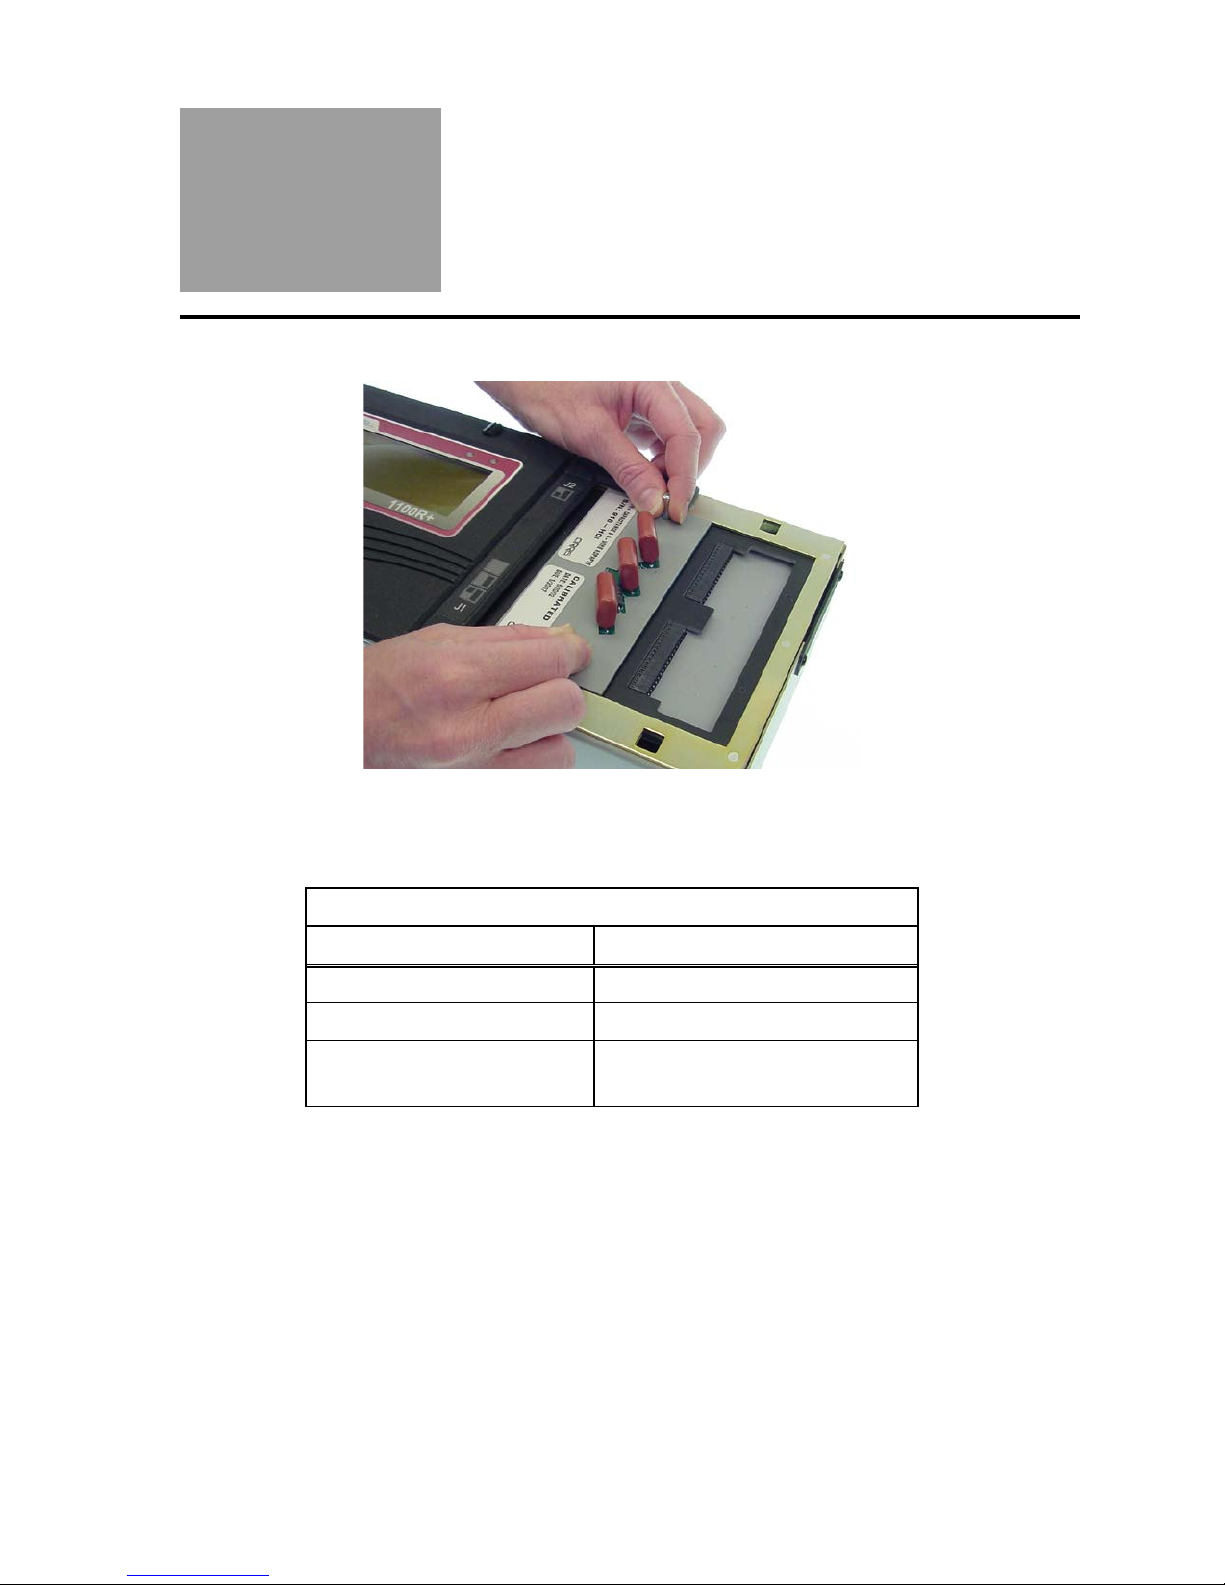
4. Remove the Zero Ohm Adapter and place it in the J3-J4 position as shown.
5. From the Main Menu, press Set Up Test Program, Create New Test, and then
press LEARN. The tester will learn the cable and display the CABLE LEARNED
screen. The screen will display TEST:94C424-6M020 where 94C424-6M020 is the
cable signature. Write the displayed signature on the verification sheet. Compare it
with the Correct Signature shown on the sheet and check off either Pass or Fail.
6. If you have installed expansion boxes, continue the verification test by moving the
Zero Ohm Adapter to each of the “J” positions and running the test. For each test,
press Set Up Test Program, Create New Test, and then press LEARN. The tester
will learn the cable and display the CABLE LEARNED screen. The screen will
display TEST:xxxxxx-xxxxx where xxxxxx-xxxxx is the cable signature. Write the
displayed signature on the verification sheet. Compare it with the Correct
Signature shown on the sheet and check off either Pass or Fail.
The following table lists the correct signatures for all the adapter “J” positions.
“J” Position for
Zero Ohm
Adapter
Correct Signature
“J” Position for
Zero Ohm
Adapter
Correct Signature
J1-J2
7F5527-6M020
J17-J18
8CE799-6M020
J3-J4
94C424-6M020
J19-J20
18483C-6M020
J5-J6
5CC1A1-6M020
J21-J22
3476BF-6M020
J7-J8
D3A34A-6M020
J23-J24
B5D5D5-6M020
J9-J10
51A15E-6M020
J25-J26
1E83A5-6M020
J11-J12
C50EFB-6M020
J27-J28
8A2C00-6M020
J13-J14
E93078-6M020
J29-J30
A61283-6M020
J15-J16
719A99-6M020
J31-J32
3BA461-6M020
5
Resistance
Measurement
System Test
1. From the Main Menu, press Set Up Test Program, and then Create New Test.
2. Press Set Learn Settings and set the Learn Settings to the following values:
Learn Settings
Setting
Value
Connection Resistance
.1 Ω
LV Insulation Resistance
5M Ω
Set Components
OFF for all components
3. Install the Resistor Leak Adapter in the J1-J2 position as shown.
4. From the Main Menu, press Set Up Test Program, Create New Test, and then press
LEARN. The tester will not learn the cable and display the LEARN ERRORS screen.
Press View Errors, to view the resistance errors.

Resistance Measurement System Test 6
5. Write the displayed resistance value on the Displayed Value blank found on the data
sheet. Compare the resistance value displayed by the tester with the Resistor Value
shown in the table on the data sheet. This value is also shown in the table below.
• If the displayed resistance falls between the MAXimum and MINimum
resistance limits shown in the table, check off Pass.
• If the displayed resistance value falls outside the resistance limits shown in the
table, check off Fail.
6. Continue scrolling through all the errors until you have recorded and checked all of the
values shown below.
Resistance Measurement
Resistor
Positions
Correct
Resistance
Minimum
Limit
Maximum
Limit
J1B002-J1B004
10.00 Ω
9.80 Ω
10.20 Ω
J1B003-J1B005
100.0 Ω
98.9 Ω
101.1 Ω
J1B006-J1B008
1,000 Ω
989.9 Ω
1,010.1 Ω
J1B007-J1B010
9,090 Ω
8,999 Ω
9,181 Ω
J1B013-J1B015
85.00K Ω
84.15K Ω
85.85K Ω
J1B016-J1A016
404.1K Ω
363.69K Ω
444.51K Ω
J1A020-J1A021
3.806M Ω
3.4254M Ω
4.1866M Ω
J1A022-J1A023
592.0K Ω
532.8K Ω
651.2K Ω

7
Resistance
Threshold
System Test
500k Threshold Test
1. From the Main Menu, press Set Up Test Program and then Create New Test.
2. Press Set Learn Settings and set the Learn Settings to the following values:
Learn Settings
Setting
Value
Connection Resistance
100k Ω
LV Insulation Resistance
500k Ω
Set Components
OFF for all components
3. Install the Resistor Leak Adapter in the J1-J2 position as shown.
4. From the Main Menu, press Set Up Test Program, Create New Test, and then press
LEARN. The tester will learn the cable and display the CABLE LEARNED screen.
5. The tester should display TEST:EB4F69-6H6E0. Write the displayed signature on the
verification sheet under Insulation Resistance Test at 500k ohms. If the displayed
signature matches the correct signature, check off Pass. Otherwise, check off Fail.
6. Press TEST:EB4F69-6H6E0 to test the resistance threshold at 500k ohms.
7. The tester will display FAILED: LOW VOLTAGE. Press View Errors to view the High
Resistance Error.
8. Verify the tester reports the High Resistance Error is between J1B016 and J1A016
and check off Pass or Fail on the verification sheet under Insulation Resistance Test
at 500k ohms. The actual value for the error will be different on each tester.

Resistance Threshold System Test 8
1M Threshold Test
1. From the Main Menu, press Set Up Test Program and then Create New Test.
2. Press Set Learn Settings and set the Learn Settings to the following values:
Learn Settings
Setting
Value
Connection Resistance
500k Ω
LV Insulation Resistance
1M Ω
Set Components
OFF for all components
3. Make sure the Resistor Leak Adapter is installed in the J1-J2 position.
4. From the Main Menu, press Set Up Test Program, Create New Test, and then press
LEARN. The tester will learn the cable and display the CABLE LEARNED screen.
5. The tester will display TEST:75698A-6K6H0. Write the displayed signature on the
verification sheet under Insulation Resistance Test at 1M ohms. If the displayed
signature matches the correct signature, check off Pass. Otherwise, check off Fail.
6. Press TEST:75698A-6K6H0 to test the resistance threshold at 1M ohms.
7. The tester will display FAILED: LOW VOLTAGE. Press the View Errors button to view
the High Resistance Error.
8. Verify the tester reports the High Resistance Error is between J1A022 and J1A023
and check off Pass or Fail on the verification sheet under Insulation Resistance Test
at 1M ohms. The actual value for the error will be different on each tester.

Resistance Threshold System Test 9
5M Threshold Test
1. From the Main Menu, press Set Up Test Program and then Create New Test.
2. Press Set Learn Settings and set the Learn Settings to the following values:
Learn Settings
Setting
Value
Connection Resistance
1M Ω
LV Insulation Resistance
5M Ω
Set Learn Components
OFF for all components
3. Make sure the Resistor Leak Adapter is installed in the J1-J2 position.
4. From the Main Menu, press Set Up Test Program, Create New Test, and then press
LEARN. The tester will learn the cable and display the CABLE LEARNED screen.
5. The tester should display TEST:CEF39B-6M6K0. Write the displayed signature on the
verification sheet under Insulation Resistance Test at 1M ohms. If the displayed
signature matches the correct signature, check off Pass. Otherwise, check off Fail.
6. Press TEST:CEF39B-6M6K0 to test the resistance threshold at 5M ohms.
7. The tester should display FAILED: LOW VOLTAGE. Press the View Errors button to
view the High Resistance Error.
8. Verify the tester reports the High Resistance Error is between J1A020 and J1A021
and check off Pass or Fail on the verification sheet under Insulation Resistance Test
at 5M ohms. The actual value for the error will be different on each tester.
10
Capacitance
Measurement
System Test
1. Install the Capacitance/4-Wire adapter in the J1-J2 position as shown here.
2. From the Main Menu, press Set Up Test Program and then Create New Test. Set the
Learn Settings to the following values:
Learn Settings
Setting
Value
Connection Resistance
1 Ω
LV Insulation Resistance
100k Ω
Set Learn Components Capacitor ON
OFF for all other components
3. From the Main Menu, press Set Up Test Program, Create New Test, and then press
LEARN. The tester will learn the cable and display the CABLE LEARNED screen.
4. The tester should display TEST:3F6323-MULTI. Write the displayed signature on the
verification sheet under Capacitance Measurement Test. If the displayed Signature
matches the correct signature, check off Pass. Otherwise, check off Fail.
Capacitance Measurement System Test 11
5. At the CABLE LEARNED screen, press Verify Test. Verify the tester reports five
connections.
•1 J1A001 J1A002 J1A003 J1A004
•2 J1A005 J1A006
•3 J1A007 J1A008
•4 J1A009 J1A010
•5 J1A011 J1A012
Check off Pass or Fail for each connection on the verification sheet under
Capacitance Measurement Test.
6. Continue scrolling to verify the tester reports the correct capacitance measurement for
points J1A005 and J1A011. Write the displayed capacitance value on the verification
sheet. Compare this capacitance value with the value shown below. If the displayed
capacitance falls between the Maximum and Minimum limits, check off Pass.
Otherwise, check off Fail.
Correct
Capacitance
Minimum
Limit
Maximum
Limit
1.41 µF
1.27 µF
1.55 µF

12
4-Wire
Measurement
System Test
1. Install the Capacitance/4-Wire adapter in the J1-J2 position on the tester as shown.
2. At the Main Menu, press Set Up Test Program,press the down button, and then
press Load 4W Cal Test.The tester will display TEST RETRIEVED.
3. At the TEST RETRIEVED screen, the tester should display TEST:7427A0-MULTI.
Write the displayed signature on the verification sheet under Fourwire Test. If the
displayed signature matches the correct signature, check off Pass. Otherwise, check
off Fail.
4. From the Main Menu, press TEST:7427A0-MULTI to test the fourwire resistance
measurement system.
5. The tester will display FAILED: LOW VOLTAGE. Press the View Errors button to view
the error.
6. Verify the tester reports a BAD 4W RESISTOR error between J1A001 and J1A003.
The tester expects a measured value of 0.2 ohms (±2% ±.005 ohm). It should display
a measured value between 0.191 and 0.209 ohms. Check off Pass or Fail on the
verification sheet under “4-Wire Measurement System.”

13
Appendix
The following information can be used a guide for setting up a formal quality system in
your organization.
Quality Standards
These standards are quality system requirements for organizations that perform quality
tests and use calibrated equipment. Establishing a quality system according to quality
standards ensures that tests are done competently and lends credibility to the
organization. In the United States, common quality standards include ANSI/NCSL Z540-
1, ISO/IEC Guide 25, ISO 10012-1, and the former MIL-STD 45662A.
You can review the ANSI/NCSL Z540 standard referred to above, as well as other helpful
metrology information, from the National Conference of Standards Laboratories
International (NCSL) at 1-303-440-3339 or www.ncsli.org. You can also review the ISO
standards from the International Standards Organization (ISO) at their web site
www.iso.net.
In the metrology industry, the word “standards” often refers to a centralized, most accurate
unit of measurement regulated by countries. The National Institute of Standards and
Technology (NIST) maintains the national standards for measurements in the United
States.
Good Quality Practices
Quality standards, such as ANSI/NCSL Z540-1 and ISO 10012-1, require several good
practices for the calibration industry including the following areas:
•Recall System
How do you ensure that your company will remember to send an instrument in for
calibration? Use a card file or a computerized database recall system. This system
includes calibration dates, due dates, calibration sources, and other instrument
records. The recall system ensures that instruments are recalibrated in a timely
manner.
•Verification Labels
How do you know if calibration has been verified without looking for the paperwork?
When an instrument’s calibration is verified, the quality standards require the
instrument to be labeled as such. These labels, which are applied to instruments,
have fields for the instrument serial number, verification date, verification due date,
and by whom. A good source of inexpensive labels is United Ad Label at 1-800-992-
5755.
•Accuracy Ratios
Can you use a ruler to calibrate your digital calipers? The answer is no. Wherever
possible, quality standards require an accuracy ratio of at least four to one. In other
words, the insturment being used to measure the calibrated instrument should be at
least four times as accurate as the calibrated instrument.

Appendix 14
•Performance Verification Certificate
How do you know that an instrument has been verified? The Performance
Verification Certificate is a record of who, when, and by what equipment the
instrument was verified. An 1100R+ Performance Verification Certificate is
provided on the next page.
•Verification Data Report
How accurate is the calibrated test instrument in relation to its published
specifications? Some organizations require the measured values of an instrument to
be written down when that instrument is calibrated. Calibration laboratories typically
charge extra to create a data report. However, when an instrument is found to be
out-of-tolerance, the quality standards require the out-of-tolerance data to be
recorded in relation to the instrument specifications. A verification data report can fill
this requirement. You can photocopy the 1100R+ Verification Data Report from the
Appendix and fill it out.
•Traceability
Traceability refers to each unbroken link of valid verificationsoh going back to
national standards such as those maintained by the NIST in the United States. To
maintain traceablity, qualified personnel must perform the performance verification
under controlled conditions, using correctly calibrated instruments with correct test
accuracy ratios.
Several years ago NIST numbers (ie. reference numbers issued on NIST reports)
were commonly copied on successive certificates as a means of showing
traceability. This practice has been discontinued. Therefore, if you are writing a
performance verification procedure, do not require NIST numbers be copied on
reports to show traceability. NIST numbers are sometimes confused with other
numbers that calibration laboratories create for reference such as “asset numbers”,
“NIST trace numbers”, “ID numbers”, and report numbers. For more information
regarding the discontinued use of NIST numbers, contact Cirris for a copy of the
position paper from the National Conference of Standards Laboratories.

1100R+ Performance Verification Certificate
Name and Address of Organization:
Certificate Number:
Performed by:
Verification Date:
Due Date:
Applicable Quality Standard(s):
Procedure:
1100R+ Performance Verification Manual
Version ___________
Temperature:
Relative Humidity:
Tester Serial Number:
Instruments used:
Serial Number
Cal. Date
Due
Date
Zero Ohm Adapter
Resistor Leak Adapter
Capacitance/Fourwire Adapter
Statement of Traceablility:
Certified by:

1100R+ Verification Data Sheet
Date: ___________________
Tester Serial Number: _______________________
Tests Performed By: ___________________________________
Signal Routing System
J Position
for Adapter
Correct
Signature
Displayed
Signature
Pass
Fail
J1-J2
7F5527-6M020
J3-J4
94C424-6M020
J5-J6
5CC1A1-6M020
J7-J8
D3A34A-6M020
J9-J10
51A15E-6M020
J11-J12
C50EFB-6M020
J13-J14
E93078-6M020
J15-J16
719A99-6M020
J17-J18
8CE799-6M020
J19-J20
18483C-6M020
J21-J22
3476BF-6M020
J23-J24
B5D5D5-6M020
J25-J26
1E83A5-6M020
J27-J28
8A2C00-6M020
J29-J30
A61283-6M020
J31-J32
3BA461-6M020
Resistance Measurement System
Resistor
Positions
Correct
Resistance
Minimum
Limit
Maximum
Limit
Displayed
Value
Pass
Fail
J1B002-J1B004
10.00 Ω
9.80 Ω
10.20 Ω
J1B003-J1B005
100.0 Ω
98.9 Ω
101.1 Ω
J1B006-J1B008
1,000 Ω
989.9 Ω
1,010.1 Ω
J1B007-J1B010
9,090 Ω
8,999 Ω
9,181 Ω
J1B013-J1B015
85.00K Ω
84.15K Ω
85.85K Ω
J1B016-J1A016
404.1K Ω
363.69K Ω
444.51K Ω
J1A020-J1A021
3.806M Ω
3.4254M Ω
4.1866M Ω
J1A022-J1A023
592.0K Ω
532.8K Ω
651.2K Ω

Resistance Threshold System
•500k Ω Test
Correct
Signature
Displayed
Signature
Pass
Fail
EB4F69-6H6E0
High Resistance Error
between:
Pass
Fail
J1B016 and J1A016
•1M Ω Test
Correct
Signature
Displayed
Signature
Pass
Fail
75698A-6K6H0
High Resistance Error
between:
Pass
Fail
J1A022 and J1A023
•5M Ω
Correct
Signature
Displayed
Signature
Pass
Fail
CEF39B-6M6K0
High Resistance Error
between:
Pass
Fail
J1A020 and J1A021
Other manuals for signature 1100R+
1
Table of contents


