CITC AQUAMAX MP 100059 User manual
Organic Haze Machine
Operating Instructions
P/N 100059 (120 VAC w/DMX)
P/N 100060 (230 VAC w/DMX)

1
Thank you for purchasing this AQUAMAX™ MP
As you will notice from the table of contents, the manual for your new
product is quite extensive.
To guarantee perfect and successful work with this machine, please
take some time to read the manual carefully.
And finally, we believe you will enjoy years of great haze effects if you
care for and maintain your AQUAMAX™ MP.
CITC
1420 80th St. SW #D
Everett, WA 98203
(888) 786-CITC
www.citcfx.com
info@citcfx.com

2
Contents
1. Set of Equipment Supplied 3
2. Accessories and Parts 3
3. Description 4
4. Safety Instructions 4
5. Operating the AQUAMAX™ MP 4
5.1 Selecting the Location
5.2Electrical Power Requirements
5.3Hooking things up
5.4Operating the machine with Remote Control
5.5Operating the machine using DMX Control
5.6Rest Period
5.7Troubleshooting
6. Maintenance and Storage 7
7. Technical Data 8
8. Limited Warranty Conditions 9

3
1. Set of Equipment Supplied
1 AQUAMAX™ MP w/DMX (w/5-pin XLR in/out)
1 Remote Cycle-Timer Controller w/5-pin XLR in/out (P/N 600387)
1 Bracket for hanging (P/N 601994)
Operating Instructions Booklet
2. Accessories and Parts
CITC Organic HazeTM P/N 150580
C-Clamp w/Safety Cable P/N 250110
C-Clamp w/eyebolt & hanging harness for 5 gal. (19 liter)
Cubitainer (P/N 250076)
Please check whether all the products you ordered are supplied.

4
3. Description of the AQUAMAX™ MP
The AQUAMAX™ MP w/DMX is CITC’s newest professional hazing system. No other
comparable machine delivers a more even output of long-lasting, water-based organic
haze. The AQUAMAX™ MP can produce longer than the stiffest competition. Available
in either 120vac or 230vac, the AQUAMAX™ MP uses a quiet, reliable pump with a 1200
watt heating head, 2-channel DMX on board, remote control cycle-timer and hanging
bracket. AQUAMAX™ MP uses CITC Organic Haze™ fluid. The extra dry water-based
haze leaves no mess and no residue.
4.Safety Instructions
WARNING: Read and understand all labels and operating
instructions before attempting installation.
oNever open the machine without disconnecting power lead first.
oBe sure you are using the correct voltage for your unit. The AquaMax MP is available as
120vac OR 230vac; they are not interchangeable.
oRisk of electrical shock- This device is supplied with a grounding conductor. To reduce
risk of electrical shock, connect only to properly grounded, grounding type receptacles.
Never remove the third prong from the plug.
oBe sure area around hazer is dry before applying electrical power.
oThe AquaMax™ MP should only be used in a level position.
oMake sure that your unit is pointed in a direction that leaves a 10ft (3m) open area out in
front. Place the front of the machine away from direct contact with electrical instruments
and people. Close output is warm and damp.
oFluid is very slippery when spilled. Care in keeping any drips or spills cleaned up is
necessary.
5. Operating the AQUAMAX™ MP
5.1 Selecting the Location
Secure a good location for the machine to rest solidly on the floor or suspended, so that
the unit is level with the ground and the output of the machine will not be restricted. Make
sure that your unit has enough room for adequate ventilation as well as sufficient open
space in front of it to allow the haze to expand, separate and enlarge.
5.2 Electrical Power Requirements
This machine requires a well-grounded 120 VAC (or 230VAC) circuit for operation. The
AQUAMAX™ MP draws approximately 10 amps at 120 VAC. (The 230VAC model draws
approximately 5 amps. Be sure the unit you have is suitable for your voltage) .During
AQUAMAX™ MP operation this circuit should be dedicated to the AQUAMAX™ MP. Do
5
not add other equipment on this circuit. If you have any doubts about the capacity or
grounding of your existing circuits, consult a qualified electrician.
5.3 Hooking things up
Plug the 5-pin XLR of the Remote Control into the inlet marked “Remote Control Input”.
Fill the bottle with CITC’s Organic HazeTM fluid. Place the filter end of the tube inside the
bottom of the bottle and tighten cap. Be sure the vent hole in the cap is not blocked.
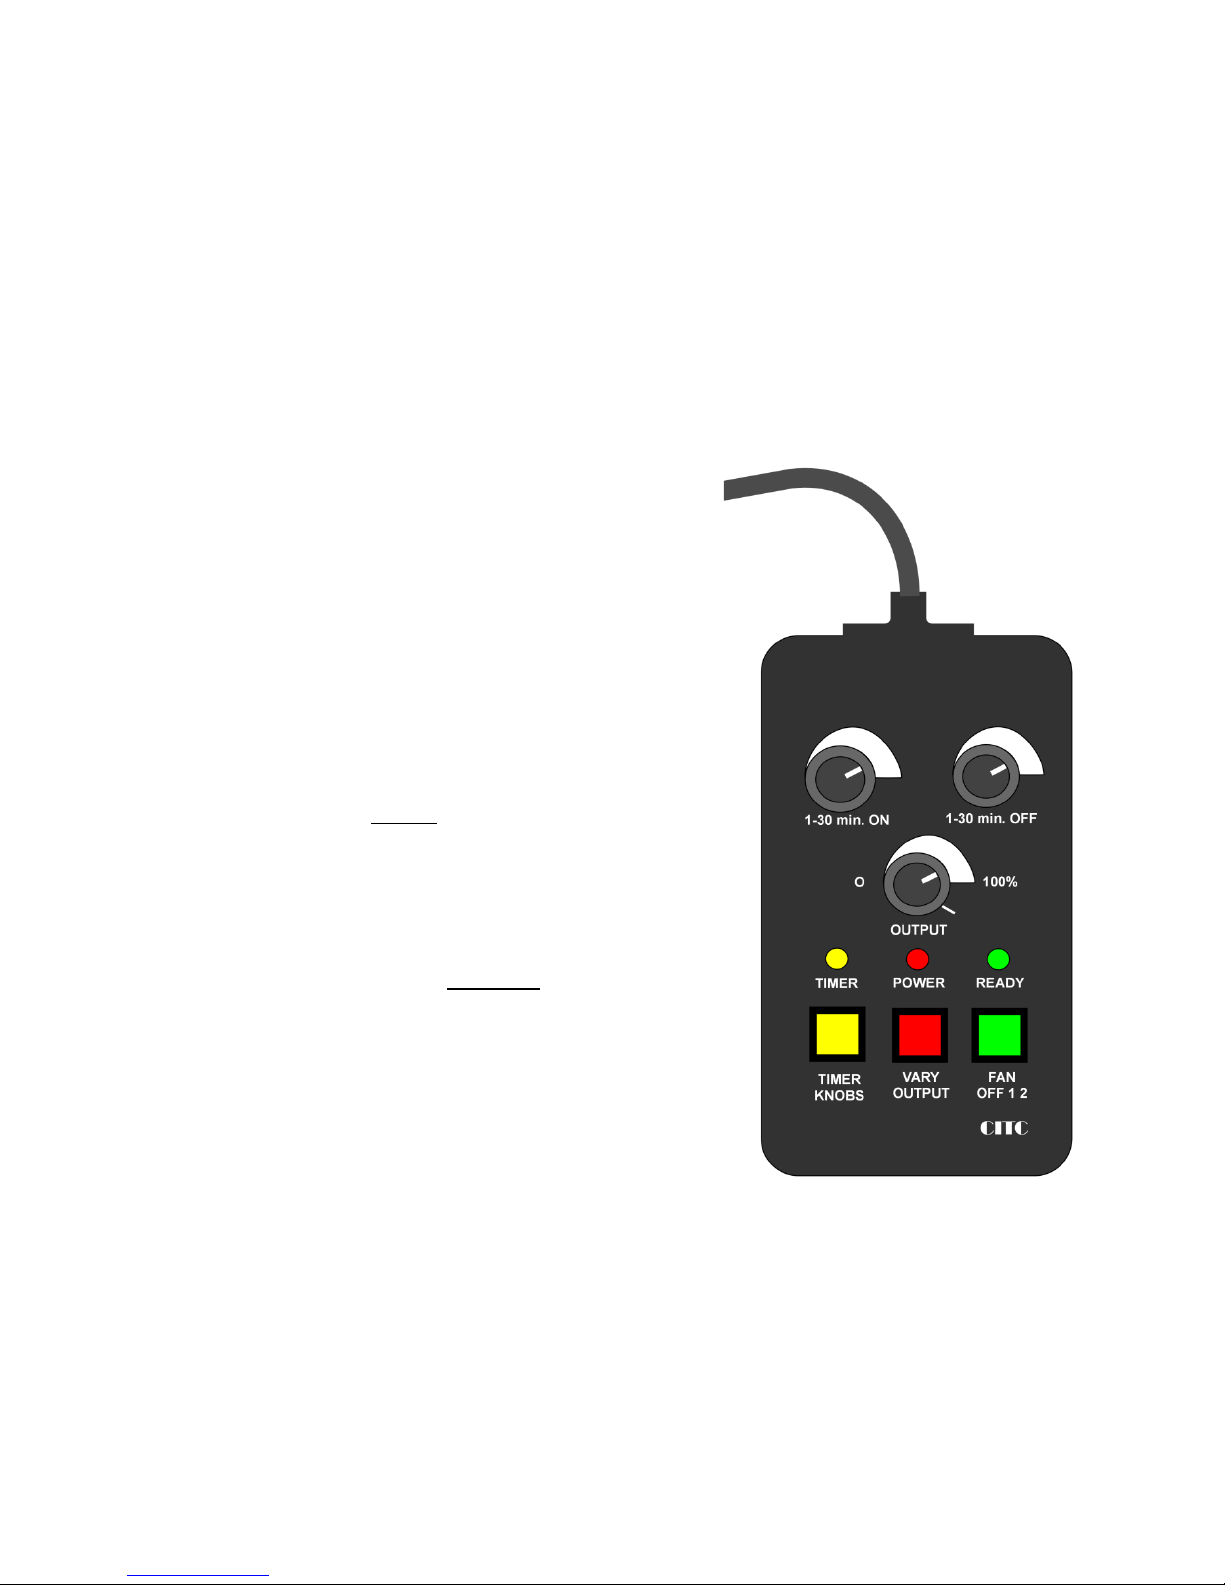
5.4 Operating the AQUAMAX™ MP using the Remote Control
1. Turn on the power switch on the hazer. Verify that
the red light in the switch, the display on the rear
panel of the AQUAMAX™ MP, and the red
“POWER” light on the Remote all come on. Wait
approximately 5-6 minutes for the green "READY"
light located on the remote control to come on.
2. Using the red "VARY OUTPUT" button, you may
adjust the output volume with the “OUTPUT”
control KNOB.
3. Using the yellow “TIMER KNOBS” button, you
may adjust the "ON" and "OFF" knobs to set the
haze cycle times. NOTE: Do not depress "VARY
OUTPUT" when using timer. To prime the pump if
your AQUAMAX™ MP has run dry, depress the
black pump priming button that is on the panel by
the lighted on/off switch. You should not need to
hold it in for more than a few seconds to see the
fluid go into the machine. DO NOT operate
continuously using the “PRIME” button. This can
cause your AquaMax™ MP to cool down, spit wet
fluid, or result in louder and wetter output.
oBy quickly depressing the green “FAN” button,
you will be able to change the speeds of the
onboard fans. The display on the AQUAMAX™
MP rear panel will illuminate to indicate fan speed
(F1, F2, and F0). Press and release quickly once for Low and twice for High. Press again
for “off”. After 5 seconds, the display will reset to show the DMX channel.
4. On remote, the fans will continue to operate at their current settings for an additional 60
seconds after the fluid pump has stopped in order to clear out residual haze.

6
Operating the AQUAMAX™ MP using DMX Control
With DMX control, you will be able to adjust both the haze levels and fan speeds on/off,
from 0 – 100%. By adjusting the push button switches on the back of the machine near
the display panel, the user may assign one DMX address to the AQUAMAX™ MP, giving
you on/off and volume control with this DMX channel. The display will show which
channel has been selected. Do not select a channel above 511, as there are only 512
channels and you will require 2 of them.
Step 1). Attach the DMX cable to the upper “in” female connector located on the back of
the hazer. DMX control overrides the manual remote. When a DMX cable is connected, a
small dot will appear on the LED display at the bottom right of the “ones” digit.
Step 2). The DMX address is configured by pressing the 3 small DMX pushbuttons on
the control panel, located directly beneath the display. The left button controls 100’s, the
center button controls 10’s, while the right button controls single digits. Set the DMX
address from 1 to 511.
When you move the slide control or digital control;
0 – 5% = Off
5– 80% = Volume Control
80 – 100% = For Maximum Output
The 2nd channel of DMX control will allow you a full range of control for the speed of the
on-board haze distribution fans. This 2nd channel will be the next one above the channel
you have selected for haze output control. For example, if you have the LED readout set
at 214, then channel 214 will control your haze output and channel 215 will control your
fan speed. It will also turn off the fans and air after the haze has been shut off for 60
seconds. This helps distribute all haze evenly and “cleans” the head.
“Input” and “Output” designations on the DMX plugs are arbitrary (i.e., you can use the
input plug for output and vice-versa). It is not necessary to attempt converting your DMX
line’s connector to female/male to match the appropriate socket on the plug. As long as it
is looped in/out, it will work.
Once your hazer is warm and the green “READY” light on the remote is on, you can
control the haze output from the control booth.
5.5 Rest Period
Continuous operation of the AQUAMAX™ MP can be accomplished when OUTPUT is
set at the “100%”, or 5 o’clock position. If for any reason the unit cools down, a short rest
period for reheating is necessary.
5.8 Troubleshooting
1. If the pump does not draw fluid into the hazing unit, check electrical power to the
machine. Be sure the unit is warm and ready to operate. Then check to see that the

7
tubing is in the fluid, not above the fluid. Note: Do not run the pump without fluid
passing through the tube. This can cause damage to the pump and is not covered
under warranty.
2. If the green “READY” light does not come on:
a. Check fuse and switch light to verify that power is on.
b. The thermal cut-out switch may need reset if unit was previously overheated.
Call your dealer for assistance with this problem.
3. If the LED display shows an error: There are two possible error conditions, resulting in
the display reading E2 or E3. The unit will not operate if any of these error conditions
exist.
a. E2- The thermal sensor is not connected. This is a safety feature and is not
customer accessible. Call CITC for more information.
b. E3-The thermal sensor input is shorted. This is also a safety feature and not
customer accessible. Call CITC for more information.
6. Maintenance and Storage
Care of your AQUAMAX™ MP will give you years of service. Note:
cleaning your unit is going to pay off in constant good performance.
1. Dry all areas on the exterior of the machine once it is cool. Clean with a soft cloth to
remove any haze fluid from inside the fluid compartment or outside area.
2. Clean thoroughly around the output area of the AquaMax™ MP. Heavy use and certain
air conditions may cause a slight build-up of haze fluid in that particular area.
3. Do not store with haze fluid inside. When placing into storage, or following periods of
heavy use, clean the tube and pump by operating the unit while running a pint of 5%
vinegar/distilled water mix through the pump, and then rinse with a pint of distilled water.
When finished, water should remain in the line for storage. Do not drain or empty the tube
of water unless a freezing condition exists. Do not run the pump without fluid passing
through the tube. This can cause damage to the pump and is not covered under
warranty.
4. Do not transport or ship with haze fluid inside the machine.

8
7. Technical Data
AQUAMAX™ MP Technical Data P/N 100059
(230V P/N 100060)
Dimensions:
20.5" x 11.5" x 13.5" (52cm x 29cm x 35cm)
Weight:
29 lbs (13.2 kg)
Shipping Weight
35 lbs (15.75 kg)
Shipping Dimensions
24 x 16 x 16 (61 x 41 x 41cm)
Electrical
Requirements:
120VAC, 10A or
230VAC, 5A
Fluid Consumption:
@ 50 - 100% output, 4 - 8 oz.
(125 – 250 ml) per hour
Fluid Type:
CITC Organic Haze™- 2 Liter or 5 gallon
Warm-up time
6 minutes
Haze hang time
2+ hours
DMX
1 channel haze volume + on/off
1 channel fan control 0-100%
Remote Timer
Included:
0-100% output control for continuous haze
0-100% output on cycle-timer
2-speed fan control
Cycle-timer = 1-30 minutes "on",
1-30 minutes "off"
Breaker
120VAC: 10A ; or 230VAC: 5A
Limited Warranty
One year
Made In USA
Rev: 01/30/2015

9
8. One Year Limited Warranty
Model: ________________ Purchased on (date): ________________
Serial number: ________________ Purchased from: ________________
Congratulations!
You can now look forward to many years of reliable operation and outstanding performance.
Thank you for making CITC your personal choice in special effects equipment. Please take a
moment to fill out the top of this warranty, and then keep it – with the receipt – in a safe
place.
If you would like to receive information about specials, sales, and new products, please log
on to www.citcfx.com and click on the “Contact Us” link.
We appreciate your business, and wish to provide you with a quality product that will serve
you for many years to come. Once again, thank you for choosing CITC, and enjoy your new
entertainment product!
LIMITED WARRANTY CONDITIONS
This limited warranty guarantees to the original purchaser that this product shall be free of
defects in material and workmanship, under normal use, for a period of one year from the
date of purchase shown on the sales receipt. This warranty covers parts and labor providing
the product is returned to CITC in the original shipping carton and packaging. The warranty
for electrical is a (90) NINETY DAY limited warranty.
Damage resulting from shipping, accidents, misuse, negligence, unauthorized repairs or
modification is not covered by this warranty. Using any fluid other than what is recommended
for this machine will void warranty. No liability is accepted for injury or for loss, damage or
expense resulting from any interruption whatsoever in the operation of the product or from
any consequential loss arising there from. No liability is accepted for normal wear and tear.
We wish to satisfy YOU, our customer, and have implemented many measures to prevent
problems and assure customer satisfaction. However, should you need a missing part or
have a functional problem with your product, please call:
(888) 786-CITC, from 7:30 am – 4:00 pm (Pacific Time), Monday – Friday, except for
holidays. Our customer service department will respond to your problems immediately.
Subject to the following conditions, CITC will repair any defect or fault in the unit if it is
caused by a proven factory defect within one year of delivery to the end user.
Insignificant deviations of the regular product quality does not guarantee replacement
rights, nor do faults or defects caused by water, by generally abnormal environment
conditions or Force Majeure:
1. Faulty parts or equipment will be repaired or replaced (manufacturer’s choice) with
correct parts. Faulty units must be shipped to CITC at customer’s expense. Call for
an RMA# - AN RMA# MUST COME WITH THE UNIT. Payment arrangements for
repair must be made before receiving your RMA#, in case the unit is not covered
under this limited warranty.
2. Repairs/replacements will only be made with the approval of the customer.

10
3. Exposure to outside elements voids Warranty. Unit cannot be used outdoors or in wet
weather without complete protection against the elements. Even then, high salty or
humid conditions will cause instant corrosion of connectors and will void Warranty.
4. The customer loses all rights for limited warranty services if any repairs or
adjustments are done to the units by unauthorized persons, and/or if spare parts are
used, which are not approved by CITC. The right of limited warranty service is also
lost if a fluid other than appropriate CITC fluid has been used or if units are sent in
without first emptying the equipment of fluid.
5. Freight costs to and from CITC, when under the limited warranty services, are the
responsibility of the customer. Customer must place appropriate insurance on return
of product. However, if product is returned due to factory defect within the first year,
CITC will cover the cost of returning the repaired unit to the customer.
6. Limited warranty services do not cause an extension of the limited warranty period or
the start of a new limited warranty period. The warranty of replaced parts ends with
the limited warranty period of the whole unit.
7. Further claims, especially for damages, losses etc. outside the unit are excluded.
Send unit to: CITC
RMA # XXXXXXX
1420 80th St. SW #D
Everett, WA 98203
Tel: (888) 786-CITC or (425) 776-4950
Fax: (425) 776-5129
Website: www.citcfx.com
E-mail: info@citcfx.com
Find us on Facebook!
www.facebook.com/CITCFX
March 13, 2018
This manual suits for next models
1
Table of contents
Other CITC Fog Machine manuals


