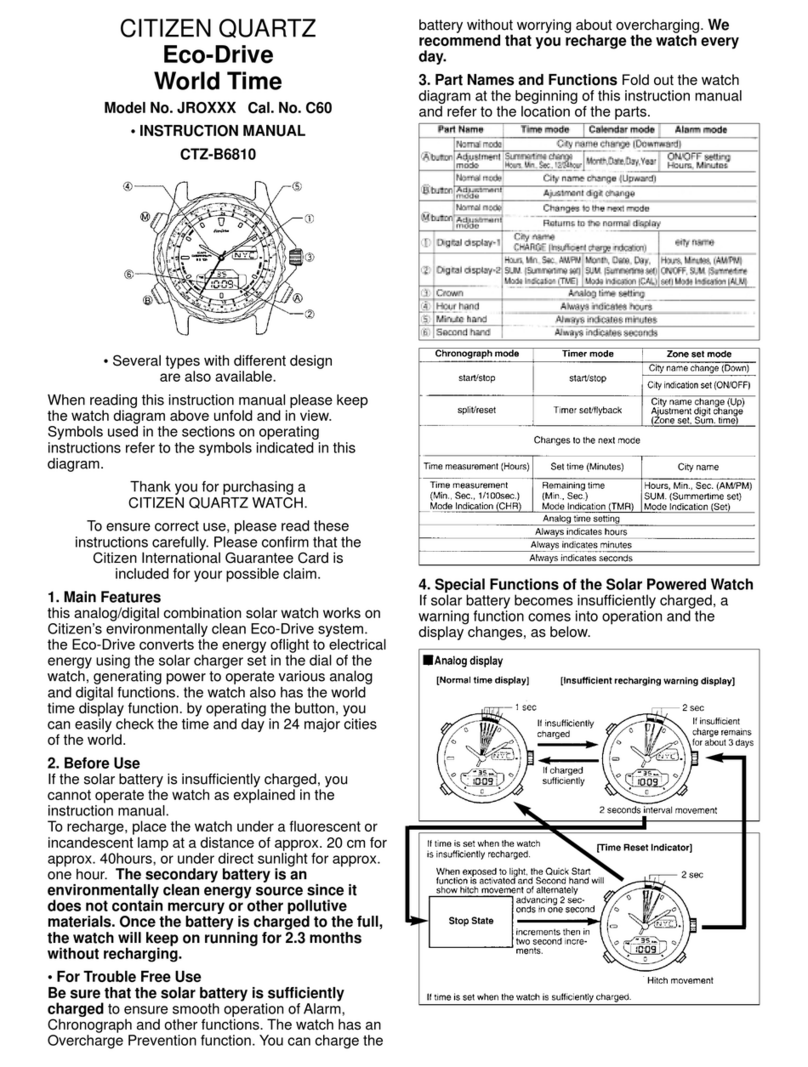
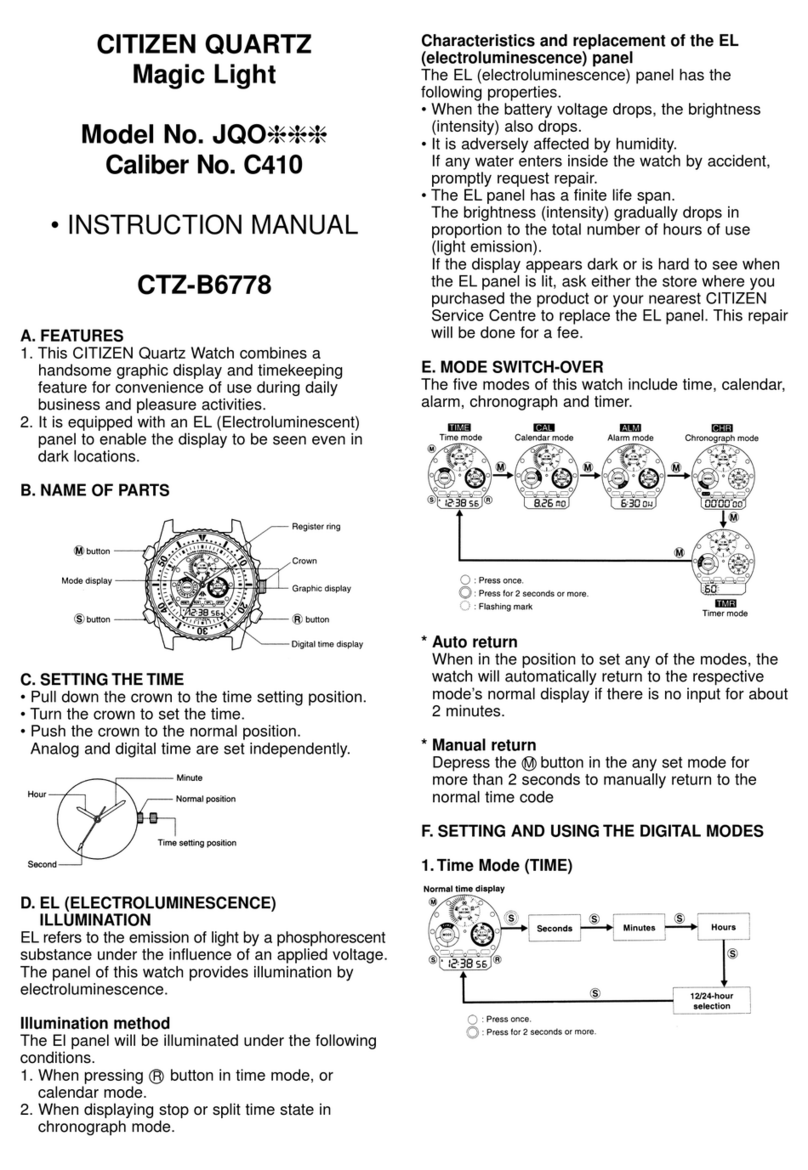
Citizen E260 User manual

1
Table of contents
Thank you for your purchase of this Citizen watch.
Before using the watch, read this instruction manual carefully to ensure correct use.
Parts identification . . . . . . . . . . . . . . . 2
Adjusting the time . . . . . . . . . . . . . . . . 5
Adjusting the date . . . . . . . . . . . . . . . . 6
Using the chronograph . . . . . . . . . . . . 7
Using the alarm. . . . . . . . . . . . . . . . . . . 8
Adjusting the dual time. . . . . . . . . . .10
Adjusting the reference position
of the dual time hand . . . . . . . . .13
Using the tachymeter . . . . . . . . . . . .14
Notes on charging your watch . . . . .16
Troubleshooting . . . . . . . . . . . . . . . . .19
Precautions . . . . . . . . . . . . . . . . . . . . .22
Maintenance . . . . . . . . . . . . . . . . . . . .30
Information. . . . . . . . . . . . . . . . . . . . .31
Specifications . . . . . . . . . . . . . . . . . . .32

2
60
400
300
250
120
130
140
150
160
180
200
220
80
85
90
95
100
110
65
70
75
T
A
C
H
Y
M
E
T
E
R
12
6
93
60
30
45 15
12
10
8
6
4
2
0
•
•
•
•
•
•
•
•
•
•
•
•
14
16
18
20
22
24
ON
OFF
60
05
10
15
20
25
30
35
40
45
50
55
Lower left crown
(Alarm crown)
Alarm indication/
Alarm ON/OFF hand
Hour hand
Second hand
Alarm time hand
Upper left button (C)
Click the button with a
narrow pointed object
such as a wooden
toothpick.
Chronograph second
hand
Minute hand
Upper right button (B)
Dual time hand
Crown
Chronograph minute
hand
Lower right button (A)
Date indication
Tachymeter
Chronograph hour hand
Parts identification
• The illustrations in this instruction manual may differ from the actual appearance of your watch.

3
How to read the dual time hand
How to read the alarm time hand
This watch has a fan-shaped window graduated in
hours for dual time in the 24-hour system.
The dual time hand moves every 15 minutes.
The time in the illustration to the left indicates
approximately 10:30 a.m.
• See page
10 to adjust the dual time.
The alarm time hand indicates the times set for the alarm
on a 12-hour system.
The alarm time set in the illustration to the left indicates
approximately 7:30 a.m. and 7:30 p.m.
• See page
8to set the alarm time.
12
8
10
6
4
2
•
•
•
•
•
•
•
•
•
14
16
1
8
2
6
93
ON
OFF
6
9
3
ON
OFF

4
How to use the screw down crown and screw down push button
Some models feature a screw down crown and screw down push button.
Locking the crown and button prevents accidental operation. Unlock them when you
want to operate the watch.
Unlock Lock
Screw down
crown
Rotate the crown
counterclockwise until it
releases from the case.
Push the crown in to the
case. With gentle pressure
towards the case, rotate
the crown clockwise to
secure it to the case. Be
sure to tighten firmly.
Screw down
push button
Rotate the locking screw
counterclockwise, and
loosen until it stops.
Rotate the locking screw
clockwise, and tighten
firmly.
• Unlocking is not required when a standard crown and button are equipped.

5
Adjusting the time
1. Pull the crown out to position 2when the
second hand indicates 12:00.
2. Adjust the time by rotating the crown.
• Pay attention to the difference between the morning
and the afternoon. When the hands indicate
approximately 12:00 midnight, the date will change.
• The hour hand and date move linked with the minute
hand. The date do not move counterclockwise.
3. Push the crown in to position 0to start the
watch.
The second hand starts to move.
012
012
Crown position
Crown position
Crown
• You must adjust the dual time separately. See page 10.

6
Adjusting the date
1. Pull the crown out to position 1.
2. Adjust the date by rotating the crown.
• The date does not change when the crown is rotated
clockwise.
3. Push the crown in to position 0.
012
012
Crown position
Crown position
Crown
• You must adjust the date for each month shorter than 31 days.

7
Using the chronograph
You can record up to 12 hours in increments of 0.2 seconds.
1. Ensure that the crown is in position 0.
2. Press the upper right button (B) to start
timing.
• The button clicks only when timing is activated.
• The chronograph operates no matter the position of
the crown.
• The chronograph stops automatically 12 hours later.
3. Press the upper right button (B) to stop
timing.
• Pressing the upper right button (B) again restarts
timing from the point of the previously recorded time.
To reset the chronograph
Press the lower right button (A) after stopping the
chronograph by pressing the upper right button (B).
• You must reset the chronograph after timing for
using other functions.
A
0
180
200
22
20
B
400
300
10
B
400
300
10
T
A
C
H
Y
12
10
8
6
4
2
•
•
•
•
•
•
•
•
•
•
14
16
18
20
22
60
T
A
TT
C
H
Y
12
10
8
6
4
2
•
•
•
•
•
•
•
•
•
•
14
16
•
18
•
20
••
22
60
60

8
Using the alarm
To set the alarm time
1. Pull the lower left crown (alarm crown) out
to position 1.
2. Rotate the lower left crown (alarm crown)
to set the alarm time.
• When adjusting the alarm time, rotate the lower left
crown (alarm crown) counterclockwise half hour past
the desired set time, then rotate the lower left crown
(alarm crown) clockwise to move the hand back to the
desired set time.
3. Push the lower left crown (alarm crown) in
to position 0.
4. Press the lower left crown (alarm crown).
The alarm ON/OFF hand indicates “ON” to
activate the alarm.
0
1
9
0
1
9
30
45
30
45

9
To stop the alarm tone
Press the lower left crown (alarm crown) to move the alarm hand to the “OFF”
position.
The alarm tone stops.
To activate/deactivate the alarm
Press the lower left crown (alarm crown) so that the alarm ON/OFF hand
indicates “ON (activate)” or “OFF (deactivate)”.
• Each time you press the lower left crown (alarm crown), the alarm ON/
OFF hand indicates “ON” or “OFF” alternately.
• If you wish to activate the alarm after stopping, you must wait for 20
minutes after the set time.
• While the alarm hand indicates “ON”, the alarm tone sounds every 12 hours.
• The alarm tone sounds for 20 seconds with the number of tones increased gradually.
0
90

10
Adjusting the dual time
The dual time makes it easy to set the local time while on a journey or to monitor an
alternate time zone.
• If the dual time hand does not match the hour mark on the 24-hour sub dial, adjust
the reference position referring to page 13.
To adjust the hour of the dual time
1. Ensure that the crown is in position 0or 1.
2. Press the upper left button (C).
• Each time you press the button, the dual time hand
advances one hour. This
feature is independent from
the minute and second of
the dual time.
• The dual time hand reaches
“24”, it returns in a reverse
direction to “0”.
C
70
75
50
012
Crown position
12
8
10
6
4
2
0
•
•
•
•
•
•
•
•
•
•
•
•
14
16
18
20
22
24
• The dual time does not synchronize the watch time.

11
Notes on the minute of the dual time
You can adjust the dual time hand in five-minute step though it moves every 15
minutes for indicating the dual time.
For adjusting the minute of the dual time, you can read graduations of the dual time as
the illustration below:
12
8
10
6
4
2
0
•
•
•
•
•
•
•
•
•
•
•
•
14
16
18
20
22
24
30 35 40 45 50 552520151050
Graduations for the dual time 0 2 4 6 8 10 12 14 16 18 20 22
Minute of the dual time for adjustment
0 5 10 15 20 25 30 35 40 45 50 55
Minute of the dual time for
adjustment
Graduations for the dual time
Continued to the next page

12
To adjust the minute of the dual time
You can also adjust the minutes of the dual time together with the time adjustment on
page 5.
1. Pull the crown out to position 2.
The watch stops and then the dual time hand
shows the minutes of the dual time.
2. Press the upper left button (C).
• Each time you press the button, the dual time hand
moves five minutes (two steps of graduations).
• For in-depth information on reading the minutes of
the dual time, see page 11.
3. Push the crown in to position 0.
• The second of the dual time starts from 0 second the
moment the crown is set to position 0.
012
012
C
70
75
50
Crown position
Crown position

13
Adjusting the reference position of the dual time hand
If the dual time hand does not match the hour mark on the 24-hour sub dial, you must
adjust the reference position.
1. Pull the crown out to position 2.
2. Press and hold the lower right button (A)
for five or more seconds.
The dual time hand indicates to the current
reference position.
3. Adjust the dual time hand by repeatedly
pressing the upper left button (C).
4. Push the crown in to position 0.
The adjustment of the dual
hand is complete.
The watch shows the dual
time based on the adjusted
reference position.
012
012
C
70
75
50
0
180
200
22
20
A
Crown position
Crown position
12
8
10
6
4
2
0
•
•
•
•
•
•
•
1
4
Correct reference
position
• Reset the chronograph before
adjusting the reference position.

14
Using the tachymeter
The tachymeter easily brings you
the average speed by recording a lap
time to go one kilometer.
• You can measure the approximate
average speed from 60 km/h up to
400 km/h.
• The illustrations in this manual
may differ from the actual
appearance of your watch.
• Some models do not feature the
tachymeter.
60
400
300
250
120
130
140
150
160
180
200
220
80
85
90
95
100
110
65
70
75
T
A
C
H
Y
M
E
T
E
R
12
6
93
60
30
45 15
12
10
8
6
4
2
0
•
•
•
•
•
•
•
•
•
•
•
•
14
16
18
20
22
24
ON
OFF
60
05
10
15
20
25
30
35
40
45
50
55
Tachymeter
Upper right
button (B)

15
To measure an average speed
Read the value on the tachymeter after recording a lap time.
1. Ensure that the crown is in position 0.
2. Press the upper right button (B) to start
timing.
The chronograph second hand starts timing.
3. Stop timing at the point one kilometer
away from the starting point by pressing
the upper right button (B).
The chronograph second hand indicates the
approximate average speed on the tachymeter.
To reset the chronograph
Press the lower right button (A).
A
0
180
200
22
20
B
400
300
10
012
Crown position

16
Notes on charging your watch
This watch has a rechargeable cell which is charged by exposing the dial to light such
as direct sunlight or fluorescent lamps.
For optimal performance:
• Expose the watch with the dial towards direct sunlight for several hours at least once
a month.
• After taking off the watch, put it in a position so that the dial is exposed to bright
light, such as by a window.
• Before storing the watch in a dark place for an extended period of time, be sure to
charge it fully.
When the watch is regularly covered with long sleeves, it may not be charged
sufficiently. Try to keep the watch exposed to light sufficient for charging.
Do not charge the watch at a high temperature (about 60˚C/140˚F or higher).

17
When the watch reaches a low charge state—insufficient charge warning
function
When the power reserve becomes low, the second hand moves once every two
seconds—This is the insufficient charge warning function. Charge the watch by
exposing the dial to light.
• After the watch is charged, the second hand will move normally. See page 18.
• If you have not charged the watch for three days or more since the insufficient
charge warning movement began, the watch will run out power and stop.
Caution
When the second hand moves once every
two seconds, you cannot use any functions—
chronograph, alarm, etc.—except the time indication.
Continued to the next page

18
Charging time by environment
Below are the approximate times needed for charging when exposing the watch dial to
light continuously.
Please use this table as a reference only.
Environment Illuminance (Lx) Charging time to work for
one day
Charging time to start
working normally when the
rechargeable cell is empty
Under direct sunlight
or cloudy weather 10000 to 100000 3 to 12 minutes 45 minutes to 3 hours
20 cm under a
fluorescent lamp (30
W)
3000 40 minutes 7.5 hours
Interior lighting 500 4 hours 60 hours
Your watch will run approximately 12 months from a full charge.

19
If you have a problem with your watch, check the table below.
Symptoms Remedies Page
Troubleshooting
The hands do not work properly.
Some hands moves
unintentionally. Stop the chronograph. 7
The second hand moves
once every two seconds. Charge the watch. 16
All hands stop moving.
Push the crown in to position 0.−
Charge the watch by exposing it to direct sunlight for five
or six hours. 16
The dual time hand does
not move.
Press the upper left button (C). If the hand does not
move yet, reset the watch. 21
Continued to the next page

2020
The time and/or date is not correct.
The time and/or date is wrong. Adjust the time and/or date. 5, 6
The date changes around at noon. Adjust the time by 12 hours. 5
Symptoms Remedies Page
Others
The watch does not
move even if the watch is
charged.
Charge the watch by exposing it to direct sunlight for
five or six hours.
Though the trouble is not solved after charging,
contact your nearest Authorized Citizen Service
Center.
16
The alarm tone does not
sound on time.
Set the alarm ON/OFF hand to “ON”. 8, 9
Push the crown in to position 0.−
Charge the watch. 16
Other manuals for E260
1
Table of contents
Other Citizen Watch manuals

Citizen
Citizen C900 Manual

Citizen
Citizen 9015 User manual

Citizen
Citizen 2115 User manual

Citizen
Citizen 82** User manual

Citizen
Citizen EO1184-81D User manual

Citizen
Citizen AD2992-59P User manual

Citizen
Citizen 6P25 User manual

Citizen
Citizen CTZ-B6810 User manual

Citizen
Citizen H460 User manual

Citizen
Citizen 6840 Operating manual

Citizen
Citizen 8651 User manual
Citizen
Citizen E365 User manual

Citizen
Citizen H990 Eco-Drive Satellite Wave User manual

Citizen
Citizen FS11 User manual

Citizen
Citizen Eco-Drive CAL 8651 User manual

Citizen
Citizen 0910 User manual

Citizen
Citizen E670 User manual

Citizen
Citizen H486 User manual

Citizen
Citizen 6P05 User manual

Citizen
Citizen C470 User manual