Citizen CTZ-B6778 User manual

CITIZEN QUARTZ
Magic Light
Model No. JQO❈❈❈
Caliber No. C410
• INSTRUCTION MANUAL
CTZ-B6778
A. FEATURES
1. This CITIZEN Quartz Watch combines a
handsome graphic display and timekeeping
feature for convenience of use during daily
business and pleasure activities.
2. It is equipped with an EL (Electroluminescent)
panel to enable the display to be seen even in
dark locations.
B. NAME OF PARTS
C. SETTING THE TIME
• Pull down the crown to the time setting position.
• Turn the crown to set the time.
• Push the crown to the normal position.
Analog and digital time are set independently.
D. EL (ELECTROLUMINESCENCE)
ILLUMINATION
EL refers to the emission of light by a phosphorescent
substance under the influence of an applied voltage.
The panel of this watch provides illumination by
electroluminescence.
Illumination method
The El panel will be illuminated under the following
conditions.
1. When pressing
Rbutton in time mode, or
calendar mode.
2. When displaying stop or split time state in
chronograph mode.
Characteristics and replacement of the EL
(electroluminescence) panel
The EL (electroluminescence) panel has the
following properties.
• When the battery voltage drops, the brightness
(intensity) also drops.
• It is adversely affected by humidity.
If any water enters inside the watch by accident,
promptly request repair.
• The EL panel has a finite life span.
The brightness (intensity) gradually drops in
proportion to the total number of hours of use
(light emission).
If the display appears dark or is hard to see when
the EL panel is lit, ask either the store where you
purchased the product or your nearest CITIZEN
Service Centre to replace the EL panel. This repair
will be done for a fee.
E. MODE SWITCH-OVER
The five modes of this watch include time, calendar,
alarm, chronograph and timer.
* Auto return
When in the position to set any of the modes, the
watch will automatically return to the respective
mode’s normal display if there is no input for about
2 minutes.
* Manual return
Depress the
M button in the any set mode for
more than 2 seconds to manually return to the
normal time code
F. SETTING AND USINGTHE DIGITAL MODES
1.Time Mode (TIME)

Setting the time
• Press the
Sbutton in the the normal time mode
for more than 2 seconds to enter the adjustment
mode. Use the
Sbutton to reset seconds to zero.
Press the Sbutton again to move to minutes,
hours, and 12/24H in order, and use the Rbutton
to make adjustments.
• Press the
Rbutton when setting the time to use
the quick-advance feature.
* Manual return
Press the
Mbutton any time during the setting
operation to manually return to the normal display.
2. Calendar Mode (CAL)
The watch displays month, day and date information
in the normal calendar mode.
Setting the calendar
• Press the
Sbutton in the calendar mode for more
than 2 seconds to enter the month adjustment
mode.
Press the
Rbutton to adjust the month digits.
Press the
Sbutton in the month adjust mode.
Press the Rbutton to make adjustment.
• Press the Rbutton when setting the calendar to
use the quick-advance feature
* Manual return
Press the
Mbutton any time during the setting
operation to manually return to the normal
calendar display.
• When a nonexistent date is set, the first day of the
following month will be shown automatically after
returning to the normal calendar display.
(Example)
Feb 31-March 1
• The year can be set from 1195 to 2080 and is
represented by the last 2 digits of the year.
• The day of the week is automatically set when the
year, month and date is adjusted.
• The calendar needs no adjustment at the end of a
month.
3. Alarm Mode (ALM)
Setting the alarm
• Press the
Rbutton in the alarm mode to switch
the alarm ON/OFF.
• Press the
Sbutton in the alarm mode for more
than 2 seconds to enter the hour adjustment
mode. Press the
Sbutton to adjust the hour digits.
Press the Rbutton to move to the minute adjustment
mode. Press the Sbutton to advance the minutes.
Press the Rbutton to finalise the setting.
• Press the
Rbutton when setting the alarm time to
use the quick-advance feature.
• If the time mode employs the 12-hour systems for
the hour display, the alarm set time is also shown
by the 12-hour system. AM/PM should be noted.
• The alarm will sound for about 20 seconds. Press
any button to stop the alarm.
* Auto return
When in the alarm mode display, the watch will
automatically return to time mode after about
2 minutes if there is no input.
* Manual return
Press the
Mbutton at any time during the setting
operation to manually return to the normal alarm
mode.
4. Chronograph Mode (CHR)
Using the chronograph
• Press the
Sbutton to activate the start/stop switch.
• Press the Rbutton to take a time reading. A split
time will be displayed for about 10 seconds. Press
the
Rbutton again while the split time is displayed
to record another split time.
• Press the
Rbutton in the stop mode to reset the
chronograph.
Measurement time range:
00:00’00”~23:59’59”99
Once 24 hours have passed, the chronograph
automatically resets and stops.
• Press the
Mbutton in the chronograph mode or
during a timing session to switch to another mode.

5. Timer Mode (TMR)
Setting the timer
The
Rbutton is used to set the timer. Press and
hold down Rbutton, quick advance feature.
Timer range: Maximum 60 minutes
Operating the timer
When time is up, there is a 5-second alarm.
Afterward, the timer will be reset to its initial setting.
1. Use the
Sbutton to start and stop timer.
2. Press the Rbutton in the timer stop mode, to
reset the time set.
3. Press
Rbutton while the timer counting down to
return the timer set time and restart.
• Then the timer will return to the set time.
Press
Mbutton in timer mode to a switch to time
mode. The timing session will continue to run
internally although the mode has been switched.
G. ALL RESET FUNCTION AND ALARM SOUND
MONITOR
1. All Reset Function
After replacing the battery, or if an unusual display
has appeared, perform the All Reset function as
follows.
1. Pull the crown out.
2. Press the
S,
Rand
M
buttons simultaneously.
3. Release all three buttons.
The digital display will be
lighted to their maximum
extent.
4. Push the crown in. You will
4. hear a confirmation beep indicated that the All
Reset function is complete. After that, set the time
and calendar.
2. Alarm Sound Monitor
To check your alarm sound:
1. Press the
Mbutton to access Alarm Mode (ALM).
2. Press the
Rbutton for 2 seconds or more and
the alarm will sound. Release
Rbutton and the
alarm will stop sounding.
H. USING THE REGISTER-RING
• The register-ring gives you a convenient way to
calculate the elapsed time or remaining time.
<Calculating the elapsed time>
• Align the minute hand with the register-ring zero
mark ( ). The elapsed minutes since the ring was
set can now be easily calculated by comparing the
positions of the zero mark and the minute hand.
Example:
1. Current time is 10:10.
Align the zero mark ( ) to
the 25 minute mark on the
dial.
2. The watch is next checked at
10:40. To determine the
2. elapsed time, read the number of the register-ring
at the minute hand position. The elapsed time is
30 minutes (fig. 1).
<Calculating the remaining time>
• Align the register ring zero mark ( ) with the
target time and use the ring’s calibrations to
calculate the remaining time.
Example:
1. The target time is 10:25.
Set the register-ring zero
mark ( ) to the 25 minute
mark on dial.
2. If the current time is 10:10,
the remaining time is
2. 15 minutes (60 minus 45) as calculated from the
register-ring (fig. 2).

I. PRECAUTIONS
Water Resistance
• To prevent water coming into contact with the
internal mechanism of the watch, the crown should
under no circumstances be pulled out while the
watch is wet.
• If watches designed for sports or working in the
water are exposed to salt water or significant
amounts of sweat, they should be rinsed in fresh
water and dried thoroughly.
• Exposure to water may affect the durability of
some types of leather bands.
• Because the internal watch parts may hold some
moisture, if the external temperature is lower than
that inside the watch, the glass covering the watch
face may fog up.
If this fogging up is only temporary it poses no
problem, however, if it persists over a long period
of time you should discuss the matter with a
salesperson at the shop where you purchased the
watch or at a Citizen Service Centre.
Temperature
Avoid exposing the watch to direct sunlight or
leaving it in extremely hot or cold locations for a
long period of time.
• This will cause malfunctioning and shorten the life
of the battery.
• This may cause your watch to gain or lose time
and affect its other functions.
Shock
• This watch will withstand the bumps and jars
normally incurred in daily use and while playing
such non-contact sports as golf and catchball.
• Dropping the watch on the floor or otherwise
imparting severe shock to it may cause
malfunctioning or damage.
Static Electricity
• The integrated circuits used in the watch are
sensitive to static electricity. If exposed to intense
static electricity, the watch’s display may lose its
accuracy.
Chemicals and Gases
Avoid wearing the watch in the presence of strong
chemicals or gases. If the watch comes in contact
with such solvents as thinner and benzine or
products containing materials such as gasoline, nail
polish, detergent or adhesive, its components may
discolour,,dissolve or crack. Be especially careful to
avoid chemicals. The watchcase or band may
discolour if they come in contact with mercury from
a broken thermometer or the equipment.
KeepYour Watch Clean
Wipe off soil and moisture from the glass with a
soft, absorbent cloth. If you wear the watch when
the back side of the case and watchband is soiled
they may cause a skin rash as they come in direct
contact with your skin. Keep your watch clean also
to avoid staining your cuffs.
Battery
• The battery is a monitor battery that has been
factory-installed. For this reason it may wear out
after purchase before the specified battery life
(about 3 years) has elapsed.
• Be sure to keep the battery out of the reach of
infants and small children. Should accidental
ingestion occur, consult a doctor immediately.
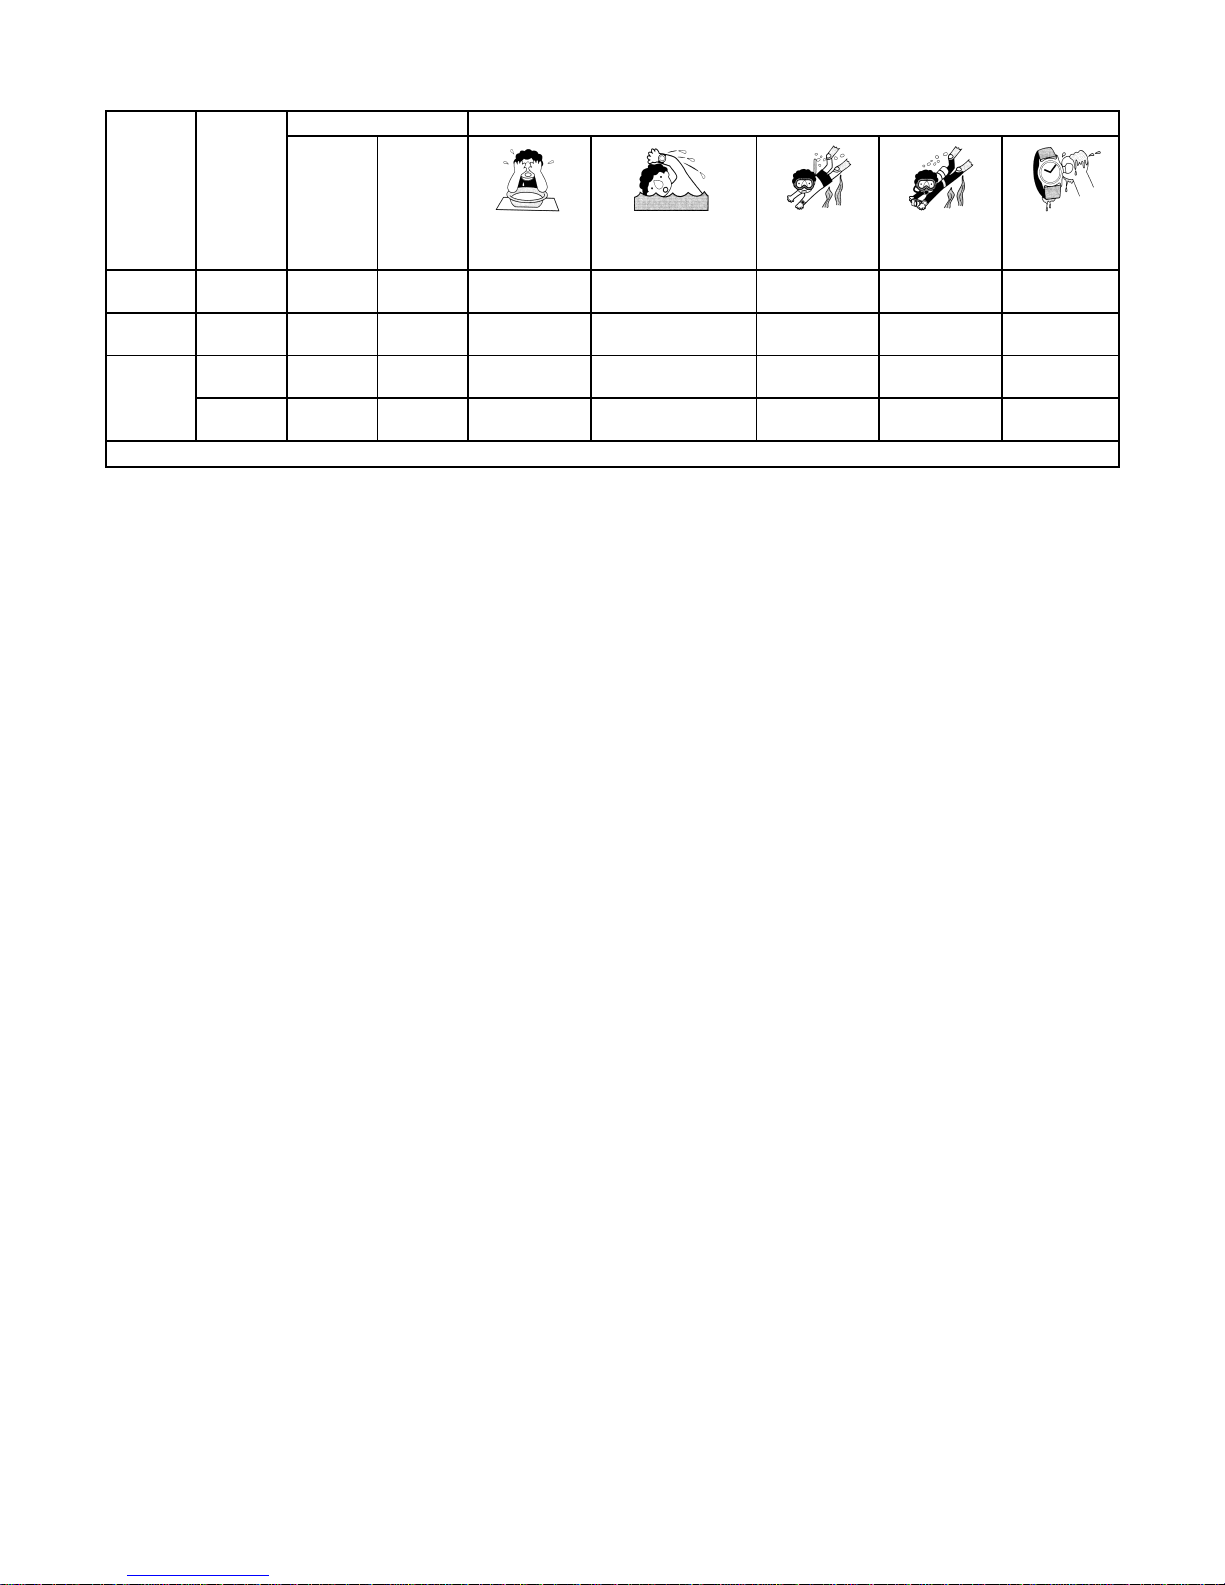
Classification Specification Dial Case back
Washing face or getting
wet in the rain, that
(when splashed over it
and no water pressure
is applied to it).
Swimming and general washing
work (kitchen work/car washing
etc.)
Water sports and skin
diving. (without air tank). Scuba diving. (with air
tank). Pulling out the crown
when the watch is wet.
NO NO NO NO NO
OK NO NO NO NO
OK OK NO NO NO
OK OK OK NO NO
No water
resistance
Water resistance
for daily life
Reinforced water
resistance for
daily life.
Non
Non WATER RESIST
(ANT)
WATER RESIST
(ANT)
WATER RESIST
(ANT)
Non Non
3 bar water
resistance watch
5 bar water
resistance watch
WATER
RESISTANT
WR
❈❈❈
/
❈❈
bar
WATER RESISTANT
WR
❈❈❈
/
❈❈
bar
10 bar/20 water
resistance watch
“WATER RESISTANT” may sometimes be abbreviated as “WATER RESIST” *Always set the crown in the normal position. *Tighten screw lock crown completely
Indication Water-related use

J. SPECIFICATIONS
1. Accuracy: 20 seconds/month
(5C to 35C/41F to 95F)
2. Display method: Digital display
Three-hand analog display
3. Effective
temperature range: 0C to 55C/32F to 131F
4. Display functions
Analog display of time (hours, minutes, seconds)
Digital display functions
• Time
• Calendar.........month/date/day
• Alarm..............AM/PM, hours, minutes, ON/OFF
• Chronograph..24-hour system, split time function
• Timer...............Timer range: 60 mins max
5. Additional
function: Illumination by EL
(eletroluminescent) panel
6. Battery used:
Part No.........................280-44
Battery name................SR927W
Battery life....................approx. 2 years (when the
EL panel is lit 3 seconds a
day)
Note This battery longevity varies with the usage of
the alarm, chronograph, EL panel, and so on.
If the chronograph is not being used, make
sure to reset it (to 00’00’’00).
The product specifications are subject to change
without notice for the purposes of product
improvement.
Table of contents
Other Citizen Watch manuals

Citizen
Citizen FS60 User manual

Citizen
Citizen A414 User manual

Citizen
Citizen H11A User manual

Citizen
Citizen 0S21 User manual

Citizen
Citizen MOVEMENT CAL. 6P20 User manual

Citizen
Citizen H82 User manual

Citizen
Citizen 8217 User manual

Citizen
Citizen NIGHT ROLLERS II User manual

Citizen
Citizen B230 Operating manual

Citizen
Citizen E81 Series User instructions

Citizen
Citizen VD5 User manual

Citizen
Citizen YF30 User manual

Citizen
Citizen Quartz 6760 Manual

Citizen
Citizen E76 Series User manual

Citizen
Citizen BTOSeries User manual

Citizen
Citizen 6P Series User manual

Citizen
Citizen 6S10 User manual

Citizen
Citizen NY0129-58L User manual

Citizen
Citizen JR00 User manual

Citizen
Citizen B11 User manual