Citronic CDUSB-1 MKII User manual

OWNERS MANUAL
Version 1.0
Safety information
1. Read these instructions.
2. Keep these instructions.
3. Heed all warnings.
4. Follow all instructions.
5. Do not use this item near moisture.
6. Clean onl with dr cloth.
7. Do not block an of the ventilation openings. Install in accordance with the
manufacture’s instructions.
8. Do not install near an heat sources such as radiators, stoves or other items (including
amplifiers) that produce heat.
9. Do not defeat the safet purpose of the polarised plug. The wide blade is provided for
our safet . If the provided plug does not fit into the item or the mains socket, consult
an electrician for replacement.
10. Protect the power cord from being walked on or pinched particularl at plug, convenience
receptacles, and point where the exit from the item.
11. Onl use attachments/accessories specified b the manufacturer.
12. Use onl with a stand, tripod, bracket or table suitable for support.
13. Unplug this item during lightning storms or when unused for long periods of time.
14. Refer all servicing to qualified service personnel. Servicing is required when the item has
been damaged in an wa , such as power suppl cord or plug is damaged, liquid has
been spilled or objects have fallen onto the item, the item has been exposed to rain or
moisture, does not operate normall , or has been dropped (Note: Accidental or cosmetic
damage is not covered b the items 12 month warrant )
15. Please keep the unit in a safe environment.
16. Do not store an thing on top of the item
CAUTION: To reduce the risk of electric shock, do not
remove an cover. No user-serviceable parts inside. Refer
servicing to qualified service personnel onl .
The lightning flash with arrowhead s mbol within the equilateral triangle is intended to
alert the user to the presence of un-insulated “dangerous voltage” within the product’s
enclosure that ma be of sufficient magnitude to constitute a risk of electric shock.
The exclamation point within the equilateral triangle is intended to alert the user to the
presence of important operation and maintenance (servicing) instructions in the
literature accompan ing this appliance.
DO NOT OPEN
RISK OF ELECTRIC SHOCK

CITRONIC CDUS -1
Main Features:
1 x USB front and 1 x USB rear inputs which can be read b both pla ers simultaneousl
Single front load CD pla er with 20 seconds anti-shock protection
MP3/WAV compatible from CD or USB (ID3 tags)
IR Remote control operation
Auto Cue
Single/Continuous pla back
+10 Track skip search
Pitch control and pitch displa
High qualit eas read LCD displa
Eas -to-use folder and file search
Jog wheel for frame search
Selectable elapsed, remain and total remain time displa
Seamless loop with fine tune adjustment
Instant start (sound is produced immediatel when the pla button is pressed)
Pitch controlled ±4, 8, 16%, ±100% (CDDA)
Pitch lock function
Auto/Manual tap BPM
19” rack mountable
Accessories
1 x UK power cable
1 x EU power cable
1 x Remote control
1 x Instruction manual

General Checks and Advice
1) Before switching off the power ensure there is no CD in the draw, the disc tra is full
closed and the LCD displa reads “NO DISC”.
2) Installation
•Place the unit on a flat surface or mount in a secure rack case.
•The CD unit will work normall when it is mounted when the front panel is within
15° of the vertical plane. If tilted excessivel discs ma not be loaded properl .
Also ensure the head unit at a similar to the one shown below for the best visual
results.
•Be sure the pla er is mounted in a well ventilated area and is not exposed to direct
sunlight, high temperatures or high humidit .
•Keep the unit as far awa as possible from TVs and tuners as the unit ma cause
undesirable interference to these devices.
3) Compact Discs
•DO NOT allow fingerprints, oil or dust to get on to the surface of the disc.
•If the disc is dirt , wipe it clean with a soft dr cloth.
•DO NOT use benzene, white spirit, electrostatic-proof chemical or silicone-treated
cloths to clean discs.
•Alwa s handle discs carefull to prevent damaging the surface; in particular when
removing a disc from its case or returning it.
•DO NOT bend the disc.
•DO NOT enlarge the hole in the centre of the disc.
•DO NOT write on the printed side of the disc with hard tipped implements such as a
pencil or ball point pen as it could effect pla back.
•Condensation will form if a disc is brought in to a warm area from a colder one.
•DO NOT attempt to dr the disc with a hair dr er etc.

General Functions and Controls
1. DISC TRAY – This tra is used to load and unload a compact disc into the drive mechanism.
The tra is opened and closed b pressing the OPEN/CLOSE BUTTON. Never attempt to
force the disc tra open or close when the power is turned off.
2. US PORT 1 (FRONT) – Insert a USB mass storage device for pla ing MP3 files.
3. OPEN/CLOSE (Transport Tray Open / Close) – This button is used to open and close
the disc tra . NOTE: When a disc is loaded, the tra will not open unless the unit is in
PAUSE or CUE mode.
4. SOURCE SELECT UTTON – This button lets ou toggle between the CD tra and USB
port 1 and 2. The selection is indicated b LEDs.
5. TIME UTTON - The button will switch the time value described in the TIME METER
between ELAPSED pla ing time, TRACK remaining time and TOTAL remaining time.
6. SGL/CTN UTTON - This function allows ou to choose between single track pla or
continuous track pla (all tracks in order with no pause between). This function also
operates in RELAY mode. With this button ou can switch auto cue on and off, b holding
the button down for 2 seconds.
7. LCD DISPLAY – The high qualit LCD displa gives a clear indication of all the functions
as the occur (see LCD displa section for more details).
8. TRACK / FOLDER KNO - This knob has three functions:
a. You can use it to select the next or previous track/folder b turning the knob
forwards or backwards.
b. Holding down and turning the knob forwards or backwards will rapidl skip through
the tracks/folders on our CD/USB b 10 tracks per click.
c. Press track knob to read the ID3 tags on the file name. Switch between: File name
/ Title name / Artist / Bit rate on the LCD displa .

9. TAP UTTON - This button is used for manual BPM. When in manual BPM mode, tap this
button to the beat of the current track.
10. PITCH SLIDER - This slider is used to adjust the pla back pitch percentage. Move the
slider down to speed up the music and move the slider up to slow the music down.
11. PITCH END UTTONS – The speed rises while the “+button” is pressed and returns to
the original pitch when the button is released. The speed drops when the “–button” is
pressed and returns to the original pitch when the button is released. These buttons can
be used to s nchronise the beats of 2 tracks.
12. PITCH (KEY) LOCK UTTON - This button turns on or turns off the PITCH LOCK
function. This function allows ou to use the PITCH SLIDER to speed up or slow down
pla back speed without altering the tonal pitch of the track.
13. PITCH RANGE UTTON - Press the button to choose pitch percentage adjustment.
±4%, ±8%, ±16%, and ±100%. (Note: 100% does not work with MP3 music)
14. SEARCH UTTONS – These search buttons allow ou to quickl scan forwards and
backwards through the track. The search speed will activel change depending on how
long ou hold down the button.
15. FOLDER UTTON – Use the FOLDER button to switch between FOLDER and TRACK (see
search options above - 8. “TRACK KNOB” When the LED is lit the pla er is in FOLDER
search mode when it is not lit it is in TRACK search mode.
NOTE: Hold the FOLDER button down for 2 seconds to activate and REPEAT function
16. PLAY/PAUSE UTTON – Pressing the PLAY/PAUSE button once will instantl start the
track. Pressing this button again will PAUSE the current track.
17. CUE UTTON – Can be used in a number of wa s:
a. Pressing the CUE button during pla back immediatel stops the current track and
returns the music to the last set cue point.
b. In pause mode pressing and holding the CUE button pla s the track from the last
set CUE point. Releasing CUE button will return the track to the last set CUE point.
c. Pressing and holding the Cue will start the track. If PLAY/PAUSE button is pressed
during this time the track will continue to pla when CUE button is released.
18. SEAMLESS LOOP UTTONS:
a. IN UTTON – Pressing the IN button sets a CUE POINT without music interruption.
This button is also used to set the starting point of a SEAMLESS LOOP.
b. OUT UTTON - This button is used to set the ending point of a LOOP. A LOOP is
started b pressing the IN button to select the starting point and the OUT button to
set the LOOP ending point. The LOOP will continue to pla until the OUT button is
pressed once again.
c. RELOOP UTTON - If a SEAMLESS LOOP has been made, but the pla er is not
activel in SEAMLESS LOOP mode.
i. Pressing the RELOOP button will instantl reactivate the seamless loop
mode. To exit loop, press the OUT button. LOOP will appear in the LCD
displa when the RELOOP function is available.
ii. You can fine tune the SEAMLESS LOOP b holding the RELOOP button and
using the jog wheel to set the exact OUT point.

19. JOG WHEEL – The JOG WHEEL can be used to pitch bend during pla back and be used
to frame search in pause mode.
20. POWER SWITCH - This switch is used to control the unit's main power.
21. POWER CONNECTOR - This is the main power connection. Onl use the supplied power
cord. Use of an other power connections ma result in severe damages to the unit.
22. US PORT 2 (REAR) – A secondar port to insert our USB mass storage device for
pla ing MP3 files.
23. AUDIO OUT R & L ALANCED XLR - These XLR connectors send audio left and right
analog mono output signal. Use these jacks to send a balanced signal to a mixer or amplifier.
24. AUDIO OUT R & L RCA - These jacks send a left and right analog mono output signal. Use
these jacks to send standard audio to a mixer or receiver. The red colored jack represents the
right channel output and white jack represents the left channels output.
LCD Display
1. CUE - This indicator will glow when the device is in CUE mode. It will flash ever time a
new CUE point is set.
2. FOLDER INDICATOR – Indicates the current folder number selected.
3. TIME AR INDICATOR – The flashing bar shows either the elapsed time or remaining
time of the track. The bar will being to flash when the track is about to end.
4. PM STATUS – This will indicate if the AUTO BPM counter is active.
5. PM METER – Show the BPM value of the currentl pla ing track.
6. PITCH METER – Shows the percentage of the track’s pitch.
7. PITCH LOCK SYM OL – When highlighted the PITCH LOCK button is active.
8. LOOP INDICATOR – Indicates if a loop has been set and can be activated b pressing
the RELOOP button.
9. RELOOP INDICATOR – Indicates if LOOP is active.

10. AUTO CUE STATUS – Indicates if AUTO CUE is activated (“AUTO CUE”). Press and hold
SGL/CTN at least 1 second to turn the AUTO CUE function on and off.
11. TIME DISPLAY – Indicates the time of the chosen time mode in either minutes, seconds
and frames.
12. MP3 INFORMATION INDICATOR – Indicates the current name of the folder and the
sampling rate.
13. TIME MODE – Indicates the elapsed time of a track pla ing (“ELAPSED”), the remaining
time of a track (“REMAIN”) or the remaining time of the entire disc (“TOTAL REMAIN”).
Change between these modes with the Time button.
14. REPEAT INDICATOR – Indicates whether the unit is in repeat pla mode.
15. SINGLE INDICATOR – Indicates whether the pla mode is set to single (“SINGLE”) or
continuous mode (no displa ).
16. TRACK INDICATOR – Indicates the number of the currentl pla ing track.
17. PLAY/PAUSE INDICATOR – Indicates the device pla mode (“ “)or if the pla er is in
pause mode (“ “)

Remote Control:
1. OPEN/CLOSE – Used to open and close the disc tra .
2. CUE – Used to instantl return to the last set CUE POINT.
3. SEARCH UTTONS – Used to quickl scan backward & forward through a track.
4. TRACK UTTONS – Used to scan backwards & forward between tracks.
5. FOLDER UTTONS – Used to scan backward & forward between folders on a USB
device to find the desired folder.
6. VOLUME CONTROL UTTONS – Used to adjust the volume of the integrated amplifier.
7. SOURCE SELECT – Used to toggle between input sources; CD, USB 1 or USB 2
8. SEAMLESS LOOP UTTONS – Used to set a loop and reactivate the LOOP mode.
a. IN – Set the CUE point
b. OUT – Set the out point or exit loop
c. RELOOP – Press to re activate the loop
9. PLAY/PAUSE – Used to cause the operation to change from pla to pause or from
pause to pla .
10. STOP – Used to stop pla back.
11. SGL/CTN – Used to change the pla mode between Single and Continuous.
12. PITCH UTTONS – Used to adjust the pla back pitch percentage when the PITCH
function is activated.
13. KEY LOCK – Used to activate/deactivate ke lock mode.
14. MUTE – Used to activate/deactivate the mute function.

Internal Menu
Hold TIME BUTTON for 3 seconds to enter the internal menu.
Turn TRACK KNOB to scroll through the different menus and press the TRACK KNOB to enter the
corresponding submenu.
Turn TRACK KNOB to change the submenus and press TIME BUTTON to memorise our settings in an
operating mode and exit the menu.
1.
Playlist – Normal / Title/ Artist / Album/ Genre
2.
Sleep Time – No sleep, 5~120 min
3.
Line Setup – MODE= 1~3(Line mode)
Dis=0.5~12.0 sec. (LINE NAME start/stop time adjustment)
Run=50~2000 msec. (LINE NAME move time adjustment)
4.
it rate – Displa ON/OFF
5.
Version – CON:XX (Control version)
DSP:XX (DSP version)
SER:XX (Servo version)
6.
Load Default – Press TRACK Knob to enter load defaults. (LCD displa s “Load OK”.)
7.
Exit & Save – Exit & Save setting to next power on (LCD displa s “Saving”.) Press the
TRACK knob to fast exit & save in an operating mode.
NOTE:
•SLEEP TIME: The CD pla er automaticall shuts off the transport and laser after about 15
minutes when in pause or cue mode). This extends the life of our motor drive and laser.
During sleep mode the displa shows the word “SLEEP”. To wake up the pla er, just press
the cue or pla button, the displa turns to normal and is read to receive instructions.
You can enter the Sleep Time menu to adjust sleep time, range is 5~120 minutes.
•SAVE: PITCH ON/OFF, PITCH RANGE, SGL/CTN, AUTO CUE, TIME MODE, KEY LOCK,
DISPLAY/RUN TIME, BIT RATE, REPEAT MODE, PLAYLIST, SLEEP TIME, LINE SETUP.
•DEFAULTS: PITCH (ON), PITCH RANGE (8%), PLAY MODE(CTN), AUTO CUE(ON), TIME
MODE (REMAIN), KEY LOCK(OFF), BIT RATE(Disp. ON), REPEAT MODE (OFF), PLAYLIST
(NORMAL), SLEEP TIME (15 min), LINE SETUP(model 1), DISPLAY(1 sec),RUN
TIME(150msec)

Data Management
DATA ASE UILDER:
Database management software for the CDUSB-1 enables ou to search for our files b Title,
Artist, Album and Genre.
Installation: Refer to the following figures for installing database management software on our
computer.
Download available at www.citronic.com
STEP 1: Click next > STEP 2: Click next >
STEP 3: Click Install STEP 4: Processing
STEP 5: Click finish
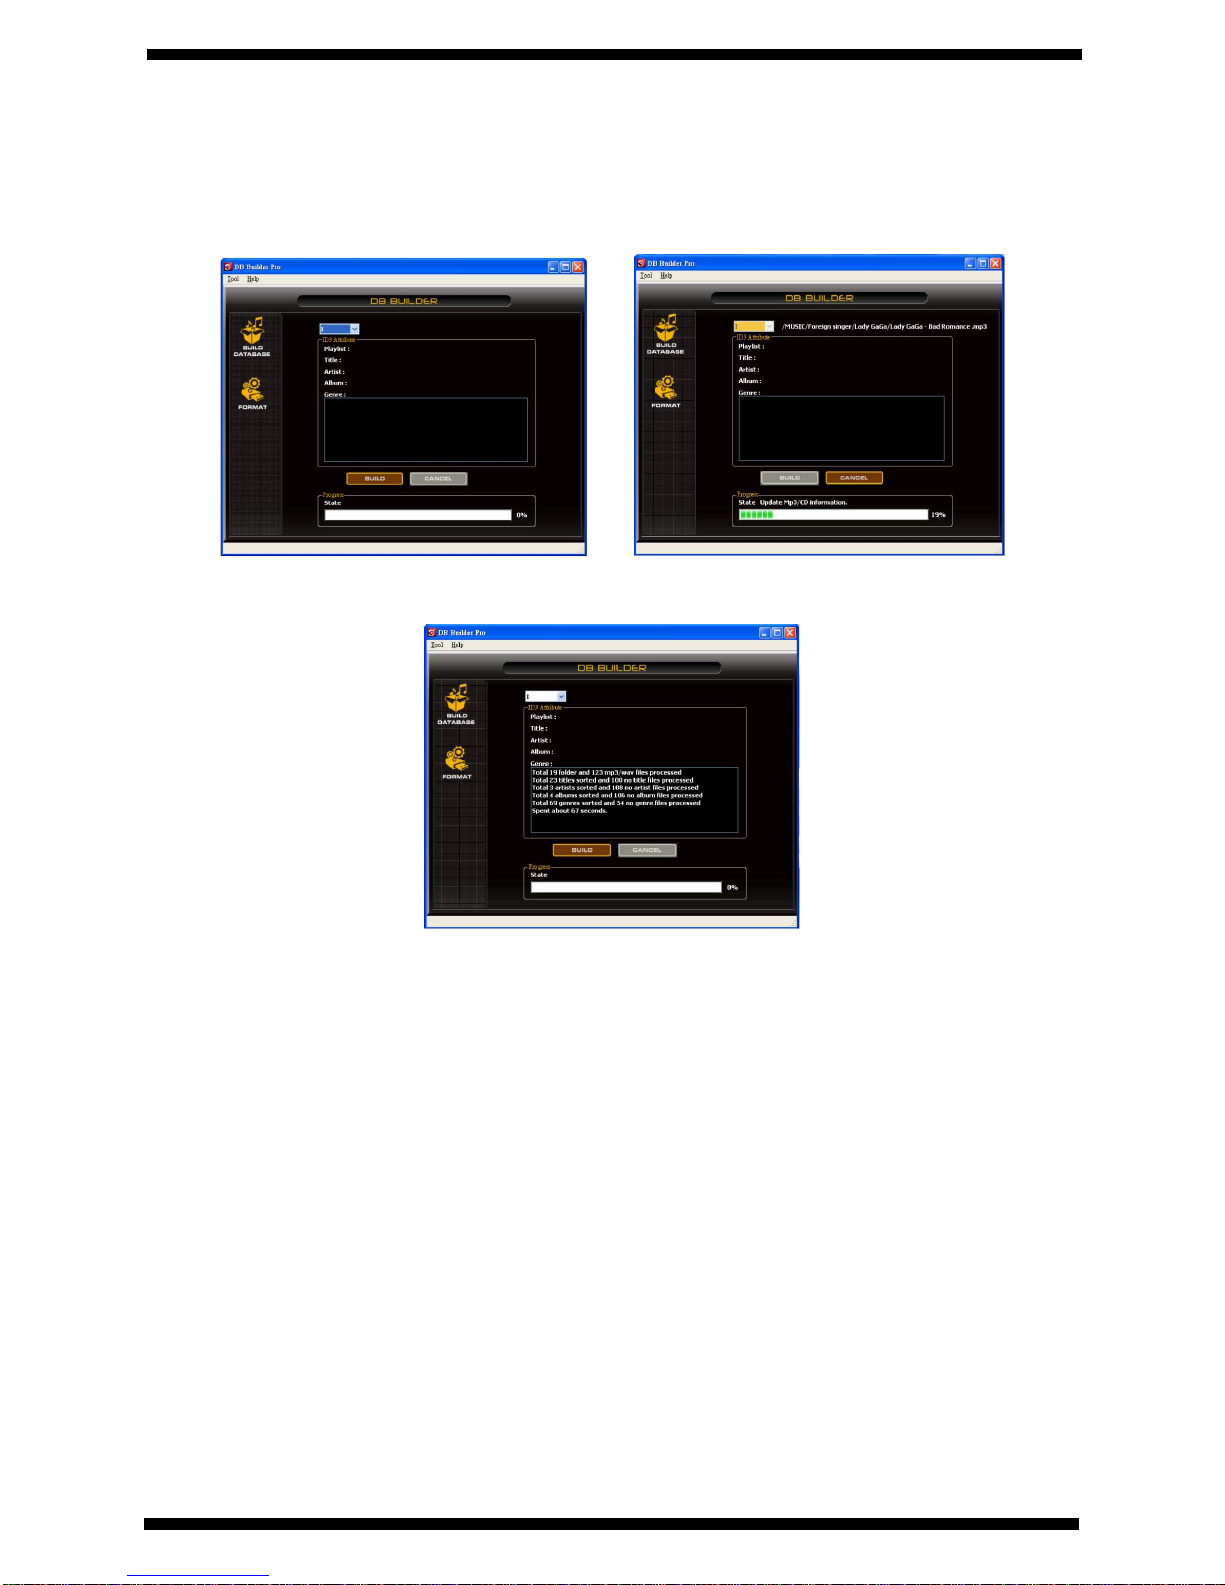
The database builder will scan the music on our USB device and create files which can be read
b the CDUSB-1. You can then easil search for the songs ou want alphabeticall b ; song title,
album title, artist name, genre etc without having to rearrange our folders.
Scan and create: Refer to the following figures to process scanning and creating database.
NOTE: For Vista users please right click the icon and select “RUN AS ADMINISTRATOR”
STEP 1: Select the desired USB STEP 2: Processing
hard drive and click build
STEP 3: Complete
NOTE: Please re-create the database builder whenever ou change the contents of our USB
device.
PLAYLIST OPERATION:
1.
Hold the TIME button down for 3 seconds to enter the internal menu and turn TRACK
knob to search PLAYLIST.
2.
Turn the Track knob to select “Normal/ Title/ Artist/ Album/ Genre” (for USB onl ). And
press the Time button again to memorize our setting and exit the menu.
Use FOLDER button to switch to Folder mode, EG: to select “Artist”
1.
Hold and turn the TRACK knob, or hold the TRACK knob and turn outer jog wheel, ou
can select the folder ou like b first letter of Artist, and the Artist alphabet is arranged
in order( A, B, C….in order)
2.
Turn the TRACK knob or hold the TRACK knob and turn inner Jog wheel to select next
“Artist”.
Use FOLDER button to switch to Track mode.
Turn the TRACK knob or hold the TRACK knob and turn Jog wheel to select the desired track.

Specification
1.
GENERAL SECTION
PRODUCT CDUSB-1
POWER SOURCE AC100 - 240V, 50/60Hz
POWER CONSUMPTION 13W
DIMENSIONS 482mm (W) X 270.5mm (D) X 88.8 mm (H)
WEIGHT: Main Unit: 4.35 Kg
2.
AUDIO CHARACTERISTICS
(CD TEST DISC: TCD-782 & TCD-781; US TEST FORMAT: MP3, 128K PS;
LOAD=100KΩ)
ITEM TYPICAL LIMIT CONDITION
(1) OUTPUT LEVEL
CD: 2V +/-0.5dB 2V +/-1dB 1KHz, 0dB
(TCD782,TRK2)
US : 1.85V +/-0.5dB 1.85V +/-1dB 1KHz, 0dB
(TCD782,TRK2)
(2) CHANNEL ALANCE WITHIN 0.2dB WITHIN 1dB 1KHz, 0dB
(TCD782,TRK2)
(3) FREQUENCY RESPONSE
CD: 17-20KHz +/-0.4dB 17-20KHz +/-1dB 0dB OUTPUT
(TCD782,TRK2/3/7)
US : 17-16KHz +/-0.2dB 17-16KHz +/-1dB 0dB OUTPUT
(TCD781,TRK1/4/16)
(4) DE-EMPHASIS
CD: -20dB +/-0.2dB -20dB +/-1dB 16KHz,-20dB
(TCD782,TRK2/14)
(5) CHANNEL SEPARATION( x 2)
CD, US : 93dB 85dB 1KHz, 0dB
(TCD782,TRK2/9/11)
(6) THD+N ( x 1)
CD: 0.008% 0.015% 1KHz, 0dB
(TCD782,TRK2)
US : 0.007% 0.015% 1KHz, 0dB
(TCD782,TRK2)
(7) S/N ( x 2)
CD: 126dB 90dB 1KHZ, 0dB
(TCD782,TRK2/8)
US : 85dB 80dB 1KHZ, 0dB
(TCD782,TRK2/8)
(8) DYNAMIC RANGE ( x 2)
CD: 92dB 88dB 1KHz, -60dB
(TCD782,TRK18)
(9) XLR OUTPUT LEVEL ( x 2)
8.22dB (2V) ±0.5dB 8.22dB (2V) ±1dB 1KHz, 0dB
(TCD782,TRK2)
NOTE: *1: WITH 20KHz LOW PASS FILTER.
*2: WITH 20KHz LOW PASS FILTER, "IHF-A" WEIGHTED.
3.
CD SEARCHING TIME: (TEST DISC: TCD-792)
ITEM TYPICAL LIMIT CONDITION
(1) SHORT ACCESS TIME 2Sec 4Sec PLAY NEXT TRACK
(2) LONG ACCESS TIME 4Sec 6Sec TRACK 1 TO 20,20 TO 1
4.
CD PLAYA ILITY:
ITEM TYPICAL LIMIT CONDITION
(1) INTERRUPTION
1mm 0.7mm TCD-725
(2) LACK DOT
1mm 0.6mm TCD-725
(3) FINGER PRINTS
75um 65um TCD-725
(4) ECCENTRICITY
140um 140um TCD-712 W/O TRACK JUMP
(5) VERTICAL DEVIATION
1mm 0.5mm TCD-731R
5.
MP3 FORMAT:
Applicable file extensions mp3. MP3. mP3. Mp3
ISO9660 Max. 63 characters
Joliet Max. 63 characters
CD-ROM sector format mode-1 onl
Max. number of Folders 255
Disc Format
Max. number of files Max. 999 files (* note #1)
File S stem FAT 12/16/32
Applicable file extensions mp3. MP3. mP3. Mp3
Max. number of Folders 999
USB Format
Max. number of files Max. 999 files
MPEG 1 La er 3 standard (ISO/IEC
11172-3), which provides for single
channel (‘mono’) and two-channel
(‘stereo’) coding at sampling rates of
32, 44.1 and 48kHz.
32/40/48/56/80/96/112/128/160/192/224
/256/320 kbps
Xing/VBRI VBR
MPEG 2 La er 3 standard (ISO/IEC
13818-3), which provides for similar
coding at sampling rates of 16, 22.05
and 24 kHz.
32/40/48/56/64/80/96/112/144/160 Kbps
Xing/VBRI VBR
MP3 Format
MPEG 2.5 La er 3 standard, which
provides for similar coding at
sampling rates of 8, 11.025 and 12
kHz.
32/40/48/56/64/80/96/112/144/160 Kbps
Xing/VBRI VBR
Disc at Once and Track at Once
Disc Writing Method
Multi Session If the 1
st
session is CDDA, ou can
pla back Onl CDDA track, If the 1
st
session is MP3, ou can pla back onl MP3
file.
Note #1: max.255 files each folder

FOR MORE INFORMATION ON CITRONIC PRODUCTS VISIT
WWW.CITRONIC.COM
Other manuals for CDUSB-1 MKII
1
Table of contents
Other Citronic MP3 Player manuals


