CITYLIFT STACKER 2LHS-6000 User manual
CITYLIFT STACKER™
2LHS-6000

CITYLIFT STACKER™
© CityLift Parking | www.cityliftparking.com | 844.388.0424
33 SECONDS
AVERAGE RETRIEVAL TIME
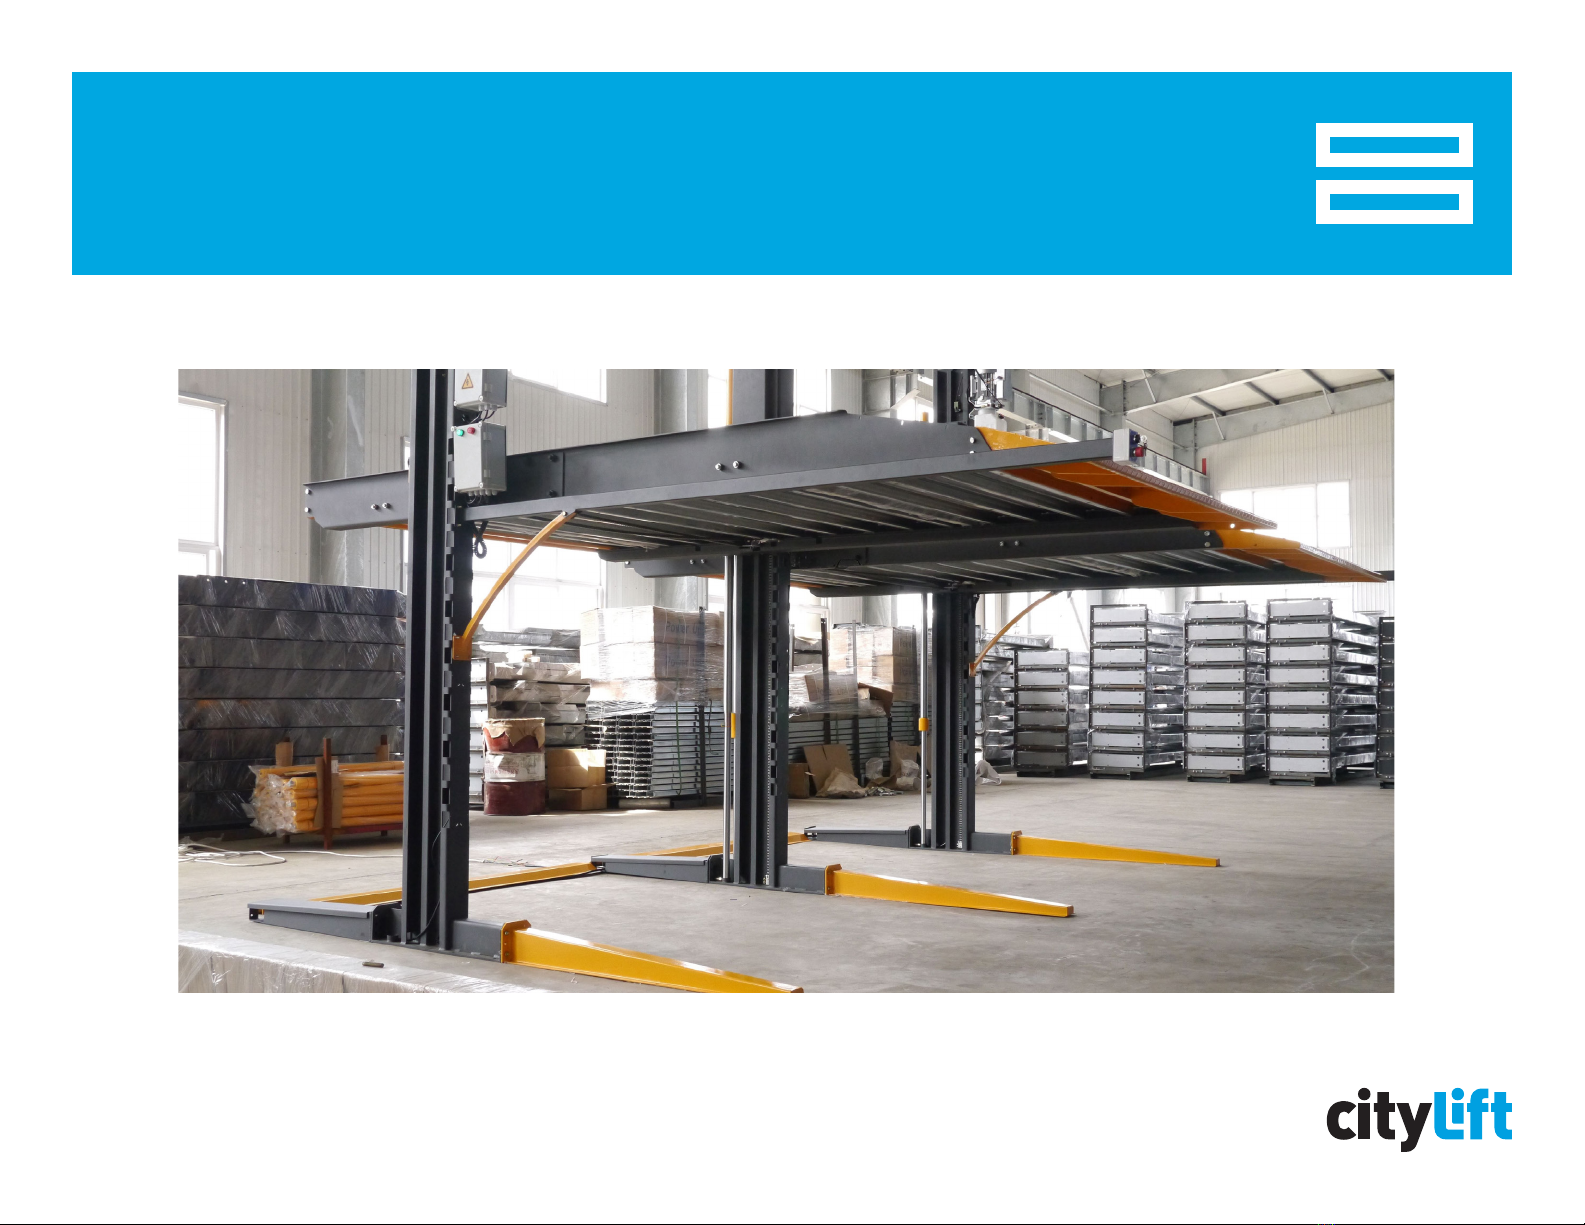
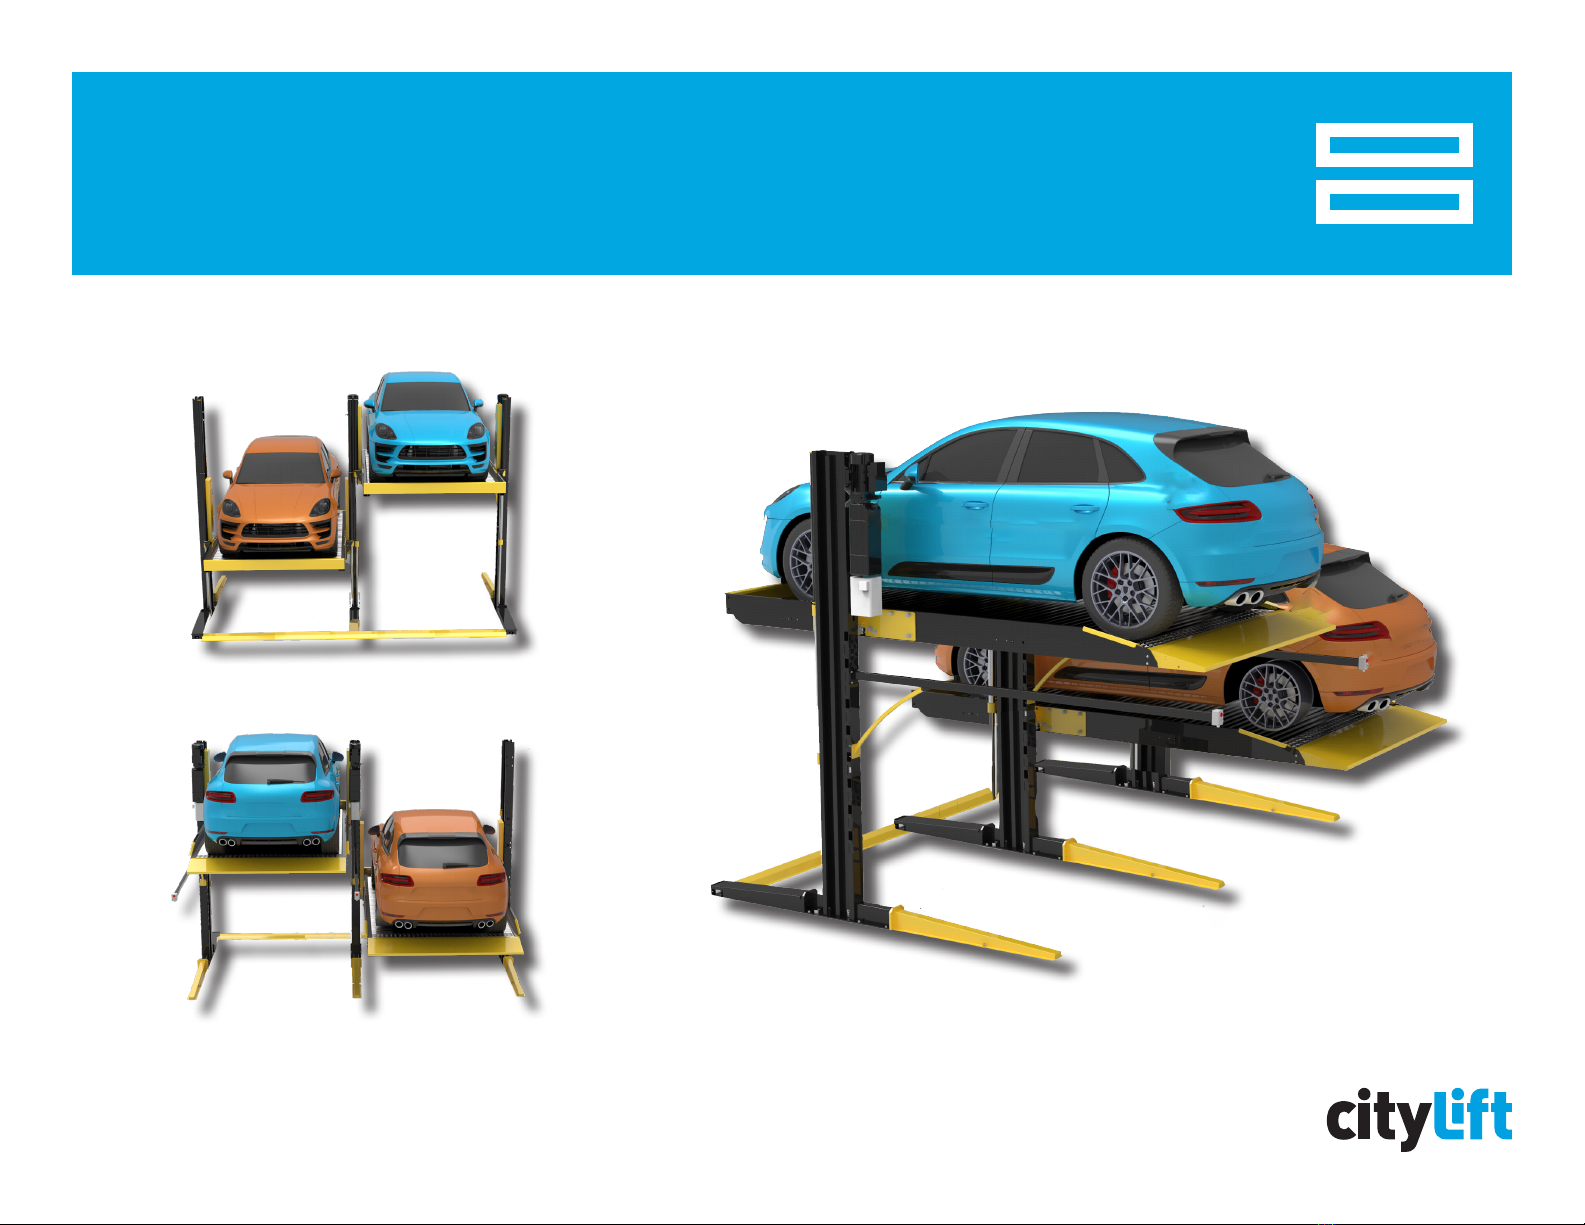
2-LEVEL CONFIGURATION
DOUBLE CYLINDER HYDRAULIC DRIVEN
EASY INSTALLATION
SHARING POST DESIGN AND MULTIPLE SAFETY FEATURES
Highly adaptable, customizable, and cost-efcient car stackers.
These manually operated parking lifts are ideal for valet parking and are a quick
and easy way to double your parking capacity.
Double cylinder
Easy disassembly and relocation
Integrated control box for easy wiring
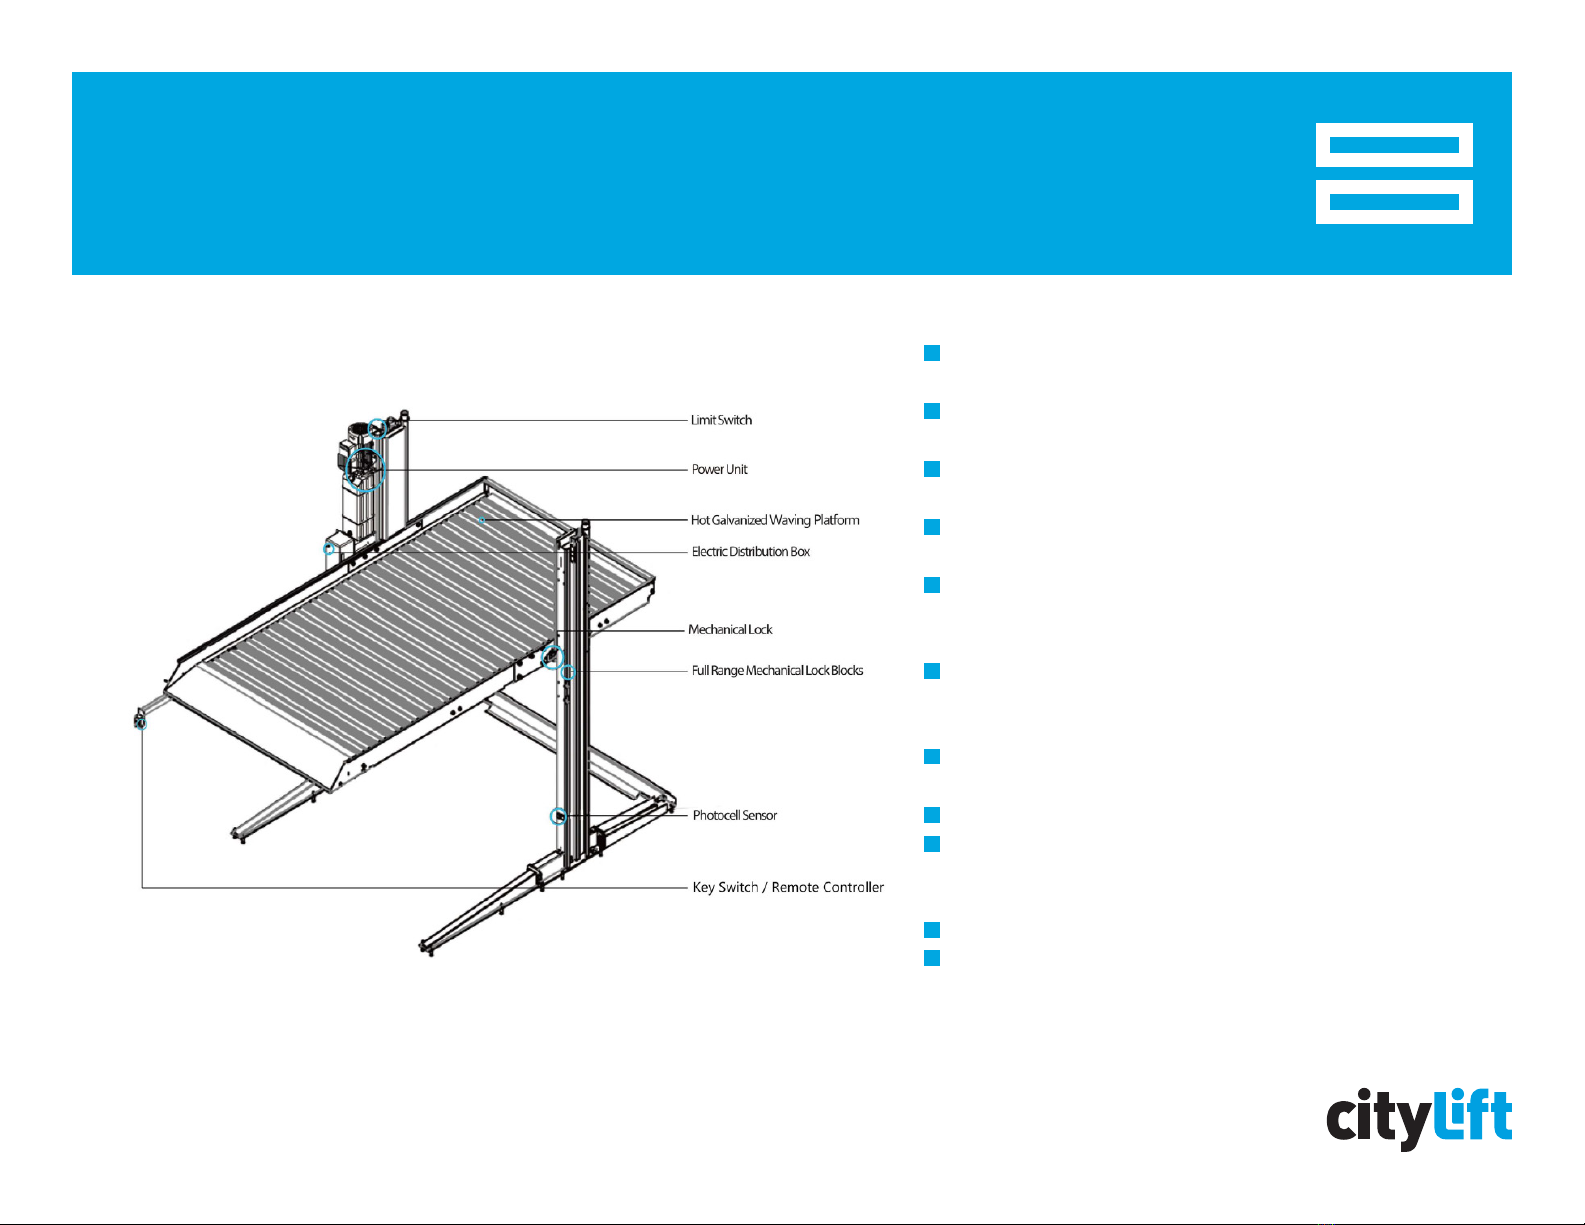
17 full range anti-fall locks
Emergency stop button
Safety key switch controller
Limit switch
Hydraulic overload protection
Anti-skid ramp and platform
Anti-rust power coating nishing
Adjustable ground level vehicle height
CITYLIFT STACKER™
© CityLift Parking | www.cityliftparking.com | 844.388.0424
SAFETY FEATURES
© CityLift Parking | www.cityliftparking.com | 844.388.0424
Top limit switch is to restrict the maximum lifting height and
avoid the wrong operation
Power unit comes with pressure relief valve and ow control
valve to tripe ensure safety
Hot galvanized waving platform has the function of anti-slipping
for the vehicle and water proof
Electric distribution box transforms the input voltage into 24v
safety current for the lift user
17 full range anti fall lock blocks are to guarantee safety of the
vehicle during platform moving in any position (other similar
lifts have only 3 - 6 locks)
The photocell sensor will stop the whole system working
immediately when it is triggered by any trespassing object under
the platform during the operation
Both key Switch and remote controller come with emergency
stop button to prevent any accidents
Electric protection for power over load or under voltage
Auto locking system for power cut as safety features
Italian hydraulic seal with double sealing design to ensure the
total quality and longer usage life of Hydraulic cylinders
Overload protection device for hydraulic power pack
The balancing chain and Platform reinforcing rod double ensue
the balance of the platform (The strength is 5 times the weight
capacity)

TECHNICAL SPECS
© CityLift Parking | www.cityliftparking.com | 844.388.0424
MODEL 2LHS-6000
EQUIPMENT HEIGHT 11’ - 8”
EQUIPMENT WIDTH 8’ - 6”
EQUIPMENT LENGTH 14’ - 61/2”
EQUIPMENT WEIGHT 2,423 lbs
VEHICLE HEIGHT
(TOP LEVEL)
Dependent on total clear
height
VEHICLE HEIGHT
(GROUND LEVEL)
6’ to 6’ - 8”
(adjustable)
VEHICLE WIDTH (MAX) 6’ - 101/2”
VEHICLE LENGTH (MAX) 17’ - 1”
VEHICLE WEIGHT (MAX) 6,000 lbs
CLEARANCE NEEDED
FROM BACK WALL
1’ - 10”
(if applicable)
CONTROL BOX Integrated Module
POWER PACK 2.2 kw hydraulic power
ELECTRICAL
CONFIGURATION
208-480V, 1 or 3 phase
60 Hz
CONTROL POWER 24V
RETRIEVAL TIME 30 seconds
CITYLIFT STACKER™
© CityLift Parking | www.cityliftparking.com | 844.388.0424
OPERATION INSTRUCTIONS
© CityLift Parking | www.cityliftparking.com | 844.388.0424
Never exceed the rated capacity
Always lift a vehicle according to the manufacturer's recommended lifting points.
In order to avoid death, personal injury and/or property damage, only well trained personnel are permitted to operate lift and accessories. Adult operation is
required.
Observe and heed all CAUTION, SAFETY and WARNING LABELS on the lift. Keep clear of lift while it is being raised or lowered.The platform is designed to rest
on the oor when fully lowered.
Keep feet clear.
After reviewing these instructions, get familiar with lift controls by running the lift through a few cycles before loading.
TO RAISE THE LIFT
1. Lift must be fully lowered and no one in area while the vehicle is brought on lift.
2. Center vehicle tires on platform and carefully back vehicle onto lift until tire contacts rear wheel stop.
Be cautious of low prole vehicles where body may not adequately clear rear wheel stop.
3. Driver and passengers must exit before raising lift!
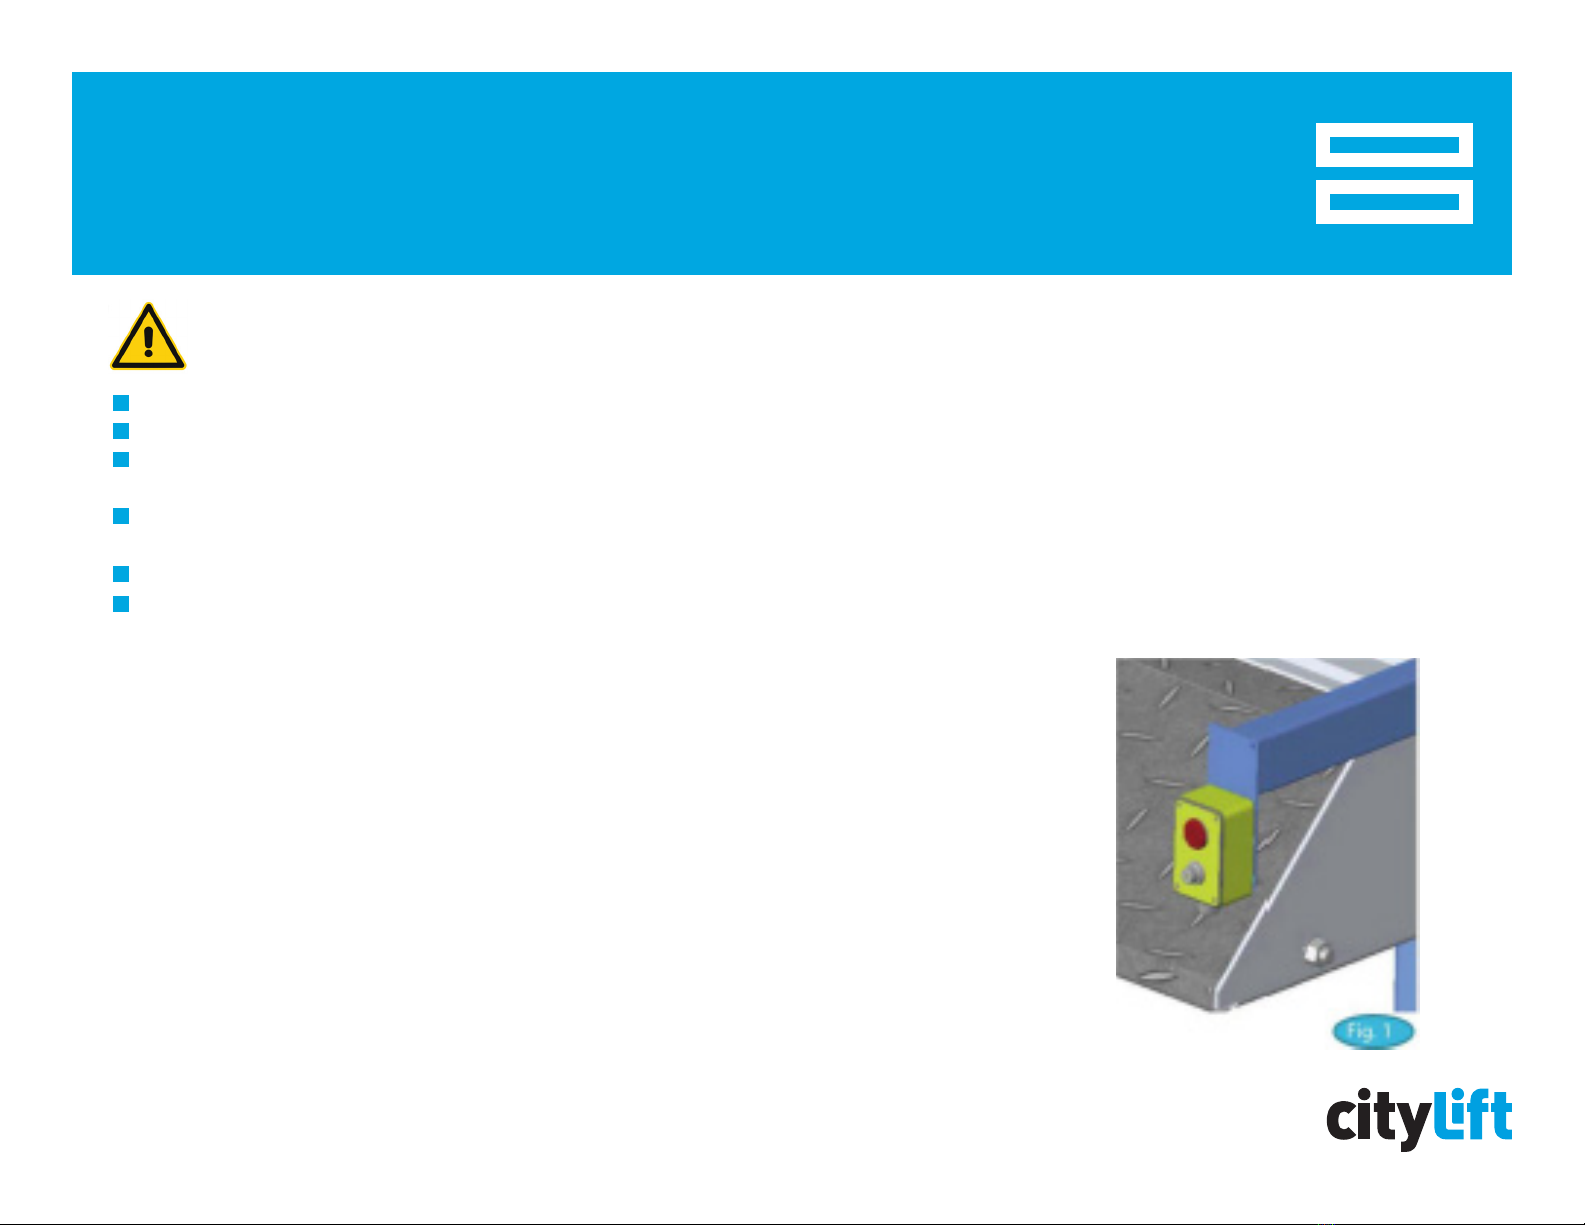
4. Turn the key switch clockwise. Release switch at desired height, Fig. 1. ONLY OPERATE ONE LIFT AT A TIME
5. Observe lift, vehicle and overhead clearance as it is raising.
PLEASE READ BEFORE OPERATING THE LIFT
DO NOT USE LIFT if any component is found to be defective or worn

OPERATION INSTRUCTIONS
© CityLift Parking | www.cityliftparking.com | 844.388.0424
TO LOWER THE LIFT
1. MAKE SURE NO ONE is in the lift area before operation.
2. Remove all obstacles from under vehicle and lift platform before operation.
3. Turn the key switch counter-clockwise, control system will automatically raise the lift of the locking latch
4. Keep turning the key switch, control system will automatically release locks through solenoid, Fig. 2., and platform will come down
5. The raising time will last for several seconds, please keep turning key switch.
6. Without actuating the lock release lever the lift will only lower onto the locking latch. After you clear the lock bar on the column, you can release the lock
release lever and continue to completely lower the lift to the ground.
7. When platform lower down at the height of 500mm from ground, the buzzer will start to work and
speed will be decreased for safety purpose.
8. Observe lift and vehicle to make sure they are coming down level. If not, stop and raise the lift until it
becomes level again. Check to see if lock lever is releasing all locks. - See trouble shooting.
9. Ensure lift is fully lowered and carefully drive vehicle off the lift.
SAFETY INSTRUCTIONS
© CityLift Parking | www.cityliftparking.com | 844.388.0424

SAFETY INSTRUCTIONS
© CityLift Parking | www.cityliftparking.com | 844.388.0424
PLEASE NOTE: THE CERTIFIED CAPACITY SHOULD NEVER BE EXCEEDED!
SAFE OPERATION OF AUTOMOTIVE LIFTS REQUIRES THAT ONLY TRAINED USERS SHOULD BE ALLOWED TO USE THE LIFT
TRAINING SHOULD INCLUDE, BUT NOT LIMITED TO:
Understanding the lift capacity. Be careful that you do not overload the lift.
Proper positioning of the vehicle on the runway.
Use of the operating controls.
Proper use, understanding and visual identication of safety lock devices and their operation.
Reviewing the safety rules.
Proper housekeeping procedures
A daily inspection of the lift should be completed prior to its use.
All maintenance and repairs of the lift should be completed by the manufacturer’s requirements.
Always make sure you have proper overhead clearance. Additionally, check that attachments, (vehicle signs, campers antennas, etc.) are not in the way.
Be sure that prior to the vehicle being raised, the doors, trunk, and hood are closed securely.
After parking the car on the platform, set the emergency brake, make sure the ignition is off, the doors are closed, overhead obstructions are cleared, and the
transmission is in neutral.
Always consider potential problems that might cause a vehicle to slip, i.e., heavy cargo, undercoating, etc.
Never get into the underneath of the platform after it raised, except parking the car.
Always lower the vehicle down slowly and smoothly.
DO NOT lower the vehicle until people, materials, and tools are clear.
USE LIFT CORRECTLY. Use lift in the proper manner. Never use lifting adapters other than what is approved by the manufacturer.

SERVICE AND MAINTENANCE
1. Apply lubrication on guide rail and guide pulley once per month.
2. Apply lubrication on balance chain once per month.
3. Change all the hydraulic oil three months after rst operation.
4. Change oil every nine month after the rst changing.
5. Frequently check the screw nuts of bolts which are xing the electromagnet and locking hook. If any is loose, tighten it ASAP.
6. Before operation, please check the electromagnet connector
7. Test top limit switch and photocell sensor before running.
8. The seal in hydraulic cylinder should be replaced every two years.
9. The roller and sliding block should be replaced every two years.
10. lf any noise comes out from electromagnet, please replace it ASAP.
11. lf the platform tilts right-and-left when lifting, please check and adjust the balance chains.
12. lf the platform tilts fore-and-aft when lifting, rst please check if vehicle is parked correctly; second check the perpendicularity of post, if the platform still tilts after the above
mentioned works please replace the roller.
13. lf the platform tilts right-and-left when descending, rst please check if the mechanical locking hook at higher side is unlocked, please balance chains if the locking hook is
unhooked.
14. lf the platform tilts fore-and-aft when descending, rst please check if vehicle is parked correctly; second check the perpendicularity of post, if the platform still tilts after the above
mentioned works please replace the roller.
15. Adjust the compensated ow control valve on the power unit, in case the lifting and descending is too fast or too slow.
16. Check if the emergency stop button is open and air switch is closed, if the equipment doesn’t lift up when keep turning UP.
17. Check if the solenoid valve is open, if the platform only lifts up but not descend, or it don’t move at all when keep turning DOWN.
18. Check if the electromagnet is working to make the mechanical locking hook unlocked, if the platform lifts up rst then descends but stop on the locking tab when keep turning
DOWN.
19. Check if the electromagnet is working to make the mechanical locking plate unlocked, if the platform descends only but then stop on the locking tab when keep turning DOWN.
20. Check if the photocell sensor works correctly if the platform only descends with buzzer and warning light on when keep turning DOWN and the platform is above 20” height.
21. Open the vent valve on the cylinder to make some air inside of cylinder released, if the platform jounces when lifts up.
22. How to get the equipment balance:
a. Lift the platform up to any locking tab above 20” height;
b. Manually open the manual switch of solenoid valve on power unit to make platform descend;
c. Keep turning on the manual switch of solenoid valve until both two mechanical locking plates on two sides of carriages fall on the bottom of the locking tabs on same level;
d. Tighten or loosen the screw on adjustable screw to adjust the tightening or sag balance chains, to make the platform in balance during operation.
© CityLift Parking | www.cityliftparking.com | 844.388.0424

TROUBLESHOOTING
PROBLEM CAUSE SOLUTION
Motor does not run
1. Check fuse or circuit breaker.
2. Check for correct voltage to motor.
3. lnspect all wiring connections.
4.Switch burned out.
5.Motor windings burned out.
1. Replace blown fuse or reset circuit breaker.*
2. Supply correct voltage to motor.*
3. Repair and insulate all connections.*
4. Replace switch.*
5. Replace motor*
Motor runs but will not raise lift
1. 0pen lowering valve.
2. Pump sucking air.
3. Suction stub of pump.
4. Low uid level.
5. Lift Valve not opening.
1. Repair or replace lowering valve.*
2. Tighten all suction line ttings.*
3. Replace suction stub.*
4. Fill tank with Dexron Ill ATF.
5. Repair or replace lift valve.*
Motor runs-raises unloaded lift but will not raise
vehicle
1. Motor running on low voltage.
2. Trash in lowering valve.
3. lmproper relief valve adjustment.
4. 0verloading lift.
1. Supply correct voltage to motor.*
2. Clean lowering valve.*
3. Replace relief valve cartridge.*
4. Check vehicle weight and/or balance vehicle weight on lifts.
Lift slowly settles down
1. Trash in check valve seat.
2. Trash in lowering valve seat.
3. External uid leaks.
1. Clean check valve.*
2. Clean lowering valve.*
3. Repair external leaks.
Slow lifting speed or uid blowing out ller
breather cap
1. Air mixed with uid.
2. Air mixed with uid suction.
3. Fluid return tube loose.
4. Cold Fluid
1. Change hydraulic uid to Dexron Ill ATF.
2. Tighten all suction line ttings.*
3. Reinstall uid return tube.*
4. Contact Rotary for optional heater.*
Lift going up unevenly 1. Chains out of adjustment.
2. Lift installed on unlevel oor.
1. Adjust slack out of chains accoding to installation instructions.
2. Level lift per installation instructions.
Lift stops short of full rise or chatters
1. Low on uid. Check uid level and bleed cylinder
If uid is required inspect all ttings, hoses, and seals. Repair as
required. Clean power unit pickup stub lter.*
Lift will not lower.
1. Latches out of adjustment.
2. Lowering valve not open.
3. Lift valve not open.
1. Check latches and adjust per install instructions.
2. Repair or replace lowering valve. 3.Repair or replace lift valve.
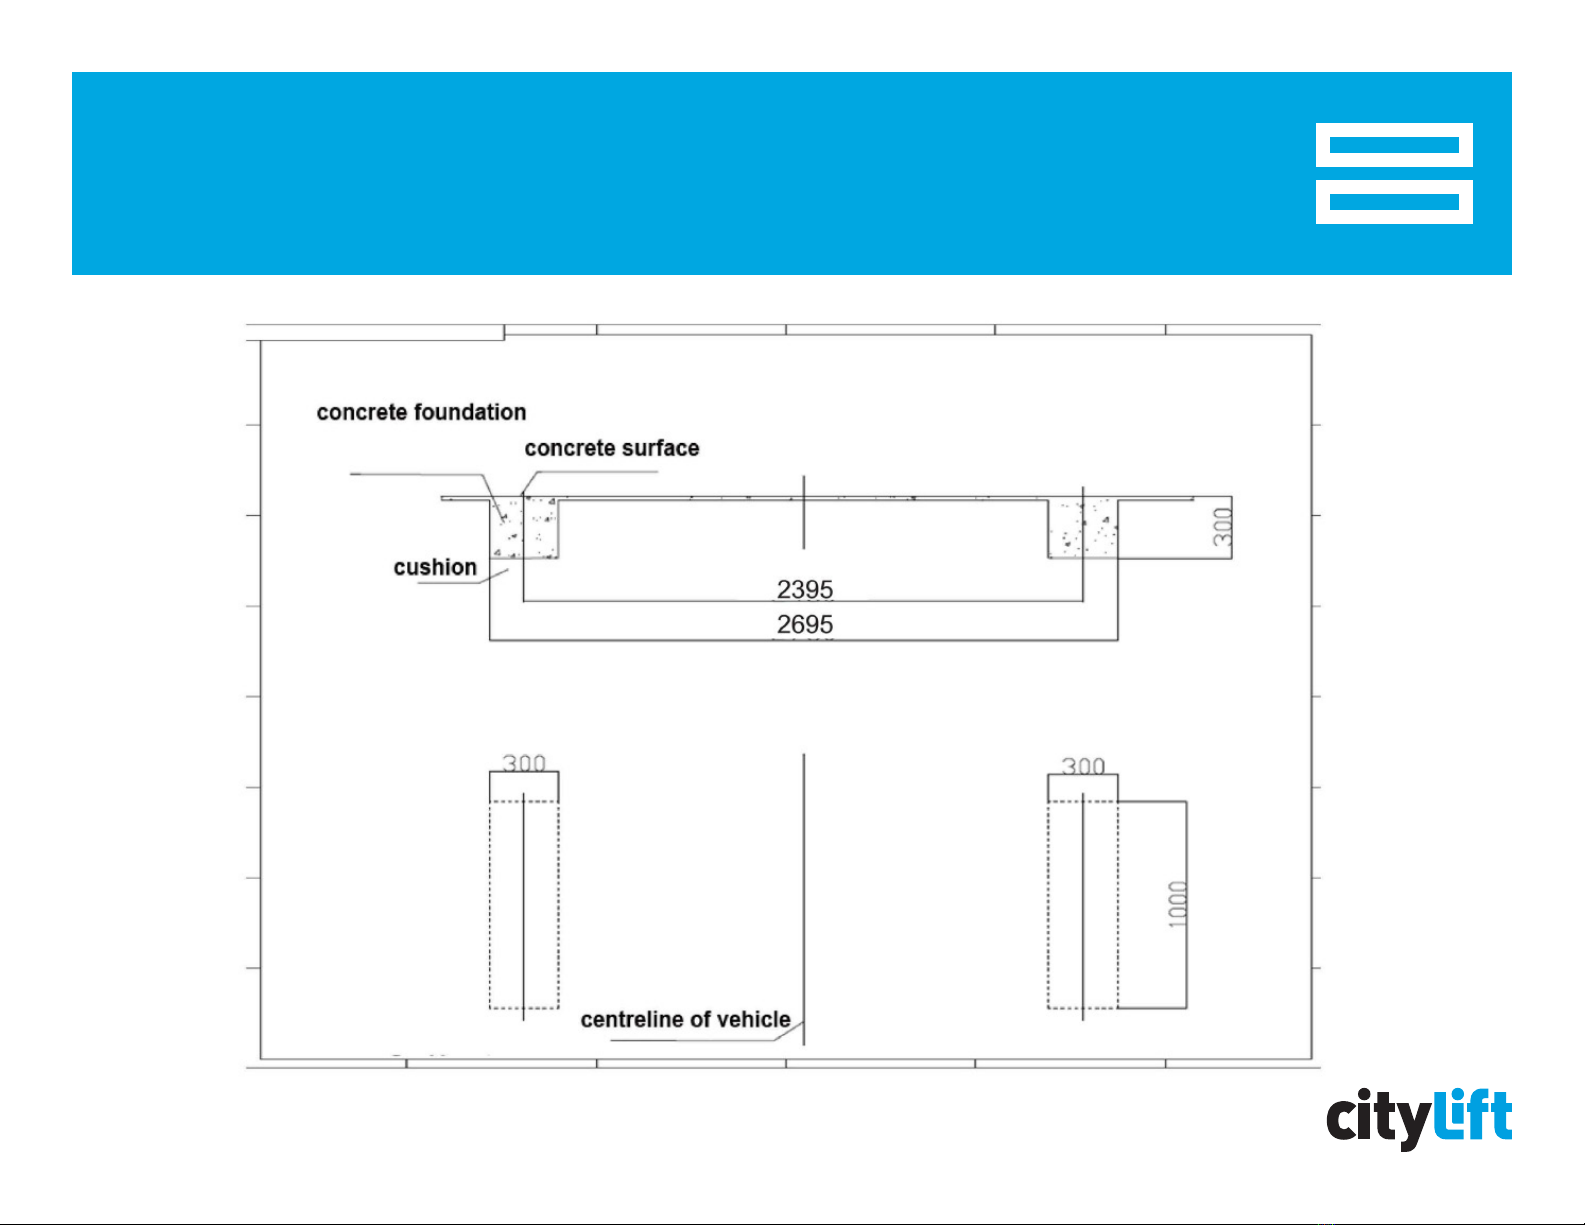
FOUNDATION DRAWING
© CityLift Parking | www.cityliftparking.com | 844.388.0424

FOUNDATION DRAWING
© CityLift Parking | www.cityliftparking.com | 844.388.0424
1. Tolerance of levelness must below 5mm, compressive strength of concrete must be above 200kg/cm2.
2. Thickness must be above 300mm and strength grade must be more than 250.
3. Ensure the new concrete be cured by at least 28 days minimum.
4. DO NOT install this lift on any asphalt surface or any surface other than concrete.
5. DO NOT install this lift on expansion seams or on cracked or defective concrete.
6. DO NOT install this lift on a second/elevated oor without rst consulting building architect.
7. DO NOT install this lift outdoors unless special consideration has been made to protect the power unit from in climate weather conditions.
8. Leave enough space for the control cabinet.
9. Always use architects plans when available. Check layout dimension against oor plan requirements making sure that adequate space is available.
10. The area where the lift will be located should be free of overhead obstructions such as heaters,building supports, electrical lines etc.
- damage caused by rain, excessive humidity, corrosive environments or other contaminants.
- any change or modication made to the equipment without prior agreement.
These warranties do not extend to any cosmetic defect not interfering with equipment functionality or any incidental, indirect, or consequential loss, damage, or expense that may result from any defect,failure, or
malfunction of a CityLift Parking lift or the breach or delay in performance of the warranty.This warranty is exclusive and in lieu of all other warranties expressed or implied. CityLift Parking makes no warranty on
components and/or accessories furnished to CityLift Parking by third parties.These are warranted only to the extent of the original manufacturer’s warranty to CityLift Parking. Other items not listed but may be
considered general wear parts. CityLift Parking reserves the right to make design changes or add improvements to its product line without incurring any obligation to make such changes on product sold previously.

ELECTRICAL DRAWING
© CityLift Parking | www.cityliftparking.com | 844.388.0424
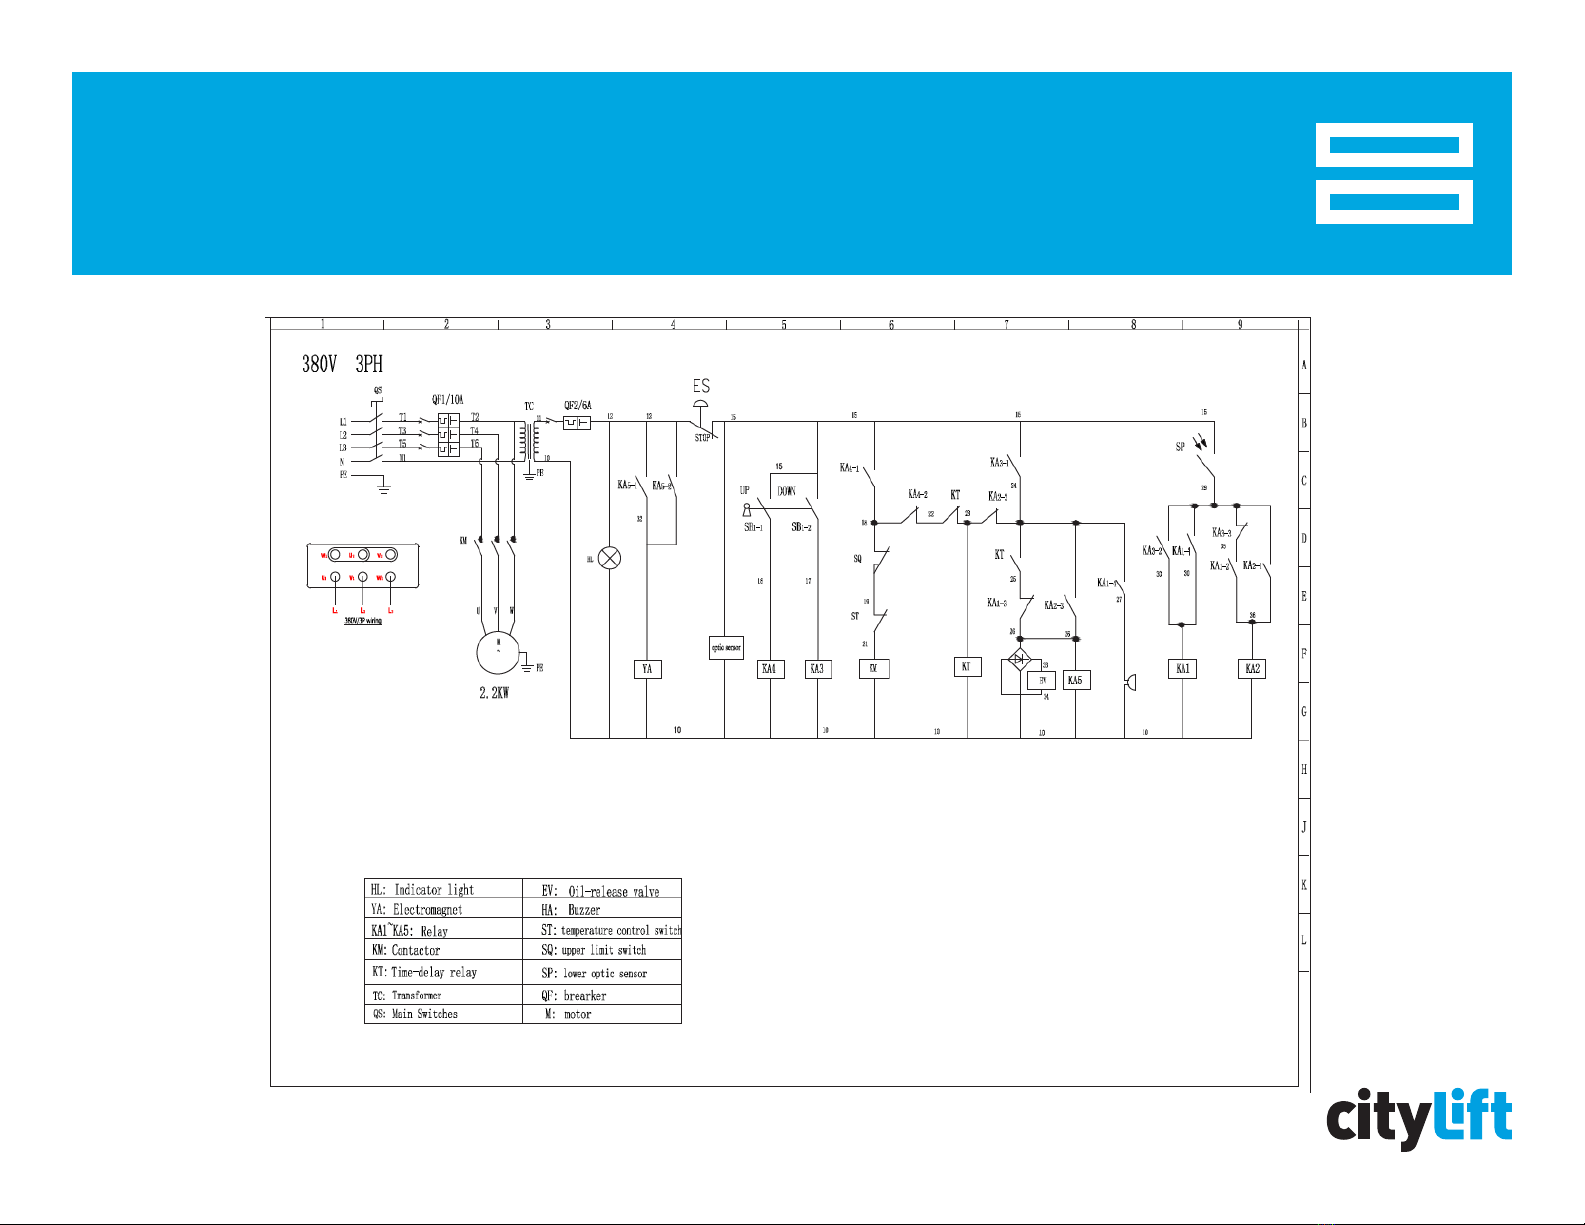
ELECTRICAL DRAWING
© CityLift Parking | www.cityliftparking.com | 844.388.0424

CITYLIFT PARKING
1901 Poplar Street, Suite B, Oakland, CA 94607
844.388.0424
www.cityliftparking.com
Oakland | Los Angeles | Boston | Seattle | New York
© CityLift Parking 2020
Table of contents


