ClairiTech Innovations Humidex HCS-BS Quick start guide
September 2019 Humidex HCS Wall Control Rev 2.1 En
HCS Wall Control
Operational Manual
English
Manufactured by:
ClairiTech Innovations Inc.
1095 Ohio Rd.
Boudreau-Ouest, NB
Canada E4P 6N4

Humidex
1
Table of Contents
Table of Contents ...................................................................................................................... 1
Service and Warranty .................................................................................................................2
FOR CUSTOMER ASSISTANCE........................................................................................................................2
CONSUMER LIMITED WARRANTY ................................................................................................................3
Installation.................................................................................................................................4
DESCRIPTION ..................................................................................................................................................4
WIRING AND ATTACHING THE CONTROL..................................................................................................4
LCD Display and Control Layout .............................................................................................6
THE LCD DISPLAY ........................................................................................................................................7
NAVIGATING THE LCD MENU ....................................................................................................................7
ENTERING THE MAIN MENU .......................................................................................................................8
RELATIVE HUMIDITY MENU ........................................................................................................................8
OVERRIDE TIMER MENU ..............................................................................................................................9
CHANGING FAN SPEEDS ...............................................................................................................................9
Humidex
2
Service and Warranty
For Customer Assistance
To aid in answering questions if you call for service or warranty purposes, please record below the
model and serial number located on the side of the unit.
Product Name:
Model #:
Date of Manufacturing:
Date of Purchase:
Serial #:
Dealer Name (If Any):
Please Note the above information before contacting us.
IMPORTANT
To properly validate your warranty, you must fill out and return the warranty card as soon as possible.
If your unit is not registered, a proof of purchase will be necessary should it require any services. You
can also register your warranty online http://www.clairitech.com/register .
For the Following Inquiries:
-Service
-Parts
-Accessories
-Additional Customer Information
Please contact us by:
Phone: 1-888-533-1348
Email: [email protected]
Website: www.humidex.com

Humidex
3
Consumer Limited Warranty
ClairiTech Innovations Inc. warrants to the first consumer that this product, when shipped in its
original container, will be free from defective workmanship and materials, and agrees that it will, at its
discretion, either repair the defect or replace the defective Product or part thereof with a new or
remanufactured equivalent at no charge to the purchaser for the period(s) set forth below. The
defective part must be returned to the manufacturer ClairiTech Innovations Inc. All transportation
charges are the sole responsibility of the purchaser.
This warranty does not apply to any appearance items of the product nor to the additional excluded
item(s) set forth below of which have been damaged, defaced, subjected to improper voltage,
abnormal service or handling, or which has been altered or modified in design or construction.
In order to enforce the rights under this limited warranty, the purchaser must fill out and return the
warranty card as soon as possible. If your unit is not registered, a proof of purchase will be necessary
should it require any services.
Neither the sales personnel of the seller nor any other person is authorized to make any warranties
other than those described herein, or to extend the duration of any warranties beyond the time period
described herein on behalf of ClairiTech Innovations Inc.
The warranties described herein shall be the sole and exclusive warranties granted by ClairiTech and
shall be the sole and exclusive remedy available to the purchaser. Correction of defects, in the manner
and for the period of time described herein, shall constitute complete fulfillment of all liabilities and
responsibilities of ClairiTech to the purchaser with respect to the Product, and shall constitute full
satisfaction of all claims, whether based on contract, negligence, and strict liability or otherwise. In no
event shall ClairiTech be liable, or in any way responsible, for any damages or defects in the Product
which were caused by repairs or attempted repairs performed by anyone other than an authorized
servicer, unless approved by ClairiTech in writing. Nor shall ClairiTech be liable or in any way
responsible for any incidental or consequential economic or property damage.
Warranty Period for this product:
Two (2) years on the control.
Additional Items Excluded from
Warranty Coverage (If Any):
Appearance items of the product, and any
printed material.
Where to obtain service:
From the Manufacturer. (Refer to Page 2)
This warranty is non-transferable and applies to residential use only.
To obtain supply, accessory or product information, contact us.
Refer to Page 2 for Contact Information.
Humidex
4
Installation
Description
The HCS Wall Control is intended for the following models:
-HCS-BS (included)
-HCS-CS (included)
-HCS-APT (optional)
-HCS-APTHC (optional)
The LCD display on this unit has a built-in backlight to allow for better readability in darker locations.
This backlight turns on when any button on the control panel is pressed and turns off after no button
has been pressed on the unit for a period of 10 seconds.
Wiring and Attaching the Control
Once the exhaust unit has been mounted, the control needs to be installed and connected. It
is crucial that the control is placed in the proper location. The HCS control must be installed
on the main floor and as close to the source of the replenishment air as possible while trying
to stay away from exterior doors and windows.
After having selected the installation location, the provided wire must be run from the main
unit to the control location.
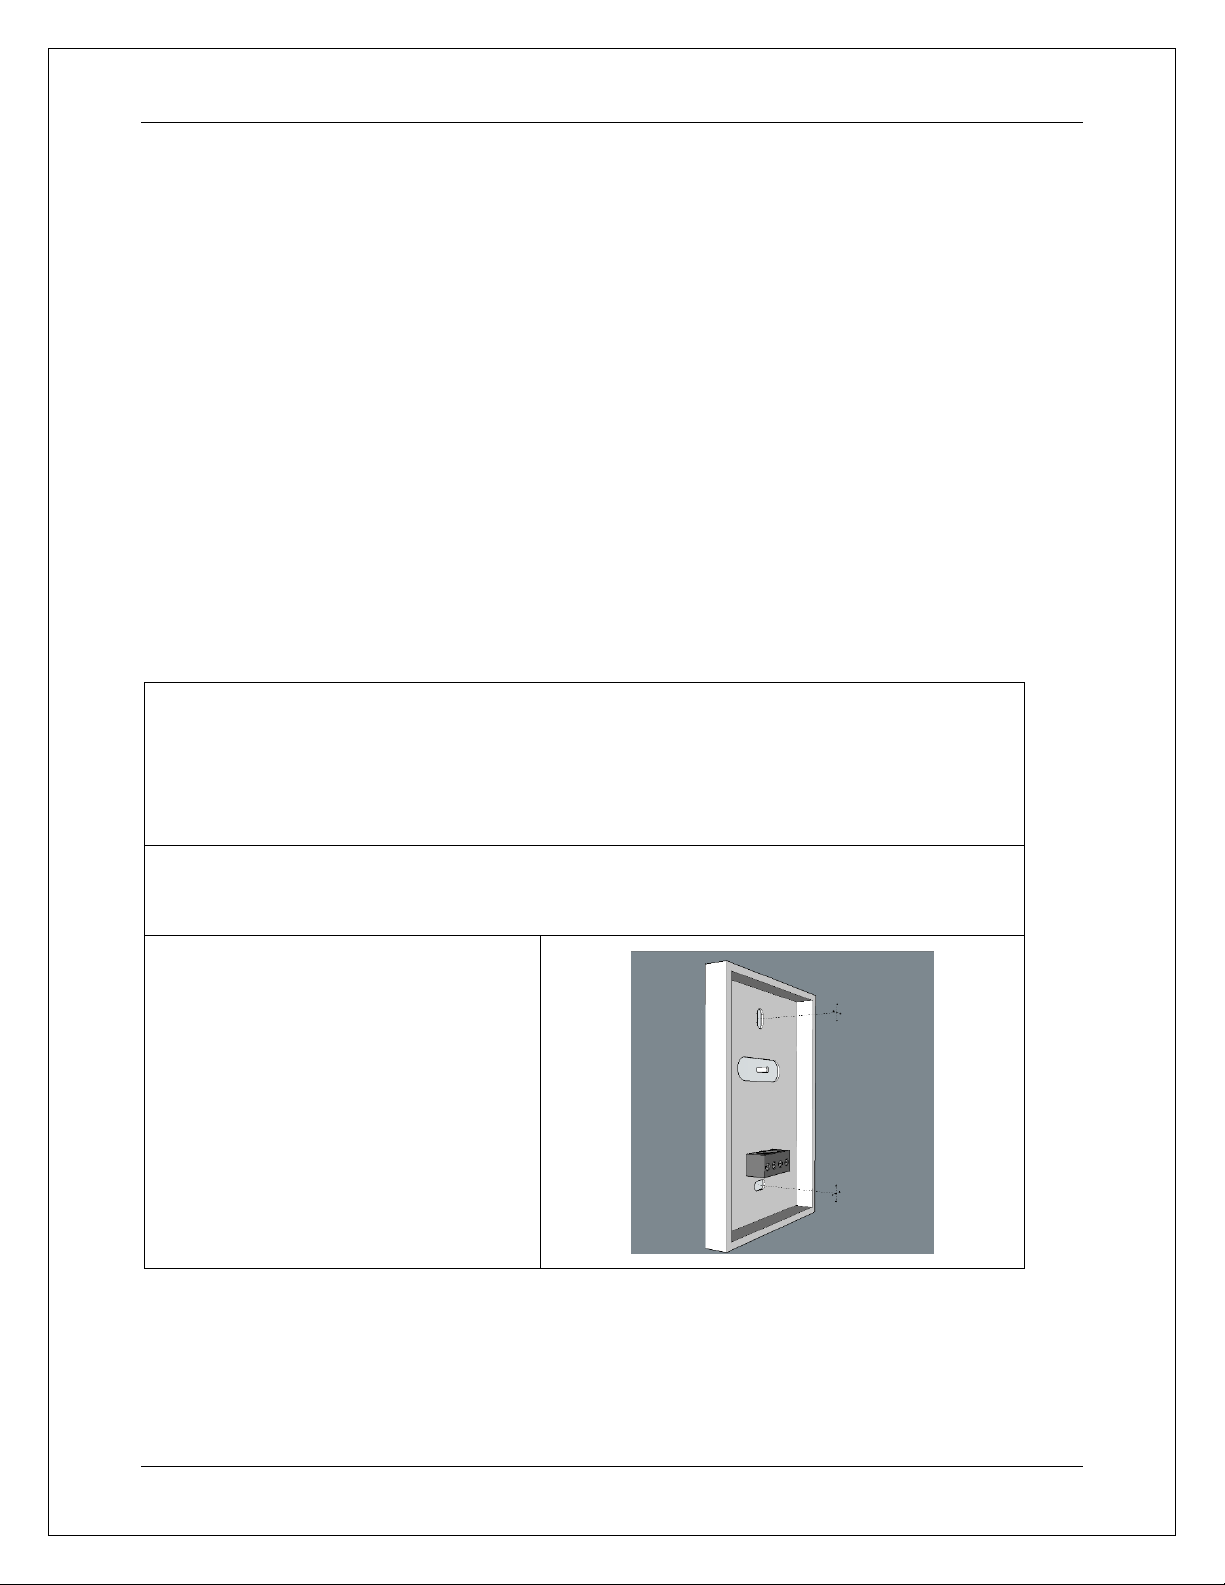
As soon as the wire has been run
through the home, the controller can be
connected. To do so, open the control
by unscrewing the bottom screw, align
the control at the chosen location (with
the wire coming in) and mount it to the
wall with the screws provided

Humidex
5
With the control mounted on the wall,
the wires must then be stripped and
connected following this guide:
Yellow Wire –B
Green Wire –A
Black Wire –GND
Red Wire –VCC
Once the wires have been connected,
the control can be closed and the screw
tightened.
This connection must then be repeated in
order to link the main exhaust unit. Wire
the green connector following the same
wire order as the control unit.
Now that the connecter has been wired,
insert it into the main exhaust unit.
Now that the control has been installed and connected to the main exhaust unit, the HCS can be
plugged into any 115V outlet.
Note: A grounded extension cord with a maximum length of 10 feet may be used if necessary.
Humidex
6
LCD Display and Control Layout
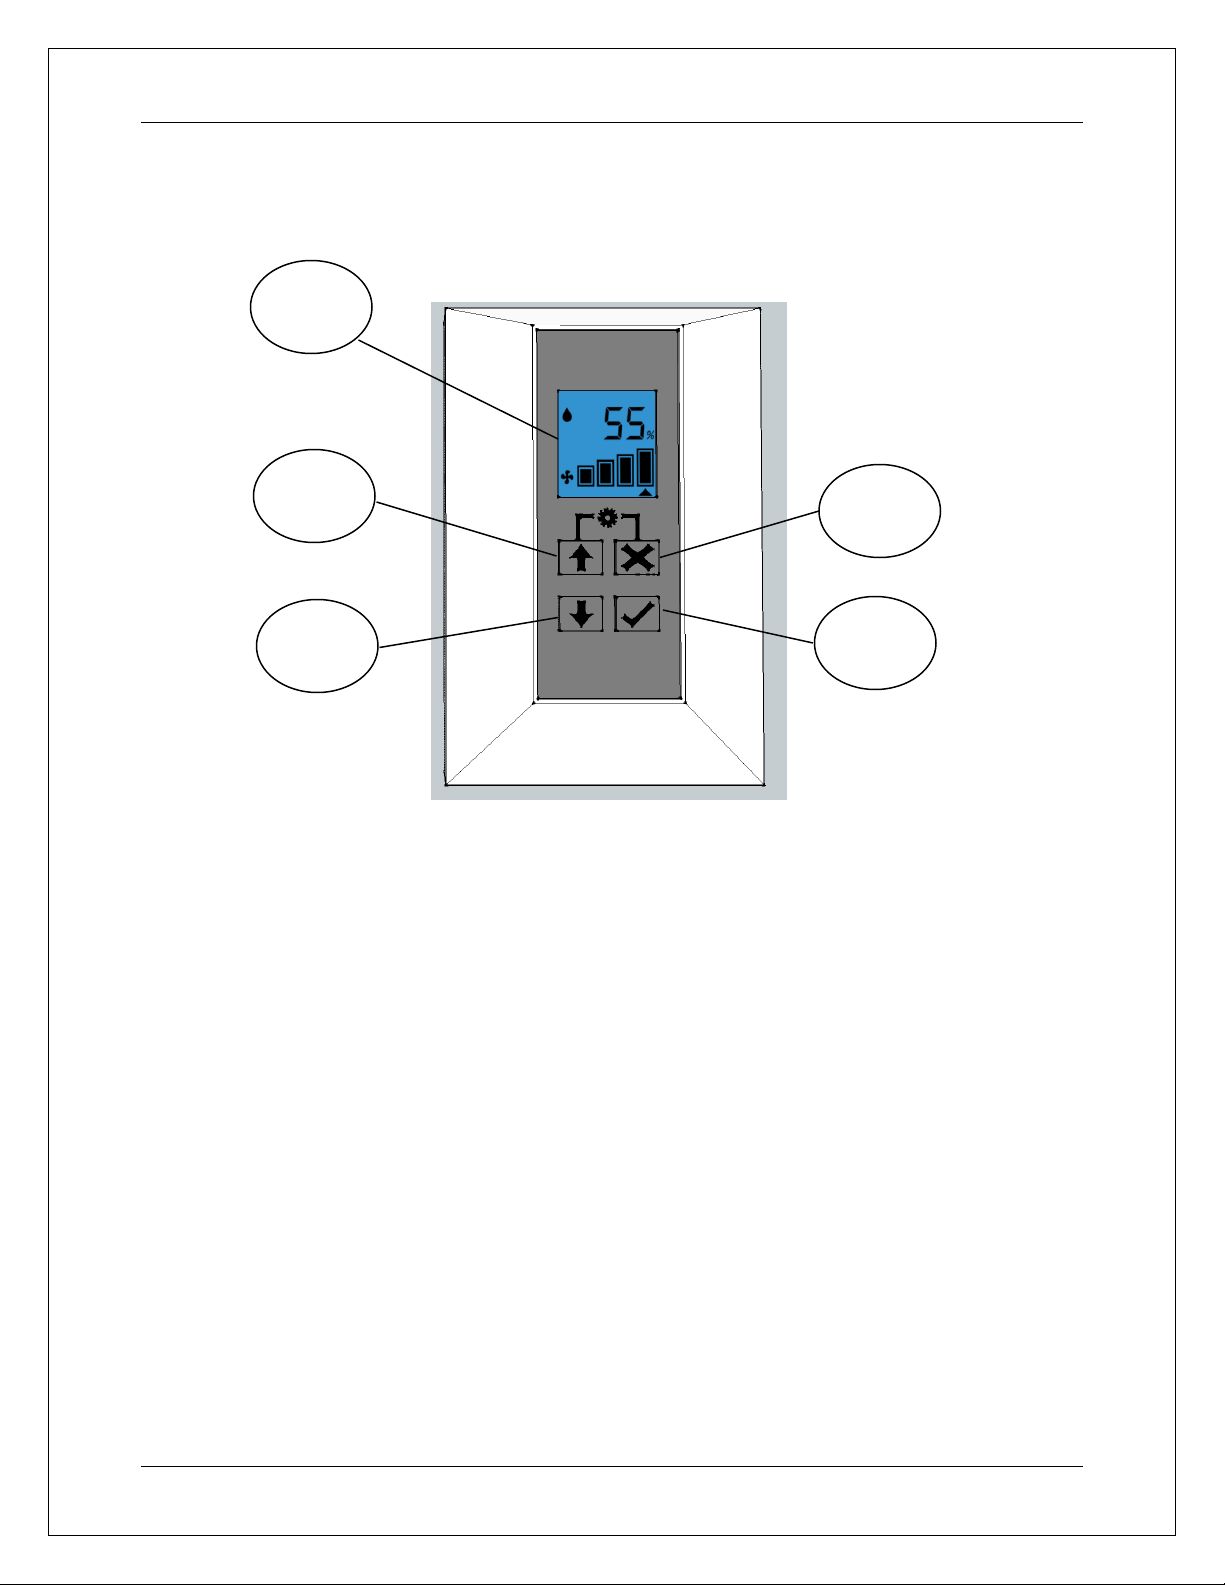
The following sections of this operating manual refer to the user interface presented below:
The user interface consists of:
1- LCD Display
2- Up Arrow Button
3- Down Arrow Button
4- Cancel Button
5- Ok Button
1
2
3
4
5
Humidex
7
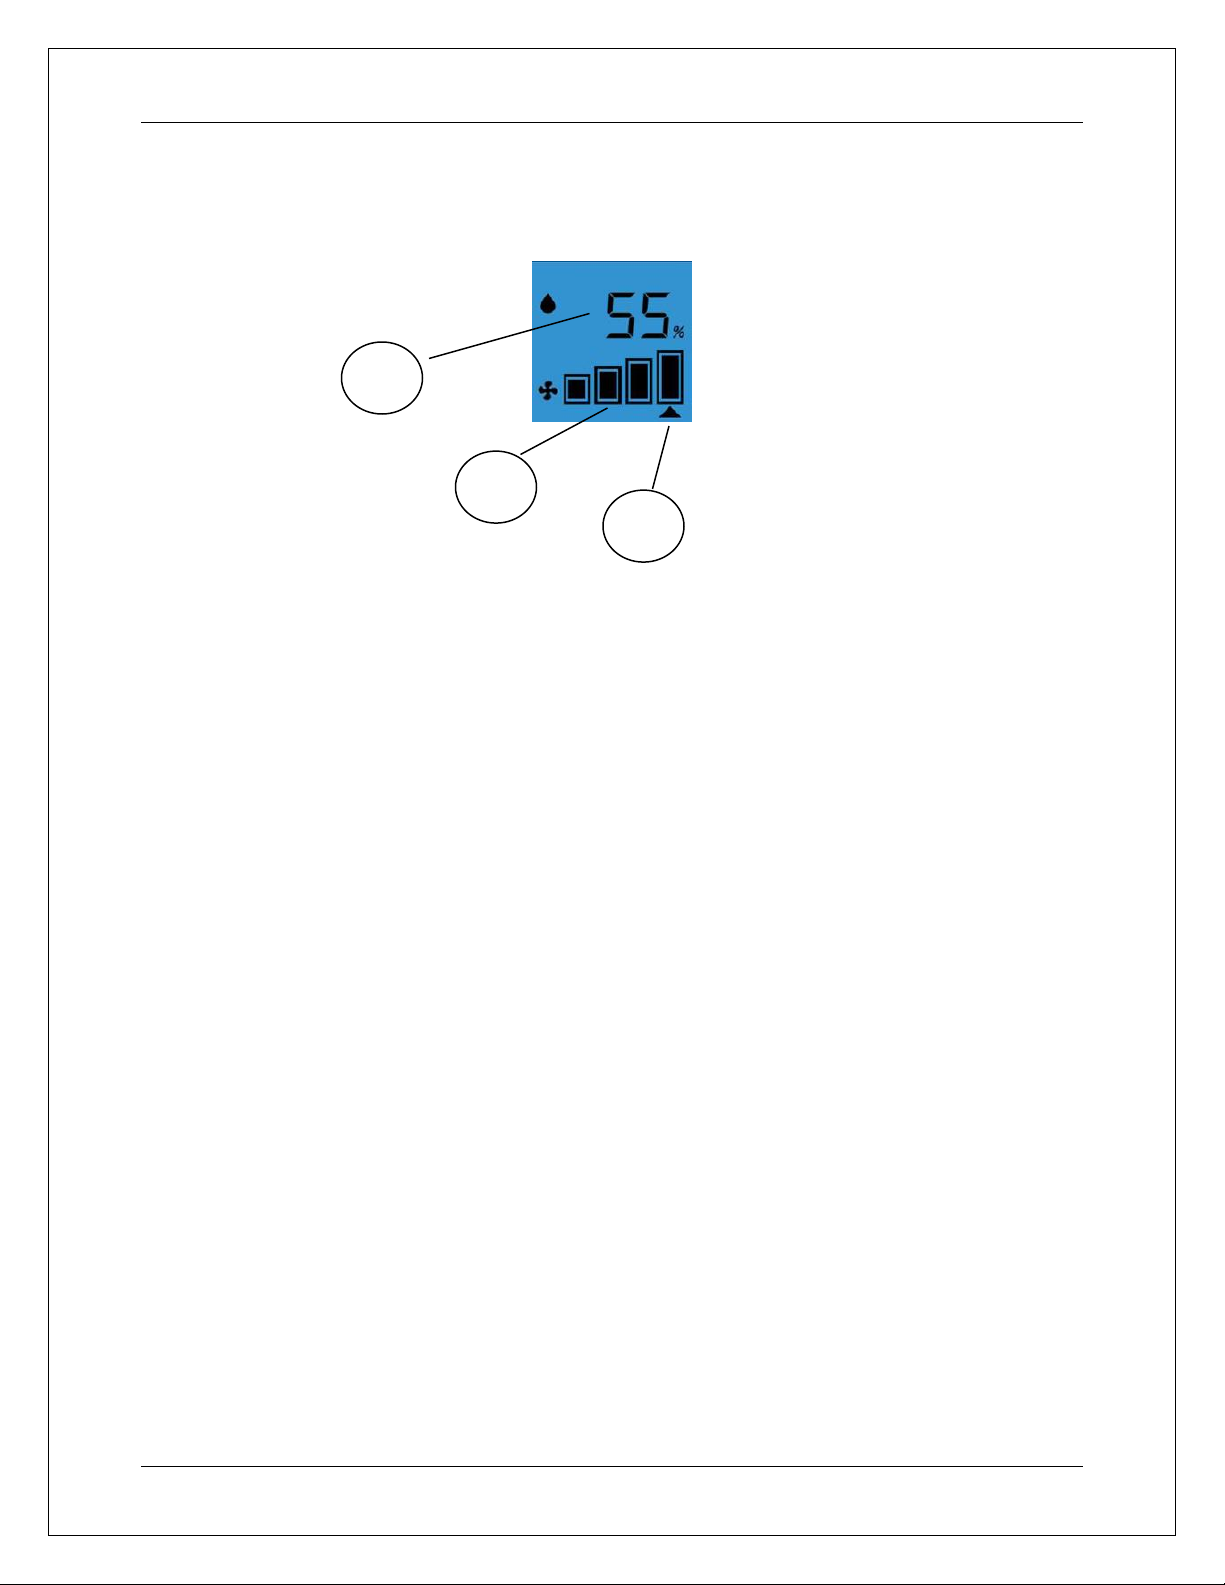
The LCD Display
The LCD Display consists of:
1- User Set Humidity Level
2- Operating Fan Speed
3- Desired Max Fan Speed Indicator
Navigating the LCD Menu
The HCS has an LCD display that allows the unit to display information about its operation. The
LCD display also has a 4 button user interface that allows the user to navigate the LCD menu and
change settings such as the maximum operating speed of the unit, the dehumidistat setting, as well as
access the unit’s built in override mode. The following sections explain how to navigate the LCD
menu and change the settings, as well as how to access the override mode.
1
2
3

Humidex
8
Entering the Main Menu
To change any settings for the HCS, you must first enter the main menu. To do so simply press the
up arrow and cancel button at the same time.
Once inside the main menu, the arrows keys can be used to cycle through the relative humidity menu,
override menu and fan speed menu. The blinking icon will allow you to know which section you’re
looking at (Red icons are blinking icons).
To select one of these menus, press the Ok button. To return to the main screen press the cancel
button.
Relative Humidity Menu
Once the relative humidity menu has been selected, the screen will change in order to allow the user
to change the desired humidity level. Using the arrows keys will allow you to increase or decrease the
desired RH value in increments of 5%. To accept a new value, select OK Button or the Cancel button
to return to the main menu. If the wrong level is entered, repeat this procedure.
** Recommended humidity level for summer season is 55% and 45% for the winter season. Please
note this does not show current humidity level, but rather the desired humidity level.
Relative Humidity Menu
Override Menu
Fan Speed Menu

Humidex
9
Override Timer Menu
The override function allows you to provide maximum ventilation for a predetermined amount of
time, regardless of the fan speed chosen by the computerized/sensor control, to alleviate certain
conditions such as fumes from new paint, flooring, furniture or excess moisture from hot showers,
cooking, etc. To set an override timer, the override menu must be selected. Once this is done the
following screen will be displayed. Use the Up/Down Arrow Buttons to cycle through the different
override timer options and once the desired override time is chosen, press the Ok Button to begin the
override or the Cancel button to return to the main menu. If the wrong time is entered, repeat this
procedure.
Changing Fan Speeds
To change the maximum fan speeds, simply select the fan speed menu from the main menu. Once
the display has changed to the Fan speed menu screen, you can use the Up/Down Arrow Buttons to
cycle through all of the different fan speeds and then you can select the speed by pressing the Ok
Button or the Cancel button to return to the main menu. If the wrong speed is entered, repeat this
procedure.
Maximum Operating Speed
Airflow (CFM)
HCS-BS
HCS-CS
HCS-APT
HCS-APTHC
High
230
130
Intermediate
150
90
Medium
90
65
Low1/Low2
35/65
35
*These speeds may vary depending on installation
The solid bars will denote the actual speed at which the fan is operating, the arrow below denotes the
maximum chosen setting.
** Please note the unit will not exceed the maximum user set fan speed, unless the override mode is
running. The control will choose the proper fan speed depending on humidity, temperature and dew
point conditions.
This manual suits for next models
3
Table of contents


