Clarity BG1000 Reference guide

PROCEDURE MANUAL
____________________________________________________________________________
Product Code: CD-BG1
Rev01.06042018 Page 1of 20
Lab Name: Procedure #:
Procedure: CLIA Complexity: WAIVED
Prepared By Date Adopted Supersedes Procedure #
Review Date Revision Date Signature
Distributed to # of Copies Distributed to # of Copies
This Procedural Bulletin is intended to provide a ready outline reference for performance of the assay. It is
the obligation of every manufacturer of medical devices labeled FOR IN VITRO DIAGNOSTIC USE to
provide a complete package insert in accordance with FDA labeling regulation (21 CFR 809.10). Prepared
in accordance with the guidelines recommended by the Clinical and Laboratory Standards Institute,
Wayne, PA 19087; CLSI Document GP2-A2.
Clarity Diagnostics provides CLSI procedures for your use. The procedures are required to
include the same information as listed in the package insert. Any modifications to this document
are the sole responsibility of the Laboratory.
CLIA Complexity: WAIVED
Intended Use:
Clarity BG1000 Blood Glucose Monitoring System is intended for the quantitative measurement of glucose
in fresh capillary whole blood drawn from fingertip, palm, and forearm of diabetic patients by healthcare
professionals as an aid in the management of diabetes, and may be used for testing multiple patients in
clinical setting.

PROCEDURE MANUAL
____________________________________________________________________________
Product Code: CD-BG1
Rev01.06042018 Page 2of 20
It is intended for use outside the body (in-vitro diagnostic use) and not for the diagnosis of or
screening for diabetes or for neonatal use. The alternative site testing (palm or forearm)
should be done only during steady state times (when glucose is not changing rapidly).
Only auto-disabling, single use lancing devices (safety lancet) should be used with this
system.
Application:
Clarity BG1000 Blood Glucose Test Strips are for in-vitro diagnostic use.
The Clarity BG1000 Blood Glucose Meter is not a substitute for the physician or healthcare
professional. Use the Clarity BG1000 Blood Glucose Meter in conjunction with patients
healthcare program.
Test Principle:
Glucose in the blood sample reacts with glucose oxidase on the test strip and a harmless electrical
current is produced. The strength of these currents change with the amount of glucose in the blood
sample and the Clarity BG1000 Blood Glucose Meter automatically interprets this reaction.
Glucose measurements are reported as plasma equivalents. This system uses a plasma equivalent
method. Results that use a plasma equivalent method are approximately 11% higher than those
obtained with whole-blood equivalent test strips.
Special Features:
Accurate result in 5 seconds using only 0.5µ1 blood sample.
The Clarity BG1000 Blood Glucose Meter identifies the test strip code automatically.
Stores up to 300 test results.
Blood
glucose
measurement
units
are
pre-set
in
mg/dl.
Usage and Storage:
Before using your monitoring system, please place it in the environment of the system's normal
operating temperature range of 50-104°F for about twenty (20) minutes.
Do not allow dirt or dust in the test strip port in order to avoid affecting the monitoring
system's accuracy .
Do not attempt to repair or alter your monitoring system.
Handle your monitoring system with care.
Avoid leaving the meter in extremely hot or cold places, such as near a
heat source or in an extremely hot or cold car.
Do not store or use the meter or test strips at high humidity levels, such as in the bathroom or
kitchen .
Always close the cap of the test strip bottle immediately after removing a test strip. Make
sure the cap is tightly closed.
Do not use a corrosive product (e.g. Benzene, Acetone) to clean your monitoring system)

PROCEDURE MANUAL
____________________________________________________________________________
Product Code: CD-BG1
Rev01.06042018 Page 3of 20
Important Information:
Before using the Clarity BG1000 Blood Glucose Monitoring System, please read this manual
carefully.
The Clarity BG1000 Blood Glucose Monitoring System is for testing outside of the body (in-vitro
diagnostic use).
This product is not for neonatal use or severely dehydrated individuals or patients.
Use this system only for blood glucose test.
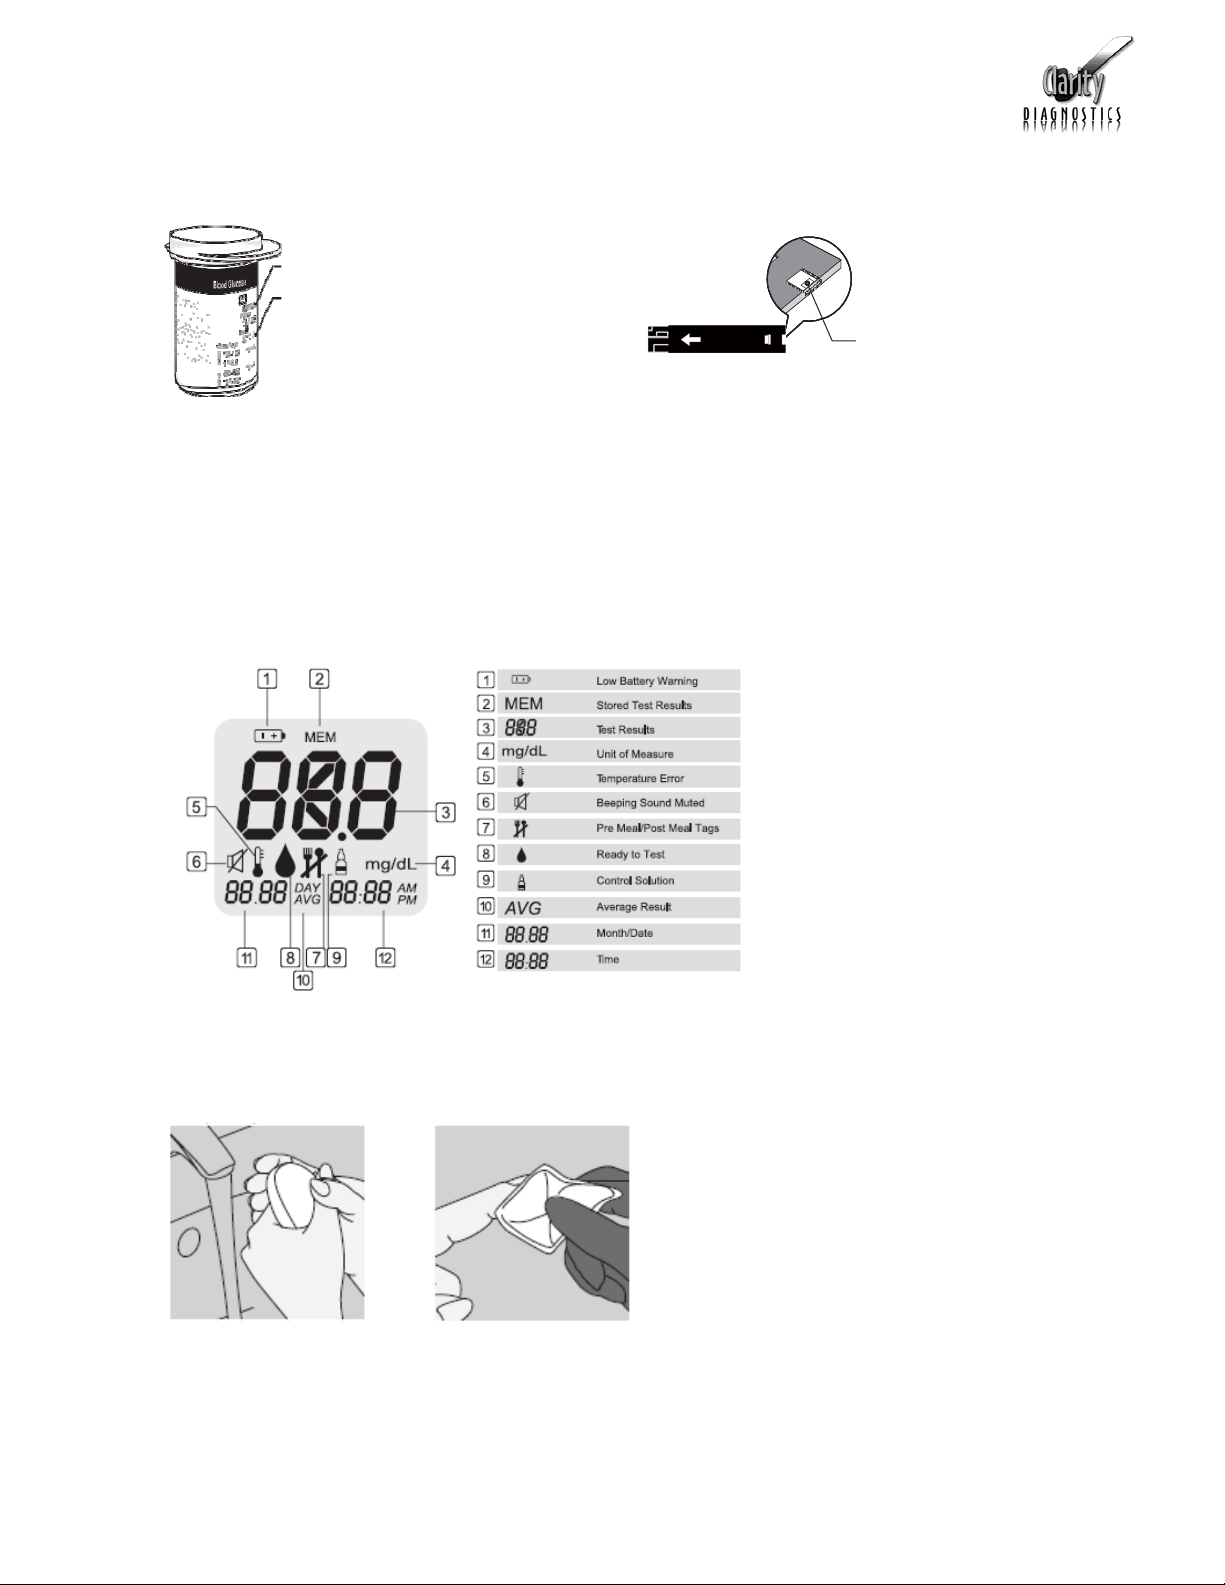
Make sure to use your test strip immediately after retrieving it from the vial,
be sure to keep the test strip vial closed tightly at all times.
For the most accurate results, make sure your hands are clean and dry before removing the
test strips from the vial. Do not touch test strip slit.
Do not use test strips that have expired, using expired test strips may cause inaccurate test
results.
Do not reuse test strips. This test strip is for single use only.
Before the test you must make sure that the code number displayed on the meter matches the code
number on the test strip vial.
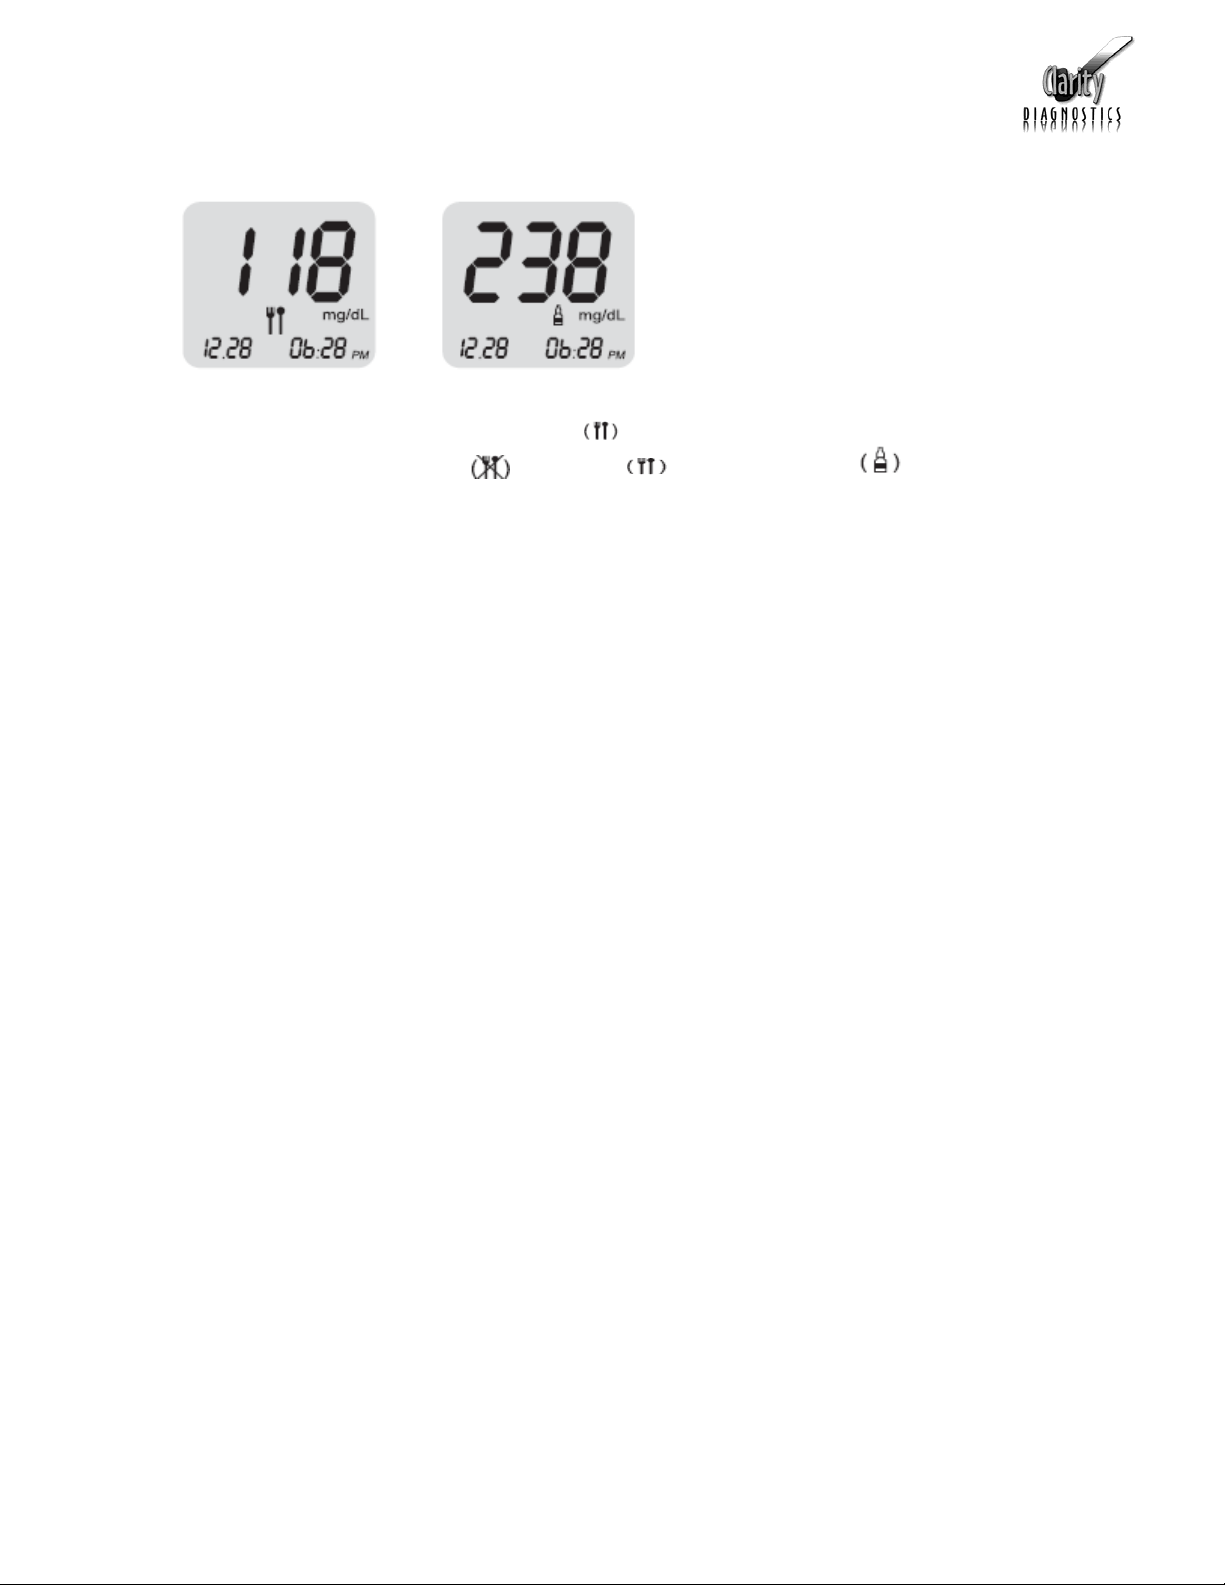
Be sure to check the glucose measurement unit on the meter before the test.
- This meter is preset tomg/dl.
- mg/dl is the unit of measurement used in theUS.
Make sure the test strip vial isclosed tightly and stored at 39.2-86°F. Do not
freeze.
Keep test strips away from direct sunlight and heat.
The meter and test strips should be handled at the same temperature.
For accurate test results, keep the Clarity BG1000 Blood Glucose Monitoring System
operating temperature at a range between 50-104°F for more than twenty (20) minutes
before testing.
You may use this system at altitude up to 10,000 feet.
Keep your Clarity BG1000 Blood Glucose Meter, lancing device, and control solutions out of
reach of children.
Clean and disinfect your Clarity BG1000 Blood Glucose Meter before testing each patient.
Dispose of used test strips and lancing device according to local regulations. Inaccurate results may
occur for individuals or patient in shock.
Inaccurate results may occur for individuals experiencing a hyperglycemic- hypersmolar state with
or without ketosis . Critically ill patients should not be tested with this blood glucose meter.
Interferences: Acetaminophen, salicylates, uric acid, ascorbic acid (vitamin C) and other interferent
substances in normal blood or normal therapeutic concentrations do not significantly affect results,
however abnormally high concentrations in blood may cause inaccurate results.
Patients undergoing oxygen therapy may yield false low results.
Lipemic samples (triglycerides) in excess of 1,500 mg/dl may produce elevated results.
Hematocrit is the percentage of red blood cells in the blood. HGT levels of 30-55% do not affect
glucose measurements with this meter.
This test strip is not for use with arterial, venous, neonatal, serum or plasma samples.
Testing outside of HGT level range of (30-55%) and recommended storage conditions may cause
inaccurate results.
Testing under out of the specification range may cause inaccurate results.

PROCEDURE MANUAL
____________________________________________________________________________
Product Code: CD-BG1
Rev01.06042018 Page 4of 20
CAUTION: Use only Clarity BG1000 Test Strips with your Clarity BG1000 Blood Glucose Meter.
Healthcare Professional Information:
Healthcare professionals performing blood glucose tests with this system on multiple patients must always
wear gloves and should follow the infection control policies and procedures approved by their facility.
When using the Clarity BG1000 Blood Glucose Monitoring System always follow the recognized
procedures for handling objects that are potentially contaminated with human material. Practice the
health and safety policy of your laboratory or institution.
A drop of blood is required to perform a blood glucose test. Only fresh capillary blood can be used.
The Complete Medisign BG1000 Blood Glucose Monitoring System:
The Clarity BG1000 Blood Glucose Monitoring System includes the Clarity BG1000 Meter,
Carrying Bag, User Manual, Warranty Card and (2) 3.0 Volt CR2032 Lithium Batteries.
Clarity BG1000 Test Strips, Clarity BG1000 Glucose Control Solutions are required but not
included and must be purchased separately.
Auto-disabling single-use lancing device, Clarity BG1000 Test Strips and Clarity BG1000
Glucose Control Solutions (Level 2, LeveI3), Clarity BG1000 Diabetes Management Software
and Clarity BG1000 Data Transfer Cable can be purchased by contacting your distributor, or for
additional information you can contact Clarity Diagnostics Customer Service at 1-877-722-6339.
Clarity BG1000 Blood Glucose Meter:
Serial Port Battery Lid
'M"
p
FRONT BACK
D
Test Strip Slot

PROCEDURE MANUAL
____________________________________________________________________________
Product Code: CD-BG1
Rev01.06042018 Page 5of 20
Clarity BG1000 Blood Glucose Test Strip:
Lot number
Expiration Date
Test Strip Slit
Test Strip Vial Clarity BG1000 Blood Glucose Test Strip
- Use Clarity BG1000 Blood Glucose Test Strips with the Clarity BG1000 Blood Glucose Meter.
- Check the expiration date of your test strips before using.
- Write the opening date of the new test strip vial in order to avoid using any expired products.
Explanation of Display:
Testing Your Blood Glucose:
Disinfect Before Testing:
- Before testing, let patients wash hands with soap and water and dry thoroughly.
- Use an alcohol prep pad to wipe the area before testing.

PROCEDURE MANUAL
____________________________________________________________________________
Product Code: CD-BG1
Rev01.06042018 Page 6of 20
- Wait until the alcohol dries completely.
Performing a Blood Glucose Test:
1. Insert a test strip to turn on the meter. Make sure it is inserted completely without bending the test
strip.
2. The meter identifies the code number automatically. Compare the code number displayed on the
LCD with the code number shown on the test strip vial. If they do not match try again with an
another test strip. If the problem persists contact Clarity Diagnostics Customer Support at 1-877-
722-6339.
3.
When the bloodsymbol appears,you can proceed withthetest.
4. Choose a sample site on the outer edge of one finger, but try to avoid the index finger or thumb.
Place the sampling device's platform against the finger and take the sample. Always choose a
different finger each time to avoid soreness.
5. Gently squeeze the patients finger to assist the flow of blood. Do not squeeze excessively on the
puncture site.
6. Hold the tip of the test strip to the drop of blood, the test strip will automatically draw the blood
into the test strip. When the test strip has enough blood the meter will beep.
NOTICE:
When the blood sample is not sufficient, the display screen will show the message of 'Er4'. (Please refer
to error message in this manual.)

PROCEDURE MANUAL
____________________________________________________________________________
Product Code: CD-BG1
Rev01.06042018 Page 7of 20
CAUTION:
Do not drop the blood directly on the end of the test strip.
The sample channel at the end of the test strip should show full. When you hear a beeping sound, you
have enough blood in the test strip.
Inaccurate results may occur for individuals or patient in shock.
Inaccurate results may occur for individuals experiencing a hyperglycemic-hypersmolar state, with
or without ketosis. Critically ill patients should not be tested with a blood glucose meter.
NOTICE:
If the test result is abnormal, please retest with a new test strip. If the test result also has a
problem, please refer to the Troubleshooting section in this manual.
7. The test result will appear after the meter counts down from five (5) seconds.Do not shake
the meter while the meter is counting down.
8. After five seconds you will hear a second beep and the test result will be displayed. You
can remove the test strip by pushing the test strip ejector on the back of the meter. The
meter will automatically power off.
CAUTION:
- Do not leave the auto-disabling, single use lancing devices after use, be sure to dispose of properly.
- Only an auto-disabling, single use lancing devices should be used.
- Always dispose of the used auto-disabling, single use lancing devices in a biohazard container.
- Keep your Glucose Meter, test strips, control solution and auto-disabling, single use lancing devices
out of reach of pet or children at all times.
- Do not reuse auto-disabling, single use lancing devices. Those are for single use only.
- The user needs to adhere to the Standard Precautions when handling or using this device.
- All parts of the glucose monitoring system should be considered potentially infectious and are
capable of transmitting blood-borne pathogens between patients and healthcare professionals.
- For more information, refer to 'Guildline for Isolation Precautions: Preventing Transmission of
Infectious Agents in Healthcare Settings 2007'.
http://www.cdc.gov/hicpac/2007ip/2007isolationprecautions.html
- The meter should be disinfected after use on each patient. This Blood Glucose Monitoring
System may only be used for testing multiple patients when Standard Precautions and the
manufacturer's disinfection procedures are followed.
- A new pair of clean gloves should be worn by the user before testing each patient.
- Refer to the following practice guidelines:
- BiosafetyinMicrobiologicalandBiomedical Laboratories (BMBL}foundat
http
:
//www
.
cdc
.
gov/biosafety/publications/bm
1
5
b
/
- Protection of Laboratory Workers From Occupationally Acquired Infections; Approved
Guideline-Third Edition, Clinical and Laboratory Standards Institute (CLSI} M29-A3.

PROCEDURE MANUAL
____________________________________________________________________________
Product Code: CD-BG1
Rev01.06042018 Page 8of 20
Flagging Test Results:
Ifyou wantto flag pre-meal, post-meal or control solution readings press the'M' Button after your
test result is displayed. The icon for post-meal will be displayed onyour screen.Pressthe'C'
Button totoggle between pre-meal
,
post-meal and control solution . After you have
identified the activity you would like to flag simply remove the test strip.(see explanation of display
on page 13)
Notice:
Control Solution Test results are not included in the 14-day average.
Alternate Site Testing:
Contact a healthcare professional before using any alternative sites to test patients blood glucose.
- Alternative site results may be different from fingertip results when glucose levels are changing
rapidly (e.g., after a meal, after taking insulin, or during or after exercise).
- Use alternative site testing only two hours or more after taking insulin, two hours or more after a
meal, two hours or more after exercise.
- Do not use alternative site testing if patient glucose level is not as stable as usual, or if you think the
patient may have hypoglycemia (low blood glucose) hyperglycemia (high blood glucose), or you think
the patients blood glucose may be rising or falling rapidly.
- Do not use alternative site testing if the patients alternative site testing results do not match the way
they feel.
- AST measurements should never be used to calibrate continuous glucose monitors (CGM).
- AST measurements should never be used in insulin dosing calculations.
Do not rely on test results at an alternative sampling site, but use samples taken from the fingertip, if any
of the following applies:
- You think the patients blood sugar is low.
- You are not aware of symptoms when the patient became hypoglycemic.
- The test results do not agree with the way they feel.
- After a meal.
- After exercise.
- During illness.
- During times of stress.
CAUTION:
Never change any treatment without first consulting the physician or a healthcare professional.
Never ignore symptoms of high or low blood glucose.
If the patients blood glucose does not match how they feel, perform a fingertip test to confirm the result.
If the fingertip test result still does not match how they feel, call their healthcare professional.

PROCEDURE MANUAL
____________________________________________________________________________
Product Code: CD-BG1
Rev01.06042018 Page 9of 20
Lancing and Sampling from an Alternate Site:
Sampling from the palm or forearm allows you to use their fingertips less often. You may find
that obtaining a blood sample from an alternative site is less painful than using a fingertip.
Getting a blood sample from the forearm or palm is different than getting a sample from their
fingertips.
Forearm sampling: Choose a fleshy area of the forearm away from the
bone, visible veins and hair. Sometimes there is less blood flow to the
forearm than to the fingertips. To help patients get a large enough
drop of blood, you may gently massage or apply warmth to their site to
increase blood flow.
Palm sampling: Choose a fleshy area on the palm below the thumb
or little finger. Select an area away from veins or deep creases which may
cause the blood sample to smear.
NOTICE:
- You may need to wait a little longer to get a large enough drop of blood from the forearm or
palm. Do not squeeze the siteexcessively.
- If the sample drop of blood runs or spreads due to contact with hair or a
crease in the palm, do notuse that sample. Try puncturing again ina smoother area.
Setting Up Your Meter:
1. Press and hold the 'M' button for roughly three seconds, you will hear a beep
sound and the LCD Screen will display the screen icons of the meter.

PROCEDURE MANUAL
____________________________________________________________________________
Product Code: CD-BG1
Rev01.06042018 Page 10 of 20
2. Continue to hold the 'M' button and "SET" will appear on the screen.
3. Setting the Month: When the month blinks, press and release the 'C' Button until the correct month
appears, then press the 'M' Button to set the correct month and move to the date setting.
4. Setting the Date: When the date blinks, press and release the 'C' Button until the correct date
appears, then press the 'M' Button to set the correct date and move to the time setting.
5. Setting the Time Format: The meter can be set to show the time in AM/PM 12 hour format or 24
hour "Military Time". With the "12h" blinking press the 'C' Button to move between 12h and 24h, then
press the 'M' Button to set and move to the hour setting.
6. Setting the Hour: When the hour blinks, press and release the 'C' Button until the correct
hour appears, then press the 'M' Button to set the correct hour
and move to the minute setting.
7. Setting the Minute: When the minute blinks, press and release the 'C' Button until the
correct minute appears, then press the 'M' Button to set the correct minute and move to the
year setting.
8. Setting the Year: The year will appear on the screen, press and release the 'C' Button until
the correct year appears, then press the 'M' Button to set the correct year and move to
confirming the Measurement Unit Type mode.

PROCEDURE MANUAL
____________________________________________________________________________
Product Code: CD-BG1
Rev01.06042018 Page 11 of 20
9. Measurement Unit: The glucose measurement unit is defaulted to "mg/dl ".Press the 'M'
Button to move on to turning the "Beeping" sound on or off.
NOTICE: This cannot be changed, if you have any questions concerning the Measurement Unit Type
contact Clarity Diagnostics Customer Service at 1-877-722-6339.
CAUTION:
- Use of the wrong unit of measure may cause you to misinterpret the blood glucose level, and
incorrect treatment.
- Contact a healthcare professional if you have any questions about measuring units.
10. Turning the Beep Sound On or Off: The meter has the Beep sound defaulted to "On". To
turn the Beep sound off on the meter press the 'C' Button until "OFF" is displayed on the
screen, then press the 'M' Button to confirm and move to Deleting Your Test Results.
NOTICE: Turning the Beep sound On or Off does not affect your glucose measurement.
11. Deleting Your Test Result: Select the 'C' Button to toggle between "YES" and "NO". If you
want to keep your readings in the memory toggle to "NO" then select the 'M' Button to
confirm.
12.
Ifyou want to delete all ofthe readings in the memory toggle to "YES" then select the 'M' Button to
confirm.
13. After deleting, the screen will show as pictured above. Press the 'M' Button again and the meter will
turn off.
Reviewing Test Results:

PROCEDURE MANUAL
____________________________________________________________________________
Product Code: CD-BG1
Rev01.06042018 Page 12 of 20
1. Begin with the meter off. Press the 'M' Button, you will hear a beeping sound and the
meter will turn on.
2. The screen will display the date and time. After 2 seconds, the last 14 days
average
result
will
be
displayed
with
a
sign
and
the
number
of
test
results for 14 days on the
display. For example, "8n" above the picture means that there are eight (8) test results
saved on the memory during the last 14 days.
3. Press the 'C' Button once and the screen will show the most recent test result.
4. Each time you continue to press the 'C' Button the screen will show the previous test result.
5. After you are done reviewing your test results, press the 'M' Button to turn off the meter.
NOTICE: The meter has an automatic shut off and will turn off in roughly two (2) minutes if no changes
are detected.
Downloading Test Results to PC:
You can transfer test results from the Clarity BG1000 Blood Glucose Meter to a computer where they
can be summarized in a report with graphs and tables. To use this feature you will need to download
the Clarity BG1000 Diabetes Management Software and use the Clarity BG1000 USB Cable.
For more information , please contact Clarity Customer Service at 1-877-722-6339 or visit our
website at www.claritydiagnostics.com.
Control Solution Test
Performing a Control Test:
- You open a new box of test strips.
- You left the test strip container open.
- You want to check whether the meter and test strips are working correctly or not.
- Test strips were stored in extreme temperature or humidity.
- You dropped the meter.
- Test result does not agree with how patients feel.
- You want to check if you are testing correctly.

PROCEDURE MANUAL
____________________________________________________________________________
Product Code: CD-BG1
Rev01.06042018 Page 13 of 20
Performing a Control Solution Test:
1. Insert the test strip with the black side and three(3) black line facing up and pointing
towards the test strip port. The code number will appear on the screen, verify that the
code number displayed matches with the code number on the vial of test strips. If the
two code numbers do not match, call Clarity Diagnostics Customer Service at 1-877-
722-6339.
2. Shake the control vials well before using. Discard the first drop and wipe the
dispenser tip. Squeeze a drop of control solution onto a clean, dry, non-absorbent
surface. Do not apply control solution to the test strip directly from the vial. Replace the
lid on the control solution vial immediately after use.
3. Gently touch the drop of the control solution to the tip of the test strip.
4. When the test strip confirmation window is full, the meter will beep. The meter will
count down from five seconds and then show the reading. Make sure the reading on
the screen is between the ranges displayed on your test strip vial (refer to page 39 for
the control solution ranges.)
5. Mark all control solution test with 'Control Solution Mark' to distinguish them from
blood glucose test results in the meter memory. Marked control solution result will not
be included in 14 day average. For more detailed information of Flagging Your Test
Results refer to page 21 for help.
CAUTION:
- If you continue to get control solution results that fall outside of the range printed on the
vial, the system may not be working properly. Do not use the meter. Please contact Clarity
Diagnostics Customer Service at 1-877-722-6339.
- User should periodically compare the test system to another test system known to be
well maintained and monitored by a healthcare provider.
- Use Clarity BG1000 Glucose Control Solution with the Clarity BG1000 Glucose Meter.

PROCEDURE MANUAL
____________________________________________________________________________
Product Code: CD-BG1
Rev01.06042018 Page 14 of 20
Understanding Control Solution Test Results:
- The example label shown above on the test strip vial shows the acceptable ranges for Level 2 and
Level 3 Control Solution for the Clarity BG1000 Glucose Meter.
- The result you get should be within this range. Make sure you compare the result to the correct level
of control.
- Each batch of test strips has different acceptable ranges.
Cleaning and Disinfecting:
The meter should be cleaned and disinfected to prevent the transmission of blood borne
pathogens as follows. Cleaning is to remove germs, dirt, and impurities from surfaces or
objects. Disinfection is to kill germs on surfaces or objects;
- User should wear disposable gloves when cleaning and disinfecting the meter.
- CaviWipes® has been validated for use with this meter to clean and disinfect the outside
of the meter. The towelette is available for purchase through your distributor. Also you can
get this product from large online retail distribution sites such as www.amazon.com ,
www.officedepot.com , etc.
- CaviWipes® disinfectant products have been shown to be safe for use with the Clarity
BG1000 Blood Glucose Monitoring System. Please note, any disinfectant product with the
EPA registration number of 46781-8 may be used on the Clarity BG1000 Blood Glucose
Meter.
- The Clarity BG1000 Blood Glucose Monitoring System has demonstrated that there was no change
in performance or in the external materials of the meter after 11,000 cleanings with disinfection cycles
designed to simulate three years of device use.
CAUTION:
Do not use other cleaners or disinfectants because they may damage the meter.
Cleaning Instructions:
Use CaviWipes® towelette to wipe the meter exterior of the front, the back and the sides
thoroughly.
Disinfection Instructions:
The meter must be cleaned and disinfected between patient uses by wiping it with a CaviWipes®
Towelette in between tests. After cleaning the meter with a CaviWipes ® Towelette use a second
Caviwipes® Towelette to thoroughly wet the pre-cleaned meter surface. Allow it to remain wet for two
minutes at 68°F as specified by the manufacturer of the disinfectant wipes and allow to air dry.

PROCEDURE MANUAL
____________________________________________________________________________
Product Code: CD-BG1
Rev01.06042018 Page 15 of 20
STEP1: Dispose of the used test strip.
STEP2: Remove a new, fresh wipe from the container (please refer to the CaviWipes ®
labeling for safety instructions). You may need to wring wipe slightly to remove excess liquid.
STEP3: Completely wipe the Glucose Meter including the front, back and sides, and take
care not to get any liquid in the test strip, test strip port and serial port. Do not wrap the
meter in a wipe. Take extreme care not to get liquid in the test strip, test strip port and serial
port of the meter. Allow to remain wet for two (2) minutes. Allow to air dry.
STEP4: Dispose of the wipe when finished. After disinfection, user's gloves should be
removed and hands washed thoroughly with soap and water before proceeding to the next
patient.
References:
1.
"FDAPublic HealthNotification: Use ofFingerstick Devices on Morethan One Person Poses
Risk for Transmitting Bloodborne Pathogens: Initial Communication" (2010)
http
:/
/www
.
fda
.
gov/MedicalDevices/Safety/
1
A
e
rtsandNo
tices/ucm224025
.
htm
2.
"CDC Clinical Reminder: Use of Fingerstick Devices on More than One Person Poses Risk for
Transmitting Bloodborne Pathogens" (2010) http://www.cdc.gov/injectionsafety/Fingerstick-
DevicesBGM.html
For more information on cleaning and disinfecting, contact Clarity Diagnostics Customer Service at 1-
877-722-6339.
CAUTION:
- Squeeze the excess liquid from the cloth before you wipe the meter's surface.
- The meter must be off when you clean or disinfect the meter.
- Do not get moisture on the test strip or in the test strip port or serial port.
- Do not spray any cleaning solution directly onto the meter.
- Do not put the meter under water or liquid.
- Immersing the meter in water will cause damage.
- Please dispose of wipes and gloves after cleaning/disinfecting.
The life of the device is three (3) years. The Clarity BG1000 meter has demonstrated that
there was no change in performance or in the external materials of the meter after 11,000
cleanings with disinfection cycles designed to simulate three (3) years for ten (10) times per
day. However, if any of the following physical and functional signs of deterioration appear after
cleaning and disinfection of the devices, stop using the device and contact Clarity Diagnostics
Customer Service at 1-877-722-6339 immediately.
- Clouding display window of meter.
- Corrosion or erosion of the plastic housing and rubber button.
- Any damage including corrosion or erosion of the test strip port and data transport port.
- Meter buttons do not function.
- Data transfer function from meters to PC does not work.

PROCEDURE MANUAL
____________________________________________________________________________
Product Code: CD-BG1
Rev01.06042018 Page 16 of 20
For more information on cleaning and disinfecting, contact Clarity Diagnostics Customer
Service at 1-877-722-6339.
Replacing the Batteries:
1. When the batteries are low the screen will display and blink the low battery icon in the top left hand
corner. This indicates that there is only enough power left in the meter for about fifty more tests and
the batteries should be replaced. When replacing the batteries your test results will be stored in the
meter, however you may need to reset the date and time. Refer to pages "Setting up Your Meter" for
more information.
2. Open the battery compartment lid on the back of the meter and remove the batteries and replace
them with two new CR2032 batteries. Make sure to align the + side facing up towards you. Once the
new batteries are in place, snap the battery lid back onto the meter.
Screen Messages:

PROCEDURE MANUAL
____________________________________________________________________________
Product Code: CD-BG1
Rev01.06042018 Page 17 of 20
Troubleshooting:

PROCEDURE MANUAL
____________________________________________________________________________
Product Code: CD-BG1
Rev01.06042018 Page 18 of 20
Technical Information and Warranty
Specifications:

PROCEDURE MANUAL
____________________________________________________________________________
Product Code: CD-BG1
Rev01.06042018 Page 19 of 20
Warranty:
Clarity Diagnostics guarantees that the Clarity BG1000 Blood Glucose Meter shall be free of defects in
material and workmanship for a period of three years. This guarantee is valid from the date of purchase.
This guarantee extends only to the original purchaser and is not transferable.
The warranty ceases to apply under the following conditions:
- The meter is damaged as a result of incorrect use.
- The meter is damaged as a result of natural disasters (e.g. hurricane, earthquake, etc.)
- The meter is damaged due to using incompatible products.
- The meter is damaged as a result of attempting to repair the meter.
Disposing of your Meter:
During blood glucose measurement the meter itself may come into contact with blood. Used meters
therefore carry a risk of infection. Please dispose of your used meter - after removing the batteries -
according to the regulations applicable in your area. For information about correct disposal, please
contact your local council and authority.
Blood Glucose Target Range:
Normal blood glucose reference value for non-diabetics is as follows:
- Before eating : < 100 mg/dl
- 2 hours after meals : <140 mg/dl
In case results are out of reference range, please contact a healthcare professional and
follow their advice.
Reference: American Diabetes Association, Clinical Practice Recommendations (2015)
Diabetes Care, Vol.38, Supplement 1, p S1 -S93
EMC Test Results:
- It is the manufacturer's responsibility to provide equipment electromagnetic compatibility information to
the customer or user.
- It is the user's responsibility to ensure that a compatible electromagnetic environment for the
equipment can be maintained in order that the device will perform as intended.
- The equipment complies with the emission and immunity requirements described in EN 61326-2-6.
- The electromagnetic environment should be evaluated prior to operation of the device.
- Do not use this meter near cellular or cordless telephones, walkie talkies, garage door openers, radio
transmitters, or other electrical or electronical equipement that are sources of electromagnetic radiation,
as these may interfere with proper operation of the meter.
Additional Supplies Available:
The following supplies and accessories are available from your distributor, for more information
contact Clarity Diagnostics Customer Service at 1-877-722-6339.
Clarity Data Transfer/USS Cable
Clarity BG1000 Diabetes Management Software Clarity
BG1000 Blood Glucose Test Strips
Clarity BG1000 Glucose Control Solution

PROCEDURE MANUAL
____________________________________________________________________________
Product Code: CD-BG1
Rev01.06042018 Page 20 of 20
Manufactured for:
Clarity Diagnostics, LLC.
1060 Holland Drive, Suite A&D
Boca Raton, FL 33487 USA
Call Customer Service Toll Free
Mon-Fri 8:30AM-5:30PM EST
1-877-722-6339
or visit our website www.claritydiagnostics.com
If you have questions or need assistance outside the operational days and times, please
contact your healthcare provider.
This manual suits for next models
1