Clarke CGG1C User manual

INSTRUCTIONS FOR USE
GC11/13
GLUE GUN KIT
MODEL NO: CGG1C
PART NO: 6463060

2
Parts & Service: 020 8988 7400 / E-mail: Parts@clarkeinternational.com or Service@clarkeinternational.com
INTRODUCTION
Thank you for purchasing this CLARKE Glue Gun Kit.
Before attempting to use this product, please read this manual thoroughly and
follow the instructions carefully. In doing so you will ensure the safety of yourself
and that of others around you, and you can look forward to your purchase
giving you long and satisfactory service.
GUARANTEE
This product is guaranteed against faulty manufacture for a period of 12
months from the date of purchase. Please keep your receipt which will be
required as proof of purchase.
This guarantee is invalid if the product is found to have been abused or
tampered with in any way, or not used for the purpose for which it was
intended.
Faulty goods should be returned to their place of purchase, no product can
be returned to us without prior permission. This guarantee does not effect your
statutory rights.
SPECIFICATION
Heating Time 5-10 mins
Operating Temperature 165OC
Electrical Insulation Class II
Operating Voltage/Frequency 240V-50Hz
IP Rating IPX0
Operating Environment Temp Min 0OC / Max 40OC
Max Glue Stick Length/Dia 150mm/11mm dia
Max Feed Speed 10g/min
Weight 0.46 kg
Dimensions (L x H x W) 197 x 54 x 143mm
Duty Cycle Classification Continuous
Other product features Anti-drip nozzle valves, trigger feed
control, two nozzle sizes, target LED.

3
Parts & Service: 020 8988 7400 / E-mail: Parts@clarkeinternational.com or Service@clarkeinternational.com
GENERAL SAFETY PRECAUTIONS
ELECTRICAL SAFETY
1. Do not expose power tools to rain or wet conditions. Water entering a
power tool will increase the risk of electric shock.
2. When operating a power tool outdoors, use an extension cable suitable for
outdoor use. Use of a cable suitable for outdoor use reduces the risk of
electric shock.
PERSONAL SAFETY
1. Stay alert, watch what you are doing and use common sense when
operating a power tool. Do not use a power tool while you are tired or
under the influence of drugs, alcohol or medication. A moment of
inattention while operating power tools may result in personal injury.
2. Always ensure that adequate lighting is available. A minimum intensity of
300 lux should be provided. Ensure that lighting is placed so that you will
not be working in your own shadow.
POWER TOOL USE AND CARE
1. Do not force a power tool. Use the correct power tool for your application.
The correct power tool will do the job better and safer at the rate which it
was designed.
2. Always handle with care and do not carry the tool by its electric cable, or
yank the cable to disconnect it from the power supply.
CARE WHEN USING A HOT GLUE GUN
1. Be aware that the nozzle of the gun gets hot and remains hot for a period
of time after the power has been switched off.
2. When the gun is not in use or is cooling down, it should be rested on the
stand provided on a stable surface.
3. Before applying heat to any surface, ensure that there are no flammable
materials, or any materials that can be damaged by heat in the vicinity.
4. When gluing always ensure that there is adequate ventilation, as glues
may give off toxic fumes which could be dangerous.
5. Keep children away when using hot appliances.
6. Do not leave the glue gun unattended when connected to the power
supply.

4
Parts & Service: 020 8988 7400 / E-mail: Parts@clarkeinternational.com or Service@clarkeinternational.com
7. Do not cover the glue gun when connected to the power supply. The gun
could overheat causing a fire.
ENVIRONMENTAL PROTECTION
Recycle unwanted materials instead of disposing of them as waste.
All tools, accessories and packaging should be sorted, taken to a
recycling centre and disposed of in a manner which is compatible
with the environment.
SAFETY SYMBOLS
The following symbols are shown on the product or it’s packaging.
Warning: TAKE CARE NOT TO ALLOW THE MELTED GLUE TO COME INTO
CONTACT WITH ANY PART OF THE BODY, HOT MELTED GLUE IS VERY HOT.
IF GLUE SHOULD GET ON THE SKIN ETC, DO NOT TRY TO REMOVE IT.
IMMERSE IN COLD WATER IMMEDIATELY AND IF NECESSARY, SEEK
MEDICAL ASSISTANCE AS SOON AS POSSIBLE.
Read instruction
manual before use
CE Mark
Class 2 Double
Insulated
Falls within Waste
Electrical Equipment
(WEE) Directive
Heat Hazard Wear eye protection

5
Parts & Service: 020 8988 7400 / E-mail: Parts@clarkeinternational.com or Service@clarkeinternational.com
ELECTRICAL CONNECTIONS
Before switching the product on, make sure that the voltage of your electricity supply is
the same as that indicated on the rating plate. This product is designed to operate on
230VAC 50Hz. Connecting it to any other power source may cause damage.
This product may be fitted with a non-rewireable plug. If it is necessary to change the
fuse in the plug, the fuse cover must be refitted. If the fuse cover becomes lost or
damaged, the plug must not be used until a suitable replacement is obtained.
If the plug has to be changed because it is not suitable for your socket, or due to
damage, it should be cut off and a replacement fitted, following the wiring instructions
shown below. The old plug must be disposed of safely, as insertion into a mains socket
could cause an electrical hazard.
If the colours of the wires in the power cable of this product do not correspond
with the markings on the terminals of your plug, proceed as follows.
• The wire which is coloured Blue must be connected to the terminal
which is marked Nor coloured Black.
• The wire which is coloured Brown must be connected to the terminal
which is marked Lor coloured Red.
We strongly recommend that this machine is connected to the mains supply
via a Residual Current Device (RCD).
If in any doubt, consult a qualified electrician. DO NOT attempt any repairs
yourself.
This symbol indicates that this is a Class II product, and does not require
an earth connection.
WARNING! READ THESE ELECTRICAL SAFETY INSTRUCTIONS
THOROUGHLY BEFORE CONNECTING THE PRODUCT TO THE
MAINS POWER SUPPLY.
WARNING! THE WIRES IN THE POWER CABLE OF THIS PRODUCT
ARE COLOURED IN ACCORDANCE WITH THE FOLLOWING CODE:
BLUE = NEUTRAL / BROWN = LIVE
Plug must be BS1363/A approved.
Always fit a 3 Amp fuse.
Ensure that the outer sheath of the cable is firmly held by the clamp
Neutral
(Blue)
Live
(Brown)

6
Parts & Service: 020 8988 7400 / E-mail: Parts@clarkeinternational.com or Service@clarkeinternational.com
OVERVIEW OF THE GLUE GUN KIT
The features of the glue gun kit include:
1Nozzle 7LED Indicator lamp
2Heating Duct 8Flat Nozzle
3Feed Opening for Glue Stick 92 x Round Nozzles
4Handle 10 6 x Glue Sticks
5Feed Trigger 11 Plastic Storage Case (not shown)
6Support

7
Parts & Service: 020 8988 7400 / E-mail: Parts@clarkeinternational.com or Service@clarkeinternational.com
USING THE GLUE GUN
Before starting work, ensure all parts to be glued are clean and free from oil
and grease etc. Test that parts fit together before applying glue. The glue gun
is suitable for gluing wood, plastic, textiles, cardboard, tiles & ceramics etc.
The glue can also be used as a paste for filling holes or sealing of joints.
1. Lightly sand any smooth, glossy surfaces before gluing.
2. Stand the glue gun in a safe position before plugging in.
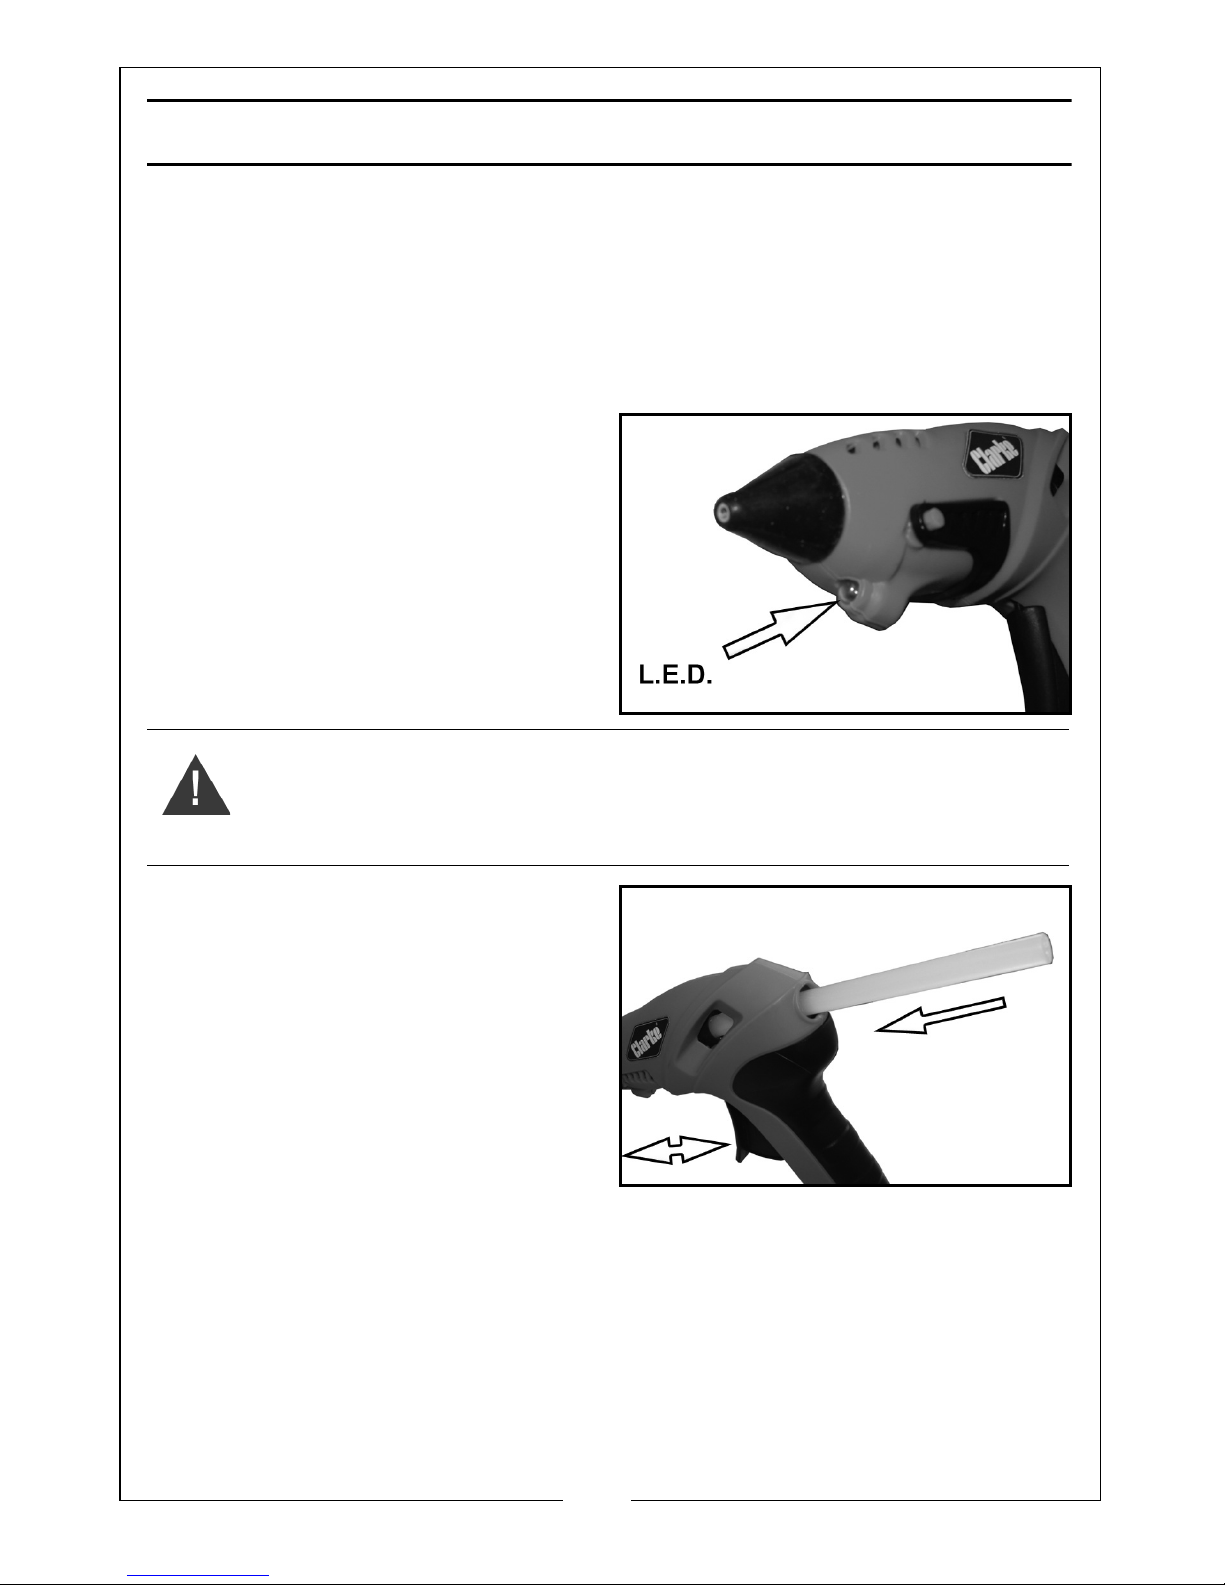
3. Plug the glue gun into a suitable
power socket, and allow to heat
up, before attempting to use,
approx 5-10 mins.
• When plugged in, the gun will
be ON and the LED on the front
of the gun will illuminate.
.
4. Insert a glue stick into the rear of
the glue gun as shown. Push the
glue stick in as far as possible and
gently operate the trigger several
times until resistance is felt. DO
NOT apply excessive force.
5. When ready to start gluing items
together, position the nozzle on
one of the parts and gently
squeeze the trigger. Glue will start
to run from the nozzle.
• Apply the glue to one part to be glued only and apply the glue as
quickly as possible.
6. When glue is applied, press both work pieces firmly together making sure
they are correctly aligned andclamp as necessary for about 5 minutes and
leave to set.
WARNING: TAKE CARE THAT WHEN THE GLUE GUN IS IN OPERATION THE
CASING IMMEDIATELY AROUND THE HEATING TUBE AND ELEMENT
ASSEMBLY BECOMES HOT (APPROX 70oC).

8
Parts & Service: 020 8988 7400 / E-mail: Parts@clarkeinternational.com or Service@clarkeinternational.com
7. When using the gun, observe the glue stick periodically through the
opening in the side of the gun, when the glue stick disappears, insert a new
stick to continue gluing.
8. Immediately the glue is applied, rest the gun back on its stand.
NOTE: The anti-drip feature of the nozzles is activated by releasing the
trigger, which will cut off the flow of glue into the nozzle. A small
amount of glue will remain in the tip when the trigger is released
and this will need to drain from the tip..
AFTER USE
1. After use, the glue gun must be placed on a stable surface, away from any
materials which could touch the hot nozzle.
2. When finished, unplug the gun, leave on stand and allow to cool down
before storing in its case.
CHANGING THE NOZZLES
The glue gun is supplied with 3 nozzles; two round nozzle (one installed) and a
flat nozzle.
1. To remove the nozzle from the
glue gun, start by removing the
silicon safety sleeve. Use a suitable
spanner to loosen and remove
the nozzle.
2. Screw the new nozzle into the tip
of the gun and tighten gently with
the spanner.
3. Replace the silicon safety sleeve
over the new nozzle.
• The glue gun is now ready for use.
CAUTION: DO NOT LEAVE THE GLUE GUN SWITCHED ON FOR MORE
THAN 15 MINUTES WITHOUT DISPENSING GLUE, FAILURE TO COMPLY WITH
THIS INSTRUCTION COULD RESULT IN THE GLUE STICK SOFTENING AND
LEAD TO THE GUN BECOMING INOPERATIVE.
WARNING: DISCONNECT FROM THE POWER SUPPLY AND ALLOW THE
TOOL TO COOL DOWN BEFORE ATTEMPTING TO CHANGE THE NOZZLE.

9
Parts & Service: 020 8988 7400 / E-mail: Parts@clarkeinternational.com or Service@clarkeinternational.com
DECLARATION OF CONFORMITY

10
Parts & Service: 020 8988 7400 / E-mail: Parts@clarkeinternational.com or Service@clarkeinternational.com
SPARE PARTS

11
Parts & Service: 020 8988 7400 / E-mail: Parts@clarkeinternational.com or Service@clarkeinternational.com
SPARE PARTS
Replacement Glue Sticks as available as Part No: 6463055.
NODESCRIPTION NODESCRIPTION
1 Positioning Ring 17 Nozzle Safety Sleeve
2 Housing (L/H) 18 Heating Tube
3 Bolt 19 Heat Shield
4. Glue Stick Pusher 20 Heat Conducting Plate
5 Glue Stick Gripper 21 PTC
6 Connecting Link 22 Steel Plate
7 LED 23 Label
8 Lamp Cover 24 Housing (R/H)
9 Locking Sleeve 25 Screw
10 Holder 26 Stand
11 Fixing Spring 27 Handle Insert
12 Clamp Ring 28 Trigger
13 O-Ring 29 Power Cable
14 Nozzle Body 30 Cable Entry Sleeve
15 Positioning Sleeve 31 Printed Circuit Board
16 Reed 32 Spring

This manual suits for next models
1
Table of contents