Clarke RWL12 User manual

OPERATION INSTRUCTIONS
GC1014
RECHARGEABLE WORK LAMP
MODEL NO: RWL12
PART NO: 4003005

2
Parts & Service: 020 8988 7400 / E-mail: Parts@clarkeinternational.com or Service@clarkeinternational.com
INTRODUCTION
Thank you for purchasing this CLARKE Rechargeable Work Lamp.
Before attempting to use this product, please read this manual thoroughly and
follow the instructions carefully. In doing so you will ensure the safety of yourself
and that of others around you, and you can look forward to your purchase
giving you long and satisfactory service.
GUARANTEE
This product is guaranteed against faulty manufacture for a period of 12
months from the date of purchase. Please keep your receipt which will be
required as proof of purchase.
This guarantee is invalid if the product is found to have been abused or
tampered with in any way, or not used for the purpose for which it was
intended.
Faulty goods should be returned to their place of purchase, no product can
be returned to us without prior permission. This guarantee does not effect your
statutory rights.
ENVIRONMENTAL RECYCLING POLICY
Through purchase of this product, the customer is taking on the
obligation to deal with the WEEE in accordance with the WEEE
regulations in relation to the treatment, recycling & recovery and
environmentally sound disposal of the WEEE.
In effect, this means that this product must not be disposed of with general
household waste. It must be disposed of according to the laws governing
Waste Electrical and Electronic Equipment (WEEE) at a recognised disposal
facility.
SPECIFICATIONS
Lamp
Voltage 12v dc
Battery Capacity 7 A/h
Weight 6.0 kg
Charger
Input 100-240 Vac, 50/60 Hz
Output 15Vdc 400mA

3
Parts & Service: 020 8988 7400 / E-mail: Parts@clarkeinternational.com or Service@clarkeinternational.com
SAFETY PRECAUTIONS
Always dispose of spent battery packs according to local authority
regulations.
Always use only the charging adapters etc supplied with the lamp.
Always ensure trailing leads do not cause a risk of tripping etc.
Never burn or throw old batteries into a fire etc.
Never shine the light directly into anyones eyes.
Never charge the battery for periods longer than 48 hours, (16 hours to fully
charge).
IMPORTANT: Before using the lamp for the first time, the battery must be
charged using the AC charger for a minimum of 16 hours. It is, however,
possible to run the lamp from another 12v source, such as a car battery,
using the correct power lead.
OVERVIEW
IMPORTANT: See Fig.1 & 2 below to familiarise yourself with the operation
and accessories etc.
1. ON/OFF Switch
2. Safety Lens
3. Fluorescent Bulb
4. Cushioned Base
5. Battery Pack
6. DC Battery Charger
7. 12v Power Cable
8. AC Battery Charger
9. Twin Socket Adaptor

4
Parts & Service: 020 8988 7400 / E-mail: Parts@clarkeinternational.com or Service@clarkeinternational.com
10. Carry Handle
11. Adjusting Knobs
12. 12V DC input Socket
13. Battery Level Test Button
14. Battery Condition Indicator
15. AC/DC Charging Socket
16. 12v Power Socket
CHARGING
To charge the battery using the AC adapter, first ensure the lamp is switched
off and connect the plug of the AC charger to the AC/DC Charging socket
on the back of the power pack, (see Fig. 2 above). Plug the AC charger into a
suitable mains socket and switch on.
Fully charging a partially discharged battery may take several hours, whereas
a completely discharged battery will take the full 16 hours, (4 hours if charging
from a car battery).
To gain the maximum life of the battery, it is not advisable to charge regularly
from a DC supply.
The charge state of the battery can be checked by operating the battery
level test button on the back of the power pack. When pressed, the battery
level indicator will glow RED if the battery requires charging. If charged the
indicator will glow GREEN
CAUTION: NEVER CHARGE THE BATTERY FOR LONGER THAN 48 HOURS
AS THIS MAY CAUSE DAMAGE TO THE UNIT AND OR PREMATURE FAILURE
OF THE BATTERY.

5
Parts & Service: 020 8988 7400 / E-mail: Parts@clarkeinternational.com or Service@clarkeinternational.com
NOTE: Using the battery test button whilst the battery is on charge gives
false information. When the battery is on charge, the level
indicator glows RED: pressing the battery level test button will
cause the indicator to turn GREEN. Release the button and the
indicator returns to RED.
To charge the battery from the 12v car battery, ensure the lamp is switched off
and connect the small plug of the DC charger into the AC/DC charging
socket. Plug the other end into the cigarette lighter socket.
DO NOT leave on charge for long periods, (more than 4 hours), as the result
may be a flat car battery.
Use either the AC or the DC charging adapters supplied to charge the
battery.
If you plan to store the lamp for long periods, it is recommended to fully
charge the battery first using the AC charger. This will ensure the longest
possible battery life.
When not in use, it is recommended to recharge the battery at least every four
months.
A fully charged battery will give approximately 5 hours of continuous use,
(lamp only).
OPERATING INSTRUCTIONS
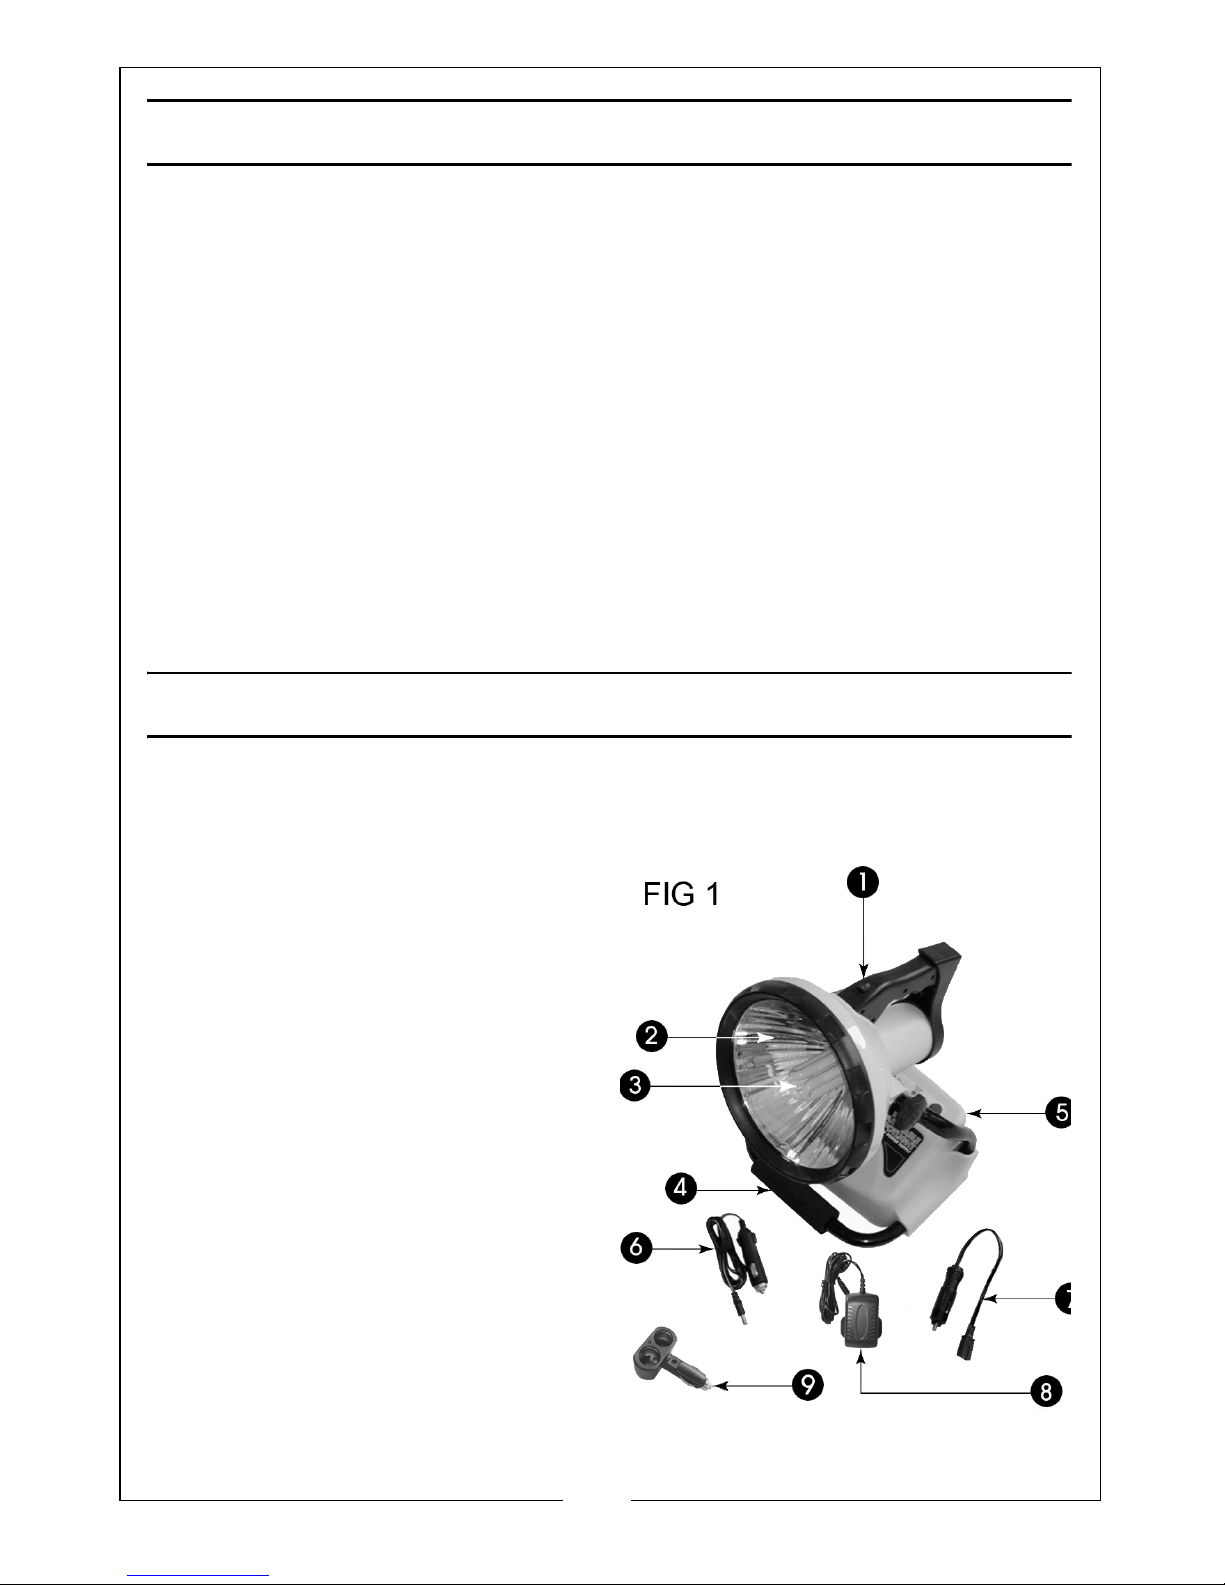
1. Ensure the 12v power cable (Item 7 - Fig. 1), is firmly connected between
the 12v power socket on the back of the power pack and the 12v DC input
socket on the back of the lamp. Switch the lamp on using the ON/OFF
switch.
2. Loosen the adjusting knobs and adjust to the desired angle, retighten both
knobs once desired position is found, DO NOT ovetighten.
3. The unit can be used as a 12v power supply to power other 12 DC
appliances at the same time as using the lamp, using the 12v Power socket
and the twin socket adapter. Using power tools etc this way will obviously
shorten the use time.
The lamp can be run directly from any 12v DC supply using the correct cable,
e.g. the 12v power cable supplied can be connected to the 12v DC input
socket and the car cigarette lighter socket.
NOTE: The 12v power cable and 12v DC charger and AC charger are
stored in the bottom of the battery pack. To access them, turn the
lamp upside down and slide the cover towards the cushioned
base, (front).

6
Parts & Service: 020 8988 7400 / E-mail: Parts@clarkeinternational.com or Service@clarkeinternational.com
BULB REPLACEMENT
Your RWL12 uses a fluorescent 230v-20w bulb with screw-type fitting, which
can be purchased locally, or from your nearest Clarke distributor. DO NOT
substitute a different type or size.
To replace the bulb, proceed as follows.
1. Ensure the lamp is turned off and the 12v power cable is disconnected.
2. Loosen the two adjusting knobs and adjust the angle of the lamp to gain
access to the four retaining screws, (‘A’) on the back of the lamp housing,
(See Fig 2).
3. Using a small phillips screwdriver, remove the four screws and store safely.
4. Carefully remove the lens assembly and store safely.
5. Gripping the base of the bulb to be removed, unscrew anticlockwise and
remove. Dispose of the bulb according to local authority regulations.
6. Fit the replacement bulb in reverse order. Take care when handling the
bulb. DO NOT overtighten.
7. Re-assemble the lens assembly, ensuring the screws line up with the screw
holes in the back of the lens, and gently tighten all screws. DO NOT force or
overtighten. If the screws do not go back easily, remove and recheck the
alignment.
Your lamp is now ready for use again.
PARTS
1. Safety Lens Assy............... AU12001
2. AC charger......................AU12002N
3. 12v Power Cable.............AU12003
4. 12v DC Charger ..............AU12004
5. Twin Socket Adapter ......AU12005
6. Bulb (not shown) .............AU12006
There are no other user serviceable
parts inside the lamp, DO NOT
disassemble the unit.

7
Parts & Service: 020 8988 7400 / E-mail: Parts@clarkeinternational.com or Service@clarkeinternational.com
DECLARATION OF CONFORMITY

Table of contents
Other Clarke Spotlight manuals