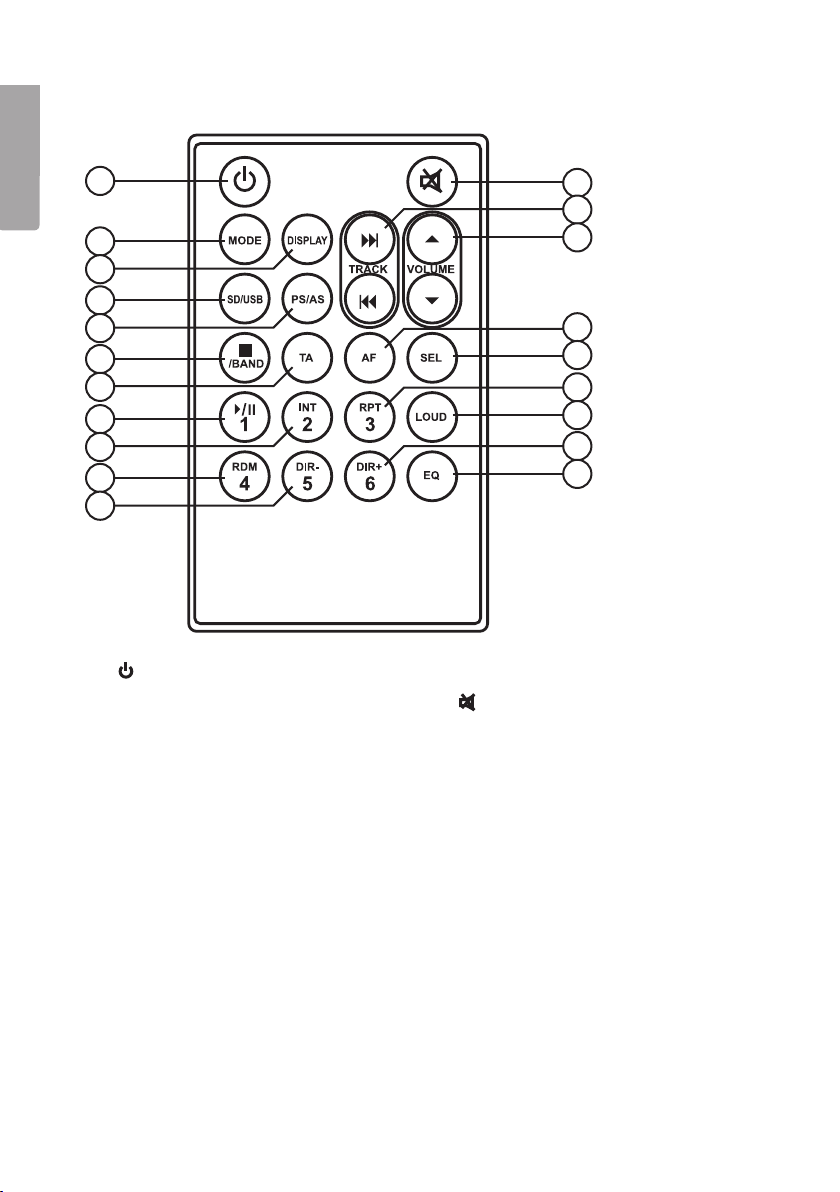
Clas Ohlson CRS005 User manual

EnglishSvenskaNorskSuomi
USB/SD Car Stereo
Bilstereo med USB/SD
Autostereot, joissa USB- ja SD-liitännät
Art.no Model
38-3786 CRS005 Ver. 201009

2

3
English
I IV V
II
III VI
USB/SD Car Stereo
Art.no 38-3786 Model CRS005
Please read the entire instruction manual before use and save it for future reference.
We reserve the right for any errors in text or images and for making any necessary
technical changes to this document. If you should have any questions concerning
technical problems please contact our Customer Services.
Safety
Read the entire manual before installing!
NOTE!
• Incorrect installation invalidates the warranty.
• Cutting the cables invalidates the warranty.
• If you do not have any existing ISO connectors use the included
ISO harness for installation.
Product description
Car Stereo with MP3 Player for USB/SD Card (not CD). Remote control, RDS receiver
and removable front panel. Reads MP3 file’s ID3 tags. 3.5 mm aux-in jack on the front
for connecting MP3 players, etc. RCA line out. ISO connector.
Contents
I. Car stereo
II. Mounting frame
III. Mounting frame key
IV. Instruction manual
V. Remote control
VI. ISO connection cable

4
English
A
B C
Installation
Dash mounting in your existing (DIN) frame
Only use the included or recommended mounting accessories for correct installation.
Do not install the car stereo in a way that interferes with the driver’s visibility or that
may pose a physical danger to the passenger or driver during quick deceleration.
Avoid installation where the car stereo may be exposed to direct sun light, extreme
heat or vibrations.
1. Detach the mounting frame from the stereo (insert the included keys to release the
catch pins, and pull the frame backwards).
2. Insert the mounting frame into your car’s dash space and fold out the locking tabs
(B) to hold the car stereo in position in the mounting space (A).
3. Pull out the car’s ISO harness through the mounting frame.
4. Connect the ISO connectors and aerial and test all the functions.
5. Slide the car stereo into the mounting frame so the catch pins (C) on the sides are
aligned correctly.

5
English
D
F
E
RESET
B
A
RESET
Removing the car stereo
1. Remove the front panel and
remove the outer frame (D)
carefully with your fingers at the
places marked in the figure.
Removing the front panel
1. Turn off the device with the ON/OFF button.
2. Push the RELEASE button .
3. Carefully remove the front panel.
Mounting the front panel
1. Mount the front panel, starting with the left
side first, as shown in the figure.
2. Carefully press in the right side of the front
panel until a “click” sound is heard.
2. Insert the included keys in the space
between the mounting frame (F) and
the car stereo (E). The keys should be
pushed in until a “click” sound is heard.
3. Carefully pull out the keys and the stereo together.
4. Disconnect the ISO and aerial connectors.

6
English
ISO connector
Line-out
(left and right rear)
Audio cable is
not included.
Aerial
connection
(aerial cable
not included).
B
A
Connections
The car stereo has the following connections:
ISO connector
Push Pin Cable colour Connect to
A4 Yellow + 12 V permanent
A5 Blue Motorised aerial
A7 Red + 12 V via ignition
A8 Black (-) Earth
B1 Purple Rear right speaker (+)
B2 Purple with black stripe Rear right speaker (-)
B3 Grey Front right speaker (+)
B4 Grey with black stripe Front right speaker (-)
B5 White Front left speaker (+)
B6 White with black stripe Front left speaker (-)
B7 Green Rear left speaker (+)
B8 Green with black stripe Rear left speaker (-)

7
English
1 2 3 4 5 6 7
8 9 10 11 12 13 14 15 16 17 18 19
Buttons and functions
1. TUNE – Automatic radio station search / manual radio station search /
back/forward
2. /MUTE – On/off/turn sound off
3. EQ/TA – Preprogrammed settings / traffic announcement
4. VOL +/- – Adjust volume / adjust clock
5. LCD – Display screen
6. LOUD – Increase bass and treble
7. – Release front panel
8. MODE – Select radio/USB/SD/AUX IN
9. DSP/AF – Display clock information / alternative radio frequency
10. PS/AS – Search for programme / automatic save
11. 1 – Radio station 1 / play or pause playback
12. 2INT – Radio station 2 / scan playback
13. 3RPT – Radio station 3 / repeated playback
14. 4RDM – Radio station 4 / random playback
15. 5 DIR- – Radio station 5 / previous folder
16. 6 DIR+ – Radio station 6 / next folder
17. BAND – Radio frequency selector / stop playback
18. AUX IN with 3.5 mm socket
19. USB port

8
English
20 31
21
32
23
25
34
27
36
29
38
22
33
24
26
35
28
37
30
39
Remote control
20. On/off
21. MODE – Select radio/USB/SD/AUX IN
22. Display – Show clock information
23. SD/USB – Select SD or USB mode
24. PS/AS – Search for programme /
automatic save
25. ■/BAND - Radio frequency selector/
stop playback
26. TA – Traffic announcement
27. 1 – Radio station 1 /
play or pause playback
28. 2INT – Radio station 2 /
scan playback
29. 4RDM – Radio station 4 /
random playback
30. 5DIR- – Radio station 5 / previous folder
31. Turn sound off
32. TRACK – Automatic radio station
search / manual radio station search /
back/forward
33. VOLUME ▼/▲ – Adjust the volume
34. AF – Alternative radio frequency
35. SEL – Audio settings
36. 3RPT – Radio station 3 / repeated
playback
37. LOUD – Increase bass and treble
38. 6DIR+ - Radio station 6 / next folder
39. EQ – Preprogrammed settings

9
English
1
2
3
4
Inserting the batteries
1. Push in catch (1) and remove the battery cover (2).
2. Insert a new battery, observing the polarity (3).
3. Replace the battery cover (4).
Use
On/off
Press to turn the stereo on.
Press and hold in to turn the stereo off.
Adjust the volume
Adjust the volume by turning the volume knob VOL on the front panel or by pressing
VOLUME on the remote control.
Mute
Press /MUTE to turn off the sound completely.
Loudness
Press LOUD to select loudness mode:
Display: LOUD ON → LOUD OFF.

10
English
Sound settings
To change the audio settings, use VOL on the front panel or SEL on the remote control.
• BAS Adjust the bass
• TRE Adjust the treble
• BAL Adjust the balance of the speakers
• FAD Adjust the balance of the volume between front and rear speakers
Clock
1. Press DSP/AF to display the time.
2. Press in and turn the volume knob to adjust the hours.
3. Press in and turn the volume knob again to adjust the minutes.
4. Press VOL to finish.
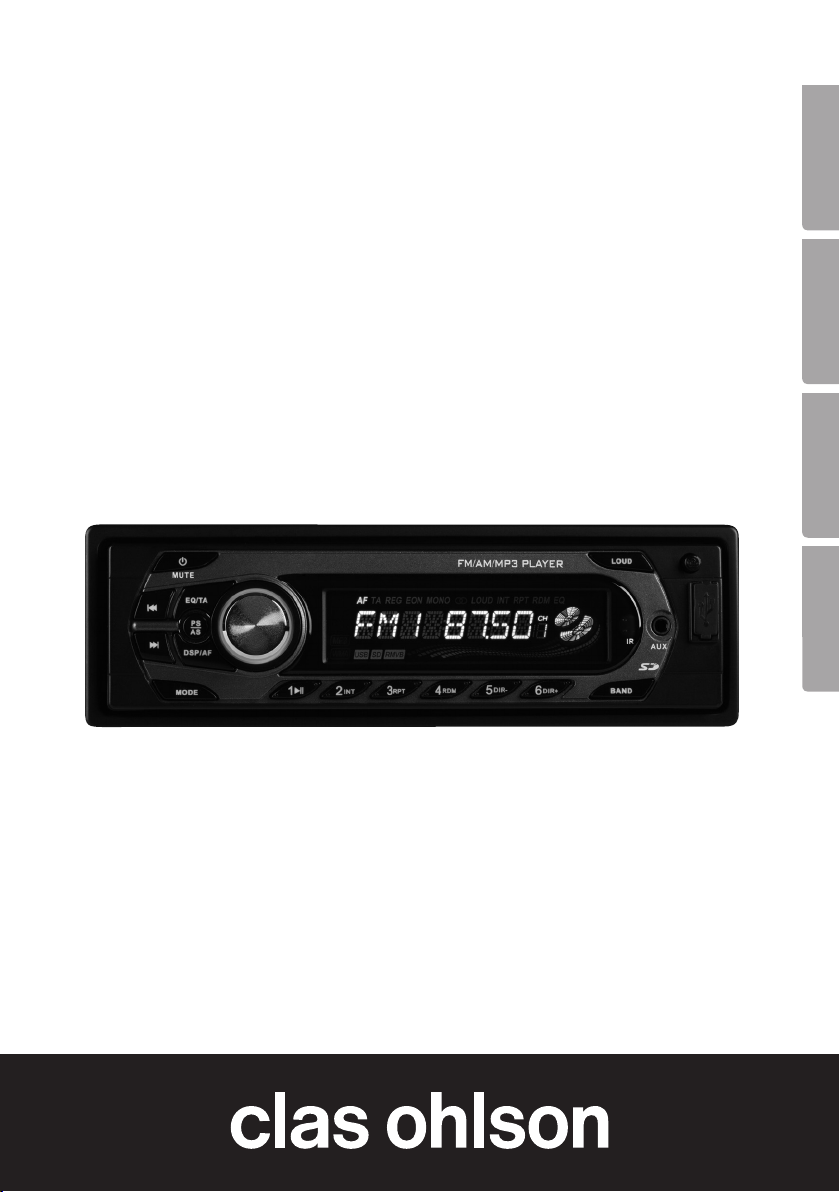
Radio
Press MODE to select either radio, USB/SD or AUX IN.
Select frequency band
Select either FM or AM. Press BAND to change.
Traffic announcement
To activate or deactivate the traffic announcement function, press and hold in EQ/TA.
Alternative frequency (AF)
If you are listening to an RDS station (Radio Data System) that broadcasts on more than
one frequency, the stereo will automatically search for the strongest broadcast signal.
The AF function is automatically activated. In certain areas with weak signals, the search
might take some time in which case, you can turn off the AF function manually.
Press and hold in DSP/AF to turn it off.

11
English
Searching for and saving radio stations
Save stations using the automatic station search.
1. Press BAND to select a frequency band.
2. To start a search, press and hold in PS/AS for 2 seconds. The car stereo searches
for and automatically saves stations on the radio station buttons.
3. Press PS/AS to scan saved stations, press again to select the station you want.
Automatic search
Press TUNE DOWN or TUNE UP.
Manual search
1. Press and hold in TUNE DOWN or TUNE UP for 2 seconds to search manually.
2. Press TUNE DOWN or TUNE UP to select a station.
3. Keep the buttons pressed in to search more quickly. The manual search function
automatically terminates after 5 seconds.
Automatic music search
You can automatically search for and save up to 6 stations on AM and FM.
1. Press BAND to select a frequency band.
2. Tune into a station manually.
3. To save the station, press and hold in one of the radio station buttons 1-6.
Selecting a saved station
Select a frequency band by pressing BAND.
Press 1-6 to select the desired station.

12
English
USB/SD
1. Insert an SD card into the slot on the back of the front
panel or insert a USB flash drive into the USB port (19).
2. Press MODE to select either USB or SD.
Select and repeat files
• Press to advance to the next track.
• Press to return to the previous track.
Fast forward or rewind
• Press and hold in to fast forward.
• Press and hold in to fast rewind.
Repeat function
During playback, press 3RPT one or more times. RPT will appear on the display.
RPT ONE → RPT FOLDER → RPT OFF
Random playback (RANDOM)
1. Press 4RDM during playback. “RANDOM” will appear on the display.
2. Press 4RDM once more to turn off the random playback function.
“RDM OFF” will appear on the display.
Play the introduction of each track (SCAN)
1. Press 2INT during playback. “SCAN” will appear on the display. The first 10
seconds of each track will now be played.
2. Press 2INT again to turn off this function. “SCAN OFF” will appear on the display.

13
English
Care and maintenance
Use a soft damp cloth to wipe the product. Never use solvents or strong cleaning agents.
The front panel’s connections can be cleaned with an ear bud dipped in cleaning solution.
Troubleshooting guide
Problem Possible cause Solution
The device
does not start.
The car’s ignition is not turned on. Turn on the ignition.
The fuse is broken. Control and switch the fuse.
No sound. The volume is turned down. Adjust the volume.
The speakers are not
connected properly.
Check the connections.
The buttons
do not work.
The micro processor may
need to be reset.
Press “Reset” behind the
front panel.
The front panel is loose. Attach the front panel properly.
No radio re-
ception.
Antenna cord is not connected. Check the connections.
The signals are too weak. Choose another frequency/station.
Disposal
Follow local ordinances when disposing of this product. If you are unsure of how to
dispose of this product, please contact your local authority.
Specifications
FM
Frequency range 87.5 – 108 MHz
General
Operating voltage 11 – 14.4 V DC
Speaker impedance 4 ohms
Output 4 x 40 W
Size 187 x 58.5 x 90 mm
Weight Approx. 750 grams

14
Svenska
I IV V
II
III VI
Bilstereo med USB/SD
Art.nr 38-3786 Modell CRS005
Läs igenom hela bruksanvisningen före användning och spara den sedan för
framtida bruk. Vi reserverar oss för ev. text- och bildfel samt ändringar av tekniska
data. Vid tekniska problem eller andra frågor, kontakta vår kundtjänst (se adress-
uppgifter på baksidan).
Säkerhet
Läs igenom hela bruksanvisningen innan montering!
OBS!
• Vid felaktig inkoppling upphör garantin att gälla!
• Om kablarna på bilstereon klipps upphör garantin att gälla.
• Om platsen för montering saknar ISO-kontakter, använd de medföljande lösa
ISO-kontakterna med kabel för montering.
Produktbeskrivning
Bilstereo med MP3-spelare för USB/SD-kort (ej CD). Fjärrkontroll, RDS-mottagare och
löstagbar stöldfront. Läser MP3-filernas ID3-tag. 3,5 mm lågnivåingång på framsidan
för anslutning av exempelvis MP3-spelare. RCA lågnivåutgång. ISO-anslutning.
Förpackningen innehåller
I. Bilstereo
II. Monteringsram
III. Verktyg för monteringsram
IV. Bruksanvisning
V. Fjärrkontroll
VI. Anslutningskablage (ISO)

15
Svenska
A
B C
Installation
Montering i monteringsram (DIN)
• Använd endast medföljande eller rekommenderade monteringstillbehör för
korrekt installation.
• Installera inte bilstereon så att den skymmer förarens sikt eller så att den kan skada
förare eller passagerare vid eventuell snabb inbromsning.
• Undvik att installera bilstereon på sådant sätt att den utsätts för direkt solljus, stark
värme eller starka vibrationer.
1. Ta av monteringsramen från stereon (tryck in de medföljande nycklarna så att
spärrarna släpper, och dra ramen bakåt).
2. Tryck in den lösa monteringsramen i bilens uttag och vik ut några av låsflikarna (B)
så att de låser fast monteringsramen i monteringshålet (A).
3. Dra fram bilens ISO-kontakter genom monteringsramen.
4. Anslut ISO-kontakterna och antennen och prova alla funktioner.
5. Tryck in bilstereon i monteringsramen så att spärrarna (C) på sidorna kommer i läge.

16
Svenska
D
F
E
RESET
B
A
RESET
Borttagning av bilstereon
1. Ta bort frontpanelen och
avlägsna den yttre ramen (D)
försiktigt med fingrarna vid
markeringarna enligt bilden.
Ta bort frontpanelen
1. Stäng av apparaten med AV/PÅ-knappen.
2. Tryck in RELEASE-knappen .
3. Ta bort frontpanelen försiktigt.
Sätta dit frontpanelen
1. Sätt dit frontpanelen med den vänstra sidan
först med pilen A mot pilen B enligt figuren.
2. Tryck försiktigt på frontpanelens högra sida
tills ett ”klick” hörs.
2. Sätt i de medföljande nycklarna i
springorna mellan monteringsramen (F)
och bilstereon (E). Nycklarna ska tryckas
in tills ett ”klick” hörs.
3. Dra försiktigt i nycklarna och bilstereon för att avlägsna bilstereon.
4. Ta bort ISO-kontakterna och antennkontakten.

17
Svenska
ISO-anslutning
Lågnivåutgång
(vänster och höger
kanal bak). Lågnivå-
kabel medföljer ej.
Antenningång
(antennkabel
medföljer ej).
B
A
Anslutningar
Bilstereoapparaten har följande anslutningar:
ISO-anslutning
Stift Kabelfärg Kopplas till
A4 Gul +12 Volt kontinuerligt
A5 Blå Motorantenn
A7 Röd + 12 Volt via tändning
A8 Svart (-) Jord
B1 Lila Höger bakre högtalare (+)
B2 Lila med svart rand Höger bakre högtalare (-)
B3 Grå Höger främre högtalare (+)
B4 Grå med svart rand Höger främre högtalare (-)
B5 Vit Vänster främre högtalare (+)
B6 Vit med svart rand Vänster främre högtalare (-)
B7 Grön Vänster bakre högtalare (+)
B8 Grön med svart rand Vänster bakre högtalare (-)

18
Svenska
1 2 3 4 5 6 7
8 9 10 11 12 13 14 15 16 17 18 19
Knappar och funktioner
1. TUNE – Automatisk radiostationssökning, manuell radiostationssökning,
bakåt/framåt
2. /MUTE – On/off/stänga av ljudet
3. EQ/TA – Förinställda inställningar, trafikmeddelande
4. VOL +/- - Ställa in volymen, justera klockan
5. LCD – display
6. LOUD – ökar bas och diskant
7. – Ta bort frontpanelen
8. MODE – Välja radio/USB/SD/AUX IN
9. DSP/AF – Visa information från klockan, läge etc, alternativa radiofrekvenser
10. PS/AS – Söka program, spara automatiskt
11. 1 – Radiostationsknapp 1, spela upp eller pausa uppspelning
12. 2INT – Radiostationsknapp 2, scanna uppspelning
13. 3RPT – Radiostationsknapp 3, repeterad uppspelning
14. 4RDM – Radiostationsknapp 4, slumpmässig uppspelning
15. 5 DIR- - Radiostationsknapp 5, föregående mapp
16. 6 DIR+ - Radiostationsknapp 6, nästa mapp
17. BAND – Välj radiofrekvens, stoppa uppspelning
18. AUX IN med 3,5 mm uttag
19. USB-uttag

19
Svenska
20 31
21
32
23
25
34
27
36
29
38
22
33
24
26
35
28
37
30
39
Fjärrkontrollen
20. On/off
21. MODE – Välja radio/USB/SD/AUX IN
22. Display – Visa information från klockan
23. SD/USB – Välja SD eller USB-läge
24. PS/AS – Söka program,
spara automatiskt
25. ■/BAND – Välj radiofrekvens,
stoppa uppspelning
26. TA – Trafikmeddelande
27. 1 – Radiostationsknapp 1,
spela upp eller pausa uppspelning
28. 2INT – Radiostationsknapp 2,
scanna uppspelning
29. 4RDM – Radiostationsknapp 4,
slumpmässig uppspelning
30. 5DIR- – Radiostationsknapp 5,
föregående mapp
31. Stänga av ljudet
32. TRACK – Automatisk
radiostationssökning, manuell
radiostationssökning, bakåt/framåt
33. VOLUME ▼/▲ – Justera volymen
34. AF – Alternativa radiofrekvenser
35. SEL – ljudinställningar
36. 3RPT – Radiostationsknapp 3,
repeterad uppspelning
37. LOUD – ökar bas och diskant
38. 6DIR+ – Radiostationsknapp 6,
nästa mapp
39. EQ – Förinställda inställningar

20
Svenska
1
2
3
4
Sätta i batterierna
1. Tryck in låsspärren (1) och dra ut batteriluckan (2).
2. Sätt i ett nytt batteri, observera polariteten (3).
3. Sätt tillbaka batteriluckan (4).
Användning
Av/på
Tryck på för att starta apparaten.
Tryck och håll ned för att stänga av apparaten.
Justera volymen
Justera volymen genom att vrida volymratten VOL på frontpanelen eller trycka
på VOLUME fjärrkontrollen en eller upprepade gånger.
Mute
Tryck på /MUTE för att stänga av ljudet helt.
Loudness
Tryck på LOUD för att välja läge enligt nedan:
Display: LOUD ON → LOUD OFF.
This manual suits for next models
1
Table of contents
Languages:
Other Clas Ohlson Car Receiver manuals