Clas Ohlson AC-6472C User manual

SVENSKANORSKSUOMI ENGLISH
Exercise Bike
Träningscykel
Trimsykkel
Kuntopyörä
34-7509
Model: AC-6472C
www.clasohlson.com
Ver. 200807


3
ENGLISH
Exercise Bike
Art.no. 34-7509, model AC-6472C
Please read the entire instruction manual before using and save it for future use. We apologise for any text
or photo errors and any changes of technical data. If you have any questions concerning technical problems
please contact our Customer Service Department (see address on reverse).
Table of Contents
1. Product Description
2. Safety
3. Contents of package
4. Assembly
5. Computer Functions
6. Use
7. Exercise Instructions
8. Make all settings before starting the exercise
9. Exploded view
10. Pulse Chart

4
ENGLISH
1. Product Description
• Exercise bike with computer and various magnetically operated resistance .
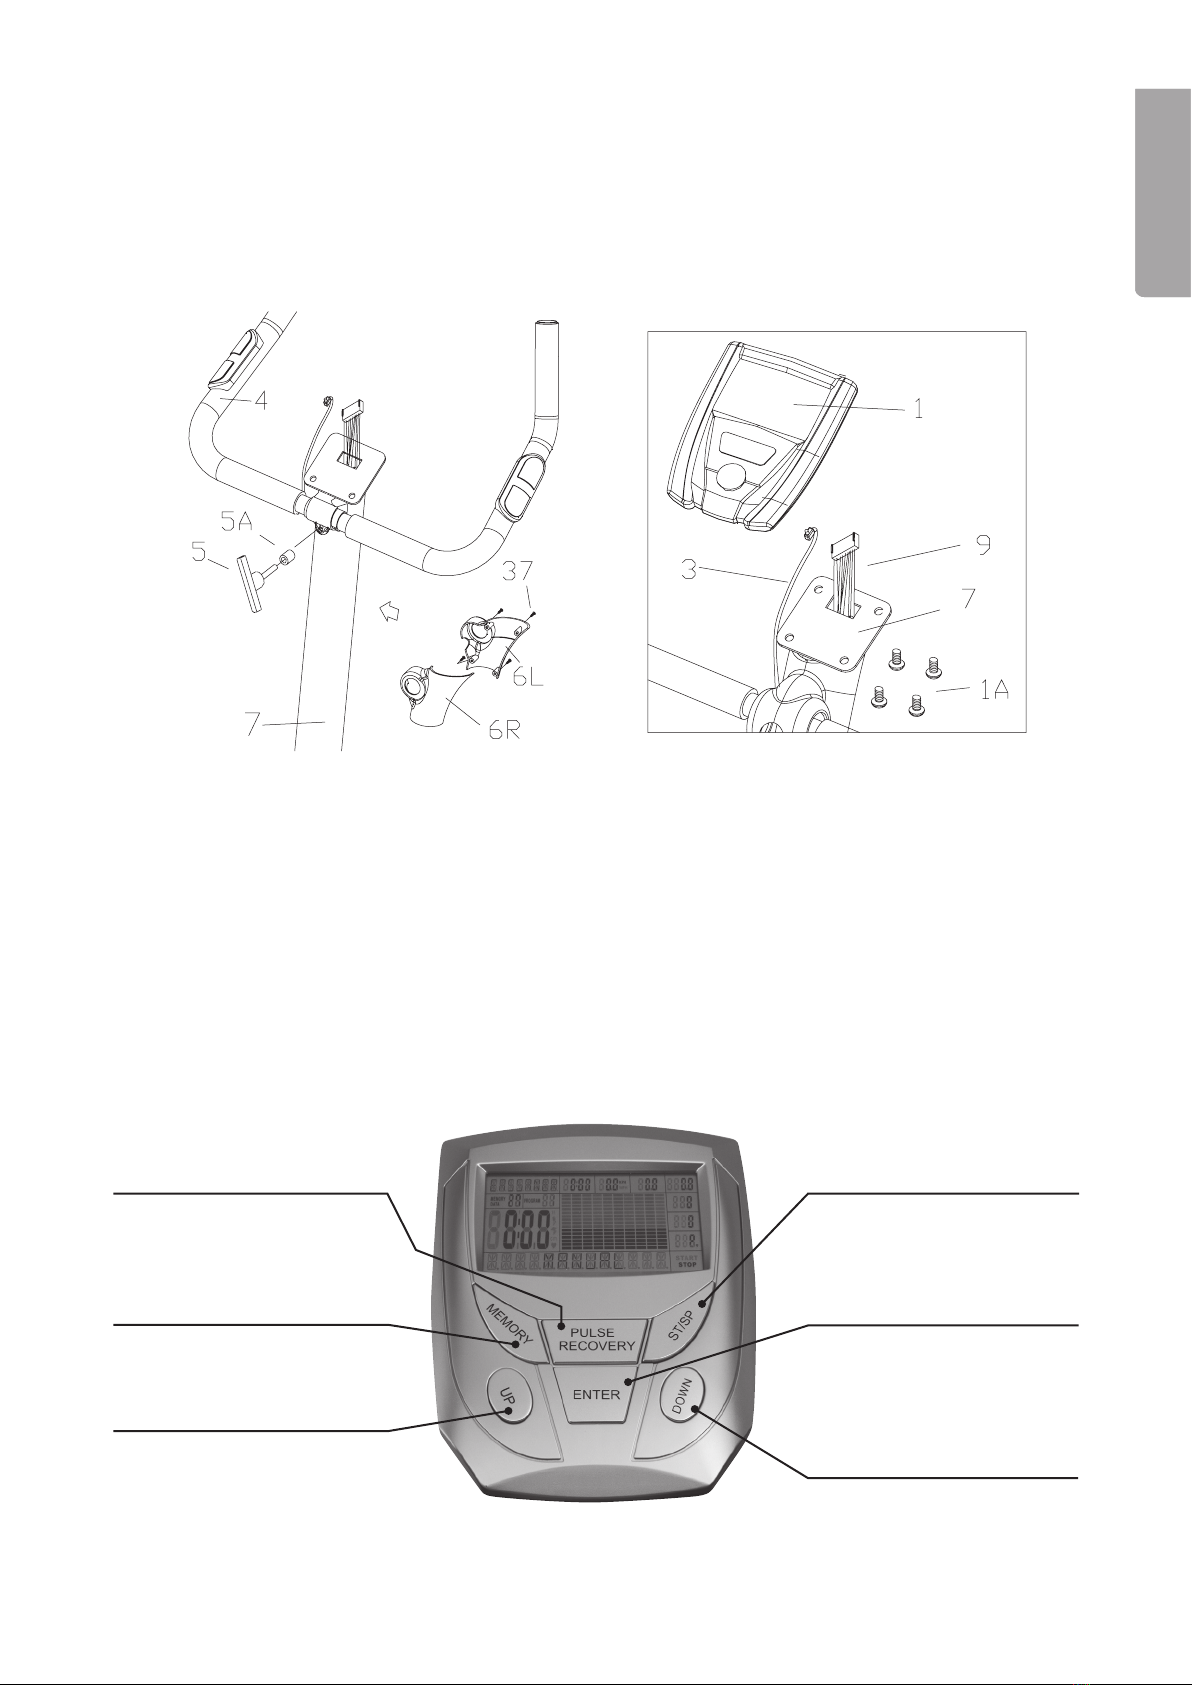
• Display for speed, distance, calories burnt & pulse.
• Max load 100 kg
Note! This product is not an ergometer since some of the measuring units are steered by actual speed.
2. Safety
The product is tested according to these safety standards: EN975-1+A1 and EN975-5/HC.
Warning: Always consult with a physician before you start to exercise if you suffer from an illness or other
complaints that can worsen by physical exercise. Stop the exercise immediately if you feel dizzy.
Check that all bolts, nuts and other parts are securely tightened on the exercise bike.
Place the exercise bike in a spacious area with at least 1 metre in all directions.
Read the entire instruction manual before you start the exercise. Save it for future use.
• The exercise bike is made for home use only and tested up to a maximum body weight of 100 kg.
• Follow the steps of the assembly instructions carefully.
• Use only the original parts as delivered.
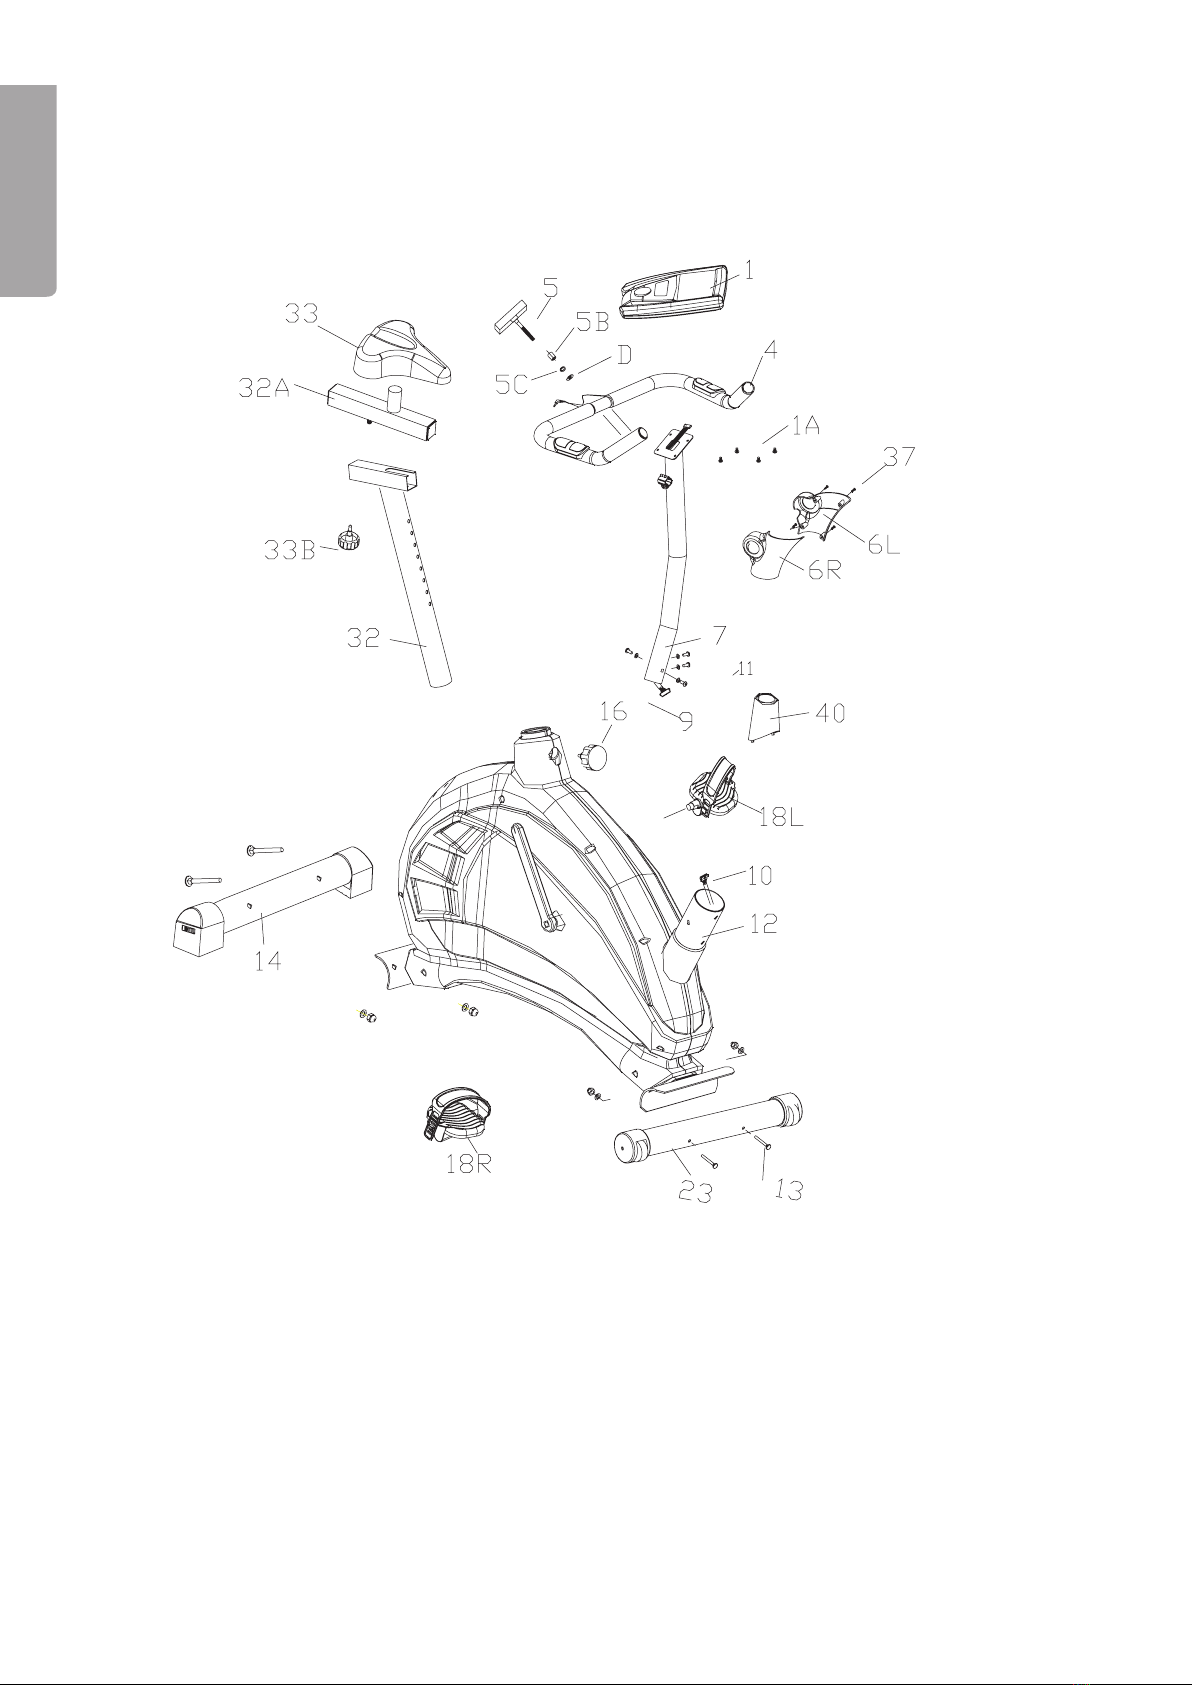
• Check that all parts are complete in the package before you start to assemble the exercise bike.
(See “Contents of package”).
• For assembly, use only suitable tools and ask for assistance if needed.
• Place the exercise bike on an even, non-slip surface. Because of possible corrosion, use of the exercise
bike in damp conditions is not recommended.
• Before rst use, and again every other month, check that all bolts and nuts are securely tightened and
undamaged on the exercise bike. Replace possible worn out parts immediately and do not use the
exercise bike before they are changed.
• For repairs, use only original spare parts.
• Never use strong solvents/detergents when cleaning the bike.
• Only use the exercise bike if it is correctly assembled, inspect it before use.
• For all adjustable parts be aware of the maximum positions to which they can be adjusted/tightened to.
Pay special attention to the minimum insertion depth of the seat post.
• The exercise bike is designed for adults. Children should not use the bike without supervision of an adult.
• Ensure that those using the exercise bike are aware of possible hazards, e.g. movable parts during
training.
• Consult your physician before starting with any exercise programme. He can advise you about suitable
kinds and levels of training. Warning! Incorrect/excessive training can cause health injuries.
• Follow the advice for correct training as detailed in the training instructions.
• The load/work can be adjusted from the computer.

5
ENGLISH
3. Contents of package
Bolt M8x70
Dome nut M8
Washer M8
Allen key
Screwdriver

6
ENGLISH
4. Assembly

7
ENGLISH
Step 1
1. Attach the front (23) and the rear (14) stabilizers.
2. Use 2 coach bolts M8x70 (13) and washers for each stabilizer.
3. If the oor is uneven, the rear height of the rear stabilizer can be adjusted on both sides.
4. The front stabilizer (23) has transportation wheels, they need to face towards the front of the cycle.
Step 2
1. Screw the pedals on to the crank. The pedals are marked with L (18L) and R (18R) at the thread end.
2. Tighten the left pedal anti-clockwise, the right pedal clockwise.
L
L
RR

8
ENGLISH
Step 3
1. Assemble the saddle (33) and the horizontal
slider (32A) on the saddle pole with the knob
(33B).
2. Insert the saddle pole (32) in the main frame
(12), choose the desired position and tighten
the knob (16). Ensure that the knob (16) is
always tightened!
Step 4
1. Pass the front cover (40)
over the handlebar post (7).
(Se g A)
2. Connect the computer cable
(9, 10). (se g. B)
3. First loosen the pre-
assembled screws from the
handlebar post (7). Slide
the handlebar post (7) onto
the main frame (12) and x
it with 4 hexagon screws
M8x20 and washers (11).
(se g. C). Make sure not
to trap the cables while
assembling!
L
L
RR
(C)
(B)
(A) A
B

9
ENGLISH
Step 5
1. Attach the handlebar (4) to the handlebar post (7).
2. Place the plastic covers (6L, 6R) on the handlebar post (7) with screws (37) and insert the T-handle (5)
into the metal cover with sleeve (5A) to x the handlebar. Make sure that it is securely tightened.
3. Adjust the handlebar (4) to the right position and tighten again.
Step 6
1. Mount the computer (1) onto the handlebar post (7) with the enclosed screws M5x10 (1A) and connect
the computer cables (9).
2. Connect the hand pulse cable(3) into the socket on the back of the computer (1).
5. Computer functions
PULSE RECOVERY
Pushing this button starts
the tness-test. The result is
graded from F1.0 to F6.0.
MEMORY
Stores the results from
the Body Fat test.
UP
Change setting/increase
tension
ST/SP
Start/Stop – pushing this button
starts or stops the selected
programme.
ENTER
Used for selecting programmes,
conrming settings and
selecting the display mode
(time, speed, distance, etc.).
DOWN
Change setting/reduce tension.

10
ENGLISH
6. Operating Instructions
6.1 Basic use
Activating the display
Push one of the buttons or start pedalling to activate the display. If the display does not work, make sure that
the AC/DC adaptor is correctly connected.
Tension
The tension is represented by bars on the display, a high bar represents a high tension and a low bar repre-
sents a lower tension. The tension can be altered whilst you are exercising using [UP] and [DOWN].
Targets
Every exercise program has various targets which you can set, such as the workout time, distance travelled,
or number of calories burned.
To Pause
Push the [ST/SP] button whenever you would like to pause the training programme. The measurement will
pause and the display will show the current values. Push [ST/SP] again to resume the programme.
To change the function whilst training
Push [ST/SP] to stop the current programme. Push [UP] or [DOWN] to select another programme, conrm by
pushing [ENTER].
Resetting
To reset set programmes, push [ST/SP] and hold it in for 3 seconds. The computer will beep and the display
will briey show every sequence of the programme.
6.2 Selecting an Exercise Programme
Explanation of the menus/programmes
No. Programmes Explanation Targets/Settings
1 Manual Exercise programme with or without set targets.
The tension can be manually adjusted whilst
exercising.
- TIME
- DISTANCE
- CALORIES
2 Rolling Preset programme with varied tension throughout
the workout.
- TIME
- DISTANCE
- CALORIES
3 Valley Preset programme representing the ups and
downs of a valley.
- TIME
- DISTANCE
- CALORIES
4 Fat Burn Preset programme representing an upward slope
and a downward slope.
- TIME
- DISTANCE
- CALORIES
5 Ramp Preset programme with gradually increasing
tension.
- TIME
- DISTANCE
- CALORIES
6 Mountain Preset mountain climbing programme with tension
levels rising and falling throughout.
- TIME
- DISTANCE
- CALORIES
7 Intervals Preset programme with the tension level changing
rapidly.
- TIME
- DISTANCE
- CALORIES

11
ENGLISH
8 Watt Control Select tension manually. Constant tension no mat-
ter how fast you pedal. Tension preset to 100 W,
but can be altered.
- TIME
- DISTANCE
- CALORIES
- WATT
9 55 % H.R.C. Heart rate controlled programme. Exercise until
you have reached 55% of your maximum pulse.
- TIME
- DISTANCE
- CALORIES
- AGE
- TARGET H.R
10 75 % H.R.C. Heart rate controlled programme. Exercise until
you have reached 75 % of your maximum pulse.
- TIME
- DISTANCE
- CALORIES
- AGE
- TARGET H.R
11 90 % H.R.C. Heart rate controlled programme. Exercise until
you have reached 90 % of your maximum pulse.
- TIME
- DISTANCE
- CALORIES
- AGE
- TARGET H.R
12 Target H.R Heart rate controlled programme. Exercise until
you have reached your target pulse.
- TIME
- DISTANCE
- CALORIES
- TARGET H.R
13 Users Prole Allows you to create a personalised programme by
setting the tension levels of each column.
- TIME
- DISTANCE
- CALORIES
- COLUMN 1-10
14 Body Test Presents the results of FAT%, BMR, BMI and
BODY TYPE (see chart).
- HEIGHT
- WEIGHT
- AGE
- SEX
15 User Data Enter you personal details. - NAME: Max. 8 letters
- HEIGHT
- WEIGHT
- AGE
- SEX
Exercising without targets
Follow these steps to start exercising without setting any targets:
1. Push [UP] or [DOWN] to select the desired exercise programme (see the chart).
2. Push [ST/SP] to start exercising without setting any targets.
3. You may now start exercising. Sit on the exercise bike as shown.

12
ENGLISH
Entering your personal settings
1. Select program 15 (User Data) using [UP] or [DOWN], conrm using [ENTER].
2. Change the setting using [UP] or [DOWN] and push [ENTER] to advance to the next setting.
3. Repeat the process until you have made all the settings.
Starting to exercise and setting targets
1. Push [UP] or [DOWN] to select the desired exercise programme (see the chart). Press [ENTER]
to conrm.
2. Press [ENTER] once or repeatedly to select targets/settings.
3. Change the setting using [UP] or [DOWN] and push [ENTER] to advance to the next setting.
4. Repeat the process until you have made all the settings.
5. When all the settings have been made, push [ST/SP] to start exercising.
6. You may now start exercising. Sit on the exercise bike as shown.
Example:
Exercising in 15 minute intervals:
1. Select program 7 (Intervals) using [UP] or [DOWN].
2. Push [ENTER] to conrm, “TIME” is shown in the display.
3. Set the time to 15 minutes using [UP] or [DOWN].
4. Push [ST/SP] to start exercising, the countdown is displayed.
5. A buzzer sounds for a few seconds when you have reached your target, e.g. when the countdown
reaches “0”.
6.3 Pulse measurement
- Place both palms against the pulse sensor on the handlebars. Hold both pulse sensors in order to obtain
as accurate a reading as possible. After a while your current pulse rate will be displayed.
- When the words “HOLD SENSOR” appear in the display during an exercise programme you should place
both palms against the sensors.
- Heart rate control is read magnetically. There is an automatic adjustment of the read heart rate compared
to the actual heart rate.
- If your pulse rate is less then the set target value, the load tension will increase. If your pulse rate is
above the set target value, the load tension will decrease.
- If the load tension has decreased to its lowest possible value and your pulse is still above the set target
value the display starts to ash to warn you to slow down.
N.B: This programme can only be used if the computer can read your pulse without interruption.
6.4 Measuring body fat – Body test (program 14)
1. Start program 14 (Body test)
2. Place both palms against the pulse sensor on the handlebars. Hold both
pulse sensors in order to obtain a correct reading. If the computer does not
read a pulse value, ERROR will appear on the display.
3. The results will be presented as FAT%, BMR, BMI and BODY TYPE. Push
[ENTER] to select which result you wish to view.
FAT% Chart
1 5 % - 14 %
2 15 % - 24 %
3 25 % - 29 %
4 30 % - 39 %
5 40 % - 50 %
N.B.
The results obtained from the computer are only for the interests of exercising and should not be
used for medical purposes.

13
ENGLISH
6.5 Fitness-test (Pulse Recovery)
This test is personal and is used to measure your pulse after you have nished exercising.
1. After you workout pass, push [PULSE RECOVERY] once.
2. Hold the pulse sensors in both hands and begin pedalling.
3. The timer counts down from 60 seconds to zero.
4. When the test is over the result is displayed:
7. Exercise instructions
Many different factors have to be considered when you plan your training program. If you have been
physically inactive for a long time or if you suffer from any kind of illness you need to consult with a physician
before you plan your exercise programme.
Intensity
• To achieve the best possible results the right intensity needs to be selected, this is based on your pulse.
This equation is often used to calculate your maximum pulse: Max pulse = 220 - Your age
• During training the workout pulse should be between 60% and 85% of your maximum pulse (see the
pulse chart in the end of the instruction manual).
• For the rst few weeks of exercise your workout pulse should be 60% of your maximum pulse.
• When you have improved your values and been training for a few weeks you can allow your workout
pulse to increase up to 85% of your maximum pulse.
Burning Fat
The body starts burning fat at 60% of your maximum pulse. The optimal fat burning will be at 60 to 70% of
your maximum pulse. You will achieve the best results if you normally do 3 workouts of 30 minutes per week.
Example:
You are 52 years old and are starting to exercise and burn fat.
Maximum pulse rate = 220 – 52 (age) = 168 pulse/min.
Lowest pulse rate = 168 x 0.6 = 101 pulse/min
Lowest pulse rate = 168 x 0.6 = 117 pulse/min
A workout pulse between 101 and 117 during training gives the best fat burning result in this example
according to the equation.
Workout tips!
Warm-up
Before every training session, you should warm-up for 5-10 minutes which can include some stretching and
cycling at low resistance.
Training session
During actual training a rate of 60 to 85% of the maximum pulse rate should be chosen.
The length of the training session can be calculated using the following as a guide.
• Daily training session = Approx.10 minutes per session.
• 2-3 times per week = Approx. 20 minutes per session.
• 1-2 times per week = Approx. 60 minutes per session.
F1.0 Excellent
F2.0 Good
F3.0 Average
F4.0 Below average
F5.0 Poor
F6.0 Very poor

14
ENGLISH
Cooling down
For an effective cooling-down of the muscles and the metabolism the intensity should be drastically
decreased during the last 5-10 minutes. Stretching is also helpful in preventing muscle stiffness.
For best results:
• Exercising will show results after quite a short time and your workout pulse will soon decrease during the
training sessions.
• In order to achieve this, you will need to be motivated to exercise regularly. Choose xed hours for your
training.
• Begin exercising carefully, and then increase the amount of your training as you become tter.
Wishing you luck with a healthy lifestyle!
8. Make all settings before starting the exercise
Step 1: The pedal straps and the saddle height
First adjust the pedal straps to t your foot comfortably. Adjust the saddle height: When one pedal is at its
most downward position, your knee on the opposite side should be slightly bent. Adjust the saddle height
like this:
1. Unscrew the knob (16).
2. Pull up the saddle post (32) to the correct height.
3. Screw on the knob (16) in the holes closest to the height on the saddle post.
4. Warning: Male sure that the saddle post is not pulled out more than to the MAX
marking.
Step 2: Adjusting the handlebar
The handlebar can be adjusted in many different positions, see the pictures. Try the different settings until
you nd the most comfortable position.
Adjust the handlebar like this:
1. Unscrew the T-bar handle (5).
2. Adjust the handlebar (4) to a comfortable position.
3. Tighten the T-bar handle (5).
N.B: The sleeve (5A) must be mounted on the T-bar handle (5) to the handlebar.
N.B: When exercising, always pedal forwards. The magnetic resistance will only work when you pedal
forwards (see picture).

15
ENGLISH
9. Exploded view
11

16
ENGLISH
Pos Description
1 Computer
2 Handlebar, plugs
3 Pulse sensor with cable
4 Handlebar
5 T-bar handle
5 A Sleeve for T-bar handle
6 L Cover left
6 R Cover right
7 Handlebar post
9 Computer cable (upper)
10 Computer cable (lower)
11 Bolt, washer for handlebar post
12 Frame
13 Screws and nuts (for the stabilizers)
14 Front stabilizer
15 Transportation wheels
16 Knob
17 Screw set (for side covers)
18 Pedals (L left, R right)
19 Side covers (left, right)
20 Screw set (for side covers)
21 L Crank, left
21 R Crank, right
22 Transportation wheels (set)
23 Rear stabilizer
24 Adjustable foot
25 Flywheel with magnetic brake
26 Driving belt
29 A Bearing (to crank)
29 C Washer (to crank)
29 D Lock ring (to crank)
30 Crank
31 Sleeve (for saddle post)
32 Saddle post
32 A Horizontal adjustment (for saddle)
33 Saddle
33 B Knob (lock knob for saddle)
34 Sensor
35 Hexagon bolt (for crank)
36 Washer (for crank)
37 Screw set (for covers)
38 Motor
39 AC/DC adaptor
40 Cover
Parts

17
ENGLISH
10. Pulse Chart
200
195
190
185
180
175
170
165
160
155
150
145
170
165.75
161.5
157.25
153
148.75
144.5
140.25
136
131.75
127.5
123.25
140
136.5
133
129.5
126
122.5
119
115.5
112
108.5
105
101.5
120
117
114
111
108
105
102
99
96
93
90
87
85
90
95
100
105
110
115
120
125
130
135
140
145
150
155
160
165
170
175
180
185
190
195
200
205
210
20 25 30 35 40 45 50 55 60 65 70 75 80
Age
Pulse
Max.
85%
70%
60%
Pulse
Age
Protecting the Environment
Sort and recycle products instead of disposing of them. All machines, electrical components and packing
material should be sorted and handled according to local environmental regulations.

18
SVENSKA
Motionscykel
Art.nr. 34-7509, modell AC-6472C
Läs igenom hela bruksanvisningen före användning och spara den sedan för framtida bruk. Vi reserverar oss
för ev. text- och bildfel samt ändringar av tekniska data. Vid tekniska problem eller andra frågor, kontakta vår
kundtjänst (se adressuppgifter på baksidan).
Innehållsförteckning
1. Produktbeskrivning
2. Säkerhet
3. Förpackningen innehåller:
4. Montering
5. Datorns funktioner
6. Användning
7. Träningsinstruktioner
8. Ställ in motionscykeln optimalt innan träningspasset börjar.
9. Sprängskiss
10. Pulsdiagram

19
SVENSKA
1. Produktbeskrivning
• Motionscykel med dator som varierar belastningen med hjälp av magnetstyrt motstånd.
• Hastighet, distans, kaloriförbrukning & puls visas.
• Avsedd för belastning upp till 100 kg.
Obs! Denna produkt är inte en ergometer då vissa mätvärden styrs av aktuell hastighet.
2. Säkerhet
Produkten är testad enligt dessa säkerhetsstandarder: EN975-1+A1 och EN975-5/HC
Varning:
Rådgör alltid med en läkare innan du börjar träna om du lider av någon sjukdom eller annan åkomma som
kan förvärras av fysisk träning. Avbryt genast träningen om du känner dig yr. Kontrollera att alla bultar/
muttrar och andra delar sitter fast på motionscykeln och är åtdragna. Placera motionscykeln så att det nns
en öppen yta runt motionscykeln på minst 1 meter i alla riktningar.
Läs hela bruksanvisningen innan du börjar träna med motionscykeln, spara bruksanvisningen för
framtida bruk.
• Motionscykeln är konstruerad för personlig användning i hemmet och är testad för en kroppsvikt
upp till 100 kg.
• Följ monteringsanvisningens olika steg noga vid monteringen.
• Använd endast de delar eller tillbehör som medföljer förpackningen.
• Kontrollera att alla delar nns med i förpackningen innan du börjar montera motionscykeln.
(Se ”Förpackningen innehåller”).
• Använd rätt verktyg vid monteringen, be någon om hjälp att hålla i om det behövs.
• Placera motionscykeln på ett jämnt halkfritt underlag i en torr lokal, den ska inte användas eller förvaras
i utomhus eller i lokaler som har hög luftfuktighet.
• Kontrollera innan första användningstillfället och sedan var eller varannan månad att alla bultar/muttrar
är åtdragna och oskadade samt att de sitter fast på motionscykeln. Ersätt ev. slitna delar omedelbart,
använd inte motionscykeln innan den är åtgärdad.
• Använd endast originaldelar (eller motsvarande) vid reparation.
• Använd aldrig starka lösningsmedel/rengöringsmedel vid rengöring.
• Använd endast motionscykeln om den är korrekt monterad, inspektera den innan användning.
• Se till att de delar som kan justeras håller sig inom rekommenderat inställningsområde och inte dras ut
för långt. Detta gäller särskilt sadelns max höjd, höj inte sadelstolpen över ”MAX” –markeringen.
• Motionscykeln är främst avsedd för vuxna. Barn bör endast använda den under tillsyn av någon vuxen.
• Den som använder motionscykeln bör vara medveten om de faror som nns t.ex. risk att fastna med
kläder i delar som rör sig under användning.
• Rådgör gärna med en läkare eller sjukgymnast innan du börjar träna så att de kan ge råd om lämplig
träningsmetod och belastning. Varning! Felaktig/överdriven träning kan ge skador.
• Följ de träningsinstruktioner som nns i bruksanvisningen.
• Arbetsbelastningen kan justeras från datorn.

20
SVENSKA
3. Förpackningen innehåller
Bult M8x70
Kupolmutter M8
Bricka M8
Insexnyckel
Stjärnmejsel
Table of contents
Languages:
Popular Exercise Bike manuals by other brands

NordicTrack
NordicTrack Gx 3.4 Bike Uživatelská příručka

Precor
Precor Experience 600 Series Getting started guide

Skandika
Skandika WIRY Series Assembly instructions and user guide

Vision Fitness
Vision Fitness R2200HRT owner's guide

York Fitness
York Fitness C520 instruction manual

Inspire
Inspire IC 1 instructions