Clas Ohlson Back Track User manual

ENGLISHSVENSKANORSKSUOMI
GPS Receiver Back Track
Art.no. Model
36-3761 Back Track


ENGLISH
GPS Receiver Back Track
Please read the entire instruction manual before use and save it for future
reference. We reserve the right for any errors in text or images and for making any
necessary technical changes to this document. If you should have any questions
concerning technical problems please contact our Customer Services.
1. Safety
N.B. A GPS receiver is only a complement for a map, compass and other tradi-
tional navigational tools. The device must be used in the correct way and with
common sense. If the batteries run out it will be of no assistance.
2. Product description
• A simple electronic GPS compass for hiking, outdoor activities, etc.
• Store your starting location and safely navigate your way back using the help-
ful display that shows both direction and distance from your starting point.
• The memory has four starting points (waypoints).
• Can also be used as a compass.
• Backlit screen with both clock and thermometer.
• Batteries: 2 x AAA/LR03.
• Size: 88 x 53 x 29 mm.
GPS (Global Positioning System) is a satellite navigational system developed by
the US Defence Department. The system consists of 32 satellites. These orbit
around the earth twice a day and transmit a weak radio signal. They are controlled
from receiving stations on earth. The GPS device receives the transmitted radio
signals and uses the distance and positioning of at least four satellites to calculate
your current latitude, longitude and altitude.
ENGLISH
3. Package contents
• GPS Receiver
• Instruction manual
• Neck strap
4. Operation
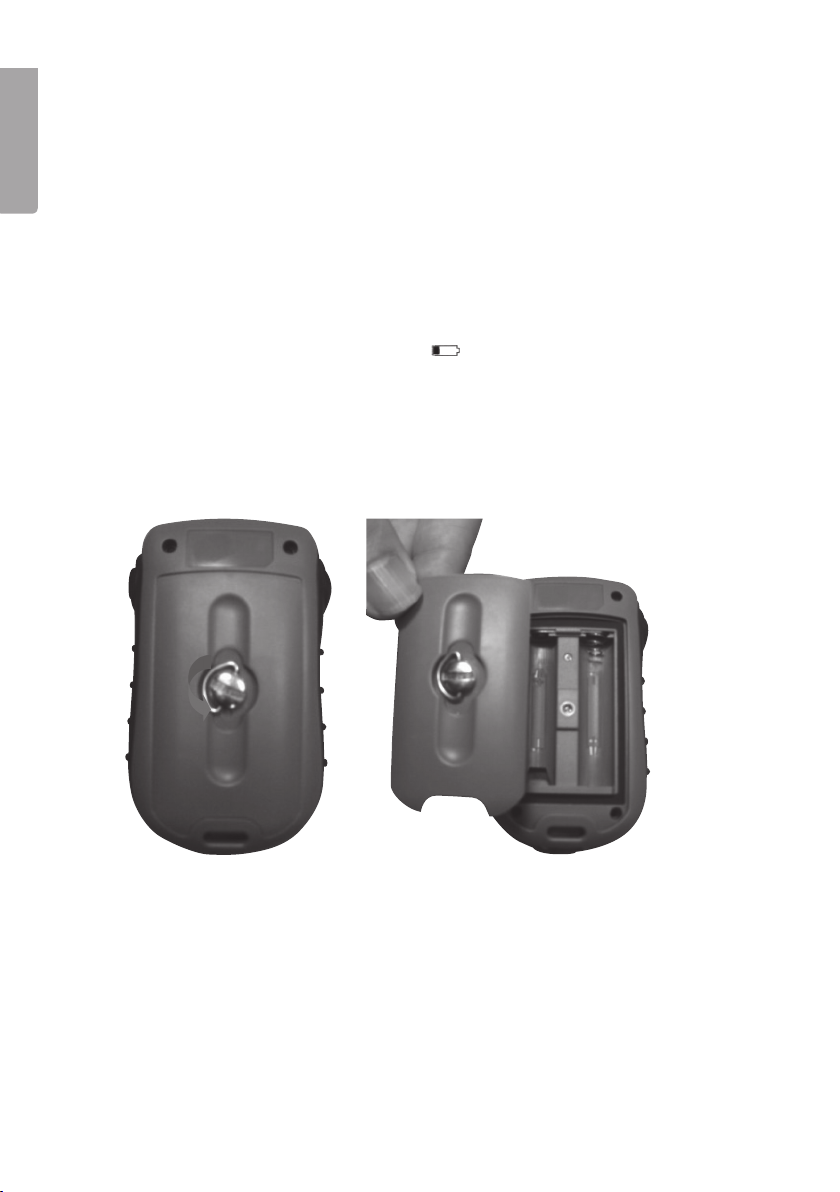
4.1 Inserting the batteries
Change the battery when the battery icon appears on the display.
1. Turn the screw clockwise to open the battery cover.
2. Insert two fresh (AAA/LR03) batteries according to the markings in the
battery compartment.
3. Replace the battery cover and tighten the screw.

ENGLISH
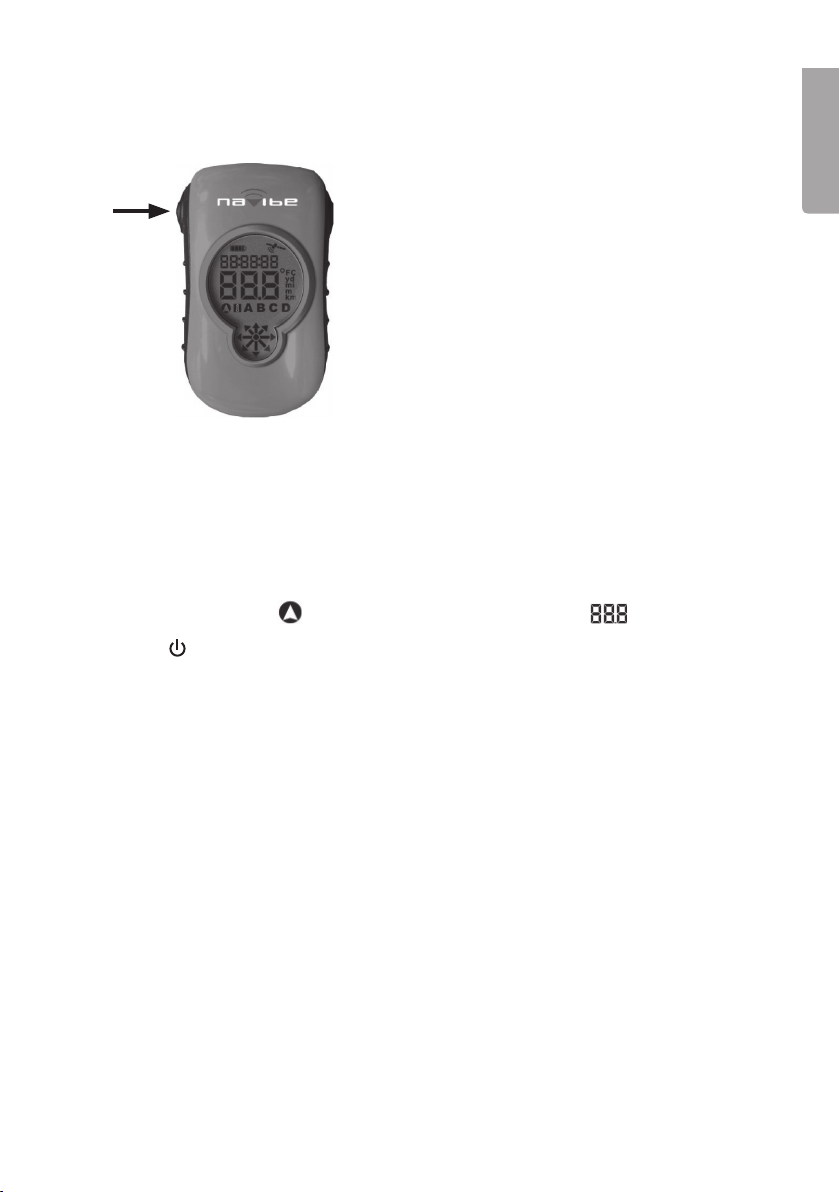
Distance &
Temperature
[ ]
Power/mode button
Icon displayed
when the GPS locks
onto a satellite
Degrees or tempera-
ture (in compass and
temperature modes)
Starting locations
(A-B-C-D)
Directional arrow
Temperature
mode
Compass mode
Distance to start-
ing point (or
compass direction
resp. temperature)
Real Time
Battery indicator
[] Save
current
position,
backlight
4.2 Buttons och features
[ ]: Turn on the GPS by holding down the button for 1 second or turn it off by
holding down the button for 3 seconds. Press the button further to browse through
the different modes:
1. Compass
2. Temperature display
3 – 6. Navigational assistance

ENGLISH
4.3 Getting started
1. Hold in [ ] for approx. 1 second to turn on the GPS. Make sure that you
are outdoors in an open area for the best possible reception. If none of the
buttons is pressed down in 30* minutes the GPS shuts down automatically to
save power.
*30 minutes if you have a satellite lock or 5 minutes if you do not have
a satellite lock.
2. The device needs time to lock onto the satellite signals. When at least four
satellites have been locked onto, the satellite icon will stop ashing. N.B. The
rst time the GPS is used it will take longer for the device to locate the satel-
lites. The following times should be much faster. Time can be saved by turning
on the GPS a few minutes before it needs to be used. The GPS will also take
longer to locate the satellite signals if you have signicantly changed your posi-
tion from the location where you had last used the device.
• ashes when the GPS is scanning for satellites (The device must
locate at least four satellites before it is ready for use).
• When the icon stops ashing the device will be ready for use.
• If no satellites can be “locked onto”, the time display will show --:--:-- and
the distance display will show ---.
3. The GPS receiver has three areas of use: Compass , Temperature
display and Navigation assistance .
4.4 Using the compass
The GPS receiver starts in compass mode . Press [ ] to switch modes.
N.B. Hold the GPS receiver horizontal when using it as a compass.
• The display should be read from bottom to top: The compass display arrow
points North. The direction from the compass is shown in degrees. Also shown
are the time display, battery icon and satellite lock icon.

ENGLISH
4.5 Using the thermometer
The GPS receiver starts in compass mode . Press [ ] to select temperature
mode .
• The display should be read from bottom to top: The compass display arrow
points north. The temperature display . is shown in degrees. Also shown are
the time display, battery icon and satellite lock icon.
4.6 Using the navigation assistance
The GPS receiver starts in compass mode . Press [ ] to select navigation as-
sistance. , , or will be displayed. The readings from the last entered
location are displayed.
• The display should be read from bottom to top: The arrow points to the se-
lected destination ( , , or ). Distance to the selected destination is
displayed in Yards or Metres - Miles or Kilometres (distance is calculated for a
direct linear route).

ENGLISH
4.7 Saving a destination (waypoint)
When you are at a destination to which you wish to return you can save this
position in the GPS memory by:
1. First checking that the satellite connection icon is shown solid (not ashing).
2. Press [ ] to select the desired designation ( , , or ), e.g. where you
have parked your car or a scenic view.
3. Hold in [] for approx. 3 seconds until 0 is displayed. This indicates that the
location is saved under your selected designation.
4. If you move from your saved position the compass arrow will display in which
direction and what distance you are from your saved destination.
5. You may now shut off the GPS receiver if you wish by holding in [ ].
Important:
• Make sure that you save your position under the proper designation. If you save
a new location using the same designation the old one will be erased.
• Remember to keep in mind which of the four designations you have saved your
position on so that you are certain that you are going in the right direction.
• ONLY hold in [] when you wish to save a destination. If you hold in this
button by mistake, your previously saved position will be erased.
• When changing battery some saved data may be erased.
4.8 Retrieving a saved destination (waypoint)
1. Hold in [ ] for 1 second to turn on the GPS receiver. The latest entry will be
saved into memory. Example: If you have saved the location where you have
parked your car, both the direction and distance to your car will be shown.
2. If you wish to nd your way to another saved location you have to choose the
desired designation ( , , or ) by pressing [ ].
3. You have reached your saved destination when the display shows 0 and all the
directional arrows appear simultaneously on the display.
ENGLISH
5. Backlight
Press [] to turn on the background light. It will light for about 30 seconds.
6. Settings
6.1 Setting the time zone in compass mode
The time zones are 012 to –13. Set 00 for the UK.
1. Hold in [] for approx. 3 seconds in Compass mode. The following icons will
ash on the display: (compass mode), --:--:-- (time) and (time zone).
2. Press [ ] the required number of times to set the time zone
(The UK is GMT 000).
3. Hold in [] for approx. 3 seconds to return to Compass mode.
ENGLISH
6.2 Setting the temperature display
Hold in [] and [ ] simultaneoulsy for about 3 seconds in Temperature mode to
switch between displaying: °C or °F.
6.3 Setting the distance display
Hold in [] and [ ] simultaneoulsy for about 3 seconds in Navigation mode to
switch between displaying in Metres or Yards: The display can show a maximum
of 999 km (or miles).
7. Care and maintenance
• Do not attempt to disassemble or modify the product.
• The product contains no parts which can be adjusted or repaired by the owner.
• Prolonged exposure to direct sunlight or high temperature may damage
the product.
8. Troubleshooting guide
Problem Possible cause Solution
The dis-
play does
not come
on.
1.Bad battery.
2.[ ] is not
depressed.
1.Replace battery.
2.Hold in [ ] until the display comes on.
No satel-
lites are
located.
1.Scan time is
too short.
2.Obstructed
signal path.
3.You are indoors.
1.Make sure the satellite icon stops ash-
ing. This means that the required number
of satellites have been locked onto.
2.Find an open area outdoors and try again.
3.Find an open area outdoors and try again.
Table of contents
Languages:
Other Clas Ohlson GPS manuals


