Classified POWERSHIFT HUB User manual

USER MANUAL
POWERSHIFT HUB

© Copyright Classified Cycling BV
This document is a translation of the originalDutchuser manual.
All rights reserved.
No part of this publication may be reproduced, transmitted, transcribed, stored in a retrieval system or translated
into any language or computer language in any form or by any means, electronic, mechanical, optical, chemical,
manual or otherwise, without the prior written permission of Classified Cycling BV. Classified Cycling BV reserves the
right to change any information in this document without notice. These changes will be incorporated in new editions
of this manual or in additional documents and publications.
Product names or trademarks of other companies are used for identification purposes only and are the property of
their respective owners.
Classified Cycling BV
Slachthuisstraat 120 B10 [email protected]
2300 Turnhout https://classified-cycling.cc
Doc. nr. classified_powershift_hub_en
Version 17/02/2021

Classified Powershift hub
Content
1. Introduction 3
1.1 Symbols used...............................................................................................................................................................................................3
1.2 Intended use.................................................................................................................................................................................................3
1.3 Prohibited use.............................................................................................................................................................................................4
1.4 Type designation.......................................................................................................................................................................................4
2. Description 6
2.1 Part names.................................................................................................................................................................................................... 6
3. Principles of operation 8
3.1 The operation of the Classified Powershift hub....................................................................................................................8
4. Safety 9
4.1 Safety precautions....................................................................................................................................................................................9
4.2 Hazardous substances...........................................................................................................................................................................9
5. Storage and transport 10
5.1 Storing and transporting the Classified Powershift hub................................................................................................10
6. Assembly and installation 11
6.1 What is included?.....................................................................................................................................................................................11
6.2 Replacing a wheel with a Classified Powershift hub......................................................................................................... 11
6.3 Bluetooth pairing..................................................................................................................................................................................... 13
7. Initial use 15
7.1 Initial use.......................................................................................................................................................................................................15
8. Operation 16
8.1 Operation......................................................................................................................................................................................................16
9. Maintenance 17
9.1 Maintenance schedule..........................................................................................................................................................................17
9.2 Checking the Powershift hub..........................................................................................................................................................17
9.3 Tools required............................................................................................................................................................................................17
9.4 Checking the battery status............................................................................................................................................................ 17
9.5 Replacing the handlebar unit's battery.....................................................................................................................................18
9.6 Recharging the battery of the smart thru axle....................................................................................................................19
9.7 Cleaning the Classified Powershift hub...................................................................................................................................20
9.8 Troubleshooting.......................................................................................................................................................................................20
EN
1

Classified Powershift hub
EN
10. Recycling 24
10.1 Recycling the Classified Powershift hub................................................................................................................................. 24
11. Appendices 25
11.1 Warranty....................................................................................................................................................................................................... 25
11.2 EC Declaration..........................................................................................................................................................................................25
11.3 Spare parts................................................................................................................................................................................................. 25
Index 26
2
Classified Powershift hub
1. Introduction
1.1 Symbols used
This user manual uses the following symbols:
TIP
Provides the user with suggestions and advice to perform a procedure more easily or
conveniently.
NOTE
A general comment which may oer an increased economic utility.
ENVIRONMENT
Guidelines that must be followed when using hazardous substances and when recycling
products and materials.
CAUTION
Indicates a hazardous situation which, if the safety instructions are not followed, may lead to
minor or moderate injury and/or damage to the product or the environment.
WARNING
Indicates a hazardous situation which, if the safety instructions are not followed, may lead to
serious injury or death, and/or serious damage to the product or the environment.
DANGER
Indicates a hazardous situation which, if the safety instructions are not followed, will lead to
serious injury or death.
1.2 Intended use
The product is a wirelessly shiftable 2 speed Powershift hub which can be integrated in road and gravel
bikes.
The product may only be used on a bicycle:
•with compatible chains. For optimal shifting performance, the following chains are recommended:
Shimano CN-HG601-11, CN-HG701-11, CN-HG901-11, KMC X11, DLC11. Other chains for 11 speed
cassettes may aect the shifting quality.
•with a front chainring with at least 40 teeth.
•combined with handlebars equipped with a hole for wiring near to the end. For example: Pro Vibe
alloy and Pro Vibe carbon
•on a bicycle with an ERD (eective rim diameter) between 548 - 594 mm.
•with center lock disc brakes
•without electric power assistance
EN
1. Introduction
1.1 Symbols used 3

Classified Powershift hub
EN
•with a frame having an installation width of 142 mm for the rear wheel
•in ambient temperatures (while in use) between -15 °C and +50 °C
•with an electronic shifter/interface equipped with a 2,5 mm audio jack, compatible with the
Classified handlebar unit
•with a frame equipped with integrated torque support or using the external torque support (which
has been released for the specific frame)
1.3 Prohibited use
It is prohibited to use the product for any other purpose than those indicated in this manual, the safety
indications or other safety documents accompanying the product.
Any modification to the product may aect its safety and warranty!
It is prohibited to use any other combinations than those described in the intended use.
It is prohibited to drill holes in the handlebar for the wiring. This will void the warranty and may lead to
injuries or death.
It is prohibited to use the product in conjunction with 2 front chainrings.
It is prohibited to open the smart thru axle or the Powershift hub for any purpose not described in the
maintenance section.
It is prohibited to install parts on the product which have not been approved by Classified Cycling.
These may:
•aect or prevent the operation of the product,
•endanger the safety of the user or other people,
•shorten the life of the product,
•void the compliance with the CE directives.
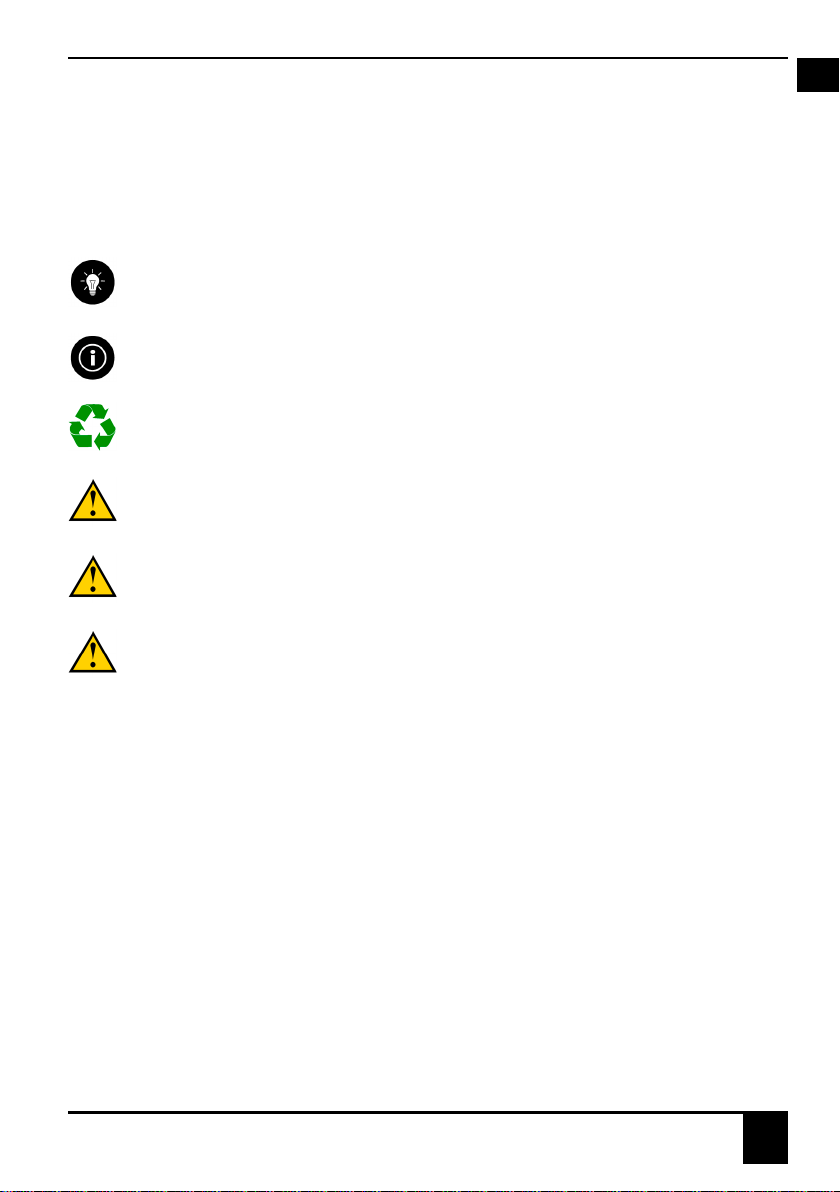
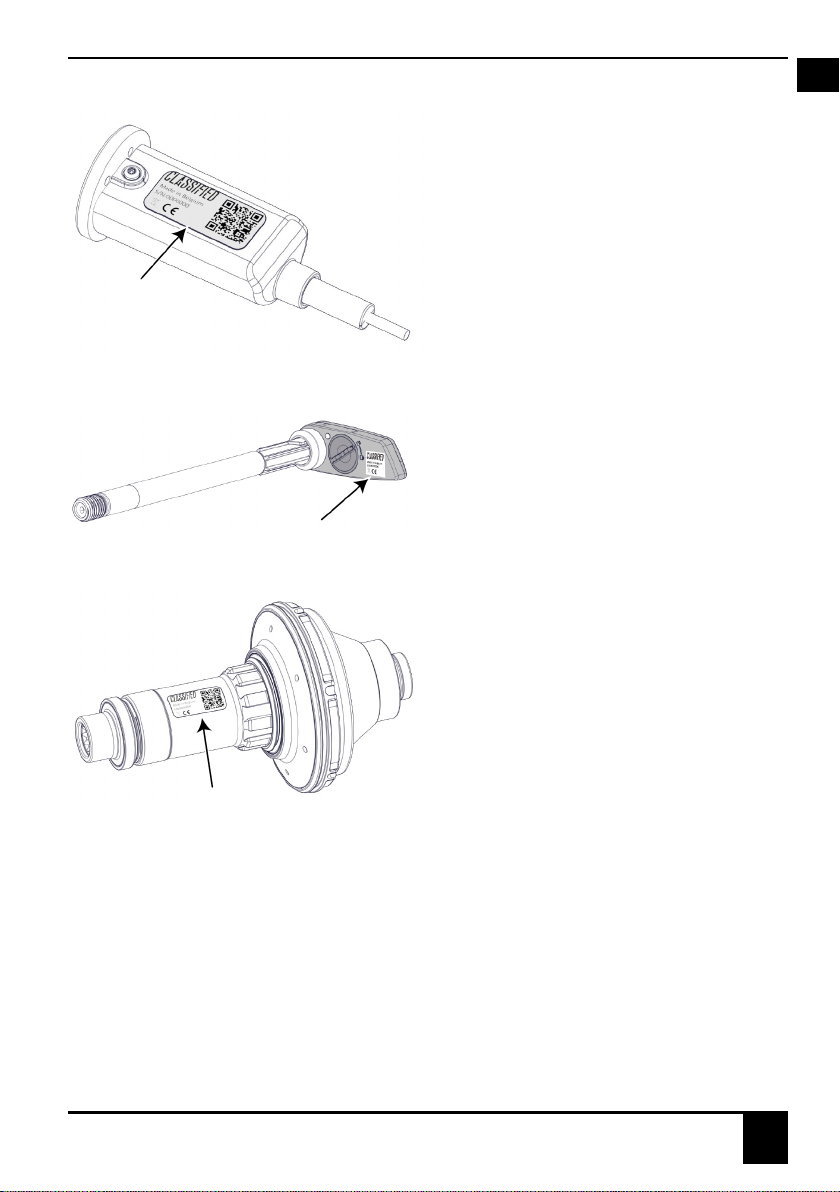
1.4 Type designation
The various Classified components are labelled with a serial number. The handlebar unit and the
Powershift hub are also marked with a QR code. A registration card is included with a copy of the
components' serial numbers. Scan the QR code on the registration card in order to register the
component.
1. Introduction
41.3 Prohibited use
Classified Powershift hub
Fig. 1: Handlebar unit label
Fig. 2: Smart thru axle label
Fig. 3: Powershift hub label
EN
1. Introduction
1.4 Type designation 5

Classified Powershift hub
EN
2. Description
2.1 Part names
Fig. 4: Parts
No. Part Explanation
1 Handlebar unit The wireless handlebar unit is installed into
the left-hand side of the handlebar and is
controlled by a shifter or satellite buttons
compatible with Classified. The handlebar
unit is powered by a battery.
2 Smart thru axle The smart thru axle receives the wireless
shift signal from the handlebar unit
and shifts the Powershift hub through
contactless energy transfer. The smart thru
axle is equipped with a rechargeable battery.
3 Center lock ring The center lock ring fixes the center lock
brake disc to the Classified hubshell
4 Hubshell The hubshell is attached to the rim by
spokes. You can equip multiple rims
with a Classified hubshell and use them
in combination with a single Classified
Powershift hub.
2. Description
62.1 Part names

Classified Powershift hub
No. Part Explanation
5 Brake-side end cap The end cap seals the Powershift hub and
interfaces with the frame from the inside.
6 Hubshell lock ring The hubshell lock ring ensures that the
hubshell is fixed to the Powershift hub.
7 Powershift hub The Powershift hub contains the shifting
mechanism and is controlled electronically.
The Powershift hub does not contain a
battery and gets it shifting power from the
smart thru axle.
8 Cassette The Classified cassette is mounted to the
Powershift hub.
9 Cassette lock ring The cassette lock ring fixes the cassette to
the Powershift hub.
EN
2. Description
2.1 Part names 7

Classified Powershift hub
EN
3. Principles of operation
3.1 The operation of the Classified Powershift hub
Through a compatible shifter or satellite button, a shifting command is sent to the handlebar unit. The
handlebar unit wirelessly transmits the shifting command to the smart thru axle using Bluetooth. The
smart thru axle transfers the power needed for shifting and the shifting command to the Powershift
hub. The shifting takes place internally within the Powershift hub.
The smart thru axle transmits your current gear ratio and battery status to your GPS bike computer
(not included) using ANT+.
The Powershift hub has 2 gear ratios:
•A 1:1 ratio, where the speed of the cassette is equal to the speed of the wheel. This is similar to the
large chainring on a traditional 2x.
•A 0.686 ratio (reduction ratio), where the speed of the wheel is lower than the speed of the
cassette. This is similar to the small chainring on a traditional 2x.
Shifting from 1:1 to the reduction ratio is like shifting from the large to the small chainring on a
traditional 2x.
Large front chainring Virtual small front chainring (Classified) *
52 36
50 34
48 33
46 32
44 30
42 29
40 27
*: These values are rounded.
3. Principles of operation
83.1 The operation of the Classified Powershift hub
Classified Powershift hub
4. Safety
4.1 Safety precautions
CAUTION
Read the user manual before using the product! Retain this user manual for future reference.
Also retain the accessories and tools included for future use.
WARNING
Never open or disassemble the Classified Powershift hub. Damage to the Classified Powershift
hub and serious injuries may occur. Furthermore, the warranty will be voided.
WARNING
As well as the intended and prohibited use, the maintenance requirements must be complied
with. Failure to comply correctly may result in the Classified Powershift hub or the chain
breaking. This may cause serious injuries.
WARNING
The Classified Powershift hub can withstand riding in rainy weather conditions. However, do
not submerge the Classified Powershift hub in water and do not clean it using a high pressure
cleaner. Damage to the Classified Powershift hub may occur, leading to serious injuries as a
result of defective operation.
4.2 Hazardous substances
The product contains:
•a replaceable button cell battery CR1632
•a rechargeable lithium ion battery, capacity 320 mAh
The lubricant used to lubricate the chain, and hence indirectly lubricating the cassette, is a hazardous
substance. Carefully read the lubricant's safety instructions.
EN
4. Safety
4.1 Safety precautions 9

Classified Powershift hub
EN
5. Storage and transport
5.1 Storing and transporting the Classified Powershift hub
If you are not going to use the Classified Powershift hub for an extended period of time and want to
store it for future use, recharge the battery of the smart thru axle once every 3 months.
The temperature for storage (when not in use) or transport is minimum -15 °C and maximum 60 °C.
After extended transport, it is recommended to recharge the battery of the smart thru axle. Vibrations
during transport potentially keep the Smart thru axle awake for prolonged periods of time.
5. Storage and transport
10 5.1 Storing and transporting the Classified Powershift hub

Classified Powershift hub
6. Assembly and installation
6.1 What is included?
Check that the following items are included. If not, please contact your distributor.
•The Classified Powershift hub, consisting of a handlebar unit, smart thru axle, hubshell and
Powershift hub + cassette
•The user manual
•USB charging cable 1.5 m
•Torx T5 screwdriver
•Registration card
NOTE
Check that all parts are undamaged. Please contact Classified Cycling if that is not the case.
6.2 Replacing a wheel with a Classified Powershift hub
Tools required:
•Lock ring tool
•Torque wrench
•Chain whip
Fig. 5: eplacing a wheel
1. Shift the Powershift hub to the 1:1 ratio and shift the cassette to the smallest sprocket using the
rear derailleur.
EN
6. Assembly and installation
6.1 What is included? 11

Classified Powershift hub
EN
2. Remove the wheel from the bicycle as you would remove any traditional wheel by removing the
Smart thru axle
a) Declutch the rear derailleur by setting the clutch to O.
b) Turn the smart thru axle anti-clockwise (1).
c) Pull the smart thru axle out of the wheel (2).
d) Push the rear derailleur backwards and carefully remove the wheel from the bicycle (3).
3. Unscrew the cassette lock ring (5) using the lock ring tool.
If the gear is not set to the 1:1 ratio, you will need to hold the cassette back using a chain whip.
4. Remove the cassette (4) from the Powershift hub.
5. Remove the end cap (6) on the side of the brake disc.
6. Unscrew the hubshell lock ring (7) using the lock ring tool.
7. Pull the Powershift hub (8) out of the hubshell.
8. Acquire a new wheel with an installed and certified Classified hubshell.
9. Place the Powershift hub into the hubshell and complete the installation in the reverse order of
removal. Use the following tightening torques:
•Cassette lock ring tightening torque: minimum 30 Nm and maximum 40 Nm.
•Hubshell lock ring tightening torque: minimum 30 Nm and maximum 40 Nm.
10. Reinstall the end cap on the disc brake side.
11. Carefully install the wheel in the bicycle.
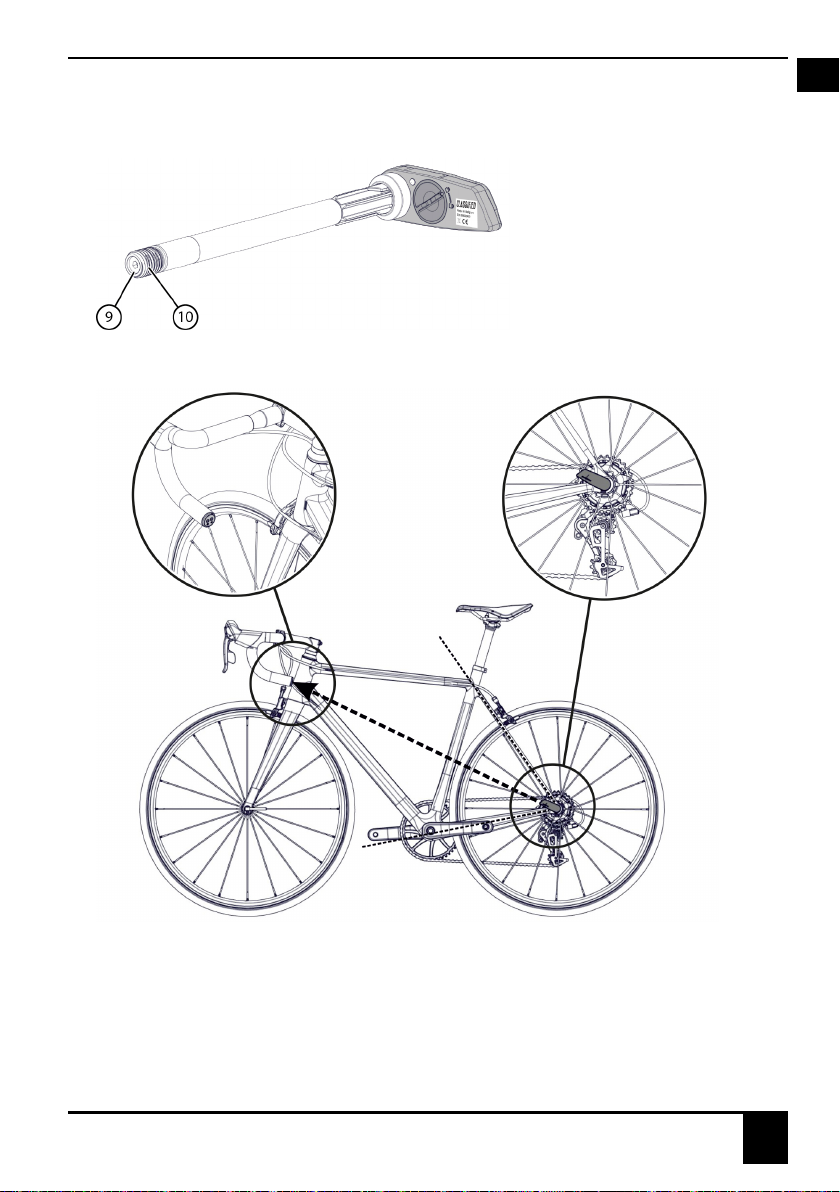
12. Install the smart thru axle, ensuring that the thru axle lever points towards the handlebar unit.
If required, loosen the smart thru axle again and loosen the hex screw (9) on the end of the smart
thru axle. Now the stud (10) can be removed from the axle and turned. Retighten the smart thru
6. Assembly and installation
12 6.2 Replacing a wheel with a Classified Powershift hub
Classified Powershift hub
axle and check that the thru axle lever points towards the handlebar unit. Repeat this action until
the thru axle lever points in the right direction and the smart thru axle is tight.
Fig. 6: Thru axle lever position adjustment
Fig. 7: Thru axle lever position
EN
6. Assembly and installation
6.3 Bluetooth pairing 13
Classified Powershift hub
EN
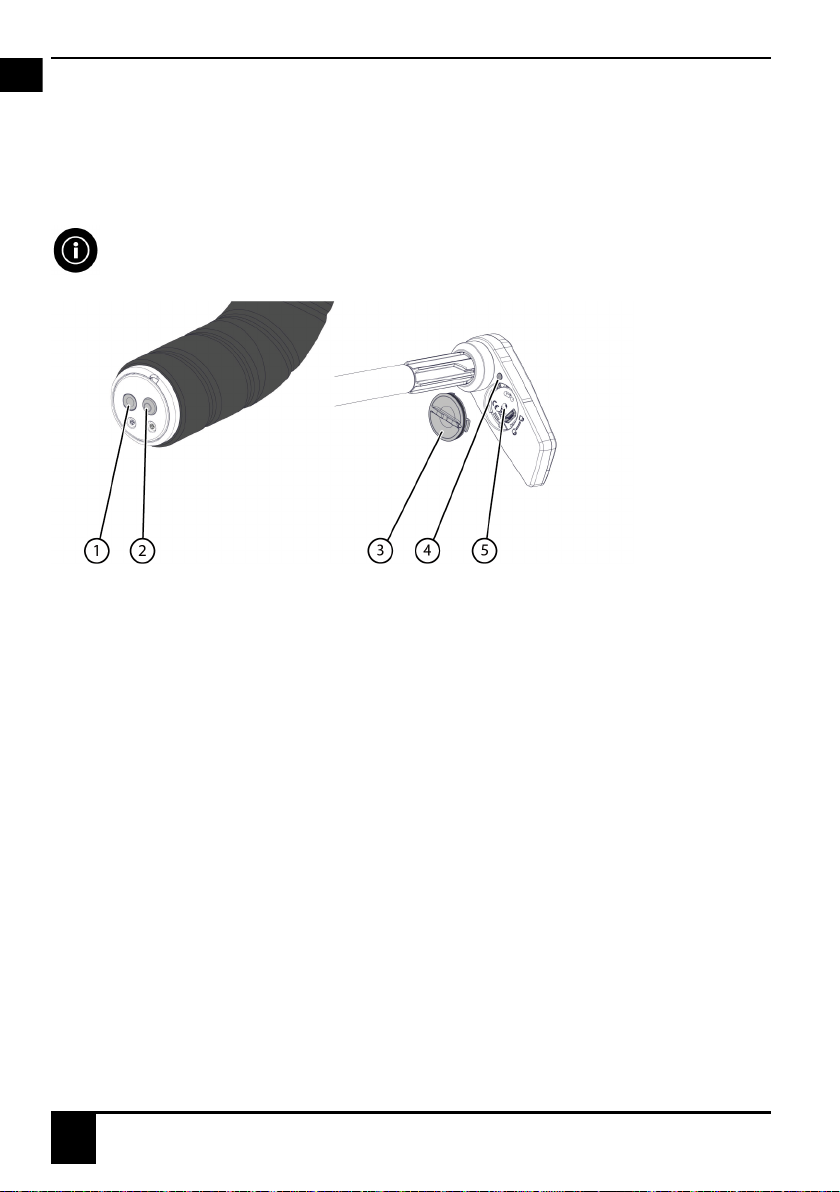
6.3 Bluetooth pairing
On delivery, the handlebar unit is already paired correctly to the smart thru axle through Bluetooth.
If they become unpaired or you buy an additional Classified Powershift hub that you want to operate
using the same handlebar unit, you will have to create a new Bluetooth connection.
NOTE
Only Classified modules can be paired through Bluetooth. Pairing with telephones, tablets or
other electronic devices is not possible.
Fig. 8: Buttons and LEDs
1. Remove the smart thru axle.
2. The bayonet lock (3) will automatically come loose by turning counter clockwise beyond the
unlocked sign
3. Press and hold the button (5) of the smart thru axle for at least 5 seconds using the supplied Torx
T5 screwdriver until the LED (4) starts to blink.
4. Press and hold the button (2) of the handlebar unit for at least 5 seconds until the LED (1) starts to
blink.
When both LEDs go o at the same time, the Bluetooth connection has been established.
5. Check the connection by shifting the Classified hub using the shifter or the satellite buttons.
The LED of the handlebar unit and the LED of the smart thru axle both briefly illuminate when
shifting.
6. Assembly and installation
14 6.3 Bluetooth pairing
Classified Powershift hub
7. Initial use
7.1 Initial use
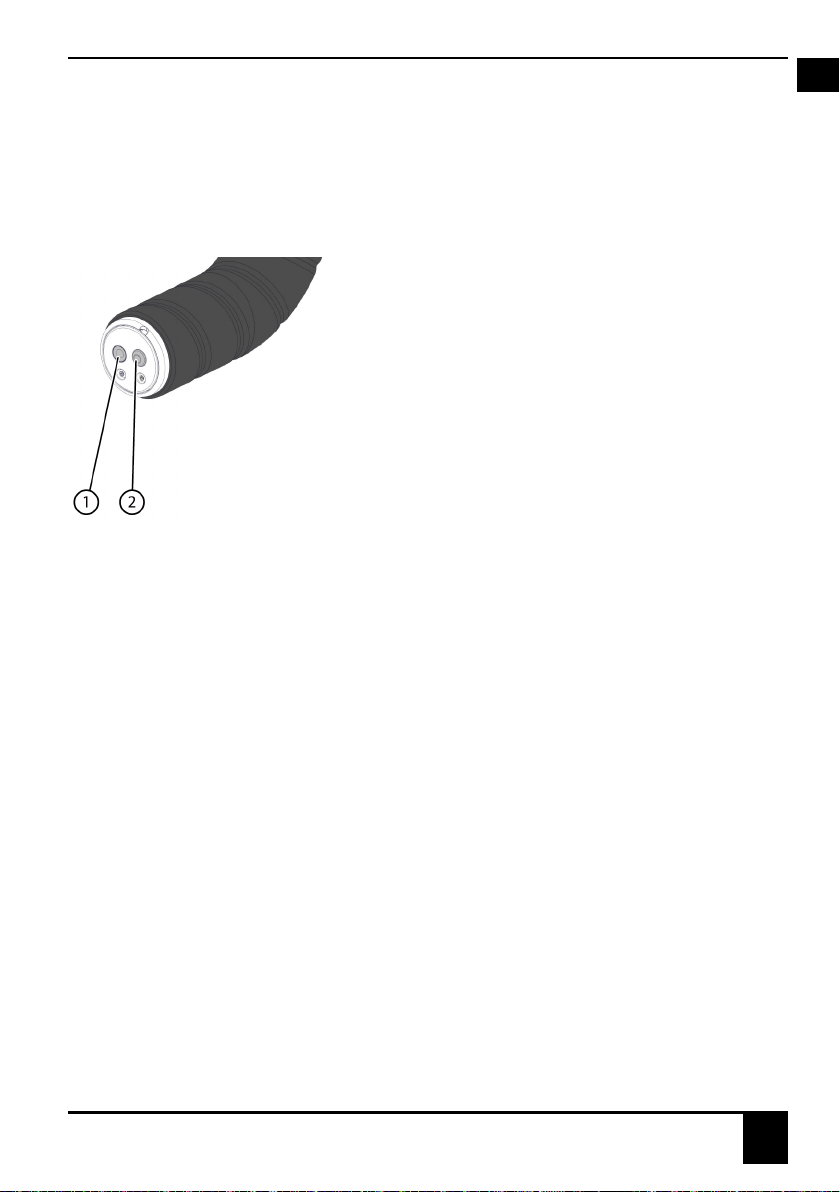
Before using the Classified Powershift hub, it is recommended that you check the following items:
Fig. 9: Button and LED on the handlebar unit
1. Check the handlebar unit. Press and hold the button (2) less than 2 seconds in order to check the
battery status. If the LED (1) blinks red or does not blink, the battery must be replaced. Please refer
to Replacing the handlebar unit's battery on page 18.
2. Recharge the battery of the smart thru axle. Please refer to Recharging the battery of the smart
thru axle on page 19.
3. Wake up the handlebar unit up by shifting once and then waiting 3 seconds.
The vibration-sensitive smart thru axle will start up automatically when the bicycle moves.
EN
7. Initial use
7.1 Initial use 15

Classified Powershift hub
EN
8. Operation
8.1 Operation
Please refer to the bicycle manufacturer's manual or the manual for the Classified compatible shifter or
satellite button.
8. Operation
16 8.1 Operation

Classified Powershift hub
9. Maintenance
9.1 Maintenance schedule
NOTE
The indicated frequency depends on the use of the Classified Powershift hub and the riding
conditions.
Action Frequency Execution
Inspection Before riding Please refer to Checking the
Powershift hub on page 17
Cleaning After riding Please refer to Cleaning the
Classified Powershift hub on
page 20
Lubrication After riding Lubricate the chain
9.2 Checking the Powershift hub
Perform this check each time before you ride the bicycle!
WARNING
If you notice any issues, please contact Classified.
1. Check the status of the batteries. Please refer to Checking the battery status on page 17.
2. Check the Bluetooth connection. Please refer to Bluetooth pairing on page 13.
9.3 Tools required
•Lock ring tool
•Torx T5 screwdriver
•Flat-head screwdriver
•Torque wrench
•Chain whip
EN
9. Maintenance
9.1 Maintenance schedule 17

Classified Powershift hub
EN
9.4 Checking the battery status
The handlebar unit and the smart thru axle are both equipped with an LED. The colour of the LED also
indicates the battery status. You can check the colour of the LEDs while shifting. However, for safety it
is recommended to get o the bicycle and perform the following procedure.
Please refer to figure Fig. 8: Buttons and LEDs on page 14.
Press and hold the button on the handlebar unit or the smart thru axle for less than 2 seconds and
observe the colour of the LED:
LED colour Battery status
Green The battery status is OK
Blinking red Depending on which LED is blinking red:
•Handlebar unit LED: replace the handlebar
unit's battery.
•Smart thru axle LED: recharge the mart
electronic thru axle's battery.
9.5 Replacing the handlebar unit's battery
You can replace the handlebar unit's button cell battery without removing the tape from your handlebar.
Fig. 10: eplacing the handlebar unit's battery
1. Loosen the twee Torx T5 screws on the handlebar unit.
9. Maintenance
18 9.5 Replacing the handlebar unit's battery
Other manuals for POWERSHIFT HUB
1
Table of contents


