Steadyrack Bike Rack Installation instructions
The first step is to mark the exact fixing position of the bolts. You may need
someone to help you hold the bike still for this step.
Take the rack out of the box, remove the end caps, then open it up and place it
down on the floor away from the wall.
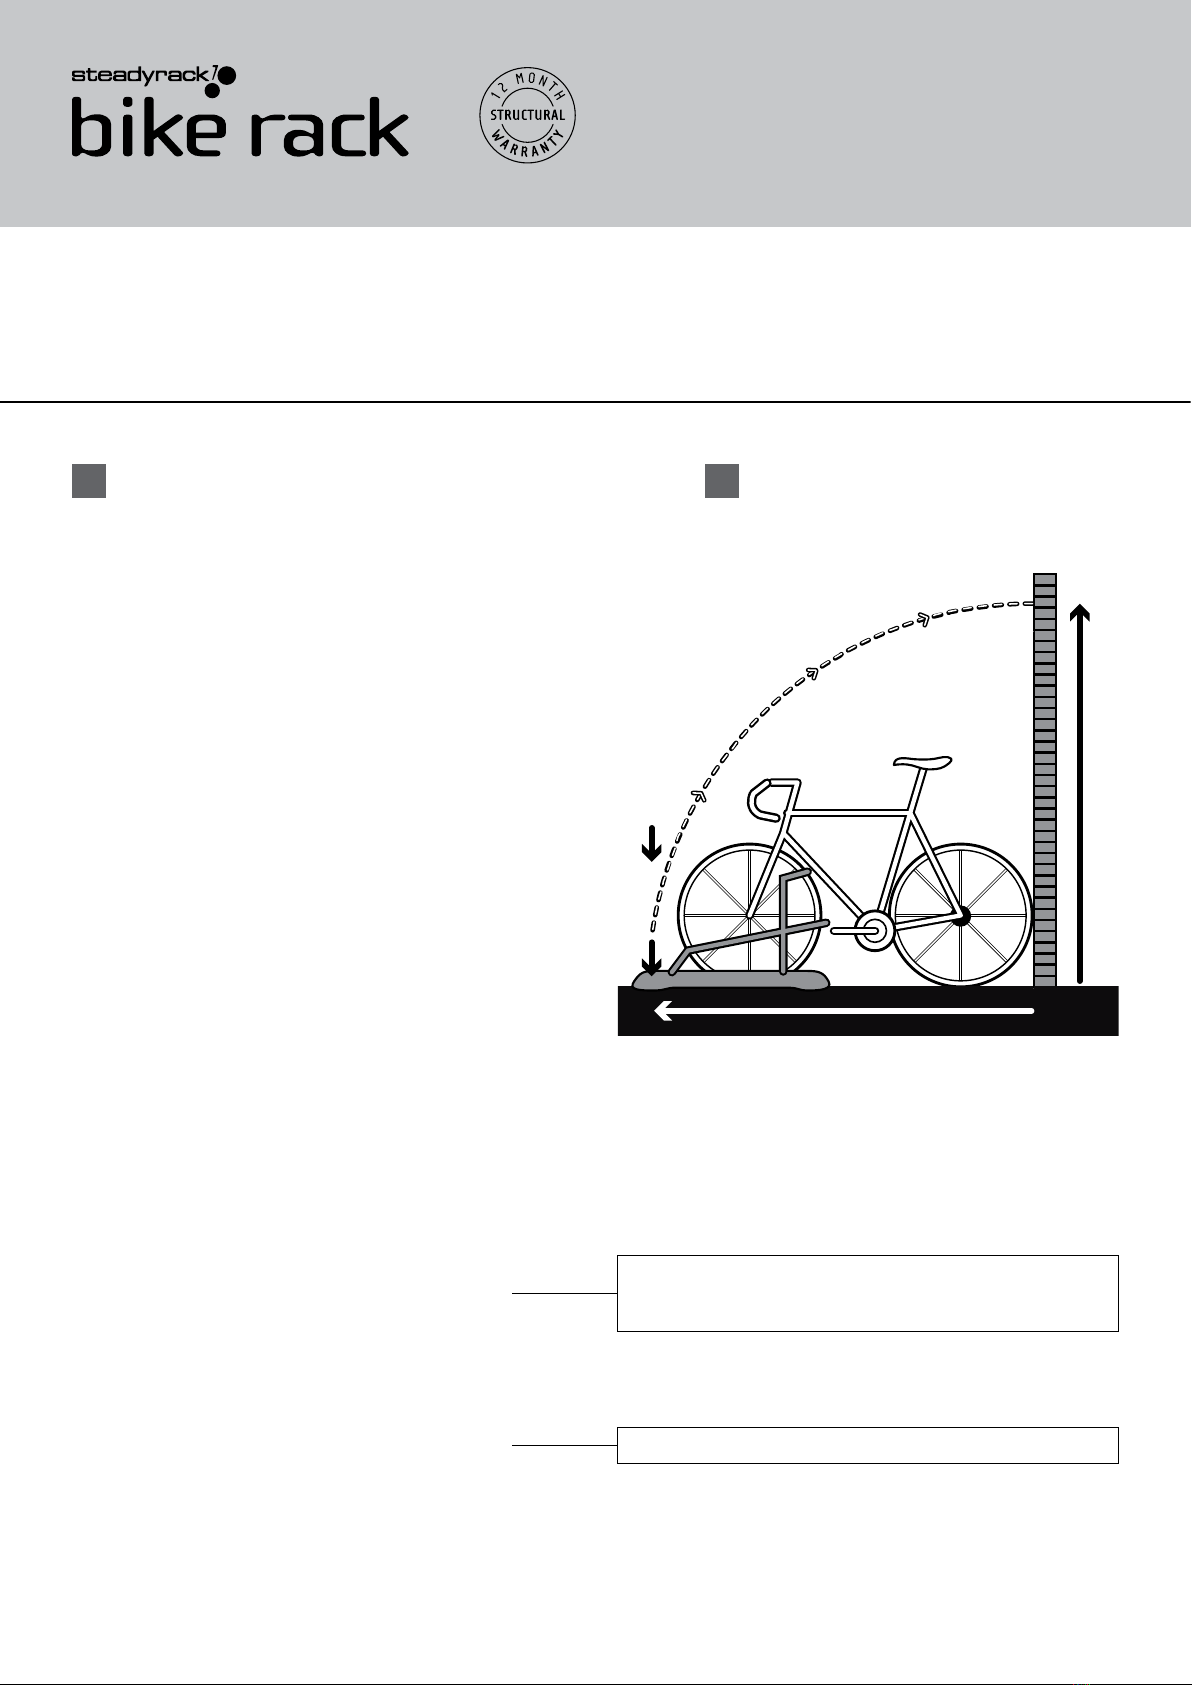
Stand your bike in its normal upright riding position and place it at right angles
to the wall you are going to attach your Steadyrack bike rack to.
Refer to Diagram 1
Make sure the back wheel is hard up against the wall. Next take your Steadyrack
bike rack and place it under the front tyre simulating it hanging in the rack. Get
someone to hold the bike still while you mark the position of the top centre hole
on the floor with a pencil. Now place the bike and the rack to one side and use
your tape measure to measure the exact distance from the wall to the pencil
mark on the floor. .
You then need to add the an additional amount to this measurement to allow for
sufficient ground clearance when the bike is hanging in the rack.
•For bikes up to 10KG in weight add an additional 50mm
•For bikes over 10kg in weight add an additional 75mm
Ideally you should have a minimum of 25mm and a maximum of 75mm
clearance between the back tire and the floor once the bike is mounted in the
rack. This range will allow for the easiest mounting and dismounting of your
bikes. Bikes come in lots of different sizes and the tyre sizes vary as well so we
recommend you check each bike before you start drilling your holes.
Now you have your measurement all you do is transfer it to the wall you intend
to fix your bike rack to and mark the position of the corresponding hole on the
rack. You now have the exact position of your first hole located.
Drill your first hole and bolt the Steadyrack to the wall so it hangs loosely. Take
a spirit level and use it to level the rack on the wall. Once you have it level and
plumb take a pencil and mark all of the remaining fixing holes. (Make sure the
rack doesn’t move while you mark the holes).
Remove the rack from the wall and drill the remaining holes.
You’re ready to fasten your Steadyrack to the wall.
Insert the fixings provided through the holes in the Steadyrack, and fasten with
a suitable size spanner or socket driver. Make sure the bolts are firm but be
careful not to over tighten them.
Replace the end caps, you’re almost finished.
First you will the following tools; a tape measure, power drill, the correct
sized drill bits and a socket wrench or shifter to tighten the fixing bolts.
The packaging includes fixings for masonry or timber. If you are fixing
your rack to steel frame or any other material check with your local
hardware supplier to ensure you have the correct fixings.
Transfer your floor measurement
to the wall adding either 50mm to
get measurement Y or 75mm to get
measurement Z depending on the
weight of your bike.
See Installing your Steadyrack
or details.
STEADYRACK
TOP CENTRE HOLE
If you want to install multiple Steadyracks for different bikes, measure
each bike first using the same rack and method. If your bikes are similar
in size you will be able to mount the racks at the same height.
Use the fixings provided to judge how deep your holes need to be drilled
The Steadyrack Bike Rack should not be assembled or installed by children
without adult supervision.
The Steadyrack Bike Rack is suitable for indoor use only and is NOT
weatherproof.
You must not use the Steadyrack Bike Rack for any purpose other than that for
which it is designed. The Steadyrack Bike Rack must not be used to carry loads
above 20 kilograms.
When opening and closing the rack ensure fingers are kept clear of the arms
and clips by holding the end of the rack. Lowering and raising the bottom arm
should only be done by holding the end of the arm. To avoid injury never allow
the arm to fall.
Failure to follow the installation and use instructions will void the warranty.
Consult our website or your Steadyrack Bike Rack dealer if you have any
questions regarding the installation or use of the Steadyrack Bike Rack.
Suitable for most standard size bicycles.
Note: •Images on the packaging are representative only.
Steadyrack warrants that the Steadyrack Bike Rack is free from defects in
workmanship and materials for a period of 12 months from the date of retail
purchase. Any claim for breach of this warranty must be made on the following
conditions:
(a) the defects have arisen solely from faulty materials or workmanship;
(b) the Steadyrack Bike Rack must not have been changed nor tampered
with in any way;
(c) failure of the Steadyrack Bike Rack must not be due to misuse, improper
installation or other maltreatment, interference or abuse including, but not
limited to, use in a manner contrary to our specifications or instructions;
(d) the Steadyrack Bike Rack must be returned to the supplier;
(e) Steadyrack will not be responsible for damage or loss caused during or
as a result of shipping;
and
Subject to the above conditions of warranty, if the Steadyrack Bike Rack fails for
any reason within the warranty period and the Steadyrack Bike Rack is returned
to us, Steadyrack will at its discretion repair or replace, or cause to be repaired
or replaced, the Steadyrack free of charge at its expense.
Except as expressly provided herein all express and implied warranties,guarantees
and conditions under statute or general law as to merchantability, description,
quality, suitability or fitness of the Steadyrack Bike Rack for any purpose or as to
design, assembly, installation, materials or workmanship or otherwise are, to the
extent permitted by law, hereby expressly excluded and Steadyrack shall not be
liable for physical or financial injury loss or damage or for consequential loss or
damage of any kind arising out of the supply, assembly, installation or use of the
Steadyrack Bike Rack or arising in any other way whatsoever.
1 X STEADYRACK BIKE RACK
2 X END CAPS
1 X REAR WHEEL SUPPORT BRACKET
SELECTION OF FASTENINGS
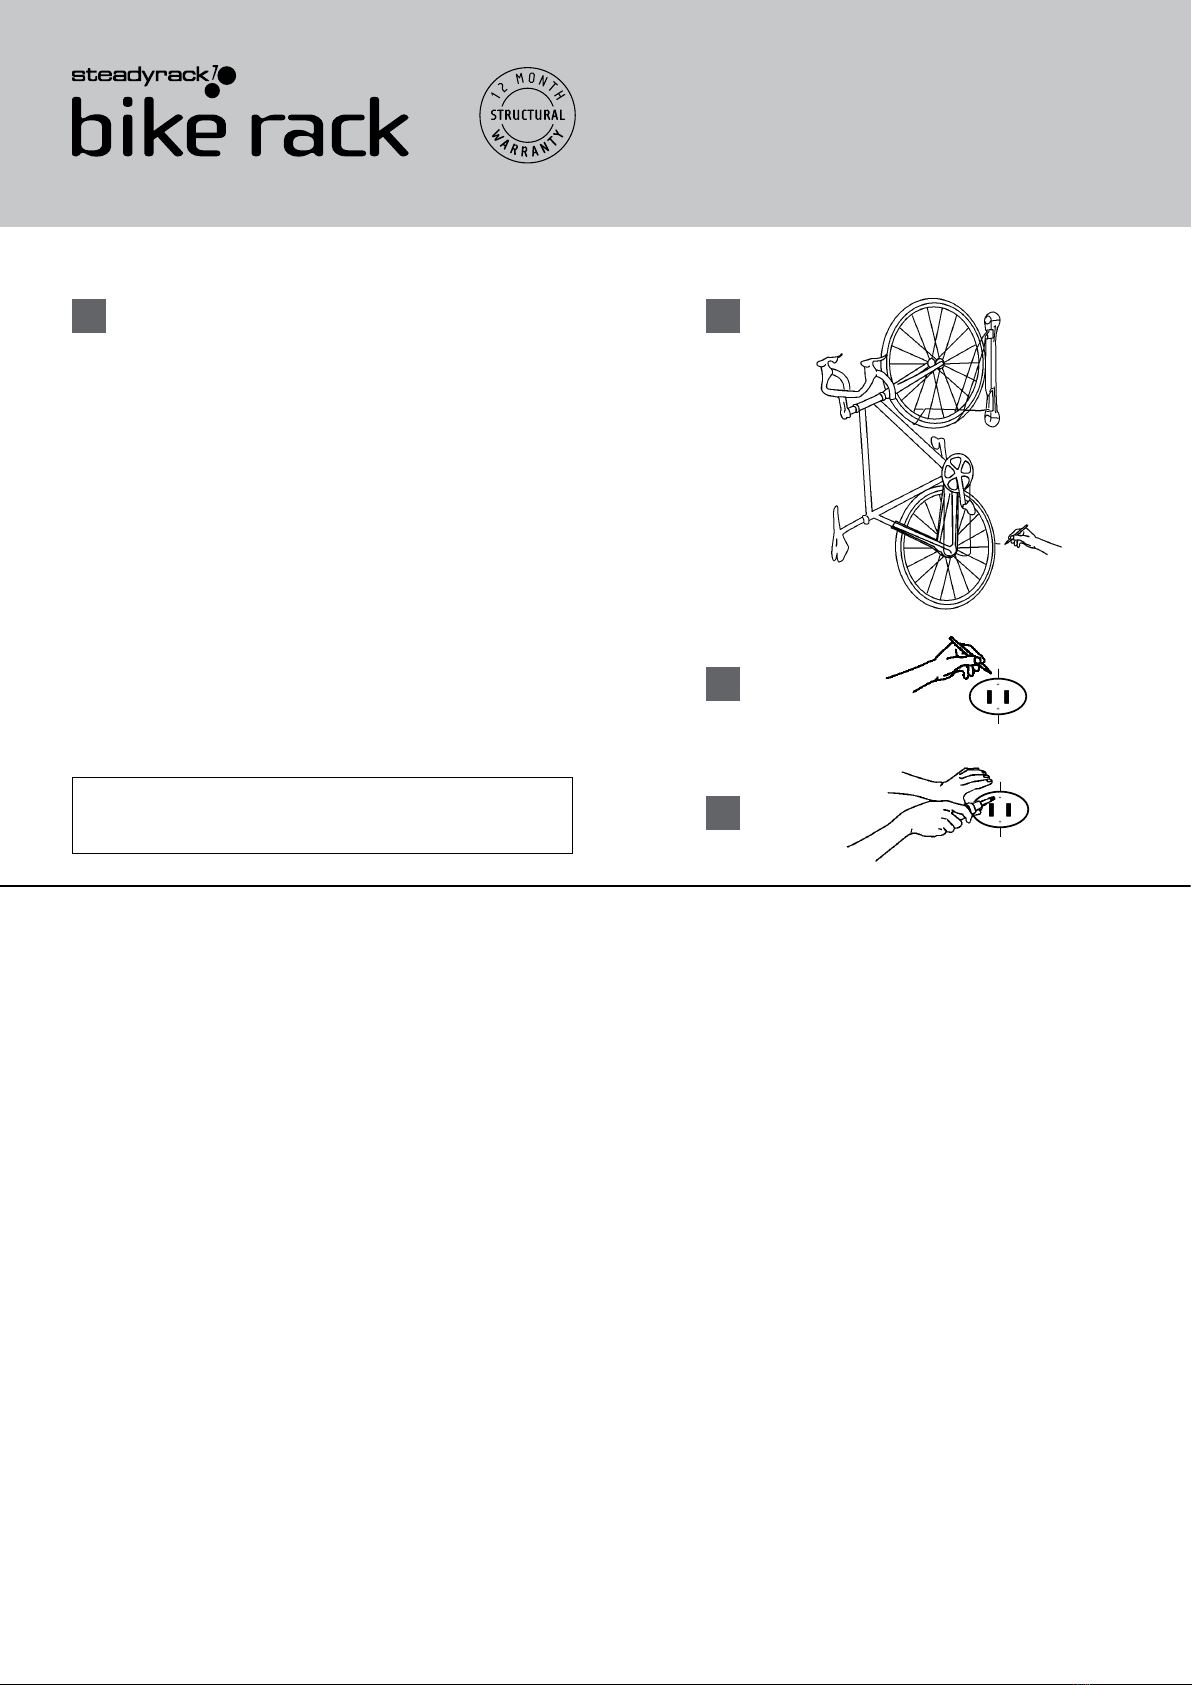
All we need to do now, is install the rear wheel support bracket.
Put the front tyre of your bike into the Steadyrack. Once it’s fully into the rack,
the back wheel should remain off the ground.
Check the bike is plumb and mark the point on the wall where your back tyre
touches. This is where you’ll put the support bracket.
Refer to Diagram 2.
Take your bike out of the Steadyrack.
Using the mark on the wall you just made place your bottom bracket so that the
centre of the bracket lines up with the mark. Now holding the bracket firmly in
place mark your two holes with a pencil.
Refer to Diagram 3.
Place the bracket to one side and drill your 2 holes. Use the fixings provided to
attach the bracket to the wall.
Refer to Diagram 4.
You are now ready to use your new Steadyrack… enjoy.
If you don’t want to mark your wall. Firstly place a strip of masking
tape on the wall, then mark the tape. Once the holes are drilled it
can be removed without marking the wall.
Other Steadyrack Bicycle Accessories manuals

Popular Bicycle Accessories manuals by other brands


Specialized
Specialized Elite CylcoComputer user manual

Sigma
Sigma BC 16.16 manual

Playcore
Playcore Dero Setbacks installation instructions

VDO Cyclecomputing
VDO Cyclecomputing x3dw instruction manual

Cateye
Cateye RAPID X2 manual

buratti meccanica
buratti meccanica Clorofilla Trail Use and maintenance manual


