Clean Air Optima CA-904B User manual
Read these instructions carefully before you start using the Design Fan Heater and keep the manual for later usage.
This product is only suitable for well insulated spaces or occasional use.
Design Fan Heater Clean Air Optima®CA-904B
© Copyright: Clean Air Optima
®
Manual
Find more languages on:
www.cleanairoptima.com/info/manuals
User manual
(DE) Gebrauchsanweisung
(NL) Gebruiksaanwijzing
(FR) Mode d’emploi
(ES) Manual del usuario
(NO) Brukermanual
(SE) Användarmanual
(FI) Ohjekirja
(DK) Brugermanual
(IT) Manuale d’uso
(PT) Manual do usuário
(BA) Uputstvo za upotrebu
(HR) Korisnički priručnik
(HU) Használati utasítás
(TR) Kullanım kılavuzu
(PL) Instrukcja obsługi
(CZ) Uživatelská příručka
(RO) Manual de utilizare
(LT) Naudotojo vadovas
(EE) Kasutusjuhend
(LV) Lietošanas pamācība
(RU) Руководство
пользователя
(MK) Прирачник
за користење

2
CA-904B / Main unit

3
13. Control panel
14. Display panel
4
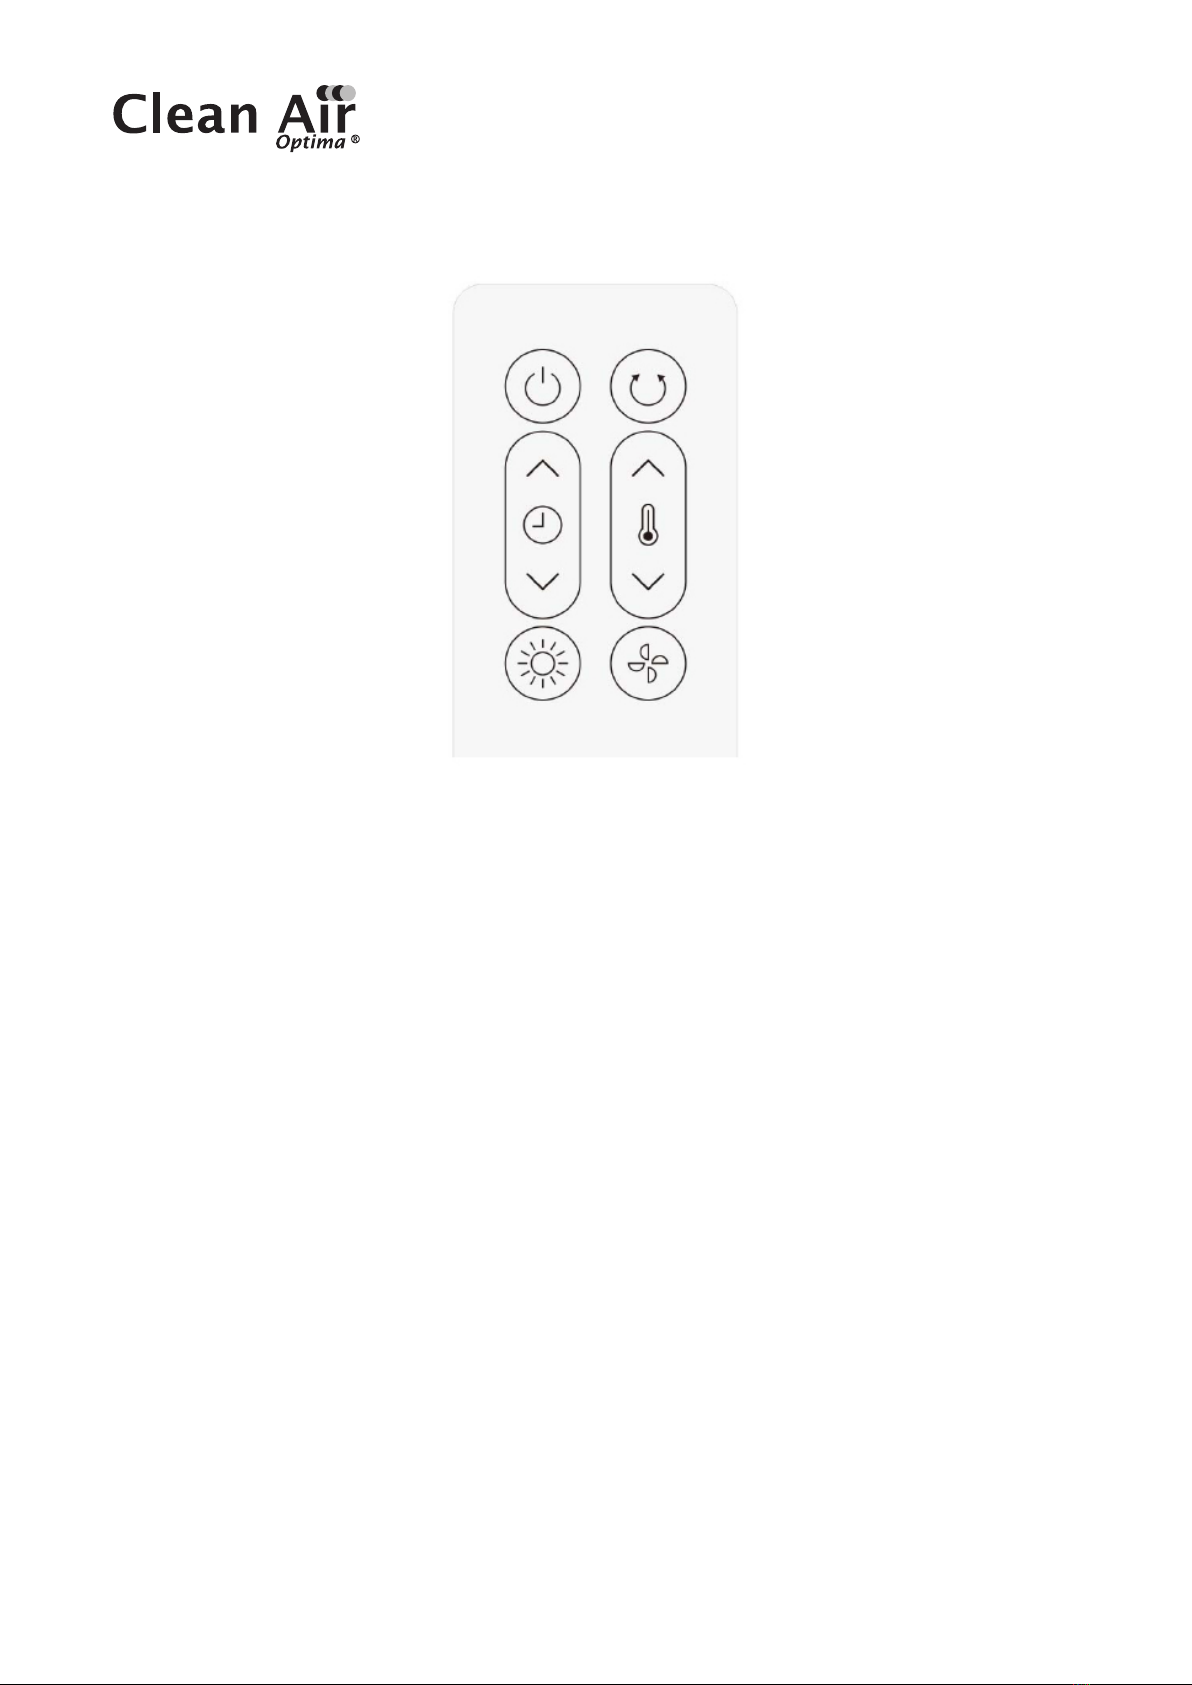
15. Remote control

5
English
Thank you for purchasing the Clean Air Optima®Design Fan Heater CA-904B.
We wish you many years of healthy indoor air with this ecient and eective product.
This product is only suitable for well insulated spaces or occasional use.
These instructions describe the safety precautions to be observed during operation.
They are meant to prevent injuries and to avoid damaging the device.
Description of the device
The device consists of the following main components:
1. Remote control signal receiver
2. Air outlet
3. Front cover
4. Base
5. Filter cover
6. Filter
7. Top cover
8. Control panel
9. Decoration display ring
10. Power cord
11. Power switch
12. Remote control holder
13. Control panel
14. Display panel
15. Remote control
6
Safety warnings
This device may only be used in accordance with these safety instructions. Take the following
steps to minimize the risk of personal injury caused by for example electric shocks or fire.
1. Only for indoor use. Do not use or store outdoors.
2. The device is not intended to be used by children or persons with reduced physical-,
sensory- or mental capabilities, unless they are supervised by a person responsible
for their safety.
3. Children should be kept away unless continuously supervised.
4. CAUTION — Some parts of this product can become very hot and can cause burns.
Particular attention has to be given when children and vulnerable people are present.
5. Warning: in order to avoid overheating, do not cover the heater.
6. The heater must not be placed immediately below a socket-outlet.
7. Do not use the device when there is visible damage on the electrical cord or on the device
itself. Do not repair the device yourself in case of damage. Never pull the device by its cord.
If the power cord is damaged, then it must be replaced by an authorized service person
to prevent electric shock or fire.
8. Repairs may only be performed by authorized service personal. Do not try to repair
the device yourself to prevent electric shock or fire.
9. Always remove the plug from the socket when the device is not being used or when you
clean internal or external parts of it.
10. Only use power cords provided.
11. To safely use the device, put it in a steady, horizontal position. Do not move while using.
12. Do not use the device in rooms where inflammable liquids or gases are stored, close
to heat sources or in particularly humid rooms like the bathroom, shower or swimming pool.
13. To prevent malfunctions, never insert strange objects into the device.
14. Never cover the air inlet and air outlet grid.
15. Never dissemble or replace the device’s inner parts.
16. To prevent injury or damage to the heater, do not touch the air inlet and outlet grille while
the device is running and do not insert the handle or any other object into the air outlet.
17. Do not put heavy objects on the unit.
18. Do not place the device in direct sunlight, to avoid that the device discolours.
19. Never immerse the unit in water or other liquids.
20.Do not touch the power cord with wet hands.
21. Do not point the air outlet directly at a baby for a long time.
22.Do not place the device close to walls, curtains or other combustible materials, it may
cause a fire.
23.When there is a unusual smell or unusual sound coming form the device, unplug the device
from the power socket right away.
24.Do not use this heater if it has been dropped.

7
25. Do not use if there are visible signs of damage to the heater.
26. Use this heater on a horizontal and stable surface, or fix it to the wall, as applicable.
27. WARNING: Do not use this heater in small rooms when they are occupied by persons
not capable of leaving the room on their own, unless constant supervision is provided.
28. This appliance can be used by children aged from 8 years and above and persons with
reduced physical, sensory or mental capabilities or lack of experience and knowledge
if they have been given supervision or instruction concerning use of the device in a safe
way and understand the hazards involved. Children shall not play with the device.
29.Cleaning and user maintenance shall not be made by children without supervision.
30.Children of less than 3 years should be kept away unless continuously supervised.
31. Children aged from 3 years and less than 8 years shall only switch on/o the device
provided that it has been placed or installed in its intended normal operating position and
they have been given supervision or instruction concerning use of the device in a safe way
and understand the hazards involved. Children aged from 3 years and less than 8 years
shall not plug in, regulate and clean the device or perform user maintenance.
32. WARNING: To reduce the risk of fire, keep textiles, curtains, or any other flammable
material a minimum distance of 1 m from the air outlet.
33.Use, maintain and clean the device as described in this manual.

8
Product Features
- Equipped with PTC ceramic heating element: this ensures that the air flow is automatically
adjusted to the room temperature.
- Adjustable Air flow and temperature:
Airflow: low - high
Temperature: cool – warm
- Timer function (1-12h)
- Digital temperature control from 15°C to 35°C
- Equipped with a Cross flow fan for silent operation
- Tip-over safety protection, double over-heating protection
- With Infrared long distance remote control function
- Wide angel swing function
- Automatic air supply, gentle breeze, smooth heating.
Installation and Operation instruction
The package contains: Main device (the base cannot be removed), remote control
and instruction manual.
Assembling the device
1. Take out the device from the package.
2. Carefully put the device on a stable surface in upright position.
3. The device needs to be positioned at least 30 cm from walls and furniture.
Function of keys
1. Plug in the device: you will hear an acoustic sound and the power symbol lights up.
2. In standby mode. Only the icon lights up. Press the key, the device starts working.
Press it again, the device turns o.
The default situation after switching on:
a) PTC: Low heating power, icon lights up.
b) Swing: Swing o, the icon is o.
c) Timer: 0h(= no timer is set), the “ ” icon is o.
d) Room temperature LED display “ ” lights up.
e) Fan switches on.
f) Temperature setting: default is set to 25°C

9
3. In operating condition, press the key to shift PTC from low heating power to high heating
power. By pressing the key again, the PTC will switch back to low heating power.
a) If working at low heating power: the low heating power icon lights up (the high heating
power icon is o).
b) If working at high heating power: the high heating power icon lights up. (high heating
starts after 10 seconds).
4. In operating condition, press the key to shift from low fan power to high fan power.
By pressing the key again, the fan switches back to low power.
a) When working at low fan speed: the low fan power icon lights up.
b) When working at high fan speed: the high fan power icon lights up.
5. In operating mode, you can press the key to make the device oscillate or not.
a) Press the Swing key: the device will oscillate, the icon lights up.
b) Press the Swing key again: the device will stop oscillating, the icon will be o.
Note:
In warm airflow mode the PTC stops working when the room temperature is higher than
the set temperature. The fan stops working after 10 seconds. During that time, the swing
function is not available.
6. In operating condition, press the key to set the timer.
a) Go to the timer setting mode, press the key, the LED time icon lights up and blinks
every 0.5 seconds. During this time-frame, press the or the key to set the timer
(0-12 hours), with each key press the time will be added by 1 hour.
By pressing and holding the or keys, the time can be set faster.
b) If no keys are pressed within 5 seconds (except for and ), the LED indicator will
show the room temperature.
c) Press the timer key to see the set time. If the value shows a number except for -0-, the
timer will start timing (not shown), if the timer reaches value -0-, then the device will
turn o at once.
d) If the value shows -0- in timer setting, then this means no time is set, the time icon will
be o, the LED display will show the current room temperature.

10
7. a) Press the key, to change the temperature by pressing the or keys.
The temperature range is from 15°C ~ 35°C, the temperature will change by 1°C by every
key press.
b) By pressing the key again or if no key is pressed within 5 seconds, the temperature that
you have set will be eected at once.
c) If no keys are pressed within 5 seconds (except for or ), the LED indicator will
show the room temperature. When the temperature is ≤-10°C, the display shows “LO”;
When the temperature is >40°C, the display shows “HI”.
d) After switching on the device, it will start measuring the temperature within 10 seconds.
If the ambient temperature is higher than the set temperature then the PTC heating
function will turn o; the low/high heating power light will be o, and the fan will switch o
after 10 seconds. The swing function will also stop, If you have set it before. All the other
icons will not change. If the ambient temperature falls below 1°C of the set temperature,
the heating function will switches on again, as well as the fan & the swing function (if set
before). The other icons will be on.
e) If both timer and room temperature are set, the values are alternately shown on the display
(at an interval of 30 seconds).
8. Memory last setting: when switching on the device, the last settings will be activated.
9. After the device has been in operation for 1 minute, the display light of the keys will dim.
10. NTC over-heating protection function:
At temperatures higher than 55°C, the device will switch itself o. If the ambient
temperature drops below 45°C, the device can be switched on again manually. If the
temperature raises above 45°C again, the device will switch o again. After 12 hours
of operation with no change in settings, the device will switch itself o.
Cleaning & Maintenance
Unplug the heater before each maintenance and make sure the heater has cooled down.
If necessary you can use a soft cloth with a neutral cleaning product dissolved in warm water
(below 50°C) to clean the outer side of the fan. Dry carefully.
To avoid damaging the device, do not use aggressive cleaning agents to clean the surface
of the heater.
To store the heater, place it in a dry and ventilated place.

11
Remote control
1. Open the battery cover at the back side of remote control to place the battery.
(see Picture 1).
2. To place the battery: there is a “security tab” at the bottom of the remote control that you
first have to slide to the right and then pull out the battery holder. (see Picture 2).
Insert the battery with the correct polarity. (see Picture 3).
3. Push the battery cover back into the remote control.
Remote control Battery cover
(Picture 1) (Picture 2)
(Picture 3) Battery (CR2032)
12
Specifications
Model CA-904B
For rooms up to 40m²/ 100m³/ 430ft²
Rated voltage 220V - 240V, 50Hz
Rated power 1000W - Max. 2000W
Nominal heat output 2000W
Minimum heat output 1000W
Maximum continuous heat output 2000W
Digital temperature control From 15°C to 35°C
Fan function Air velocity: up to 5 meter/second
Turning circle Oscillation: 80°
Sound level Silent fan < 35dB(A) Low
Dimensions 688 x 210 x 210mm
Weight 4,56kg
Colour Black
Carried standard EN/IEC 60035-1,EN/IEC60335-2-30,EN/IEC60335-2-80
Complies with EU regulations CE / WEEE / RoHS
Ask your retailer or your municipality for updated information regarding the
disposal of the packaging and of the device.

13
Service
Warranty Certificate for the Clean Air Optima®Design Fan Heater CA-904B.
Date of purchase: .......................................................................................
Customers name: ......................................................................................
Address: ............................................................................................................
Telephone: .......................................................................................................
Email: ..................................................................................................................
Seller’s name: ...............................................................................................
Address: ............................................................................................................
1. Please fill in completely this Warranty Certificate. Send it with the invoice and the unit,
postage pre-paid and using the original packing box, to your distributor. Make sure to include
the appropriate return postage for the package.
2. Please enclose a short description of the damage, fault or malfunction,
and the circumstances under which these problems arose.
The Clean Air Optima®Design Fan Heater CA-904B is subjected to strict testing procedures
before leaving the factory. If within 2 years from the date of purchase the product does not
perform according to the specifications, because of factory defects, the purchaser is entitled
to free repairs or replacement of parts upon presentation of this warranty (provided that
the malfunction or damage to the device and/or parts occurred under normal operating
conditions). What is covered: All parts defective in material and workmanship. For how long:
two years from purchase date. What we will do: Repair or replace any defective parts.
Other Conditions
The provisions of this warranty are in lieu of any other written warranty whether express
or implied, written or oral, including any warranty of merchantability or fitness for a particular
purpose. The manufacturer’s maximum liability shall not exceed the actual purchase price
paid by you for the product. In no event shall the manufacturer be liable for special, incidental,
consequential, or indirect damages. This warranty does not cover a defect that has resulted
from improper or unreasonable use or maintenance, faulty assembly, accident, natural
catastrophes, improper packing, or unauthorized tampering, alteration, or modification
as determined solely by us. This warranty is void if the label bearing the serial number
has been removed or defaced.
14
Thank you for reading!
Share your feedback about the Clean Air Optima®
Design Fan Heater CA-904B on:
www.cleanairoptima.com
For frequently asked questions about the CA-904B go to:
www.cleanairoptima.com and search for the CA-904B.
Download PDF instruction manual on:
www.cleanairoptima.com/info/manuals
Watch all Clean Air Optima®Product
animation video’s on:
www.youtube.com
Clean Air Optima International B.V. | David Ricardostraat 9-7 / 9-9 | 7559 SH Hengelo (ov)
The Netherlands | Phone: +31 (0) 74 - 2670145
Clean Air Optima Germany GmbH | Enschedestraße 14 | 48529 Nordhorn | Germany
Phone: +49 (0) 5921 879-121

15
Deutsch
Vielen Dank, dass Sie sich für den Clean Air Optima®Design-Heizlüfter
CA-904B entschieden haben.
Wir wünschen Ihnen viele Jahre gesunde Raumluft mit diesem ezienten und eektiven Produkt.
Dieses Produkt ist nur für gut isolierte Räume oder gelegentlichen Gebrauch geeignet.
Diese Anleitung beschreibt die Sicherheitsvorkehrungen, die im Betrieb zu beachten sind. Sie sind
dafür vorgesehen, Verletzungen vorzubeugen und Beschädigungen am Gerät zu vermeiden.
Beschreibung des Geräts
Das Gerät besteht aus folgenden Hauptkomponenten:
1. Empfänger für Fernbedienungssignal
2. Luftauslass
3. Vordere Abdeckung
4. Fuß
5. Filterabdeckung
6. Filter
7. Obere Abdeckung
8. Bedienfeld
9. Display-Dekoring
10. Netzkabel
11. Netzschalter
12. Halter für Fernbedienung
13. Bedienfeld
14. Anzeigefeld
15. Fernbedienung
16
Sicherheitshinweise
Dieses Gerät darf nur in Übereinstimmung mit diesen Sicherheitshinweisen verwendet werden.
Führen Sie die folgenden Schritte aus, um das Verletzungsrisiko für Personen (z.B. durch
Stromschläge oder Feuer) zu minimieren.
1. Nur für Innenräume geeignet. Nicht im Freien verwenden oder lagern.
2. Das Gerät ist nicht für die Verwendung durch Kinder oder Personen mit eingeschränkten
körperlichen, sensorischen oder geistigen Fähigkeiten bestimmt, es sei denn, diese Personen
werden von einer für ihre Sicherheit verantwortlichen Person beaufsichtigt.
3. Kinder müssen vom Gerät ferngehalten werden, außer die Kinder sind unter ständiger Aufsicht.
4. VORSICHT — Teile dieses Produkts können sehr heiß werden und Verbrennungen
verursachen. Besondere Aufmerksamkeit ist notwendig, wenn Kinder und gefährdete Personen
anwesend sind.
5. Warnung: Um Überhitzung zu vermeiden, das Heizgerät nicht abdecken.
6. Das Heizgerät darf nicht direkt unter einer Steckdose aufgestellt werden.
7. Verwenden Sie das Gerät nicht, wenn sichtbare Schäden am Netzkabel oder am Gerät selbst
vorhanden sind. Reparieren Sie das Gerät nicht selbst, wenn es beschädigt ist. Ziehen Sie
das Gerät niemals an seinem Kabel. Wenn das Netzkabel beschädigt ist, muss es von
einem befugten Servicemitarbeiter ausgetauscht werden, um Stromschlag oder Feuer
zu vorzubeugen.
8. Reparaturen dürfen nur von befugtem Servicepersonal durchgeführt werden.
Um Stromschlägen oder Feuer vorzubeugen: Nicht versuchen, das Gerät selbst zu reparieren.
9. Immer den Stecker aus der Steckdose ziehen, wenn das Gerät nicht benutzt wird, oder wenn
Sie innere oder äußere Teile des Geräts reinigen.
10. Verwenden Sie nur die mitgelieferten Netzkabel.
11. Stellen Sie das Gerät zum sicheren Gebrauch in eine stabile, horizontale Position.
Beim Gebrauch nicht bewegen.
12. Verwenden Sie das Gerät nicht in Räumen, in denen brennbare Flüssigkeiten oder Gase
aufbewahrt werden, in der Nähe von Wärmequellen oder in besonders feuchten Räumen wie
dem Badezimmer.
13. Um Fehlfunktionen vorzubeugen: Führen Sie keine Fremdkörper in das Gerät ein.
14. Nie den Lufteinlass und das Luftauslassgitter abdecken.
15. Nie die inneren Teile des Geräts zerlegen oder ersetzen.
16. Um Verletzungen oder Schäden am Heizgerät zu vermeiden: Berühren Sie bei laufendem
Gerät nicht die Luftein- und -auslassgitter. Stecken Sie weder den Gri noch einen anderen
Gegenstand in den Luftauslass.
17. Keine schweren Gegenstände auf das Gerät stellen.
18. Das Gerät nicht in direktem Sonnenlicht aubewahren, damit sich das Gerät nicht verfärbt.
19. Nie das Gerät in Wasser oder andere Flüssigkeiten eintauchen.
20.Das Netzkabel nicht mit nassen Händen berühren.
21. Den Luftauslass nicht längere Zeit direkt auf ein Baby richten.
22.Stellen Sie das Gerät nicht in der Nähe von Wänden, Vorhängen oder anderen brennbaren
Materialien auf, da es einen Brand verursachen kann.

17
23.Wwenn ein ungewöhnlicher Geruch oder ein ungewöhnliches Geräusch aus dem Gerät kommt:
Sofort den Stecker aus der Steckdose ziehen.
24.Dieses Heizgerät nicht verwenden, wenn es fallen gelassen wurde.
25.Das Heizgerät nicht verwenden, wenn Anzeichen für eine Beschädigung sichtbar sind.
26.Stellen Sie dieses Heizgerät auf einem stabilen horizontalen Untergrund auf oder befestigen
Sie es gegebenenfalls an der Wand.
27. WARNUNG: Verwenden Sie dieses Heizgerät nicht in einem kleinen Raum, wenn sich darin
Personen aufhalten, die den Raum nicht selbständig verlassen können, außer es ist ständige
Aufsicht vorhanden.
28.Dieses Gerät kann von Kindern ab 8 Jahren und von Personen mit eingeschränkten
körperlichen, sensorischen oder geistigen Fähigkeiten oder mangelnden Erfahrungen
und Kenntnissen benutzt werden, wenn sie beaufsichtigt werden oder eine Einweisung
in den sicheren Gebrauch des Geräts erhalten haben und die mit ihm verbundenen Gefahren
verstehen. Kinder dürfen nicht mit dem Gerät spielen.
29.Die
Reinigung und Wartung durch den Benutzer darf NICHT von Kindern ohne Aufsicht ausgeführt
werden.
30.Kinder unter 3 Jahren müssen vom Gerät ferngehalten werden, außer die Kinder sind unter
ständiger Aufsicht.
31. Kinder im Alter ab 3 Jahren und unter 8 Jahren dürfen das Gerät nur ein- und ausschalten, wenn
es in seiner vorgesehenen normalen Betriebsposition aufgestellt oder installiert wurde und sie
Aufsicht oder eine Einweisung in den sicheren Gebrauch des Gerätes erhalten haben und die damit
verbundenen Gefahren verstehen. Kinder ab dem Alter von 3 Jahren und unter 8 Jahren dürfen das
Gerät nicht an die Steckdose anschließen, regeln und reinigen oder Wartung durch den Benutzer
durchführen.
32.WARNUNG: Um die Brandgefahr zu verringern: Halten Sie von Textilien, Vorhängen oder
anderen brennbaren materialien einen Mindestabstand von 1 m zum Luftauslass des Geräts
ein.
33.Verwenden, warten und reinigen Sie das Gerät wie in dieser Anleitung beschrieben.

18
Produktmerkmale
- Ausgestattet mit einem keramischen PTC-Heizelement: Dadurch wird der Luftstrom automatisch
auf die Raumtemperatur geregelt.
- Luftstrom und Temperatur einstellbar:
Luftstrom: niedrig– hoch
Temperatur: kühl– warm
- Timerfunktion (1-12 Std.)
- Digitale Temperaturregelung von 15°C bis 35°C
- Ausgestattet mit einem Querstromlüfter für einen geräuscharmen Betrieb
- Kippsicherheitsschutz, doppelter Überhitzungsschutz
- Mit Infrarot-Fernbedienung für große Entfernungen
- Weitwinkel-Schwenkfunktion
- Automatische Luftzufuhr, sanfte Brise, sanfte Heizung.
Installations- und Bedienungsanleitung
Die Verpackung enthält: Hauptgerät (der Fuß kann nicht entfernt werden), Fernbedienung
und Bedienungsanleitung.
Zusammenbau des Gerätes
1. Nehmen Sie das Gerät aus der Verpackung.
2. Stellen Sie das Gerät in aufrechter Position vorsichtig auf einen stabilen Untergrund.
3. Das Gerät muss in mindestens 30 cm Entfernung von Wänden und Möbeln aufgestellt werden.
Funktion der Tasten
1. Stecken Sie den Netzstecker des Geräts ein: Sie hören ein akustisches Signal,
und das Betriebssymbol leuchtet auf.
2. Im Standby-Modus. Nur das Symbol leuchtet auf. Drücken Sie auf die Taste ,
das Gerät beginnt zu arbeiten.Drücken Sie noch einmal auf die Taste. Das Gerät schaltet sich aus.
Die Standardsituation nach dem Einschalten:
a) PTC: Niedrige Heizleistung, Symbol leuchtet auf.
b) Schwenken: Schwenken aus, das Symbol ist ausgeschaltet.
c) Timer: 0h(= kein Timer eingestellt), das Symbol „ “ist ausgeschaltet.
d) Die LED-Anzeige der Raumtemperatur „ “ leuchtet auf.
e) Der Lüfter schaltet sich ein.
f) Temperatureinstellung: als Standard ist 25°C eingestellt
19
3. Drücken Sie im Betrieb die Taste , um den PTC von niedriger auf hohe Heizleistung
umzuschalten. Ein weiterer Druck auf die Taste schaltet den PTC zurück auf niedrige
Heizleistung.
a) Im Betrieb mit niedriger Heizleistung: Das Symbol für niedrige Heizleistung leuchtet
(das Symbol für hohe Heizleistung ist aus).
b) Im Betrieb mit hoher Heizleistung: Das Symbol für hohe Heizleistung leuchtet auf.
(hohe Heizstufe startet nach 10 Sekunden).
4. Um von niedriger Lüfterleistung auf hohe Lüfterleistung umzuschalten, drücken Sie
im Betriebszustand die Taste . Ein weiterer Druck auf die Taste schaltet den Lüfter zurück
auf niedrige Leistung.
a) Im Betrieb mit niedriger Lüfterdrehzahl: Das Symbol für niedrige Lüfterleistung leuchtet auf.
b) Im Betrieb mit hoher Lüfterdrehzahl: Das Symbol für hohe Lüfterleistung leuchtet auf.
5. Im Betriebsmodus können Sie die Taste drücken, um das Gerät oszillieren (bzw. nicht
oszillieren) zu lassen.
a) Drücken Sie die Schwenken-Taste: Das Gerät schwenkt, das Symbol leuchtet auf.
b) Drücken Sie die Schwenken-Taste erneut: Das Gerät hört auf zu schwenken, das Symbol
wird ausgeschaltet.
Hinweis:
Im Warmluftstrom-Modus arbeitet der PTC nicht mehr, wenn die Raumtemperatur höher als
die eingestellte Temperatur ist. Der Lüfter läuft nach 10 Sekunden nicht mehr. In dieser Zeit steht
die Schwenkfunktion nicht zur Verfügung.
6. Um den Timer einzustellen, drücken Sie im Betriebszustand die Taste .
a) Gehen Sie in den Timer-Einstellmodus, drücken Sie die Taste . Das LED-Zeitsymbol
leuchtet auf und blinkt alle 0,5 Sekunden. Drücken Sie während dieses Zeitraums die Taste
oder , um den Timer einzustellen (0-12 Stunden). Mit jedem Tastendruck wird die Zeit
um 1 Stunde verlängert.
Durch Drücken und Halten der Tasten oder kann die Zeit schneller eingestellt werden.
b) Werden innerhalb von 5 Sekunden keine Tasten gedrückt (außer und ), zeigt die LED-
Anzeige die Raumtemperatur an.

20
c) Drücken Sie die Timertaste, um die eingestellte Zeit anzuzeigen. Wird als Wert eine andere
Zahl als -0- angezeigt, startet der Timer die Zeitmessung (nicht dargestellt). Wenn der Timer
den Wert -0- erreicht, schaltet sich das Gerät sofort aus.
d) Wird der Wert -0- in der Timer-Einstellung angezeigt, bedeutet es, dass keine Zeit eingestellt ist.
Das Zeitsymbol ist ausgeschaltet, die LED-Anzeige zeigt die aktuelle Raumtemperatur an.
7. a)
Drücken Sie die Taste , um die Temperatur durch Drücken der Taste oder zu ändern.
Der Temperaturbereich ist 15 °C°C ~ 35°C. Die Temperatur ändert sich mit jedem Tastendruck
um 1 °C.
b) Durch erneutes Drücken der Taste , oder wenn innerhalb von 5 Sekunden keine Taste
gedrückt wird, wird die von Ihnen eingestellte Temperatur sofort übernommen.
c) Werden innerhalb von 5 Sekunden keine Tasten gedrückt (außer bei oder ), zeigt die
LED-Anzeige die Raumtemperatur an. Wenn die Temperatur ≤-10 °Cist, zeigt das Display „LO“ an.
Wenn die Temperatur >40°C ist, zeigt das Display „HI“ an.
d) Nach dem Einschalten des Gerätes beginnt es innerhalb von 10 Sekunden mit der Messung der
Temperatur. Wenn die Umgebungstemperatur höher als die eingestellte Temperatur ist, schaltet
die PTC-Heizfunktion aus; die Kontrollleuchte für niedrige/hohe Heizleistung erlischt und der
Lüfter schaltet sich nach 10 Sekunden aus. Auch die Schwenkfunktion stoppt, wenn Sie sie zuvor
eingestellt haben. Alle anderen Symbole ändern sich nicht. Wenn die Umgebungstemperatur
mehr als 1°C unter die eingestellte Temperatur sinkt, schaltet sich die Heizfunktion wieder ein,
ebenso wie der Lüfter und die Schwenkfunktion (falls vorher eingestellt). Die anderen Symbole
sind eingeschaltet.
e) Sind sowohl Timer als auch Raumtemperatur eingestellt, zeigt das Display die Werte
abwechselnd (im Abstand von 30 Sekunden) an.
8. Letzte Einstellung speichern: Beim Einschalten des Geräts werden die letzten Einstellungen
aktiviert.
9. Nachdem das Gerät 1 Minute lang in Betrieb war, wird die Beleuchtung der Tasten auf dem
Display gedimmt.
10. NTC-Überhitzungsschutzfunktion:
Bei Temperaturen über 55°C schaltet sich das Gerät von selbst aus. Sinkt
die Umgebungstemperatur unter 45°C, kann das Gerät von Hand wieder
eingeschaltet werden. Steigt die Temperatur wieder über 45°C, schaltet sich das Gerät wieder
aus. Nach 12 Betriebsstunden ohne Änderung der Einstellungen schaltet sich das Gerät
automatisch aus.
Reinigung und Wartung
Ziehen Sie vor jeder Wartung den Netzstecker des Heizgeräts ab und stellen Sie sicher,
dass das Heizgerät abgekühlt ist.
Bei Bedarf können Sie ein weiches Tuch mit einem neutralen Reinigungsmittel in warmem Wasser
(unter 50°C) verwenden, um die Außenseite des Ventilators zu reinigen. Vorsichtig abtrocknen.
Um Schäden am Gerät vorzubeugen: Reinigen Sie die Oberfläche des Heizgerätes nicht
mit aggressiven Reinigungsmitteln.
Zum Aufbewahren stellen Sie das Heizgerät an einen trockenen und belüfteten Ort.
Table of contents
Languages:
Other Clean Air Optima Heater manuals


Popular Heater manuals by other brands

Vulkan
Vulkan WATRA Series user manual

Drash
Drash D-1000B Operation & maintenance manual

Sealey
Sealey Space warmer LP170.V2 instructions

EINHELL
EINHELL ETH 2000 Original operating instructions

Detroit Radiant Products
Detroit Radiant Products DX2 Series Installation, operation, maintenance and parts manual

Star Progetti
Star Progetti VARMA 303 MOBILE operating instructions

Singer
Singer SRMH-15 instruction manual

EUROM
EUROM Dual-mate 2000 RC user manual

Master
Master MH-40-GFA User's manual & operating instructions

Southern Enterprises
Southern Enterprises FA4723 Assembly

Hayward
Hayward HC Series troubleshooting guide

GÜDE
GÜDE GKH 1200 DT Translation of the original operating instructions


