CleanCraft KM 625 User manual

Sweeper
Operating Instructions
KM 625
KM 825
KM 625 KM 825

2KM Series | 1.02
Imprint
Product identification
Sweeper Item number
KM 625 7302162
KM 825 7302182
Manufacturer
Stürmer Maschinen GmbH
Dr.-Robert-Pfleger-Str. 26
D-96103 Hallstadt
Fax: 0049 (0) 951 96555 - 55
E-Mail: [email protected]
Internet: www.cleancraft.de
Information regarding the operating instructions
Original instruction
Edition: 25.03.2021
Version: 1.02
Language: English
Author: FL/RL
Information regarding the copyright
Copyright © 2021 Stürmer Maschinen GmbH, Hallstadt,
Germany.
The company Stürmer Maschinen GmbH is the sole ow-
ner of the content of these operating instructions. For-
warding and reproduction of this document as well as
use and notification of its content is not permitted without
explicit consent. Infringements will lead to claims for da-
mages.
Subject to technical modifications and error.
Content
1 Introduction ............................................. 3
1.1 Copyright ............................................................ 3
1.2 Costumer service................................................ 3
1.3 Limitation of liability............................................. 3
2 Safety ....................................................... 3
2.1 Symbol explanation ............................................ 3
2.2 Obligations of the operating company ................ 4
2.3 Qualification of the staff ...................................... 5
2.4 Personal protective equipment ........................... 5
2.5 General safety regulations................................. 5
2.6 Safety instructions Battery.................................. 6
2.7 Safety data sheets .............................................. 6
2.8 Safety markings on the machine ........................ 6
3 Intended Use ........................................... 7
3.1 Misuse ................................................................ 7
3.2 Residual risks ..................................................... 7
4 Technical Data......................................... 7
5 Type Plate ................................................ 7
6 Scope of Delivery.................................... 8
7 Optional Accessories ............................. 8
8 Transport, Packaging, Storage .............. 8
8.1 Packaging........................................................... 9
8.2 Storage ............................................................... 9
9 Description .............................................. 9
9.1 Description of control panel ............................... 9
10 Assembling.......................................... 10
11 Commissioning ................................... 11
11.1 Operating the charger..................................... 11
12 Operation ............................................. 12
12.1 Adjusting the side brush ................................. 12
13 Care, Maintenance and Repair........... 12
13.1 Care by cleaning............................................. 12
13.1.1 Emptying the dirt collection container....... 12
13.1.2 Clean pre-filter.......................................... 13
13.1.3 Clean main filter ....................................... 13
13.2 Maintenance and Service/Repair.................... 14
13.2.1 Replacing the sweeping brush .................. 14
13.2.2 Replacing the main sweeper roller ............ 15
14 Disposal, Recycling of old Equipment..
15
14.1 Decommission ................................................ 15
14.2 Disposal of electrical equipment..................... 15
14.3 Disposal via municipal Collecting points......... 15
15 Troubleshooting.................................. 16
15.1 Display error codes........................................ 16
15.1.1 Programming............................................. 16
15.1.2 Programmierungsanleitung ....................... 16
16 Spare Parts .......................................... 17
16.1 Ordering spare parts....................................... 17
16.2 Spare parts drawings...................................... 18
16.2.1 Spare parts drawings KM 625 ................... 18
16.2.2 Spare parts drawings KM 825 .................. 20
17 Electrical Circuit Diagrams ................ 22
17.1 Electrical circuit diagram KM 625 ................... 22
17.2 Electrical circuit diagram KM 825 ................... 23
18 EC - Declaration of Conformity.......... 24

Introduction
KM Series | 1.02 3
1 Introduction
You have made a good choice by purchasing the
CLEANCRAFT Sweeper.
Read the operating manual thoroughly before com-
missioning the machine.
It gives you information about the proper commission-
ing, intended use and safe and efficient operation and
maintenance of your Sweeper.
The operating manual is part of the Sweeper package.
Always keep this operating manual in the location where
your Sweeper is being operated. All local accident pre-
vention regulations and general safety instructions for
the operating range of your Sweeper must also be com-
plied with.
Illustrations in this operating manual serve the general
understanding and may deviate from the actual design.
1.1 Copyright
The contents of these instructions are copyright. They
may be used in conjunction with the operation of the
Sweeper. Any application beyond those described is not
permitted without the written approval of Stuermer Ma-
schinen GmbH. For the protection of our products, we
shall register trademark, patent and design rights, as this
is possible in individual cases. We strongly oppose any
infringement of our intellectual property.
1.2 Costumer service
If you have questions about your machine or technical in-
formation, please contact your dealer. There you will be
happy to help with expert advice and information.
Germany:
Stürmer Maschinen GmbH
Dr.-Robert-Pfleger-Str. 26
D-96103 Hallstadt
Repair-Service:
Fax: 0049 (0) 951 96555-111
Email: service@stuermer-maschinen.de
Internet: www.cleancraft.de
Spare parts orders:
Fax: 0049 (0) 951 96555-119
Email: ersatzteil[email protected]
We are always interested in valuable experience and
knowledge gained from using the application-which then
could be shared and be valuable to develop our products
even further.
1.3 Limitation of liability
All information and notes in these operating instructions
were summarised while taking applicable standards and
rules, the state-of-the-art technology and our longterm
knowledge and experiences into consideration.
In the following cases the manufacturer is not liable for
damages:
- Non-observance of the operating instructions,
- Inappropriate use
- Use of untrained staff,
- Unauthorised modifications
- Technical changes,
- Use of not allowed spare parts.
The actual scope of delivery may deviate from the ex-
planations and presentations described here in case of
special models, when using additional ordering options
or due to latest technical modifications.
The obligations agreed in the delivery contract, the gen-
eral terms and conditions as well as the delivery condi-ti-
ons of the manufacturer and the legal regulations at the
time of the conclusion of the contract are applicable.
2 Safety
This section provides an overview of all important safety
packages for the protection of operating personnel as
well as for safe and fault-free operation. Other task-ba-
sed safety notes are included in the paragraphs of the in-
dividual phases of life.
2.1 Symbol explanation
Safety instructions
The safety notes in these operating instructions are high-
lighted by symbols. The safety notes are introduced by
signal words which express the concern of the risk.
DANGER!
This combination of symbol and signal words indi-
cates an imminently dangerous situation which may
lead to death or severe injury if not avoided.
4KM Series | 1.02
Safety
Tips and recommendations
To reduce the risk of personal injury and property da-
mage and to avoid dangerous situations, the safety inst-
ructions in this manual must be observed.
2.2 Obligations of the operating com-
pany
The operating company is the person who operates the
Sweeper for business or commercial reasons by herself,
or leaves it to a third party for use or application, and who
bears the legal product responsibility for the protection of
the user, the staff or for third parties.
Obligations of the operator:
If the machine is used in the commercial sector, the ope-
rator of the machine is subject to the legal obligations for
occupational safety.
For this reason, the safety instructions in this operating
manual as well as the safety, accident prevention and
environmental protection regulations applicable to the
area of application of the machine must be observed.
The following applies in particular:
- The operating company must be informed about
the applying industrial safety regulations and fur-
ther analyse hazards resulting from the special
working conditions at the place of use of the Swee-
per. She must implement these in form of opera-
ting manuals for the operation of the Sweeper.
- During the entire lifetime the Sweeper, the opera-
ting company must verify whether the operating
manuals prepared by her correspond to the current
status of the regulations, and must adapt these if
necessary.
- The operating company must unambiguously regu-
late and determine the responsibilities for installa-
tion, operation, troubleshooting, maintenance and
cleaning.
- The operating company must ensure that all per-
sons who work with the Sweeper, have read and
understood this manual. Furthermore she must in-
struct the staff in regular intervals and inform them
about the hazards.
Furthermore the operating company is responsible to
keep the Sweeper always in a technically flawless state.
Thus, the following applies:
- The operator must ensure that the maintenance in-
tervals described in this manual are kept.
- The operator must have all safety devices checked
regularly for their good working order and their in-
tegrity.
WARNING!
This combination of symbol and signal words indi-
cates a potentially dangerous situation which may
lead to death or severe injury if not avoided.
CAUTION!
This combination of symbol and signal words indi-
cates a potentially dangerous situation which may
lead to slight or minor injury if not avoided.
ATTENTION!
This combination of symbol and signal words indi-
cates a possibly dangerous situation which may lead
to property and environmental damages if they are
not avoided.
NOTE!
This combination of symbol and signal words indi-
cates a potentially dangerous situation which may
lead to material or environmental damage if not avoi-
ded.
Tips and recommendations
This symbol highlights useful tips and recommendati-
ons as well as information for efficient and trouble-
free operation.

Safety
KM Series | 1.02 5
2.3 Qualification of the staff
The different tasks described in this manual represent
different requirements to the qualification of the persons
entrusted with these tasks.
Only persons reliable working procedures can be ex-
pected from, are allowed to perform all works. Persons
the responsiveness of which is affected by e. g. drugs,
alcohol or medication, are not allowed to work with the
machine.
The qualifications of the personnel for the different tasks
are mentioned below:
Operator
The operator is instructed by the operating company ab-
out the assigned tasks and possible risks in case of im-
proper behaviour. Any tasks which need to be performed
beyond the operation in the standard mode must only be
performed by the operator if it is indicated in these inst-
ructions and if the operating company expressively com-
missioned the operator.
Electrically qualified person
Electrically qualified person is due to their professional
training, knowledge and experience as well as knowl-
edge of the relevant standards and regulations, in a po-
sition to carry out work on the electrical systems and to
independently recognize and avoid possible dangers.
Qualified personnel
Due to their professional training, knowledge and expe-
rience as well as their knowledge of relevant regulations
the specialist staff is able to perform the assigned tasks
and to recognise and avoid any possible dangers them-
selves.
Manufacturer
Certain works may only be performed by specialist per-
sonnel of the manufacturer. Other personnel is not au-
thorized to perform these works. Please contact our cus-
tomer service for the execution of all arising work.
2.4 Personal protective equipment
The personal protective equipment serves to protect per-
sons against impairments of safety and health while wor-
king. The staff member has to wear personal protective
equipment while performing different tasks on and with
the machine which are indicated in the individual para-
graphs of these instructions.
The personal protective equipment is explained in the
following paragraph:
2.5 General safety regulations
Please note the following:
- Never work without guards and keep them in good
working order.
- Always keep the sweeper and its working environ-
ment clean.
- Do not modify the sweeper's design or use it for pur-
poses other than those for which it was designed by
the manufacturer.
- Never work under the influence of diseases that im-
pair concentration, fatigue, drugs, alcohol or medica-
tion.
- Keep children and persons unfamiliar with the
sweeper away from its working environment.
- Persons with reduced physical, sensory or mental ca-
pabilities must not use the machine unless they are
supervised and instructed by a carer.
- Only use the sweeper in accordance with these in-
structions.
WARNING!
Danger in case of insufficient quali-
fication of the staff!
Insufficiently qualified persons cannot estimate the
risks while using the single-disc machine and expose
themselves and others to the danger of severe or let-
hal injuries.
- Have all works only performed by qualified per-
sons.
- Keep insufficiently qualified persons out of the wor-
king area.
Protective gloves
The protective gloves serve to protect the hands
against sharp components as well as against fric-
tion, abrasions or deep injuries.
Safety boots
Safety boots protect the feet from being crushed, fal-
ling parts and slipping over on slippery ground.
Protective clothes
Protective clothes are made of a tightly fitted fabric
without the protruding parts of low tear strength.

6KM Series | 1.02
Safety
- Do not sweep up gel, liquid, flammable, explosive, in-
candescent and harmful substances with the
sweeper.
- Do not sweep up liquids.
- The machine is only intended for sweeping on paved
areas. The sweeping environment must not be wet.
- Never put hands or feet on or under rotating parts.
- Before each use, make sure that there are no dama-
ged parts on the sweeper.
- Damaged parts must be replaced immediately to
avoid sources of danger.
- Hold the machine firmly during operation.
- Do not expose the machine to rain or snow.
- Be aware of all power lines, electrical circuits, water li-
nes and other mechanical hazards in your work area,
especially those hazards below the work surface that
are hidden from the operator's view and may come
into contact unintentionally.
- Do not use your sweeper in places where there is a
risk of fire or explosion; e.g. in the presence of flam-
mable liquids, gases or dust.
- Make sure that the brushes do not block during opera-
tion. Prolonged blocking of the brushes can damage
the appliance.
- Replace defective parts immediately. Only use origi-
nal spare parts.
- Do not make any changes, additions or conversions
to the sweeper.
- If damage occurs to the machine, stop using it and
have it repaired or contact our customer service.
- If you sweep in glass or broken pieces, wear protec-
tive goggles and gloves.
- Use robust gloves to remove glass and other sharp
objects from the dirt container.
- Operate the sweeper only with the dirt bin and filter
correctly fitted.
- Only drive at low speed on sloping or slippery sur-
faces.
- The machine must not be used for transporting per-
sons or objects.
- Wear a dust mask, safety goggles and protective
gloves in dusty areas.
- Do not disassemble the machine or attempt to repair it
yourself.
- Only use original spare parts and accessories.
2.6 Safety instructions Battery
- Disconnect the battery and charger before working on
the machine.
- Do not smoke when working on or adjusting the bat-
tery.
- If the charger cable is damaged, it must be replaced
by the manufacturer, authorised dealer or equally
qualified personnel.
- Do not use batteries that are not intended for use with
the machine.
- Never use a defective charger or charging cable to
charge the battery.
- Be careful not to short-circuit the battery terminals or
cause a spark.
- Keep the battery away from open flames.
- To avoid fire or explosion, check the batteries and
charger for damage before use.
- Do not use the machine with a damaged battery.
- Remove damaged batteries from the machine and
dispose of them safely. Do not throw the battery away
with household waste, but dispose of it in accordance
with local laws and regulations.
2.7 Safety data sheets
Safety data sheets on hazardous goods can be obtained
from your specialist dealer or by calling +49 (0)951/
96555-0. Specialist dealers can find safety data sheets in
the download area of the partner portal.
2.8 Safety markings on the machine
The Sweeper has safety markings and instructions (Fig.
1) which must be observed and followed.
Fig. 1: Safety markings
Damaged or missing safety symbols on the machine can
lead to incorrect actions with personal injury and damage
to property. The safety symbols attached to the machine
must not be removed. Damaged safety symbols must be
replaced immediately. From the moment when the signs
are not immediately recognisable and comprehensible at
first sight, the machine must be taken out of operation
until the new signs are attached.
Intended Use
KM Series | 1.02 7
3 Intended Use
The sweeper is designed exclusively for sweeping dirt, dry
waste and dust on hard floors outdoors and indoors or car-
peted floors indoors. The machine may only be used in ac-
cordance with its intended purpose. Any other use beyond
this is not in accordance with the intended use.
Intended use also includes compliance with all the informa-
tion in these instructions.
Stürmer Maschinen GmbH accepts no liability for design
and technical modifications to the sweeper.
Claims of any kind for damage due to improper use are ex-
cluded.
3.1 Misuse
3.2 Residual risks
Even if all safety instructions are observed and the
sweeper is used according to the instructions, there are
still residual risks, which are listed below:
- Risk of injury to upper limbs (e.g. hands, fingers).
- Risk of fire if the battery is incorrectly connected.
- Never clean floors with a height gradient greater than
that indicated on the machine.
- Do not use at altitudes above 2000m.
4 Technical Data
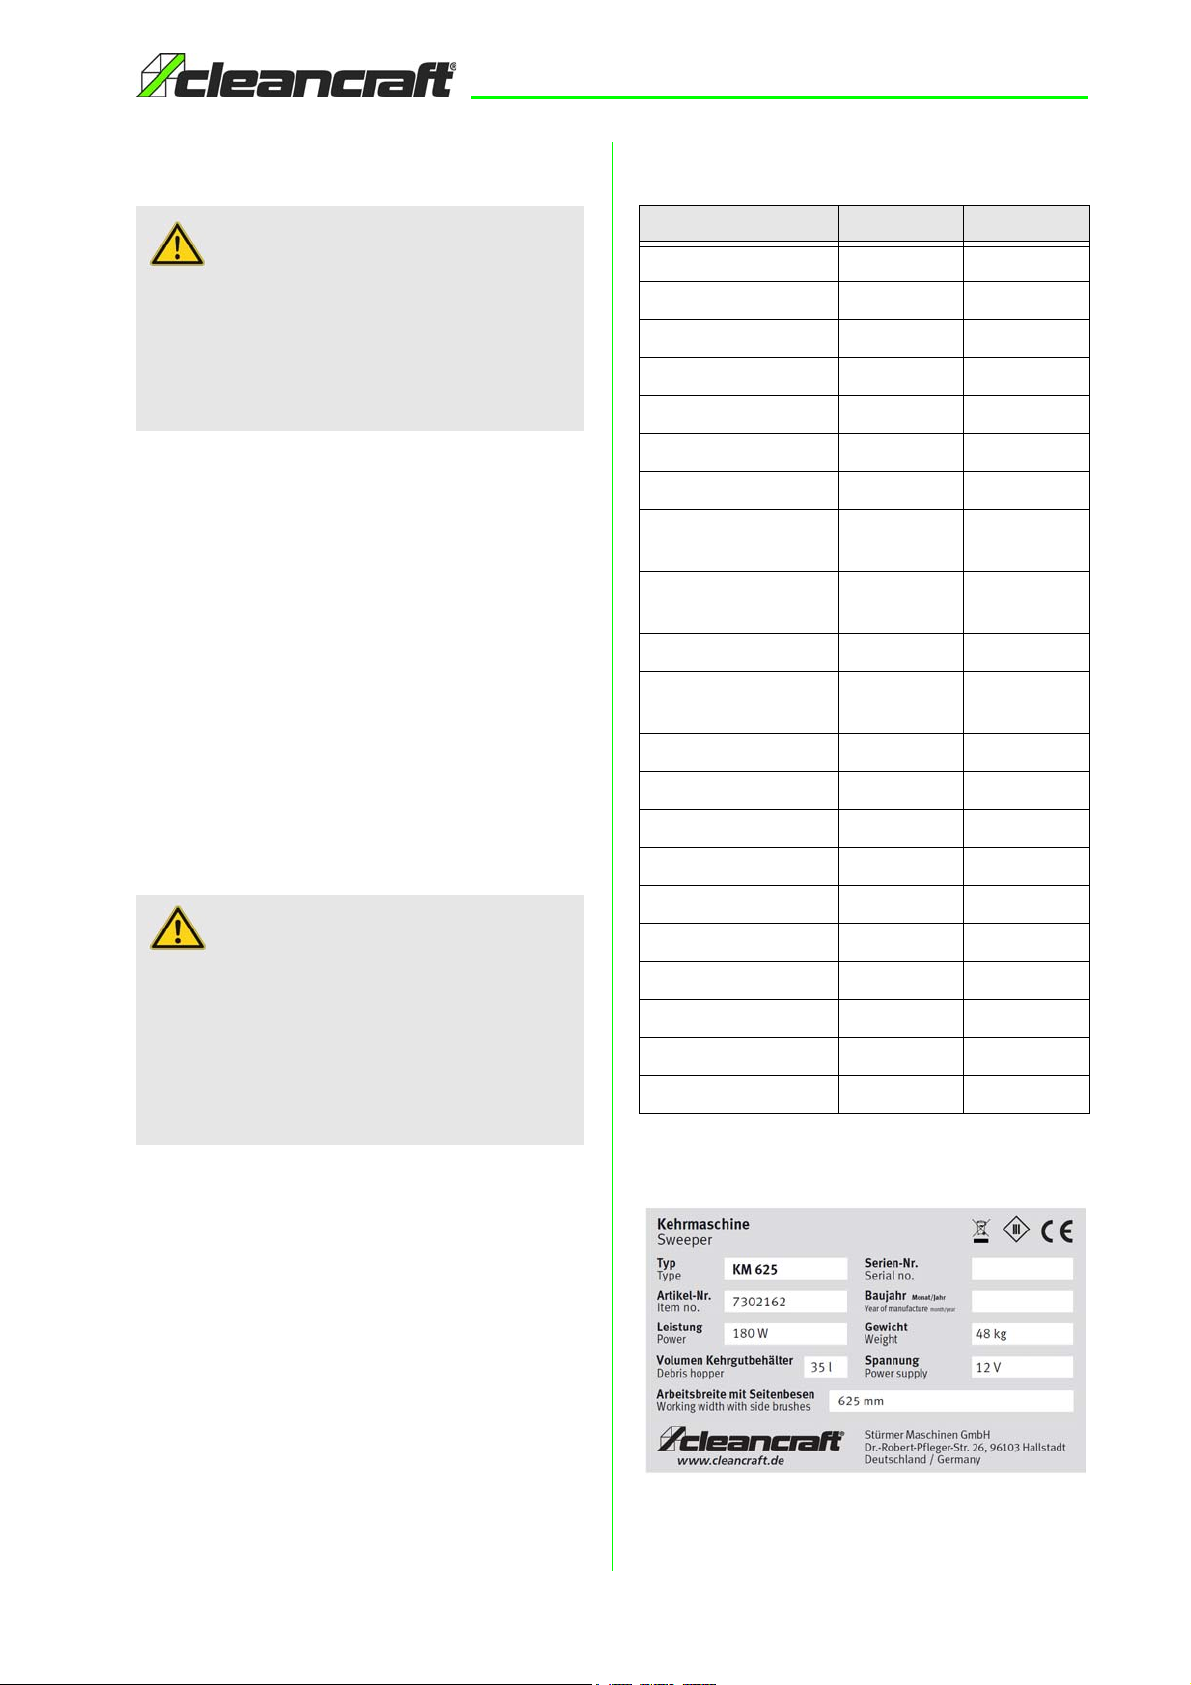
5 Type Plate
Fig. 2: Type plate KM 625
ATTENTION!
Any modification of the appliance is prohibited. In
addition to invalidating the warranty, the modification
may result in fire and injury, including mortal danger,
to the user. The manufacturer accepts no liability for
damage caused to property or persons as a result of
failure to comply with these instructions or misuse of
the appliance.
ATTENTION!
Risk of misuse!!
A mususe on Sweeper can lead to dangerous situati-
ons or damage to the device.
- Only operate the Sweeper in the performance range
specified in the technical data.
- Never bypass or override the safety devices.
- Only operate the scrubber-drier in a technically per-
fect condition.
Model KM 625 KM 825
Length 1033 mm 1033 mm
Width / Depth 615 mm 815 mm
Height 994 mm 994 mm
Weight 48 kg 53 kg
Working capacity 2180 m²/h 2600 m²/h
Cleaning surface 625 m² 825 m²
Operational capacity 2180 m²/h 2600 m²/h
Working width with
central brush
405 mm 660 mm
Working width with
side brushes
625 mm 825 mm
Speed 0 - 3,5 km/h 0 - 3,5 km/h
Maximum ramp gra-
dient
2% 2%
Debris hopper 35 l 45 l
Speed brushes 550 rpm 550 rpm
Brush diameter 200 mm 200 mm
Total power 0,18 kW 0,18 kW
Sound pressure level 56 dB(A) 56 dB(A)
Vibration level 1,3 m/s² 1,40 m/s²
Protection class IPX3 IPX3
Power supply 12V battery 12V battery
Battery lifetime 110 min 110 min
Battery charge time 8 hours 8 hours

8KM Series | 1.02
Scope of Delivery
6 Scope of Delivery
Scope of delivery KM 625 and KM 825
- Battery 12V 42Ah AGM
"You can receive the safety data sheet from your spe-
cialist dealer or by calling Tel: +49 (0)951/96555-0"
- On-board charger 12V 5Ah
- Side broom
- Main sweeping roller
- Plate filter
7 Optional Accessories
KM 625
- Main sweeper roller soft
item number: 7310000
- Main sweeper roller medium
item number: 7310001
- Main sweeper roller hard
item number: 7310002
- Side broom
item number: 7310010
- Plate filter
item number: 7310015
- Polyester plate filter
item number: 7310016
- AGM battery 12V 42 Ah
item number: 7310020
KM 825
- Main sweeper roller soft
item number: 7310005
- Main sweeper roller medium
item number: 7310006
- Seitenbesen
item number: 7310010
- Plate filter
item number: 7310015
- Polyester plate filter
item number: 7310016
- AGM battery 12V 42 Ah
item number: 7310020
8 Transport, Packaging, Sto-
rage
Transport
Improper transport of individual devices, unsecured de-
vices stacked on top of each other or next to each other
in packed or already unpacked condition is accident-
prone and can cause damage or malfunctions for which
we do not grant any liability or guarantee.
Transport the scope of delivery secured against shifting
or tilting with a sufficiently dimensioned industrial truck to
the installation site.
General risks during internal transport
Devices may only be transported by authorized and qua-
lified persons. Act responsibly during transport and al-
ways consider the consequences. Refrain from daring
and risky actions.
Gradients and descents (e.g. driveways, ramps and the
like) are particularly dangerous. If such passages are
unavoidable, special caution is required.
Before starting the transport check the transport route for
possible danger points, unevenness and disturbances
as well as for sufficient strength and load capacity.
Danger points, unevenness and disturbance points must
be inspected before transport. The removal of danger
spots, disturbances and unevenness at the time of trans-
port by other employees leads to considerable dangers.
Careful planning of internal transport is therefore essen-
tial.
CAUTION!
Injuries caused by parts falling over or off a forklift,
pallet truck or transport vehicle.
Only use means of transport that can carry the total
weight and are suitable for it.
CAUTION: DANGER OF TIPPING!
The device may be lifted unsecured by a maximum
of 2cm.
Employees must be outside the danger zone, the
reach of loads. Warn employees and, if necessary,
advise employees of the hazard.

Description
KM Series | 1.02 9
8.1 Packaging
All used packaging materials and packaging aids are re-
cyclable and should be taken to a materials recycling de-
pot to be disposed of.
The delivery packaging is made of cardboard, so please
dispose carefully by having it chopped up and given to
the recycling collection.
The film is made of polyethylene (PE) and the cushioned
parts of polystyrene (PS). Deliver these substances to a
collection point for recyclable materials or to the waste
disposal company which looks after your region.
8.2 Storage
Store the sweeper in a dry, clean and frost-free environ-
ment. If the machine is not used for more than one
month, disconnect the red and black battery connection
cable.
9 Description
Fig. 3: Description KM 625
1 Control panel
2 Push handle
3 Swivel castor
4 Sweeping brush
5 Running wheel
6 Dirt collecting container
9.1 Description of control panel
Fig. 4: Control panel
1 On / Off button
Button for switching the machine on and off.
2 Display
Numerical display indicating voltage or operating time.
3 Button for toggling between indicating voltage /
operating hours and operating minutes. minutes
Numerical display button: Pressing the button displays the
machine voltage, as well as the hours (one press) and mi-
nutes (two presses) of machine operation.
4 On / Off button for selecting the operating mode for
light soiling
On-off button for selecting the operating mode: By pres-
sing the button, two different operating modes can be
selected: Mode 1 for light soiling and Mode 2 for intensive
soiling.
5 On-off button for selecting the operating mode for
intensive soiling
On-off button for selecting the operating mode: By pres-
sing the button, two different operating modes can be
selected: Mode 1 for light soiling and Mode 2 for intensive
soiling.
6 Battery charge status indication
LED's for indicating the battery charge status. LED lights
up green when the battery is charged, red when it is
discharged and yellow when it is in reserve or recharge
status.
7 Button for manual activation of the filter shaker
With the button the filter shaking can be activated. This
function is in addition to the automatic shaking that occurs
every 3 minutes.
1
2
3
4
5
6

10 KM Series | 1.02
Assembling
8 Button for switching off the automatically active in-
take fan
Intake fan: The intake fan is automatically switched on du-
ring working operation. The switch is thus used when it is
necessary to switch off the fan during machine operation.
10 Assembling
Unpack the machine carefully and avoid movements that
could cause damage.
After removing the packaging, check the condition of the
components. If any damaged parts are found, contact an
authorised dealer immediately.
Proceed as follows to assemble the sweeper:
Step 1: Remove the packaging of the sweeper and
check that there is no damage to the machine.
Step 2: Check that the scope of delivery is complete.
Step 3: Lift the machine at the front and slide the
sweeping brush onto the shaft..
Fig. 5: Mounting the sweeping brush
Step 4: Unlock the clamping device of the push bar.
Fig. 6: Unlocking the clamping device
Step 5: Pull out the push bar to the desired height.
Fig. 7: Adjusting the push bar
Step 6: Clamp the clamping device of the push bar.
Step 7: Check the lever for lifting the suction lip for cor-
rect assembly. (model KM 825 only).
Fig. 8: Lever for lifting the suction lip
unlocking
Handle clamping device

Commissioning
KM Series | 1.02 11
Step 8: Remove the top cover of the sweeper to access
the battery.
Step 9: Connect the two cables with each other. Make
sure the cables are connected correctly . (Red to
Red and Black to Black)
Fig. 9: Connect battery
11 Commissioning
After all assembly and preparation operations have been
carried out, the sweeper can be used. To obtain the best
performance and avoid damage to the machine, be sure
to follow the instructions in the manual carefully.
- Do not use the machine to pick up cables, ropes,
threads, water or other liquids.
- If there is a lot of waste on the floor (paper, leaves,
etc.), push up the front of the machine by pushing
the handlebar downwards.
- To collect hard and bulky rubbish, lift the suction lips
with the lever on the handle (Fig.8). As far as pos-
sible, do not operate the sweeper with the suction lip
lifted, as this leads to poorer cleaning results.
- At the end of the work, switch on the filter shaker.
11.1 Operating the charger
Fig 9.1: Charger fuse
As soon as the battery of the machine is discharged, the
red LED on the control panel lights up and all machine
functions switch off automatically. The operator must
therefore switch off the machine and start the charging
process by connecting the charger plug to the machine
and the power supply. During the charging process, the
yellow LED lights up on the display. When charging is
complete, the green LED lights up. The charger plug can
now be pulled out and the machine can be used again.
ATTENTION!
The machine is not designed for use on wet floors.
However, if the machine is used in moderately damp
areas (accumulation of moisture on the floor), it is
essential to switch ON the suction filter to avoid filter
damages. No guarantee is given in case of damage
to the machine due to vacuuming of wet waste.
black
black
red
red
ATTENTION!
Be careful not to switch on the sweeper until the bat-
tery is fully charged. Stopping the charging process
before the battery it is fully charged may shorten the
battery's life.
NOTE!
The fuse of the charger is 2.5 A.
Fuse 2,5A
12 KM Series | 1.02
Operation
12 Operation
Step 1: Switch on the unit by pressing the ON/OFF button.
Step 2: Check that the green LED is lit and that the bat-
tery is charged.
Step 3: Select the appropriate operating mode:
- On / Off switch 1 for light soiling and smooth floors.
- On / Off switch 2 for heavy dirt, cement, smooth as-
phalt or carpeted floors.
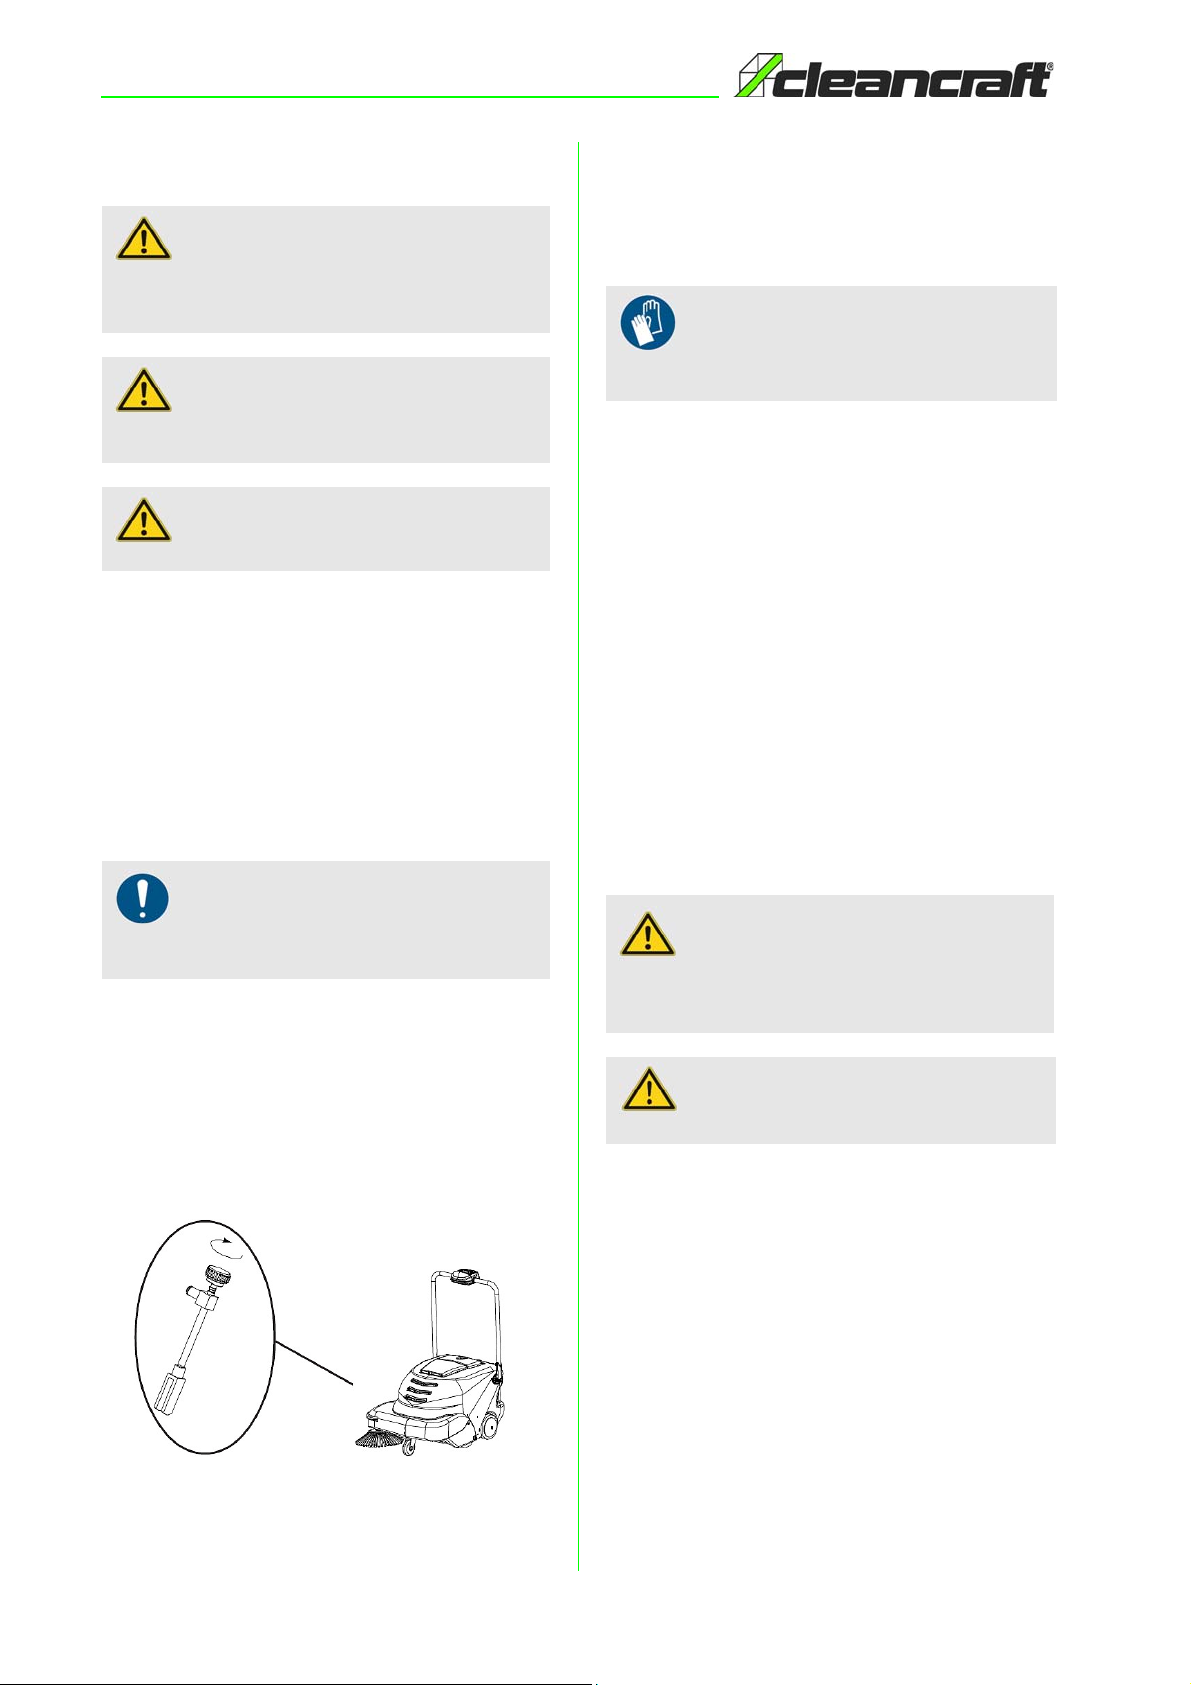
12.1Adjusting the side brush
Depending on the application and wear, the side brush can
be adjusted by using the adjustment screw (Fig. 10). Re-
move the top cover and turn the adjustment screw clock-
wise to increase the distance to the ground. Turn the adju-
stment screw anticlockwise to decrease the distance.
Fig. 10: Side brush adjustment
13 Care, Maintenance and Repair
13.1Care by cleaning
The sweeper must always be kept in a clean condition.
- Clean the sweeper only with a dry or damp cloth. Do
not use aggressive chemicals or scouring agents for
cleaning.
- Remove foreign objects such as leaves, twigs, etc.
from the brushes.
- Do not wash the brushes with hot water.
- Regularly check the drive belts for correct fit and ten-
sion.
- Store the sweeper indoors in a dry place protected
from dust, dirt and extreme temperatures.
- Keep metal parts dry to avoid or minimise corrosion.
- Avoid sweeping in long strings or ropes, as the brus-
hes can become tangled and damaged. If a rope or
thread becomes tangled, please remove the rever-
sing roller.
13.1.1 Emptying the dirt collection container
Before removing the dirt collection container, make sure
that the machine is switched off.
Step 1: Unlock the locking clamp of the dirt collection con-
tainer.
Step 2: Pull the handle to remove the container.
Step 3: Empty the container.
Step 4: Clean the dirt collection container and put it back
into the sweeper.
Step 5: Tighten the locking clamp of the dirt collection
container.
ATTENTION!
The machine must only be used by authorised per-
sonnel. Do not leave the machine unattended when it
is switched on.
ATTENTION!
Empty the dirt collection container regularly to ensure
safe work operation.
CAUTION!
Do not use the sweeper in wet areas!
NOTE!
When using operation mode 2, the battery working
time of the machine is reduced.
Wear protective gloves
Wear suitable protective gloves for cleaning to pro-
tect against injury.
ATTENTION!
Clean all parts of the sweeper when you finished
working with the machine. Empty the container and
wipe it with a cloth.
ATTENTION!
Never use the sweeper without dirt collection container.

Care, Maintenance and Repair
KM Series | 1.02 13
Fig. 11: Emptying the dirt collecction container
13.1.2 Clean pre-filter
The filters are essential and fundamental machine parts
for proper operation. By cleaning the filters correctly,
your machine will perform at its best.
Step 1: Remove the dirt collection container.
Step 2: Unlock both metal clips of the pre-filter.
Step 3: Remove the pre-filter.
Step 4: Clean the pre-filter and let it dry if necessary.
Step 5: Insert the pre-filter and secure it with the two metal
clamps.
Step 6: Replace the dirt collection container and clamp it
firmly.
13.1.3 Clean main filter
The main filter can be cleaned in three ways:
Automatic filter shaker
During operation, the filter shaker switches on automati-
cally every 3 minutes.
Switching on the filter shaker manually
A simple operation is enough to clean the filter. Press
and hold the PUSH-button (7) for a few seconds and
repeat this action 4 to 5 times. It is recommended to per-
form this operation at the end of each work cycle.
If the machine is used in dusty environments, the manual
filter shaker should be used more frequently.
Manual cleaning of the main filter
The filter should be cleaned every 20 working hours. If the
filter shaker alone is not enough, the filter can be cleaned
manually. Before carrying out any work on the machine,
make sure that it is switched off and that all functions are
deactivated.
Step 1: Remove the dirt collection container.
Step 2: Remove the main filter.
Step 3: Shake out the filter or clean it with compressed air.!
Step 4: Replace the main filter.
Step 5: Replace the dirt collection container and clamp it
in place.
Fig. 12: Clean main filter
Wear protective goggles!
Risk of eye injuries. Always wear safety goggles when
cleaning the components. Particular care is required by
using compressed air.

14 KM Series | 1.02
Care, Maintenance and Repair
13.2 Maintenance and Service/Repair
Regularly check the belt of the machine for good fit. Re-
place the belt if it is worn.
Regularly check the brushes for wear and replace them if
necessary.
Maintenance intervals:
If the hand sweeper does not work properly, contact a
specialist dealer or our customer service. You will find
the contact details in chapter 1.2 Customer service.
13.2.1 Replacing the sweeping brush
Step 1: Switch off the machine.
Step 2: Lift the machine at the front.
Step 3: Press in the two tabs on the sweeping brush and
pull it out downwards.
Step 4: Insert the new sweeping brush and press it in un-
til it is locked in place.
Fig. 13: Replacing the sweeping brush
ATTENTION!
Maintenance and repair work must always be carried
out by qualified personnel; any damaged parts may only
be replaced with original spare parts.
ATTENTION!
Unplug the battery and the charger before carrying out
maintenance work on the machine.
On delivery
Daily
Every 10 hours
Every 20 hours
Every 50 hours
Every 100 hours
Check the functionality of all
components XXXXXX
Empty and clean the dirt col-
lection container X
Remove and clean the pre-fil-
ter X
Check the seals X
Check the main filter (clean, if
necessary) X
Check bolts and nuts for tight-
ness X
Check wear of the rollers and
brushes X
Check the belt tension X
ATTENTION!
Maintenance and repairs must always be carried out
by qualified personnel. Any damaged parts must only
be replaced with original spare parts.

Disposal, Recycling of old Equipment
KM Series | 1.02 15
13.2.2 Replacing the main sweeper roller
Step 1: Switch off the machine.
Step 2: Tilt the machine backwards until the handle tou-
ches the ground.
Step 3: Turn the sweeper roller until a black push button
is visible on the right side.
Fig. 14: Push button on the sweeper roller
Step 4: Press the black push-button to unlock the
sweeper roller.
Step 5: Remove the sweeper roller by pulling it down-
wards.
Step 6: Insert the new sweeper roller into the guide from
below.
Fig. 15: Insert new sweeper roller
Step 7: Stand the machine up again.
14 Disposal, Recycling of old
Equipment
In your own interests and in the interest of the environ-
ment, please ensure that all components of the machine
are disposed of in the proper and approved way.
14.1Decommission
Immediately decommission disused machines in order to
avoid later misuse and endangering of the environ-ment
or personal safety.
- Eliminate all environmentally hazardous operating ma-
terials from the used device.
- If required, disassemble the machine into easy-to-
handle and usable components and parts.
- Dispose of machine components and operating ma-te-
rials by the disposal channels provided.
14.2Disposal of electrical equipment
Please note that electrical appliances contain a variety of
recyclable materials as well as environmentally harmful
components.
Make sure that these components are disposed of sepa-
rately and properly. In case of doubt, please contact your
municipal waste disposal.
If necessary, the help of a specialized waste disposal
company can be used for the treatment..
14.3Disposal via municipal Collecting
points
Disposal of used electrical and electronic equipment (to be
applied in the countries of the European Union and other
European countries with a separate collection system for
this equipment).
The symbol on the product or its packaging in-
dicates that this product should not be treated
as normal household waste, but should be ta-
ken to a collection point for the recycling of
electrical and electronic equipment. By helping to dispose
of this product correctly, you are protecting the environ-
ment and the health of those around you. The environment
and health are endangered by incorrect disposal. Material
recycling helps to reduce the consumption of raw materials.
For more information about recycling this product, contact
your local council, municipal waste disposal service or the
shop where you purchased the product.

16 KM Series | 1.02
Troubleshooting
15 Troubleshooting
15.1Display error codes
15.1.1 Programming
Your machine has factory set for optimal operation so no
further adjustments are necessary. However, if any of
the following codes appear: P1.x, P2.x or SF.x (x= value
between 0 and 9), follow the programming instructions to
reset the display. Operating the machine with settings
other than the factory settings may cause operational
problems.
15.1.2 Programming guide
If the display indicates P1.0, P2.1 or SF.3, switch the
machine off and on again to reset the display (these are
the factory settings). If the display shows higher values
than above (e.g. P1. "5", P2. "7", SF. "9"), proceed as
follows:
To call up the factory settings, switch on the machine,
press the display switch and hold it pressed for at least 3
seconds (battery/time symbols). P1.x will appear on the
display. The value P1 should be "0" (e.g. P1.0). If the
value is greater than "0", press the intake fan push but-
ton until P1.0 appears on the display. Press the display
switch again to display the next code. The value P2.x
should be "1" (e.g. P2.1). Press the push button of the in-
take fan to achieve the correct setting. Press the display
button to show the last code. The code should be SF.3. If
the value is not "3", press the filter shaker button until
SF.3 appears on the display. To exit the programming
function, switch off the machine.
NOTE!
If you cannot fix the problems with your sweeper by
yourself, please contact your local Cleancraft dealer.
Please write down the following information regarding
the sweeper or the operating instructions so that we
can support you in the best manner.
- Model name of the machine
- Serial number of the machine
- Year of manufacture
- Exact description of the error
Fault Remedy
Unsatisfactory
sweeping result
1. Empty the dirt collection con-
tainer
2. Adjust the height of the main
brush
3. Clean or replace the main
brush
4. Replace drive belt
5. Adjust / replace / clean side
brush
6. Adjust the height of the side
brush
Code Fault Remedy
C22 Protection of the
sweeper roller
against short-cir-
cuits: All functions
stops.
Switch the machine
OFF and then ON
again.
C14 Heat dissipator for
high temperatures.
Switches on at a
temperature above
90 °C.
The machine is re-
set as soon as the
temperature drops
below 80 °C.
FS0 Roller/brush worn
out.
Replace roller/
brush.
SP1 Defective brush. Is activated when
the brushes stop
three times within
one minute. Fault
can be reset by
switching off the
machine.
Yellow
LED
lights
up
Reserve state of
the battery
You can continue
operating the ma-
chine. Just for refe-
rence, the battery is
being charged.
Red
LED
flashes
Empty battery All machine functi-
ons are interrupted.
Switch off the ma-
chine and charge
the battery.
P1.X Push-button pro-
gramming of opera-
ting mode 1 activa-
ted.
See "programming"
chapter below
P2.X Push-button pro-
gramming of opera-
ting mode 2 activa-
ted.
See "programming"
chapter below
SF.X Filter shaker pro-
gramme setting is
activated.
See "programming"
chapter below
Code Fault Remedy

Spare Parts
KM Series | 1.02 17
16 Spare Parts
16.1 Ordering spare parts
The spare parts may be purchased with the authorised
dealer or directly with the manufacturer. Please find the
corresponding contact data in Chapter 1.2 Customer
service.
Indicate the following basic information for requests or
orders of spare parts:
- Type of device
- Item No.
- Position No.
- Year of construction
- Quantity
- Required mode of dispatch (mail, freight, sea, air,
express)
- Address of dispatch
Spare parts orders without the information mentioned
above cannot be considered. If the shipping method is
not specified, shipping will be at the discretion of the sup-
plier.
Details of the unit type, item number and year of manu-
facture can be found on the type plate attached to the
sweeper.
Example
The battery for the KM 625 sweeper must be ordered.
The battery has the number 39 in spare parts drawing 1.
When ordering spare parts, send a copy of the spare
parts drawing (1) with the marked component (battery)
and marked position number (39) to the authorised de-
aler or the spare parts department and provide the follo-
wing information:
- Type of device: Sweeper KM 625
- Item number: 7302162
- Spare parts drawing: 1
- Position number: 39
DANGER!
Risk of injury due to incorrect spare
parts!
The use of incorrect or faulty replacement parts may
cause danger to the operator and cause damage and
malfunction.
- Only use original spare parts from the manufacturer
or replacement parts approved by the manufacturer.
- In case of doubt, always contact the manufacturer.
Loss of warranty
The manufacturer's warranty will become null and
void if non-permissible spare parts are used.

18 KM Series | 1.02
Spare Parts
16.2 Spare parts drawings
The following drawings should help in case of service to identify necessary spare parts. To order, send a copy of the parts
drawing with the parts marked to your authorized dealer.
16.2.1 Spare parts drawings KM 625
Spare parts drawing 1
Fig. 16: Spare parts drawing 1 KM 625

Spare Parts
KM Series | 1.02 19
Spare parts drawing 2
Fig. 17: Spare parts drawing 2 KM 625

20 KM Series | 1.02
Spare Parts
16.2.2 Spare parts drawings KM 825
Spare parts drawing 1
Fig. 18: Spare parts drawing 1 KM 825
This manual suits for next models
1
Table of contents
Other CleanCraft Blower manuals


Popular Blower manuals by other brands


GARDTECH
GARDTECH GT10007/GY8900 manual

Fantom
Fantom PT199H owner's manual

EINHELL
EINHELL BG-EL 2301 E Original operating instructions

Kongskilde
Kongskilde Multiair 3000 user manual

Terramite
Terramite TSS46 Operator's handbook, maintenance, service & parts manual

stayer
stayer MULTI L20 operating instructions


