cleanJPsystem OpenAIR OA 240 User manual

OpenAIR OA 240
Intelligent air purier
1
User manual OpenAIR OA 240
OpenAIR OA 240
Air Purier User Manual
Index
Safety guidelines------------------------------------------- 2
Product parts introducon------------------------------- 3
Installaon Guide------------------------------------------ 4
Operaon instrucons------------------------------------ 4
Filter cleaning and replacement-------------------------- 5
Cleaning and maintenance-------------------------------- 5
Instrucons to disassemble detacheable parts--------- 7
Part assembly instrucons-------------------------------- 8
Problems and soluons------------------------------------ 9
Warranty instrucons-------------------------------------- 10
Maintenance record--------------------------------------- 11
Aer-sales service card------------------------------------ 12
Thank you for using our air purier. To ensure maximum funconality of
this product, please carefully review subjected user manual before use,
and reserve it properly for future reference.

23
User manual OpenAIR OA 240 User manual OpenAIR OA 240
Safety guidelines
This product is designed for household applicaon; please use this purier under stand-
ard condions by following below operaon instrucons before use.
Warning
1. Please prevent the device from contacng with water; do not plug/unplug the
power with wet hands.
2. Please do not clean or spray the device by water, other liquid, cleaning agent or any
inammable detergent.
3. Please do not block the air inlet or outlet.
4. Do not use the power extension cable unless approved by the local authority
5. Please do not use the device when it is damaged.
6. Please do not try to disassemble, repair or ret the device.
7. Please do not use the device nearby heang machines (such as stove, oven, re-
place, heater and etc) or expose directly in the sunshine.
8. Please unplug the power in case you do not use it for a long me.
9. Please do not use this product in an environment with large temperature variaon.
10. Please do not use the product under high temperature or humid condions (such
as bathroom or kitchen).
11. In case of abnormal noise, burning smell or smog coming out from the device,
please remove the power plug under safe mode, then contact technical support
center.
12. In case the plug does not match with the socket, please contact qualied technician
to install a correct socket. Please do not modify the plug or use a change-over plug.
Safety precauons
1. Please ensure the plug is connected to correct socket according to marked voltage
requirement on the back of device.
2. In case power cable damage, it should be replaced by the Manufacturer or qualied
service agent.
3. The device should not be operated by those who are physically, sensory or mental-
ly decient or who else has lile experience or knowledge on purier operaon (in-
cluding children), unless they are under the supervision of other security personnel.
4. Children are only allowed to operate this product under supervision.
Product parts introducon
5. In case of aromatherapy, spray insect repellent is being used in the room, or the
room is full of oil contaminaon, inammable gas or chemical smoke, subjected
device is prohibited to be used.
6. This purier is not designed to eliminate Co and Rn, which cannot be used as secu-
rity appliance while re of hazardous chemical accident occurs.
7. This product is not a substute for normal venlaon device or dust collector.
Please ensure air circulaon while the purier is working, please do not apply it
together with range hoods or exhaust fan.
8. Please ensure the correct power connecon to avoid overload and heang.
9. Please ensure the device is used on a dry and at plaorm.
10. The minimum distance between the device and the wall or other object is 20cm,
while the top side should be no less than 30cm space.
11. Only original lter designed by our company can be used for the purier, do not
use any other type.
12. Do not push, lean, press, bump, or insert sharp objects into any part of the product.
13. Please ensure the power is o before cleaning or maintaining the device.
45
User manual OpenAIR OA 240 User manual OpenAIR OA 240
Installaon guide
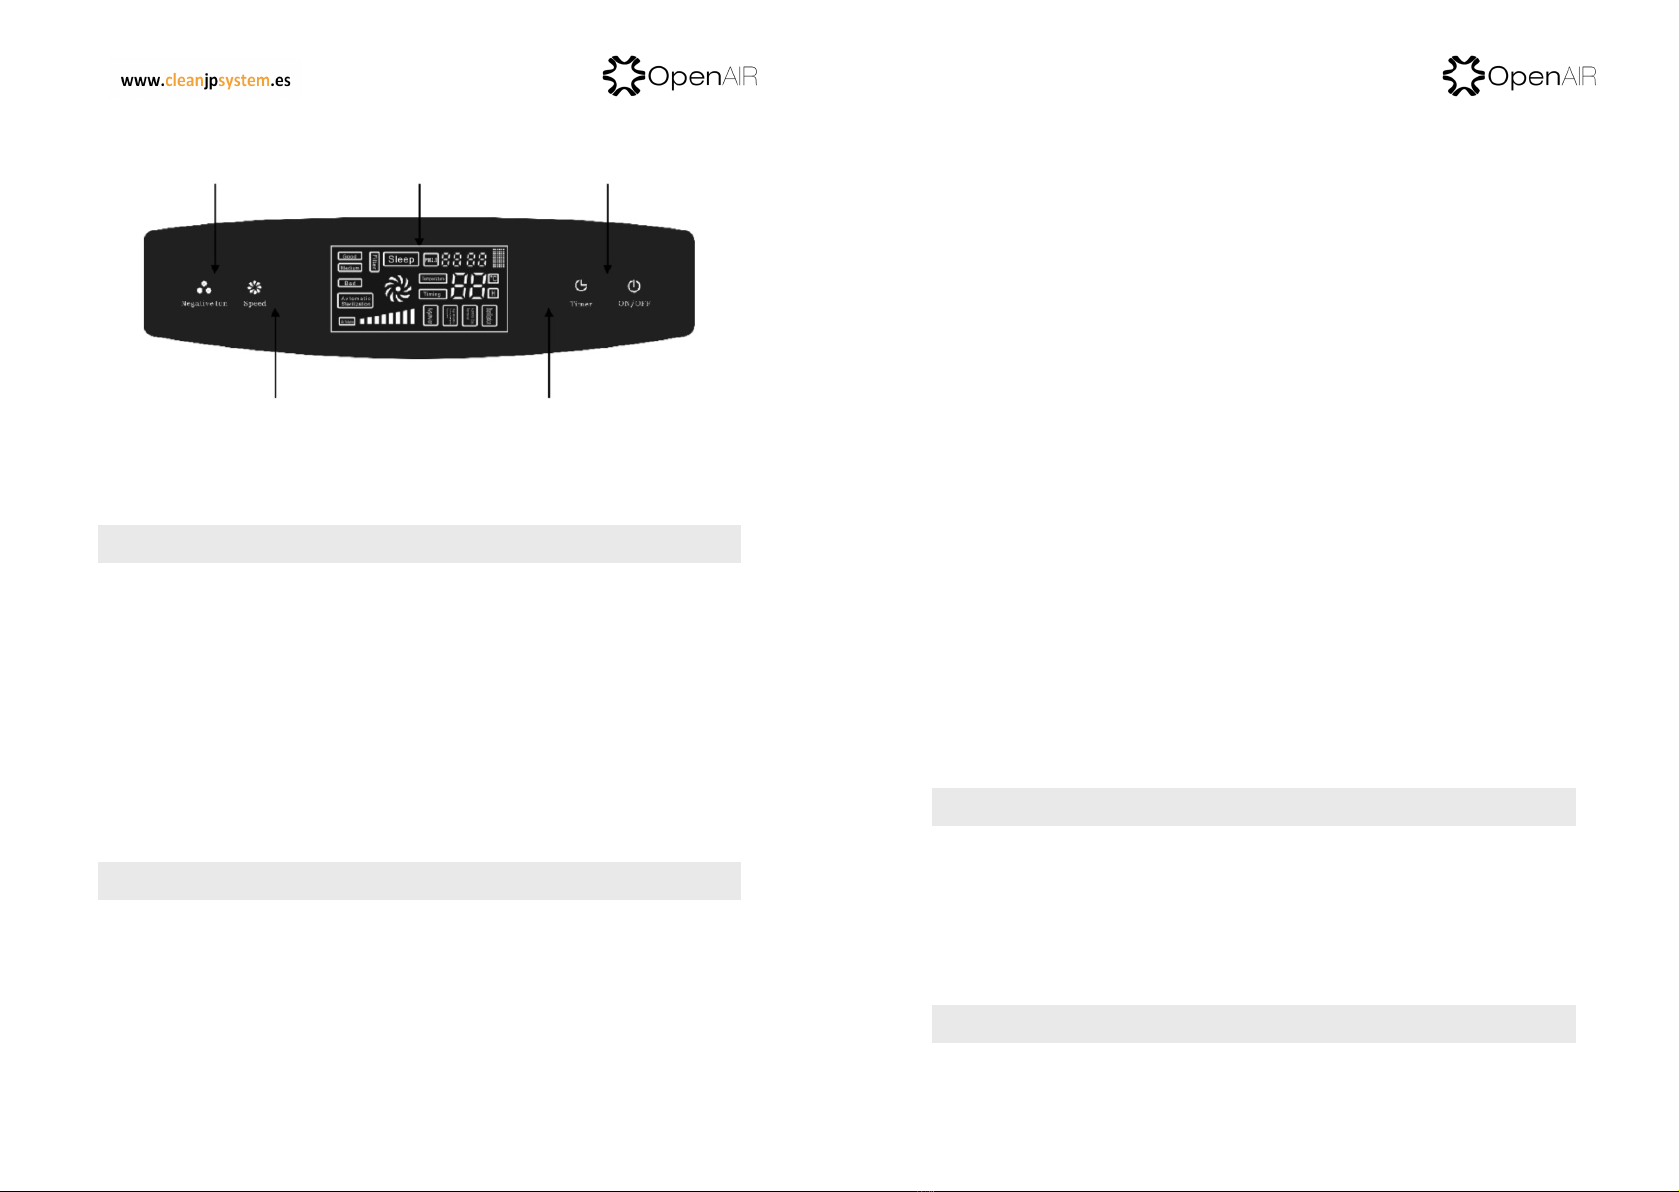
Control panel
Note: if the model you purchase is not equipped with dust sensor, it only monitors air
quality (odor) level; the control panel may be slightly dierent, the actual device will
prevail.
Preparaon before First Use
1. Please read this user manual carefully and reserve it for future reference.
2. Remove all the packages, and then clean all detachable parts and device interior by
so dry cloth. Tips: please refer to following chapters for the method of disassem-
bling the detachable parts.
3. Please remove the packaging tape of the lters before using.
4. Please place the device on a dry and at plaorm, andkeepthedevice 20cm mini-
mum far away from the other object.
5. Before plugging into the socket, please check the socket or the extension cable
meets product requirement.
6. While turning on”negave ion”funcon, if surrounding environment is extremely
quiet, slight “sizzling” noise will be heard, that is normal phenomenon, as the nega-
ve ion generator is releasing high volume negave ion.
Connect the device with suitable power socket, ready for funcon.
1. Startup/Shutdown
Startup: Press On/O buon to startup the device; the purier enters into natural
wind speed aer every startup.
Shutdown: Press On/O buon again to turn o the device.
Operaon instrucons
Funcon setup buon Display panel Power buon
Wind speed setup buon Timing setup
Filter cleaning and replacement
2. Air quality detecon
The device is equipped with dust sensor and odor sensor, showing three air quality
levels by three colors: green, yellow and red, which represent good, moderate and bad
respecvely. Note: if the model you chose is not equipped with dust sensor, it only
shows air quality (odor) detecon and display.
3. Mode selecon
Press “Mode” buon to select the required wind speed.
1. If general mode is required or surrounding environment is relavely quiet, medium
speed is recommended.
2. If quiet mode is required, low speed opon is recommended.
3. If high ecient mode is required or indoor contaminaon is heavy, ecient mode
(highest speed)
4. If automac mode is selected, the device adjusts the wind speed according to in-
door air quality.
4. Timer
Four opons for ming: 1 H, 4H, 8H and 24H, but only three light signals will be shown:
1H,4H and 8H, if 24H ming is set up, all lights will be o. Press for the 1 st me, 1 H
indicator lights on, press for 2nd me, 2H indicator lights on, press for 3rd me, 4H indi-
cator lights on. All lights will be o if the operator presses 4th me, the device restores
to default state and keeps working for 24 hours then shuts down automacally. With
me passes, the ming light will change accordingly.
5. Negave Ions
When the operator switches from On to O, the negave ion buon changes automat-
ically, the “ION” light is on while the device is on, the light is o while the device is o.
6. Filter replacement indicaon
Aer a period of working, the indicator of “lter replacement” ashes connuously, it
reminds the operatorto replace with new lter. Aer the replacement, under startup
mode, please press “mode” and “ming” buon simultaneously for 3 seconds for reset-
ng.
1. The lifespan of the lter diers by indoor environment, cycle me and usage lo-
caon.
2. To ensure puricaon eciency, please adopt the lters recommended by our
company.
3. Please unplug the power before lter cleaning and replacing.
1. Please unplug the purier from power socket before lter cleaning and replacing.
Cleaning and maintenance

67
User manual OpenAIR OA 240 User manual OpenAIR OA 240
2. Purier Main Body Cleaning
Clean the dust and dirt by so and dry cloth. Tips: wet cloth can be adopted to slightly
wipe the surface in case serious contaminaon, but rough cloth is prohibited.
3. Air Inlet And Outlet Cleaning
Use a so brush to clean the dust accumulated on the inlet and outlet.
4. Dust Sensor Cleaning
Open the protecon cover (by a at or sharp tool), clean the dust sensor by a slight wet-
ted coon swab, then dry it by another dry swab and cover it back.
Some models are without dust sensor, the actual device will prevail.
5. Clean hairs
Or other similar or bigger pollutants on the preliminary
an-microbial lter by so brushing twice a month.
Warning: please do not ush or soak the HEPA lter, acvated carbon lter and an-
-microbial lter.
Use a slightly wet
coon swab to
clean the dust
sensor, and then
dry it with another
dry swab.
Instrucons to disassemble detacheable parts
1
Please ensure the device is under o status before disassembling and then unplug the
cable.
Tips: while disassembling, the operator could put the device against the wall to
enhance the stability.
2Hold the top of the front cover; pull the cover buckle slightly (1)
3
Pull out the cover upwardly (2).
4
Pull up the Bulge (on the boom)
of the HEPA lter, the HEPA lter
and an-microbial lter can then
be removed.
The Bulge --------------->
5
Hold the drawstring on the middle
boom of the acvated carbon
lter to remove it.
Hold the drawstring on the middle boom
Table of contents


