Clearent PAX A Series User manual

PAX Technology®
PAX A Series
Quick Reference Guide
PAX A80PAX A920
support.clearent.com

PAX A Series Quick Reference Guide
The PAX A Series Quick Reference Guide
is to help you with step by step instructions
for basic transactions and functions.
PAX Android Countertop Terminals
Powered by Android.
Supported by the PAXSTORE open software distribution platform,
within which payment service providers create and manage their
own independent app store marketplaces.
The PAX A Series is a new generation of terminals that function as
a countertop device, packed with the latest PCI PTS 5.x and NFC
contactless certifications and powered by the Android 6.0 operating
system.
With a full range of communication options to choose from, including
Wi-Fi, Dial and Ethernet, and an optional back-up battery, the PAX A
Series terminals are always connected, ensuring peak performance
during business hours.
The PAX A Series terminals have a built-in camera and comes with
a stunning high definition 4-inch touchscreen display which offers
merchants and customers alike a graphical user interface way
superior to traditional POS terminals.

PAX A Series Quick Reference Guide
Quick Setup
Adding Server / Clerk IDs 1
Accessing the Terminal / Android Settings 1
Setting Date & Time 2
Setting Wi-Fi Connection 2
Setting Ethernet (A80 Only) 2
Setting Password for Terminal / Android 2
Setting Volume & Key Beep 3
Customizing the Batch / Default Report 3
*PAX Technology, Inc. is not responsible for the content, quality, accuracy or completeness of any information
or materials contained in on these pages. PAX Technology, Inc. does not endorse any content, viewpoints,
products, or services contained on these pages and shall not be held liable for any losses caused by reliance
on the accuracy, reliability or timeliness of such information. Any person or entity that relies on any information
obtained from these pages does so at his/her own risk.
PAX Technology, 8880 Freedom Crossing Trail, Building 400, 3rd Floor, Suite 300, Jacksonville, FL 32256

1
If you are in the payment
application, choose the
CIRCLE AT THE BOTTOM
to return to the home menu.
Enter in the Operator
Name (optional) and the
OPERATOR ID (required)
Press the CONFIRM
option on the screen.
2
Choose the
OPERATOR option in
the function menu of
the payment app.
Once on the Android home
screen choose the option
for SETTINGS.
3
Enter in the password and
press either the ENTER key
on the screen OR the green
button on the terminal keypad.
The default password is the
day’s date in mmddyyyy format.
Press the OK option on
the screen.
4
Press the option for
ADD OPERATOR.
Once in the settings
menu you can use your
nger to scroll down to
reach the settings you
want to congure.
The settings password is
9876. Once that is keyed into
the terminal press the OK
on the terminal screen –the
green keypad button will
not work on this screen.
Either enter in another
OPERATOR ID OR
PRESS the BACK
ARROW to return to the
previous screen.
To go back to the
function menu in the
payment app press the
BACK ARROW. To view
the operators choose
the option for QUERY
OPERATOR. To delete an
operator choose the option
for DELETE OPERATOR.
Adding Server / Clerk IDs
Accessing the Terminal / Android Settings
Choose the FUNCTION
option in the payment app.
1
56 7 8
12 3 4

2
2
Choose the option for DATE
& TIME to access the date
and time setting menu.
The terminal will come with
the auto time zone set to
Eastern time zone and in
Military time.
TURN THE Wi-Fi OPTION
ON and then choose the
network to connect to.
Use your nger to scroll
to nd the merchant’s
time zone and choose
the option for the
appropriate time zone.
Flag off AUTOMATIC TIME
ZONE setting and then
choose the SELECT TIME
ZONE setting option to
congure the merchant’s
time zone.
Choose the ETHERNET
OPTION to set the
Ethernet setup.
Turn the ETHERNET
OPTION ON.
Setting Date & Time
Setting Wi-Fi Connection Setting Ethernet (A80 Only)
21 3 4
Choose the Wi-Fi OPTION
to set the Wi-Fi setup.
121
32
Choose the PASSWORD
setting to update the Password.
Default password is 9876,
but it is recommended that you
change the password and keep
it in a secure place.
If you turn this option OFF it
will disable the password for
the terminal/android settings.
Choose MODIFY PASSWORD
option to change the terminal/
android setting password.
Enter the original password
and then the new password
you wish to set twice. Once
entered press the OK button
to complete update.
Setting Password for Terminal / Android
1

3
support.clearent.com
866.435.0666
Choose the SOUND &
NOTIFICATION SETTING
to update the volume and
keypad beeps.
This setting controls the NOTIFICATION
VOLUME –notication can consist of
application updates made to the payment
app, and other app pushes made to the
terminal. To turn off the keypad beeps
ag the KEY TONE OPTION OFF.
Setting Volume & Key Beep
12
1 2 3
5
4
Choose the FUNCTION
option in the payment app.
Choose the REPORT
TYPE and how you want the
transactions on the report to
be SORTED.
Choose the REPORTS
option in the function
menu of the payment app.
To print the report that is
set as the default report
(set in the parameters
of the le build) choose
DEFAULT REPORT. To
set some customized
lters for the report choose
CURRENT REPORT.
Enter in the password and
press either the ENTER
key on the screen OR
the green button on the
terminal keypad. The default
password is the day’s date in
mmddyyyy format.
Customizing the Batch / Default Report
6 7
Once the report type is
chosen with the appropriate
lters, choose the option
for PRINT.
To set this as the new
Default report press OK.
If you do not want this set
as the default report and
only wish to print, press
the CANCEL option.

4
PAX A Series Quick Reference Guide
Contents
Credit Sale with Tip 5
Credit Refund 6
Credit Void Sale 8
Forced Sale 9
Close Batch 11
Reprint Last 12
Tip Adjustment 13
Technical Support 14
*PAX Technology, Inc. is not responsible for the content, quality, accuracy or completeness of any information
or materials contained in on these pages. PAX Technology, Inc. does not endorse any content, viewpoints,
products, or services contained on these pages and shall not be held liable for any losses caused by reliance
on the accuracy, reliability or timeliness of such information. Any person or entity that relies on any information
obtained from these pages does so at his/her own risk.
PAX Technology, 8880 Freedom Crossing Trail, Building 400, 3rd Floor, Suite 300, Jacksonville, FL 32256

5
PAX A Series Quick Reference Guide
Step 1
From the idle screen select the
transaction type [SALE].
Step 3 (Restaurant Only)
Enter the tip amount and select
[CONFIRM] or enter [0] for no tip
or select [CONFIRM] to bypass tip
entry and add the tip later.
Step 5 (Restaurant Only)
Enter the Server ID and select
[CONFIRM].
Step 4
Insert, swipe or manually enter
the card number.
Step 6
Once card holder signs on the
screen, select [CONFIRM] to
accept or [CLEAR] to clear the
signature and retry the signature.
CREDIT SALE
Step 2
Please enter the sale amount
and select [CONFIRM].
1
3
5
2
4
6

6
PAX A Series Quick Reference Guide
Step 1
From the idle screen select the
transaction type [REFUND].
Step 8
Please remove the card.
Step 3
Enter the refund amount and
select [CONFIRM].
CREDIT SALE
Step 2
Select how the terminal will apply
the refund. Select [BY CARD NUM]
to use the original card number or
select [RefNo] to use the original
transaction reference number.
Step 9
The terminal will display the
transaction status.
8
1
3
Step 7
Select the [PRINT] button to
print the receipts.
7
9
2
CREDIT REFUND

7
PAX A Series Quick Reference Guide
Step 4
Swipe or enter the card number.
Step 6
Once card holder signs on the
screen, select [CONFIRM] to
accept or [CLEAR] to clear the
signature and retry the signature.
Step 5 (Restaurant Only)
Enter the Server ID and select
[CONFIRM].
CREDIT REFUND Cont.
Step 8
The terminal will display the
transaction status.
4
8
5
6
5
Step 7
Select the [PRINT] button to
print the receipts.
7

8
PAX A Series Quick Reference Guide
Step 2
Swipe or enter the card number.
Step 6
Once card holder signs on the
screen, select [CONFIRM] to
accept or [CLEAR] to clear the
signature and retry the signature.
Step 4 (Restaurant Only)
Enter the Server ID and select
[CONFIRM].
Step 5
Select [CONFIRM] if the
displayed transaction is the one
to be voided. Scroll screen up to
locate the conrm button.
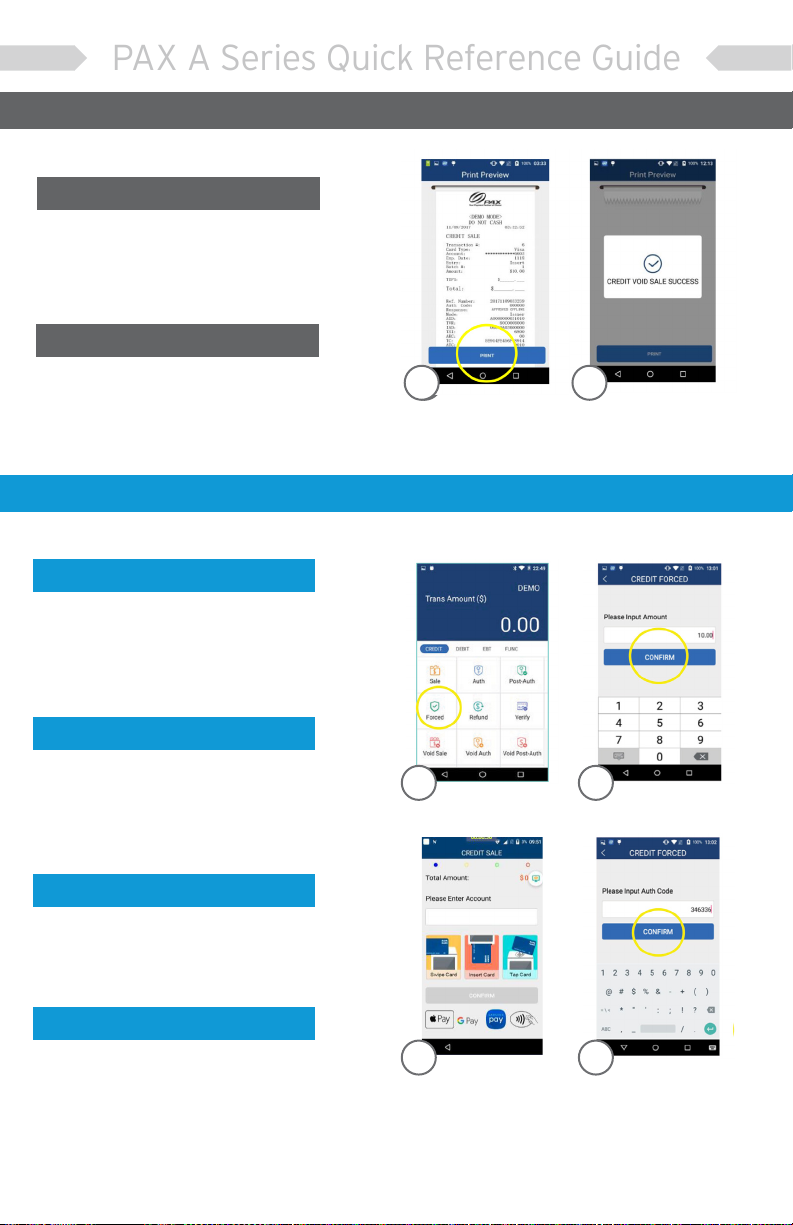
CREDIT VOID SALE
Step 3
Input the original transaction number
and then select [CONFIRM].
1
5
3 4
2
6
Step 1
From the idle screen select the
transaction type [VOID SALE].
9
PAX A Series Quick Reference Guide
Step 8
The terminal will display the
transaction status. 85
Step 7
Select the [PRINT] button to
print the receipts.
7
CREDIT VOID SALE Cont.
FORCED SALE
Step 2
Please enter the sale amount
and select [CONFIRM].
Step 3
Swipe or enter the card number.
Step 4
Enter the Auth Code of the
original transaction and then
select [CONFIRM].
1
3
2
4
Step 1
From the idle screen select the
transaction type [FORCED].
10
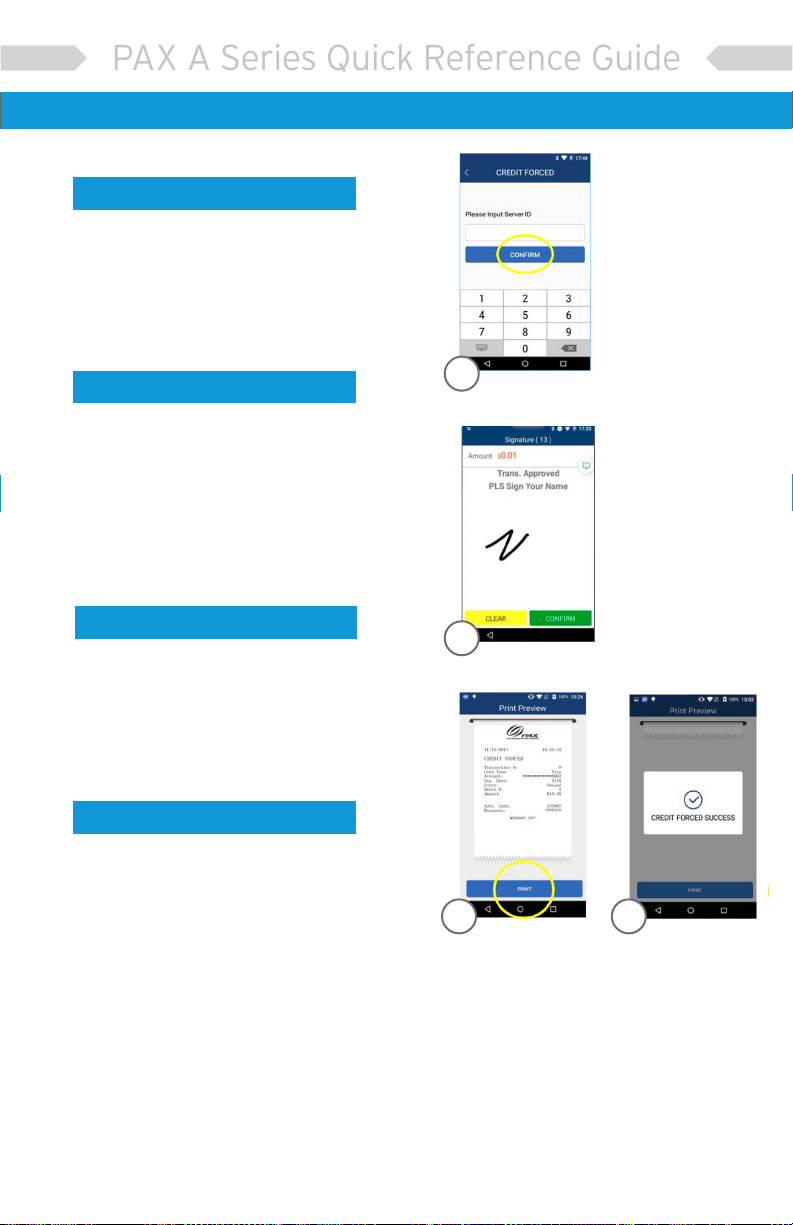
PAX A Series Quick Reference Guide
Step 8
The terminal will display the
transaction status.
85
Step 7
Select the [PRINT] button to
print the receipts.
7
FORCED SALE Cont.
Step 5 (Restaurant Only)
Enter the Server ID and select
[CONFIRM].
5
Step 6
Once card holder signs on the
screen, select [CONFIRM] to
accept or [CLEAR] to clear the
signature and retry the signature.
6
11
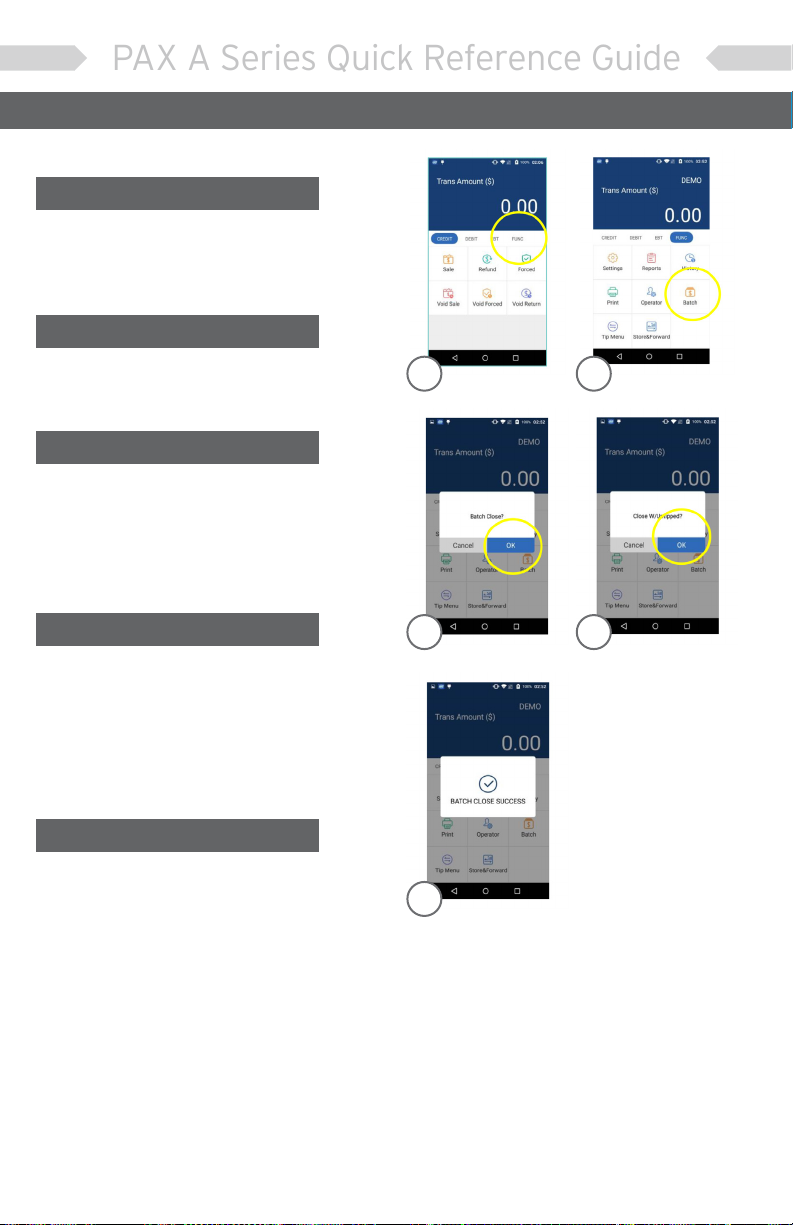
PAX A Series Quick Reference Guide
Step 1
From the idle screen select the
[FUNC] option.
Step 3
When prompted “Close Batch?”
select [OK] to close the batch
or select [CANCEL] to stop the
batch close.
Step 4
If prompted “Close W/Untipped?”
select [OK] to zero out untipped
transactions and close the batch
or select [CANCEL] to stop the
batch close.
Step 5
The terminal will display the
batch close status.
CLOSE BATCH
Step 2
Select the [BATCH] option. 1
3
5
2
4

12
PAX A Series Quick Reference Guide
Step 1
From the idle screen select the
[FUNC] option.
Step 3
To reprint the last transaction,
select the [PRINT LAST] option.
REPRINT LAST
Step 2
Select the [PRINT] option. 1
2
3

13
PAX A Series Quick Reference Guide
TIP ADJUSTMENT
Step 2
From the Func menu select the
[TIP MENU].
Step 3
From the Tip Menu select the
desired search format. To
search by operator ID select
[BY OPERATOR].
Step 4
Select the desired transaction.
Step 5
The transaction details will be
displayed. Scroll the screen to
display the Adjust option. To
adjust the tip, select [ADJUST].
Step 6
Enter the tip amount and
select [CONFIRM].
Step 7
To conrm the tip amount adjustment,
select [OK]. To cancel the tip amount
adjustment select Cancel.
Step 6
The terminal will display the
transaction status.
Step 1
From the idle screen select the
[FUNC] option.
21
3
7 8
4
4
5

14
PAX A Series Quick Reference Guide
This document is provided to you for informational purposes only. All features and specications are subject
to change without notice. PAX are either trademarks or registered trademarks of PAX Technology Limited
in China and/or other countries. All other trademarks or brand names are the properties of their respective
holders. Copyright 2016, PAX Technology Limited, All Rights Reserved.
FCC Regulations. This device complies with part 15 of the FCC Rules. Operation is subject to the following
two conditions: (1) This device may not cause harmful interference and (2) this device must accept
any interference received, including interference that may cause undesired operation. This equipment
complies with Part 68 of the FCC rules and the requirements adopted by the ACTA. On the body of
this equipment is a label that contains among other information a product identier. If requested, this
number must be provided to the telephone company. RF Exposure Information. This device meets the
government’s requirement for exposure to radio waves. This device is designed and manufactured not to
exceed the emission limits for exposure to radio frequency (RF) energy set by the Federal Communications
Commission of the U.S. government.
For questions about terminals and/or equipment:
Clearent Technical Support
866.435.0666 Option 1, then Option 2
7 a.m. – 11 p.m. Central, Monday through Sunday
technicalsupport@clearent.com
TERMINAL & TECHNICAL SUPPORT
Self-service options available at:
support.clearent.com

clearent.com
© 2020 Clearent, LLC is a registered agent for Central Bank of St. Louis, MO and Wells Fargo Bank, N.A., Concord, CA.
This manual suits for next models
2
Table of contents


