Cleva JOEY VSA2110UK User manual

Cordless Vacuum Cleaner
Slimline Design and 2-in-1
JOEY 21.6V Lithium
TM
Model Number - VSA2110UK

Thank you for choosing our JOEYTM cordless vacuum
cleaner. This is a cordless vacuum cleaner intended for
indoor use on light, dry household dust and debris.
Before Using Your New Vacuum Cleaner..........................
Getting Help..........................................................................
Safety Information...............................................................
Guarantee Information.......................................................
Parts and Features...............................................................
Assembly Instructions.........................................................
Charging Instructions..........................................................
Operating Instructions & Tips ...........................................
Maintenance and Care........................................................
Troubleshooting...................................................................
Technical Data .....................................................................
Disposal and Recycling .......................................................
CONTENTS
• Please read this instruction manual. It will help you
assemble and operate your new vacuum cleaner in the
safest and most effective way.
• Keep this instruction book and your sales receipt in a
safe place for future reference.
BEFORE USING YOUR VACUUM CLEANER
1
1
1
2
4
5
6
7
8
11
15
17
17
For more information on this product, please visit our
website.
cleva-uk.com
GETTING HELP
Thank
y
ou
f
or choosin
g
our JOEY
T
Mcordless vacuum
cleaner. This is a cordless vacuum cleaner intended
f
or
i
ndoor use on li
g
ht, dr
y
household dust and debris
.
B
e
f
ore Usin
g
Your New Vacuum Cleaner..........................
G
ettin
g
Hel
p
..........................................................................
S
a
f
et
y
In
f
ormation...............................................................
G
uarantee In
f
ormation.......................................................
Pa
rt
s
an
d
Fe
at
ur
es
..
..
..
..
..
..
..
..
..
..
..
..
..
..
..
..
..
..
..
..
..
..
..
..
..
..
..
..
..
..
..
.
A
ssembl
y
Instructions.........................................................
C
har
g
in
g
Instructions..........................................................
Op
eratin
g
Instructions & T
ip
s ...........................................
M
aintenance and Care........................................................
T
roubleshootin
g
...................................................................
T
echnical Data .....................................................................
D
is
p
osal and Rec
y
clin
g
.......................................................
C
O
N
T
E
N
T
S
•
Please read this instruction manual. It will hel
p
y
ou
assemble and o
p
erate
y
our new vacuum cleaner in the
s
a
f
est and most e
ff
ective wa
y.
•
Kee
p
this instruction book and
y
our sales rece
ip
t in a
s
a
f
e
p
lace
f
or
f
uture re
f
erenc
e.
BEF
O
RE USING Y
O
UR VACUUM CLEANE
R
1
1
1
2
4
5
6
7
8
11
15
17
17
For more in
f
ormation on this
p
roduct,
pl
ease visit our
w
ebsite.
cleva-uk
.
com
G
ETTIN
G
HELP

• This appliance can be used by children aged from 8
years and above and persons with reduced physical,
sensory or mental capabilities or lack of experience and
knowledge if they have been given supervision or
instruction concerning use of the appliance in a safe
way and understand the hazards involved. Children
must not play with the appliance. Cleaning and user
maintenance must not be made by children without
supervision.
• This appliance should only be used for normal
vacuuming in a domestic environment.
• Make sure the vacuum cleaner is stored in a dry place.
• Unplug the vacuum cleaner from the charger before
cleaning or maintenance.
• Children should be supervised to ensure that they do
not play with the appliance.
• Packaging material, e.g. plastic bags should not be
accessible to children to avoid suffocation.
• Check that your supply voltage is the same as that
stated on the rating plate on the charging adaptor.
• Each vacuum cleaner is designed for a specific charging
voltage, use only the original charging adaptor
supplied with this vacuum cleaner.
• While there is no shock hazard from electrical terminals
located on the vacuum, a burn could result from metal
objects being inserted into the terminal areas. Vacuum
cleaner terminals should always be kept free of objects.
• Leaks from battery cells can occur under extreme
usage or temperature conditions. If the liquid gets on
skin, wash quickly with water. If liquid gets into the
eyes, flush them immediately with clean water for a
minimum of 10 minutes. Seek medical attention.
• Do not mutilate or incinerate batteries as they will
explode at high temperatures.
SAFETY INFORMATION
2
•
This a
pp
liance can be used b
y
children a
g
ed
f
rom 8
y
ears and above and
p
ersons with reduced
p
h
y
sical,
sensor
y
or mental ca
pa
bilities or lack o
f
ex
pe
rience and
k
nowled
g
e i
f
the
y
have been
g
iven su
p
ervision or
i
nstruction concernin
g
use o
f
the a
pp
liance in a sa
f
e
w
a
y
and understand the hazards involved. Children
m
ust not
p
la
y
with the a
pp
liance. Cleanin
g
and user
m
aintenance must not be made b
y
children without
su
p
ervision
.
•
This a
pp
liance should onl
y
be used
f
or normal
vacuumin
g
in a domestic environment.
•
Make sure the vacuum cleaner is stored in a dr
y
p
lace.
•
Un
pl
ug
the vacuum cleaner
f
rom the cha
rg
er be
f
ore
cleanin
g
or maintenance
.
•
Children should be su
p
ervised to ensure that the
y
do
n
ot
p
la
y
with the a
pp
liance.
•
Packa
g
in
g
material, e.
g
.
p
lastic ba
g
s should not be
a
ccessible to children to avoid su
ff
ocation
.
•
Check that
y
our su
pp
l
y
volta
g
e is the same as that
stated on the ratin
g
p
late on the char
g
in
g
ada
p
tor.
•
Each vacuum cleaner is desi
g
ned
f
or a s
p
eci
f
ic char
g
in
g
volta
g
e, use onl
y
the ori
g
inal char
g
in
g
ada
p
tor
su
pp
lied with this vacuum cleaner.
•
Whil
e
th
er
e
is
n
o
sh
oc
k ha
za
rd
f
ro
m el
ec
tr
ic
al
t
er
mi
na
ls
l
ocated on the vacuum, a burn could result
f
rom metal
ob
j
ects bein
g
inserted into the terminal areas. Vacuum
cleaner terminals should alwa
y
s be ke
p
t
f
ree o
f
ob
j
ects
.
•
Leaks
f
rom batte
ry
cells can occur under extreme
usa
g
e or tem
p
erature conditions. I
f
the li
q
uid
g
ets on
skin, wash
q
uickl
y
with water. I
f
li
q
uid
g
ets into the
e
y
es,
f
lush them immediatel
y
with clean water
f
or a
mi
ni
mu
m
o
f
1
0
mi
nu
te
s.
S
ee
k
me
di
ca
l
at
te
nt
io
n.
•
Do not mutilate or incinerate batteries as the
y
will
ex
p
lode at hi
g
h tem
p
eratures
.
S
AFETY INF
O
RMATI
O
N
2

• The appliance must only be stored and charged
indoors.
• Do not leave the vacuum cleaner in direct sunlight.
• Avoid exposing the vacuum cleaner to strong heat.
• Do not expose the appliance to temperatures below
0 °C or above 40 °C.
• Keep the vacuum cleaner away from your head when
using nozzles and tubes.
• Do not use a damaged charger or cable.
• When disconnecting the charging cable from the mains,
pull the plug itself to remove it; do not pull on the
power cord.
• Do not pull the charging cable over sharp edges or
allow it to become trapped.
• If a fault is detected, switch off the appliance and
disconnect it from the charging cable and the mains.
• For safety reasons, only authorised or experienced
service personnel are permitted to carry out repairs.
• Do not try to touch the brush roll while the cleaner is
switched on and the brush roll is turning.
• Switch off the appliance when it is not in use.
• The battery cells within must not be dismantled, short
circuited, or placed against a metal surface.
PROPER USE
3
• The a
pp
liance must onl
y
be stored and char
g
ed
i
ndoors.
• Do not leave the vacuum cleaner in direct sunl
ig
ht.
• Avoid ex
po
si
ng
the vacuum cleaner to stron
g
heat.
• Do not ex
p
ose the a
pp
liance to tem
p
eratures below
0
°C or above 40 °C.
• Ke
ep
the vacuum cleaner aw
ay
f
rom
yo
ur head when
usin
g
nozzles and tubes.
• Do not use a dam
ag
ed cha
rg
er or cabl
e.
• When disconnectin
g
the char
g
in
g
cable
f
rom the mains,
p
ull the
p
lu
g
itsel
f
to remove it; do not
p
ull on the
po
wer cord
.
• Do not
p
ull the char
gi
n
g
cable over shar
p
ed
g
es or
allow it to become tra
pp
ed.
• I
f
a
f
ault is detected, switch o
ff
the a
pp
liance and
disconnect it
f
rom the char
g
in
g
cable and the mains.
• For sa
f
e
ty
reasons, on
ly
authorised or e
xp
erienced
service
p
ersonnel are
p
ermitted to carr
y
out re
p
airs.
• Do not t
ry
to touch the brush roll while the cleaner is
switched on and the brush roll is turnin
g
.
• Switch o
ff
the a
pp
liance when it is not in use.
• The batter
y
cells within must not be dismantled, short
c
ircuited, or
pl
aced a
g
ainst a metal sur
f
ace
.
PR
O
PER US
E
3

Cleva take pride in engineering high quality, durable
products.
This product is guaranteed against defects in
workmanship and materials for two years from the date
of purchase when it is assembled, operated and
maintained according to all supplied instructions.
• This guarantee is void if this product is used for
anything other than private household purposes.
• This guarantee does not apply to defects due to direct
or indirect abuse, negligence, misuse, accidental
damage, repairs or alterations or lack of maintenance.
• This guarantee provides benefits which are additional
to your statutory rights as a consumer and does not
affect your legal rights.
For more detailed information about your guarantee,
please visit cleva-uk.com
GUARANTEE INFORMATION
• In wet areas.
• On building rubble.
• Close to flammable gases, etc.
• When the product shows visible signs of damage.
• On sharp objects or fluids.
• On hot or cold cinders, lighted cigarette butts, etc.
• On fine dust, for instance from plaster, concrete, flour,
hot or cold ashes.
• Without its filters.
Using the vacuum cleaner in the above circumstances
may cause serious personal injury or damage to the
product. Such injury or damage is not covered by the
warranty or by CLEVA.
NEVER USE THIS VACUUM CLEANER
4
C
leva take
p
ride in en
g
ineerin
g
hi
g
h
q
ualit
y
, durable
p
roducts.
T
his
p
roduct is
g
uaranteed a
g
ainst de
f
ects in
w
orkmanshi
p
and materials
f
or two
ye
ars
f
rom the date
of
p
urchase when it is assembled, o
p
erated and
m
aintained accordin
g
to all su
pp
lied instructions
.
•
This
g
uarantee is void i
f
this
p
roduct is used
f
or
an
y
thin
g
other than
p
rivate household
p
ur
p
oses.
•
This
g
uarantee does not
ap
pl
y
to de
f
ects due to direct
or indirect abuse, ne
g
li
g
ence, misuse, accidental
dama
g
e, re
p
airs or alterations or lack o
f
maintenance.
•
This
g
uarantee
p
rovides bene
f
its which are additional
to
y
our statutor
y
ri
g
hts as a consumer and does not
a
ff
ect
y
our le
ga
l ri
gh
ts.
F
or more detailed in
f
ormation about
y
our
g
uarantee,
p
lease visit cleva-uk.com
G
U
A
R
A
N
T
E
E
I
N
F
O
R
M
A
T
I
O
N
• In wet areas.
• On buildin
g
rubble.
• Close to
f
lammable
g
ases, etc.
• When the
p
roduct shows visible s
ig
ns o
f
dama
ge
.
• On shar
p
ob
j
ects or
f
luids.
• On hot or cold cinders, li
g
hted ci
g
arette butts, etc.
• On
f
ine dust,
f
or instance
f
rom
pl
aster, concrete,
f
lour,
hot or cold ashes.
• Without its
f
ilters.
U
sin
g
the vacuum cleaner in the above circumstances
ma
y
cause serious
pe
rsonal i
nj
ur
y
or dam
ag
e to the
p
roduct. Such in
ju
r
y
or dama
g
e is not covered
by
the
warran
ty
or
by
CLEVA
.
N
EVER U
S
E THI
S
VA
C
UUM
C
LEANE
R
4

PARTS AND FEATURES
5
1
2
3
4
5
7
9
6
8
10
11
12
13
16
15 14
17
18
(13)
Handle
Touch control panel
Handheld Vacuum Cleaner
Main Body
Release Button
Combination Tool
Motorised Brush Head
Brush Cleaning Button
LED Lights
Handheld Vacuum
Cleaner Release Button
1
2
3
4
5
6
7
8
9
10
Handheld Vacuum
Cleaner Power Switch
Dust Bin Release Button
Dust Bin (Filter Inside)
Charging Adapter
Vacuum Cleaner Support
Charger Base
Upholstery Tool
Long crevice Tool
11
12
13
14
15
16
17
18
P
ART
S
AND FEATURE
S
5
1
2
3
4
5
7
9
6
8
10
11
12
13
16
15
14
17
18
(
13
)
H
andle
T
ouch control
p
anel
H
andheld Vacuum Cleane
r
M
ain Bod
y
R
elease Button
C
ombination Tool
M
otorised Brush He
ad
B
rush Cleanin
g
Butto
n
L
ED Li
g
hts
H
andheld Vacuum
C
leaner Release Butto
n
1
2
3
4
5
6
7
8
9
1
0
Handheld Vacuum
Cleaner Power Switc
h
Dust Bin Release Butto
n
Dust Bin
(
Filter Insid
e)
Char
gi
n
g
Ada
p
te
r
Vacuum Cleaner Su
pp
ort
Char
g
er Base
U
p
holster
y
Tool
Lon
g
crevice Tool
11
12
13
14
15
16
17
18
ASSEMBLY INSTRUCTIONS
6
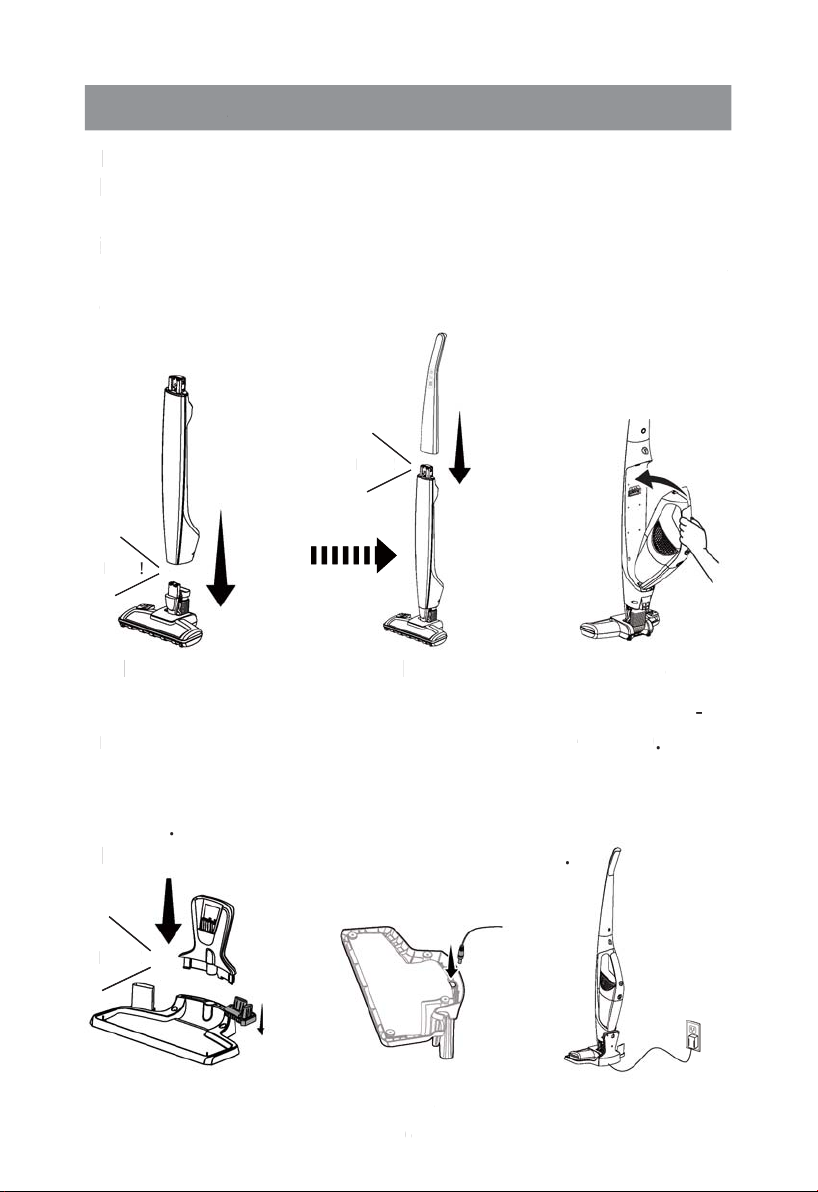
• Fit the vacuum cleaner body into the motorised brush
head and lock into place (Fig.1).
• Insert the handle into the top of the main body as
illustrated and lock into place (Fig.2).
• Insert the handheld vacuum cleaner into the main body
as shown and lock into place. Ensure that the dust bin is
secure in place (Fig.3).
• Insert vacuum cleaner support and brush tool attach-
ment into charger base and lock into place (Fig.4).
• Insert the charging adapter plug into the charging port
on the bottom of the charger base and secure the cord
(Fig.5).
• Plug the adapter into a wall socket (Fig.6).
Lock!
Lock!
Lock!
Fig.1 Fig.2 Fig.3
Fig.4 Fig.5 Fig.6
ASSEMBLY INSTRUCTI
O
NS
6
•
F
it the vacuum cleaner bod
y
into the motorised brush
h
ead and lock into
p
lace
(
Fi
g.
1
)
.
•
I
nsert the handle into the to
p
o
f
the main bod
y
as
i
llustrated and lock into
pl
ace
(
F
ig
.2
)
.
•
I
nsert the handheld vacuum cleaner into the main bod
y
a
s shown and lock into
p
lace. Ensure that the dust bin is
s
ecure in
pl
ace
(
F
ig
.3
)
.
•
I
nsert vacuum cleaner su
pp
ort and brush tool attac
h
-
m
ent into char
g
er base and lock into
p
lace
(
Fi
g
.4
)
.
•
I
nsert the char
g
in
g
ada
p
ter
p
lu
g
into the char
g
in
g
p
ort
o
n the bottom o
f
the cha
rg
er base and secure the cord
(
Fi
g
.5
)
.
•
P
lu
g
the ada
p
ter into a wall socket
(
Fi
g
.6
)
.
Lo
ck
!
L
ock!
L
ock!
Fi
g
.
1
Fi
g
.
2
Fi
g
.3
F
i
g
.
4
Fi
g
.
5
F
i
g
.6

7
CHARGING INSTRUCTIONS
Fig.7 Fig.8
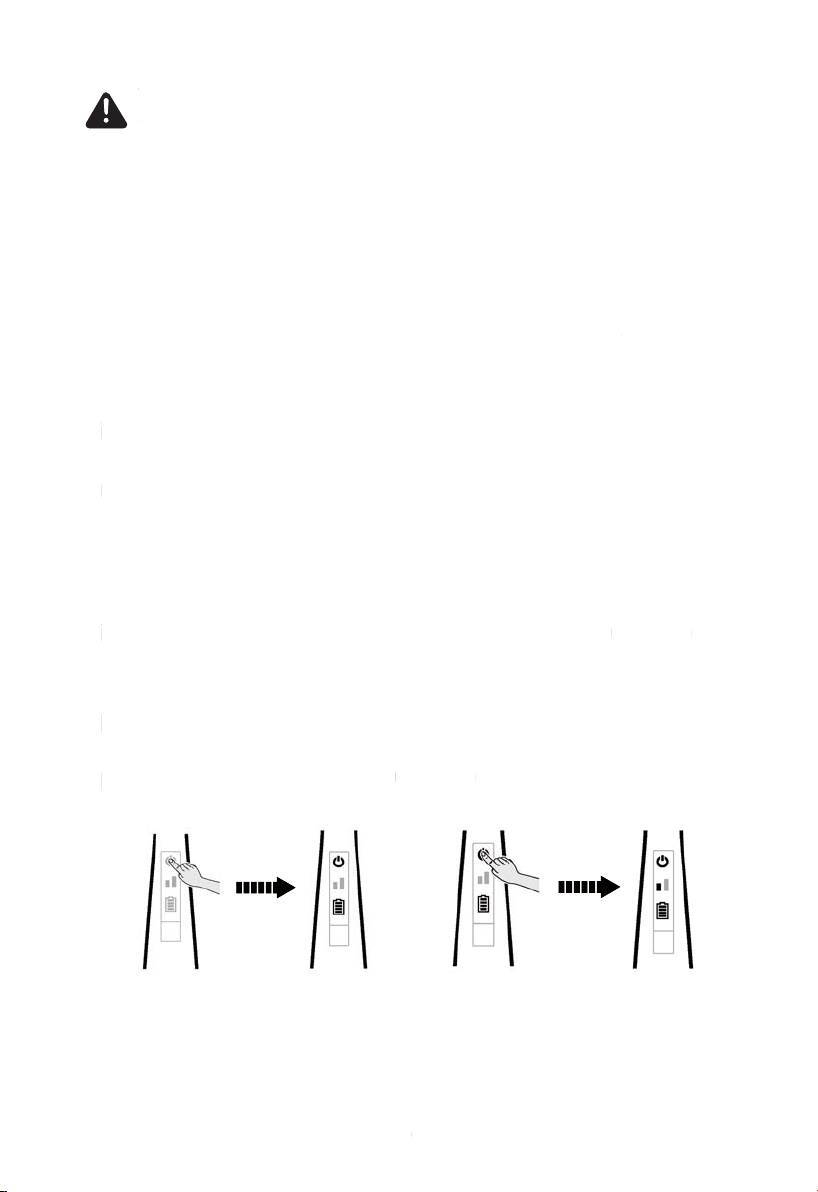
Please switch off the unit before placing it on the charger.
• Plug the charging adapter into an outlet. Insert the
vacuum cleaner onto the charger base as shown (Fig.7).
• Make sure the vacuum cleaner is fully charged before
using for the first time. The vacuum cleaner may take up
to 5 hours to charge completely if fully discharged.
• The battery charge indicator will flash continuously until
vacuum is fully charged. (Fig.8).
• When the vacuum has reached full charge (100%), the
battery charge indicator will remain lit with four (4) bars
illuminated for 3 seconds then go to dormant mode with
no illuminated lights showing. (Fig.9)
Battery Charge Indicator:
Touch Control Panel
7
CHARGING INSTRUCTI
O
NS
F
i
g.
7
Fi
g.
8
Please switch o
ff
the unit be
f
ore
p
lacin
g
it on the char
g
er.
•
Pl
ug
the cha
rg
in
g
ad
ap
ter into an outlet. Insert the
vacuum cleaner onto the char
g
er base as show
n
(
Fi
g
.7
)
.
•
Make sure the vacuum cleaner is
f
ull
y
char
g
ed be
f
ore
usin
g
f
or the
f
irst time. The vacuum cleaner ma
y
take u
p
t
o 5 hours to char
g
e com
p
letel
y
i
f
f
ull
y
dischar
g
ed.
•
The batter
y
char
ge
indicator will
f
lash continuous
ly
until
vacuum is full
y
char
g
ed.
(
Fi
g
.8
)
.
•
When the vacuum has reached full char
g
e
(
100%
)
, the
batter
y
char
ge
indicator will remain lit with four
(
4
)
bars
i
lluminated
f
or 3 seconds then
g
o to dormant mode with
no illuminated li
g
hts showin
g
.
(
Fi
g
.9
)
Batter
y
Char
g
e Indicator:
Tou
ch
Con
tro
l P
ane
l
Fig.9

NOTE: If the battery charging indicator does not
illuminate when charging, ensure:
• that the vacuum cleaner is seated properly on to the
charger base.
• that the charging adaptor is plugged into the wall
socket properly.
• that the wall socket is switched on.
• that the adaptor power plug is connected properly
on the charger base.
NOTE: For improved battery performance, always keep
the vacuum cleaner on the charger base while not in use.
CAUTION! Moving parts! To reduce the risk of
personal injury, DO NOT touch the brush roll when
the vacuum cleaner is on. Contacting the brush roll
while it is rotating can cut, bruise or cause other
injuries. Always turn off before servicing. Use cau-
tion when operating near children (Fig.10).
8
OPERATING INSTRUCTIONS & TIPS
USING YOUR VACUUM CLEANER
Fig.10
CONTROL PANEL
The control panel is located on the top of the handle,
which includes:
Power Icon=On/Off
Battery Indicator = Electric Capacity
Speed Indicator=Low/High
NOTE: I
f
the batter
y
char
g
in
g
indicator does not
illuminate when char
gi
ng
, ensure:
•
that the vacuum cleaner is seated
p
ro
p
erl
y
on to the
char
g
er base.
•
that the cha
rg
in
g
ad
ap
tor is
p
lu
gg
ed into the wall
socket
p
ro
p
erl
y
.
•
that the wall socket is switched on.
•
that the ada
p
tor
p
ower
p
lu
g
is connected
p
ro
p
erl
y
on the char
g
er bas
e.
NOT
E:
F
or im
p
roved batter
y
p
er
f
ormance, alwa
y
s kee
p
t
he vacuum cleaner on the char
g
er base while not in us
e.
C
AUTI
O
N
!
Movin
g
pa
rts! To reduce the risk o
f
p
ersonal i
nj
ur
y
, DO NOT touch the brush roll when
t
he vacuum cleaner is on. Contactin
g
the brush roll
w
hile it is rotatin
g
can cut, bruise or cause othe
r
i
n
j
uries. Alwa
y
s turn o
ff
be
f
ore servicin
g
. Use ca
u
-
t
ion when
op
eratin
g
near childre
n
(
F
ig
.10
)
.
8
O
PERATING INSTRUCTI
O
NS & TIPS
U
SING Y
O
UR VACUUM CLEANE
R
Fi
g
.1
0
CO
NTR
O
L PANEL
The control
p
anel is located on the to
p
o
f
the handle,
w
hich includes:
Power Icon=On
/
Of
f
B
atter
y
Indicator = Electric Ca
p
acit
y
Sp
eed Indicator=Low
/
Hi
gh
NOTE: When the vacuum is low on battery power, the
control panel or the battery icon will flash. The flashing
will continue until the unit is placed on the charging
station or is completely out of battery power.
WARNING - Do not operate vacuum cleaner
without filter in place.
• Before vacuuming, check that the brush wheels and
brush roll are clear of any sharp objects to avoid
scratching floors.
• Use low speed for surface cleaning of bare floors or low
pile rugs and carpets or when increased runtime is needed.
• Use high speed for cleaning of plush rugs and carpets
or when additional cleaning power is required.
Vacuum Operation:
• Touch the power icon to illuminate control panel and
initiate power. (Fig.11)
NOTE: If no further action is taken in 5 seconds, panel
returns to previous state.
• Start the vacuum cleaner by touching the power icon
once more. The speed bars will illuminate allowing for
speed control. (Fig.12)
• To change power setting, touch the speed indicator
icon for desired power setting (Low or High). (Fig.13)
NOTE: This vacuum cleaner is equipped with a memory
function that allows the vacuum to start in the last
power setting.
• After vacuuming, turn the unit off by touching the
power icon for 2 seconds. (Fig.14)
NOTE: Holding for less than 2 seconds causes no action.
9
N
OTE: When the vacuum is low on batter
y
p
ower, the
c
ontrol
p
anel or the batter
y
icon will
f
lash. The
f
lashin
g
w
ill continue until the unit is
p
laced on the char
g
in
g
s
tation or is com
p
letel
y
out o
f
batter
y
p
ower.
W
ARNING - Do not o
p
erate vacuum cleaner
w
ithout
f
ilter in
p
lace
.
•
Be
f
ore vacuumin
g
, check that the brush wheels and
brush roll are clear o
f
an
y
shar
p
ob
j
ects to avoid
scratchin
g
f
loors
.
•
Use low s
p
eed
f
or sur
f
ace cleanin
g
o
f
bare
f
loors or low
p
ile ru
g
s and car
p
ets or when increased runtime is
n
eeded.
•
Use hi
g
h s
p
eed
f
or cleanin
g
o
f
p
lush ru
g
s and car
p
ets
or when additional cleanin
g
p
ower is re
q
uired.
Vacuum O
p
eration
:
•
Touch the
p
ower icon to illuminate control
p
anel and
i
nitiate
p
ower.
(
Fi
g
.1
1)
NOTE: I
f
no
f
urther action is taken in 5 seconds,
p
anel
returns to
p
revious state
.
•
Start the vacuum cleaner b
y
touchin
g
the
p
ower icon
once more. The s
p
eed bars will illuminate allowin
g
f
or
s
p
eed control.
(
Fi
g
.1
2)
•
To chan
g
e
p
ower settin
g
, touch the s
p
eed indicator
i
con for desired
p
ower setti
ng
(
Low or H
ig
h
)
.
(
F
ig
.13
)
NOTE: This vacuum cleaner is e
q
ui
pp
ed with a memor
y
f
unction that allows the vacuum to start in the last
p
ower settin
g.
•
A
f
ter vacuumin
g
, turn the unit o
ff
b
y
touchin
g
the
po
wer icon
f
or 2 seconds.
(
F
ig
.14
)
NOTE: Holdin
g
f
or less than 2 seconds causes no action
.
9
Fig.11 Fig.12

10
Low Speed High Speed
NOTE: When battery power is low, the battery charge
indicator around the switch will flash.
To charge, place the handheld vacuum cleaner into the
main body and place the whole unit onto the charger base
• To remove the handheld vacuum cleaner, press the
release button and detach from the main body (Fig.15).
• To turn on the handheld vacuum cleaner, press the
power switch located on top of the handle (Fig.16).
• To clean difficult to reach areas, use the Combination
Tool / Long Crevice Tool / Upholstery Brush by inserting
end of tool into the handheld vacuum cleaner as shown
(Fig.17).
CLEANING WITH THE HANDHELD VACUUM CLEANER
Power
Switch
1
0
L
ow S
p
eed
Hi
g
h S
p
ee
d
NO
TE
:
When batter
y
p
ower is low, the batter
y
char
g
e
i
ndicator around the switch will
f
lash.
To char
g
e,
p
lace the handheld vacuum cleaner into the
m
ain bod
y
and
pl
ace the whole unit onto the char
ge
r
base
•
T
o remove the handheld vacuum cleaner,
p
ress the
release button and detach
f
rom the main bod
y
(
Fi
g
.15
)
.
•
T
o turn on the handheld vacuum cleaner,
p
ress th
e
p
ower switch located on to
p
o
f
the handl
e
(
Fi
g
.16
)
.
•
T
o clean di
ff
icult to reach areas, use the Combination
T
ool
/
Lon
g
Crevice Tool
/
U
p
holster
y
Brush b
y
insertin
g
end o
f
tool into the handheld vacuum cleaner as show
n
(
Fi
g
.17
).
C
LEANIN
G
WITH THE HANDHELD VA
C
UUM
C
LEANE
R
P
ower
S
witc
h
Fig.15
Fig.13 Fig.14
Fig.16 Fig.17
11
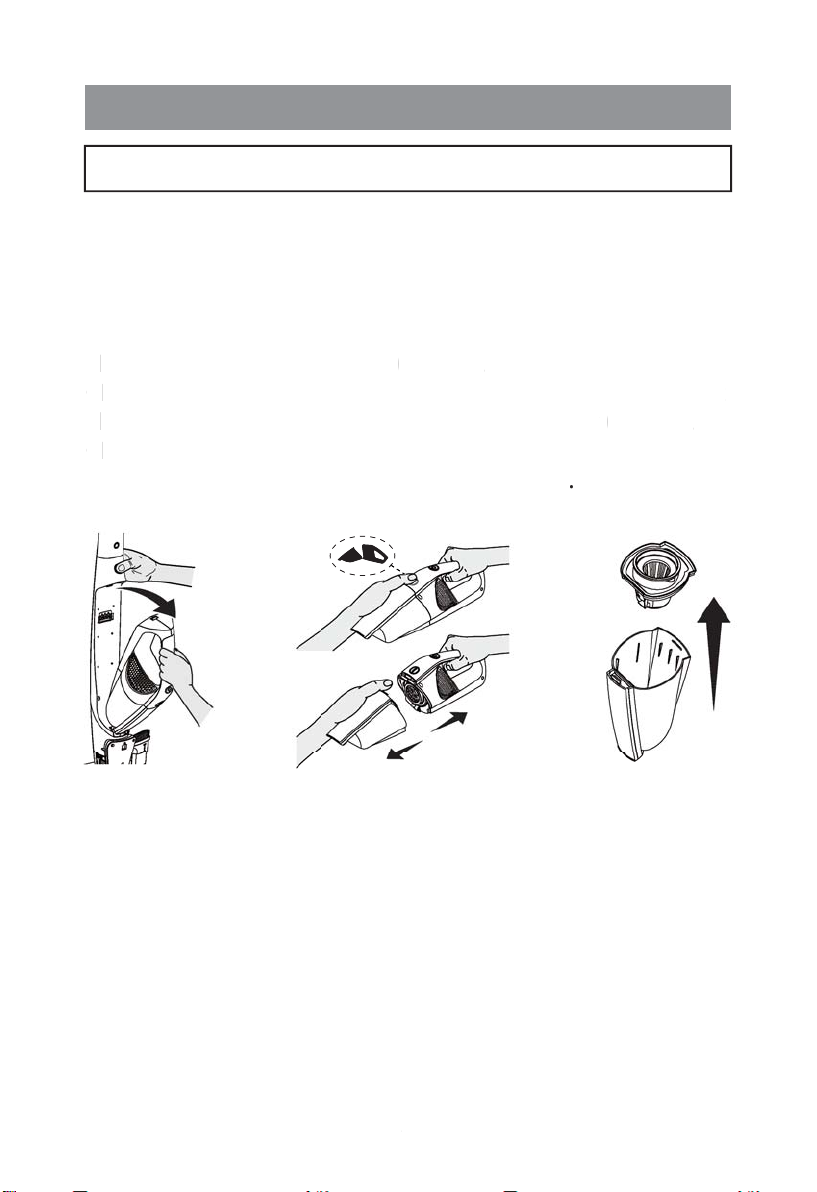
For best performance, empty the dust bin after every
use. Never operate the vacuum cleaner without the dust
bin and filter in place.
• Remove the handheld vacuum cleaner from the main
body by pressing the release button and detaching the
handheld vacuum cleaner (Fig.18).
• Press the dust bin release button and separate the dust
bin from the handheld vacuum cleaner body (Fig.19).
• Remove the filter basket from the dust bin. Empty the
dust bin contents into a waste bin (Fig.20).
MAINTENANCE AND CARE
EMPTYING THE DUST BIN
11
body
by
pressing
the
release
button
and
detaching
the
handheld vacuum cleane
r
(
Fi
g
.18
)
.
•
P
ress the dust bin release button and se
p
arate the dust
bin
f
rom the handheld vacuum cleaner bod
y
(
F
ig
.19
).
•
R
emove the
f
ilter basket
f
rom the dust bin. Em
p
t
y
the
dust bin contents into a waste b
in
(
Fi
g
.20
)
.
Fig.18 Fig.19 Fig.20
12
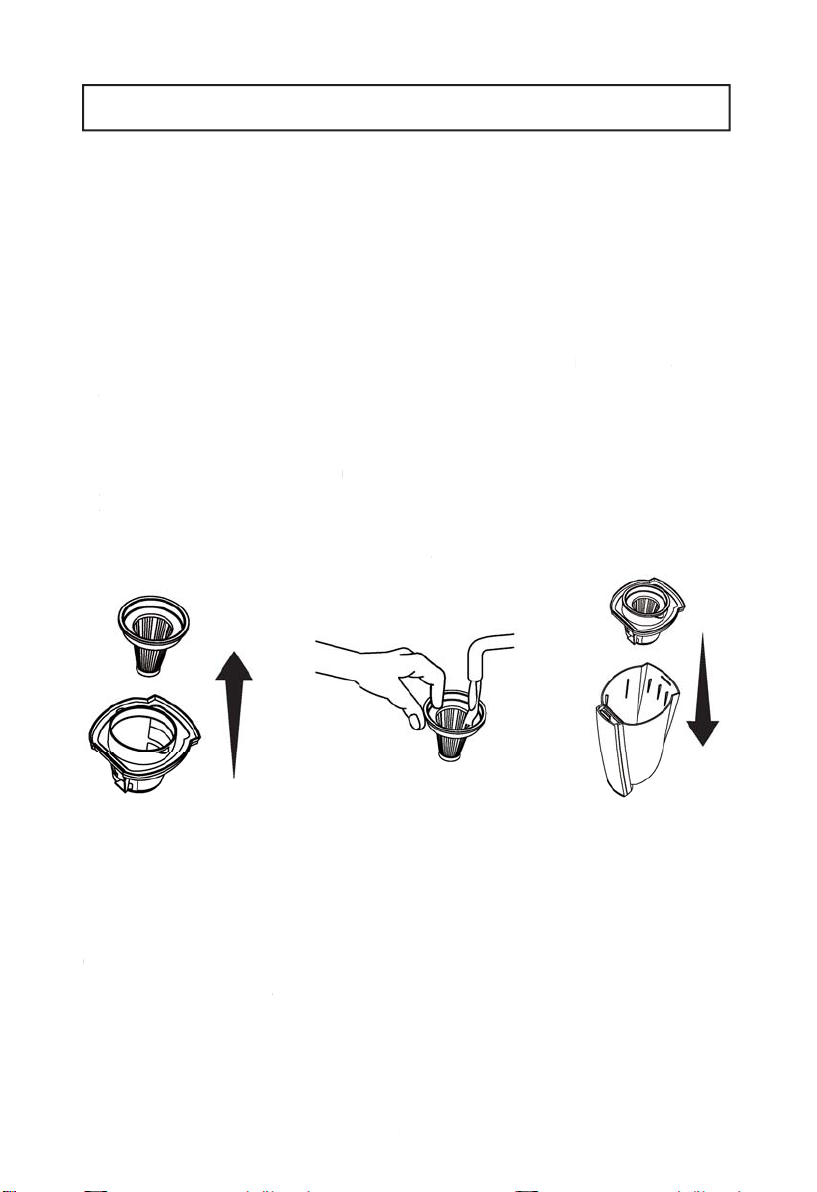
• Remove the filter from the filter basket. With a soft
brush, brush accumulated debris from the side screens
of the filter basket and from the filter cloth (Fig.21).
• After repeated use, it may be necessary to wash the
filter. First brush loose debris from the filter cloth, then
hand wash in warm water. After washing, set it aside
and allow it to air dry (Fig.22).
• Insert the spare clean, dry filter into the basket, fit the
basket into the dust bin, and reconnect the dust bin to
the handheld vacuum cleaner (Fig.23).
The key to maximum performance is having a clean
filter. Cleaning the filter frequently will help your vacuum
cleaner operate at peak efficiency. A spare filter is
provided with your vacuum cleaner to allow you to dry
one filter properly while using the other.
CLEANING THE FILTER
IMPORTANT: The filter must be completely dry before
reuse. A spare filter is provided with your vacuum
cleaner to allow you to dry one filter properly while
using the other.
1
2
brush,
brush
accumulated
debris
from
the
side
screens
of
the
f
ilter basket and
f
rom the
f
ilter clot
h
(
Fi
g
.21
)
.
•
Af
ter re
p
eated use, it ma
y
be necessar
y
to wash the
f
ilter. First brush loose debris
f
rom the
f
ilter cloth, then
h
and wash in warm water. A
f
ter washin
g
, set it aside
a
nd allow it to air dr
y
(
Fi
g
.22
)
.
•
I
nsert the s
p
are clean, dr
y
f
ilter into the basket,
f
it the
basket into the dust bin, and reconnect the dust bin to
t
he handheld vacuum cleane
r
(
Fi
g
.23
)
.
IMPORTANT: The
f
ilter must be co
mp
lete
ly
d
ry
be
f
ore
reuse. A s
p
are
f
ilter is
p
rovided with
y
our vacuum
cleaner to allow
y
ou to dr
y
one
f
ilter
p
ro
p
erl
y
while
usin
g
the othe
r.
Fig.21 Fig.22 Fig.23

13
WARNING: This Product contains a brushroll
cleaning blade. Do not touch the blade during
maintenance. Do not touch moving parts.
The brush roll may accumulate debris such as strings,
hair and fibres. This type of debris can wrap around the
brush and diminish its ability to clean effectively.
• The brush cleaning system will remove most debris
accumulated on the brush roll. To clean the brush roll
with the brush cleaning system step on the button as
illustrated while the brush roll is spinning (Fig.24).
CLEANING THE MOTORISED BRUSH ROLL
• Ensure the vacuum cleaner is OFF. Turn unit over to
access the brush roll, unlock the brush roll tab with flat
head screwdriver or similar tool as illustrated (Fig.25).
• Lift the brush roll out of the housing. Clean off debris
and anything wrapped around the brush (Fig.26).
• If the brush roll is damaged or needs replacing please
contact our sales department to purchase the accesso-
ry.
REMOVING THE BRUSH ROLL FOR CLEANING
W
ARNING
:
This Product contains a brushroll
c
leanin
g
blade. Do not touch the blade durin
g
m
aintenance. Do not touch movi
ng
p
arts.
T
he brush roll ma
y
accumulate debris such as strin
g
s,
hair and
f
ibres. This t
yp
e o
f
debris can wra
p
around the
brush and diminish its abilit
y
to clean e
ff
ectivel
y.
•
T
he brush cleanin
g
s
y
stem will remove most debris
accumulated on the brush roll. To clean the brush roll
w
ith the brush cleanin
g
s
y
stem ste
p
on the button as
i
llustrated while the brush roll is s
p
innin
g
(
Fi
g
.24
)
.
C
LEANING THE M
O
T
O
RISED BRUSH R
O
LL
•
E
nsure the vacuum cleaner is OFF. Turn unit over to
a
ccess the brush rol
l,
unlock the brush roll tab with
f
l
at
h
ead screwdriver or similar tool as illustrate
d
(
F
ig
.25
)
.
•
L
i
f
t the brush roll out o
f
the housin
g
. Clean o
ff
debris
a
nd an
y
thin
g
wra
pp
ed around the brus
h
(
Fi
g
.26
)
.
•
If
the brush roll is dama
g
ed or needs re
p
lacin
g
p
lease
c
ontact our sales de
p
artment to
p
urchase the accesso
-
ry
.
REM
O
VING THE BRUSH R
O
LL F
O
R CLEANIN
G
Fig.24

14
NOTE: Do not use scissors or other sharp objects to
remove a blockage from the hose as these may
damage the hose.
• Align the end to the brush drive first, then insert the
other end correctly. When installed correctly, the brush
roll should rotate freely. Lock the brush in place by
closing the tab as illustrated (Fig.27).
• To clean out the hose, press the hose release tabs, as
illustrated, and pull the motorised brush head away
from the main body (Fig.28).
• Carefully remove any debris or blockage from the inside
of the hose. Reattach the motorised brush head onto
the main body (Fig.29).
REMOVING BLOCKAGES
N
OTE: Do not use scissors or other sha
rp
o
bj
ects to
r
emove a blocka
g
e
f
rom the hose as these ma
y
d
ama
g
e the hose
.
•
A
l
ig
n the end to the brush drive
f
irst, then insert the
o
ther end correctl
y
. When installed correctl
y
, the brush
r
oll should rotate
f
reel
y
. Lock the brush in
p
lace b
y
c
losin
g
the tab as illustrate
d
(
Fi
g
.27
)
.
•
T
o clean out the hose,
p
ress the hose release tabs, as
i
llustrated, and
p
ull the motorised brush head awa
y
f
rom the main bod
y
(
Fi
g
.28
)
.
•
C
are
f
ull
y
remove an
y
debris or blocka
g
e
f
rom the inside
of
the hose. Reattach the motorised brush head onto
t
he main bod
y
(
Fi
g
.29
)
.
REM
O
VING BL
O
CKAGES
Fig.25 Fig.26 Fig.27
Fig.28 Fig.29

15
WARNING: Disconnect electrical supply before
performing maintenance to the vacuum cleaner.
Failure to do so could result in electrical shock or
personal injury.
TROUBLESHOOTING
Problem
Vacuum
cleaner
will not
turn on.
Possible Cause
1. Battery may be
depleted.
2. Wrong charger
being used.
3. Handheld
vacuum cleaner is
not installed
properly.
1. Charge the battery
as instructed on
page 7.
2. Be sure to use only
the charger supplied
with your product.
3. Remove handheld
vacuum cleaner and
reattach ensuring
that it is securely in
place.
Battery
charge
indicator
does not
illuminate.
1. Battery may be
depleted.
2. Charging
adapter is not
plugged in.
3. Debris
accumulated on
the metal charge
contacts on the
handheld vacuum
cleaner, main body
and charging
adapter.
4. The electrical
outlet is switched
off.
1. Charge the battery as
instructed on page 7.
2. Be sure the charging
adapter is plugged in
properly to the outlet
and to the charging
hole on the bottom of
the charging adapter.
3. Be sure no debris is
accumulated on the
metal charger contacts
on the handheld
vacuum cleaner, main
body and charging
adapter.
4. Ensure that the outlet
is supplying power to
the charger.
Solution

16
Motorised
brush
not turning.
1. Brush roll is
jammed.
2. Brush roll is not
installed well.
1. Remove any obstruc-
tion or clean the
brushroll as necessary.
Follow instructions on
page 12.
2. Remove brush roll
and reinstall following
instructions on page 12.
Vacuum
cleaner not
picking up
or suction
power is
weak.
1. Dust bin is full.
2. Filter needs
cleaning.
3. Filter needs to
be replaced.
4. Battery may be
depleted.
5. Dust bin is not
installed well.
1. Empty dust bin.
2. Follow filter cleaning
instructions on page 11.
3. Replace filter.
4. Charge the battery as
instructed on page 7.
5. Check dust bin for
correct installation and
ensure it is snapped
firmly in place.
Dust
escapes
from
vacuum
cleaner.
1. Filter is missing
or installed
incorrectly.
2. Filter is
damaged and
needs to be
replaced.
3. Dust bin
installed
incorrectly.
1. Check filter for
correct installation.
2. Replace filter.
3. Position dust bin
correctly and snap
firmly into place.
Vacuum
cleaner
turns off on
its own.
1. Battery may be
depleted.
2. The motorised
brush bar may be
wrapped in hair.
1. Charge the battery as
instructed on page 7.
2. Thoroughly clean the
brush bar and in the
vacuum head. Replace
the brush bar if neces-
sary.

Do not dispose with household waste
Recycle products and components according to
local legal requirements.
TECHNICAL DATA
DISPOSAL AND RECYCLING
17
Specification
Battery power
Battery pack
Running time
Speed settings
Dust capacity
Weight
Charger input
Charger output
Battery full charge time
Value
21.6V 2.0Ah
21.6V Li-ion
35 mins max
2 speeds
0.5L
2.6 kg
100-240V~ 50-60Hz
25.6V 500mA
5 hours

Cleva UK Ltd
G2 Stephenson
Prestwick Park
Prestwick
Newcastle upon Tyne
NE20 9SJ
cleva-uk.com
Table of contents
Other Cleva Vacuum Cleaner manuals


