Clever Clean ViralOff 2608 User manual
Deutsch
English
Français
Nederlands
Polska
Gebrauchsanleitung
ab Seite 3
Instructions for Use
from page 12
Mode d’emploi
à partir de la page 20
Gebruiksaanwijzing
vanaf pagina 28
Instrukcja obsługi
od strony 36
ViralO® Dampfbesen
ViralO® Steam Broom
ViralO® Clever Clean Balai à vapeur
Slimme, schone ViralO® stoombezem
Clever Clean ViralO® miotła parowa
... für ein sauberes Zuhause!
ViralOff®
Dampfbesen

Deutsch
3
Artikelnummer: 2608
BEDIENUNGSANLEITUNG
Clever Clean ViralO® Dampfbesen
Artikelnummer: 2608
Sehr geehrte Kundin, sehr geehrter Kunde,
wir freuen uns, dass Sie sich für den Clever Clean ViralO® Dampfbesen entschieden haben. Bitte
lesen Sie vor dem ersten Gebrauch des Gerätes die Anleitung sorgfältig durch und bewahren Sie
diese gut auf. Bei Weitergabe des Gerätes ist diese Anleitung mit auszuhändigen. Hersteller und Importeur
übernehmen keine Haftung, wenn die Angaben in dieser Anleitung nicht beachtet werden!
ImRahmen ständiger Weiterentwicklung behalten wir uns das Recht vor, Produkt, Verpackung oder Beipackunterlagen
jederzeit zu ändern.
Sollten Sie Fragen haben, kontaktieren Sie den Kundenservice über unsere Mailadresse:
WIE FUNKTIONIERT VIRALOFF
ViralO® wird dauerhaft auf den Wischbezug des Dampfbesens aufgebracht. Es handelt sich um einen
Schutz für das Produkt selbst. Der Wirksto ist ein Biozid aus Silberchlorid. Auf dem Material stoppt
ViralO® die Virenaktivitäten durch die Interaktion mit Schlüsselproteinen. Auf diesem behandelten
Material kann eine Reduktion von 99% verschiedener getesteter Vieren in einem Zeitraum von zwei
Stunden nachgewiesen werden. Nachgewiesen durch den Test: ISO 18184:2019 (SARS-CoV-2,
H3N2, H1N1). Möglichst nicht waschen, um die maximale Wirkung zu erhalten.
BEDEUTUNG DER SYMBOLE
WARNUNG! Allgemeine Sicherheitshinweise sind mit diesem Symbol gekennzeichnet. Es besteht
Verletzungsgefahr bei Nichteinhaltung der Sicherheitshinweise.
GEFAHR! Dieses Symbol kennzeichnet lebensgefährliche Situationen durch elektrischen
Strom. Es besteht die Gefahr von schweren Verletzungen oder des Todes.
WARNUNG! Dieses Symbol warnt vor Verbrennungen durch heiße Oberächen. Das Gerät
verfügt über Oberächen, die während des Betriebs und auch noch nach Betrieb heiß sein
können.
WARNUNG! Dieses Symbol warnt vor Verbrühungen durch heißen Dampf.
HINWEIS! Hebt nützliche Tipps für einen störungsfreien und komfortablen Betrieb hervor.

Deutsch
Deutsch
4 5
Artikelnummer: 2608
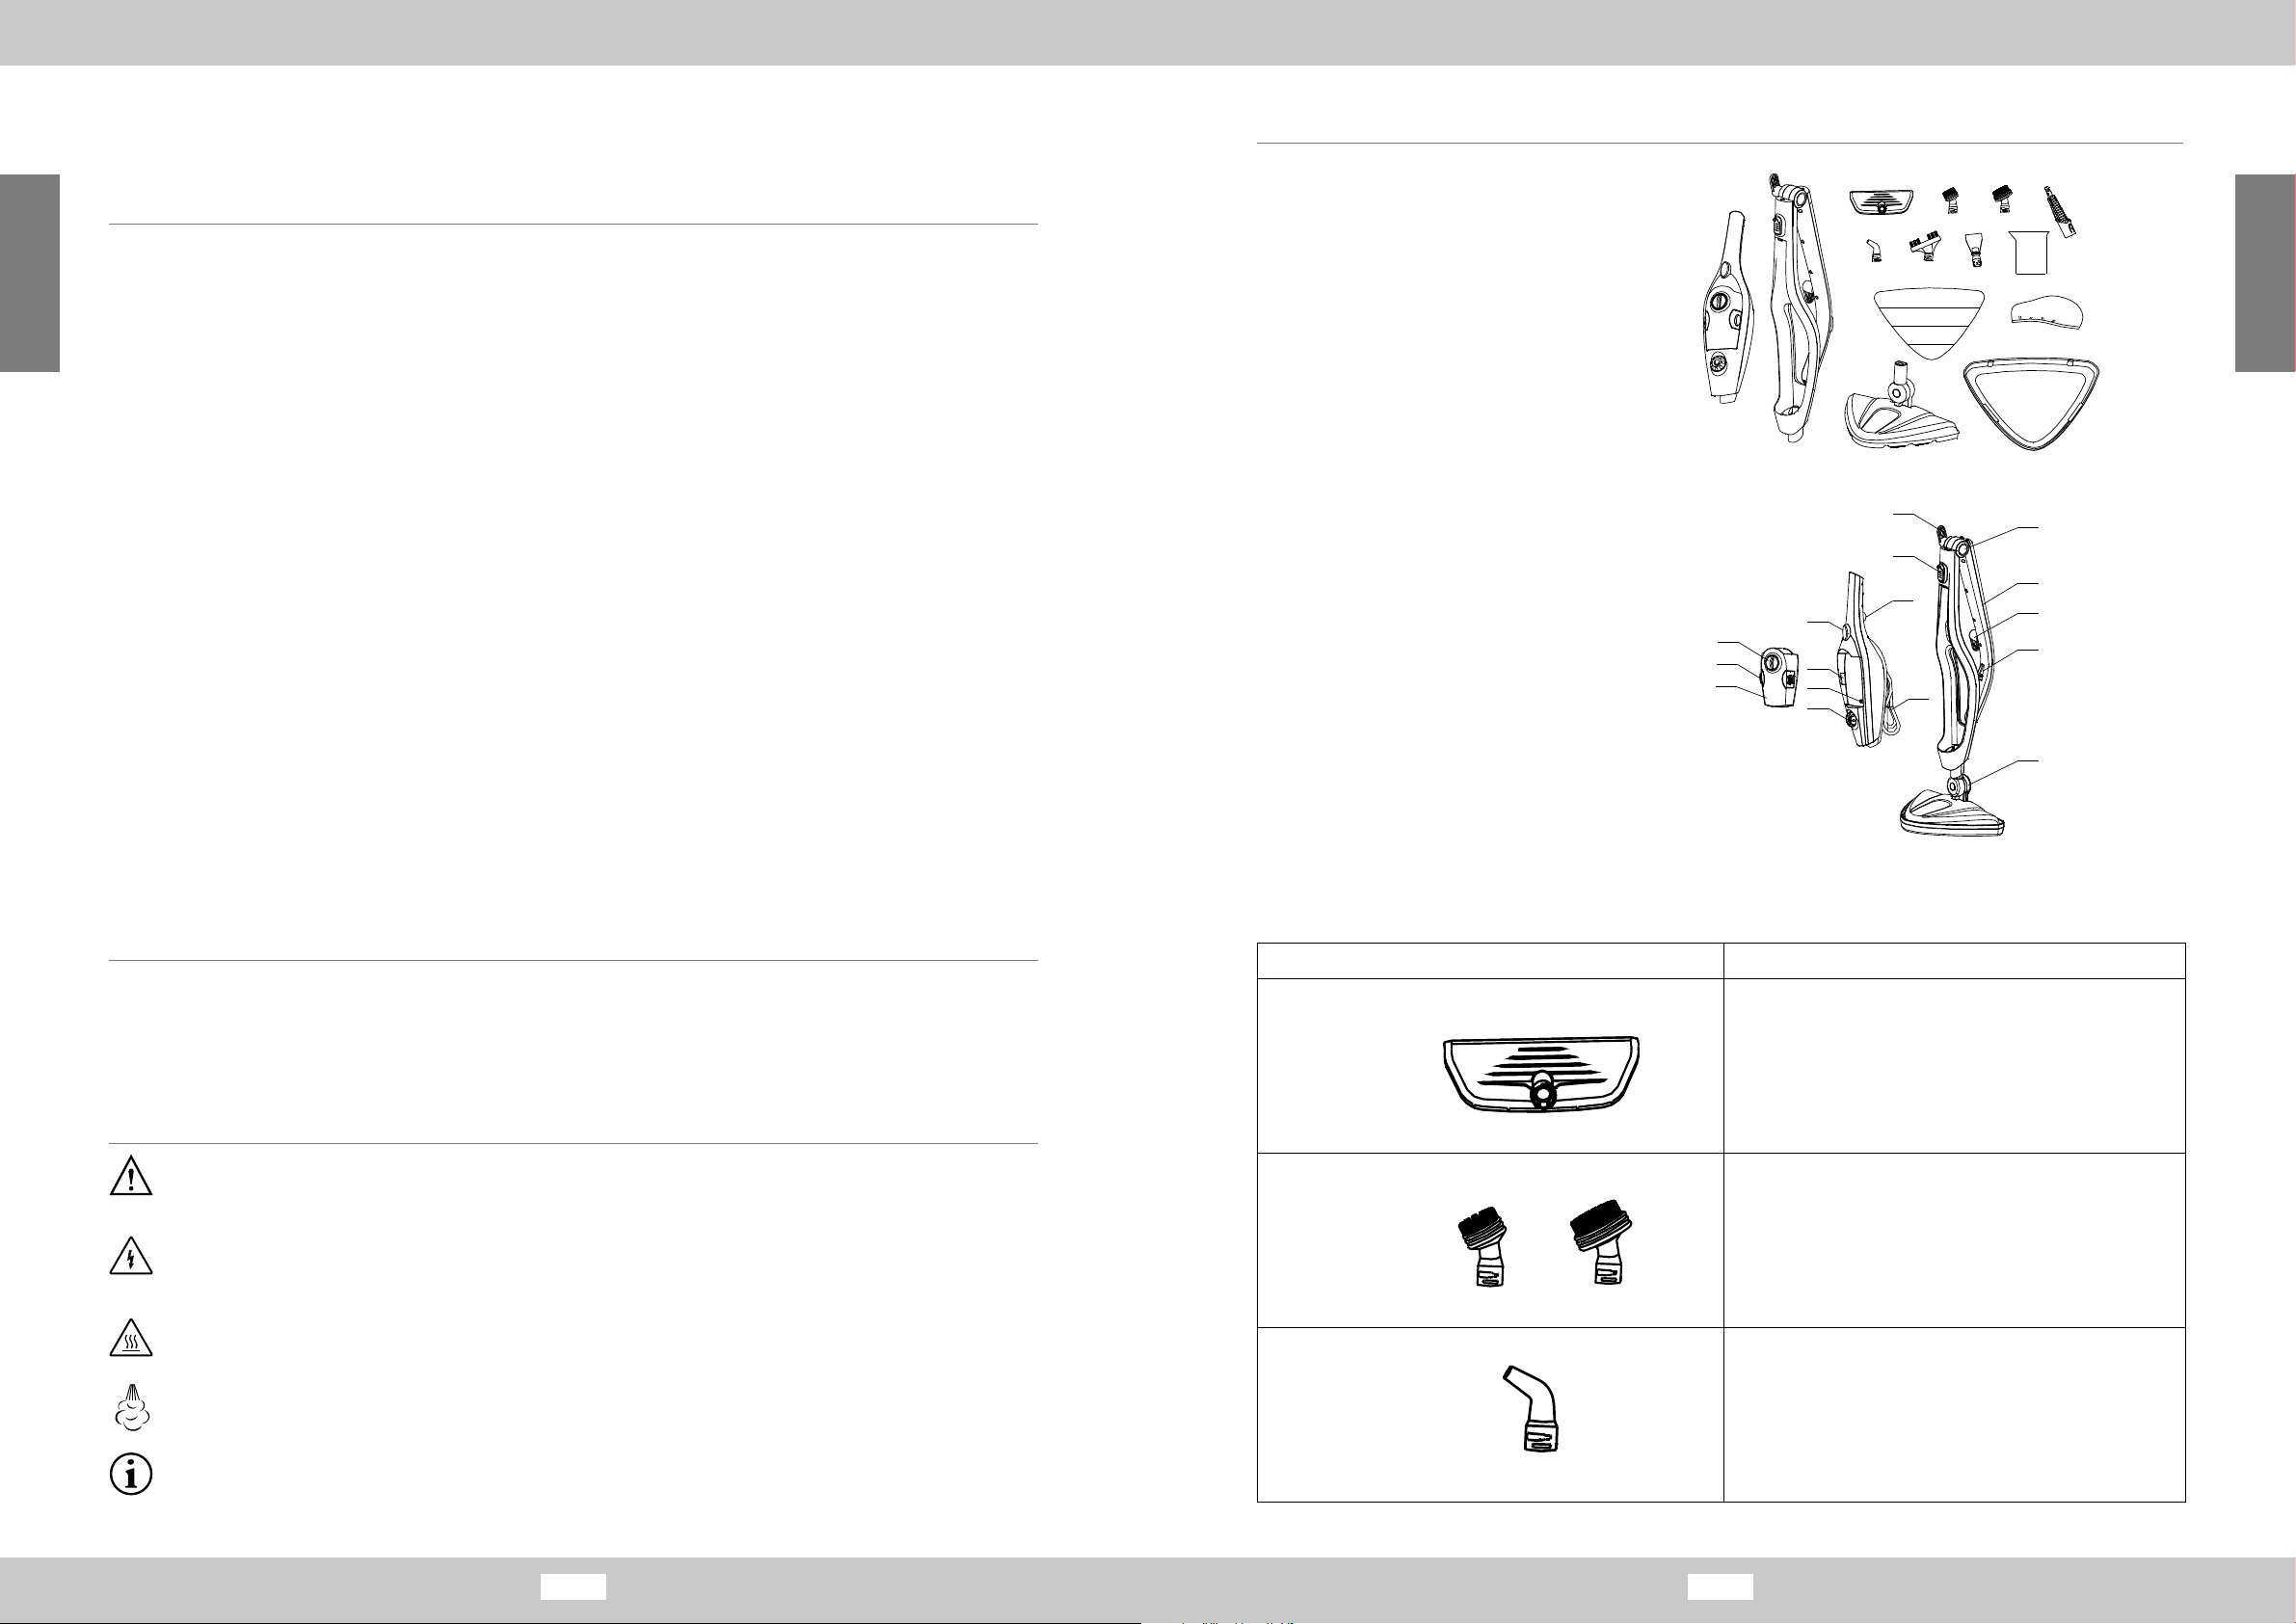
LIEFERUMFANG UND GERÄTEÜBERSICHT
A Haupteinheit mit Wassertank
B Haltevorrichtung
C Fensterabzieher
D kleine Düse
E große Düse
F Adapter für Zubehör
G Winkeldüse
H Fugenbürste
I Schaber
J Messbecher
K Antiviraler Wischbezug
L kleine Wischbezüge (2x)
M Dampuß
N Teppichgleiter
1 Verriegelungstaste Knickgelenk
2 Gri
3 Stromkabelhalter
4 Dampfknopf
5 Gelenk mit Entriegelungstaste
6 Verriegelungstaste Haupteinheit
7 Dampfknopf
8 Stromkabel
9 Ein / Aus – Taste
10 Lampen
11 Wasserdurchlauf
12 Dampfregler
13 Deckel Wassertank
14 Verriegelungstaste Wassertank
15 Wassertank
BESTIMMUNGSGEMÄSSER GEBRAUCH
• Dieses Gerät ist ausschließlich zum hygienischen Reinigen von feutigkeitskeits- und hitzebeständigen Oberächen geeignet.
• Verwenden Sie den Dampfreiniger nicht auf unbehandelten Holzböden, Holzmöbeln, weichem Kunststo oder Leder.
Empndliche Materialien wie Samt und synthetische Stoe dürfen nicht mit dem Dampfbesen gereinigt werden.
• Wenn Sie unsicher sind, informieren Sie sich bei einem Fachmann, ob Ihre Oberächen zur Reinigung mit dem Dampfbesen
geeignet sind. Wir empfehlen, den Dampfbesen an einer unauälligen Stelle zu testen.
• Das Gerät ist nicht für die Verwendung im Freien bestimmt.
• Verwenden Sie das Gerät nur wie in dieser Bedienungsanleitung beschrieben.
• Verwenden Sie nur originale Zubehörteile.
• Das Gerät ist nur für den persönlichen Gebrauch und nicht für kommerzielle Anwendungen bestimmt.
• Lassen Sie nur autorisierte Fachhändler alle Arten von Schäden am Gerät reparieren.
• Von der Gewährleistung ausgeschlossen sind alle Mängel, die durch unsachgemäße Behandlung, Beschädigung oder
Reparaturversuche entstehen. Dies gilt auch für den normalen Verschleiß.
Zubehör Anwendung für
Fensterabzieher Fenster, Glastüren, Glas-Duschkabinen, Spiegel, Fliesen.
kleine Düse
große Düse
das Reinigen und Scheuern von Oberächen wie Fliesen,
Felgen, Badewannen und viele mehr.
Winkeldüse schwer erreichbare Ecken.
Zubehör Anwendung für
Fugenbürste alle Arten von Fugen.
Schaber hartnäckige Verschmutzungen.
kleiner Wischbezug
(für Fensterabzieher)
Fenster, Glastüren,
Glas-Duschkabinen, Spiegel, Fliesen.
Antiviraler Wischbezug
allgemeine Reinigung der Hartböden und Teppichen
(Der Dampuß hat einen großen Drehwinkel und ist daher
für eine Reinigung von Ecken und Flächen mit geringem
Platz geeignet.
A
BC ED F
GHI J
KL
M
N
A
BC ED F
GHI J
KL
M
N
A
BC ED F
GHI J
KL
M
N
A
BC ED F
GHI J
KL
M
N
A
BC ED F
GHI J
KL
M
N
A
BC ED F
GHI J
KL
M
N
A
BC ED F
GHI J
KL
M
N
A
BC ED F
GHI J
KL
M
N
12
10
9
11
13
14
15 8
3
6
7
4
3
2
5
1
A
BC ED F
GHI J
KL
M
N
Deutsch
Deutsch
6 7
Artikelnummer: 2608
SICHERHEITSHINWEISE
Lesen Sie die Sicherheitshinweise sorgfältig durch. Ein unsachgemäßer Gebrauch
des Dampfbesen kann zu schweren Verbrennungen oder Stromschlägen führen!
Allgemeine Sicherheitshinweise
• Entnehmen Sie den Dampfbesen und das Zubehör vorsichtig aus der Verpackung und überprüfen
Sie das Gerät auf Vollzähligkeit und Beschädigungen.
• Halten Sie Verpackungsmaterial von Kindern und Haustieren fern. Es besteht Erstickungsgefahr!
• Überprüfen Sie das Gerät immer auf Beschädigungen, bevor Sie es in Betrieb nehmen.
Wenn das Gerät sichtbare Beschädigungen aufweist, darf es nicht benutzt werden.
• Benutzen Sie das Gerät nur wenn es vollständig zusammengebaut ist.
• Verwenden Sie das Gerät nicht, wenn es eine Fehlfunktion hatte, herunter oder ins Wasser
gefallen ist.
• Dieses Gerät darf von Personen mit eingeschränkten Kenntnissen hinsichtlich seiner Handhabung
bzw. einer Beeinträchtigung der Sinnesorgane verwendet werden, unter der Voraussetzung
sie werden beaufsichtigt und im sicheren Gebrauch des Gerätes geschult, und sind
sich der damit verbundenen Gefahren bewusst.
• Sorgen Sie dafür, dass Kinder nicht mit dem Gerät spielen.
• Betreiben Sie den Dampfbesen nicht ohne Wasser.
• Überschreiten Sie nicht die vorgegebene Füllmenge des Wassertanks.
• Füllen Sie ausschließlich Wasser in den Wassertank. Keinesfalls Reinigungs- oder Lösungsmittel.
• Entnehmen Sie den Wassertank nicht wenn das Gerät in Betrieb ist.
• Die Sohle des Dampußes wird während des Betriebes heiß! Halten Sie das Gerät von
brennbaren Gegenständen fern. Fassen Sie den Dampfbesen nur an den Grien an.
• Der Wasserdampf erreicht große Hitze, die zu Verbrühungen führen kann.
Nur mit größter Vorsicht verwenden.
• Lassen Sie den Dampfbesen ausreichend abkühlen bevor Sie das Zubehör wechseln oder abnehmen.
• Benutzen Sie das Gerät nicht, wenn entzündliche Gase in der Luft vorhanden sind.
• Halten Sie ausreichend Abstand zu Wärmequellen wie z. B. Herdplatten oder Öfen.
• Schalten Sie das Gerät immer aus, bevor Sie den Netzstecker ziehen.
• Ziehen Sie den Netzstecker nicht am Netzkabel aus der Steckdose.
Gefahr von Stromschlägen
• Lassen Sie den Dampfbesen niemals unbeaufsichtigt, wenn dieser an das Stromnetz angeschlossen ist.
• Berühren Sie Gerät, Netzkabel oder Stecker niemals mit feuchten Händen.
• Stecken Sie keine Metallgegenstände in das Gerät, um einen elektrischen Schlag zu vermeiden.
• Tauchen Sie weder das Gerät selbst noch Netzkabel oder -stecker in Wasser.
• Greifen Sie nie nach einem Elektrogerät, wenn es ins Wasser gefallen ist. Ziehen Sie sofort den Netzstecker.
• Ziehen Sie vor dem Befüllen des Wassertanks immer den Stecker aus der Steckdose.
• Niemals den Wasserdampf auf Geräte mit elektrischen Bauteilen richten. (z.B. Fernseher, Radios, Lampen, usw.)
• Reinigen Sie niemals über Bodensteckdosen.
BEDIENUNG
Vor dem ersten Gebrauch
• Entnehmen Sie den Dampfbesen und das Zubehör vorsichtig aus der Verpackung und überprüfen
Sie das Gerät auf Vollzähligkeit und Beschädigungen. Verwenden Sie keine beschädigten Bestandteile.
In so einem Fall kontaktieren Sie den Kundendienst.
• Entfernen Sie alle Transportverpackungen und Schutzfolien vom Dampfbesen und dem Zubehör.
Es können sich Wasserreste im Wassertank benden. Dies stellt keinen Mangel dar.
Dies zeigt lediglich, dass das Gerät durch die Qualitätssicherung geprüft worden ist.
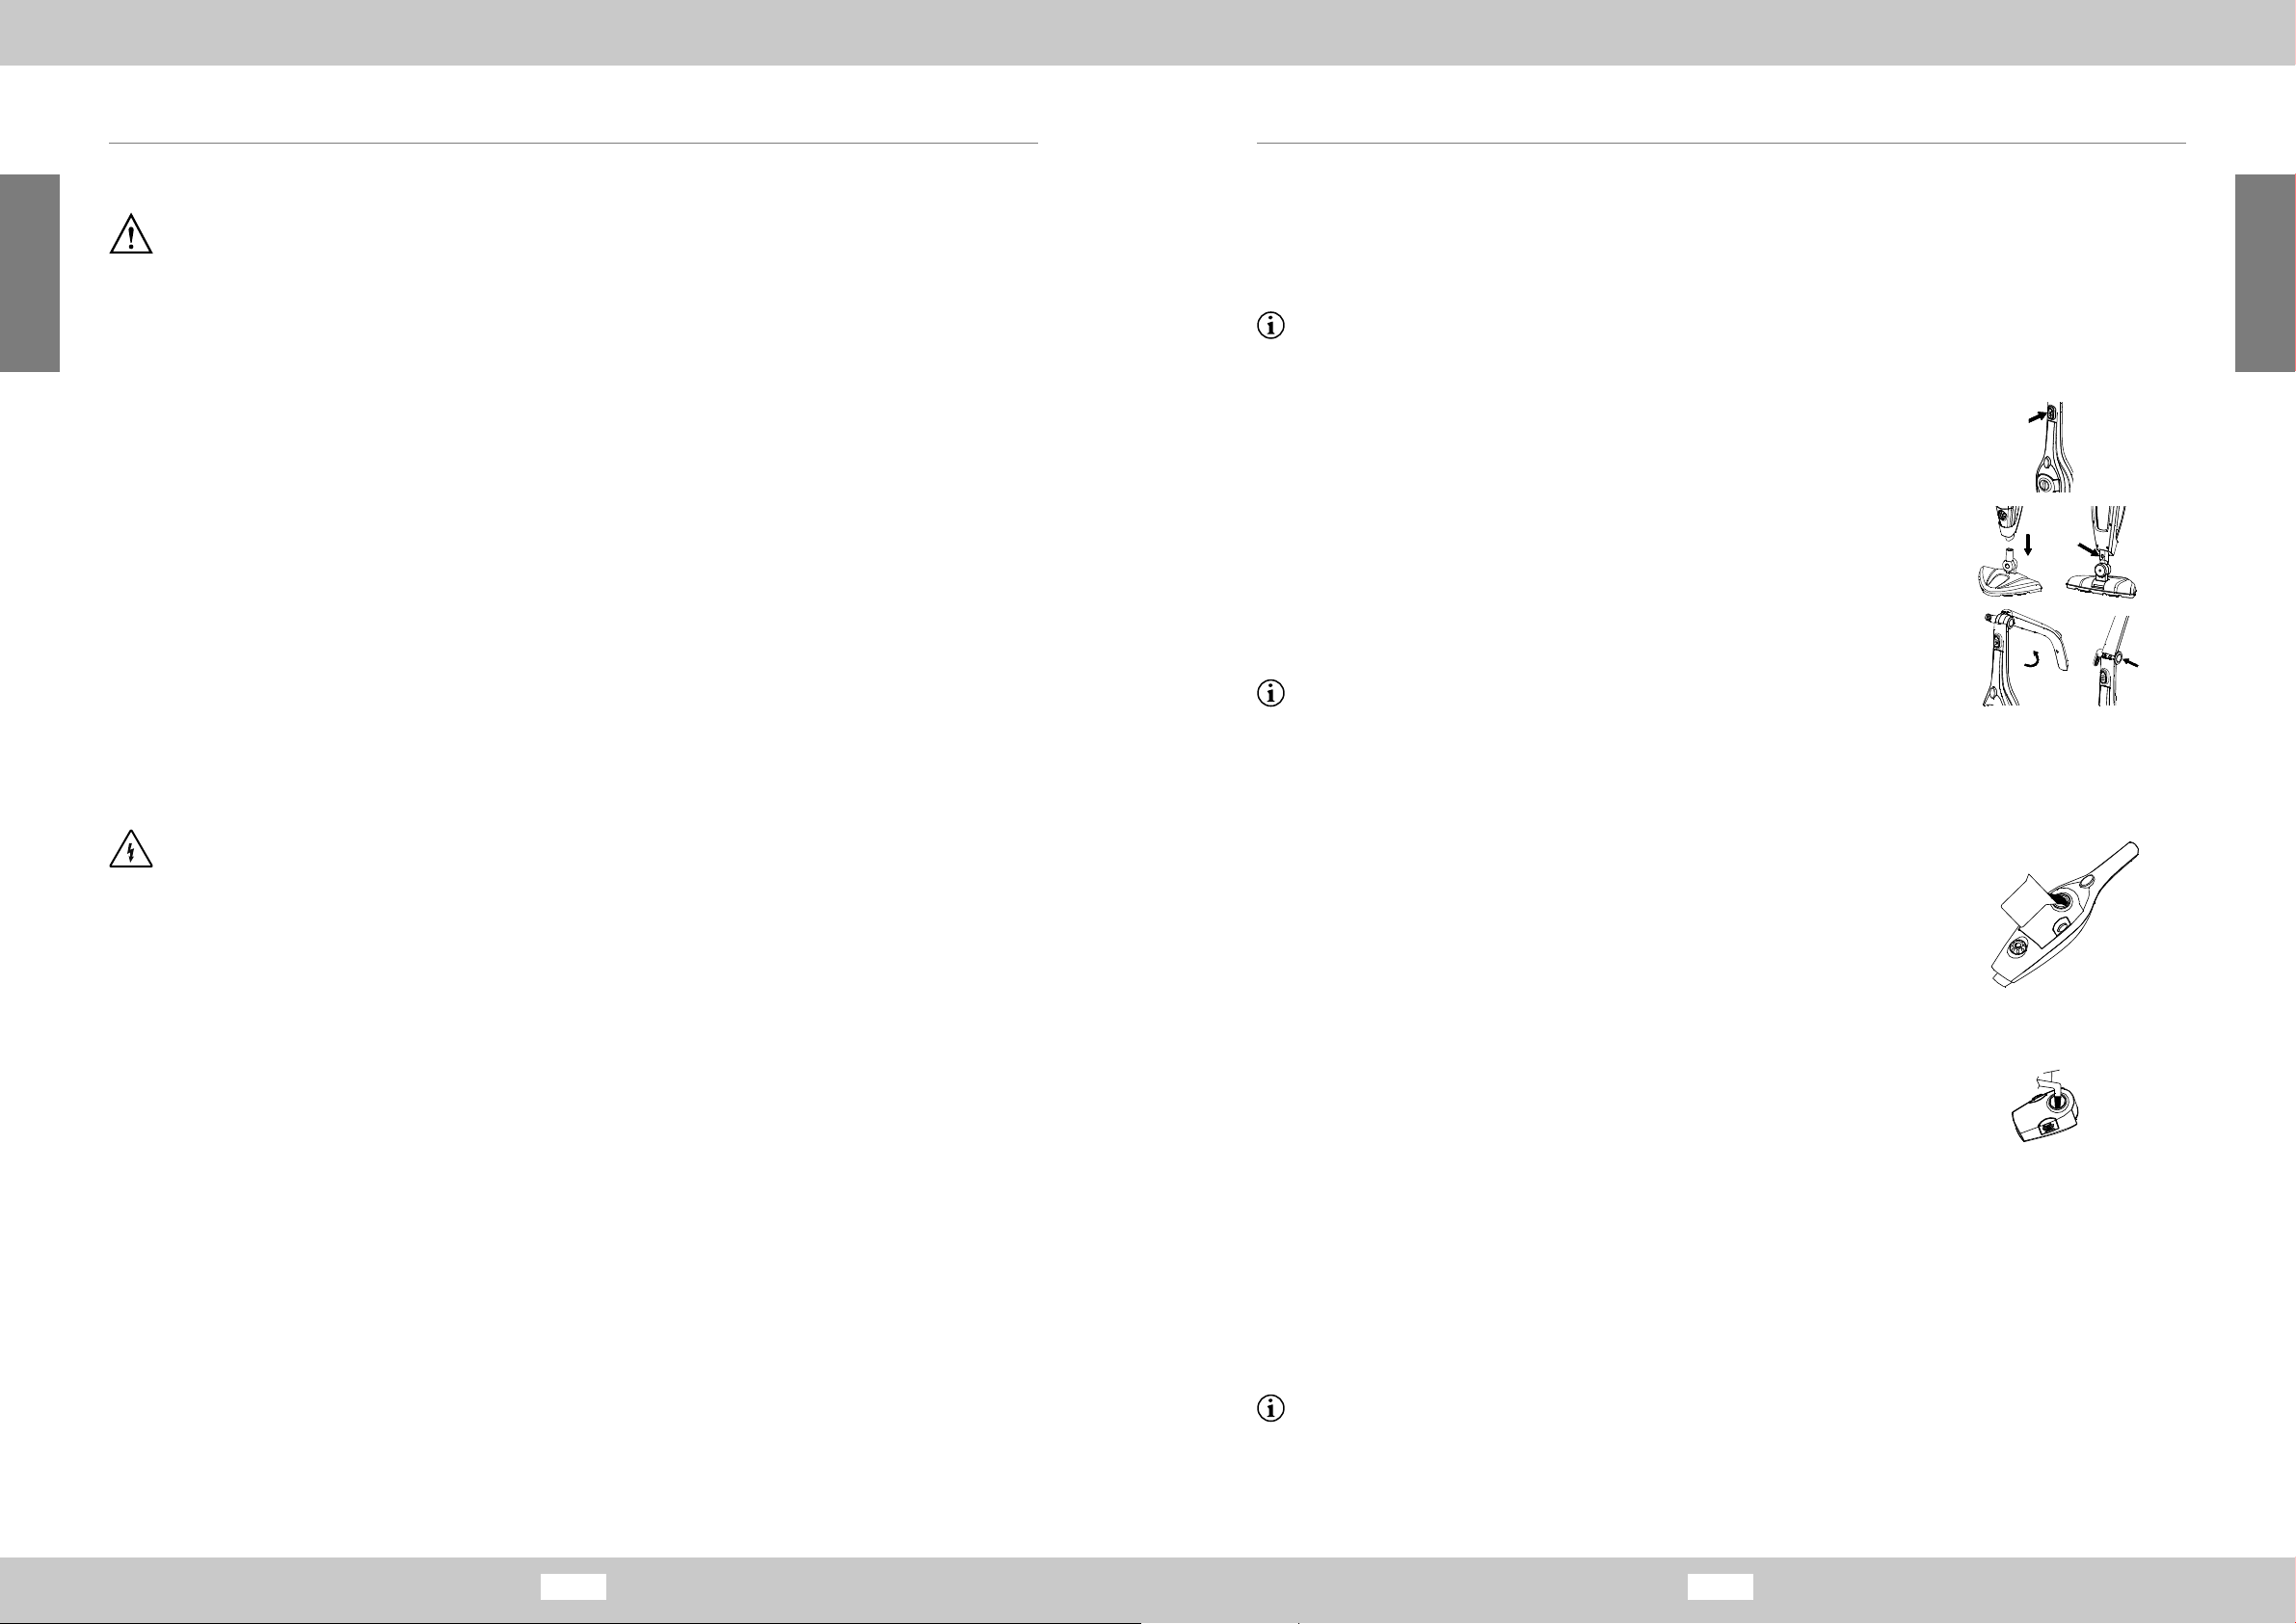
Zusammenbau
1. Setzen Sie die Haupteinheit [A] in die Haltevorrichtung [B] ein,
bis diese hörbar einrastet. Durch das Betätigen der Verriegelungstaste [6] können
Sie die Haupteinheit [A] wieder entnehmen.
2. Stecken Sie die Haltevorrichtung [B] auf den Dampuß [M], bis dieser mit einem
Klick einrastet. Mit Betätigen der Entriegelungstaste auf der Rückseite können Sie
den Dampuß [M] wieder von der Haltevorrichtung [B] entnehmen.
3. Klappen Sie den Gri [2] nach oben, bis dieser hörbar einrastet. Mit der
Verriegelungstaste am Knickgelenk [1] wird der Gri [2] wieder zusammengeklappt.
4. Ziehen Sie den antiviralen Wischbezug [K] über den Dampuß [M] und ziehen Sie
diesen mit der Kordel fest.
5. Zum Reinigen von Teppichen stecken Sie den Teppichgleiter [N] auf den Dampuß [M].
Wir empfehlen, die zu reinigenden Flächen vor dem Einsatz des Dampfbesens
gründlich staubzusaugen bzw. von Krümeln und Ähnlichem zu reinigen.
Befüllen des Wassertanks
Methode 1 – eingesetzten Wassertank befüllen
1. Drehen Sie den Deckel des Wassertanks [13] gegen den Uhrzeigersinn, um den
Wassertank [15] zu önen.
2. Befüllen Sie den Wassertank [15] mit dem mitgelieferten Messbecher [J].
3. Setzen Sie den Deckel [13] ein und drehen Sie diesen mit dem Uhrzeigersinn wieder fest.
Methode 2 – entnommenen Wassertank befüllen
1. Ziehen Sie den Wassertank [15] aus der Haupteinheit [A], indem Sie beide
Verriegelungstasten am Wasserbehälter [14] gedrückt halten.
2. Drehen Sie den Deckel des Wassertanks [15] gegen den Uhrzeigersinn, um den
Wassertank [15] zu önen.
3. Halten Sie den Wassertank [15] unter einen Wasserhahn und befüllen diesen.
4. Setzen Sie den Deckel [13] ein und drehen Sie diesen im Uhrzeigersinn wieder fest.
5. Setzen Sie den Wassertank wieder in die Haupteinheit [A] ein,
bis diese mit einem Kick einrastet.
Dampfreinigen von Oberächen
1. Stecken Sie den Netzstecker in eine Steckdose.
2. Schalten Sie das Gerät mit der Ein / Aus – Taste [9] ein.
3. Die Lampen [10] beginnen rot zu leuchten und signalisieren damit, dass der Dampfbesen sich
in der Aufheizphase bendet. Das Aufheizen dauert ungefähr 25 Sekunden. Sobald die Lampen
[10] blau leuchten ist das Gerät betriebsbereit.
Ein voller Wasserbehälter reicht für etwa 20 Minuten. Falls die Stromzufuhr während oder
nach dem Vorheizen unterbrochen wird, wird das Gerät das oben beschriebene Heizverfahren
wiederholen.
Deutsch
NOTE:Each steam mop is 100% tested in the factory to ensure product performance and
safety.When assembling your new steam mop for the first time you may notice water residue
inside of the unit.
!WARNING:Before attempting any of the following operations,make sure that the appliance is
switched off and unplugged and that the appliance is cold and contains minimal or no water.
Spread holder
Round the holder along spindle until click to fix holder.
Press spindle button 1,turn the holder,the holder can become folded state.
Attaching the steam head
Slide the bottom end of main body onto
the steam head M until Steam head Spindle 5
clicks into place
The steam head M can be removed from the
Main body by pressing salient point on the
Steam head Spindle 5
Attaching a cleaning pad
Because of barb design at the bottom of steam head M,just
place a micro-fiber cleaning pad L to steam had,they can
bond hard.
Place the front of your shoe onto the cleaning pad removal
Tab and press down firmly.
Attaching Carpet Gilder
Press the micro-fiber cleaning pad L with main body to
Carpet gilder O by vertical pressure,until it into place.
Place the front of your shoe onto the cleaning pad removal
Tab and press down firmly,carpet gilder will remove form
steamhead
Page 5 of 10
NOTE:Each steam mop is 100% tested in the factory to ensure product performance and
safety.When assembling your new steam mop for the first time you may notice water residue
inside of the unit.
!WARNING:Before attempting any of the following operations,make sure that the appliance is
switched off and unplugged and that the appliance is cold and contains minimal or no water.
Spread holder
Round the holder along spindle until click to fix holder.
Press spindle button 1,turn the holder,the holder canbecome folded state.
Attaching the steam head
Slide the bottom end of main body onto
the steam head M until Steam head Spindle 5
clicks into place
The steam head M can be removed from the
Main body by pressing salient point on the
Steam head Spindle 5
Attaching a cleaning pad
Because of barb design at the bottom of steam head M,just
place a micro-fiber cleaning pad L to steam had,they can
bond hard.
Place the front of your shoe onto the cleaning pad removal
Tab and press down firmly.
Attaching Carpet Gilder
Press the micro-fiber cleaning pad L with main body to
Carpet gilder O by vertical pressure,until it into place.
Place the front of your shoe onto the cleaning pad removal
Tab and press down firmly,carpet gilder will remove form
steamhead
Page 5 of 10
ASSEMBLY
NOTE:Each steam mop is 100% tested in the factory to ensure product performance and
safety.When assembling your new steam mop for the first time you may notice water residue
inside of the unit.
!WARNING:Before attempting any of the following operations,make sure that the appliance is
switched off and unplugged and that the appliance is cold and contains minimal or no water.
Spread holder
Round the holder along spindle until click to fix holder.
Press spindle button 1,turn the holder,the holder canbecome folded state.
Attaching the steam head
Slide the bottom end of main body onto
the steam head M until Steam head Spindle 5
clicks into place
The steam head M can be removed from the
Main body by pressing salient point on the
Steam head Spindle 5
Attaching a cleaning pad
Because of barb design at the bottom of steam head M,just
place a micro-fiber cleaning pad L to steam had,they can
bond hard.
Place the front of your shoe onto the cleaning pad removal
Tab and press down firmly.
Attaching Carpet Gilder
Press the micro-fiber cleaning pad L with main body to
Carpet gilder O by vertical pressure,until it into place.
Place the front of your shoe onto the cleaning pad removal
Tab and press down firmly,carpet gilder will remove form
steam head
Page 5 of 10
Method one::
Open the water tank cup 5 by counterclockwise
rotation,fill 360ML water use Measuring cup,
and then clockwise rotation to close water tank cup 5.
Method two:
Remove the water tank from main body,open the
water tank cup 5 by counterclockwise rotation,fill
the water tank from water faucet.,and then clockwise
rotation to close water tank cup 5.
Install the water tank 7to main body until it clicks into place.
2.Plug in the appliance to a grounded outlet.
3.When switch the appliance on,the indicator lights will turn red at the each side of water tank,it
indicate preheating.If the lights does not illuminate,please check the "troubleshooting" section for
more details.
4.It will takes approximately 25 seconds for preheating.Once the steam mop is ready to use the
water tank will glow blue.
5.When the water tank full fill with water,it can work approximately 20 minutes.If the water tank
7 without water,the indicator lights 12 will glow red,and the lights will flash to point out need to
add water
NOTICE:If power off during preheating or after preheating,then power again,the
appliance will repeat above preheating action.
6.Press the steam button 4 and steam button13,the steam out.
7.Add control volume by turnsteam control knob 8
lockwise,and counterclockwise to reduce,User
can adjust steam volume according different objects
NOTICE:steam volume control by PCB,It will takes 3 seconds adaptation time
when you adjust steam volume .It is normal phenomenon.
8. When normal cleaning,the steam head
has big rotary angle,can clean corners
nd also can clean low space.
USE AS A STEAM CLEANER IN HAND
Push Lock Catch,take the main body A out of holder A,and also take out the power cord.
Install the accessory adaptor at the top of main body A,until it into place.
Press salient point at the accessory adaptor to remove the accessory adaptor from main body
A
Choose the appropriate accessories(check accessories use list),according to arrow indicator to
align and implant to accessory adaptor G,then turn anticlockwise,until it into place.
Page 6 of 10
rotation,fill 360ML water use Measuring cup,
and then clockwise rotation to close water tank cup 5.
Method two:
Remove the water tank from main body,open the
water tank cup 5 by counterclockwise rotation,fill
the water tank from water faucet.,and then clockwise
rotation to close water tank cup 5.
Install the water tank 7to main body until it clicks into place.
2.Plug in the appliance to a grounded outlet.
3.When switch the appliance on,the indicator lights will turn red at the each side of water tank,it
indicate preheating.If the lights does not illuminate,please check the "troubleshooting" section for
more details.
4.It will takes approximately 25 seconds for preheating.Once the steam mop is ready to use the
water tank will glow blue.
5.When the water tank full fill with water,it can work approximately 20 minutes.If the water tank
7 without water,the indicator lights 12 will glow red,and the lights will flash to point out need to
add water
NOTICE:If power off during preheating or after preheating,then power again,the
appliance will repeat above preheating action.
6.Press the steam button 4 and steam button13,the steam out.
7.Add control volume by turn steam control knob 8
clockwise,and counterclockwise to reduce,User
can adjust steam volume according different objects
NOTICE:steam volume control by PCB,It will takes 3 seconds adaptation time
when you adjust steam volume .It is normal phenomenon.
8. When normal cleaning,the steamhead
has big rotary angle,can clean corners
and also can clean low space.
USE AS A STEAM CLEANER IN HAND
Push Lock Catch,take the main body A out of holder A,and also take out the power cord.
Install the accessory adaptor at the top of main body A,until it into place.
Press salient point at the accessory adaptor to remove the accessory adaptor from main body
A
Choose the appropriate accessories(check accessories use list),according to arrow indicator to
align and implant to accessory adaptor G,then turn anticlockwise,until it into place.
Page 6 of 10
OPERATION
1.Filling the watertank
Method one::
Open the water tank cup 5 by counterclockwise
rotation,fill 360ML water use Measuring cup,
andthen clockwise rotation to close water tank cup 5.
Method two:
Remove the water tank from main body,open the
watertank cup 5 by counterclockwise rotation,fill
the water tank from water faucet.,and then clockwise
rotation to close water tank cup 5.
Install the water tank 7to main body until it clicks into place.
2.Plug in the appliance to a grounded outlet.
3.When switch the appliance on,the indicator lights will turn red at the each side of water tank,it
indicate preheating.If the lights does not illuminate,please check the "troubleshooting" section for
more details.
4.It will takes approximately 25 seconds for preheating.Once the steam mop is ready to use the
water tank will glow blue.
5.When the water tank full fill with water,it can work approximately 20 minutes.If the water tank
7 without water,the indicator lights 12 will glow red,and the lights will flash to point out need to
add water
NOTICE:If power off during preheating or after preheating,then power again,the
appliance will repeat above preheating action.
6.Press the steam button 4 and steam button13,the steam out.
7.Add control volume by turn steam control knob 8
clockwise,and counterclockwise to reduce,User
can adjust steamvolume according different objects
NOTICE:steam volume control by PCB,It will takes 3 seconds adaptation time
when you adjust steam volume .It is normal phenomenon.
8. When normal cleaning,the steam head
has big rotary angle,can clean corners
and also can clean low space.
USE AS A STEAM CLEANER IN HAND
Push Lock Catch,take the main body A out of holder A,and also take out the power cord.
Install the accessory adaptor at the top of main body A,until it into place.
Press salient point at the accessory adaptor to remove the accessory adaptor from main body
A
Choose the appropriate accessories(check accessories use list),according to arrow indicator to
align and implant to accessory adaptor G,then turn anticlockwise,until it into place.
Page 6 of 10
Method one::
Open the water tank cup 5 by counterclockwise
rotation,fill 360ML water use Measuring cup,
and then clockwise rotation to close water tank cup 5.
Method two:
Remove the water tank from main body,open the
water tank cup 5 by counterclockwise rotation,fill
the water tank from water faucet.,and then clockwise
rotation to close water tank cup 5.
Install the water tank 7to main body until it clicks into place.
2.Plug in the appliance to a grounded outlet.
3.When switch the appliance on,the indicator lights will turn red at the each side of water tank,it
indicate preheating.If the lights does not illuminate,please check the "troubleshooting" section for
more details.
4.It will takes approximately 25 seconds for preheating.Once the steam mop is ready to use the
water tank will glow blue.
5.When the water tank full fill with water,it can work approximately 20 minutes.If the water tank
7 without water,the indicator lights 12 will glow red,and the lights will flash to point out need to
add water
NOTICE:If power off during preheating or after preheating,then power again,the
appliance will repeat above preheating action.
6.Press the steam button 4 and steam button13,the steam out.
7.Add control volume by turnsteam control knob 8
lockwise,and counterclockwise to reduce,User
can adjust steam volume according different objects
NOTICE:steam volume control by PCB,It will takes 3 seconds adaptation time
when you adjust steam volume .It is normal phenomenon.
8. When normal cleaning,the steam head
has big rotary angle,can clean corners
nd also can clean low space.
USE AS A STEAM CLEANER IN HAND
Push Lock Catch,take the main body A out of holder A,and also take out the power cord.
Install the accessory adaptor at the top of main body A,until it into place.
Press salient point at the accessory adaptor to remove the accessory adaptor from main body
A
Choose the appropriate accessories(check accessories use list),according to arrow indicator to
align and implant to accessory adaptor G,then turn anticlockwise,until it into place.
Page 6 of 10
rotation,fill 360ML water use Measuring cup,
and then clockwise rotation to close water tank cup 5.
Method two:
Remove the water tank from main body,open the
water tank cup 5 by counterclockwise rotation,fill
the water tank from water faucet.,and then clockwise
rotation to close water tank cup 5.
Install the water tank 7to main body until it clicks into place.
2.Plug in the appliance to a grounded outlet.
3.When switch the appliance on,the indicator lights will turn red at the each side of water tank,it
indicate preheating.If the lights does not illuminate,please check the "troubleshooting" section for
more details.
4.It will takes approximately 25 seconds for preheating.Once the steam mop is ready to use the
water tank will glow blue.
5.When the water tank full fill with water,it can work approximately 20 minutes.If the water tank
7 without water,the indicator lights 12 will glow red,and the lights will flash to point out need to
add water
NOTICE:If power off during preheating or after preheating,then power again,the
appliance will repeat above preheating action.
6.Press the steam button 4 and steam button13,the steam out.
7.Add control volume by turn steam control knob 8
clockwise,and counterclockwise to reduce,User
can adjust steam volume according different objects
NOTICE:steam volume control by PCB,It will takes 3 seconds adaptation time
when you adjust steam volume .It is normal phenomenon.
8. When normal cleaning,the steamhead
has big rotary angle,can clean corners
and also can clean low space.
USE AS A STEAM CLEANER IN HAND
Push Lock Catch,take the main body A out of holder A,and also take out the power cord.
Install the accessory adaptor at the top of main body A,until it into place.
Press salient point at the accessory adaptor to remove the accessory adaptor from main body
A
Choose the appropriate accessories(check accessories use list),according to arrow indicator to
align and implant to accessory adaptor G,then turn anticlockwise,until it into place.
Page 6 of 10
OPERATION
1.Filling the watertank
Method one::
Open the water tank cup 5 by counterclockwise
rotation,fill 360ML water use Measuring cup,
andthen clockwise rotation to close water tank cup 5.
Method two:
Remove the water tank from main body,open the
watertank cup 5 by counterclockwise rotation,fill
the water tank from water faucet.,and then clockwise
rotation to close water tank cup 5.
Install the water tank 7to main body until it clicks into place.
2.Plug in the appliance to a grounded outlet.
3.When switch the appliance on,the indicator lights will turn red at the each side of water tank,it
indicate preheating.If the lights does not illuminate,please check the "troubleshooting" section for
more details.
4.It will takes approximately 25 seconds for preheating.Once the steam mop is ready to use the
water tank will glow blue.
5.When the water tank full fill with water,it can work approximately 20 minutes.If the water tank
7 without water,the indicator lights 12 will glow red,and the lights will flash to point out need to
add water
NOTICE:If power off during preheating or after preheating,then power again,the
appliance will repeat above preheating action.
6.Press the steam button 4 and steam button13,the steam out.
7.Add control volume by turn steam control knob 8
clockwise,and counterclockwise to reduce,User
can adjust steamvolume according different objects
NOTICE:steam volume control by PCB,It will takes 3 seconds adaptation time
when you adjust steam volume .It is normal phenomenon.
8. When normal cleaning,the steam head
has big rotary angle,can clean corners
and also can clean low space.
USE AS A STEAM CLEANER IN HAND
Push Lock Catch,take the main body A out of holder A,and also take out the power cord.
Install the accessory adaptor at the top of main body A,until it into place.
Press salient point at the accessory adaptor to remove the accessory adaptor from main body
A
Choose the appropriate accessories(check accessories use list),according to arrow indicator to
align and implant to accessory adaptor G,then turn anticlockwise,until it into place.
Page 6 of 10
•

Deutsch
Deutsch
8 9
Artikelnummer: 2608
REINIGUNG UND LAGERUNG
• Reinigen Sie den Dampfbesen und das Zubehör regelmäßig, um eine optimale Funktion zu gewährleisten.
• Halten Sie das Gerät oder den Netzstecker auf keinen Fall unter Wasser, da sonst Flüssigkeit
eindringen kann und den Dampfbesen beschädigt wird.
• Fassen Sie den Netzstecker niemals mit feuchten Händen an.
• Verwenden Sie zur Reinigung des Gerätes keine ätzenden oder scheuernden Reinigungsmittel.
Diese können das Gerät beschädigen.
• Stellen Sie den Dampfbesen niemals in den Geschirrspüler.
• Lassen Sie das Gerät vollständig abkühlen, entfernen Sie das restliche Wasser aus dem
Wassertank bevor Sie es reinigen oder lagern.
• Bewahren Sie das Gerät und das Zubehör außerhalb der Reichweite von Kindern und Tieren
an einem trockenen, frostfreien und vor Sonneneinstrahlung geschützten Ort auf.
1. Ziehen Sie vor der Reinigung den Stecker aus der Steckdose und lassen Sie den Dampfbesen ausreichend abkühlen.
2. Wischen Sie das Gerät mit einem feuchten Tuch und einem milden Reiniger ab.
3. Lassen Sie das Gerät vollständig trocken bevor Sie es lagern.
4. Wickeln Sie das Stromkabel mit Hilfe der Stromkabelhalter [3] auf.
FEHLERBEHEBUNG
Fehler mögliche Gründe Fehlerbehebung
Kein Dampf
Das Gerät benötigt mehr Zeit zum
Aufheizen
Warten Sie ca. 30 Sekunden bis sich
das Gerät aufgeheizt hat
Dampfregler falsch eingestellt Dampfregler auf den richtigen Bereich
einstellen
Kein oder zu wenig Wasser im Tank Bitte Wasser einfüllen
Auslaufendes Wasser
Der Wasserstand ist zu hoch Überschüssiges Wasser ausgießen
Die Hitze ist nicht hoch genug Dampftaste erst betätigen, wenn die
Kontrollleuchte auf blau umschaltet
Wenig Dampf
Der Dampfregler ist zu niedrig
eingestellt ist Stellen Sie den Dampfregler höher ein
Der Wassertank ist leer oder es
bendet sich zu wenig Wasser im
Wassertank
Prüfen Sie die Füllmenge im Wassertank
und füllen Sie ggf. Wasser nach
Gerät schaltet
sich nicht ein
Das Gerät ist nicht oder nicht
ordnungsgemäß an die Steckdose
angeschlossen
Überprüfen Sie den korrekten Sitz des
Netzsteckers. / Überprüfen Sie die Sicherung
Die Steckdose ist defekt Probieren Sie eine andere Steckdose aus
4. Die Dampfmenge können Sie mit dem Dampfregler [12] regulieren. Drehen Sie den
Regler gegen den Uhrzeigersinn, um die Dampfmenge zu verringern und mit dem
Uhrzeigersinn, um die Dampfmenge zu erhöhen.
5. Setzen Sie den Dampuß auf den Boden und neigen den Dampfbesen leicht nach hinten.
6. Halten Sie den Dampfknopf [4] am Gri gedrückt, um Dampf austreten zu lassen. Dies dauert
einige Sekunden. Für die volle Reinigungskraft dampfen Sie den trockenen antiviralen Wischbezug
[K] ca. 30 Sekunden ein. Betätigen Sie während des Reinigens den Dampfknopf [4] nur
mit Unterbrechungen, um eine Übernässung des antiviralen Wischbezugs zu vermeiden.
7. Reinigen Sie den Boden.
8. Mit einem erneuten betätigen der Ein / Aus – Taste [9] schalten Sie den Dampfbesen wieder aus.
Die Anpassungszeit beim Dampfeinstellen beträgt etwa drei Sekunden. Der Dampuß sollte
beim Reinigen nicht für längere Zeit auf der gleichen Stelle und immer in Bewegung sein. So
vermeiden Sie eine Übernässung.
Sollten während des Reinigungsvorgans unerwartet an nicht vorgesehenen Stellen Wasser
oder Wasserdampf austreten, stellen Sie umgehend den Betrieb ein und ziehen den Netzstecker.
Kontaktieren Sie den Kundendienst!
Method one::
Open the water tank cup 5 by counterclockwise
rotation,fill 360ML water use Measuring cup,
and then clockwise rotation to close water tank cup 5.
Method two:
Remove the water tank from main body,open the
water tank cup 5 by counterclockwise rotation,fill
the water tank from water faucet.,and then clockwise
rotation to close water tank cup 5.
Install the water tank 7to main body until it clicks into place.
2.Plug in the appliance to a grounded outlet.
3.When switch the appliance on,the indicator lights will turn red at the each side of water tank,it
indicate preheating.If the lights does not illuminate,please check the "troubleshooting" section for
more details.
4.It will takes approximately 25 seconds for preheating.Once the steam mop is ready to use the
water tank will glow blue.
5.When the water tank full fill with water,it can work approximately 20 minutes.If the water tank
7 without water,the indicator lights 12 will glow red,and the lights will flash to point out need to
add water
NOTICE:If power off during preheating or after preheating,then power again,the
appliance will repeat above preheating action.
6.Press the steam button 4 and steam button13,the steam out.
7.Add control volume by turnsteam control knob 8
lockwise,and counterclockwise to reduce,User
can adjust steam volume according different objects
NOTICE:steam volume control by PCB,It will takes 3 seconds adaptation time
when you adjust steam volume .It is normal phenomenon.
8. When normal cleaning,the steam head
has big rotary angle,can clean corners
nd also can clean low space.
USE AS A STEAM CLEANER IN HAND
Push Lock Catch,take the main body A out of holder A,and also take out the power cord.
Install the accessory adaptor at the top of main body A,until it into place.
Press salient point at the accessory adaptor to remove the accessory adaptor from main body
A
Choose the appropriate accessories(check accessories use list),according to arrow indicator to
align and implant to accessory adaptor G,then turn anticlockwise,until it into place.
Page 6 of 10
rotation,fill 360ML water use Measuring cup,
and then clockwise rotation to close water tank cup 5.
Method two:
Remove the water tank from main body,open the
water tank cup 5 by counterclockwise rotation,fill
the water tank from water faucet.,and then clockwise
rotation to close water tank cup 5.
Install the water tank 7to main body until it clicks into place.
2.Plug in the appliance to a grounded outlet.
3.When switch the appliance on,the indicator lights will turn red at the each side of water tank,it
indicate preheating.If the lights does not illuminate,please check the "troubleshooting" section for
more details.
4.It will takes approximately 25 seconds for preheating.Once the steam mop is ready to use the
water tank will glow blue.
5.When the water tank full fill with water,it can work approximately 20 minutes.If the water tank
7 without water,the indicator lights 12 will glow red,and the lights will flash to point out need to
add water
NOTICE:If power off during preheating or after preheating,then power again,the
appliance will repeat above preheating action.
6.Press the steam button 4 and steam button13,the steam out.
7.Add control volume by turn steam control knob 8
clockwise,and counterclockwise to reduce,User
can adjust steam volume according different objects
NOTICE:steam volume control by PCB,It will takes 3 seconds adaptation time
when you adjust steam volume .It is normal phenomenon.
8. When normal cleaning,the steamhead
has big rotary angle,can clean corners
and also can clean low space.
USE AS A STEAM CLEANER IN HAND
Push Lock Catch,take the main body A out of holder A,and also take out the power cord.
Install the accessory adaptor at the top of main body A,until it into place.
Press salient point at the accessory adaptor to remove the accessory adaptor from main body
A
Choose the appropriate accessories(check accessories use list),according to arrow indicator to
align and implant to accessory adaptor G,then turn anticlockwise,until it into place.
Page 6 of 10
OPERATION
1.Filling the watertank
Method one::
Open the water tank cup 5 by counterclockwise
rotation,fill 360ML water use Measuring cup,
andthen clockwise rotation to close water tank cup 5.
Method two:
Remove the water tank from main body,open the
watertank cup 5 by counterclockwise rotation,fill
the water tank from water faucet.,and then clockwise
rotation to close water tank cup 5.
Install the water tank 7to main body until it clicks into place.
2.Plug in the appliance to a grounded outlet.
3.When switch the appliance on,the indicator lights will turn red at the each side of water tank,it
indicate preheating.If the lights does not illuminate,please check the "troubleshooting" section for
more details.
4.It will takes approximately 25 seconds for preheating.Once the steam mop is ready to use the
water tank will glow blue.
5.When the water tank full fill with water,it can work approximately 20 minutes.If the water tank
7 without water,the indicator lights 12 will glow red,and the lights will flash to point out need to
add water
NOTICE:If power off during preheating or after preheating,then power again,the
appliance will repeat above preheating action.
6.Press the steam button 4 and steam button13,the steam out.
7.Add control volume by turn steam control knob 8
clockwise,and counterclockwise to reduce,User
can adjust steamvolume according different objects
NOTICE:steam volume control by PCB,It will takes 3 seconds adaptation time
when you adjust steam volume .It is normal phenomenon.
8. When normal cleaning,the steam head
has big rotary angle,can clean corners
and also can clean low space.
USE AS A STEAM CLEANER IN HAND
Push Lock Catch,take the main body A out of holder A,and also take out the power cord.
Install the accessory adaptor at the top of main body A,until it into place.
Press salient point at the accessory adaptor to remove the accessory adaptor from main body
A
Choose the appropriate accessories(check accessories use list),according to arrow indicator to
align and implant to accessory adaptor G,then turn anticlockwise,until it into place.
Page 6 of 10
Wechseln des Zubehörs
Der Clever Clean ViralO® Dampfbesen kann auch als Hand-Dampfreiniger verwendet werden und
wird mit einem umfangreichen Zubehör geliefert. So können Sie auch schwer zugängliche Flächen
und Objekte für die der Dampuß ungeeignet ist reinigen.
1. Betätigen Sie die Verriegelungstaste [6], um die Haupteinheit [A] von der Haltevorrichtung [B]
zu lösen. Nun kann der Dampfbesen als praktischer Hand-Dampfbesen verwendet werden.
2. Stecken Sie den Adapter für Zubehör [F] auf das Gerät, bis es mit einem Klick einrastet.
3. Stecken Sie das gewünschte Zubehör auf den Adapter [F] und drehen dieses mit dem Uhrzeigersinn fest.
4. Um das Zubehör nach dem Reinigungsvorgang abzunehmen, drehen Sie das Zubehör gegen
den Uhrzeigersinn lose und ziehen es vom Adapter [F] wieder ab.
5. Betätigen Sie den Sicherungsknopf des Adapters [F] auf der Rückseite des Geräts, wenn Sie
den Adapter [F] wieder abnehmen möchten.
6. Die Haupteinheit [A] kann jetzt wieder in die Haltevorrichtung [B] eingesetzt werden.
Achtung! Die Unterseite der Haupteinheit [A] wird während der Benutzung heiß! Es besteht Verbrennungsgefahr.
Lassen Sie die Haupteinheit [A] abkühlen, bevor Sie diese berühren.
Deutsch
Deutsch
10 11
Artikelnummer: 2608
TECHNISCHE DATEN
Artikelnummer: JJ-SC-002 / 2708
Betriebsspannung: 220 – 240V~, 50Hz / 60Hz
Leistung: 1500W
IP Schutzgrad: PX4
Schutzklasse: Klasse 1
Kapazität Wassertank: 375ml
Dampftemperatur: ca. 100°C
ENTSORGUNG
Verpackungsmaterial umweltgerecht entsorgen und der Wertstosammlung zuführen
Dieses Gerät unterliegt der europäischen Richtlinie 2012/19/EU für Elektro- und Elektronik-
Altgeräte (WEEE). Dieses Gerät nicht als normalen Hausmüll, sondern umweltgerecht über
einen behördlich zugelassenen Entsorgungsbetrieb entsorgen.
English
English
12 13
Item Number: 2608
INSTRUCTION MANUAL
Clever Clean ViralO® Steam Broom
Item number: 2608
Dear customer, ,
We are pleased that you have chosen the Clever Clean ViralO® steam broom.
Please read the in- structions carefully before using the appliance for the rst time and keep them in a safe place.
If the appliance is passed on to someone else, these instructions must also be handed over. The manufacturer and importer
accept no liability if the information in these instructions is not observed! In the context of continuous development,
we reserve the right to change the product, packaging or accom- panying documents at any time.
If you have any questions, please contact customer service via our e-mail address:
HOW DOES VIRALOFF WORK
ViralO® is permanently applied to the mop of the steam broom. It is a protection for the product itself.
The active ingredient is a biocide of silver chloride. On the material, ViralO® stops viral activity by interacting with key proteins.
On this treated material, a reduction of 99% of dierent tested fours can be demonstrated in a period of two hours.
Proven by the test: ISO 18184:2019 (SARS-CoV-2, H3N2, H1N1) If possible, do not wash for maximum eect.
MEANING OF THE SYMBOLS
WARNING! General safety instructions are marked with this symbol.
There is a risk of injury if the safety instructions are not observed.
DANGER! This symbol indicates life-threatening situations caused by electric current.
There is a risk of serious injury or death.
WARNING! This symbol warns against burns from hot surfaces.
The appliance has surfaces that can be hot during operation and even after operation.
WARNING! This symbol warns against scalding by hot steam.
NOTE! Highlights useful tips for trouble-free and convenient operation
SCOPE OF DELIVERY AND EQUIPMENT OVERVIEW
A Main unit with water tank
B Holding device
C Window scraper
D small nozzle
E large nozzle
F Adapter for accessories
G Angled nozzle
H Joint brush
I Scraper
J Measuring cup
K Antiviral mop
L small mop (2x)
M Steam foot
N Carpet gliders
1 locking button articulated joint
2 handle
3 Power cable holder
4 steam knob
5 Joint with unlocking button
6 Locking button main unit
7 Steam knob
8 Power cable
9 On / O button
10 Lamps
11 Water ow
12 Steam regulator
13 Water tank cover
14 Water tank locking button
15 Water tank
Accessories Application for
Window puller Windows, glass doors, glass shower cabins, mirrors, tiles.
Small nozzle
Large nozzle
cleaning and scrubbing of surfaces such as tiles, rims,
bathtubs and many more
Angled nozzle hard to reach corners.
A
BC ED F
GHI J
KL
M
N
A
BC ED F
GHI J
KL
M
N
A
BC ED F
GHI J
KL
M
N
A
BC ED F
GHI J
KL
M
N
12
10
9
11
13
14
15 8
3
6
7
4
3
2
5
1
A
BC ED F
GHI J
KL
M
N

English
English
14 15
Item Number: 2608
INTENDED USE
• This appliance is only suitable for hygienic cleaning of surfaces that are resistant to moisture and heat.
• Do not use the steam cleaner on untreated wooden oors, wooden furniture, soft plastic or le- ather. Sensitive materials such
as velvet and synthetic fabrics must not be cleaned with the steam broom.
• If you are unsure, consult a specialist to nd out whether your surfaces are suitable for cleaning with a steam broom. We
recommend that you test the steam broom on an inconspi- cuous spot.
• The device is not intended for outdoor use.
• Use the machine only as described in this manual.
• Only use original accessories.
• The device is intended for personal use only and not for commercial applications.
• Have only authorised dealers repair all types of damage to the machine.
• Excluded from the warranty are all defects caused by improper handling, damage or attemp- ted repairs. This also applies to
normal wear and tear.
Accessories Application for
Joint brush all types of joints.
Scraper
stubborn stains.
small mops
(for window
squeegees)
Windows, glass doors, glass shower cabins, mirrors, tiles.
Antiviral mop
general cleaning of hard oors and carpets (The steam foot
has a large angle of rotation and is therefore suitable for
cleaning corners and areas with limited space.
A
BC ED F
GHI J
KL
M
N
A
BC ED F
GHI J
KL
M
N
A
BC ED F
GHI J
KL
M
N
A
BC ED F
GHI J
KL
M
N
SAFETY INSTRUCTIONS
Read the safety instructions carefully.
Improper use of the steam broom can lead to serious burns or electric shocks!
General safety instructions
• Carefully remove the steam broom and accessories from the packaging and check the appli- ance for completeness and
damage.
• Keep packaging material away from children and pets. There is a danger of suocation!
• Always check the machine for damage before operating it. If there is visible damage to the unit, do not use it.
• Only use the unit when it is fully assembled.
• Do not use the machine if it has malfunctioned, been dropped or dropped into water.
• This appliance may be used by persons with limited knowledge of its operation or sensory im- pairment, provided they are
supervised and trained in the safe use of the appliance and are aware of the associated risks.
• Make sure that children do not play with the appliance.
• Do not operate the steam broom without water.
• Do not exceed the specied ll level of the water tank.
• Only ll water into the water tank. Never use cleaning agents or solvents.
• Do not remove the water tank when the machine is in operation.
• The sole of the steam foot becomes hot during operation! Keep the appliance away from ammable objects. Only touch the
steam broom by its handles.
• The water vapour reaches high temperatures, which can lead to scalding. Use only with ext- reme caution.
• Let the steam broom cool down suciently before changing or removing the accessories.
• Do not use the unit if ammable gases are present in the air.
• Keep a sucient distance from heat sources such as cookers or ovens.
• Always switch o the machine before removing the mains plug.
• Do not pull the mains plug out of the socket by the power cord.
Risk of electric shock
• Never leave the steam broom unattended when it is connected to the mains.
• Never touch the machine, power cord or plug with wet hands.
• Do not insert metal objects into the machine to avoid electric shock.
• Do not immerse the appliance itself or the power cord or plug in water.
• Never reach for an electrical appliance if it has fallen into water. Unplug the appliance imme- diately.
• Always disconnect the plug from the socket before lling the water tank.
• Never direct the steam onto appliances with electrical components. (e.g. television sets, ra- dios, lamps, etc.)
• Never clean over oor sockets.

English
English
16 17
Item Number: 2608
OPERATION
Before the rst use
• Carefully remove the steam broom and accessories from the packaging and check the appliance
for completeness and damage. Do not use damaged components.
In such a case, contact the customer service department.
• Remove all transport packaging and protective lms from the steam broom and accessories
There may be water residue in the water tank. This is not a defect.
This only shows that the device has been tested by the quality assurance department.
Assembly
1. Insert the main unit [A] into the holding device [B] until it clicks into place.
You can remove the main unit [A] by pressing the locking button [6].
2. Push the holding device [B] onto the steam foot [M] until it clicks into place.
By pressing the re- lease button on the back, you can remove the steam foot [M]
from the holding device [B].
3. Fold the handle [2] upwards until it clicks into place. Fold the handle [2] back together
with the locking button on the articulated joint [1].
4. Pull the antiviral mop [K] over the steam foot [M] and tighten it with the cord.
5. To clean carpets, place the carpet slider [N] on the steam foot [M]
We recommend that the surfaces to be cleaned should be thoroughly
vacuumed or cleaned of crumbs and the like before using the steam broom.
Filling the water tank
Method 1 - Fill the inserted water tank
1. Turn the water tank cover [13] counterclockwise to open the water tank [15].
2. Fill the water tank [15] with the supplied measuring cup [J].
3. Insert the cover [13] and turn it clockwise to tighten it.
Method 2 - Fill the removed water tank
1. Pull the water tank [15] out of the main unit [A] by pressing and holding
both lock buttons on the water tank [14].
2. Turn the water tank cover [15] counterclockwise to open the water tank [15].
3. Hold the water tank [15] under a tap and ll it.
4. Insert the cover [13], and then turn it clockwise to tighten it.
5. Reinsert the water tank into the main unit [A] until it clicks into place.
Steam cleaning of surfaces
1. Insert the mains plug into a socket.
2. Turn on the machine with the Power Key [9].
3. The lamps [10] start to light up red to indicate that the steam broom is in the heating phase.
Heating up takes about 25 seconds. As soon as the lamps [10] light up blue, the machine is ready for operation.
A full water tank is sucient for about 20 minutes.
If the power supply is interrupted during or after preheating,
the appliance will repeat the heating process described above.
4. You can regulate the steam quantity with the steam controller [12].
Turn the knob counterclo- ckwise to decrease the steam quantity and turn it
clockwise to increase the steam quantity.
Deutsch
NOTE:Each steam mop is 100% tested in the factory to ensure product performance and
safety.When assembling your new steam mop for the first time you may notice water residue
inside of the unit.
!WARNING:Before attempting any of the following operations,make sure that the appliance is
switched off and unplugged and that the appliance is cold and contains minimal or no water.
Spread holder
Round the holder along spindle until click to fix holder.
Press spindle button 1,turn the holder,the holder can become folded state.
Attaching the steam head
Slide the bottom end of main body onto
the steam head M until Steam head Spindle 5
clicks into place
The steam head M can be removed from the
Main body by pressing salient point on the
Steam head Spindle 5
Attaching a cleaning pad
Because of barb design at the bottom of steam head M,just
place a micro-fiber cleaning pad L to steam had,they can
bond hard.
Place the front of your shoe onto the cleaning pad removal
Tab and press down firmly.
Attaching Carpet Gilder
Press the micro-fiber cleaning pad L with main body to
Carpet gilder O by vertical pressure,until it into place.
Place the front of your shoe onto the cleaning pad removal
Tab and press down firmly,carpet gilder will remove form
steamhead
Page 5 of 10
NOTE:Each steam mop is 100% tested in the factory to ensure product performance and
safety.When assembling your new steam mop for the first time you may notice water residue
inside of the unit.
!WARNING:Before attempting any of the following operations,make sure that the appliance is
switched off and unplugged and that the appliance is cold and contains minimal or no water.
Spread holder
Round the holder along spindle until click to fix holder.
Press spindle button 1,turn the holder,the holder canbecome folded state.
Attaching the steam head
Slide the bottom end of main body onto
the steam head M until Steam head Spindle 5
clicks into place
The steam head M can be removed from the
Main body by pressing salient point on the
Steam head Spindle 5
Attaching a cleaning pad
Because of barb design at the bottom of steam head M,just
place a micro-fiber cleaning pad L to steam had,they can
bond hard.
Place the front of your shoe onto the cleaning pad removal
Tab and press down firmly.
Attaching Carpet Gilder
Press the micro-fiber cleaning pad L with main body to
Carpet gilder O by vertical pressure,until it into place.
Place the front of your shoe onto the cleaning pad removal
Tab and press down firmly,carpet gilder will remove form
steamhead
Page 5 of 10
ASSEMBLY
NOTE:Each steam mop is 100% tested in the factory to ensure product performance and
safety.When assembling your new steam mop for the first time you may notice water residue
inside of the unit.
!WARNING:Before attempting any of the following operations,make sure that the appliance is
switched off and unplugged and that the appliance is cold and contains minimal or no water.
Spread holder
Round the holder along spindle until click to fix holder.
Press spindle button 1,turn the holder,the holder canbecome folded state.
Attaching the steam head
Slide the bottom end of main body onto
the steam head M until Steam head Spindle 5
clicks into place
The steam head M can be removed from the
Main body by pressing salient point on the
Steam head Spindle 5
Attaching a cleaning pad
Because of barb design at the bottom of steam head M,just
place a micro-fiber cleaning pad L to steam had,they can
bond hard.
Place the front of your shoe onto the cleaning pad removal
Tab and press down firmly.
Attaching Carpet Gilder
Press the micro-fiber cleaning pad L with main body to
Carpet gilder O by vertical pressure,until it into place.
Place the front of your shoe onto the cleaning pad removal
Tab and press down firmly,carpet gilder will remove form
steamhead
Page 5 of 10
ASSEMBLY
NOTE:Each steam mop is 100% tested in the factory to ensure product performance and
safety.When assembling your new steam mop for the first time you may notice water residue
inside of the unit.
!WARNING:Before attempting any of the following operations,make sure that the appliance is
switched off and unplugged and that the appliance is cold and contains minimal or no water.
Spread holder
Round the holder along spindle until click to fix holder.
Press spindle button 1,turn the holder,the holder canbecome folded state.
Attaching the steam head
Slide the bottom end of main body onto
the steam head M until Steam head Spindle 5
clicks into place
The steam head M can be removed from the
Main body by pressing salient point on the
Steam head Spindle 5
Attaching a cleaning pad
Because of barb design at the bottom of steam head M,just
place a micro-fiber cleaning pad L to steam had,they can
bond hard.
Place the front of your shoe onto the cleaning pad removal
Tab and press down firmly.
Attaching Carpet Gilder
Press the micro-fiber cleaning pad L with main body to
Carpet gilder O by vertical pressure,until it into place.
Place the front of your shoe onto the cleaning pad removal
Tab and press down firmly,carpet gilder will remove form
steam head
Page 5 of 10
Method one::
Open the water tank cup 5 by counterclockwise
rotation,fill 360ML water use Measuring cup,
and then clockwise rotation to close water tank cup 5.
Method two:
Remove the water tank from main body,open the
water tank cup 5 by counterclockwise rotation,fill
the water tank from water faucet.,and then clockwise
rotation to close water tank cup 5.
Install the water tank 7to main body until it clicks into place.
2.Plug in the appliance to a grounded outlet.
3.When switch the appliance on,the indicator lights will turn red at the each side of water tank,it
indicate preheating.If the lights does not illuminate,please check the "troubleshooting" section for
more details.
4.It will takes approximately 25 seconds for preheating.Once the steam mop is ready to use the
water tank will glow blue.
5.When the water tank full fill with water,it can work approximately 20 minutes.If the water tank
7 without water,the indicator lights 12 will glow red,and the lights will flash to point out need to
add water
NOTICE:If power off during preheating or after preheating,then power again,the
appliance will repeat above preheating action.
6.Press the steam button 4 and steam button13,the steam out.
7.Add control volume by turnsteam control knob 8
lockwise,and counterclockwise to reduce,User
can adjust steam volume according different objects
NOTICE:steam volume control by PCB,It will takes 3 seconds adaptation time
when you adjust steam volume .It is normal phenomenon.
8. When normal cleaning,the steam head
has big rotary angle,can clean corners
nd also can clean low space.
USE AS A STEAM CLEANER IN HAND
Push Lock Catch,take the main body A out of holder A,and also take out the power cord.
Install the accessory adaptor at the top of main body A,until it into place.
Press salient point at the accessory adaptor to remove the accessory adaptor from main body
A
Choose the appropriate accessories(check accessories use list),according to arrow indicator to
align and implant to accessory adaptor G,then turn anticlockwise,until it into place.
Page 6 of 10
rotation,fill 360ML water use Measuring cup,
and then clockwise rotation to close water tank cup 5.
Method two:
Remove the water tank from main body,open the
water tank cup 5 by counterclockwise rotation,fill
the water tank from water faucet.,and then clockwise
rotation to close water tank cup 5.
Install the water tank 7to main body until it clicks into place.
2.Plug in the appliance to a grounded outlet.
3.When switch the appliance on,the indicator lights will turn red at the each side of water tank,it
indicate preheating.If the lights does not illuminate,please check the "troubleshooting" section for
more details.
4.It will takes approximately 25 seconds for preheating.Once the steam mop is ready to use the
water tank will glow blue.
5.When the water tank full fill with water,it can work approximately 20 minutes.If the water tank
7 without water,the indicator lights 12 will glow red,and the lights will flash to point out need to
add water
NOTICE:If power off during preheating or after preheating,then power again,the
appliance will repeat above preheating action.
6.Press the steam button 4 and steam button13,the steam out.
7.Add control volume by turn steam control knob 8
clockwise,and counterclockwise to reduce,User
can adjust steam volume according different objects
NOTICE:steam volume control by PCB,It will takes 3 seconds adaptation time
when you adjust steam volume .It is normal phenomenon.
8. When normal cleaning,the steamhead
has big rotary angle,can clean corners
and also can clean low space.
USE AS A STEAM CLEANER IN HAND
Push Lock Catch,take the main body A out of holder A,and also take out the power cord.
Install the accessory adaptor at the top of main body A,until it into place.
Press salient point at the accessory adaptor to remove the accessory adaptor from main body
A
Choose the appropriate accessories(check accessories use list),according to arrow indicator to
align and implant to accessory adaptor G,then turn anticlockwise,until it into place.
Page 6 of 10
OPERATION
1.Filling the watertank
Method one::
Open the water tank cup 5 by counterclockwise
rotation,fill 360ML water use Measuring cup,
andthen clockwise rotation to close water tank cup 5.
Method two:
Remove the water tank from main body,open the
watertank cup 5 by counterclockwise rotation,fill
the water tank from water faucet.,and then clockwise
rotation to close water tank cup 5.
Install the water tank 7to main body until it clicks into place.
2.Plug in the appliance to a grounded outlet.
3.When switch the appliance on,the indicator lights will turn red at the each side of water tank,it
indicate preheating.If the lights does not illuminate,please check the "troubleshooting" section for
more details.
4.It will takes approximately 25 seconds for preheating.Once the steam mop is ready to use the
water tank will glow blue.
5.When the water tank full fill with water,it can work approximately 20 minutes.If the water tank
7 without water,the indicator lights 12 will glow red,and the lights will flash to point out need to
add water
NOTICE:If power off during preheating or after preheating,then power again,the
appliance will repeat above preheating action.
6.Press the steam button 4 and steam button13,the steam out.
7.Add control volume by turn steam control knob 8
clockwise,and counterclockwise to reduce,User
can adjust steamvolume according different objects
NOTICE:steam volume control by PCB,It will takes 3 seconds adaptation time
when you adjust steam volume .It is normal phenomenon.
8. When normal cleaning,the steam head
has big rotary angle,can clean corners
and also can clean low space.
USE AS A STEAM CLEANER IN HAND
Push Lock Catch,take the main body A out of holder A,and also take out the power cord.
Install the accessory adaptor at the top of main body A,until it into place.
Press salient point at the accessory adaptor to remove the accessory adaptor from main body
A
Choose the appropriate accessories(check accessories use list),according to arrow indicator to
align and implant to accessory adaptor G,then turn anticlockwise,until it into place.
Page 6 of 10
Method one::
Open the water tank cup 5 by counterclockwise
rotation,fill 360ML water use Measuring cup,
and then clockwise rotation to close water tank cup 5.
Method two:
Remove the water tank from main body,open the
water tank cup 5 by counterclockwise rotation,fill
the water tank from water faucet.,and then clockwise
rotation to close water tank cup 5.
Install the water tank 7to main body until it clicks into place.
2.Plug in the appliance to a grounded outlet.
3.When switch the appliance on,the indicator lights will turn red at the each side of water tank,it
indicate preheating.If the lights does not illuminate,please check the "troubleshooting" section for
more details.
4.It will takes approximately 25 seconds for preheating.Once the steam mop is ready to use the
water tank will glow blue.
5.When the water tank full fill with water,it can work approximately 20 minutes.If the water tank
7 without water,the indicator lights 12 will glow red,and the lights will flash to point out need to
add water
NOTICE:If power off during preheating or after preheating,then power again,the
appliance will repeat above preheating action.
6.Press the steam button 4 and steam button13,the steam out.
7.Add control volume by turnsteam control knob 8
lockwise,and counterclockwise to reduce,User
can adjust steam volume according different objects
NOTICE:steam volume control by PCB,It will takes 3 seconds adaptation time
when you adjust steam volume .It is normal phenomenon.
8. When normal cleaning,the steam head
has big rotary angle,can clean corners
nd also can clean low space.
USE AS A STEAM CLEANER IN HAND
Push Lock Catch,take the main body A out of holder A,and also take out the power cord.
Install the accessory adaptor at the top of main body A,until it into place.
Press salient point at the accessory adaptor to remove the accessory adaptor from main body
A
Choose the appropriate accessories(check accessories use list),according to arrow indicator to
align and implant to accessory adaptor G,then turn anticlockwise,until it into place.
Page 6 of 10
rotation,fill 360ML water use Measuring cup,
and then clockwise rotation to close water tank cup 5.
Method two:
Remove the water tank from main body,open the
water tank cup 5 by counterclockwise rotation,fill
the water tank from water faucet.,and then clockwise
rotation to close water tank cup 5.
Install the water tank 7to main body until it clicks into place.
2.Plug in the appliance to a grounded outlet.
3.When switch the appliance on,the indicator lights will turn red at the each side of water tank,it
indicate preheating.If the lights does not illuminate,please check the "troubleshooting" section for
more details.
4.It will takes approximately 25 seconds for preheating.Once the steam mop is ready to use the
water tank will glow blue.
5.When the water tank full fill with water,it can work approximately 20 minutes.If the water tank
7 without water,the indicator lights 12 will glow red,and the lights will flash to point out need to
add water
NOTICE:If power off during preheating or after preheating,then power again,the
appliance will repeat above preheating action.
6.Press the steam button 4 and steam button13,the steam out.
7.Add control volume by turn steam control knob 8
clockwise,and counterclockwise to reduce,User
can adjust steam volume according different objects
NOTICE:steam volume control by PCB,It will takes 3 seconds adaptation time
when you adjust steam volume .It is normal phenomenon.
8. When normal cleaning,the steamhead
has big rotary angle,can clean corners
and also can clean low space.
USE AS A STEAM CLEANER IN HAND
Push Lock Catch,take the main body A out of holder A,and also take out the power cord.
Install the accessory adaptor at the top of main body A,until it into place.
Press salient point at the accessory adaptor to remove the accessory adaptor from main body
A
Choose the appropriate accessories(check accessories use list),according to arrow indicator to
align and implant to accessory adaptor G,then turn anticlockwise,until it into place.
Page 6 of 10
OPERATION
1.Filling the watertank
Method one::
Open the water tank cup 5 by counterclockwise
rotation,fill 360ML water use Measuring cup,
andthen clockwise rotation to close water tank cup 5.
Method two:
Remove the water tank from main body,open the
watertank cup 5 by counterclockwise rotation,fill
the water tank from water faucet.,and then clockwise
rotation to close water tank cup 5.
Install the water tank 7to main body until it clicks into place.
2.Plug in the appliance to a grounded outlet.
3.When switch the appliance on,the indicator lights will turn red at the each side of water tank,it
indicate preheating.If the lights does not illuminate,please check the "troubleshooting" section for
more details.
4.It will takes approximately 25 seconds for preheating.Once the steam mop is ready to use the
water tank will glow blue.
5.When the water tank full fill with water,it can work approximately 20 minutes.If the water tank
7 without water,the indicator lights 12 will glow red,and the lights will flash to point out need to
add water
NOTICE:If power off during preheating or after preheating,then power again,the
appliance will repeat above preheating action.
6.Press the steam button 4 and steam button13,the steam out.
7.Add control volume by turn steam control knob 8
clockwise,and counterclockwise to reduce,User
can adjust steamvolume according different objects
NOTICE:steam volume control by PCB,It will takes 3 seconds adaptation time
when you adjust steam volume .It is normal phenomenon.
8. When normal cleaning,the steam head
has big rotary angle,can clean corners
and also can clean low space.
USE AS A STEAM CLEANER IN HAND
Push Lock Catch,take the main body A out of holder A,and also take out the power cord.
Install the accessory adaptor at the top of main body A,until it into place.
Press salient point at the accessory adaptor to remove the accessory adaptor from main body
A
Choose the appropriate accessories(check accessories use list),according to arrow indicator to
align and implant to accessory adaptor G,then turn anticlockwise,until it into place.
Page 6 of 10
5. Place the steam foot on the oor and tilt the steam broom back slightly.
6. Press and hold the steam knob [4] on the handle to release steam. This takes a few seconds.
For full cleaning power, steam the dry antiviral mop [K] for about 30 seconds. During cleaning, press the steam button [4]
intermittently to avoid over-wetting the antiviral mop.
7. Clean the oor.
8. Press the On / O key [9] again to switch the steam brush o.
The adjustment time for steam setting is about three seconds.
The steam foot should not be on the same spot for a long-time during cleaning and should always be in motion.
In this wayyou avoid over-wetting.
If water or steam should unexpectedly escape from unintended places during the cleaning process, stop operation immedi-
ately and remove the mains plug. Contact the customer ser- vice!
Method one::
Open the water tank cup 5 by counterclockwise
rotation,fill 360ML water use Measuring cup,
and then clockwise rotation to close water tank cup 5.
Method two:
Remove the water tank from main body,open the
water tank cup 5 by counterclockwise rotation,fill
the water tank from water faucet.,and then clockwise
rotation to close water tank cup 5.
Install the water tank 7to main body until it clicks into place.
2.Plug in the appliance to a grounded outlet.
3.When switch the appliance on,the indicator lights will turn red at the each side of water tank,it
indicate preheating.If the lights does not illuminate,please check the "troubleshooting" section for
more details.
4.It will takes approximately 25 seconds for preheating.Once the steam mop is ready to use the
water tank will glow blue.
5.When the water tank full fill with water,it can work approximately 20 minutes.If the water tank
7 without water,the indicator lights 12 will glow red,and the lights will flash to point out need to
add water
NOTICE:If power off during preheating or after preheating,then power again,the
appliance will repeat above preheating action.
6.Press the steam button 4 and steam button13,the steam out.
7.Add control volume by turnsteam control knob 8
lockwise,and counterclockwise to reduce,User
can adjust steam volume according different objects
NOTICE:steam volume control by PCB,It will takes 3 seconds adaptation time
when you adjust steam volume .It is normal phenomenon.
8. When normal cleaning,the steam head
has big rotary angle,can clean corners
nd also can clean low space.
USE AS A STEAM CLEANER IN HAND
Push Lock Catch,take the main body A out of holder A,and also take out the power cord.
Install the accessory adaptor at the top of main body A,until it into place.
Press salient point at the accessory adaptor to remove the accessory adaptor from main body
A
Choose the appropriate accessories(check accessories use list),according to arrow indicator to
align and implant to accessory adaptor G,then turn anticlockwise,until it into place.
Page 6 of 10
rotation,fill 360ML water use Measuring cup,
and then clockwise rotation to close water tank cup 5.
Method two:
Remove the water tank from main body,open the
water tank cup 5 by counterclockwise rotation,fill
the water tank from water faucet.,and then clockwise
rotation to close water tank cup 5.
Install the water tank 7to main body until it clicks into place.
2.Plug in the appliance to a grounded outlet.
3.When switch the appliance on,the indicator lights will turn red at the each side of water tank,it
indicate preheating.If the lights does not illuminate,please check the "troubleshooting" section for
more details.
4.It will takes approximately 25 seconds for preheating.Once the steam mop is ready to use the
water tank will glow blue.
5.When the water tank full fill with water,it can work approximately 20 minutes.If the water tank
7 without water,the indicator lights 12 will glow red,and the lights will flash to point out need to
add water
NOTICE:If power off during preheating or after preheating,then power again,the
appliance will repeat above preheating action.
6.Press the steam button 4 and steam button13,the steam out.
7.Add control volume by turn steam control knob 8
clockwise,and counterclockwise to reduce,User
can adjust steam volume according different objects
NOTICE:steam volume control by PCB,It will takes 3 seconds adaptation time
when you adjust steam volume .It is normal phenomenon.
8. When normal cleaning,the steamhead
has big rotary angle,can clean corners
and also can clean low space.
USE AS A STEAM CLEANER IN HAND
Push Lock Catch,take the main body A out of holder A,and also take out the power cord.
Install the accessory adaptor at the top of main body A,until it into place.
Press salient point at the accessory adaptor to remove the accessory adaptor from main body
A
Choose the appropriate accessories(check accessories use list),according to arrow indicator to
align and implant to accessory adaptor G,then turn anticlockwise,until it into place.
Page 6 of 10
OPERATION
1.Filling the watertank
Method one::
Open the water tank cup 5 by counterclockwise
rotation,fill 360ML water use Measuring cup,
andthen clockwise rotation to close water tank cup 5.
Method two:
Remove the water tank from main body,open the
watertank cup 5 by counterclockwise rotation,fill
the water tank from water faucet.,and then clockwise
rotation to close water tank cup 5.
Install the water tank 7to main body until it clicks into place.
2.Plug in the appliance to a grounded outlet.
3.When switch the appliance on,the indicator lights will turn red at the each side of water tank,it
indicate preheating.If the lights does not illuminate,please check the "troubleshooting" section for
more details.
4.It will takes approximately 25 seconds for preheating.Once the steam mop is ready to use the
water tank will glow blue.
5.When the water tank full fill with water,it can work approximately 20 minutes.If the water tank
7 without water,the indicator lights 12 will glow red,and the lights will flash to point out need to
add water
NOTICE:If power off during preheating or after preheating,then power again,the
appliance will repeat above preheating action.
6.Press the steam button 4 and steam button13,the steam out.
7.Add control volume by turn steam control knob 8
clockwise,and counterclockwise to reduce,User
can adjust steamvolume according different objects
NOTICE:steam volume control by PCB,It will takes 3 seconds adaptation time
when you adjust steam volume .It is normal phenomenon.
8. When normal cleaning,the steam head
has big rotary angle,can clean corners
and also can clean low space.
USE AS A STEAM CLEANER IN HAND
Push Lock Catch,take the main body A out of holder A,and also take out the power cord.
Install the accessory adaptor at the top of main body A,until it into place.
Press salient point at the accessory adaptor to remove the accessory adaptor from main body
A
Choose the appropriate accessories(check accessories use list),according to arrow indicator to
align and implant to accessory adaptor G,then turn anticlockwise,until it into place.
Page 6 of 10
Changing the accessories
The Clever Clean ViralO® steam broom can also be used as a hand steam cleaner and is supplied with a wide range of acces-
sories. This allows you to clean even hard-to-reach areas and objects for which the steam foot is unsuitable.
1. Press the locking key [6] to release the main unit [A] from the holding device [B]. The steam broom can now be used as a
practical hand steam broom.
2. Push the accessory adapter [F] onto the machine until it clicks into place.
3. Attach the desired accessory to the adapter [F] and rotate it clockwise.
4. To remove the accessory after cleaning, loosely rotate the accessory counterclockwise and pull it o the adapter [F].
5. To remove the adapter [F], press the lock button of the adapter [F] on the rear of the machine.
6. The main unit [A] can now be reinstalled in the holding device [B].
Attention! The bottom of the main unit [A] becomes hot during use! There is a danger of burns. Let the main unit [A] cool
down before touching it.

English
English
18 19
Item Number: 2608
CLEANING AND STORAGE
• Clean the steam broom and accessories regularly to ensure optimum function.
• Never hold the appliance or the mains plug under water, as this may cause liquid to penetrate and damage the steam broom.
• Never touch the mains plug with wet hands.
• Do not use caustic or abrasive cleaning agents to clean the machine. These can damage the machine.
• Never put the steam broom in the dishwasher.
• Allow the appliance to cool down completely, remove any remaining water from the water tank before cleaning or storing.
• Store the appliance and accessories out of the reach of children and animals in a dry, frost- free place protected from sunlight.
1. Before cleaning, remove the plug from the socket and allow the steam broom to cool down suciently.
2. Wipe the machine with a damp cloth and a mild detergent.
3. Leave the appliance completely dry before storing.
4. Wind up the power cord using the power cord holders [3].
TROUBLESHOOTING
Error possible reasons Troubleshooting
No steam
The device needs more time to heat
up Wait approx. 30 seconds until the device has heated up
Steam controller incorrectly set Set steam regulator to the correct range
No or too little water in the tank Please ll in water
Leaking water
The water level is too high Pour out excess water
The heat is not high enough Do not press the steam key until the Control lamp
switches to blue
Little steam
The steam regulator is set too low Set the steam regulator higher
The water tank is empty or there is
too little water in the water tank
Check the ll level in the water tank and top up with
water if necessary
Unit does not switch on
The appliance is not connected or
not pro- perly connected to the
power outlet
Check that the mains plug is correctly seated. /
Check the fuse
The socket is defective Try a dierent socket
TECHNICAL DATA
Item number: JJ-SC-002 / 2708
Operating voltage: 220 - 240V~, 50Hz / 60Hz
Power: 1500W
IP Degree of protection: PX4
Protection class: Class 1
Water tank capacity: 375ml
Steam temperature: approx. 100°C
DISPOSAL
Dispose of packaging material in an environmentally friendly manner and take it to the recyc- ling collection
This device is subject to the European Directive 2012/19/EU for Waste Electrical and Electro- nic Equipment (WEEE).
Do not dispose of this device as normal household waste, but in an environmentally friendly manner via an ocial-
ly approved disposal company.

Français
Français
20 21
Code article : 2608
INSTRUCTIONS D‘UTILISATION
ViralO® Clever Clean Balai à vapeur
Numéro d‘article : 2608
Cher client,
Nous sommes heureux que vous ayez choisi le Clever Clean ViralO® balai à vapeur. Veuillez lire attentivement les instructions
avant d‘utiliser l‘appareil pour la première fois et conservez-les dans un endroit sûr. Lors de la remise de l‘appareil, veuillez éga-
lement remettre ces instructions. Le fabricant et l‘importateur déclinent toute responsabilité si les informations contenues dans
ce manuel ne sont pas respectées ! Dans le cadre d‘un développement continu, nous nous réservons le droit de modier à tout
moment le produit, l‘emballage ou les documents d‘accompagnement.
Si vous avez des questions, veuillez contacter le service clientèle via notre adresse électronique :
COMMENT FONCTIONNE® VIRALOFF
ViralO® est appliqué en permanence sur la vadrouille du balai à vapeur. C‘est une protection pour le produit lui-même.
L‘ingrédient actif est un biocide de chlorure d‘argent. Sur le matériel, ViralO®
arrête l‘activité virale en interagissant avec des protéines clés. Sur ce matériau traité, une réduction de 99% des diérents fours
testés peut être démontrée en deux heures. Prouvé par le test : ISO 18184:2019 (SARS-CoV-2, H3N2, H1N1) Si possible, ne pas
laver pour obtenir un eet maximal.
LA SIGNIFICATION DES SYMBOLES
ATTENTION ! Les instructions générales de sécurité sont marquées de ce symbole.
Il existe un risque de blessure si les consignes de sécurité ne sont pas respectées.
DANGER ! Ce symbole indique les situations de danger de mort causées par le courant électrique.
Il existe un risque de blessure grave ou de décès
ATTENTION ! Ce symbole met en garde contre les brûlures dues à des surfaces chaudes.
L‘appareil possède des surfaces qui peuvent être chaudes pendant et même après son fonctionnement.
ATTENTION ! Ce symbole met en garde contre les brûlures par la vapeur chaude.
NOTE ! Il met en avant des conseils utiles pour un fonctionnement sans problème et pratique
ÉTENDUE DE LA PRESTATION ET APERÇU DES DISPOSITIFS
A Unité principale avec réservoir d‘eau
B Dispositif de retenue
C Extracteur de vitre
D petite buse
E grande buse
F Adaptateur pour accessoires
G Buse d‘angle
H Brosse d‘articulation
I Raclette
J Verre de mesure
K Couvercle d‘essuie-glace antiviral
L Petits couvercles d‘essuie-glace (2x)
M Pied vapeur
N Planeurs à tapis
1 bouton de verrouillage pour l‘articulation
2 poignée
3 Porte-câble électrique
4 Bouton de vapeur
5 Joint avec bouton de déverrouillage
6 Bouton de verrouillage de l’unité principale
7 Bouton vapeur
8 Câble d‘alimentation
9 Bouton marche/arrêt
10 Lampes
11 Débit d‘eau
12 Régulateur de vapeur
13 Couvercle du réservoir d‘eau
14 Bouton de verrouillage du réservoir d‘eau
15 Réservoir d‘eau
Accessoires Demande de
Tire-fenêtre Fenêtres, portes vitrées, cabines de douche en verre,
miroirs, carrelage.
Petite buse Grande buse le nettoyage et le récurage de surfaces telles que les carreaux,
les jantes, les baignoires et bien d‘autres
Buse coudée des coins diciles à atteindre.
A
BC ED F
GHI J
KL
M
N
A
BC ED F
GHI J
KL
M
N
A
BC ED F
GHI J
KL
M
N
A
BC ED F
GHI J
KL
M
N
12
10
9
11
13
14
15 8
3
6
7
4
3
2
5
1
A
BC ED F
GHI J
KL
M
N

Français
Français
22 23
Code article : 2608
USAGE APPROPRIÉ
• Cet appareil ne convient que pour le nettoyage hygiénique de surfaces qui résistent à l‘humidité et à la chaleur.
• N‘utilisez pas le nettoyeur à vapeur sur des sols en bois non traités, des meubles en bois, du plastique souple ou du cuir. Les
matériaux sensibles tels que le velours et les tissus synthétiques ne doivent pas être nettoyés avec le balai à vapeur.
• Si vous n‘êtes pas sûr, consultez un spécialiste pour savoir si vos surfaces peuvent être nettoyées avec un balai à vapeur. Nous
vous recommandons de tester le balai à vapeur dans un endroit peu visible.
• L‘appareil n‘est pas destiné à être utilisé à l‘extérieur.
• Utilisez l‘appareil uniquement comme décrit dans ce manuel.
• N‘utilisez que des accessoires d‘origine.
• L‘appareil est destiné à un usage personnel uniquement et non à des applications commerciales.
• Ne faites réparer que par des revendeurs agréés tous les types de dommages causés à l‘appareil.
• Sont exclus de la garantie tous les défauts causés par une mauvaise manipulation, des dom- mages ou des tentatives de
réparation. Cela s‘applique également à l‘usure normale.
Accessoires Demande de
Brosse à joint toutes sortes de joints.
Racleur des taches tenaces.
Petits balais à franges
(Pour les raclettes
de fenêtre)
Fenêtres, portes vitrées, cabines de douche en verre,
miroirs, carrelage
Serpillière antivirale
le nettoyage général des sols durs et des tapis (Le pied à
vapeur a un grand angle de rotation et convient donc au
nettoyage des coins et des zones où l'espace est limité.
A
BC ED F
GHI J
KL
M
N
A
BC ED F
GHI J
KL
M
N
A
BC ED F
GHI J
KL
M
N
A
BC ED F
GHI J
KL
M
N
LES CONSIGNES DE SÉCURITÉ
Lisez attentivement les consignes de sécurité.
Une mauvaise utilisation du balai à vapeur peut entraîner de graves brûlures ou un choc électrique !
Instructions générales de sécurité
• Retirez soigneusement le balai à vapeur et les accessoires de l‘emballage et vériez que l‘appareil est complet et qu‘il n‘est pas
endommagé.
• Gardez le matériel d‘emballage hors de portée des enfants et des animaux domestiques. Il y a un risque d‘étouement !
• Vériez toujours que l‘appareil n‘est pas endommagé avant de le mettre en service. Si l‘appareil présente des dommages
visibles, il ne doit pas être utilisé.
• N‘utilisez l‘appareil que lorsqu‘il est entièrement assemblé.
• N‘utilisez pas l‘appareil s‘il a mal fonctionné, s‘il est tombé ou s‘il a été jeté dans l‘eau.
• Cet appareil peut être utilisé par des personnes ayant une connaissance limitée de son fonctionnement ou une décience
sensorielle, à condition qu‘elles soient supervisées et formées à l‘utilisation sûre de l‘appareil et qu‘elles soient conscientes des
risques associés.
• Veillez à ce que les enfants ne jouent pas avec l‘appareil.
• Ne faites pas fonctionner le balai à vapeur sans eau.
• Ne pas dépasser la quantité de remplissage spéciée du réservoir d‘eau.
• Ne remplissez que le réservoir d‘eau. N‘utilisez jamais de produits de nettoyage ou de solvants.
• Ne retirez pas le réservoir d‘eau lorsque l‘appareil est en fonctionnement.
• La semelle du pied à vapeur devient chaude pendant l‘opération ! Tenez l‘appareil éloigné des objets inammables. Ne touchez
le balai à vapeur que par ses manches.
• La vapeur atteint des températures élevées, ce qui peut entraîner des échaudures. A n‘utiliser qu‘avec une extrême prudence.
• Laissez le balai à vapeur refroidir susamment avant de changer ou d‘enlever les accessoires.
• N‘utilisez pas l‘appareil si des gaz inammables sont présents dans l‘air.
• Gardez une distance susante par rapport aux sources de chaleur telles que les plaques chauantes ou les fours.
• Éteignez toujours l‘appareil avant de débrancher la prise de courant.
• Ne retirez pas la che de la prise de courant par le cordon d‘alimentation.
Risque de choc
• Ne laissez jamais le balai à vapeur sans surveillance lorsqu‘il est branché au réseau.
• Ne touchez jamais l‘appareil, le cordon d‘alimentation ou la prise avec les mains mouillées.
• N‘insérez pas d‘objets métalliques dans l‘appareil pour éviter les chocs électriques.
• N‘immergez pas l‘appareil lui-même, ni le cordon d‘alimentation ou la prise dans l‘eau.
• N‘essayez jamais d‘attraper un appareil électrique s‘il est tombé dans l‘eau. Débranchez immédiatement l‘appareil.
• Débranchez toujours la che de la prise avant de remplir le réservoir d‘eau.
• Ne jamais diriger la vapeur sur des appareils comportant des composants électriques.
(Par exemple, téléviseurs, radios, lampes, etc.)
• Ne jamais nettoyer au-dessus des prises de courant.
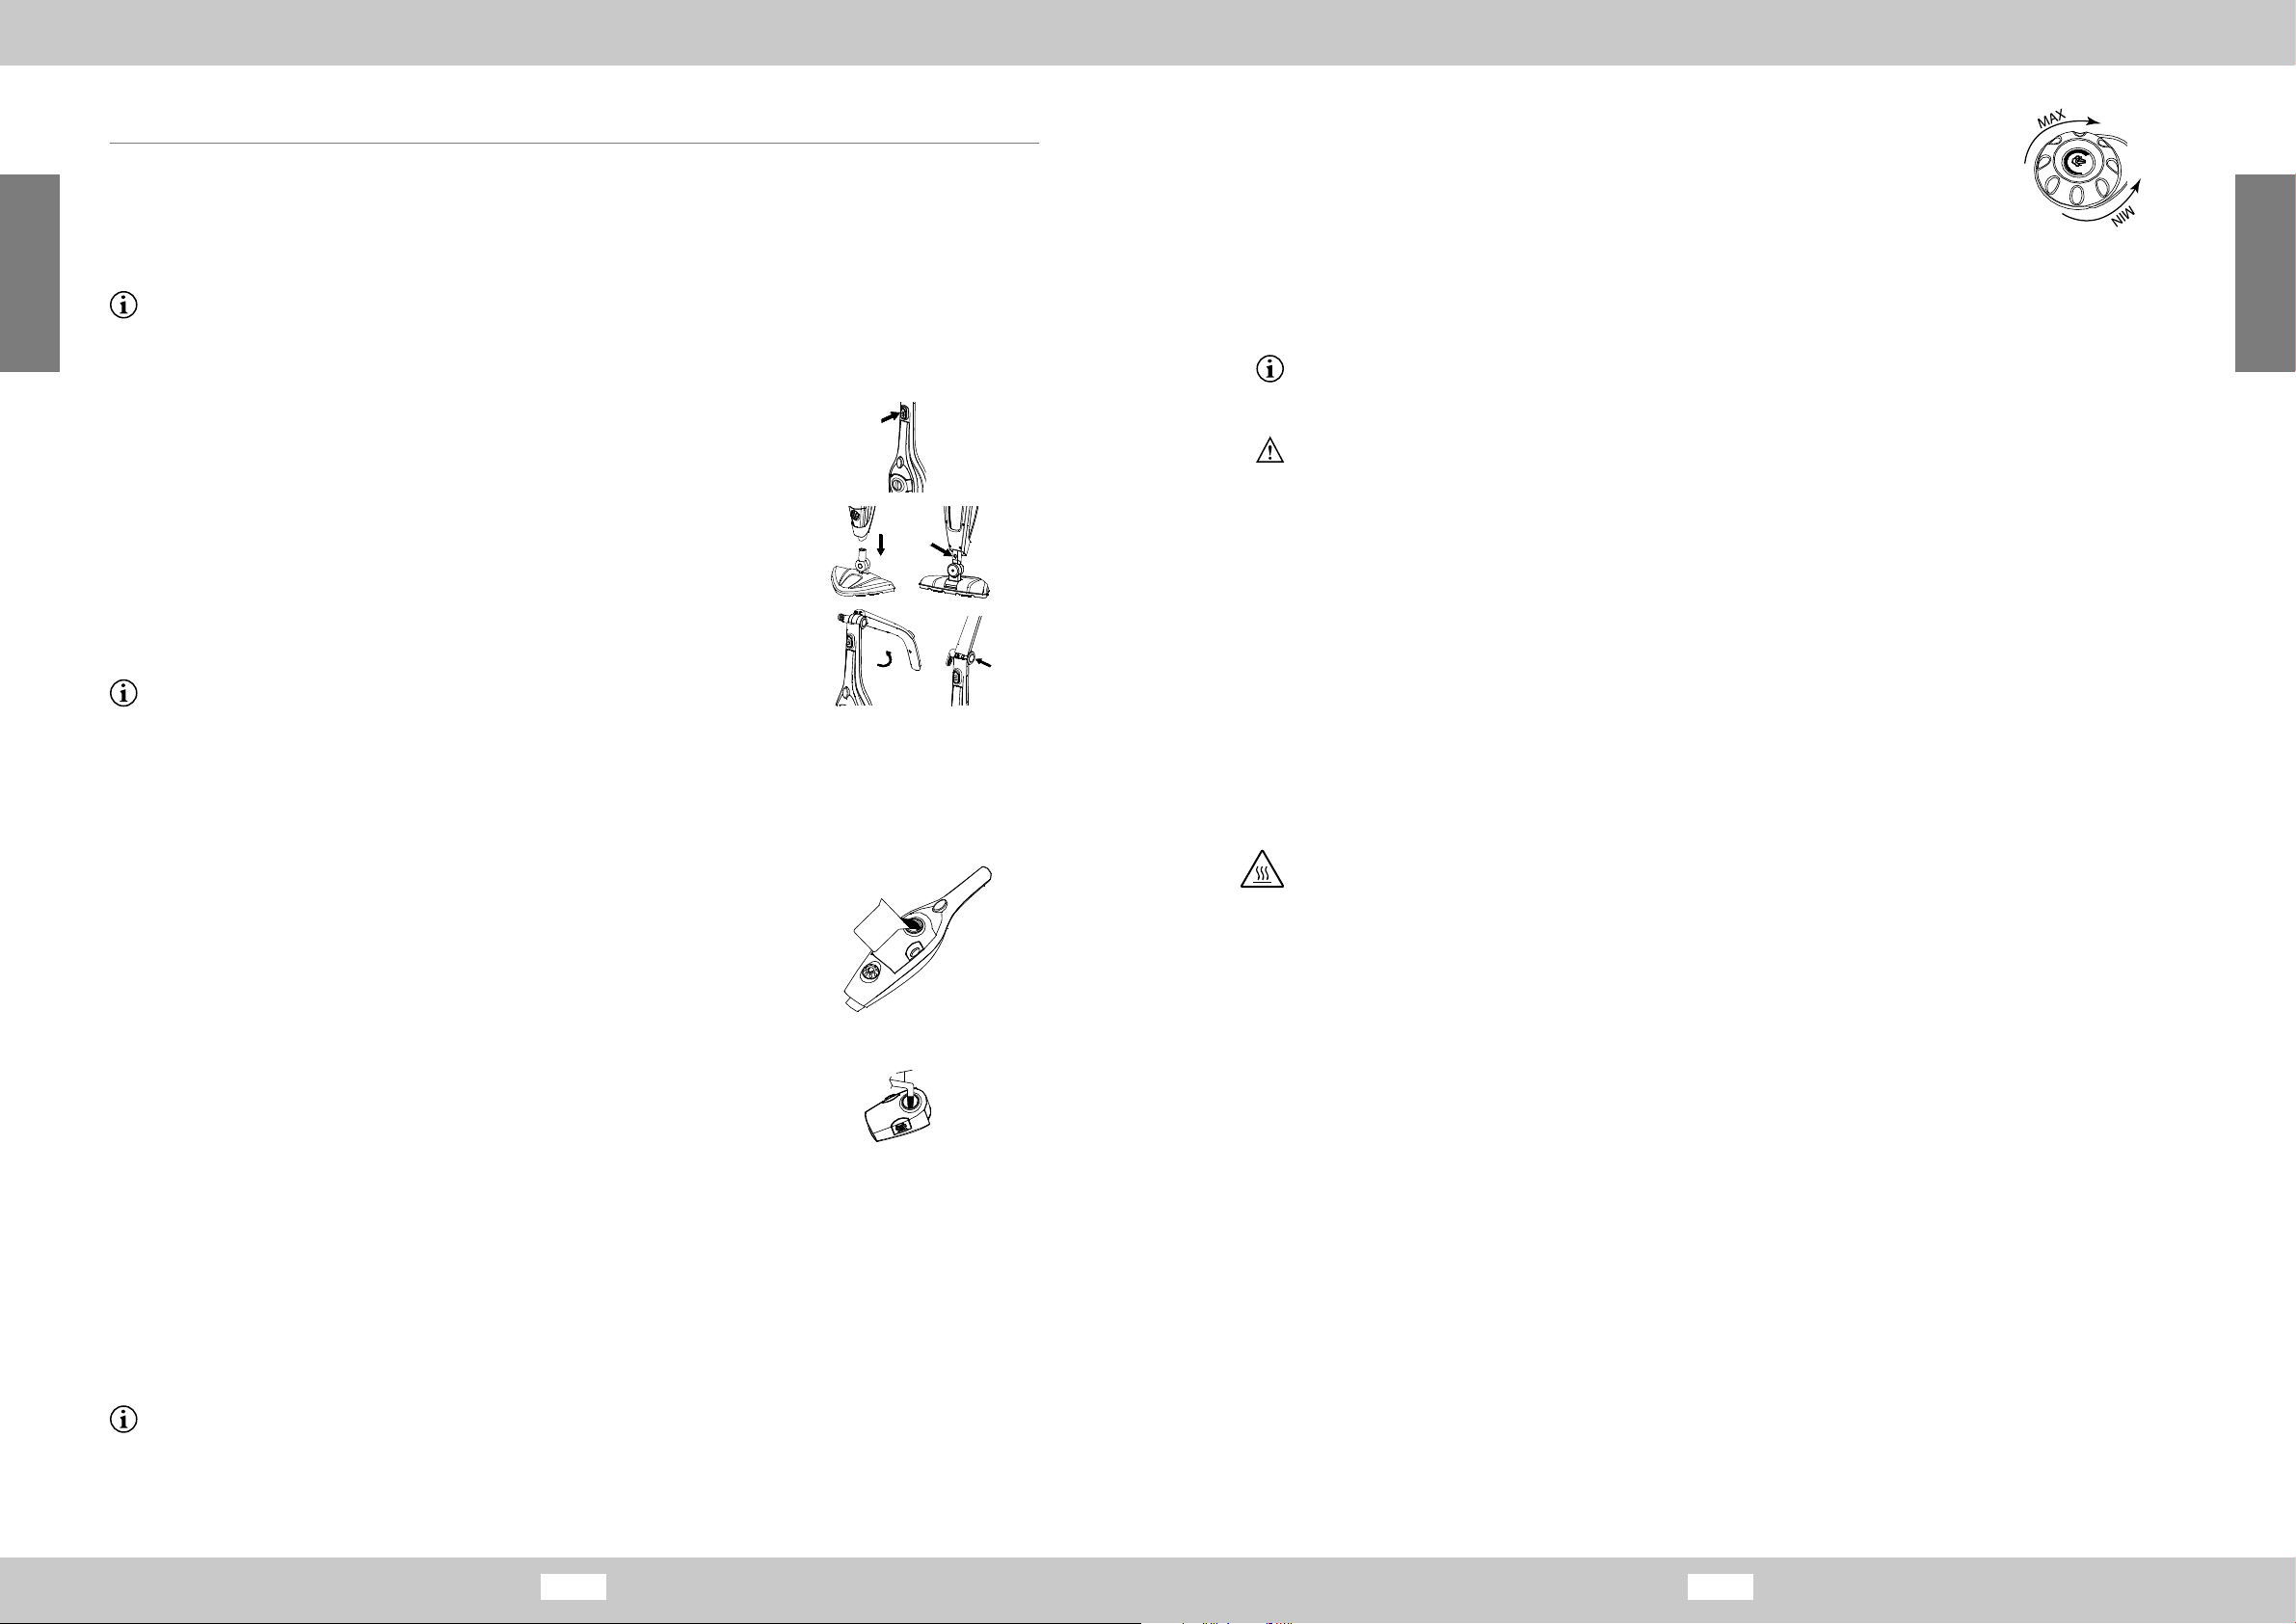
Français
Français
24 25
Code article : 2608
OPÉRATIONS
Avant la première utilisation
• Retirez soigneusement le balai à vapeur et les accessoires de l‘emballage et vériez que l‘appareil est complet et qu‘il n‘est pas
endommagé. N‘utilisez pas de composants endommagés. Dans ce cas, contactez le service clientèle.
• Retirez tous les emballages de transport et les lms de protection du balai à vapeur et de ses accessoires.
Il peut y avoir des résidus d‘eau dans le réservoir d‘eau. Ce n‘est pas un défaut.
Cela montre seulement que l‘appareil a été testé par le service d‘assurance qualité.
Assemblée
1. Insérez l‘unité principale [A] dans le dispositif de retenue [B] jusqu‘à ce que vous entendiez
un déclic. Vous pouvez à nouveau retirer l‘unité principale [A] en appuyant
sur le bouton de verrouillage [6].
2. Poussez le dispositif de maintien [B] sur le pied à vapeur [M] jusqu‘à ce qu‘il s‘enclenche.
En appuyant sur le bouton de déclenchement au dos, vous pouvez retirer le pied
à vapeur [M] du dispositif de maintien [B].
3. Repliez la poignée [2] vers le haut jusqu‘à ce que vous entendiez un déclic.
Repliez la poignée [2] avec le bouton de verrouillage de l‘articulation [1].
4. Tirez le couvercle de l‘essuie-glace antiviral [K] sur le pied vapeur [M]
et serrez-le avec la cor- de.
5. Pour nettoyer les tapis, placez le curseur de tapis [N] sur le pied à vapeur [M]
Nous recommandons que les surfaces à nettoyer soient soigneusement aspirées ou
débarrassées des miettes et autres éléments similaires avant d‘utiliser le balai à vapeur.
Remplir le réservoir d‘eau
Méthode 1 - Remplir le réservoir d‘eau inséré
1. Tournez le couvercle du réservoir d‘eau [13] dans le sens inverse des aiguilles d‘une
montre pour ouvrir le réservoir d‘eau [15].
2. Remplissez le réservoir d‘eau [15] avec la tasse à mesurer [J] fournie.
3. Insérez le couvercle [13] et revissez-le en le tournant dans le sens des
aiguilles d‘une montre.
Méthode 2 - Remplir le réservoir d‘eau retiré
1. Retirez le réservoir d‘eau [15] de l‘unité principale [A] en appuyant sur les deux
boutons de verrouillage du réservoir d‘eau [14] et en les maintenant enfoncés.
2. Tournez le couvercle du réservoir d‘eau [15] dans le sens inverse des aiguilles
d‘une montre pour ouvrir le réservoir d‘eau [15].
3. Tenez le réservoir d‘eau [15] sous un robinet d‘eau et remplissez-le.
4. Insérez le couvercle [13] et revissez-le dans le sens des aiguilles d‘une montre.
5. Remettez le réservoir d‘eau dans l‘unité principale [A] jusqu‘à ce qu‘il s‘enclenche d‘un coup de pied.
Nettoyage des surfaces à la vapeur
1. Insérez la che dans une prise électrique.
2. Allumez l‘appareil à l‘aide du bouton On / O [9].
3. Les lampes [10] commencent à s‘allumer en rouge, indiquant que le balai à vapeur est en phase de chauage.
Le réchauement prend environ 25 secondes. Dès que les lampes [10] s‘allument en bleu,
l‘appareil est prêt à fonctionner.
Un réservoir d‘eau plein sut pour environ 20 minutes. Si l‘alimentation électrique est inter- rompue pendant ou après le
préchauage, l‘appareil répète la procédure de chauage décrite Ci-dessus
Deutsch
NOTE:Each steam mop is 100% tested in the factory to ensure product performance and
safety.When assembling your new steam mop for the first time you may notice water residue
inside of the unit.
!WARNING:Before attempting any of the following operations,make sure that the appliance is
switched off and unplugged and that the appliance is cold and contains minimal or no water.
Spread holder
Round the holder along spindle until click to fix holder.
Press spindle button 1,turn the holder,the holder can become folded state.
Attaching the steam head
Slide the bottom end of main body onto
the steam head M until Steam head Spindle 5
clicks into place
The steam head M can be removed from the
Main body by pressing salient point on the
Steam head Spindle 5
Attaching a cleaning pad
Because of barb design at the bottom of steam head M,just
place a micro-fiber cleaning pad L to steam had,they can
bond hard.
Place the front of your shoe onto the cleaning pad removal
Tab and press down firmly.
Attaching Carpet Gilder
Press the micro-fiber cleaning pad L with main body to
Carpet gilder O by vertical pressure,until it into place.
Place the front of your shoe onto the cleaning pad removal
Tab and press down firmly,carpet gilder will remove form
steamhead
Page 5 of 10
NOTE:Each steam mop is 100% tested in the factory to ensure product performance and
safety.When assembling your new steam mop for the first time you may notice water residue
inside of the unit.
!WARNING:Before attempting any of the following operations,make sure that the appliance is
switched off and unplugged and that the appliance is cold and contains minimal or no water.
Spread holder
Round the holder along spindle until click to fix holder.
Press spindle button 1,turn the holder,the holder canbecome folded state.
Attaching the steam head
Slide the bottom end of main body onto
the steam head M until Steam head Spindle 5
clicks into place
The steam head M can be removed from the
Main body by pressing salient point on the
Steam head Spindle 5
Attaching a cleaning pad
Because of barb design at the bottom of steam head M,just
place a micro-fiber cleaning pad L to steam had,they can
bond hard.
Place the front of your shoe onto the cleaning pad removal
Tab and press down firmly.
Attaching Carpet Gilder
Press the micro-fiber cleaning pad L with main body to
Carpet gilder O by vertical pressure,until it into place.
Place the front of your shoe onto the cleaning pad removal
Tab and press down firmly,carpet gilder will remove form
steamhead
Page 5 of 10
ASSEMBLY
NOTE:Each steam mop is 100% tested in the factory to ensure product performance and
safety.When assembling your new steam mop for the first time you may notice water residue
inside of the unit.
!WARNING:Before attempting any of the following operations,make sure that the appliance is
switched off and unplugged and that the appliance is cold and contains minimal or no water.
Spread holder
Round the holder along spindle until click to fix holder.
Press spindle button 1,turn the holder,the holder canbecome folded state.
Attaching the steam head
Slide the bottom end of main body onto
the steam head M until Steam head Spindle 5
clicks into place
The steam head M can be removed from the
Main body by pressing salient point on the
Steam head Spindle 5
Attaching a cleaning pad
Because of barb design at the bottom of steam head M,just
place a micro-fiber cleaning pad L to steam had,they can
bond hard.
Place the front of your shoe onto the cleaning pad removal
Tab and press down firmly.
Attaching Carpet Gilder
Press the micro-fiber cleaning pad L with main body to
Carpet gilder O by vertical pressure,until it into place.
Place the front of your shoe onto the cleaning pad removal
Tab and press down firmly,carpet gilder will remove form
steamhead
Page 5 of 10
ASSEMBLY
NOTE:Each steam mop is 100% tested in the factory to ensure product performance and
safety.When assembling your new steam mop for the first time you may notice water residue
inside of the unit.
!WARNING:Before attempting any of the following operations,make sure that the appliance is
switched off and unplugged and that the appliance is cold and contains minimal or no water.
Spread holder
Round the holder along spindle until click to fix holder.
Press spindle button 1,turn the holder,the holder canbecome folded state.
Attaching the steam head
Slide the bottom end of main body onto
the steam head M until Steam head Spindle 5
clicks into place
The steam head M can be removed from the
Main body by pressing salient point on the
Steam head Spindle 5
Attaching a cleaning pad
Because of barb design at the bottom of steam head M,just
place a micro-fiber cleaning pad L to steam had,they can
bond hard.
Place the front of your shoe onto the cleaning pad removal
Tab and press down firmly.
Attaching Carpet Gilder
Press the micro-fiber cleaning pad L with main body to
Carpet gilder O by vertical pressure,until it into place.
Place the front of your shoe onto the cleaning pad removal
Tab and press down firmly,carpet gilder will remove form
steam head
Page 5 of 10
Method one::
Open the water tank cup 5 by counterclockwise
rotation,fill 360ML water use Measuring cup,
and then clockwise rotation to close water tank cup 5.
Method two:
Remove the water tank from main body,open the
water tank cup 5 by counterclockwise rotation,fill
the water tank from water faucet.,and then clockwise
rotation to close water tank cup 5.
Install the water tank 7to main body until it clicks into place.
2.Plug in the appliance to a grounded outlet.
3.When switch the appliance on,the indicator lights will turn red at the each side of water tank,it
indicate preheating.If the lights does not illuminate,please check the "troubleshooting" section for
more details.
4.It will takes approximately 25 seconds for preheating.Once the steam mop is ready to use the
water tank will glow blue.
5.When the water tank full fill with water,it can work approximately 20 minutes.If the water tank
7 without water,the indicator lights 12 will glow red,and the lights will flash to point out need to
add water
NOTICE:If power off during preheating or after preheating,then power again,the
appliance will repeat above preheating action.
6.Press the steam button 4 and steam button13,the steam out.
7.Add control volume by turnsteam control knob 8
lockwise,and counterclockwise to reduce,User
can adjust steam volume according different objects
NOTICE:steam volume control by PCB,It will takes 3 seconds adaptation time
when you adjust steam volume .It is normal phenomenon.
8. When normal cleaning,the steam head
has big rotary angle,can clean corners
nd also can clean low space.
USE AS A STEAM CLEANER IN HAND
Push Lock Catch,take the main body A out of holder A,and also take out the power cord.
Install the accessory adaptor at the top of main body A,until it into place.
Press salient point at the accessory adaptor to remove the accessory adaptor from main body
A
Choose the appropriate accessories(check accessories use list),according to arrow indicator to
align and implant to accessory adaptor G,then turn anticlockwise,until it into place.
Page 6 of 10
rotation,fill 360ML water use Measuring cup,
and then clockwise rotation to close water tank cup 5.
Method two:
Remove the water tank from main body,open the
water tank cup 5 by counterclockwise rotation,fill
the water tank from water faucet.,and then clockwise
rotation to close water tank cup 5.
Install the water tank 7to main body until it clicks into place.
2.Plug in the appliance to a grounded outlet.
3.When switch the appliance on,the indicator lights will turn red at the each side of water tank,it
indicate preheating.If the lights does not illuminate,please check the "troubleshooting" section for
more details.
4.It will takes approximately 25 seconds for preheating.Once the steam mop is ready to use the
water tank will glow blue.
5.When the water tank full fill with water,it can work approximately 20 minutes.If the water tank
7 without water,the indicator lights 12 will glow red,and the lights will flash to point out need to
add water
NOTICE:If power off during preheating or after preheating,then power again,the
appliance will repeat above preheating action.
6.Press the steam button 4 and steam button13,the steam out.
7.Add control volume by turn steam control knob 8
clockwise,and counterclockwise to reduce,User
can adjust steam volume according different objects
NOTICE:steam volume control by PCB,It will takes 3 seconds adaptation time
when you adjust steam volume .It is normal phenomenon.
8. When normal cleaning,the steamhead
has big rotary angle,can clean corners
and also can clean low space.
USE AS A STEAM CLEANER IN HAND
Push Lock Catch,take the main body A out of holder A,and also take out the power cord.
Install the accessory adaptor at the top of main body A,until it into place.
Press salient point at the accessory adaptor to remove the accessory adaptor from main body
A
Choose the appropriate accessories(check accessories use list),according to arrow indicator to
align and implant to accessory adaptor G,then turn anticlockwise,until it into place.
Page 6 of 10
OPERATION
1.Filling the watertank
Method one::
Open the water tank cup 5 by counterclockwise
rotation,fill 360ML water use Measuring cup,
andthen clockwise rotation to close water tank cup 5.
Method two:
Remove the water tank from main body,open the
watertank cup 5 by counterclockwise rotation,fill
the water tank from water faucet.,and then clockwise
rotation to close water tank cup 5.
Install the water tank 7to main body until it clicks into place.
2.Plug in the appliance to a grounded outlet.
3.When switch the appliance on,the indicator lights will turn red at the each side of water tank,it
indicate preheating.If the lights does not illuminate,please check the "troubleshooting" section for
more details.
4.It will takes approximately 25 seconds for preheating.Once the steam mop is ready to use the
water tank will glow blue.
5.When the water tank full fill with water,it can work approximately 20 minutes.If the water tank
7 without water,the indicator lights 12 will glow red,and the lights will flash to point out need to
add water
NOTICE:If power off during preheating or after preheating,then power again,the
appliance will repeat above preheating action.
6.Press the steam button 4 and steam button13,the steam out.
7.Add control volume by turn steam control knob 8
clockwise,and counterclockwise to reduce,User
can adjust steamvolume according different objects
NOTICE:steam volume control by PCB,It will takes 3 seconds adaptation time
when you adjust steam volume .It is normal phenomenon.
8. When normal cleaning,the steam head
has big rotary angle,can clean corners
and also can clean low space.
USE AS A STEAM CLEANER IN HAND
Push Lock Catch,take the main body A out of holder A,and also take out the power cord.
Install the accessory adaptor at the top of main body A,until it into place.
Press salient point at the accessory adaptor to remove the accessory adaptor from main body
A
Choose the appropriate accessories(check accessories use list),according to arrow indicator to
align and implant to accessory adaptor G,then turn anticlockwise,until it into place.
Page 6 of 10
Method one::
Open the water tank cup 5 by counterclockwise
rotation,fill 360ML water use Measuring cup,
and then clockwise rotation to close water tank cup 5.
Method two:
Remove the water tank from main body,open the
water tank cup 5 by counterclockwise rotation,fill
the water tank from water faucet.,and then clockwise
rotation to close water tank cup 5.
Install the water tank 7to main body until it clicks into place.
2.Plug in the appliance to a grounded outlet.
3.When switch the appliance on,the indicator lights will turn red at the each side of water tank,it
indicate preheating.If the lights does not illuminate,please check the "troubleshooting" section for
more details.
4.It will takes approximately 25 seconds for preheating.Once the steam mop is ready to use the
water tank will glow blue.
5.When the water tank full fill with water,it can work approximately 20 minutes.If the water tank
7 without water,the indicator lights 12 will glow red,and the lights will flash to point out need to
add water
NOTICE:If power off during preheating or after preheating,then power again,the
appliance will repeat above preheating action.
6.Press the steam button 4 and steam button13,the steam out.
7.Add control volume by turnsteam control knob 8
lockwise,and counterclockwise to reduce,User
can adjust steam volume according different objects
NOTICE:steam volume control by PCB,It will takes 3 seconds adaptation time
when you adjust steam volume .It is normal phenomenon.
8. When normal cleaning,the steam head
has big rotary angle,can clean corners
nd also can clean low space.
USE AS A STEAM CLEANER IN HAND
Push Lock Catch,take the main body A out of holder A,and also take out the power cord.
Install the accessory adaptor at the top of main body A,until it into place.
Press salient point at the accessory adaptor to remove the accessory adaptor from main body
A
Choose the appropriate accessories(check accessories use list),according to arrow indicator to
align and implant to accessory adaptor G,then turn anticlockwise,until it into place.
Page 6 of 10
rotation,fill 360ML water use Measuring cup,
and then clockwise rotation to close water tank cup 5.
Method two:
Remove the water tank from main body,open the
water tank cup 5 by counterclockwise rotation,fill
the water tank from water faucet.,and then clockwise
rotation to close water tank cup 5.
Install the water tank 7to main body until it clicks into place.
2.Plug in the appliance to a grounded outlet.
3.When switch the appliance on,the indicator lights will turn red at the each side of water tank,it
indicate preheating.If the lights does not illuminate,please check the "troubleshooting" section for
more details.
4.It will takes approximately 25 seconds for preheating.Once the steam mop is ready to use the
water tank will glow blue.
5.When the water tank full fill with water,it can work approximately 20 minutes.If the water tank
7 without water,the indicator lights 12 will glow red,and the lights will flash to point out need to
add water
NOTICE:If power off during preheating or after preheating,then power again,the
appliance will repeat above preheating action.
6.Press the steam button 4 and steam button13,the steam out.
7.Add control volume by turn steam control knob 8
clockwise,and counterclockwise to reduce,User
can adjust steam volume according different objects
NOTICE:steam volume control by PCB,It will takes 3 seconds adaptation time
when you adjust steam volume .It is normal phenomenon.
8. When normal cleaning,the steamhead
has big rotary angle,can clean corners
and also can clean low space.
USE AS A STEAM CLEANER IN HAND
Push Lock Catch,take the main body A out of holder A,and also take out the power cord.
Install the accessory adaptor at the top of main body A,until it into place.
Press salient point at the accessory adaptor to remove the accessory adaptor from main body
A
Choose the appropriate accessories(check accessories use list),according to arrow indicator to
align and implant to accessory adaptor G,then turn anticlockwise,until it into place.
Page 6 of 10
OPERATION
1.Filling the watertank
Method one::
Open the water tank cup 5 by counterclockwise
rotation,fill 360ML water use Measuring cup,
andthen clockwise rotation to close water tank cup 5.
Method two:
Remove the water tank from main body,open the
watertank cup 5 by counterclockwise rotation,fill
the water tank from water faucet.,and then clockwise
rotation to close water tank cup 5.
Install the water tank 7to main body until it clicks into place.
2.Plug in the appliance to a grounded outlet.
3.When switch the appliance on,the indicator lights will turn red at the each side of water tank,it
indicate preheating.If the lights does not illuminate,please check the "troubleshooting" section for
more details.
4.It will takes approximately 25 seconds for preheating.Once the steam mop is ready to use the
water tank will glow blue.
5.When the water tank full fill with water,it can work approximately 20 minutes.If the water tank
7 without water,the indicator lights 12 will glow red,and the lights will flash to point out need to
add water
NOTICE:If power off during preheating or after preheating,then power again,the
appliance will repeat above preheating action.
6.Press the steam button 4 and steam button13,the steam out.
7.Add control volume by turn steam control knob 8
clockwise,and counterclockwise to reduce,User
can adjust steamvolume according different objects
NOTICE:steam volume control by PCB,It will takes 3 seconds adaptation time
when you adjust steam volume .It is normal phenomenon.
8. When normal cleaning,the steam head
has big rotary angle,can clean corners
and also can clean low space.
USE AS A STEAM CLEANER IN HAND
Push Lock Catch,take the main body A out of holder A,and also take out the power cord.
Install the accessory adaptor at the top of main body A,until it into place.
Press salient point at the accessory adaptor to remove the accessory adaptor from main body
A
Choose the appropriate accessories(check accessories use list),according to arrow indicator to
align and implant to accessory adaptor G,then turn anticlockwise,until it into place.
Page 6 of 10
4. Vous pouvez régler la quantité de vapeur avec le régulateur de vapeur [12].
Tournez le régulateur dans le sens inverse des aiguilles d‘une montre pour réduire le débit de
vapeur et dans le sens des aiguilles d‘une montre pour l‘augmenter.
5. Placez le pied à vapeur sur le sol et inclinez légèrement le balai à vapeur vers l‘arrière.
6. Appuyez et maintenez le bouton vapeur [4] sur la poignée pour laisser la vapeur s‘échapper.
Cela prend quelques secondes. Pour un nettoyage complet, faites cuire à la vapeur la lingette
antivirale sèche [K] pendant environ 30 secondes. Pendant le nettoyage, n‘appuyez sur le bouton
vapeur [4] que par intermittence pour éviter de trop mouiller la serpillière antivirale.
7. Nettoyez le sol.
8. Appuyez à nouveau sur le bouton Marche / Arrêt [9] pour éteindre le fouet à vapeur.
Le temps d‘ajustement pour le réglage de la vapeur est d‘environ trois secondes.
Lors du nettoyage, le pied à vapeur ne doit pas rester longtemps au même endroit et doit toujours
être en mouvement. De cette façon, vous évitez de trop mouiller.
Si de l‘eau ou de la vapeur s‘échappe inopinément d‘un endroit non prévu pendant
le processus de nettoyage, arrêtez immédiatement le fonctionnement et débranchez la prise de courant.
Contactez le service clientèle !
Method one::
Open the water tank cup 5 by counterclockwise
rotation,fill 360ML water use Measuring cup,
and then clockwise rotation to close water tank cup 5.
Method two:
Remove the water tank from main body,open the
water tank cup 5 by counterclockwise rotation,fill
the water tank from water faucet.,and then clockwise
rotation to close water tank cup 5.
Install the water tank 7to main body until it clicks into place.
2.Plug in the appliance to a grounded outlet.
3.When switch the appliance on,the indicator lights will turn red at the each side of water tank,it
indicate preheating.If the lights does not illuminate,please check the "troubleshooting" section for
more details.
4.It will takes approximately 25 seconds for preheating.Once the steam mop is ready to use the
water tank will glow blue.
5.When the water tank full fill with water,it can work approximately 20 minutes.If the water tank
7 without water,the indicator lights 12 will glow red,and the lights will flash to point out need to
add water
NOTICE:If power off during preheating or after preheating,then power again,the
appliance will repeat above preheating action.
6.Press the steam button 4 and steam button13,the steam out.
7.Add control volume by turnsteam control knob 8
lockwise,and counterclockwise to reduce,User
can adjust steam volume according different objects
NOTICE:steam volume control by PCB,It will takes 3 seconds adaptation time
when you adjust steam volume .It is normal phenomenon.
8. When normal cleaning,the steam head
has big rotary angle,can clean corners
nd also can clean low space.
USE AS A STEAM CLEANER IN HAND
Push Lock Catch,take the main body A out of holder A,and also take out the power cord.
Install the accessory adaptor at the top of main body A,until it into place.
Press salient point at the accessory adaptor to remove the accessory adaptor from main body
A
Choose the appropriate accessories(check accessories use list),according to arrow indicator to
align and implant to accessory adaptor G,then turn anticlockwise,until it into place.
Page 6 of 10
rotation,fill 360ML water use Measuring cup,
and then clockwise rotation to close water tank cup 5.
Method two:
Remove the water tank from main body,open the
water tank cup 5 by counterclockwise rotation,fill
the water tank from water faucet.,and then clockwise
rotation to close water tank cup 5.
Install the water tank 7to main body until it clicks into place.
2.Plug in the appliance to a grounded outlet.
3.When switch the appliance on,the indicator lights will turn red at the each side of water tank,it
indicate preheating.If the lights does not illuminate,please check the "troubleshooting" section for
more details.
4.It will takes approximately 25 seconds for preheating.Once the steam mop is ready to use the
water tank will glow blue.
5.When the water tank full fill with water,it can work approximately 20 minutes.If the water tank
7 without water,the indicator lights 12 will glow red,and the lights will flash to point out need to
add water
NOTICE:If power off during preheating or after preheating,then power again,the
appliance will repeat above preheating action.
6.Press the steam button 4 and steam button13,the steam out.
7.Add control volume by turn steam control knob 8
clockwise,and counterclockwise to reduce,User
can adjust steam volume according different objects
NOTICE:steam volume control by PCB,It will takes 3 seconds adaptation time
when you adjust steam volume .It is normal phenomenon.
8. When normal cleaning,the steamhead
has big rotary angle,can clean corners
and also can clean low space.
USE AS A STEAM CLEANER IN HAND
Push Lock Catch,take the main body A out of holder A,and also take out the power cord.
Install the accessory adaptor at the top of main body A,until it into place.
Press salient point at the accessory adaptor to remove the accessory adaptor from main body
A
Choose the appropriate accessories(check accessories use list),according to arrow indicator to
align and implant to accessory adaptor G,then turn anticlockwise,until it into place.
Page 6 of 10
OPERATION
1.Filling the watertank
Method one::
Open the water tank cup 5 by counterclockwise
rotation,fill 360ML water use Measuring cup,
andthen clockwise rotation to close water tank cup 5.
Method two:
Remove the water tank from main body,open the
watertank cup 5 by counterclockwise rotation,fill
the water tank from water faucet.,and then clockwise
rotation to close water tank cup 5.
Install the water tank 7to main body until it clicks into place.
2.Plug in the appliance to a grounded outlet.
3.When switch the appliance on,the indicator lights will turn red at the each side of water tank,it
indicate preheating.If the lights does not illuminate,please check the "troubleshooting" section for
more details.
4.It will takes approximately 25 seconds for preheating.Once the steam mop is ready to use the
water tank will glow blue.
5.When the water tank full fill with water,it can work approximately 20 minutes.If the water tank
7 without water,the indicator lights 12 will glow red,and the lights will flash to point out need to
add water
NOTICE:If power off during preheating or after preheating,then power again,the
appliance will repeat above preheating action.
6.Press the steam button 4 and steam button13,the steam out.
7.Add control volume by turn steam control knob 8
clockwise,and counterclockwise to reduce,User
can adjust steamvolume according different objects
NOTICE:steam volume control by PCB,It will takes 3 seconds adaptation time
when you adjust steam volume .It is normal phenomenon.
8. When normal cleaning,the steam head
has big rotary angle,can clean corners
and also can clean low space.
USE AS A STEAM CLEANER IN HAND
Push Lock Catch,take the main body A out of holder A,and also take out the power cord.
Install the accessory adaptor at the top of main body A,until it into place.
Press salient point at the accessory adaptor to remove the accessory adaptor from main body
A
Choose the appropriate accessories(check accessories use list),according to arrow indicator to
align and implant to accessory adaptor G,then turn anticlockwise,until it into place.
Page 6 of 10
Changer les accessoires
Le balai à vapeur Clever Clean ViralO® peut également être utilisé comme nettoyeur à vapeur manuel
et est livré avec une large gamme d‘accessoires. Cela vous permet de nettoyer même les zones diciles
d‘accès et les objets pour lesquels le pied vapeur n‘est pas adapté.
1. Appuyez sur le bouton de verrouillage [6] pour libérer l‘unité principale [A] du dispositif de maintien [B].
Le balai à vapeur peut maintenant être utilisé comme un balai à vapeur manuel pratique.
2. Poussez l‘adaptateur pour accessoires [F] sur l‘appareil jusqu‘à ce qu‘il s‘enclenche en place.
3. Placez l‘accessoire souhaité sur l‘adaptateur [F] et serrez-le en le tournant dans le sens des aiguilles d‘une montre.
4. Pour retirer l‘accessoire après le processus de nettoyage, tournez l‘accessoire sans serrer dans le sens inverse des aiguilles
d‘une montre et retirez-le de l‘adaptateur [F].
5. Appuyez sur le bouton de sécurité de l‘adaptateur [F] à l‘arrière de l‘appareil si vous souhaitez retirer l‘adaptateur [F].
6. L‘unité principale [A] peut maintenant être insérée à nouveau dans le dispositif de retenue [B].
Attention ! Le fond de l‘unité principale [A] devient chaud pendant l‘utilisation !
Il y a un risque de brûlures. Laissez l‘unité principale [A] refroidir avant de la toucher.
Français
Français
26 27
Code article : 2608
LE NETTOYAGE ET LE STOCKAGE
• Nettoyez régulièrement le balai à vapeur et ses accessoires pour en assurer le fonctionne- ment optimal.
• Ne tenez jamais l‘appareil ou la che secteur sous l‘eau, car cela pourrait faire pénétrer du liquide
et endommager le balai à vapeur.
• Ne touchez jamais la prise de courant avec les mains mouillées.
• N‘utilisez pas de produits de nettoyage caustiques ou abrasifs pour nettoyer l‘appareil.
Ceux-ci peuvent endommager l‘appareil.
• Ne mettez jamais le balai à vapeur dans le lave-vaisselle.
• Laissez l‘appareil refroidir complètement, retirez l‘eau restante du réservoir d‘eau avant de le nettoyer ou de le stocker.
• Rangez l‘appareil et ses accessoires hors de portée des enfants et des animaux dans un endroit sec,
à l‘abri du gel et de la lumière du soleil.
1. Avant de nettoyer, débranchez la che de la prise de courant et laissez le balai à vapeur refroidir susamment.
2. Essuyez l‘appareil avec un chion humide et un détergent doux.
3. Laissez l‘appareil complètement sec avant de le ranger.
4. Enroulez le câble d‘alimentation en utilisant les supports de câble d‘alimentation [3].
DÉPANNAGE
Erreur Les raisons possibles Dépannage
Pas de vapeur
L'appareil a besoin de plus de temps
pour chauer Attendez environ 30 secondes que l'ap- pareil ait chaué
Le régulateur de vapeur est mal
réglé Régler le régulateur de vapeur sur la bonne plage
Pas ou trop peu d'eau dans le
réservoir Veuillez remplir d'eau
Fuite d'eau
Le niveau de l'eau est trop élevé Vider l'excès d'eau
La chaleur n'est pas assez élevée
N‘appuyez pas sur le bouton vapeur avant que là Le
témoin lumineux passe au bleu
Un peu de vapeur
Le régulateur de vapeur est réglé
trop bas Régler le régulateur de vapeur à un ni- veau plus élevé
Le réservoir d'eau est vide ou il y a
trop peu d'eau dans le réservoir
Vérier la quantité de remplissage du réservoir d‘eau et
faire l‘appoint si nécessaire
L‘appareil ne s‘allume pas
L‘appareil n‘est pas ou pas correcte-
ment branché à la prise de courant
Vériez que la che secteur est correctement insérée /
Vériez le fusible
La prise de courant est défectueuse Essayez une autre prise de courant
LES SPÉCIFICATIONS TECHNIQUES
Numéro d‘article : JJ-SC-002 / 2708
Tension de fonctionnement : 220 - 240V~, 50Hz / 60Hz
Puissance : 1500W
IP Degré de protection : PX4
Classe de protection : Classe 1
Capacité du réservoir d‘eau : 375 ml
Température de la vapeur : environ 100°C
DISPOSITION
Éliminer les matériaux d‘emballage dans le respect de l‘environnement et les apporter à la collecte de recyclage
Cet appareil est soumis à la directive européenne 2012/19/UE relative aux déchets d‘équipe- ments électriques et
électroniques (DEEE). Ne jetez pas cet appareil avec les déchets ména- gers normaux, mais de manière écologique
par l‘intermédiaire d‘une entreprise d‘élimination ociellement agréée.

Nederlands
Nederlands
28 29
Artikelnummer: 2608
GEBRUIKSHANDLEIDING
Slimme, schone ViralO® stoombezem
Artikelnummer: 2608
Beste klant,
We zijn blij dat u hebt gekozen voor de Clever Clean ViralO® stoombezem. Lees de gebruiksaanwijzing zorgvuldig door voordat
u het apparaat voor het eerst gebruikt en bewaar deze op een veilige plaats. Geef bij het doorgeven van het apparaat ook deze
instructies door. De fabrikant en importeur aanvaarden geen aansprakelijkheid als de informatie in deze handleiding niet wordt
nageleefd! In het kader van de voortdurende ontwikkeling behouden wij ons het recht voor om het product, de
verpakking of de begeleidende documenten te allen tijde te wijzigen.
Als u vragen heeft, neem dan contact op met de klantenservice via ons e-mailadres:
HOE WERKT VIRALOFF®
ViralO® wordt permanent aangebracht op de dweil van de stoombezem. Het is een bescherming voor het product zelf. De
werkzame stof is een biocide van zilverchloride. Op het materiaal stopt ViralO® de virale activiteit door interactie met belangri-
jke eiwitten. Op dit behandelde materiaal kan in
een periode van twee uur een reductie van 99% van verschillende geteste fours worden aangetoond. Bewezen door de test: ISO
18184:2019 (SARS-CoV-2, H3N2, H1N1) Indien mogelijk, niet wassen voor een maximaal eect.
BETEKENIS VAN DE SYMBOLEN
WAARSCHUWING! Algemene veiligheidsinstructies zijn met dit symbool gemarkeerd.
Er bestaat gevaar voor letsel als de veiligheidsinstructies niet worden opgevolgd.
GEVAAR! Dit symbool geeft levensbedreigende situaties aan die worden veroorzaakt door elektrische stroom. Er
bestaat een risico op ernstig letsel of de dood.
WAARSCHUWING! Dit symbool waarschuwt voor brandwonden van hete oppervlakken. Het apparaat heeft op-
pervlakken die tijdens en zelfs na het gebruik heet kunnen zijn.
WAARSCHUWING! Dit symbool waarschuwt voor verbranding door hete stoom.
OPMERKING! Benadrukt nuttige tips voor een probleemloze en comfortabele bediening.
LEVERINGSOMVANG EN APPARAATOVERZICHT
A Hoofdunit met waterreservoir
B Houdtoestel
C Vensterafzuiging
D kleine sproeier
E grote sproeier
F Adapter voor toebehoren
G Haakse sproeier
H Gezamenlijke borstelI Schraper
J Maatbeker
K Antivirale ruitenwisserafdekking
L Kleine ruitenwisserafdekkingen (2x)
M Stoomvoet
N Tapijtglijders
1 vergrendelknop voor scharnierverbinding
2 handgrepen
3 Houder voor de voedingskabel
4 Stoomknop
5 Joint met ontgrendelingsknop
6 Vergrendelingsknop van de hoofdeenheid
7 Stoomknop
8 Stroomkabel
9 Aan/uit-knop
10 Lampen
11 Waterdebiet
12 Stoomregelaar
13 Watertankdeksel
14 Vergrendelingsknop watertank
15 Watertank
Accessoires Aanvraag voor
Venstrekker Ramen, glazen deuren, glazen douchecabines, spiegels,
tegels.
Klein mondstuk
Groot mondstuk
het reinigen en schrobben van oppervlakken zoals tegels,
velgen, badkuipen en nog veel meer
Hoekig mondstuk moeilijk te bereiken hoeken.
A
BC ED F
GHI J
KL
M
N
A
BC ED F
GHI J
KL
M
N
A
BC ED F
GHI J
KL
M
N
A
BC ED F
GHI J
KL
M
N
12
10
9
11
13
14
15 8
3
6
7
4
3
2
5
1
A
BC ED F
GHI J
KL
M
N

Nederlands
Nederlands
30 31
Artikelnummer: 2608
PROPER GEBRUIK
• Dit apparaat is alleen geschikt voor hygiënische reiniging van oppervlakken die bestand zijn tegen vocht en hitte.
• Gebruik de stoomreiniger niet op onbehandelde houten vloeren, houten meubels, zacht plastic of leer.
Gevoelige materialen zoals uweel en synthetische stoen mogen niet met de stoomborstel worden gereinigd.
• Als u niet zeker bent, raadpleeg dan een specialist om na te gaan of uw oppervlakken geschikt zijn voor reiniging met een
stoombezem. Wij raden u aan de stoombezem te testen op een onopvallende plaats.
• Het apparaat is niet bedoeld voor gebruik buitenshuis.
• Gebruik het apparaat alleen zoals beschreven in deze handleiding.
• Gebruik alleen originele accessoires.
• Het apparaat is alleen bedoeld voor persoonlijk gebruik en niet voor commerciële toepassingen.
• Laat alleen geautoriseerde dealers alle soorten schade aan het apparaat repareren.
• Uitgesloten van de garantie zijn alle defecten die veroorzaakt zijn door verkeerde behandeling,
schade of pogingen tot reparatie. Dit geldt ook voor normale slijtage.
Accessoires Aanvraag voor
Brosse à joint allerlei soorten gewrichten.
Schraper hardnekkige vlekken.
kleine dweilen
(voor raamwissers)
Ramen, glazen deuren, glazen douchecabines, spiegels,
tegels.
Antivirale mop
algemene reiniging van harde vloeren en tapij- ten (De
stoomvoet heeft een grote rotatiehoek en is daarom geschikt
voor het reinigen van hoeken en ruimtes met beperkte
ruimte.
A
BC ED F
GHI J
KL
M
N
A
BC ED F
GHI J
KL
M
N
A
BC ED F
GHI J
KL
M
N
A
BC ED F
GHI J
KL
M
N
VEILIGHEIDSAANWIJZINGEN
Lees de veiligheidsinstructies aandachtig door. Onjuist gebruik van de stoombezem kan leiden tot ernstige brandwonden of
elektrische schokken!
Algemene veiligheidsinstructies
• Haal de stoombezem en accessoires voorzichtig uit de verpakking en controleer het apparaat op
volledigheid en beschadiging.
• Houd verpakkingsmateriaal uit de buurt van kinderen en huisdieren.
Er bestaat verstikkingsgevaar!
• Controleer het apparaat altijd op schade voordat u het in gebruik neemt.
Als er zichtbare schade aan het apparaat is, mag het niet worden gebruikt.
• Gebruik het apparaat alleen als het volledig gemonteerd is.
• Gebruik het apparaat niet als het defect is, is gevallen of in het water is gevallen.
• Dit apparaat mag worden gebruikt door personen met beperkte kennis van de werking of zintuiglijke beperking,
mits zij onder toezicht staan en getraind zijn in het veilig gebruik van het apparaat en zich bewust zijn van de
bijbehorende risico‘s.
• Zorg ervoor dat kinderen niet met het apparaat spelen.
• Bedien de stoombezem niet zonder water.
• Overschrijd de aangegeven vulhoeveelheid van het waterreservoir niet.
• Vul alleen water in het waterreservoir. Gebruik nooit reinigingsmiddelen of oplosmiddelen.
• Verwijder het waterreservoir niet als het apparaat in werking is.
• De zool van de stoomvoet wordt tijdens het gebruik heet! Houd het apparaat uit de buurt van ontvlambare voorwerpen. Raak
de stoombezem alleen aan bij de handgrepen.
• De stoom bereikt hoge temperaturen, wat kan leiden tot verbranding.
Gebruik alleen met uiterste voorzichtigheid.
• Laat de stoombezem voldoende afkoelen alvorens de accessoires te vervangen of te verwijderen.
• Gebruik het apparaat niet als er brandbare gassen in de lucht aanwezig zijn.
• Houd voldoende afstand tot warmtebronnen zoals kookplaten of ovens.
• Schakel het apparaat altijd uit voordat u de stekker uit het stopcontact trekt.
• Trek de stekker niet uit het stopcontact aan het netsnoer.
schokgevaar
• Laat de stoombezem nooit onbeheerd achter wanneer deze is aangesloten op het elektriciteitsnet.
• Raak het apparaat, het netsnoer of de stekker nooit met natte handen aan.
• Steek geen metalen voorwerpen in het apparaat om elektrische schokken te voorkomen.
• Dompel het apparaat zelf of het netsnoer niet onder en sluit het niet aan op water.
• Grijp nooit naar een elektrisch apparaat als het in het water is gevallen. Trek de stekker onmiddellijk uit het stopcontact.
• Trek altijd de stekker uit het stopcontact voordat u het waterreservoir vult.
• Richt de stoom nooit op apparaten met elektrische componenten. (bv. televisietoestellen, radio‘s, lampen, enz.)
• Reinig nooit over vloerdozen.

Nederlands
Nederlands
32 33
Artikelnummer: 2608
WERKINGEN
Voor het eerste gebruik
• Haal de stoombezem en accessoires voorzichtig uit de verpakking en controleer het apparaat op volledigheid en
beschadiging. Gebruik geen beschadigde onderdelen. Neem in dat geval contact op met de klantenservice.
• Verwijder alle transportverpakkingen en beschermfolies van de stoombezem en accessoires.
Er kunnen waterresten in het waterreservoir zitten. Dit is geen gebrek.
Dit toont alleen aan dat het apparaat is getest door de afdeling kwaliteitsborging.
Assemblage
1. Steek de hoofdeenheid [A] in de houder [B] totdat u hoort dat deze op zijn plaats klikt.
U kunt de hoofdeenheid [A] weer verwijderen door op de vergrendelknop [6] te drukken.
2. Druk het vasthoudmechanisme [B] op de stoomvoet [M] tot deze vastklikt.
Door op de ont- grendelingsknop aan de achterzijde te drukken,
kunt u de stoomvoet [M] uit de houder [B] halen.
3. Klap het handvat [2] naar boven totdat je het hoort klikken.
Klap de handgreep [2] samen met de vergrendelknop op het scharniergewricht [1] weer terug.
4. Trek het antivirale ruitenwisserdeksel [K] over de stoomvoet [M] en zet het vast met het koord.
5. Om tapijten te reinigen, plaatst u de tapijtschuif [N] op de stoomvoet [M].
Wij raden aan de te reinigen oppervlakken grondig te stofzuigen of te ontdoen
van kruimels en dergelijke alvorens de stoombezem te gebruiken.
Het vullen van de watertank
Methode 1 - Vul het geplaatste waterreservoir
1. Draai het deksel van het waterreservoir [13] tegen de wijzers van de
klok in om het waterre- servoir te openen [15].
2. Vul het waterreservoir [15] met de bijgeleverde maatbeker [J].
3. Plaats het deksel [13] en schroef het terug door
het met de klok mee te draaien.
Methode 2 - Vul het verwijderde waterreservoir
1. Trek het waterreservoir [15] uit de hoofdeenheid [A] door beide vergrendelknoppen
op het wa- terreservoir [14] in te drukken en vast te houden.
2. Draai het deksel van het waterreservoir [15] tegen de wijzers van de klok in om
het waterre- servoir te openen [15].
3. Houd het waterreservoir [15] onder een waterkraan en vul het.
4. Plaats het deksel [13] en schroef het terug met de klok mee.
5. Steek het waterreservoir terug in de hoofdeenheid [A] tot het met een schop op zijn plaats klikt.
Stoomreiniging van oppervlakken
1. Steek de stekker in een stopcontact.
2. Schakel het apparaat in met de aan/uit-knop [9].
3. De lampen [10] beginnen rood op te lichten, wat aangeeft dat de stoombezem zich in de opwarmfase bevindt.
Het opwarmen duurt ongeveer 25 seconden. Zodra de lampen [10] blauw oplichten, is het apparaat klaar voor gebruik.
Een volle watertank is voldoende voor ongeveer 20 minuten.
Als de stroomtoevoer tijdens of na het voorverwarmen wordt onderbroken, zal het toestel de hierboven beschreven verwar-
mingsprocedure herhalen.
4. U kunt de hoeveelheid stoom regelen met de stoomregelaar [12].
Draai de regelaar tegen de klok in om het stoomdebiet te verminderen en met de
klok mee om het stoomdebiet te verhogen.
5. Plaats de stoomvoet op de vloer en kantel de stoomborstel iets terug.
Deutsch
NOTE:Each steam mop is 100% tested in the factory to ensure product performance and
safety.When assembling your new steam mop for the first time you may notice water residue
inside of the unit.
!WARNING:Before attempting any of the following operations,make sure that the appliance is
switched off and unplugged and that the appliance is cold and contains minimal or no water.
Spread holder
Round the holder along spindle until click to fix holder.
Press spindle button 1,turn the holder,the holder can become folded state.
Attaching the steam head
Slide the bottom end of main body onto
the steam head M until Steam head Spindle 5
clicks into place
The steam head M can be removed from the
Main body by pressing salient point on the
Steam head Spindle 5
Attaching a cleaning pad
Because of barb design at the bottom of steam head M,just
place a micro-fiber cleaning pad L to steam had,they can
bond hard.
Place the front of your shoe onto the cleaning pad removal
Tab and press down firmly.
Attaching Carpet Gilder
Press the micro-fiber cleaning pad L with main body to
Carpet gilder O by vertical pressure,until it into place.
Place the front of your shoe onto the cleaning pad removal
Tab and press down firmly,carpet gilder will remove form
steamhead
Page 5 of 10
NOTE:Each steam mop is 100% tested in the factory to ensure product performance and
safety.When assembling your new steam mop for the first time you may notice water residue
inside of the unit.
!WARNING:Before attempting any of the following operations,make sure that the appliance is
switched off and unplugged and that the appliance is cold and contains minimal or no water.
Spread holder
Round the holder along spindle until click to fix holder.
Press spindle button 1,turn the holder,the holder canbecome folded state.
Attaching the steam head
Slide the bottom end of main body onto
the steam head M until Steam head Spindle 5
clicks into place
The steam head M can be removed from the
Main body by pressing salient point on the
Steam head Spindle 5
Attaching a cleaning pad
Because of barb design at the bottom of steam head M,just
place a micro-fiber cleaning pad L to steam had,they can
bond hard.
Place the front of your shoe onto the cleaning pad removal
Tab and press down firmly.
Attaching Carpet Gilder
Press the micro-fiber cleaning pad L with main body to
Carpet gilder O by vertical pressure,until it into place.
Place the front of your shoe onto the cleaning pad removal
Tab and press down firmly,carpet gilder will remove form
steamhead
Page 5 of 10
ASSEMBLY
NOTE:Each steam mop is 100% tested in the factory to ensure product performance and
safety.When assembling your new steam mop for the first time you may notice water residue
inside of the unit.
!WARNING:Before attempting any of the following operations,make sure that the appliance is
switched off and unplugged and that the appliance is cold and contains minimal or no water.
Spread holder
Round the holder along spindle until click to fix holder.
Press spindle button 1,turn the holder,the holder canbecome folded state.
Attaching the steam head
Slide the bottom end of main body onto
the steam head M until Steam head Spindle 5
clicks into place
The steam head M can be removed from the
Main body by pressing salient point on the
Steam head Spindle 5
Attaching a cleaning pad
Because of barb design at the bottom of steam head M,just
place a micro-fiber cleaning pad L to steam had,they can
bond hard.
Place the front of your shoe onto the cleaning pad removal
Tab and press down firmly.
Attaching Carpet Gilder
Press the micro-fiber cleaning pad L with main body to
Carpet gilder O by vertical pressure,until it into place.
Place the front of your shoe onto the cleaning pad removal
Tab and press down firmly,carpet gilder will remove form
steamhead
Page 5 of 10
ASSEMBLY
NOTE:Each steam mop is 100% tested in the factory to ensure product performance and
safety.When assembling your new steam mop for the first time you may notice water residue
inside of the unit.
!WARNING:Before attempting any of the following operations,make sure that the appliance is
switched off and unplugged and that the appliance is cold and contains minimal or no water.
Spread holder
Round the holder along spindle until click to fix holder.
Press spindle button 1,turn the holder,the holder canbecome folded state.
Attaching the steam head
Slide the bottom end of main body onto
the steam head M until Steam head Spindle 5
clicks into place
The steam head M can be removed from the
Main body by pressing salient point on the
Steam head Spindle 5
Attaching a cleaning pad
Because of barb design at the bottom of steam head M,just
place a micro-fiber cleaning pad L to steam had,they can
bond hard.
Place the front of your shoe onto the cleaning pad removal
Tab and press down firmly.
Attaching Carpet Gilder
Press the micro-fiber cleaning pad L with main body to
Carpet gilder O by vertical pressure,until it into place.
Place the front of your shoe onto the cleaning pad removal
Tab and press down firmly,carpet gilder will remove form
steam head
Page 5 of 10
Method one::
Open the water tank cup 5 by counterclockwise
rotation,fill 360ML water use Measuring cup,
and then clockwise rotation to close water tank cup 5.
Method two:
Remove the water tank from main body,open the
water tank cup 5 by counterclockwise rotation,fill
the water tank from water faucet.,and then clockwise
rotation to close water tank cup 5.
Install the water tank 7to main body until it clicks into place.
2.Plug in the appliance to a grounded outlet.
3.When switch the appliance on,the indicator lights will turn red at the each side of water tank,it
indicate preheating.If the lights does not illuminate,please check the "troubleshooting" section for
more details.
4.It will takes approximately 25 seconds for preheating.Once the steam mop is ready to use the
water tank will glow blue.
5.When the water tank full fill with water,it can work approximately 20 minutes.If the water tank
7 without water,the indicator lights 12 will glow red,and the lights will flash to point out need to
add water
NOTICE:If power off during preheating or after preheating,then power again,the
appliance will repeat above preheating action.
6.Press the steam button 4 and steam button13,the steam out.
7.Add control volume by turnsteam control knob 8
lockwise,and counterclockwise to reduce,User
can adjust steam volume according different objects
NOTICE:steam volume control by PCB,It will takes 3 seconds adaptation time
when you adjust steam volume .It is normal phenomenon.
8. When normal cleaning,the steam head
has big rotary angle,can clean corners
nd also can clean low space.
USE AS A STEAM CLEANER IN HAND
Push Lock Catch,take the main body A out of holder A,and also take out the power cord.
Install the accessory adaptor at the top of main body A,until it into place.
Press salient point at the accessory adaptor to remove the accessory adaptor from main body
A
Choose the appropriate accessories(check accessories use list),according to arrow indicator to
align and implant to accessory adaptor G,then turn anticlockwise,until it into place.
Page 6 of 10
rotation,fill 360ML water use Measuring cup,
and then clockwise rotation to close water tank cup 5.
Method two:
Remove the water tank from main body,open the
water tank cup 5 by counterclockwise rotation,fill
the water tank from water faucet.,and then clockwise
rotation to close water tank cup 5.
Install the water tank 7to main body until it clicks into place.
2.Plug in the appliance to a grounded outlet.
3.When switch the appliance on,the indicator lights will turn red at the each side of water tank,it
indicate preheating.If the lights does not illuminate,please check the "troubleshooting" section for
more details.
4.It will takes approximately 25 seconds for preheating.Once the steam mop is ready to use the
water tank will glow blue.
5.When the water tank full fill with water,it can work approximately 20 minutes.If the water tank
7 without water,the indicator lights 12 will glow red,and the lights will flash to point out need to
add water
NOTICE:If power off during preheating or after preheating,then power again,the
appliance will repeat above preheating action.
6.Press the steam button 4 and steam button13,the steam out.
7.Add control volume by turn steam control knob 8
clockwise,and counterclockwise to reduce,User
can adjust steam volume according different objects
NOTICE:steam volume control by PCB,It will takes 3 seconds adaptation time
when you adjust steam volume .It is normal phenomenon.
8. When normal cleaning,the steamhead
has big rotary angle,can clean corners
and also can clean low space.
USE AS A STEAM CLEANER IN HAND
Push Lock Catch,take the main body A out of holder A,and also take out the power cord.
Install the accessory adaptor at the top of main body A,until it into place.
Press salient point at the accessory adaptor to remove the accessory adaptor from main body
A
Choose the appropriate accessories(check accessories use list),according to arrow indicator to
align and implant to accessory adaptor G,then turn anticlockwise,until it into place.
Page 6 of 10
OPERATION
1.Filling the watertank
Method one::
Open the water tank cup 5 by counterclockwise
rotation,fill 360ML water use Measuring cup,
andthen clockwise rotation to close water tank cup 5.
Method two:
Remove the water tank from main body,open the
watertank cup 5 by counterclockwise rotation,fill
the water tank from water faucet.,and then clockwise
rotation to close water tank cup 5.
Install the water tank 7to main body until it clicks into place.
2.Plug in the appliance to a grounded outlet.
3.When switch the appliance on,the indicator lights will turn red at the each side of water tank,it
indicate preheating.If the lights does not illuminate,please check the "troubleshooting" section for
more details.
4.It will takes approximately 25 seconds for preheating.Once the steam mop is ready to use the
water tank will glow blue.
5.When the water tank full fill with water,it can work approximately 20 minutes.If the water tank
7 without water,the indicator lights 12 will glow red,and the lights will flash to point out need to
add water
NOTICE:If power off during preheating or after preheating,then power again,the
appliance will repeat above preheating action.
6.Press the steam button 4 and steam button13,the steam out.
7.Add control volume by turn steam control knob 8
clockwise,and counterclockwise to reduce,User
can adjust steamvolume according different objects
NOTICE:steam volume control by PCB,It will takes 3 seconds adaptation time
when you adjust steam volume .It is normal phenomenon.
8. When normal cleaning,the steam head
has big rotary angle,can clean corners
and also can clean low space.
USE AS A STEAM CLEANER IN HAND
Push Lock Catch,take the main body A out of holder A,and also take out the power cord.
Install the accessory adaptor at the top of main body A,until it into place.
Press salient point at the accessory adaptor to remove the accessory adaptor from main body
A
Choose the appropriate accessories(check accessories use list),according to arrow indicator to
align and implant to accessory adaptor G,then turn anticlockwise,until it into place.
Page 6 of 10
Method one::
Open the water tank cup 5 by counterclockwise
rotation,fill 360ML water use Measuring cup,
and then clockwise rotation to close water tank cup 5.
Method two:
Remove the water tank from main body,open the
water tank cup 5 by counterclockwise rotation,fill
the water tank from water faucet.,and then clockwise
rotation to close water tank cup 5.
Install the water tank 7to main body until it clicks into place.
2.Plug in the appliance to a grounded outlet.
3.When switch the appliance on,the indicator lights will turn red at the each side of water tank,it
indicate preheating.If the lights does not illuminate,please check the "troubleshooting" section for
more details.
4.It will takes approximately 25 seconds for preheating.Once the steam mop is ready to use the
water tank will glow blue.
5.When the water tank full fill with water,it can work approximately 20 minutes.If the water tank
7 without water,the indicator lights 12 will glow red,and the lights will flash to point out need to
add water
NOTICE:If power off during preheating or after preheating,then power again,the
appliance will repeat above preheating action.
6.Press the steam button 4 and steam button13,the steam out.
7.Add control volume by turnsteam control knob 8
lockwise,and counterclockwise to reduce,User
can adjust steam volume according different objects
NOTICE:steam volume control by PCB,It will takes 3 seconds adaptation time
when you adjust steam volume .It is normal phenomenon.
8. When normal cleaning,the steam head
has big rotary angle,can clean corners
nd also can clean low space.
USE AS A STEAM CLEANER IN HAND
Push Lock Catch,take the main body A out of holder A,and also take out the power cord.
Install the accessory adaptor at the top of main body A,until it into place.
Press salient point at the accessory adaptor to remove the accessory adaptor from main body
A
Choose the appropriate accessories(check accessories use list),according to arrow indicator to
align and implant to accessory adaptor G,then turn anticlockwise,until it into place.
Page 6 of 10
rotation,fill 360ML water use Measuring cup,
and then clockwise rotation to close water tank cup 5.
Method two:
Remove the water tank from main body,open the
water tank cup 5 by counterclockwise rotation,fill
the water tank from water faucet.,and then clockwise
rotation to close water tank cup 5.
Install the water tank 7to main body until it clicks into place.
2.Plug in the appliance to a grounded outlet.
3.When switch the appliance on,the indicator lights will turn red at the each side of water tank,it
indicate preheating.If the lights does not illuminate,please check the "troubleshooting" section for
more details.
4.It will takes approximately 25 seconds for preheating.Once the steam mop is ready to use the
water tank will glow blue.
5.When the water tank full fill with water,it can work approximately 20 minutes.If the water tank
7 without water,the indicator lights 12 will glow red,and the lights will flash to point out need to
add water
NOTICE:If power off during preheating or after preheating,then power again,the
appliance will repeat above preheating action.
6.Press the steam button 4 and steam button13,the steam out.
7.Add control volume by turn steam control knob 8
clockwise,and counterclockwise to reduce,User
can adjust steam volume according different objects
NOTICE:steam volume control by PCB,It will takes 3 seconds adaptation time
when you adjust steam volume .It is normal phenomenon.
8. When normal cleaning,the steamhead
has big rotary angle,can clean corners
and also can clean low space.
USE AS A STEAM CLEANER IN HAND
Push Lock Catch,take the main body A out of holder A,and also take out the power cord.
Install the accessory adaptor at the top of main body A,until it into place.
Press salient point at the accessory adaptor to remove the accessory adaptor from main body
A
Choose the appropriate accessories(check accessories use list),according to arrow indicator to
align and implant to accessory adaptor G,then turn anticlockwise,until it into place.
Page 6 of 10
OPERATION
1.Filling the watertank
Method one::
Open the water tank cup 5 by counterclockwise
rotation,fill 360ML water use Measuring cup,
andthen clockwise rotation to close water tank cup 5.
Method two:
Remove the water tank from main body,open the
watertank cup 5 by counterclockwise rotation,fill
the water tank from water faucet.,and then clockwise
rotation to close water tank cup 5.
Install the water tank 7to main body until it clicks into place.
2.Plug in the appliance to a grounded outlet.
3.When switch the appliance on,the indicator lights will turn red at the each side of water tank,it
indicate preheating.If the lights does not illuminate,please check the "troubleshooting" section for
more details.
4.It will takes approximately 25 seconds for preheating.Once the steam mop is ready to use the
water tank will glow blue.
5.When the water tank full fill with water,it can work approximately 20 minutes.If the water tank
7 without water,the indicator lights 12 will glow red,and the lights will flash to point out need to
add water
NOTICE:If power off during preheating or after preheating,then power again,the
appliance will repeat above preheating action.
6.Press the steam button 4 and steam button13,the steam out.
7.Add control volume by turn steam control knob 8
clockwise,and counterclockwise to reduce,User
can adjust steamvolume according different objects
NOTICE:steam volume control by PCB,It will takes 3 seconds adaptation time
when you adjust steam volume .It is normal phenomenon.
8. When normal cleaning,the steam head
has big rotary angle,can clean corners
and also can clean low space.
USE AS A STEAM CLEANER IN HAND
Push Lock Catch,take the main body A out of holder A,and also take out the power cord.
Install the accessory adaptor at the top of main body A,until it into place.
Press salient point at the accessory adaptor to remove the accessory adaptor from main body
A
Choose the appropriate accessories(check accessories use list),according to arrow indicator to
align and implant to accessory adaptor G,then turn anticlockwise,until it into place.
Page 6 of 10
6. Druk op de stoomknop [4] op het handvat en houd deze ingedrukt om stoom te laten ontsnappen.
Dit duurt een paar seconden. Voor de volledige reinigingskracht, stoom de droge antivirale doek [K]
gedurende ongeveer 30 seconden. Druk tijdens het reinigen slechts met tussenpozen op de stoomknop [4]
om te voorkomen dat de antivirale mop te nat wordt.
6. Maak de vloer schoon.
7. Druk nogmaals op de aan/uit-knop [9] om de stoomklopper uit te schakelen.
De aanpassingstijd voor het instellen van de stoom is ongeveer drie seconden. Bij het reinigen moet de stoomvoet niet lang
op dezelfde plaats staan en altijd in beweging zijn. Zo vermijd je overbevochtiging.
Als er tijdens het reinigingsproces onverwacht water of stoom uit onbedoelde plaatsen ontsnapt, dient u de werking onmid-
dellijk te stoppen en de stekker uit het stopcontact te trekken. Neem contact op met de klantenservice!
Method one::
Open the water tank cup 5 by counterclockwise
rotation,fill 360ML water use Measuring cup,
and then clockwise rotation to close water tank cup 5.
Method two:
Remove the water tank from main body,open the
water tank cup 5 by counterclockwise rotation,fill
the water tank from water faucet.,and then clockwise
rotation to close water tank cup 5.
Install the water tank 7to main body until it clicks into place.
2.Plug in the appliance to a grounded outlet.
3.When switch the appliance on,the indicator lights will turn red at the each side of water tank,it
indicate preheating.If the lights does not illuminate,please check the "troubleshooting" section for
more details.
4.It will takes approximately 25 seconds for preheating.Once the steam mop is ready to use the
water tank will glow blue.
5.When the water tank full fill with water,it can work approximately 20 minutes.If the water tank
7 without water,the indicator lights 12 will glow red,and the lights will flash to point out need to
add water
NOTICE:If power off during preheating or after preheating,then power again,the
appliance will repeat above preheating action.
6.Press the steam button 4 and steam button13,the steam out.
7.Add control volume by turnsteam control knob 8
lockwise,and counterclockwise to reduce,User
can adjust steam volume according different objects
NOTICE:steam volume control by PCB,It will takes 3 seconds adaptation time
when you adjust steam volume .It is normal phenomenon.
8. When normal cleaning,the steam head
has big rotary angle,can clean corners
nd also can clean low space.
USE AS A STEAM CLEANER IN HAND
Push Lock Catch,take the main body A out of holder A,and also take out the power cord.
Install the accessory adaptor at the top of main body A,until it into place.
Press salient point at the accessory adaptor to remove the accessory adaptor from main body
A
Choose the appropriate accessories(check accessories use list),according to arrow indicator to
align and implant to accessory adaptor G,then turn anticlockwise,until it into place.
Page 6 of 10
rotation,fill 360ML water use Measuring cup,
and then clockwise rotation to close water tank cup 5.
Method two:
Remove the water tank from main body,open the
water tank cup 5 by counterclockwise rotation,fill
the water tank from water faucet.,and then clockwise
rotation to close water tank cup 5.
Install the water tank 7to main body until it clicks into place.
2.Plug in the appliance to a grounded outlet.
3.When switch the appliance on,the indicator lights will turn red at the each side of water tank,it
indicate preheating.If the lights does not illuminate,please check the "troubleshooting" section for
more details.
4.It will takes approximately 25 seconds for preheating.Once the steam mop is ready to use the
water tank will glow blue.
5.When the water tank full fill with water,it can work approximately 20 minutes.If the water tank
7 without water,the indicator lights 12 will glow red,and the lights will flash to point out need to
add water
NOTICE:If power off during preheating or after preheating,then power again,the
appliance will repeat above preheating action.
6.Press the steam button 4 and steam button13,the steam out.
7.Add control volume by turn steam control knob 8
clockwise,and counterclockwise to reduce,User
can adjust steam volume according different objects
NOTICE:steam volume control by PCB,It will takes 3 seconds adaptation time
when you adjust steam volume .It is normal phenomenon.
8. When normal cleaning,the steamhead
has big rotary angle,can clean corners
and also can clean low space.
USE AS A STEAM CLEANER IN HAND
Push Lock Catch,take the main body A out of holder A,and also take out the power cord.
Install the accessory adaptor at the top of main body A,until it into place.
Press salient point at the accessory adaptor to remove the accessory adaptor from main body
A
Choose the appropriate accessories(check accessories use list),according to arrow indicator to
align and implant to accessory adaptor G,then turn anticlockwise,until it into place.
Page 6 of 10
OPERATION
1.Filling the watertank
Method one::
Open the water tank cup 5 by counterclockwise
rotation,fill 360ML water use Measuring cup,
andthen clockwise rotation to close water tank cup 5.
Method two:
Remove the water tank from main body,open the
watertank cup 5 by counterclockwise rotation,fill
the water tank from water faucet.,and then clockwise
rotation to close water tank cup 5.
Install the water tank 7to main body until it clicks into place.
2.Plug in the appliance to a grounded outlet.
3.When switch the appliance on,the indicator lights will turn red at the each side of water tank,it
indicate preheating.If the lights does not illuminate,please check the "troubleshooting" section for
more details.
4.It will takes approximately 25 seconds for preheating.Once the steam mop is ready to use the
water tank will glow blue.
5.When the water tank full fill with water,it can work approximately 20 minutes.If the water tank
7 without water,the indicator lights 12 will glow red,and the lights will flash to point out need to
add water
NOTICE:If power off during preheating or after preheating,then power again,the
appliance will repeat above preheating action.
6.Press the steam button 4 and steam button13,the steam out.
7.Add control volume by turn steam control knob 8
clockwise,and counterclockwise to reduce,User
can adjust steamvolume according different objects
NOTICE:steam volume control by PCB,It will takes 3 seconds adaptation time
when you adjust steam volume .It is normal phenomenon.
8. When normal cleaning,the steam head
has big rotary angle,can clean corners
and also can clean low space.
USE AS A STEAM CLEANER IN HAND
Push Lock Catch,take the main body A out of holder A,and also take out the power cord.
Install the accessory adaptor at the top of main body A,until it into place.
Press salient point at the accessory adaptor to remove the accessory adaptor from main body
A
Choose the appropriate accessories(check accessories use list),according to arrow indicator to
align and implant to accessory adaptor G,then turn anticlockwise,until it into place.
Page 6 of 10
Veranderen van de accessoires
De Clever Clean ViralO® Steam Broom kan ook gebruikt worden als manuele stoomreiniger en wordt geleverd met een
breed scala aan accessoires. Zo kunt u zelfs moeilijk bereikbare plaatsen en voorwerpen reinigen waarvoor de stoomvoet niet
geschikt is.
1. Druk op de vergrendelknop [6] om de hoofdeenheid [A] van de houder [B] te ontgrendelen. De stoombezem kan nu
worden gebruikt als een praktische handstoombezem.
2. Duw de adapter voor accessoires [F] op het apparaat totdat deze vastklikt.
3. Plaats het gewenste accessoire op de adapter [F] en draai deze vast door deze met de klok mee te draaien.
4. Om het accessoire na het reinigingsproces te verwijderen, draait u het accessoire losjes tegen de klok in en trekt u het van
de adapter [F].
5. Druk op de veiligheidsknop van de adapter [F] op de achterkant van het apparaat als u de adapter [F] wilt verwijderen.
6. De hoofdeenheid [A] kan nu weer in de houder [B] worden geplaatst.
Kijk uit! De bodem van het hoofdtoestel [A] wordt tijdens het gebruik heet! Er is gevaar voor brandwonden.
Laat het hoofdtoestel [A] afkoelen voordat u het aanraakt.

Nederlands
Nederlands
34 35
Artikelnummer: 2608
REINIGING EN OPSLAG
• Reinig de stoombezem en accessoires regelmatig om een optimale werking te garanderen.
• Houd het apparaat of de stekker nooit onder water, want dan kan er vloeistof binnendringen en de stoombezem beschadigen.
• Raak de stekker nooit met natte handen aan.
• Gebruik geen bijtende of schurende reinigingsmiddelen om het apparaat te reinigen. Deze kunnen het apparaat beschadigen.
• Zet de stoombezem nooit in de vaatwasser.
• Laat het apparaat volledig afkoelen, verwijder het resterende water uit het waterreservoir alvorens het te reinigen of op te
slaan.
• Bewaar het apparaat en de accessoires buiten het bereik van kinderen en dieren op een droge, vorstvrije plaats die beschermd
is tegen zonlicht.
1. Verwijder voor het reinigen de stekker uit het stopcontact en laat de stoombezem voldoende af- koelen.
2. Veeg het apparaat af met een vochtige doek en een mild reinigingsmiddel.
3. Laat het apparaat volledig drogen voordat u het opbergt.
4. Wikkel de stroomkabel op met behulp van de stroomkabelhouders [3].
HET OPLOSSEN VAN PROBLEMEN
Fout Mogelijke oorzaken Problemen oplossen
Geen stoom
Het apparaat heeft meer tijd nodig
om op te warmen
Wacht ongeveer 30 seconden tot het apparaat is
opgewarmd.
Stoomregelaar verkeerd ingesteld Stel de stoomregelaar in op het juiste bereik
Geen of te weinig water in de tank Gelieve water in te vullen
Lekkend water
Het waterpeil is te hoog Giet het overtollige water uit
De hitte is niet hoog genoeg
N‘appuyez pas sur le bouton vapeur avant que là Le
témoin lumineux passe au bleu
Weinig stoom
De stoomregelaar is te laag inge-
steld Zet de stoomregelaar hoger
De watertank is leeg of er zit te wei-
nig wa- ter in de watertank
Controleer de vulhoeveelheid in het wa- terreservoir en
vul indien nodig water bij.
Apparaat schakelt niet in
Het apparaat is niet of niet goed
aangeslo- ten op het stopcontact.
Controleer of de netstekker correct is geplaatst. / Contro-
leer de zekering.
Het stopcontact is defect Probeer een ander stopcontact
TECHNISCHE SPECIFICATIES
Artikelnummer: JJ-SC-002 / 2708
Bedrijfsspanning: 220 - 240V~, 50Hz / 60Hz
Power: 1500W
IP Mate van bescherming: PX4
Beschermingsklasse: Klasse 1
Inhoud van de watertank: 375ml
Stoomtemperatuur: ca. 100°C
DISPOSAL
Verpakkingsmateriaal op een milieuvriendelijke manier afvoeren en naar de recyclage- inzameling brengen
Dit apparaat valt onder de Europese richtlijn 2012/19/EU voor afgedankte elektrische en elekt- ronische apparatuur
(AEEA). Voer dit apparaat niet af als normaal huishoudelijk afval, maar op een milieuvriendelijke manier via een
ocieel erkend afvalverwerkingsbedrijf.

Polska
Polska
36 37
Numer pozycji: 2608
INSTRUKCJA OBSŁUGI
Clever Clean ViralO® miotła parowa
Numer pozycji: 2608
Drogi klientu,
Cieszymy się, że wybrali Państwo Clever Clean ViralO® miotłę parową. Przed pierwszym użyciem urządzenia należy dokładnie
przeczytać instrukcję i przechowywać ją w bezpiecznym miejscu. Przy przekazywaniu urządzenia należy również przekazać
niniejszą instrukcję. Producent i importer nie ponoszą żadnej odpowiedzialności w przypadku nieprzestrzegania informacji
zawartych w niniejszej instrukcji! W związku z ciągłym rozwojem, zastrzegamy sobie prawo do zmiany produktu, opakowania lub
dokumentów towarzyszących w dowolnym momencie.
W razie jakichkolwiek pytań prosimy o kontakt z działem obsługi klienta za pośrednictwem naszego adresu e-mail:
JAK DZIAŁA VIRALOFF®
ViralO® jest na stałe nakładany na mopa miotły parowej. Jest to ochrona dla samego produktu. Składnik aktywny jest biocydem
chlorku srebra. Na materiale, ViralO® zatrzymuje aktywność wi- rusową poprzez interakcję z kluczowymi białkami.
Na tym obrabianym materiale w ciągu dwóch godzin można wykazać redukcję o 99% różnych badanych czwórek.
Potwierdzone badaniem: ISO18184:2019 (SARS-CoV-2, H3N2, H1N1) Jeśli to możliwe,
nie myć dla uzyskania maksymalnego efektu.
MEANING OF THE SYMBOLS
OSTRZEŻENIE! Ogólne wskazówki bezpieczeństwa są oznaczone tym symbolem.
W przypadku nieprzestrzegania instrukcji bezpieczeństwa istnieje ryzyko odniesienia obrażeń ciała.
NIEBEZPIECZEŃSTWO! Ten symbol oznacza sytuacje zagrożenia życia spowodowane przez prąd elektryczny.
Istnieje ryzyko poważnych obrażeń lub śmierci.
OSTRZEŻENIE! Ten symbol ostrzega przed oparzeniami od gorących powierzchni.
Urządze- nie posiada powierzchnie, które mogą być gorące podczas pracy, a nawet po jej zakończeniu.
OSTRZEŻENIE! Ten symbol ostrzega przed poparzeniem gorącą parą.
UWAGA! Podkreśla użyteczne wskazówki dotyczące bezproblemowej i wygodnej obsługi.
UWAGA! Podkreśla użyteczne wskazówki dotyczące bezproblemowej i wygodnej obsługi.
ZAKRES DOSTAWY I PRZEGLĄD URZĄDZEŃ
A Jednostka główna ze zbiornikiem na wodę
B Urządzenie przytrzymujące
C Ściągacz okien
D mała ssawka E duża ssawka
F Adapter do akcesoriów
G Ssawka kątowa
H Szczotka stawowa
I Zgarniacz
J Kubek pomiarowy
K Pokrowiec na wycieraczki antywirusowe
L Małe pokrowce na wycieraczki (2x)
M Steam foot
N Szybowce dywanowe
1 przycisk blokujący dla przegubu przegubowego
2 klamka
3 Uchwyt na kabel zasilający
4 Pokrętło parowe
5 Przegub z przyciskiem odblokowującym
6 Przycisk blokady jednostki głównej
7 Przycisk pary
8 Przewód zasilający
9 Przycisk włączania/wyłączania
10 Lampy
11 Przepływ wody
12 Regulator pary
13 Pokrywa zbiornika wody
14 Przycisk blokady zbiorni ka wody
15 Zbiornik wody
Akcesoria Wniosek o
Ściągacz okien Okna, szklane drzwi, szklane kabiny prysznicowe, lustra,
płytki.
Mała dysza
Duża dysza
czyszczenie i szorowanie powierzchni takich jak
płytki, felgi, wanny i wiele innych
Dysza kątowa trudno dostępne zakątki.
A
BC ED F
GHI J
KL
M
N
A
BC ED F
GHI J
KL
M
N
A
BC ED F
GHI J
KL
M
N
A
BC ED F
GHI J
KL
M
N
12
10
9
11
13
14
15 8
3
6
7
4
3
2
5
1
A
BC ED F
GHI J
KL
M
N

Polska
Polska
38 39
Numer pozycji: 2608
WŁAŚCIWE ZASTOSOWANIE
• Urządzenie to nadaje się tylko do higienicznego czyszczenia powierzchni, które są odporne na wilgoć i ciepło.
• Nie należy używać środka do czyszczenia parą na nieprzetworzonych drewnianych podłogach, drewnianych meblach, mięk-
kim plastiku lub skórze. Materiałów wrażliwych, takich jak aksamit i tkaniny syntetyczne, nie wolno czyścić za pomocą miotły
parowej.
• Jeśli nie jesteś pewien, skonsultuj się ze specjalistą, aby dowiedzieć się, czy Twoje powierzchnie nadają się do czyszczenia
szczotką parową. Zalecamy przetestować miotłę parową w niepozornym miejscu.
• Urządzenie nie jest przeznaczone do użytku zewnętrznego.
• Urządzenie należy używać wyłącznie w sposób opisany w niniejszej instrukcji.
• Używaj tylko oryginalnych akcesoriów.
• Urządzenie jest przeznaczone wyłącznie do użytku osobistego, a nie do zastosowań komercyjnych.
• Wszystkie rodzaje uszkodzeń urządzenia mogą być naprawiane wyłącznie przez autoryzowanych dealerów.
• Wyłączone z gwarancji są wszystkie wady spowodowane nieprawidłową obsługą,
uszkodzeniem lub próbą naprawy. Odnosi się to również do normalnego zużycia.
Akcesoria Wniosek o
Szczotka do spoinowania wszystkie rodzaje stawów.
Scraper uporczywe plamy.
małe mopy
(do wycieraczek
okiennych)
Okna, szklane drzwi, szklane kabiny prysznicowe, lustra,
płytki.
Mop antywirusowy
ogólne czyszczenie twardych podłóg i dywanów (Stopa pa-
rowa ma duży kąt obrotu i dlatego nadaje się do czyszczenia
narożników i obs- zarów o ograniczonej przestrzeni
A
BC ED F
GHI J
KL
M
N
A
BC ED F
GHI J
KL
M
N
A
BC ED F
GHI J
KL
M
N
A
BC ED F
GHI J
KL
M
N
INSTRUKCJE BEZPIECZEŃSTWA
Przeczytaj uważnie instrukcję bezpieczeństwa. Niewłaściwe użycie miotły parowej
może prowadzić do poważnych oparzeń lub porażenia prądem elektrycznym!
Ogólna instrukcja bezpieczeństwa
• Ostrożnie wyjmij miotłę parową i akcesoria z opakowania i sprawdź urządzenie pod kątem kompletności i uszkodzeń.
• Materiały opakowaniowe należy przechowywać z dala od dzieci i zwierząt domowych. Istnieje
niebezpieczeństwo uduszenia się!
• Przed uruchomieniem należy zawsze sprawdzić urządzenie pod kątem uszkodzeń. W przypadku widocznych uszkodzeń
urządzenia, nie wolno go używać.
• Urządzenia należy używać tylko wtedy, gdy jest ono w pełni zmontowane.
• Nie należy używać urządzenia, jeśli uległo ono awarii, upadło lub zostało wrzucone do wody.
• Wyrób ten może być używany przez osoby o ograniczonej wiedzy na temat jego działania lub upośledzenia czucia, pod warun-
kiem, że są one nadzorowane i przeszkolone w zakresie bezpiecznego użytkowania wyrobu i mają świadomość związanych z
tym zagrożeń.
• Upewnij się, że dzieci nie bawią się urządzeniem.
• Nie wolno używać miotły parowej bez wody.
• Nie należy przekraczać podanej ilości napełnienia zbiornika wody.
• Napełniaj tylko wodę do zbiornika na wodę. Nigdy nie używać środków czyszczących ani rozpuszczalników.
• Nie należy wyjmować zbiornika na wodę podczas pracy urządzenia.
• Podeszwa stopy parowej staje się gorąca podczas pracy! Urządzenie należy trzymać z dala od łatwopalnych przedmiotów.
Miotłę parową należy dotykać tylko za jej uchwyty.
• Para osiąga wysokie temperatury, co może prowadzić do poparzeń. Używać tylko z dużą
ostrożnością.
• Przed wymianą lub usunięciem akcesoriów należy pozostawić miotłę parową do dostatecznego ostygnięcia.
• Nie należy używać urządzenia, jeśli w powietrzu znajdują się gazy palne.
• Należy zachować odpowiednią odległość od źródeł ciepła, takich jak płyty grzewcze lub piekarniki.
• Zawsze wyłączaj urządzenie przed wyciągnięciem wtyczki sieciowej.
• Nie należy wyciągać wtyczki z gniazdka za kabel zasilający.
Zagrożenie uderzeniowe
• Nigdy nie pozostawiaj miotły parowej bez nadzoru, gdy jest podłączona do sieci elektrycznej.
• Nigdy nie należy dotykać urządzenia, przewodu zasilającego ani wtyczki mokrymi rękoma.
• Nie wolno wkładać do urządzenia metalowych przedmiotów, aby uniknąć porażenia prądem.
• Nie wolno zanurzać samego urządzenia, kabla zasilającego ani podłączać go do wody.
• Nigdy nie sięgaj po urządzenie elektryczne, jeśli wpadło ono do wody. Natychmiast odłączyć urządzenie od zasilania.
• Przed napełnieniem zbiornika wody należy zawsze odłączyć wtyczkę od gniazda.
• Nigdy nie należy kierować pary wodnej na urządzenia z elementami elektrycznymi. (np. telewizory, radia, lampy itp.)
• Nigdy nie czyścić gniazdek podłogowych.
Table of contents


