Vitek VT-8190 User manual

1
VT-8190
3
8
13
18
23
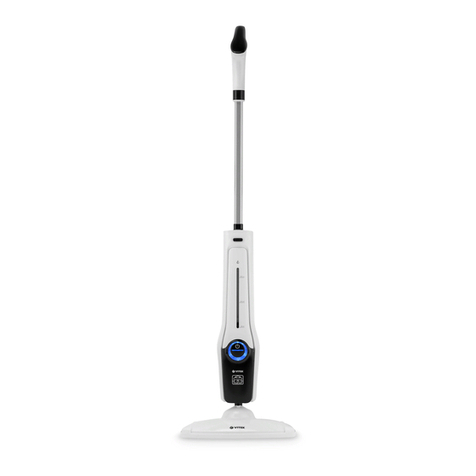
Steam Mop
Паровая швабра
VT-8190.indd 1 9/21/20 4:30 PM
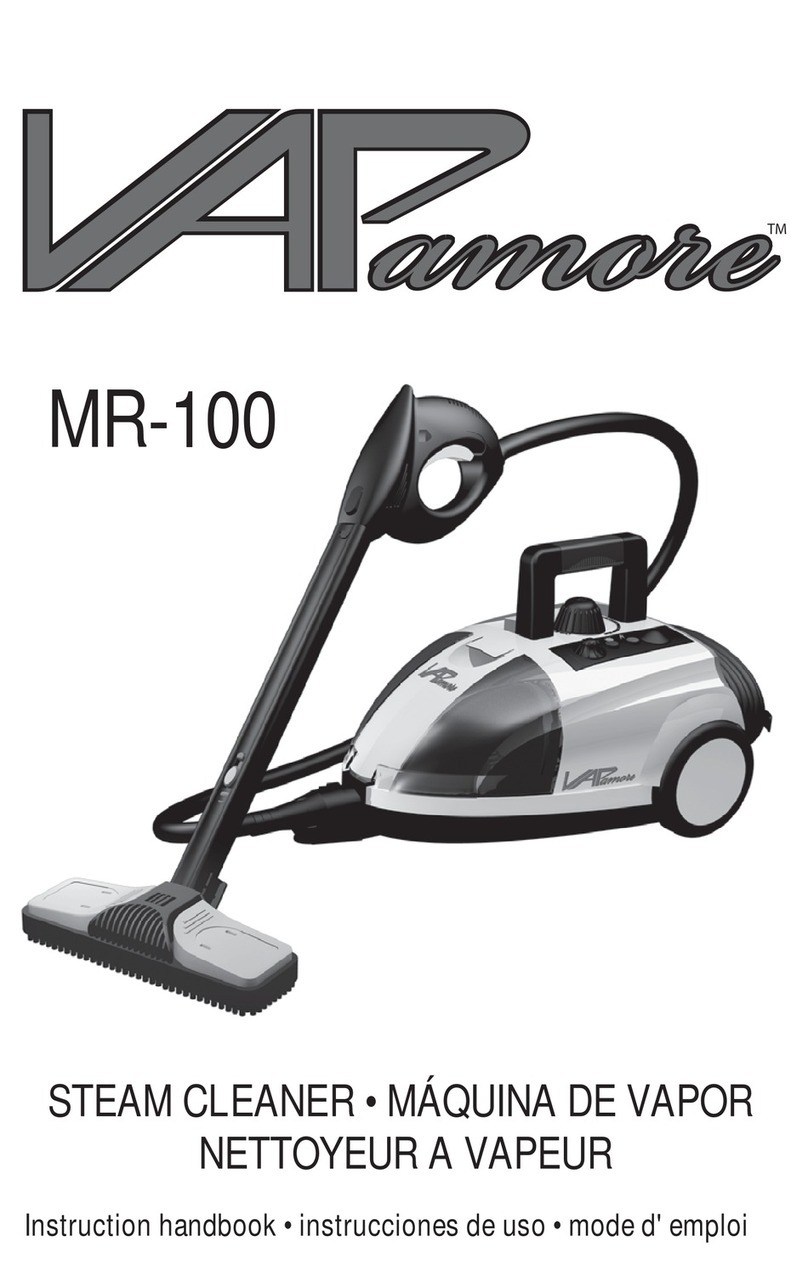
Рис.1
Рис.3
Рис.4
Рис.5
Рис.2
7
8
10
11
12
13
20
21
14
15
16
22
23
24
17
18
19
9
1
2
3
4
5
6
VT-8190.indd 2 9/21/20 4:30 PM

3
ENGLISH
STEAM MOP VT-8190
The steam mop is intended for washing and disinfecting
floors and carpets.
DESCRIPTION
1. Floor brush
2. Floor brush release button
3. Body
4. Power cord
5. Filter
6. Water tank lid
7. Water tank
8. Water tank release button
9. Extension pipe
10. Upper hook for cord winding
11. Handle
12. Control panel
13. Handle clamp button
14. Lower hook for cord winding
15. Extension pipe release button
16. Indication panel
17. Frame for carpets
18. Microfiber cloth
19. Measuring cup
20. Steam release control button ( )
21. On/off button ( )
22. Power on/ready indicator
23. Low steam supply indicator
24. High steam supply indicator
WARNING: High temperature. Danger of burns!
If indicated on the product, do not touch it, as
the parts may be extremely hot.
WARNING: STEAM!
Danger of burns!
The unit reaches very high temperatures.
Improper use of the unit can result in burns.
SAFETY MEASURES
Before using the unit, read this instruction manual carefully
and keep it for future reference.
Use the unit for intended purposes only, as specified in this
manual. Mishandling the unit can lead to its breakage and
cause harm to the user or damage to his/her property. The
use of any accessories or attachments or performance of
any operation other than recommended in this manual can
pose risk of injury.
•
Make sure that the operating voltage of the unit indicated
on the label corresponds to your home mains voltage.
•
The power plug has a grounding contact, connect it to
the socket with reliable grounding contact.
•
Unwind the power cord completely before connect-
ing the unit to the mains and before use. Always use
the product with the power cord completely unwound.
•
To avoid fire, do not use adapters for connecting the
unit to the mains.
•
Do not touch the unit body, the power cord and the
power plug with wet hands.
•
Switch the unit off and unplug it when the water tank
becomes empty.
•
Never leave the unit connected to the mains unat-
tended.
•
Do not use the unit near heating appliances, heat
sources or open flame.
•
Do not expose to rain.
•
Do not use the unit in proximity to the kitchen sink, in
bathrooms, near swimming pools or other containers
filled with water.
•
If the unit is dropped into water, unplug it immediately,
and only then you can take the unit out of water. Apply
to the authorized service center for testing or repair-
ing the unit.
•
Do not use the unit in places where aerosols are used
or sprayed, in proximity to inflammable liquids and in
places where such liquids are stored and where there
is the danger of explosions or in the presence of toxic
substances.
•
Do not fill the tank with toxic substances, acids, sol-
vents, alcohol or descaling detergents, corrosive sub-
stances and/or explosives or perfume additives, as this
can damage the mop or render it unsafe to use.
•
Do not direct the steam to electric appliances or elec-
tric sockets.
•
Do not direct the steam jet towards toxic substances,
acids, solvents, detergents or corrosive substances.
Hazardous substances must be handled and disposed
of in accordance with the instructions of the manufac-
turers of these substances.
•
Do not direct the steam jet towards explosive pow-
ders or liquids, hydrocarbons, open flames, or very
hot objects.
•
Use the carrying handle. Do not pull on the power cord.
Do not use the power cord as a handle. Do not lift the
unit by the power cord. Do not run the power cord over
sharp corners and heated surfaces.
•
Do not place the unit near heat sources such as fire-
places, stoves and ovens.
•
Do not install the unit near electromagnetic fields such
as induction hobs.
•
Wind the power cord back onto the winding hooks when
you do not intend to use the unit.
•
When cleaning stairs, place the unit on the steps below
the user’s level.
•
Do not direct the steam jet at any part of the body of
people or animals.
•
Do not use the mop to clean leather, wax-polished fur-
niture or floors, synthetic fabrics, velvet or other fine
materials sensitive to steam.
•
Do not use on any unsealed hard floor surfaces. Further,
the shine can be removed from the surfaces treated with
wax or on some non-wax floors by heat and steam. It is
always recommended to check the isolated area of the
VT-8190.indd 3 9/21/20 4:30 PM

4
ENGLISH
floor, the surface that needs to be cleaned, before pro-
ceeding. We also recommend reading the instructions
for use and care from the floor manufacturer.
•
Place the unit vertically on an even, dry, moisture- and
heat-resistant surface, do not place it horizontally and
do not turn it over during the operation.
•
Use only the attachments supplied.
•
Before using the unit, make sure that the steam head is
set and fixed properly.
•
It is recommended to fill the water tank with tap water
which was additionally cleaned with domestic filters.
Do not use carbonated water or any perfume additives.
•
The unit generates very hot steam for disinfection of the
operating area. It means that the floor brush and the
cloth become very hot during the operation.
Caution: always wear suitable footwear when using the
steam mop and when changing accessories on the steam
mop. Do not wear slippers or open toe shoes.
•
The unit body can heat up strongly during the opera-
tion. Do not touch hot surfaces with your hands. Be
careful! Possible danger of burns!
•
Avoid getting burns by hot steam.
•
Unplug the unit after usage or before cleaning.
•
When unplugging the unit hold the power plug and
remove it from the mains socket, do not pull the power
cord – this can lead to its damage and cause short cir-
cuit.
•
The unit is not intended for usage by children.
•
Do not leave children unattended to avoid them using
the unit as a toy.
•
Do not allow children to touch the operating surface,
unit body, power cord or power plug during operation
of the unit.
•
Be especially careful if children or disabled persons are
near the operating unit.
•
During the unit operation and breaks between opera-
tion cycles, place the unit out of reach of children.
•
The unit is not intended to be used by people with phys-
ical, sensory or mental disabilities (including children)
or by persons lacking experience or knowledge if they
are not under supervision of a person who is respon-
sible for their safety or if they are not instructed by this
person on the usage of the unit.
•
For child safety reasons do not leave polyethylene bags
used as packaging unattended.
Attention! Do not allow children to play with polyethylene
bags or packaging film. Danger of suffocation!
•
From time to time check the power cord integrity.
•
If the power cord is damaged, it should be replaced
by the manufacturer, a maintenance service or similar
qualified personnel to avoid danger.
•
Do not use the unit if the power cord or the power plug
is damaged, if the unit works improperly and after it
was dropped.
•
Do not repair the unit by yourself. Do not disassemble the
unit by yourself, if any malfunction is detected or after it
was dropped, unplug the unit and apply to any authorized
service center at the contact addresses given in the war-
ranty certificate and on the website www.vitek.ru.
•
To avoid damages, transport the unit in the original
package only.
•
Keep the unit in a dry cool place out of reach of children
and disabled persons.
THIS UNIT IS INTENDED FOR HOUSEHOLD USE ONLY.
ITS COMMERCIAL USE AND USE IN PRODUCTION AND
WORKING AREAS ARE PROHIBITED.
BEFORE THE FIRST USE
After unit transportation or storage at low temperature
keep it for at least three hours at room temperature.
•
Unpack the unit and remove any packaging materials
and advertising stickers.
•
Keep the original package.
•
Read the safety measures and operating recommen-
dations.
•
Check the delivery set.
•
Examine the unit for damages; if the unit is damaged,
do not plug it into the mains.
•
Make sure that the indicated specifications of the
power supply voltage of the unit correspond to the
specifications of your mains.
•
To remove dust clean the unit with a slightly damp cloth,
and then wipe it dry.
ASSEMBLING THE STEAM MOP
Note: Each steam mop passes 100% testing at the factory
to guarantee the working ability and safety of the product.
When assembling a new steam mop for the first time you
can find some water remaining inside the unit. This is not
a defect.
•
Remove the unit from the packaging making sure the
product is not damaged and that all parts are included
in the package.
•
Insert the handle (11) into the extension pipe (9) until
clicking, having preliminary pressed the clamp button
(13) (pic. 1).
•
To detach the handle (11) press the clamp button (13)
and pull the handle out of the extension pipe (9).
•
Insert the extension pipe (9) into the upper part of the
steam mop body (3) until clicking (pic. 1).
•
To detach the extension pipe (9) press the release but-
ton (15) and pull the handle out of the unit body.
•
Insert the body with the extension pipe and the handle
into the floor brush (1) so the floor brush release button
(2) goes into the opening in the unit body (3) (pic. 2).
•
To detach the unit body from the brush, slightly press
the brush down to the floor with your foot, press the
release button (2) and pull the unit body upwards.
•
Due to the special design of the hinge, the floor brush
(1) has a large rotation angle, so it can clean corners as
well as low space under furniture (pic. 5).
VT-8190.indd 4 9/21/20 4:30 PM
5
ENGLISH
CONTROL PANEL AND INDICATION
The control panel (12) is situated in the front part of the
handle (11) and has two control buttons:
Button (20) - steam supply control button.
Button (21) - switch on/off button.
Consequently press the button (20) to increase or re-
duce the steam supply to the floor brush (1).
The indication panel (16) has three operating mode LED
indicators (22, 23, 24); it is situated in the upper front part
of the unit body (3).
The top LED indicator (22) indicates whether the unit is
switched on and ready for operation. When you press the
on/off button (21) the top LED indicator (22) lights up
red which means the preheating is on. The preheating of
the steam mop takes about 25 seconds. When the steam
mop is ready for operation, the LED indicator (22) light
color will change to blue.
The middle LED indicator (23) shows the low steam
supply mode and starts glowing blue right after the unit is
switched on with the button (21) .
The bottom LED indicator (24) shows the high steam
supply mode and starts glowing blue after you press the
steam supply control button (20) .
In the high steam supply mode both LED indicators (23,
24) glow.
USING THE STEAM MOP
Attention! Avoid dropping of the steam mop on the floor.
Hitting the floor can damage the inner parts of the appli-
ance and crack the mop handle.
Be sure to completely unwind the power cord before using
the unit.
The upper power cord winding hook (10) rotates 180° to
remove the cord easily.
Filling the water tank with water
•
Press the release button (8) on the unit body (3) and
remove the water tank (7).
•
Open the water tank lid (6) turning it counterclockwise.
•
Fill the water tank (7) with clean water using the
Measuring cup (19).
•
After filling the water tank with water close the lid (6)
turning it clockwise.
•
Install the water tank back to its place until clicking.
•
If during the operation the water tank becomes empty,
switch the unit off by pressing the on/off button (21),
disconnect the power cord (4) plug from the mains
socket and fill the water tank (7) with clean water as
described above.
Washing and disinfecting the floor
•
Attach the microfiber cloth (18) to the floor brush (1)
(pic. 2). Press the brush to the cloth so that the stickers
on the cloth attach properly to the bars on the brush.
•
Connect the power plug (4) to the mains socket and
press the on/off button (21). The switch on indica-
tor (22) will light up red and the low steam supply indi-
cator (23) will light up blue. When the indicator (22)
lights up blue, the steam mop is ready for operation.
•
Consequently press the button (20) to select the
required level of steam supply.
•
To keep the power cord out of the way during cleaning,
pass it through the upper hook (10).
Cleaning the carpets
•
Install the frame for carpets (17) on the floor brush (1)
with the cloth (18) attached. To do this, install the floor
brush on the frame and press until the frame snaps
into place.
•
The frame (17) provides the easy gliding of the brush
(1) along the carpets without the cloth (18) slipping up.
•
Connect the power plug (4) to the mains socket and
press the on/off button (21). The switch on indicator
(22) will light up red and the low steam supply indicator
(23) will light up blue. When the indicator (22) lights up
blue, the steam mop is ready for operation.
•
Consequently press the button (20) to select the
required level of steam supply.
Water level
The water level is always visible thanks to the transparent
water tank (7).
When the water is used up, steam will no longer be gener-
ated.
To resume operation, refill the water tank with water as de-
scribed above.
WARNING: this operation should always be performed af-
ter disconnecting the unit from the mains.
RECOMMENDATIONS ON USING
•
Before cleaning the floor, it is recommended to sweep
or vacuum it to remove dust and dirt particles.
•
When washing the floor, move the unit in an even back
and forth motion, pushing it away from you and pull-
ing it back. Move backwards to avoid stepping on the
already washed floor.
•
The microfiber cloth (18) collects water when washing
the floor. However, depending on the characteristics
of the floor surface and the set steam intensity, some
moisture may remain on the floor. In this case, it is rec-
ommended to let the floor dry naturally. Drying can be
accelerated by using a fan directed to the desired area.
•
After you finish cleaning, remove the cloth (18) from the
floor brush (1). Then the floor under the mop will not get
soaked from a damp cloth.
•
• You can clean the carpets with the floor brush (1) with
installed frame (17). To freshen the carpet, try to do
the following: mix one part of water with one part of a
carpet shampoo. Spray the solution on the carpet and
leave it for 2 hours. After that clean the carpet with the
steam mop. The carpet will be wet after this procedure,
so you’ll have to dry it.
VT-8190.indd 5 9/21/20 4:30 PM
Table of contents
Languages:
Other Vitek Steam Cleaner manuals

Vitek
Vitek VT-2440 User manual

Vitek
Vitek VT-2437 User manual

Vitek
Vitek VT-8189 User manual

Vitek
Vitek VT-2435 User manual

Vitek
Vitek VT-1285 BD User manual

Vitek
Vitek VT-2662 User manual

Vitek
Vitek VT-1287 W User manual

Vitek
Vitek VT-8191 User manual

Vitek
Vitek VT-2436 User manual

Vitek
Vitek VT-2660 User manual