clevershower ALBERT PRO User manual

R
www.clevershower.com
Shower curtain mounting
ALBERT PRO
ASSEMBLY INSTRUCTION

Page 2
ASSEMBLY INSTRUCTION
Shower curtain mounting ALBERT PRO
Turn the joint feet (10) into the
rear mounting piece (4) up to
the stop.
Insert the rear mounting piece (4) behind your shower bar. If the
distance between the shower bar and the wall is too small, remove
the black joint plate (10-A) from the threaded rod (10-B) and attach
it again thereafter.
Screw the joint feet (10) into the rear mounting
piece (4) until the latter rests against your
shower bar without any backlash.
Place the front mounting piece (3) on the
rear mounting piece (4).
4
Turn the joint feet (10) into the
Turn the joint feet (10) into the
rear mounting piece (4) up to
the stop.
Insert the rear mounting piece (4) behind your shower bar. If the
4
Place the front mounting piece (3) on the
rear mounting piece (4).
3
5
First insert the four stainless steel nuts (6) into the
rear mounting piece (4) and press them fi rmly.
Protect your shower tray and bathtub from enamel damage with a
towel during installation and close the drain if, for example, a screw
falls down during installation.
1
ATTENTION!
2
R

R
Page 3
Place the round tubes (1 & 2), the tube connector (11),
the aluminum connector (8) and the two cylinder head
screws (5) as shown in the picture. Please make sure
that the round recess of the connector (8) faces
outwards.
Insert the tube connector (11) into the ends of the two U-shaped
round tubes (1) without transverse hole.
Now insert the aluminum connector (8) into the ends of the
two U-shaped round tubes (1) with transverse hole.
Thread the appropriate number of shower curtain rings onto the
U-shaped round tubes (1). Of course, you can also clip on the shower
curtain rings at a later date. Then connect both ends of the U-shaped
round tubes (1) in a fl ush manner.
Carefully screw in the four cylinder head screws (5) each with one
washer (7) by hand. To fi nd the correct mounting height for the
holder (3 & 4), please refer to the dimensional drawing in the
supplementary sheet. Tighten the four cylinder head screws (5)
evenly with the hexagon key (9) until the holder can no longer
slide downwards. The height can easily be corrected at a later
point in time by loosening the screws.
R
Insert the tube connector (11) into the ends of the two U-shaped
curtain rings at a later date. Then connect both ends of the U-shaped
round tubes (1) in a fl ush manner.
9
11
Please check whether the holder (3 & 4) is positioned
parallel to the wall. Corrections can be made by turning
the joint feet (10).
7
8
10
6

Page 4
Insert the I-shaped round tubes (2) into the assembled mounting.
Put the shower head into the cone slider (12).
Thread the shower rings into the shower curtains.
Our recommended shower curtain combination is:
2 pieces 180 x 200 cm (width x height).
For a perfect splash guard, the side of one
shower curtain should overlap the opposite
side of the other shower curtain. One eyelet
of the shower curtain remains free on the
shower head.
16
16
15
BRAVO!
Loosen the conical slider (12) with the rotary knob and
slide it onto one of the two I-shaped round tubes (2).
Adjust the inclination of the shower head holder and fi x
the cone slide with the rotary knob.
13
Screw the pre-assembled U-shaped round tubes (1) including the
aluminum connector (8) to the I-shaped round tubes (2) using two
cylinder head screws (5). Carefully tighten the two cylinder head
screws (5) with the hexagon key (9) until the tubes are fi rmly
connected to each other.
Screw the pre-assembled U-shaped round tubes (1) including the
aluminum connector (8) to the I-shaped round tubes (2) using two
12
14
R
V3.0
R
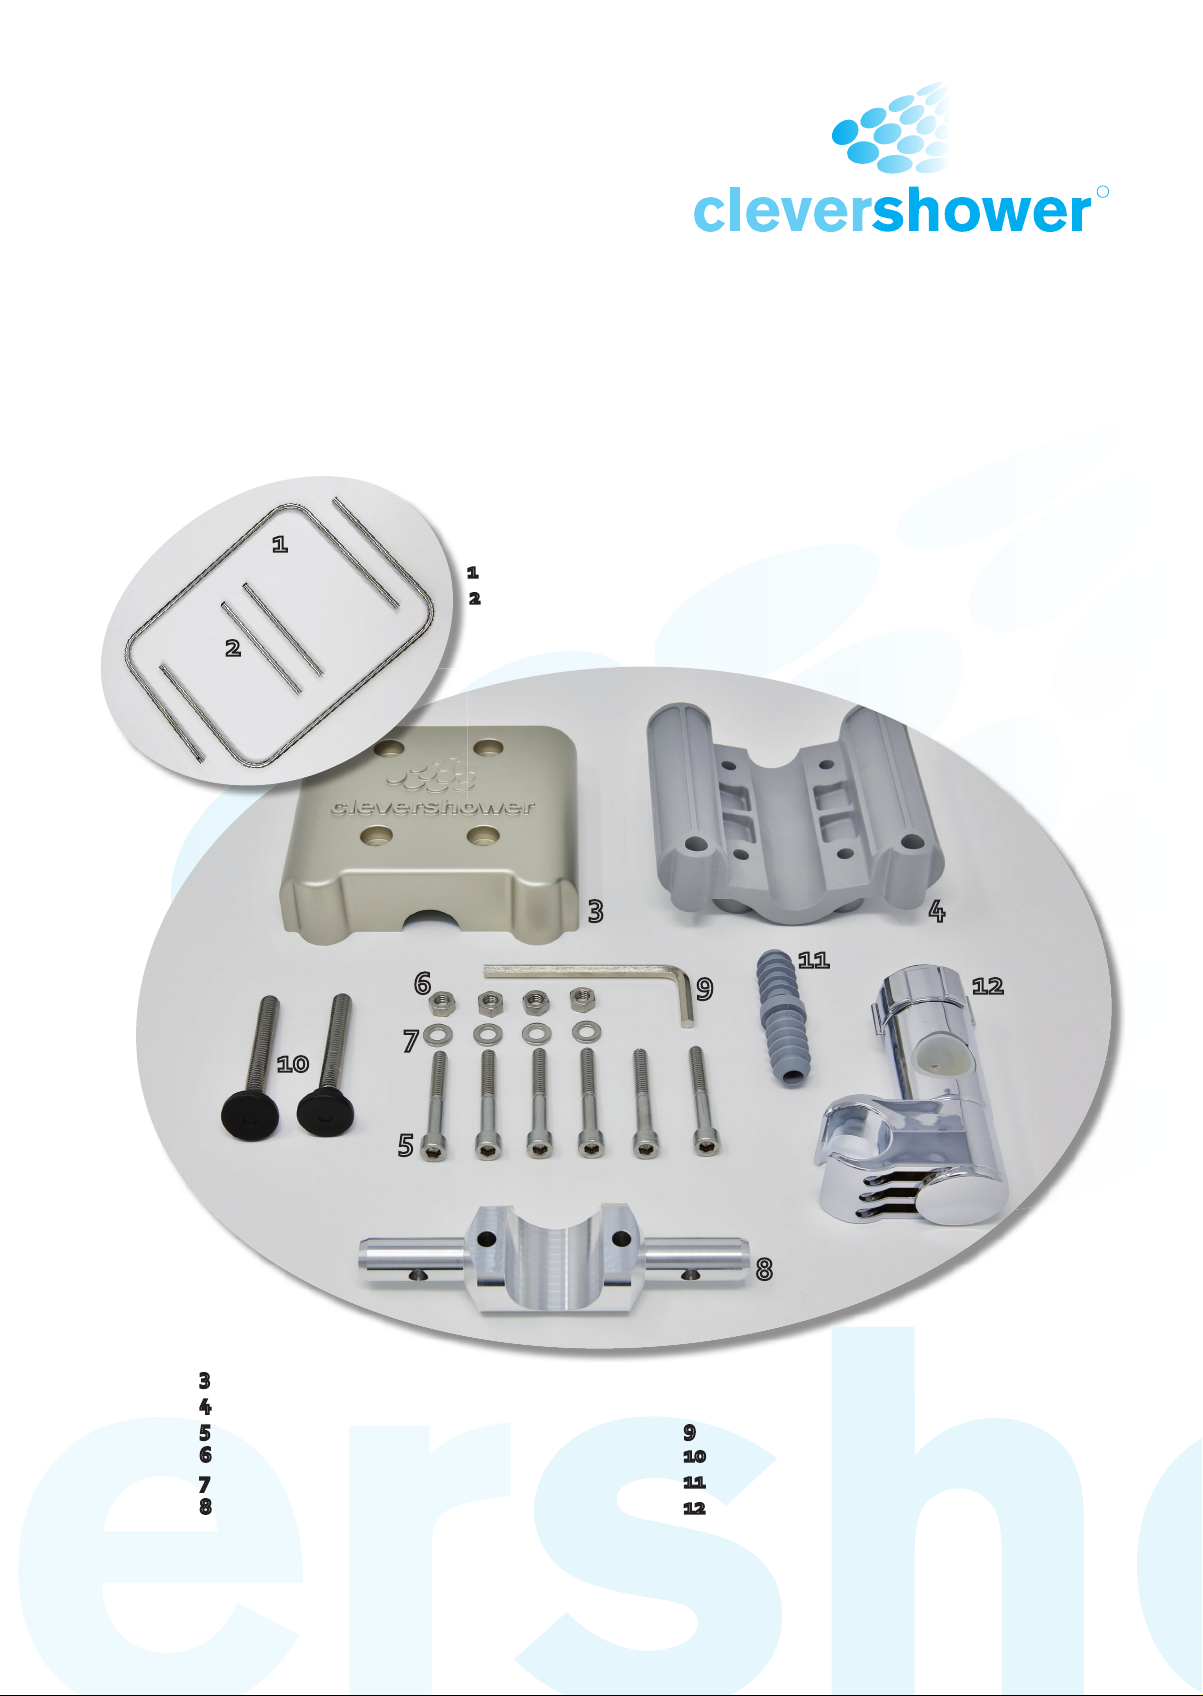
SCOPE OF SUPPLY
Shower curtain mounting ALBERT PRO
31x Front mounting piece
41x Rear mounting piece
56x Stainless steel cylinder head screw M6x45
64x Stainless steel nut M6
74x Stainless steel washer M6
81x Aluminum connector
91x Hexagon key 5 mm
10 2x Stainless steel joint foot M8
11 1x Tube connector for Ø 18 mm
12 1x Cone glider for Ø 18 mm
3
10
5
7
4
6
8
11
9 12
12x Stainless steel U-shaped round tube Ø 18 mm
22x Stainless steel I-shaped round tube Ø 18 mm
1
2
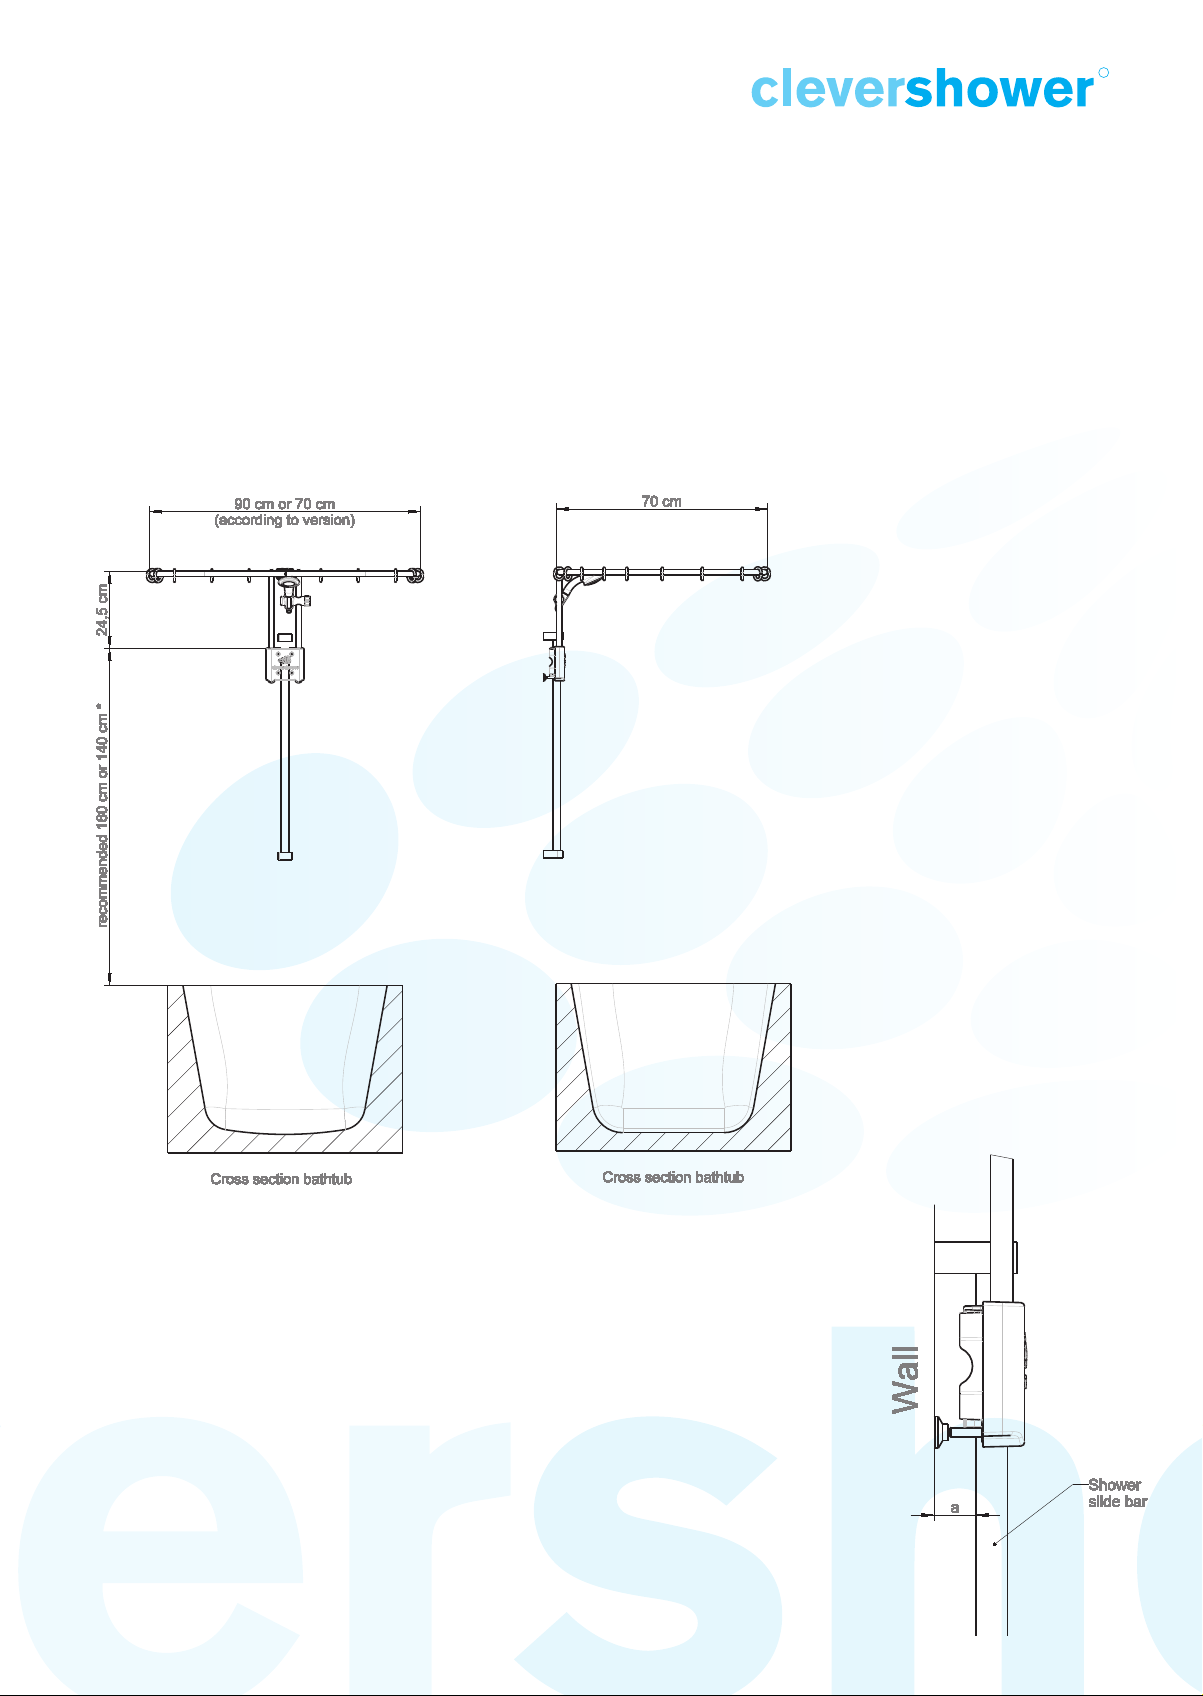
Dimensions
Shower curtain mounting ALBERT PRO
The Shower curtain mounting ALBERT PRO is available in the dimensions 70 x 70 cm or 90 x 70 cm (width x depth).
Please note that the clamp mounting on the shower bar can only be done in the middle. The textile shower curtain
should hang into the bathtub by at least 15 cm, but should not contact bathtub fl oor.
Recommended mounting height (as measured from the upper edge of the bathtub):
• 160 cm for a shower curtain with a length of 200 cm
• 140 cm for a shower curtain with a length of 180 cm
We have successfully tested all current and commercial round shower bars with
diameters from 18-25 mm for clamp mounting. However, it cannot be excluded that
other models exist on the market. Please measure the distance between the wall
and the shower bar. If the distance of your shower bar is outside the value range,
please contact us.
Shower bar Ø Min. distance (a) Max. distance (a)
18 mm 3.2 cm 6.0 cm
22 mm 2.9 cm 6.0 cm
25 mm 2.6 cm 6.0 cm
The clamping system is not designed for angular or oval shower bars or those having
a diameter of more than 25 mm.
R
V3.0

R
CARE INSTRUCTIONS
Shower curtain mounting ALBERT PRO
Please use only plastic shower curtain rings. Shower curtain rings made of metal will scratch the surface of the
stainless steel round tubes over time.
Light soiling, such as fi ngerprints or lime stains, can be removed with the enclosed care cloth by simply rubbing it
off . Do not use any aggressive household cleaners as they can damage the stainless steel surface permanently.
Stubborn dirt or slight scratches on the stainless steel round tubes can be removed with the supplied abrasive
fl eece.
Please make sure that the abrasive fl eece is always used in the direction of the surface fi nish of the stainless steel
tubes (see picture). Never move the abrasive fl eece back and forth in the longitudinal direction of the tubes. The
abrasive fl eece must also never be used for cleaning aluminum or plastic parts.
V3.0

R
DRILLING TEMPLATE - Extension kit Dowel
Shower curtain mounting ALBERT PRO
62.41
45
V3.0

R
22.5
22.5
62.4
45
16
DRILLING TEMPLATE - Extension kit Dowel
Shower curtain mounting ALBERT PRO
Table of contents
Popular Bathroom Fixture manuals by other brands

noken
noken SOTTO 100237665-N350798853 manual

Omnires
Omnires PM7444CR Installation and Maintenance

Triton
Triton Thames Installation and operating instructions

Bristan
Bristan IRBS1-CP Installation instructions and user guide

SAT
SAT CEMENTO CEM4242A Mounting instruction

Sanela
Sanela SLU 22B Instructions for use


