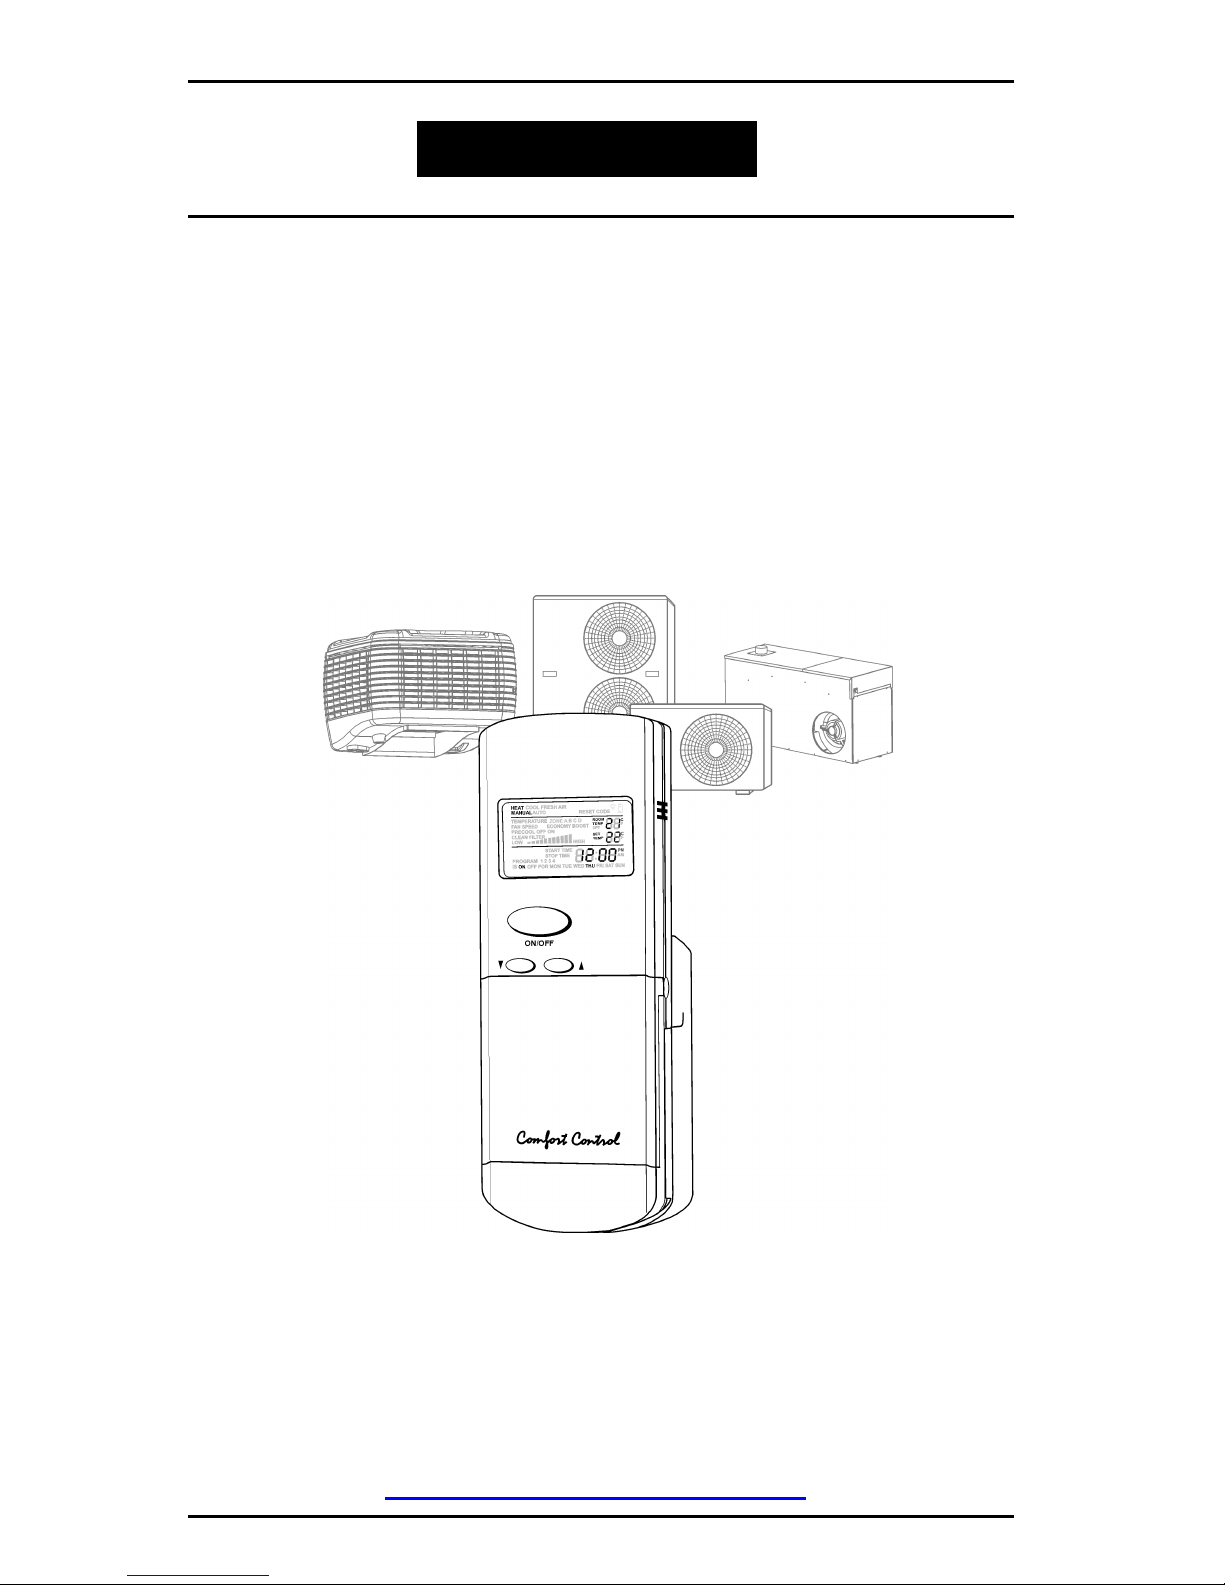
Climate Technologies multi-appliance Comfort Control User manual
PNE Control - 2004
Using the
Ducted Gas Central Heating
Add-on Refrigerated Air Conditioning
Ducted Evaporative Air Conditioning
with your
multi-appliance
Comfort Control
Radio Frequency & Low Voltage
Please keep this important manual in a safe place. It is the owner’s responsibility to ensure that
regular maintenance is carried out on this Ducted Evaporative Air Conditioner. Failure to do so will
void all guarantees beyond statutory and legal requirements.
www.climatetechnologies.com.au
Owner’s Manual

Multi-Appliance Comfort Control
PNE Comfort Control - 2004 Page 2
Contents
INTRODUCTION.............................................................................................................................. 4
YOUR MULTI-APPLIANCE COMFORT CONTROLLER ..............................................................................................4
GENERAL INFORMATION. ..........................................................................................................................................4
Important Installation Notice. .................................................................................................................4
Data Location..........................................................................................................................................4
Warranty..................................................................................................................................................4
NAVIGATING THE CONTROLS..................................................................................................... 5
QUICK START .............................................................................................................................................................. 5
QUICK START - SIMPLE MANUAL OPERATION........................................................................................................ 5
The Comfort Controller..................................................................................................................................................7
THE LCD DISPLAY....................................................................................................................................................... 7
USING THE 9 BUTTONS..............................................................................................................................................8
SETTING DAY AND TIME ..........................................................................................................................................10
DUCTED GAS CENTRAL HEATING............................................................................................ 11
GENERAL INFORMATION. ........................................................................................................................................12
Important Notice....................................................................................................................................12
Warranty.................................................................................................. Error! Bookmark not defined.
Data Location........................................................................................................................................12
Assembly................................................................................................................................................12
SAFETY.......................................................................................................................................................................13
Safety & Owner Responsibility..............................................................................................................13
Precautions............................................................................................................................................13
Features.................................................................................................................................................13
Power or Gas interruption.....................................................................................................................13
USING YOUR COMFORT CONTROL ........................................................................................................................14
Manual Operation .................................................................................................................................14
ECONOMY & BOOST for heating........................................................................................................15
Summer Fan...........................................................................................................................................15
ZONES - Selecting ABCD options........................................................................................................16
Summer Shutdown .................................................................................................................................16
First Startup or Restart After Shutdown................................................................................................16
Auto Mode .............................................................................................................................................17
Programming Your Comfort Control ....................................................................................................17
HEATER MAINTENANCE...........................................................................................................................................19
SCHEDULED MAINTENANCE. .................................................................................................................................. 19
PROBLEM SOLVING.................................................................................................................................................. 20
ADD-ON REFRIGERATED AIR CONDITIONING ........................................................................ 21
GENERAL INFORMATION. ........................................................................................................................................22
Important Notice....................................................................................................................................22
Data Location........................................................................................................................................22
Assembly................................................................................................................................................22
SAFETY.......................................................................................................................................................................22
Safety & Owner Responsibility..............................................................................................................22
Precautions............................................................................................................................................22
Features.................................................................................................................................................22
Power interruption. ...............................................................................................................................22
COMFORT CONTROL................................................................................................................................................ 23

Multi-Appliance Comfort Control
PNE Comfort Control - 2004 Page 3
Contents
Manual Operation .................................................................................................................................23
ZONES - Selecting ABCD Options........................................................................................................24
Fan Operation .......................................................................................................................................24
Programming Your Comfort Control ....................................................................................................24
Using the Programming Sequence ........................................................................................................24
DUCTED EVAPORATIVE AIR CONDITIONING .......................................................................... 25
INTRODUCTION.........................................................................................................................................................26
UNIT OPERATION......................................................................................................................................................26
Exhaust..................................................................................................................................................26
Dialflo....................................................................................................................................................27
Optional Dump Valve............................................................................................................................27
Comfort Control – Quick Reference ............................................................................................................................ 28
USING YOUR COMFORT CONTROL ........................................................................................................................29
Manual Mode.........................................................................................................................................29
Auto Mode (Thermostat)........................................................................................................................29
BOOST...................................................................................................................................................30
TIMER MODE.......................................................................................................................................30
PRECOOL ON/OFF..............................................................................................................................31
Filter Cleaning ......................................................................................................................................31
DUCTED EVAPORATIVE AIR CONDITIONER MAINTENANCE...............................................................................32
CONTROL SETUP ........................................................................................................................ 35
SETTING UP THE CONTROL - GENERAL................................................................................................................35
Installation.............................................................................................................................................35
Coding The Unit....................................................................................................................................36
Checking The Signal – RF Remote Control Only..................................................................................36
Changing the Code................................................................................................................................36
SETTING UP THE CONTROLS – DUCTED GAS CENTRAL HEATING ...................................................................37
Setting Minimum Fan Speed..................................................................................................................37
Setting Maximum Fan Speed.................................................................................................................37
Setting The Zone Availability.................................................................................................................37
SETTING UP THE CONTROLS – DUAL CYCLE ADDON REFRIGERATED AIR CONDITIONING ........................38
Setting the Fan Control from Continuous to Auto Mode.......................................................................38
Setting the Fan Control from Auto to Continuous Mode.......................................................................39
Setting Minimum Fan Speed..................................................................................................................39
Setting Maximum Fan Speed.................................................................................................................39
Setting The Zone Availability Filter.......................................................................................................39
SETTING UP THE CONTROLS – DUCTED EVAPORATIVE AIR CONDITIONING..................................................40
Setting Minimum Fan Speed..................................................................................................................40
Setting Maximum Fan Speed.................................................................................................................40
Setting up the Dump Valve (Where Fitted)............................................................................................41
COMMISSIONING CHECK LIST ................................................................................................................................42
WARRANTY .................................................................................................................................. 44
APPLIANCE WARRANTY STATEMENT.................................................................................................................... 44
Conditions And Exclusions....................................................................................................................44
WARRANTY ON REPLACEMENTS PARTS. ............................................................................................................. 45
PERIODS OF WARRANTY – YEARS.........................................................................................................................45
SERVICE........................................................................................................................................ 46
Multi-Appliance Comfort Control
PNE Comfort Control - 2004 Page 4
Introduction
INTRODUCTION
YOUR MULTI-APPLIANCE COMFORT CONTROLLER
You have chosen one of the world's most advanced comfort control systems incorporating the latest
technology.
Your Comfort Control has been designed to operate various Climate Technologies products:
Heating - Ducted Gas Central Heaters.
Fresh Air Conditioners - Ducted Evaporative Air Conditioners.
Dual Cycle Add-on Cooling - Refrigerated Air Conditioning (cooling only) designed to add-on to
Ducted Gas Central Heaters.
Your Comfort Controller is designed to automatically detect the appliances during the commissioning of the
unit by the installer. Controller options not required for your appliances will usually not be visible on your
Comfort Control display.
Whether hand held or wall mounted take advantage of the versatility your Comfort Controller offers.
Use your Comfort Controller to reduce your energy bills by selectively conditioning part or all of your home
at an economical reduced rate or by setting programs to suit your needs.
Your Comfort Control is designed in Australia to suit Australian conditions and will ensure that your home
is comfortable all year round.
GENERAL INFORMATION.
IMPORTANT INSTALLATION NOTICE.
A licensed person is required to install Climate Technologies equipment. If the equipment is not installed in a
accordance with the installation instructions and the governing body regulations, Climate Technologies
reserves the right to refuse service on non compliant installations.
Subject to state regulations and by laws a certificate of compliance must be issued for the electrical and
plumbing connections certifying that the work complies with all the relevant standards.
Note: Only a licensed person will have insurance protecting their workmanship.
DATA LOCATION.
Your appliance model number, serial number and model description are located on the appliance data plate
on the end of the heater or inside the cooler in the vicinity of the electronic controls. These details should
also be in the warranty section of this booklet.
You will need this information, should your appliance require servicing, spare parts or just if you require
additional information about this product.
WARRANTY
Warranty service work must only be carried out by Climate Technologies service division or its authorised
service providers. See warranty section.

Multi-Appliance Comfort Control
PNE Comfort Control - 2004 Page 5
Navigating the Controls
NAV IGAT ING TH E CONTR OLS
QUICK START
First - the 15 second delay
To give you time to choose your settings the
Comfort Control pauses 15 seconds then
sends its signal to your Heater/Cooler. So
don't worry if something doesn't happen
immediately.
Watch for the transmit symbol at the top
of the screen. This means that the signal has
been sent.
If you don't want to wait, pressing and
releasing the ENTER button sends your
settings immediately. (You don't need to do
this when using ON/OFF.)
Second - What you'll see is what you've got
Your Comfort Controller is designed to
automatically detect the appliances you have
installed. Controller options not required for
your appliances will usually not be visible on
your Comfort Control display. So don't worry if
you don't see all the menu items listed in this
book.
QUICK START - SIMPLE MANUAL OPERATION
Here's all you have to do to get going (if the
installer hasn't already done it for you).
1. If you have a Radio Frequency comfort control make sure the 3 new AAA alkaline batteries have
been fitted (see page 6). The wall mounted comfort control gets its power from a cable.
2. Press and release the ON/OFF button until ON appears at the bottom of the display screen.
3. Press & release the HEAT/COOL/FRESH AIR button (inside the flip open door) to select the
appliance. The choices available will be dependant on the appliances you have installed. Press
MANUAL/AUTO to select MANUAL.
4. Press ▼or ▲buttons to choose the desired setting.
Your unit will now operate in manual mode.

Multi-Appliance Comfort Control
PNE Comfort Control - 2004 Page 6
Navigating the Controls
IDENTIFY YOUR COMFORT CONTROL MODEL
Use these pictures to identify which model you have.
WALL MOUNTED
This model is mounted permanently in the cradle on
your wall. No batteries are required. Power is supplied
via the same cable that takes the controller's signals to
your heating and / or cooling appliances.
HAND HELD RF
This model is hand held and will operate your appliances
from most areas of your home – See IMPORTANT
NOTE for exceptions.
It is powered by 3 AAA batteries. The controller uses
radio signals to control your appliance.
IMPORTANT NOTE
To reduce the risk of possible R
F
interference, do not locate your R
F
control near any electrica
l
equipment e.g. TV’s computers,
fridges, telecommunications and HI
FI equipment or close to meta
l
objects or window frames.
Other RF devices within your home
can also cause interference such
wireless door bells, gate or doo
r
openers, or perhaps baby monitors
& intercoms. Such interference can
impede the operation of you
r
appliance.
Ensure the RF control unit is no
t
exposed to excessive heat,
humidity, moisture or dampness.
Multi-Appliance Comfort Control
PNE Comfort Control - 2004 Page 7
Navigating the Controls
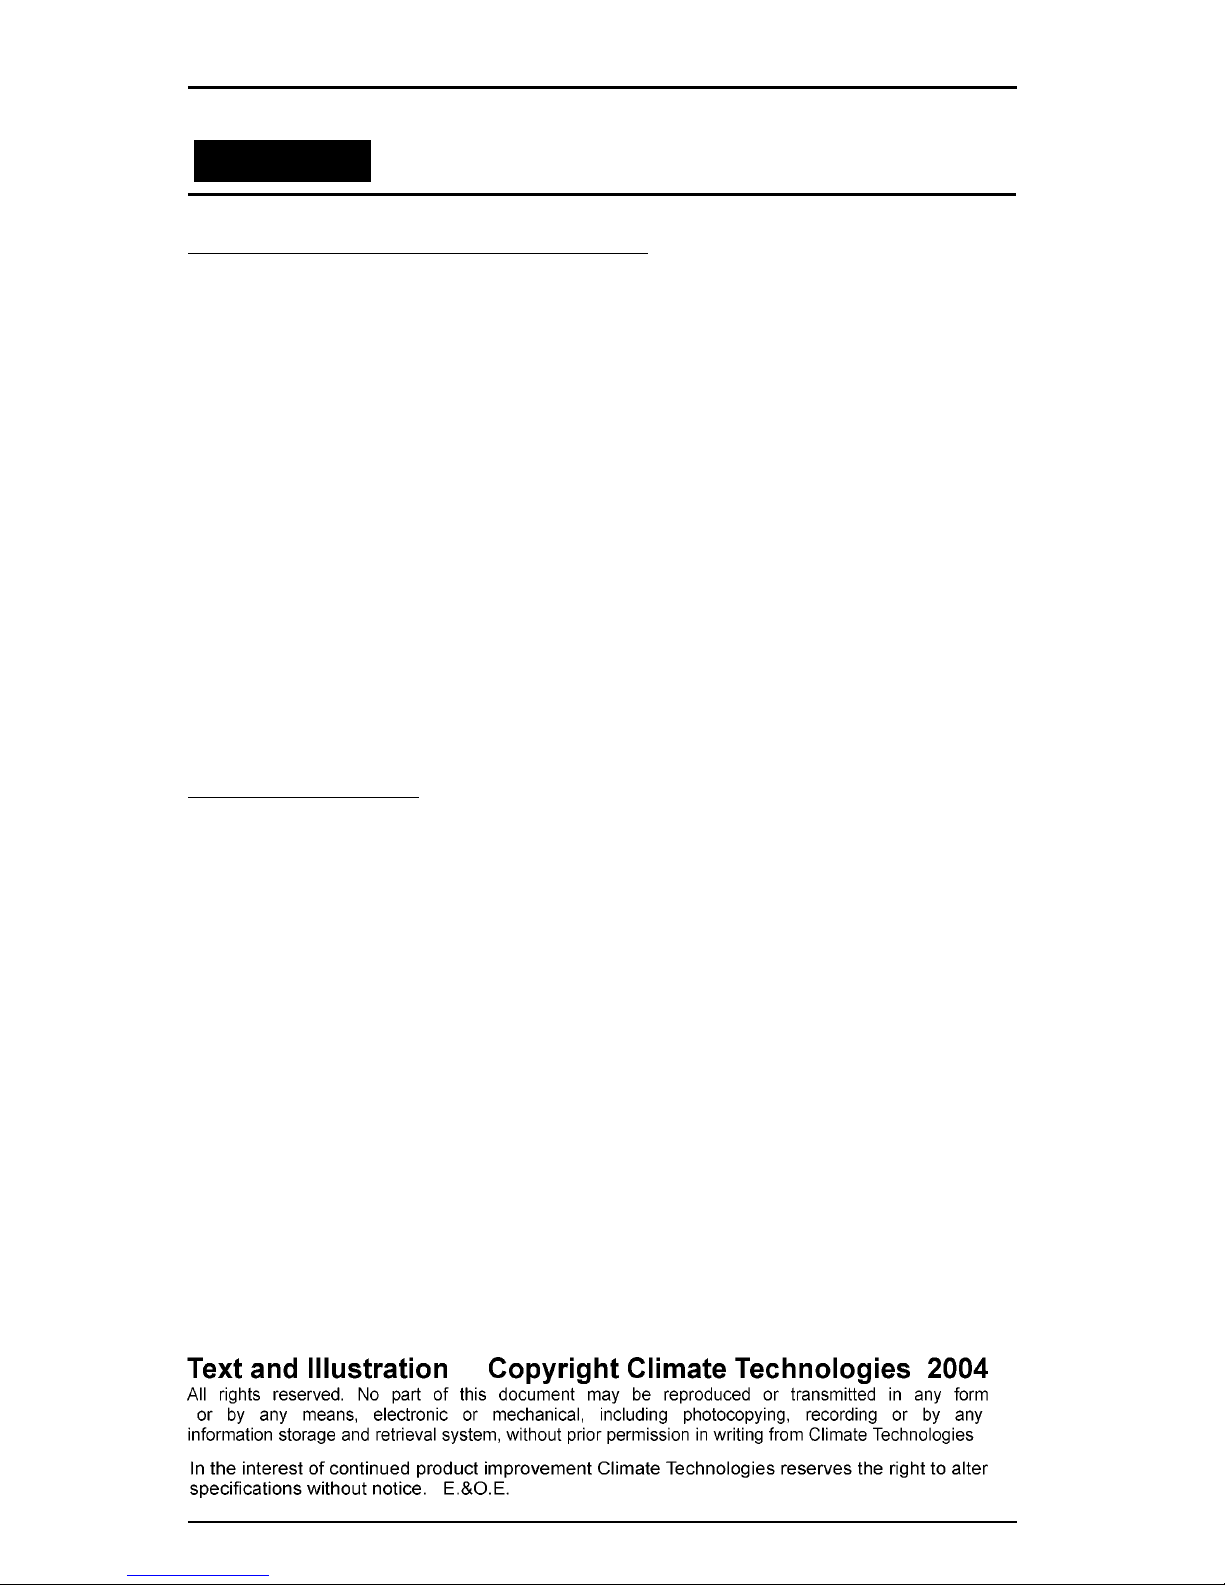
The Comfort Controller
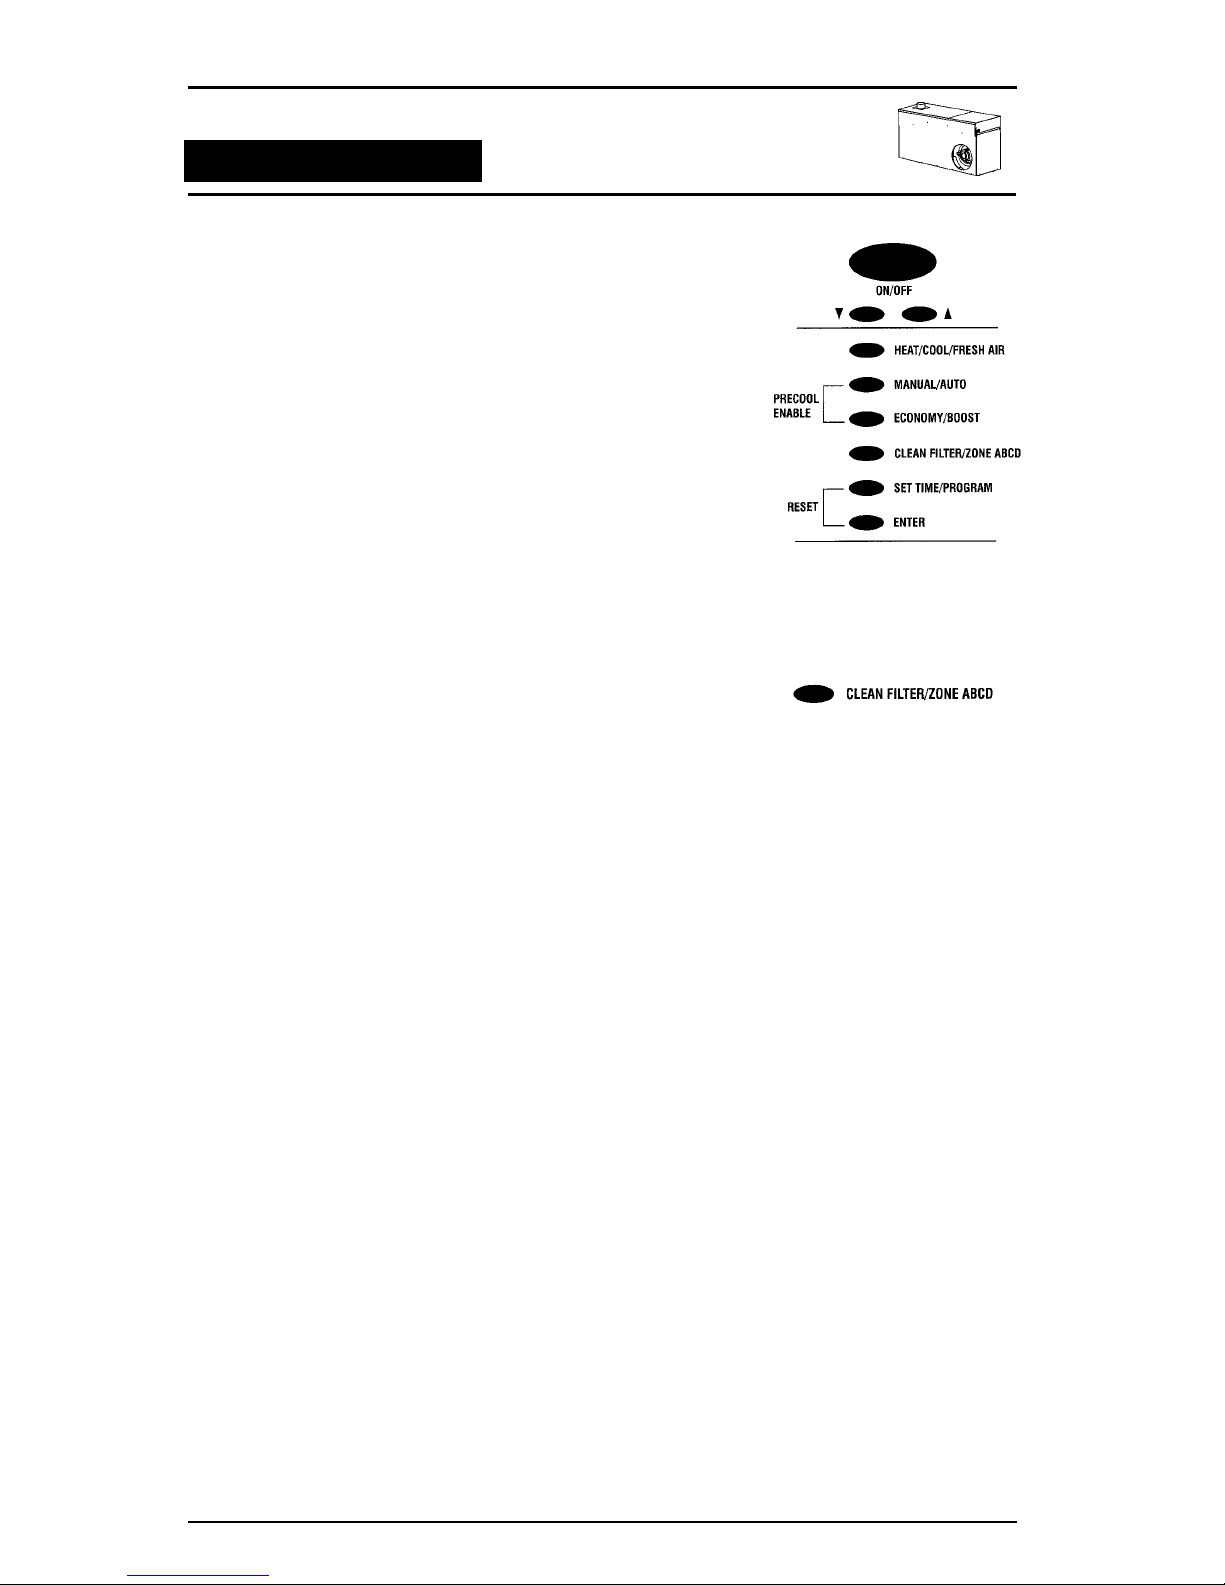
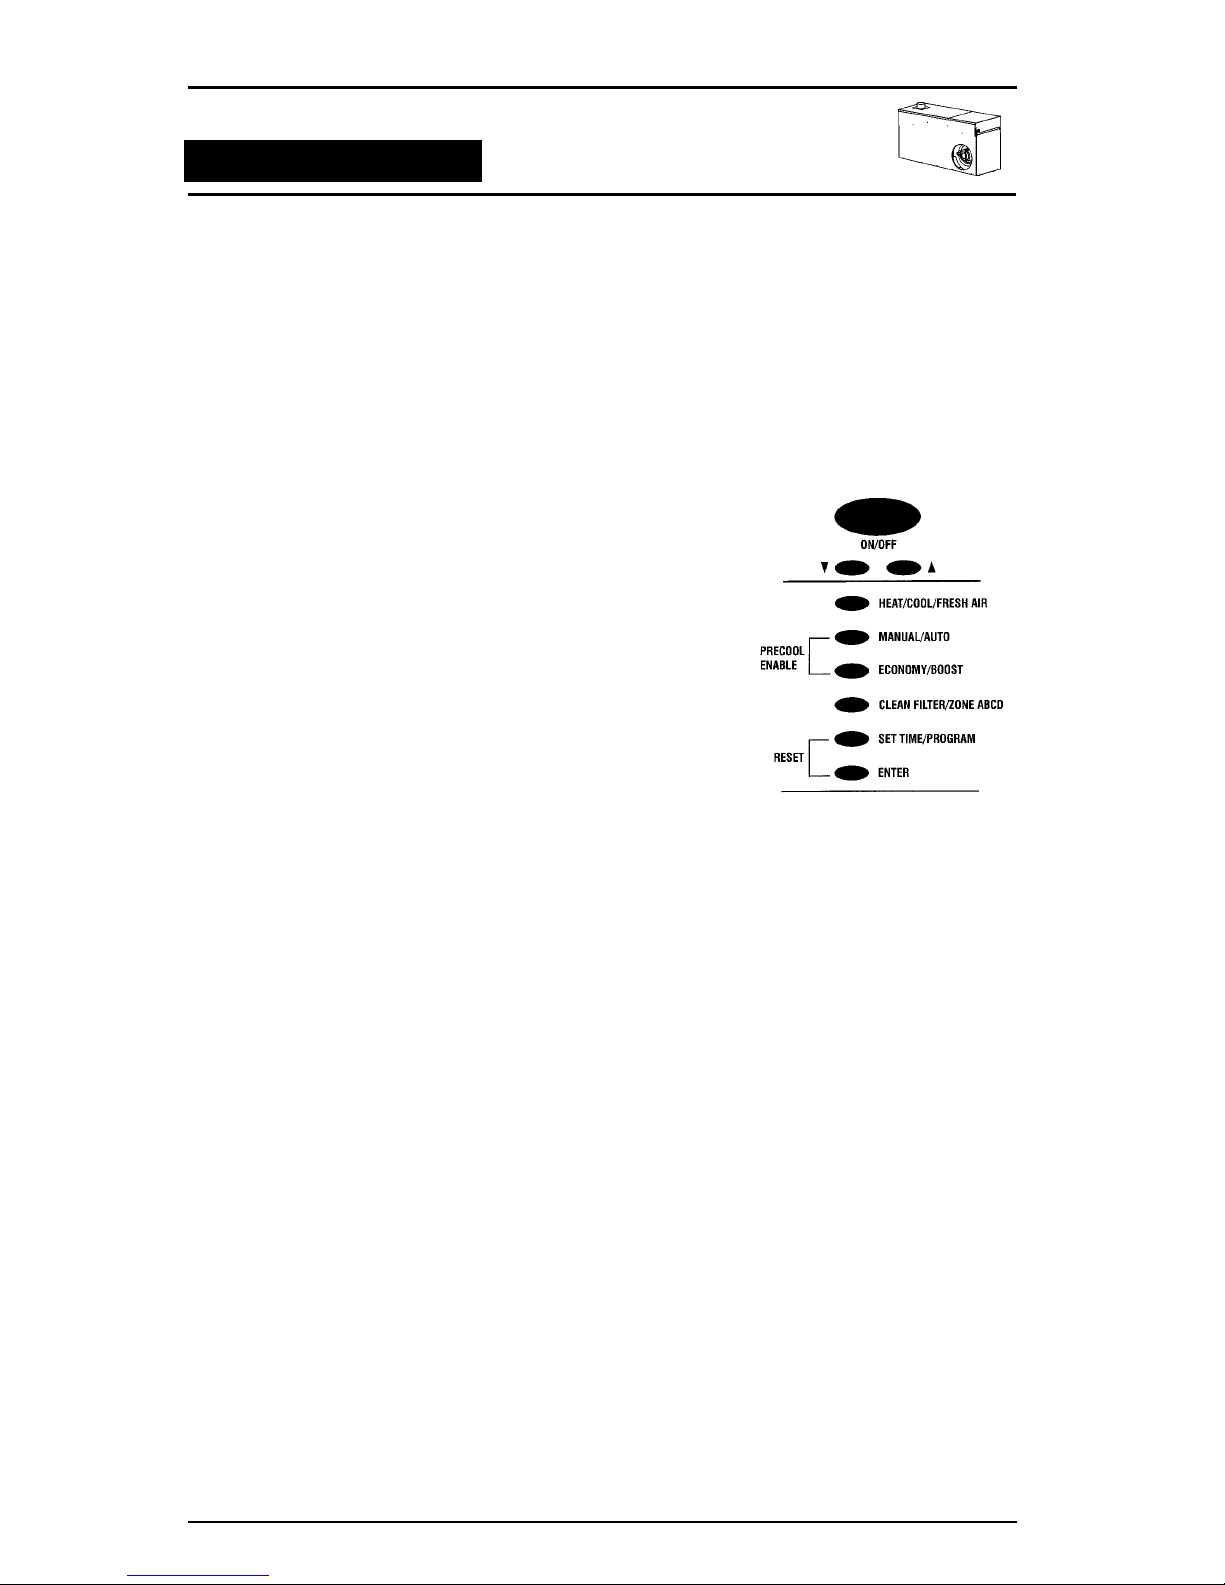
Features of the Controller
1. Temperature sensor
Measures room temperature for thermostatic
operation.
2. Display screen LCD (Liquid Crystal Display)
Displays operational status of mode, time, day,
room temperature, set temperature, temporary
temperature, fan speed, filter cleaning, batteries
and programming.
3. Flip open door
Covers the less frequently used secondary
buttons.
4. Soft touch buttons
9 button layout includes large ON/OFF button
5. Comfort Control cradle
Fixed to the wall to permanently mount the wall
control. Fixed to the wall for easy access to the
portable RF control.
THE LCD DISPLAY
The Controller display shows different
information depending on the functions
in use. The Controller usually shows
only those items required for the
appliances you have installed.

Multi-Appliance Comfort Control
PNE Comfort Control - 2004 Page 8
Navigating the Controls
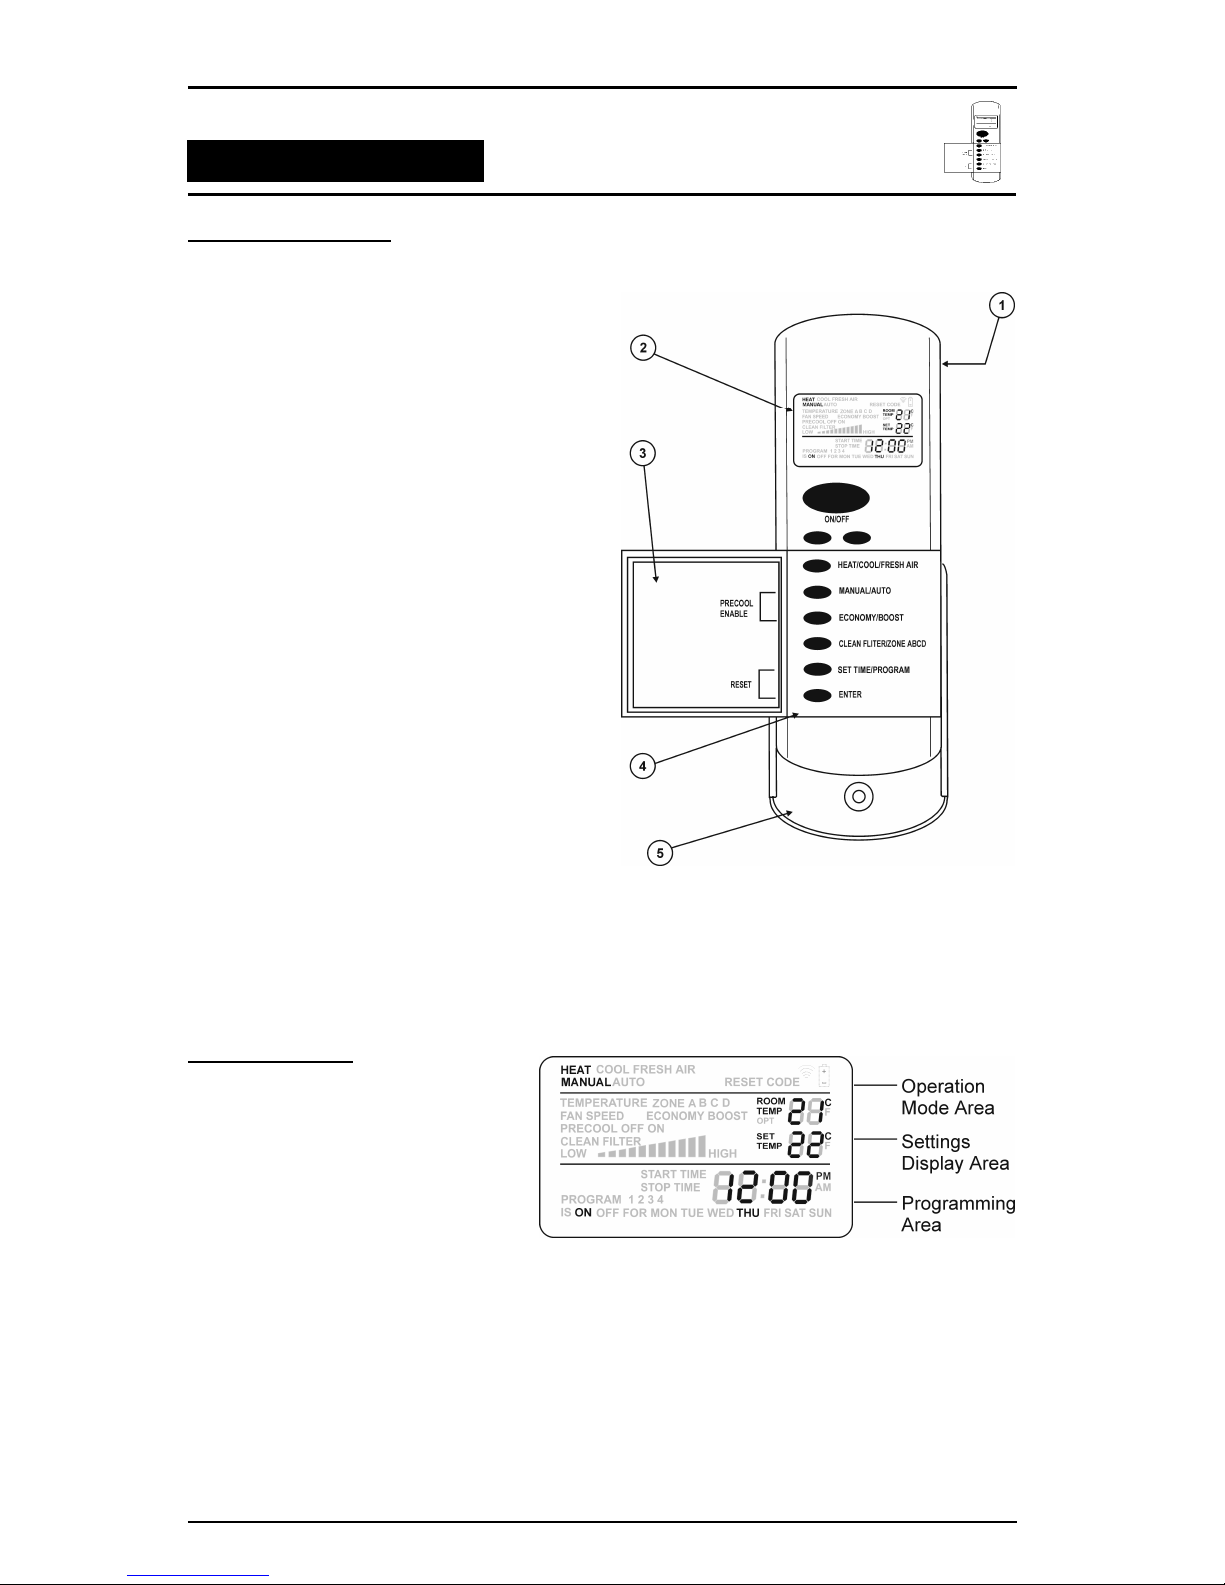
USING THE 9 BUTTONS
The following explains the function of each of the buttons:
ON/OFF
•Turns your heating and / or cooling appliances ON and
OFF. When you switch on in AUTO mode your preset
programs stored in memory (heating only) will start to
operate .
•During programming the ON/OFF button selects ON or
OFF for the program period.
•Use to set Fresh Air Conditioner TIMER ON/OFF
•Use to turn ZONES on and off (if fitted)
▼▲BUTTONS
•Press & hold ▼▲(DOWN/UP) button to increase or
decrease settings.
•Or press & release ▼▲buttons to increase or
decrease one setting at a time. Settings include day,
time, temperature, fan speed and timer.
•The ▼▲buttons are also used to select the different
zones or programs available.
HEAT/COOL/FRESH AIR
•Press to select from the heating and or cooling choices (in
most cases you will only be able to see the titles for the
appliances that you have installed).
•HEAT Ducted Gas Central Heaters
•COOL Dual Cycle Add-on Refrigerated Air Conditioning
•COOL FRESH AIR Ducted Evaporative Air
Conditioning
•FRESH AIR Fan only from your Fresh Air
Conditioner
•HEAT COOL Automatic selection of either a Gas
Central Heater or Dual Cycle Add-on Refrigerated Air
Conditioning to maintain a desired temperature no title
shows' Fan only from your Heater (when no other appliance
is installed)
Multi-Appliance Comfort Control
PNE Comfort Control - 2004 Page 9
Navigating the Controls
MANUAL/AUTO
•Press to select manual thermostat or
programmed operation for heating and manual
or thermostat for evaporative cooling.
ECONOMY/BOOST
•Select economy, boost or normal operating
modes.
CLEAN FILTER/ZONE ABCD
•Press to select the different zones within the
house (if available) or to activate the CLEAN
FILTER facility when in COOL FRESH AIR
mode.
SET TIME/PROGRAM
•Press & release to select the programming
options.
•To SET TIME, press and hold the button until
TIME is displayed.
ENTER
•Press and release to save settings when in
SET TIME, PROGRAM mode and ZONE
setting.
•Press and release to immediately send
instructions.
PRECOOL
•Press & release MANUAL/AUTO and
ECONOMY/ BOOST together to access
PRECOOL settings. PRECOOL can be set
with the Controller OFF.
RESET
•Press & release SET TIME/PROGRAM and
ENTER simultaneously to reset the unit if
RESET is displayed.

Multi-Appliance Comfort Control
PNE Comfort Control - 2004 Page 10
Navigating the Controls
SETTING DAY AND TIME
After installing batteries for the first time or replacing old batteries(RF hand held model), or after a power
cut (Low voltage hard wired model), the display will indicate OFF and the day and time when the
batteries/power were last removed.
SET TIME
Using SET TIME mode:
1. Press ON/OFF to switch the controller ON.
2. Press & hold the SET TIME/PROGRAM button for more
than 2 seconds until TIME flashes. A DAY will also flash
on the bottom row of the display.
3. Press ▲to advance to next day or ▼for previous days.
4. Press ENTER to select the day. The DAYS will stop
flashing and the HOURS segments will flash.
5. Press ▲to advance to next hour or ▼for previous
hours.
6. Press ENTER to select hour. HOUR will stop flashing and
MINUTES will flash.
7. Press ▲to advance to next minute or ▼for previous
minutes.
8. Press ENTER to select minutes.
9. Press SET TIME/PROGRAM to exit the time setting mode
at any stage.
12/24 HOUR CLOCK
To change between the 12 hour and 24 hour clock modes
1. Press & hold the SET TIME/PROGRAM button for more
than 2 seconds until TIME flashes.
2. When TIME is flashing press the SET TIME/PROGRAM
button again for approximately 3 seconds. The time will
switch between the 12 and 24 hour clock. (AM or PM
shows next to the clock in 12 hour clock mode.) Press SET
TIME/PROGRAM to exit.
Multi-Appliance Comfort Control
PNE Comfort Control - 2004 Page 11
Ducted Gas Heating
DUCTED GAS CENTRAL HEATING
Owner’s Operation and Maintenance Manual
Please keep this important manual in a safe place. It is the owner’s responsibility to ensure that
regular maintenance is carried out on this Ducted Gas Central Heater. Failure to do so will void all
guarantees beyond statutory and legal requirements.

Multi-Appliance Comfort Control
PNE Comfort Control - 2004 Page 12
Ducted Gas Heating
Congratulations on purchasing this Ducted Gas Central Heating system, an exciting new product
manufactured by Climate Technologies.
Wholly designed and manufactured in Australia, this Ducted Gas Central Heater represents an exciting
new development in warm air furnace design. It embodies the latest advances in gas heating technology.
Your heater is supported by Climate Technologies, Australia’s most advanced manufacturer of a complete
range of climate control products.
To ensure you fully enjoy the benefits of this Ducted Gas Central Heater, please read these instructions
carefully and keep them handy for future reference.
Operated and maintained in accordance with this manual, this unit will provide you with years of warm and
environmentally friendly operation. Please take the time to read this manual.
NOTE: The manufacturer and it's service providers reserve the right to refuse service unless safety
and accessibility to the unit can be guaranteed in accordance with the installation instructions and
Australian Standards. The cost of any extra equipment required to provide access to the unit for
servicing is the responsibility of the owner.
GENERAL INFORMATION.
IMPORTANT NOTICE.
A licensed person is required to install Climate Technologies equipment. If the equipment is not installed in a
accordance with the installation instructions and the governing body regulations, Climate Technologies
reserves the right to refuse service on non compliant installations.
Subject to state regulations and by laws a certificate of compliance must be issued for the electrical and
plumbing connections certifying that the work complies with all the relevant standards.
Note: Only a licensed person will have insurance protecting their workmanship.
DATA LOCATION.
Your appliance model number, serial number and model description are located on the appliance data
plate on the end of the heater or under the lid in the vicinity of the electronic controls. These details should
also be in the warranty section of this booklet.
You will need this information, should your appliance require servicing, spare parts or just if you require
additional information about this product.
ASSEMBLY.
There is no assembly required of this Ducted Gas Central Heater. Your Dealer or installer will carry out all
assembly and commissioning upon installation.

Multi-Appliance Comfort Control
PNE Comfort Control - 2004 Page 13
Ducted Gas Heating
SAFETY
SAFETY & OWNER RESPONSIBILITY
The manufacturer and its service providers reserve the right to refuse service unless safety and
accessibility to the unit can be guaranteed in accordance with the installation instructions and Australian
Standards. The cost of any extra equipment required to provide access to the unit for servicing is the
responsibility of the owner.
PRECAUTIONS.
DO NOT PLACE ARTICLES ON OR AGAINST THIS APPLIANCE.
DO NOT USE OR STORE FLAMMABLE MATERIALS NEAR THIS APPLIANCE.
DO NOT SPRAY AEROSOLS IN THE VICINITY OF THIS APPLIANCE WHILE IT IS IN OPERATION.
DO NOT PLACE ARTICLES IN FRONT OF OR OVER THE RETURN AIR GRILLE.
FEATURES.
Your Ducted Gas Central Heater has all the safety devices to ensure safe operation. These devices
conform to the standards set out by Standards Australian.
POWER OR GAS INTERRUPTION.
Should there be an interruption to the power supply during the heating operation the controls will
automatically turn off the gas.
The heater will automatically resume operation once the power has been restored.
Should there be an interruption to the gas supply, the heater will endeavor to re-light 3 times and if
unsuccessful will lock out. (This is part of the safety features). Should this occur the heater will need to be
reset. To reset the heater press the SET TIME/ ENTER button for 5 seconds.
Please refer to your problem-solving chart to assist resolving other problems.

Multi-Appliance Comfort Control
PNE Comfort Control - 2004 Page 14
Ducted Gas Heating
USING YOUR COMFORT CONTROL
There is 2 ways to operate your Comfort Control. You can use MANUAL and select the operation modes
or you can use the AUTO and program the operation modes to happen automatically.
MANUAL OPERATION
1. Turn the comfort control on, press and release the ON/OFF
button. If there is only a central heater fitted the control will default
to Heat Cool.
NOTE: Your Comfort Controller is designed to automatically
detect the appliances you have installed, once coded. Controller
options not required for your appliances will usually not be visible
on your Comfort Control display. So don't worry if you don't see all
the menu items listed in this book.
2. Press the MANUAL/AUTO button until Manual is displayed.
3. Press the HEAT/COOL/FRESH AIR button until Heat appears at
the top of the display.
4. Press & hold the ▼or ▲buttons to decrease or increase SET
TEMP or, press & release buttons to change the SET TEMP one
degree at a time.
5. The Comfort Control measures the room temperature using a
thermostat inside its case. When the room temperature is colder
than the SET TEMP the Heater will come on after a 30 seconds
ignition process.
6. The Comfort Control will run both the modulating and non
modulating heaters until it measures temperature a little above
your SET TEMP. The thermostat will then turn off the heater until
the temperature falls a little below set temperature before
restarting.
7. For modulating heaters, the operation of the heater is as follows:
•If at start up the room temperature is more than 2.0°below
the set temperature, the central heater will start up at high
fan speed and high gas rate quickly bringing your house up
to temperature.
•As the room temperature gets closer to the set temperature
the central heater will reduce the room air fan and the gas
rate to the burner.
•When the thermostat reaches the set temperature the central
heater will be on low fan and the gas will modulate to low
fire.
Multi-Appliance Comfort Control
PNE Comfort Control - 2004 Page 15
Ducted Gas Heating
•When the temperature has gone past the set temperature by
approximately a ½º the central heater will shut down.
•When the temperature has dropped approximately 1º below
set temperature the unit will restart.
•As your activities vary, you may find you need different
temperature settings, e.g. a temperature comfortable for
sitting is usually too warm compared to when your moving
about.
•For economical operation, set a low SET TEMP during the
day when you are active, or use ECONOMY. Switch the
Comfort Control OFF when asleep and ON again when
awake. These cost saving functions can be programmed to
operate automatically (see Programmed Control).
8. Press the ON/OFF button to switch the heater OFF. OFF will
appear on the display.
9. The Comfort Control remembers your SET TEMP setting and
uses it next time you turn it ON.
ECONOMY & BOOST FOR HEATING
ECONOMY operates the heater at the lowest fan speed and a lowest
possible gas rate continuously.
Note:- Continual use of economy may not heat the environment
effectively.
BOOST operates at the highest fan speed and a highest possible gas
rate continuously.
1. To select ECONOMY or BOOST switch the Controller ON and
select HEAT and MANUAL.
2. Now press ECONOMY/BOOST. The display will first show
ECONOMY. Press again and BOOST is shown. Save your
selection by pressing ENTER.
3. Set Temperature to the desired level.
SUMMER FAN
With Gas Ducted Central Heating the control default is to run a Dual
Cycle Add-on Cooling system if installed. If there is no Add-on Cooling
you can use the fan only to circulate the air. To operate:
1. Press ON/OFF to switch the controller ON.
2. Press the HEAT/COOL/FRESH AIR button until COOL appears
by it’s self in the mode selection line of the LCD.
The room air fan will now run.
Multi-Appliance Comfort Control
PNE Comfort Control - 2004 Page 16
Ducted Gas Heating
ZONES - SELECTING ABCD OPTIONS
Selecting ZONE ABCD only applies if your home is fitted with optional
motorised ductwork dampers (please consult your installer) that allow
opening or closing of each section of ducting.
Many homes have no motorised ductwork dampers fitted, however the
control will still display the ‘A’ zone. Where zone motors are fitted the
installer can set your controller to show only the zones available for
use.
In homes with more than one zone, at least one zone must be open at
all times. The default zone is A if no other is selected.
The Controller will not allow you to turn all off. If you press and release
ENTER with all zones set to off the Controller will recall your last correct
zone setting.
To set the open or closed status of a ZONE:
1. Press and release the CLEAN FILTER/ZONE ABCD button.
ZONE A (or the current open zone) will flash.
2. Press ▼or ▲to select the zone you wish to control.
3. Press the ON/OFF button to set a zone as open (ON) or closed
(OFF). Repeat to open or close more zones. If the letter is
already displayed on the LCD screen the zone is open / on.
4. Press and release ENTER to save your selections. Now the
Heater operates only in your selected zone.
SUMMER SHUTDOWN
1. Switch the Comfort Control OFF
2. Switch the power point OFF and turn the gas tap OFF. They are
usually located close to the Heater.
FIRST STARTUP OR RESTART AFTER SHUTDOWN
1. Switch the Comfort Control ON, (Check the batteries are still good
– RF remote model only. It's a good idea to replace them at the
beginning of the season.)
2. Switch on the power point to the heater. Turn on the gas tap on
the gas supply line into the heater.
3. Select HEAT and MANUAL. Press & hold ▼or ▲button to
decrease or increase the SET TEMP. Press ENTER.

Multi-Appliance Comfort Control
PNE Comfort Control - 2004 Page 17
Ducted Gas Heating
AUTO MODE
Auto mode is where the Comfort control operates your unit to
a specific set of program settings. The default sequence is as
per the chart. To set your program, see next section
Programming Your Comfort Control.
To operate your unit in AUTO mode, press the
MANUAL/AUTO for the screen to display the word AUTO.
The unit will now turn on and off at specific times and will
change operational functions as programmed.
PROGRAMMING YOUR COMFORT CONTROL
Programming your Comfort Control will provide energy and time
savings. Your heating and or cooling system will only operate when you
need it, and at your chosen comfort levels.
Determine your most comfortable settings, program them and let your
Comfort Control do the rest automatically.
Programming Sequence
Heater / Dual Cycle Add-on Refrigerated Air Conditioning
If you've never programmed your Comfort Controller before (or it’s been
a while) remember it's easiest to program the whole week to the same
settings (by selecting the whole week MON TUE WED THU FRI SAT
SUN day choice) and then program variations for particular days or the
weekend as you become more familiar with programming.
If the Controller exits program mode it may be because you've paused
longer than about 15 seconds to make your next choice. All the settings
you've made up to then will be saved. Just switch back to program
mode, scroll through your settings using the ENTER key and carry on
from where you left off.
The following is the programming sequence once the control is turned
on:-
1. To Start Program: Press the SET TIME/PROGRAM button.
PROGRAM 1 and the current day will flash.
2. Selecting the Days / Day Group: Press the ▲▼arrows to select
the day or day group to be modified. Options are: Single Day,
MON TUE WED THU FRI or SAT SUN or MON TUE WED THU
FRI SAT SUN. Press ENTER to complete the selection
3. Turning the unit On or Off: Press the ON/OFF button to turn the
unit ON or OFF. At this point the control display will be ON or OFF
and the timer hour number will be flashing.
4. Selecting the Product: if unit ON: If your heater has been fitted
with an add-on refrigerated air conditioner your can now select
between heating and cooling. Press the HEAT/COOL/FRESH AIR
button to select the product require, else proceed to the next step.
Multi-Appliance Comfort Control
PNE Comfort Control - 2004 Page 18
Ducted Gas Heating
5. Setting the time to start the program: Using the ▲▼arrows set
the HOUR required and press ENTER. The MINUTES number will
flash. Using the ▲▼arrows set the minutes number required.
The time will now be set. Press ENTER to proceed.
6. Setting the operation parameters: Before accepting or adjusting
the temperature you can also set:-
•ZONE Requirements - If ZONE motors fitted select the zones
to be open or closed.
−Press and release the CLEAN FILTER/ZONE ABCD
button. ZONE A (or the current open zone) will flash
−Press ▼or ▲to go to the next zone. Press the
ON/OFF button to set a zone as open (ON) or closed
(OFF). Repeat to open or close more zones.
−Press and release ENTER to save your selections.
Now the Heater operates only in your selected zone.
•ECONOMY / BOOST - press ECONOMY/BOOST. The
display will first show ECONOMY. Press again and BOOST
is shown.
7. Setting the Temperature: use the ▲▼arrows set the required
temperature. Press ENTER. The next PROGRAM period will
flash.
8. If next program is required to be OFF use function steps 3 & 5.
The next PROGRAM will now be flashing.
9. If next program is required to be ON. Use steps 3, 4, 5, 6 & 7.
After steps 3, 4, 5, 6 & 7 are completed the next PROGRAM
period will be flashing.
If you want to make corrections to what you've entered, press SET
TIME/PROGRAM twice and you'll start the programming sequence
again. Scroll through the program selections by pressing the ENTER
key and change any items as you come to them.
If at any stage in programming mode you want to revert to the factory
default settings, remove the batteries (RF model only) or turn the power
off to the unit for hardwired controls and the settings will be as they
were before you started.

Multi-Appliance Comfort Control
PNE Comfort Control - 2004 Page 19
Ducted Gas Heating
HEATER MAINTENANCE
CLEANING.
Warning: Before commencing any maintenance work on your unit, isolate the power at the supply
(Fuse Box).
Note: It is essential that your central heater be maintained in accordance with this manual. Failure
to do so will effect the life of the product and reduce the level of efficiency.
ELECTRICAL
No general maintenance is required to the electrical system.
A Qualified Electrician should only carry out electrical connections and maintenance.
RETURN AIR GRILLE FILTER.
If your heating system has a filter in the return air grille, it is extremely important it is cleaned every 3 – 4
weeks during the operating period to ensure correct operation of the heating unit. Failure to do so may
cause your heater to stop because of over temperature and cause an unnecessary service call not
covered by warranty.
FLUE.
The flue and cowl assembly should be clean and free of obstructions.
SCHEDULED MAINTENANCE.
Your Ducted Gas Central Heater should be serviced annually to ensure trouble free operation.
1. To ensure that your heater continues to operate at peak efficiency it is recommended that it be
periodically serviced by a qualified service technician
2. Fan blades, motors should ignition systems and burners should be checked every year. Heater
cabinet and immediate surroundings should be kept clean.
3. Replace the batteries in the Radio Frequency Comfort Controller (where fitted) at the start of each
heating season with new AAA alkaline batteries.
OTHER ITEMS.
There are other items your Climate Technologies service technician will attend to on scheduled
maintenance.

Multi-Appliance Comfort Control
PNE Comfort Control - 2004 Page 20
Ducted Gas Heating
PROBLEM SOLVING.
CENTRAL HEATERWILL NOT OPERATE!
Question Y/N Solution
Yes Refer to question 4
1. Has the unit been run
since installation?
No Check the unit is turned on at the power point and the gas cock is
turned on. Call the installer to commission the unit.
Yes Refer to question 3
2. Is the unit installed in a
new home?
No Refer to question 4
Yes Refer to question 4
3. Has the installer run the
unit?
No Check the unit is turned on at the power point and the gas cock is
turned on. Call the installer to commission the unit.
Yes Press the reset buttons or turn the unit off then on to reset unit. If
the unit still does not start call for service. (refer to solution 6 for
reset instructions)
4. Is the set temperature
greater that the room
temperature?
No Increase the set temperature so the thermostat calls for heat.
Yes The heater may be programmed to be OFF. To operate the heater
manually press the Manual / Auto button until the MANUAL is
displayed. Adjust the room thermostat greater than set
temperature.
5. Is the thermostat in
program mode?
No Adjust the room thermostat greater than set temperature.
Yes Reset the unit. This can be done by:
1. Turn the power OFF then ON at the power point
2. Turn the control to OFF
3. Pressing the reset button on the circuit control board
6. Has there been a known
power surge?
No Unit should operate normally. If not a service call will be required.
THIS TROUBLE SHOOTING GUIDE IS A REFERENCE ONLY.
FOR SERVICE OR WARRANTY REQUIREMENTS PLEASE REFER TO
THE WARRANTY SECTION OF THIS BOOK
Table of contents
Other Climate Technologies Remote Control manuals

Popular Remote Control manuals by other brands


Casablanca
Casablanca W-505 Installation & operation guide

XAG
XAG ARC1 user manual

General Instrument
General Instrument DRC-400 user guide

Conductix-Wampfler
Conductix-Wampfler MarK Series Installation and user technical manual

Kirkland Signature
Kirkland Signature Remote Control 2 Getting started

ACQUA SOURCE
ACQUA SOURCE RCP-1500 owner's manual


