Climatouch CT03TS/217S31 User manual

Climatouch /CT03TS/217S31 Programmable Universal TouchScreen thermostat
• Fully configurable 1-4 stages heat/ cool
• Can be configured for heatpumps , air handlers , oil, gas electric furnaces in any
combination
• Backlit display with “Night Reverse”
• Auto change over
• Ultra friendly throw away this manual
• Permanent memory no batteries required
• Relay outputs provide reliable operation
• Suitable for Residential / Commercial
• Outdoor wireless Temperature sensor optional
Specifications
Electrical Rating: 24volt AC
1 amp maximum per terminal
4 amp maximum total load
Temperature Control Ranges Accuracy +/- 1ºF 41ºF- 95ºF , adjustable dead band and
differential
System Configurations: 2 stage heat, 2 stage cool , heat pump , air handler , gas ,
oil, electric in any combination whatsoever (totally
universal)
Terminations I1-I2-Dh-H Future expansion
C-Y2-R–Ob-W2-G-Y1
Safety Information:
Always turn off power at the main power supply before installing or removing
thermostat.
• This product is for 24 VAC operation only
• All wiring must conform to local and national electrical and building codes.

FCC Statement
NOTE: THE MANUFACTURER IS NOT RESPONSIBLE FOR ANY RADIO OR TV
INTERFERENCE CAUSED BY UNAUTHORIZED MODIFICATIONS TO THIS
EQUIPMENT. SUCH MODIFICATIONS COULD VOID THE USER'S AUTHORITY
TO OPERATE THE EQUIPMENT
FCC ID: RAN217S31
THIS DEVICE COMPLIES WITH PART 15 OF THE FCC
RULES.OPERATION IS SUBJECT TO THE FOLLOWING TWO
CONDITIONS: (1) THIS DEVICE MAY NOT CAUSE
HARMFUL INTERFERENCE, AND (2) THIS DEVICE
MUST ACCEPT ANY INTERFERENCE RECEIVED,
INCLUDING INTERFERENCE THAT MAY CAUSE
UNDESIRED OPERATION.
Installation
Replacement
Turn off power at the main service panel before proceeding .
Remove the cover of the old thermostat .
Loosen the screws holding the old thermostat base .
Carefully disconnect the wires from the old thermostat make sure that
you write down the connection label of each wire. This will simplify
installation of your new thermostat.
If the terminal designations on your old thermostat do not match those
of your old thermostat please refer to the list below.
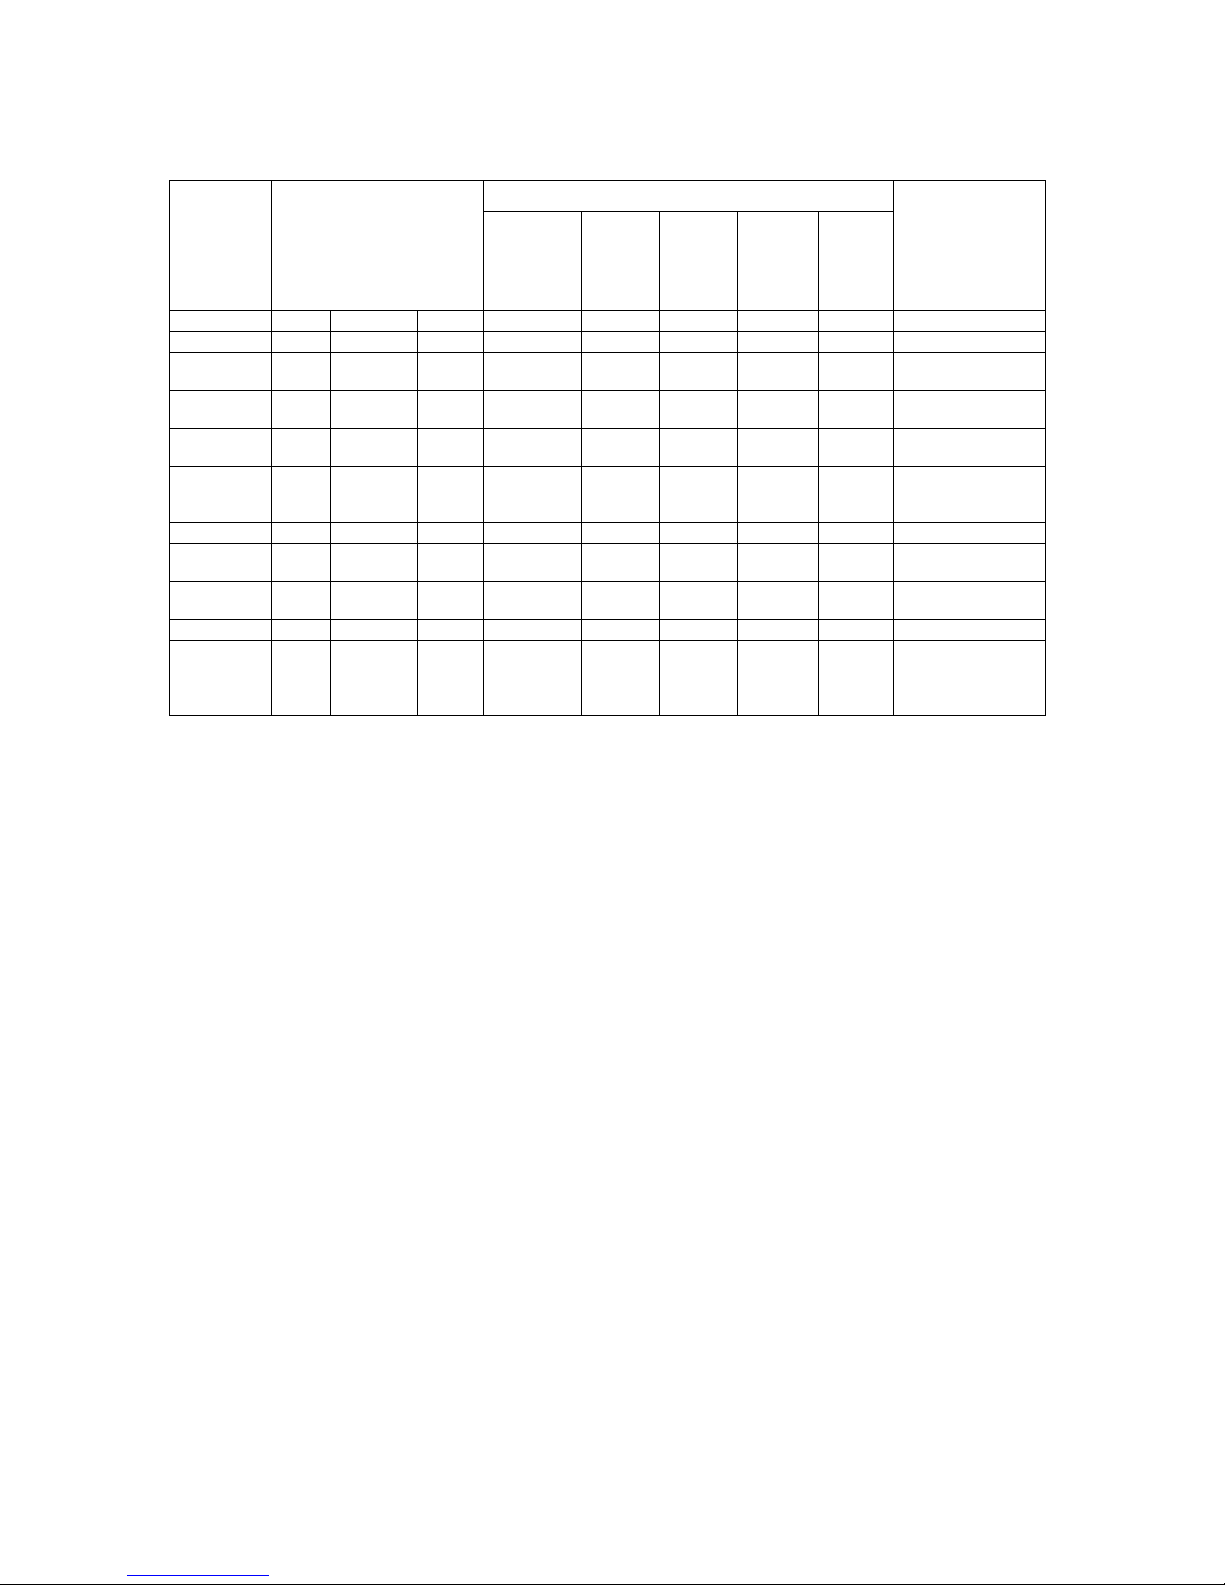
Table 1. Terminal Designations on Old and New Thermostats
C may not be used on all systems
O/B is used if your system is a heat pump
Configuration
The configuration mode is used to setup your Climatouch thermostat to match the exact
profile of your HVAC system . It can be configured as a single stage furnace thermostat
right up to a 4 stage (2 heat 2 cool ) controller .
Alternative Terminal Designations
217S31/
CT03TS
Typical Terminal
Designations from the
Existing Thermostat
Trane
American
Standard
Lennox
York
Borg
Warner
General
Electric
Rheem
Ruud
Function
Description
C C C or X C B X B Common
R R R R R V or
VRbR R R Power
Y1 Y or
Y1 Y or Y1 Y or
Y1 Y M Y Y Y or Y1 Compressor
- - - - - - - - Stage 1 heating
relay
W2 W or
W1 W,W1
or W2 W or
W1 W or W1
jumped to
U
W1 or
Y W or
W2 W or
W1 W2 Auxiliary heat
relay
G G G G G F or G G G G Fan Relay
OB OaO
aO
aO
aR or OaO
aO
aO
aCooling
changeover relay
B
aB
aB
a- - H - - Heating
changeover relay
L L or X L F or L L F F or L L System monitor
Y2
E E E or
X X2 or E E X or E E or X2 E Emergency heat
relay
See configuration
section

To enter the configuration mode Touch the center of the Climatouch screen , this will
bring you to the main control page . Touch “MENU” , this will take you to the main
menu page . Press and hold for 5 seconds the “ADVANCED SETTINGS” button. All
installation and configurations are made through the “ADVANCED SETTINGS “ menu.
The following parametersshould be set up , since the CT03TS/217S31 is the most user friendly,
setup and configuration are very simple .
* Installer Message: Up to a 42 character message can be entered here and set to display
on your CT03TS/217S31 Climatouch thermostatat programmed intervals . Simply enteryour
message, when finished press “OK” and set the number of months for this message to
repeatedly display . An example of a message is “ Call for maintenance 555-555-5555”
for example if set for 6 months this message will display every 6 months on the main
screen . Themessage will disappearwhen the CT03TS/217S31 screen is touched.
*Filter : Turning on this function and setting the number of days will cause a filter icon
to display after the fan run time has exceeded the entered number of days .
Energy Watch: Entering in the KW ratings of your HVAC installation will allow the
user to monitor the energy cost of the HVAC system . Simply enter in the compressor
KW , the furnace KW if you are using an electric furnace and the fan KW rating . All
KW ratings should be rounded for example if your fan is a 750w unit set to 1 KW .
Min Diff: Heat and cool set points will never come closer then the value set .
Dead Band : This is the area where there will be no demand for heating or air
conditioning for example if the heat is set for 72ºF and the dead band is 2 then the heat
will turn on when the room temperature reaches 70ºF .
HVAC System Configuration
In “advanced settings” menu there are two buttons used to tailor your Climatouch
thermostat to function with your specific heating/cooling system. The correct setting
influences the type of control buttons available to the user. For example if you configure
your CT03TS/217S31 for heat onlythere will be no displayofa cool button. The advanced
touch screen and display icons provide the most user friendly thermostat interface in the
world.
“HEAT PUMP”
“AIR CONDITIONING”
“NO COMPRESSOR” :used for furnace only installations
“FURNACE OFF”
“ELECTRIC FURNACE”

“EMERGENCY ELECTRIC FURNACE” SETS Y2 TO CONTROL AN
ADDITIONAL HEATER ELEMENT (used in northern installations)
“GAS FURNACE” fan is controlled by the operation of the furnace
“OIL FURNACE” fan is controlled by the operation of the furnace
Owners Information
Your Climatouch CT03TS/217S31 has been engineered to the highest electronic and logical
standards . We have taken great pain to make the operation of this Climatouch product
user friendly and intuitive. Our priority was to design a product that would sustain the test
of time . It is rare to find an operationally friendly product that does not require that there
be a lengthy and complicated instruction manual always in close proximity to the
thermostat.
Temperature control
Simplytouch the CT03TS/217S31 screen , this will take you to the control pagewheryou have
the option to change any of the following functions :
HOLD TEMP : holds the temperature to your set point
RUN PROGRAM : runs the programmable temperature settings .
Cool – heat –Emergency Heat – off – auto - Depending on your specific configuration
not all of these buttons may be present
Auto selects either heat or cool automatically
Emergency heat forces on your furnace and disables your heat pump.
Fan Auto: Fan turns on only when there is a demand for heat or cool
Fan on: Fan runs continuously
Fan Intermittent: Fan runs 20 minutes per hour or whenever there is a demand for heat
or cool , this is a convenient way to filter the air intermittently while saving energy .
Menu
Advanced Settings: Caution , this menu is for installers only
Date/Time Settings: sets date and time
Vacation Settings : Sets your temperature to a fixed set point while you are away on
vacation. When “vacation mode “ is set a suit case icon will be
displayed on the main screen When you return you will see a message “vacation mode
ended” displayed on the screen simply touch the screen to cancel the
message. Vacation mode begins at 11pm on the day of your
departure and ends at midnight (12am) on the day of your arrival .

Filter Monitor: Indicates how many days of “fan run time” the air filter has been used, it
should be reset after changing your air filter.
Set Screen:
Wipe Animates the appearance between each screen transition.
Reverse: Changes the appearance of the display to negative or positive.
Night Reverse: Changes the appearance of the display to negative after 9PM and
positive after 6am, this effectively and automatically dims the display for night time
viewing.
Cleaning your CT03TS/217S31 Climatouch Thermostat
From time to time your Climatouch screen may require cleaning, lightly dampen a tissue
with water, Press the “Clean Screen” button and gently wipe the screen. This function
allows you to wipe the screen without accidentally changing any of the settings; it places
the touch screen in a sleep mode for 8 seconds. Stop wiping when the warning alarm
sounds, this indicates that the touch screen will become active. If you need to repeat the
process simply press the “Clean Screen “button once again.
Optional UHF Outdoor temperature transmitter Installation
To install your optional outdoor UHF temperature transmitter which will automatically
display outdoor temperature on your Climatouch thermostat simply remove the 4 screws
at the rear of the temperature transmitter remove the battery cover, insert 2 AAA alkaline
batteries and replace the cover . The transmitter will immediately begin transmitting
temperature information backto your CT03TS/217S31 Climatouch Thermostatand it will be
displayed on the main screen. It is important to locate the transmitter in a location which
is not too distant from the thermostat; maximum range is typically 40 feet. For the first 10
minutes after the batteries have been inserted the outdoor temperature transmitter will
transmit a signal every 10 seconds as can be seen by the flashing dot to the left of the
outside temperature display on the thermostat screen . It is important to locate the
transmitter in an area where this dot flashes to insure that the location that you have
selected is one which insures good communications back to the thermostat. After 10
minutes the outdoor temperature transmitter will only update once every 20 minutes. If
you notice that your outside temperature does not display reliably and disappears from
the Climatouch thermostat screen it may be necessary to relocate the transmitter in an
area closer to the thermostat.
Table of contents
Other Climatouch Thermostat manuals


Popular Thermostat manuals by other brands


Lennox
Lennox ComfortSense L7742U owner's manual

GENERAL LIFE
GENERAL LIFE HT250 SET manual

Netatmo
Netatmo Smart thermostat manual

Peco
Peco TW180 installation instructions

GENERAL LIFE
GENERAL LIFE HT120 SET user manual

meitav-tec
meitav-tec ETN-P Series Owner's manual installation and operating instructions


