Climax L Series User manual

Climax Coffee Grinder
Made In Melbourne Australia For Over 65 Years
Climax Coffee Grinder L series
Specifications
Machine Dimensions: H 590mm W 195mm D 315mm
Grinding Capability: From Turkish to Plunger infinite adjustment
Grinding Burrs: Flat 75mm Diameter
Grind Capacity: 300g per minute set on medium grind
Hopper: Stainless Steel 750g Capacity
Colours: Black, Silver, Beige or Stainless Steel
Motor: Australian Made 1/2h.p. 230/250v Single Phase

Climax Coffee Grinder
Made In Melbourne Australia For Over 65 Years
Climax Coffee Grinder L series
Operating Instructions
Dear Customer,
We congratulate and thank you for your purchase of our
Climax Coffee Grinder L series.
These operating instructions have been prepared to simplify
your use of the coffee grinder. They contain information and
instructions for the best use of your unit.
The Climax Coffee Grinder is a quality product but cannot be excluded from
damaging or the risk of injury if misused or operated improperly.
______________________________________________________________________
1. The Climax Coffee Grinder L series is suitable for grinding various types of
coffee. By adjusting the knob you can set the grinding fineness which ranges from
“Turkish fine” to “coarse”.
The machine is designed to grind coffee but can grind other things like herbs and nuts.
Although the machine might clog if the moisture content is greater than coffee, cleaning all foreign
material from the inside the cutter compartment will restore the grinder to its original condition.
2. How to use the Climax Coffee Grinder.
-Make sure there are no coffee beans in the hopper or grinding chamber, if
unsure turn the grinder on(L025), any left over residue from previous grinds will
flow though the burrs(L011), when this is done turn machine off(L025).
-Set the grinding fineness for the coffee with the selection knob(L014)
0 Finest (Turkish) to 5 Coarse.
-Slide open the Lid (L001) and place the coffee beans in the hopper.
-Place the bag or container below the spout you must place the bag between the
spout and the bag holder (L022) spring loaded clamp.
-Press the ON/OFF switch (L025).
-When grinding is finished switch off the grinder.
-Remove container.

Climax Coffee Grinder
Made In Melbourne Australia For Over 65 Years
This machine is fitted with an automatic thermo trip which will cut off power to the motor if the
motor overheats. (E.g. A hard body such as a stone preventing the cutters from turning) As the
thermo trip will reset afterabout 20 seconds andthe machinewillturn on. To avoid burning out the
motor please switch machine off at the on/off switch or on the wall outlet, then remove the
obstruction.
3. Care / Maintenance / Adjustment
-Care and Cleaning of coffee Grinder
The coffee grinder should be cleaned at least once a week and always if soiled.
Only clean the coffee grinder with a dry cloth.
Do not use an alkaline cleaning agent
Do not spray the coffee grinder with water and/or steam.
Using these can result in a short circuit of the machine risking permanent damage. The use of an
alkaline cleaning agent can also alter the taste of the coffee.
-Maintenance
If the quality of the grinder is no longer at the required standard, the grinding burrs
must be replaced.
The burrs should also be inspected for wear annually.
Don’t attempt to inspect the quality of the grinding disks by yourself. Always get a competent
specialist and/or service personnel to do it for you.
-Grinder calibration
Calibration of the grinder (with the setting nut) makes the fineness of the ground
coffee correspond with the fineness set on the scale (marked)
Calibration of the grinder must only be performed by persons familiar with the unit after carefully
reading the following instructions.
-Basic calibrations should be made after replacing the grinding burrs, following
inadvertent displacement of the basic calibration.

Climax Coffee Grinder
Made In Melbourne Australia For Over 65 Years
4. Basic Calibration
If the calibration of the grinder is incorrect friction can occur between the grinding
burrs, resulting in excessive wear.
-Turn large black knob(L014) anti clockwise till it stops
-Place two levers one left, the other right, under the grind setting knob pull gently
-Large black knob will slide off its serrations
-Turn the grinder on (L025)
-Gently turn the serrated setting nut (L013) clockwise until you hear the burrs
coming into contact, mark this position with a marker on the body and on the
screw, rotate setting nut (L013) anti clockwise 12mm from this position.
-Place a handful of coffee beans in the hopper, the following grind should be
Turkish if this is not to your personal liking then you can adjust the setting screw
plus or minus 5mm no more. DO NOT ADJUST THE SETTING SCREW MORE
THAN 5MM CLOCKWISE AS THIS COULD DAMAGE YOUR BURRS
-When the setting is correct or to your liking turn grinder OFF(L025), fit the black
setting knob(L014) by aligning the inside fin of the knob to the left side of the tab
on front cover and the outside indicator of the knob to the scale 0 setting, push
firmly onto serrations. Move knob anti clockwise and clockwise, check that it
comes to a stop at 0 and at 5 on the setting scale.
-Check your setting and tag if required.
When thegrinder isON, turning the setting knobfrom scale position 0 –5, there must be no sound
of metal parts rubbing together.
If there is the sound of rubbing metal, it could equal excessive wear or damage of the grinding
burrs.

Climax Coffee Grinder
Made In Melbourne Australia For Over 65 Years
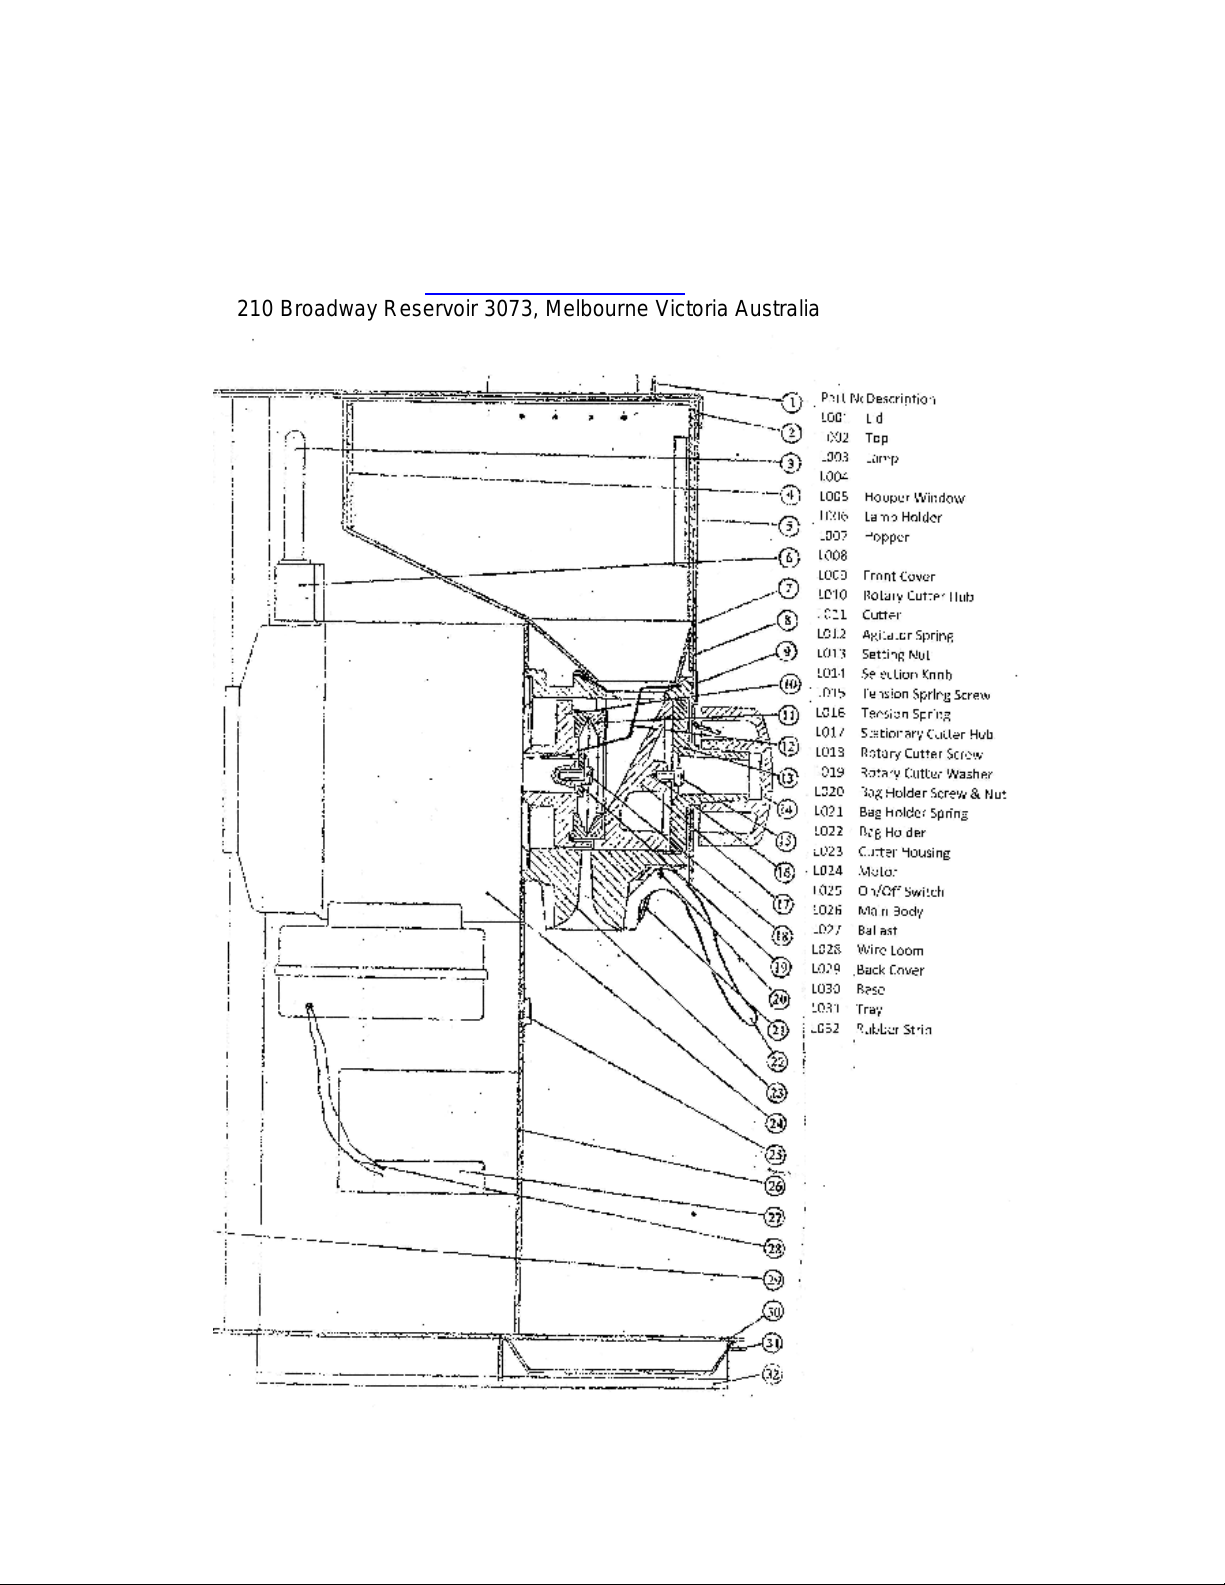
5. Replacing grinding discs
Before changing grinding burrs switch off the motor and pull the power cable out of its
socket. Grinding burrs must only be replaced by persons familiar with operation of the machine
according to the following instructions.
-Switch off (L025) the motor and pull out the power cable.
-Dismantle top cover (L002), 2 screws on each side use 2.5mm hex key.
-Remove selection knob (L014), place two levers under the grind selection knob,
pull gently large black knob will slide off its serrations.
-Remove front cover (L009), 2 screws top and bottom inside cover, main body
side, use 2.5mm hex key.
-Remove setting nut (L013) unwind anti clockwise until removed.
-Remove tension spring screw (L015), use 5mm hex key.
-Remove tension spring (L016), slide out one side then the other side.
-Remove Hopper (L007), 2 screws centrally located use 2.5mm hex key.
-Remove agitator spring (L012), 1 screw centrally located at top of cutter housing
(L023) chamber, use 3mm hex key.
-Pull out stationary cutter hub (L017) remove burr, 3 screws use 5mm hex key.
Clean thoroughly as any dirt under the cutter could affect the quality of the grind.
Place new burrs in position and screw in place.
-Remove Burr (L011) from rotating cutter hub (L010), 3 screws use 5mm hex
key. Clean thoroughly as any dirt under the cutter could affect the quality of the
grind. Place new burrs in position and screw in place.
-Then re-assemble parts in reverse sequence. Tighten all screws.
-Plug in power cable, switch on coffee grinder briefly. If it blocks or there is the
sound of metal parts rubbing together, disassemble and check.
-Setting must be re-adjusted as per 4 Basic Calibration.
The CLIMAX COFFEE GRINDER is a precision machine, if the above instructions are
adhered to, we are confident that it will give many years of trouble free service.

Climax Coffee Grinder
Made In Melbourne Australia For Over 65 Years
If further information or assistance is needed, please contact.
Climax Coffee
Fax: 64 03 94663912 Email: Info@climaxcoffee.com.au
Address: 210 Broadway Reservoir 3073, Melbourne Victoria Australia
Part No Description
L001 Lid
L002 Top
L003 Lamp
L004
L005 Hopper Window
L006 Lamp Holder
L007 Hopper
L008 Back Strip
L009 Front Cover
L010 Rotary Cutter Hub
L011 Cutter (Flat Burr)
L012 Agitator Spring
L013 Setting Nut
L014 Selection Knob
L015 Tension Spring Screw
L016 Tension Spring
L017 Stationery Cutter Hub
L018 Rotary Cutter Screw
L019 Rotary Cutter Washer
L020 Bag Holder Screw & Nut
L021 Bag Holder Spring
L022 Bag Holder Handle
L023 Cutter Housing
L024 Motor
L025 ON/OFF Switch
L026 Main Body
L027 Balast
L028 Wire Loom
L029 Back Cover
L030 Base
L031 Tray
L032 Rubber Strip
10 Ivanhoe Court Thomastown Vic 3074 Australia
Table of contents